11.4. From Medusa v1 to v2: Conceptual Differences
In this chapter, you'll learn about the differences and changes between concepts in Medusa v1 to v2.
What to Expect in This Chapter#
This chapter is designed to help developers migrate from Medusa v1 to v2 by understanding the conceptual differences between the two versions.
This chapter will cover:
- The general steps to update your project from Medusa v1 to v2.
- The changes in tools and plugins between Medusa v1 and v2.
- The high-level changes in the concepts and commerce features between Medusa v1 and v2.
By following this chapter, you'll learn about the general changes you need to make in your project, with links to read more about each topic. Only topics documented in the v1 documentation are covered.
This chapter is also useful for developers who are already familiar with Medusa v1 and want to learn about the main differences from Medusa v2. However, it doesn't cover all the new and improved concepts in Medusa v2. Instead, it's highly recommended to read the rest of this documentation to learn about them.
Prerequisites#
Node.js Version#
While Medusa v1 supported Node.js v16+, Medusa v2 requires Node.js v20+. So, make sure to update your Node.js version if it's older.
Refer to the Node.js documentation for instructions on how to update your Node.js version.
New Database#
Medusa v2 makes big changes to the database. So, your existing database will not be compatible with the database for your v2 project.
If you want to keep your product catalog, you should export the products from the admin dashboard, as explained in this V1 User Guide. Then, you can import them into your new v2 project from the Medusa Admin.
For other data types, you'll probably need to migrate them manually through custom scripts. Custom CLI scripts may be useful for this.
How to Upgrade from Medusa v1 to v2#
In this section, you'll learn how to upgrade your Medusa project from v1 to v2.
1. Update Dependencies in package.json#
The first step is to update the dependencies in your package.json.
A basic v2 project has the following dependencies in package.json:
1{2 "dependencies": {3 "@medusajs/admin-sdk": "2.8.2",4 "@medusajs/cli": "2.8.2",5 "@medusajs/framework": "2.8.2",6 "@medusajs/medusa": "2.8.2"7 },8 "devDependencies": {9 "@medusajs/test-utils": "2.8.2",10 "@swc/core": "1.5.7",11 "@swc/jest": "^0.2.36",12 "@types/jest": "^29.5.13",13 "@types/node": "^20.0.0",14 "@types/react": "^18.3.2",15 "@types/react-dom": "^18.2.25",16 "jest": "^29.7.0",17 "prop-types": "^15.8.1",18 "react": "^18.2.0",19 "react-dom": "^18.2.0",20 "ts-node": "^10.9.2",21 "typescript": "^5.6.2",22 "vite": "^5.2.11",23 "yalc": "^1.0.0-pre.53"24 }25}
The main changes are:
- You need to install the following Medusa packages (All these packages use the same version):
@medusajs/admin-sdk@medusajs/cli@medusajs/framework@medusajs/medusa@medusajs/test-utils(as a dev dependency)
- You need to install the following extra packages for development and testing:
@swc/core@1.5.7@swc/jest@^0.2.36@types/node@^20.0.0jest@^29.7.0ts-node@^10.9.2typescript@^5.6.2vite@^5.2.11yalc@^1.0.0-pre.53
- Other packages, such as
@types/reactand@types/react-dom, are necessary for admin development and TypeScript support.
Once you're done, run the following command to install the new dependencies:
In Medusa v1, you needed to install Medusa modules like the Event, Product, or Pricing modules.
These modules are now available out of the box, and you don't need to install or configure them separately.
2. Update Script in package.json#
Medusa v2 comes with changes and improvements to its CLI tool. So, update your package.json with the following scripts:
1{2 "scripts": {3 "build": "medusa build",4 "seed": "medusa exec ./src/scripts/seed.ts",5 "start": "medusa start",6 "dev": "medusa develop",7 "test:integration:http": "TEST_TYPE=integration:http NODE_OPTIONS=--experimental-vm-modules jest --silent=false --runInBand --forceExit",8 "test:integration:modules": "TEST_TYPE=integration:modules NODE_OPTIONS=--experimental-vm-modules jest --silent=false --runInBand --forceExit",9 "test:unit": "TEST_TYPE=unit NODE_OPTIONS=--experimental-vm-modules jest --silent --runInBand --forceExit"10 }11}
Where:
build: Builds the Medusa application for production.seed: Seeds the database with initial data.start: Starts the Medusa server in production.dev: Starts the Medusa server in development mode.test:integration:http: Runs HTTP integration tests.test:integration:modules: Runs module integration tests.test:unit: Runs unit tests.
You'll learn more about the changes in the CLI tool later in this chapter. You can also refer to the following documents to learn more about these changes:
3. TSConfig Changes#
In Medusa v1, you had multiple TSConfig configuration files for different customization types. For example, you had tsconfig.admin.json for admin customizations and tsconfig.server.json for server customizations.
In Medusa v2, you only need one root tsconfig.json file in your project. For admin customizations, you create a src/admin/tsconfig.json file. Refer to each of those links for the recommended configurations.
4. Update Configuration File#
In Medusa v1, you configured your application in the medusa-config.js file. Medusa v2 supports this file as medusa-config.ts, so make sure to rename it.
medusa-config.ts now exports configurations created with the defineConfig utility. It also uses the loadEnv utility to load environment variables based on the current environment.
For example, this is the configuration file for a basic Medusa v2 project:
1import { loadEnv, defineConfig } from "@medusajs/framework/utils"2 3loadEnv(process.env.NODE_ENV || "development", process.cwd())4 5module.exports = defineConfig({6 projectConfig: {7 databaseUrl: process.env.DATABASE_URL,8 http: {9 storeCors: process.env.STORE_CORS!,10 adminCors: process.env.ADMIN_CORS!,11 authCors: process.env.AUTH_CORS!,12 jwtSecret: process.env.JWT_SECRET || "supersecret",13 cookieSecret: process.env.COOKIE_SECRET || "supersecret",14 },15 },16})
You can refer to the full list of configurations in the Medusa Configurations chapter. The following table highlights the main changes between v1 and v2:
Medusa v1 | Medusa v2 |
|---|---|
| |
| |
| |
| |
| |
| |
| |
| |
| |
| |
| |
| |
| |
| |
| |
| |
| No longer supported. |
| |
|
Plugin Changes
While the plugins configuration hasn't changed, plugins available in Medusa v1 are not compatible with Medusa v2. These are covered later in the Plugin Changes section.
Module Changes
In Medusa v1, you had to configure modules like Inventory, Stock Location, Pricing, and Product. These modules are now available out of the box, and you don't need to install or configure them separately.
For the Cache and Event modules, refer to the Redis Caching Module Provider and Redis Event Module documentations to learn how to configure them in v2 if you had them configured in v1.
Feature Flags
Some features like product categories and tax inclusive pricing were disabled behind feature flags.
All of these features are now available out-of-the-box. So, you don't need to enable them in your configuration file anymore.
Admin Configurations
In v1, the admin dashboard was installed as a plugin with configurations. In v2, the Medusa Admin is available out-of-the-box with different configurations.
The Medusa Admin Changes section covers the changes in the Medusa Admin configurations and customizations.
5. Setup New Database#
Now that you have updated your dependencies and configuration file, you need to set up the database for your v2 project.
This will not take into account entities and data customizations in your v1 project, as you still need to change those. Instead, it will only create the database and tables for your v2 project.
First, change your database environment variables to the following:
You can change medusa-v2 to any database name you prefer.
Then, run the following commands to create the database and tables:
This command will create the database and tables for your v2 project.
After that, you can start your Medusa application with the dev command. Note that you may have errors if you need to make implementation changes that are covered in the rest of this guide, so it's better to wait until you finish the v2 migration process before starting the Medusa application.
(Optional) 6. Seed with Demo Data#
If you want to seed your Medusa v2 project with demo data, you can copy the content of this file to your src/scripts/seed.ts file.
Then, run the following command to seed the database:
This will seed your database with demo data.
Medusa Admin Changes#
In this section, you'll learn about the changes in the Medusa Admin between v1 and v2.
The Medusa Admin is now available out-of-the-box. It's built with Vite v5 and runs at http://localhost:9000/app by default when you start your Medusa application.
Admin Configurations#
You previously configured the admin dashboard when you added it as a plugin in Medusa v1.
In Medusa v2, you configure the Medusa Admin within the defineConfig utility in medusa-config.ts. defineConfig accepts an admin property to configure the Medusa Admin:
You can refer to the Medusa Configuration chapter to learn about all the admin configurations. The following table highlights the main changes between v1 and v2:
Medusa v1 | Medusa v2 |
|---|---|
| |
| No longer supported. The Medusa Admin is always built when you run the |
| |
| No longer supported. The Medusa Admin is now built in the |
| No longer supported. The admin.vite property may be used to achieve similar results. |
Admin Webpack Configurations#
In v1, you were able to modify Webpack configurations of the admin dashboard.
Since Medusa Admin is now built with Vite, you can modify the Vite configurations with the admin.vite configuration. Learn more in the Medusa Configuration chapter.
Admin CLI Tool#
In Medusa v1, you used the medusa-admin CLI tool to build and run the admin dashboard.
In Medusa v2, the Medusa Admin doesn't have a CLI tool. Instead, running medusa build and medusa develop also builds and runs the Medusa Admin, respectively.
In addition, you can build the Medusa Admin separately from the Medusa application using the --admin-only option. Learn more in the Build Medusa Application chapter.
Medusa CLI Changes#
The Medusa CLI for v2 is now in the @medusajs/cli package. However, you don't need to install it globally. You can just use npx medusa, yarn medusa, or pnpm medusa in your Medusa projects.
Refer to the Medusa CLI reference for the full list of commands and options. The following table highlights the main changes between v1 and v2:
Medusa v1 | Medusa v2 |
|---|---|
| |
| db:rollback. However, this command reverts migrations of specific modules, not all migrations. |
| No longer supported. |
| No longer supported. However, you can create a custom CLI script and seed data in it. |
|
Plugin Changes#
Medusa v2 supports plugins similar to Medusa v1, but with changes in its usage, development, and configuration.
In Medusa v1, you created plugins that contained customizations like services that integrated third-party providers, custom API routes, and more.
In Medusa v2, a plugin can contain customizations like modules that integrate third-party providers, custom API routes, workflows, and more. The plugin development experience has also been improved to resolve big pain points that developers faced in v1.
Refer to the Plugins chapter to learn more about plugins in Medusa v2.
The rest of this section will cover some of the main changes in plugins between v1 and v2.
Medusa Plugins Alternative#
In v1, Medusa provided a set of plugins that you could use in your project. For example, the Stripe and SendGrid plugins.
In v2, some of these plugins are now available as module providers out-of-the-box. For example, the Stripe and SendGrid module providers. Other plugins may no longer be available, but you can still find guides to create them.
The following table highlights the alternatives for the Medusa v1 plugins:
Medusa v1 | v2 Alternative |
|---|---|
Algolia | |
Brightpearl | Not available, but you can follow the ERP recipe. |
Contenful | |
Discount Generator | Not available, but you can build it as a module. |
IP Lookup | Not available, but you can build it as a module. |
Klarna | Not available, but you can integrate it as a Payment Module Provider. |
Local File | |
Mailchimp | |
MinIO | |
MeiliSearch | Not available, but you can integrate it in a module. |
PayPal | Not available, but you can integrate it as a Payment Module Provider. |
Restock Notification | |
S3 | |
Segment | |
SendGrid | |
Shopify | Not available, but you can build it as a module. |
Slack | |
Spaces (DigitalOcean) | |
Strapi | Not available, but you can integrate it in a module. |
Stripe | |
Twilio | |
Wishlist |
You can also find Medusa and community integrations in the Integrations page.
Plugin Options#
Similar to Medusa v1, you can pass options to plugins in Medusa v2.
However, plugin options are now only passed to modules and module providers created in a plugin.
So, if you previously accessed options in a plugin's subscriber, for example, that's not possible anymore. You need to access the options in a module or module provider instead, then use its service in the plugin's subscriber.
For example, this is how you can access options in a plugin's subscriber in v2:
1import { SubscriberArgs, type SubscriberConfig } from "@medusajs/framework"2 3export default async function orderPlacedHandler({4 event: { data },5 container,6}: SubscriberArgs<{ id: string }>) {7 const customModuleService = container.resolve("custom")8 9 const options = customModuleService.getOptions()10 11 // Use the options in your logic...12}13 14export const config: SubscriberConfig = {15 event: `order.placed`,16}
Learn more in the Create Plugin chapter.
enableUI Option
Plugins in v1 accepted an enableUI option to configure whether a plugin's admin customizations should be shown.
In v2, this option is no longer supported. All admin customizations in a plugin will be shown in the Medusa Admin.
Tool Changes#
This section covers changes to tools that were available in Medusa v1.
Medusa v1 | Medusa v2 |
|---|---|
JS Client | |
Medusa React | No longer supported. Instead, you can use the JS SDK with Tanstack Query or similar approaches. |
Next.js Starter Template | Next.js Starter Storefront. The changes may be big to support v2 commerce changes. |
Medusa Dev CLI | No longer supported. |
Changes in Concepts and Development#
In the next sections, you'll learn about the changes in specific concepts and development practices between Medusa v1 and v2.
Entities, Services, and Modules#
In Medusa v1, entities, services, and modules were created separately:
- You create an entity to add a new table to the database.
- You create a service to add new business logic to the Medusa application.
- You create a module to add new features to the Medusa application. It may include entities and services.
In Medusa v2, you create entities (now called data models) and services in a module. You can't create them separately anymore. The data models define new tables to add to the database, and the service provides data-management features for those data models.
In this section, you'll learn about the most important changes related to these concepts. You can also learn more in the Modules chapter.
Modules
A module is a reusable package of functionalities related to a single domain or integration. For example, Medusa provides a Product Module for product-related data models and features.
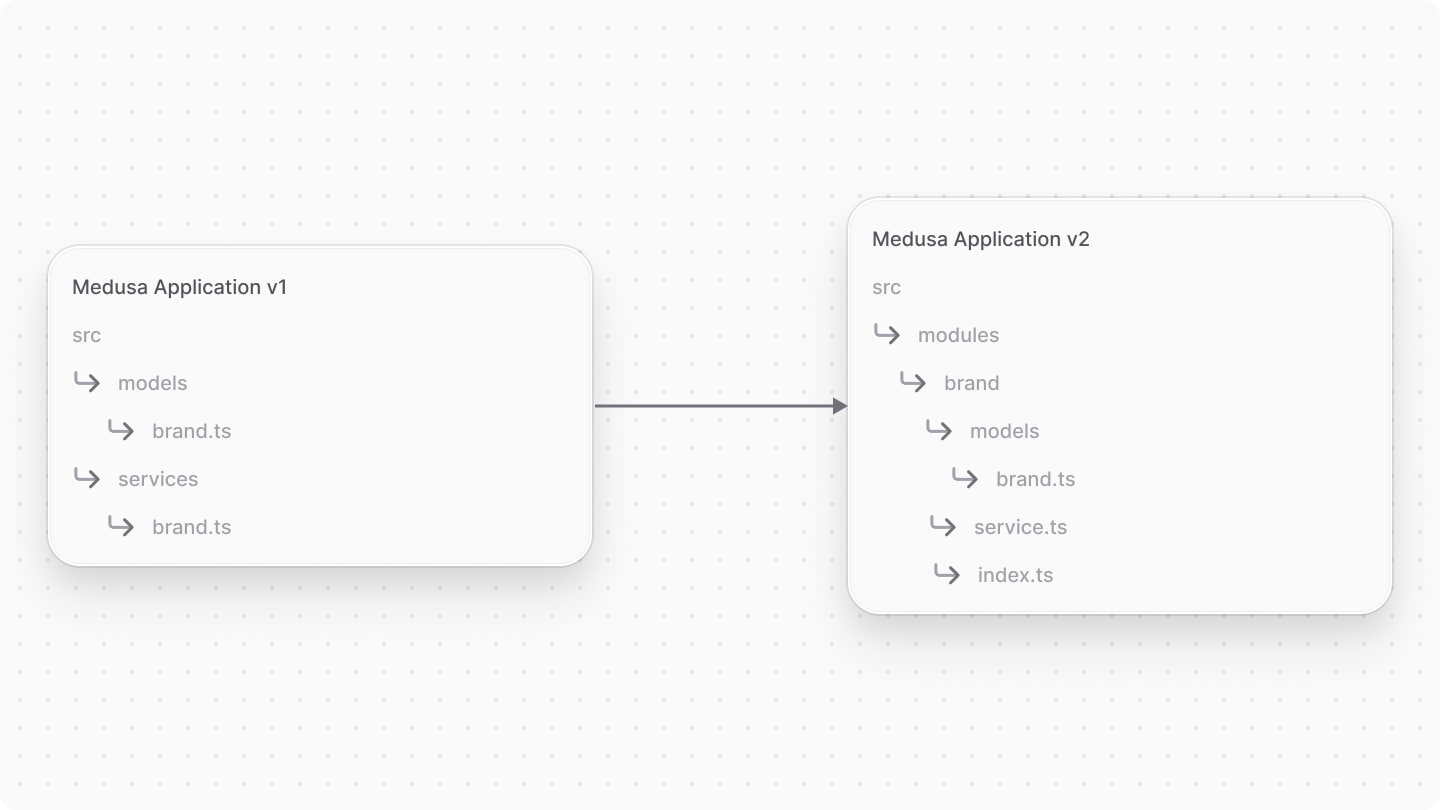
So, if in Medusa v1 you had a Brand entity and a service to manage it, in v2, you create a Brand Module that defines a Brand data model and a service to manage it.
To learn how to create a module, refer to the Modules chapter.
Data Models
In Medusa v1, you created data models (entities) using TypeORM.
In Medusa v2, you use Medusa's Data Model Language (DML) to create data models. It simplifies defining a table's columns, relations, and indexes with straightforward methods and configurations.
For example:
Learn more about data models in the Data Models chapters.
Migrations
In Medusa v1, you had to write migrations manually to create or update tables in the database. Migrations were based on TypeORM.
In Medusa v2, you can use the Medusa CLI to generate migrations based on MikroORM. For example:
This generates migrations for data models in the Brand Module. Learn more in the Migrations chapter.
Services
In Medusa v1, you created a service with business logic related to a feature within your Medusa project. For example, you created a BrandService at src/services/brand.ts to manage the Brand entity.
In Medusa v2, you can only create a service in a module, and the service either manages the module's data models in the database, or connects to third-party services.
For example, you create a BrandService in the Brand Module at src/modules/brand/service.ts:
The service has automatically generated data-management methods by extending MedusaService from the Modules SDK. So, you now have methods like retrieveBrand and createBrands available in the service.
Learn more in the Service Factory chapter.
When you register the module in the Medusa application, the service is registered in the Medusa container, allowing you to use its methods in workflows, subscribers, scheduled jobs, and API routes.
Repositories
In Medusa v1, you used the repository of a data model in a service to provide data-management features. For example, you used the BrandRepository to manage the Brand entity. Repositories were also based on TypeORM.
In Medusa v2, you generally don't need repositories for basic data-management features, as they're generated by the service factory. However, for more complex use cases, you can use the data model repository based on MikroORM.
For example:
1import { InferTypeOf, DAL } from "@medusajs/framework/types"2import Post from "./models/post"3 4type Post = InferTypeOf<typeof Post>5 6type InjectedDependencies = {7 postRepository: DAL.RepositoryService<Post>8}9 10class BlogModuleService {11 protected postRepository_: DAL.RepositoryService<Post>12 13 constructor({ 14 postRepository, 15 }: InjectedDependencies) {16 super(...arguments)17 this.postRepository_ = postRepository18 }19}20 21export default BlogModuleService
Learn more in the Database Operations chapter.
Module Isolation
In Medusa v1, you had access to all entities and services in the Medusa application. While this approach was flexible, it introduced complexities, was difficult to maintain, and resulted in hacky workarounds.
In Medusa v2, modules are isolated. This means that you can only access entities and services within the module. This isolation allows you to integrate modules into your application without side effects, while still providing you with the necessary flexibility to build your use cases.
The Module Isolation chapter explains this concept in detail. The rest of this section gives a general overview of how module isolation affects your Medusa v1 customizations.
Extending Entities
In Medusa v1, you were able to extend entities by creating a new entity that extended the original one. For example, you could create a custom Product entity that extended the original Product entity to add a brand column.
In Medusa v2, you can no longer extend entities. Instead, you need to create a new data model that contains the columns you want to add. Then, you can create a Module Link that links your data model to the one you want to extend.
For example, you create a Brand Module that has a Brand data model. Then, you create a Module Link that links the Brand data model to the Product data model in the Product Module:
1import BrandModule from "../modules/brand"2import ProductModule from "@medusajs/medusa/product"3import { defineLink } from "@medusajs/framework/utils"4 5export default defineLink(6 {7 linkable: ProductModule.linkable.product,8 isList: true,9 },10 BrandModule.linkable.brand11)
You can then associate brands with a product, retrieve them in API routes and custom functionalities, and more.
Learn more in the Module Links chapter.
Extending Services
In Medusa v1, you were able to extend services by creating a new service that extended the original one. For example, you could create a custom ProductService that extended the original ProductService to add a new method.
In Medusa v2, you can no longer extend services. Instead, you need to create a module with a service that contains the methods you want to add. Then, you can:
- Build workflows that use both services to achieve a custom feature.
- Consume Workflow Hooks to run custom actions in existing workflows.
- For more complex use cases, you can re-create an existing workflow and use your custom module's service in it.
For example, if you extended the CartService in v1 to add items with custom prices to the cart, you can instead build a custom workflow that uses your custom module to retrieve an item's price, then add it to the cart using the existing addToCartWorkflow:
1import { 2 createWorkflow,3 transform,4 WorkflowResponse,5} from "@medusajs/framework/workflows-sdk"6import { addToCartWorkflow } from "@medusajs/medusa/core-flows"7import { 8 getCustomPriceStep, 9} from "./steps/get-custom-price"10 11type AddCustomToCartWorkflowInput = {12 cart_id: string13 item: {14 variant_id: string15 quantity: number16 metadata?: Record<string, unknown>17 }18}19 20export const addCustomToCartWorkflow = createWorkflow(21 "add-custom-to-cart",22 ({ cart_id, item }: AddCustomToCartWorkflowInput) => {23 // assuming this step uses a custom module to get the price24 const price = getCustomPriceStep({25 variant: item.variant_id,26 currencyCode: "usd",27 quantity: item.quantity,28 })29 30 const itemToAdd = transform({31 item,32 price,33 }, (data) => {34 return [{35 ...data.item,36 unit_price: data.price,37 }]38 })39 40 addToCartWorkflow.runAsStep({41 input: {42 items: itemToAdd,43 cart_id,44 },45 })46 }47)
Refer to the Workflows chapters to learn more about workflows in Medusa v2.
Integrating Third-Party Services
In Medusa v1, you integrated third-party services by creating a service under src/services and using it in your customizations.
In Medusa v2, you can integrate third-party services by creating a module with a service that contains the methods to interact with the third-party service. You can then use the module's service in a workflow to build custom features.

Medusa and Module Containers#
In Medusa v1, you accessed dependencies from the container in all your customizations, such as services, API routes, and subscribers.
In Medusa v2, there are two containers:
Container | Description | Accessed By |
|---|---|---|
Main container that contains Framework and commerce resources, such as services of registered modules. |
| |
Container of a module. It contains some resources from the Framework, and resources implemented in the module. | Services and loaders in the module. |
You can view the list of resources in each container in the Container Resources reference.
Workflow Changes#
In Medusa v2, workflows are the main way to implement custom features spanning across modules and systems.
Workflows have been optimized for data reliability, flexibility, and orchestration across systems. You can learn more in the Workflows chapters.
This section highlights the main changes in workflows between v1 and v2.
Workflows SDK Imports
In Medusa v1, you imported all Workflows SDK functions and types from the @medusajs/workflows-sdk package.
In Medusa v2, you import them from the @medusajs/framework/workflows-sdk package. For example:
Workflow Return Value
In Medusa v1, you returned any value from a workflow, such as a string or an object.
In Medusa v2, you must return an instance of WorkflowResponse from a workflow. The data passed to WorkflowResponse's constructor is returned to the caller of the workflow.
For example:
1import { 2 createWorkflow, 3 WorkflowResponse,4} from "@medusajs/framework/workflows-sdk"5 6export const helloWorldWorkflow = createWorkflow(7 "hello-world", 8 () => {9 return new WorkflowResponse("Hello, world!")10 }11)12 13// in API route, for example:14import type {15 MedusaRequest,16 MedusaResponse,17} from "@medusajs/framework/http"18 19export const GET = (20 req: MedusaRequest,21 res: MedusaResponse22) => {23 // message is "Hello, world!"24 const { result: message } = await helloWorldWorkflow(req.scope)25 .run()26 27 res.json({28 message,29 })30}
New Workflow Features
- Use when-then in workflows to run steps if a condition is satisfied.
- Consume hooks to run custom steps in existing workflows.
- Create long-running workflows that run asynchronously in the background.
API Route Changes#
API routes are generally similar in Medusa v1 and v2, but with minor changes.
You can learn more about creating API routes in the API Routes chapters. This section highlights the main changes in API routes between v1 and v2.
HTTP Imports
In Medusa v1, you imported API-route related types and functions from the @medusajs/medusa package.
In Medusa v2, you import them from the @medusajs/framework/http package. For example:
Protected API Routes
In Medusa v1, routes starting with /store/me and /admin were protected by default.
In Medusa v2, routes starting with /store/customers/me are accessible by registered customers, and /admin routes are accessible by admin users.
In an API route, you can access the logged in user or customer using the auth_context.actor_id property of AuthenticatedMedusaRequest. For example:
Learn more in the Protected API Routes chapter.
Authentication Middlewares
In Medusa v1, you had three middlewares to protect API routes:
authenticateto protect API routes for admin users.authenticateCustomerto optionally authenticate customers.requireCustomerAuthenticationto require customer authentication.
In Medusa v2, you can use a single authenticate middleware for the three use cases. For example:
1import { 2 defineMiddlewares,3 authenticate,4} from "@medusajs/framework/http"5 6export default defineMiddlewares({7 routes: [8 {9 matcher: "/custom/admin*",10 middlewares: [authenticate("user", ["session", "bearer", "api-key"])],11 },12 {13 matcher: "/custom/customer*",14 // equivalent to requireCustomerAuthentication15 middlewares: [authenticate("customer", ["session", "bearer"])],16 },17 {18 matcher: "/custom/all-customers*",19 // equivalent to authenticateCustomer20 middlewares: [authenticate("customer", ["session", "bearer"], {21 allowUnauthenticated: true,22 })],23 },24 ],25})
Learn more in the Protected API Routes chapter.
Middlewares
In Medusa v1, you created middlewares by exporting an object in the src/api/middlewares.ts file.
In Medusa v2, you create middlewares by exporting an object created with defineMiddlewares, which accepts an object with the same properties as in v1. For example:
1import { 2 defineMiddlewares,3 MedusaNextFunction, 4 MedusaRequest, 5 MedusaResponse, 6} from "@medusajs/framework/http"7 8export default defineMiddlewares({9 routes: [10 {11 matcher: "/custom*",12 middlewares: [13 (14 req: MedusaRequest, 15 res: MedusaResponse, 16 next: MedusaNextFunction17 ) => {18 console.log("Received a request!")19 20 next()21 },22 ],23 },24 ],25})
Learn more in the Middlewares chapter.
Disable Body Parser
In Medusa v1, you disabled the body parser in API routes by setting bodyParser: false in the route's middleware configuration.
In Medusa v2, you disable the body parser by setting bodyParser.preserveRawBody to true in the route's middleware configuration. For example:
Learn more in the Body Parser chapter.
Extending Validators
In Medusa v1, you passed custom request parameters to Medusa's API routes by extending a request's validator.
In Medusa v2, some Medusa API routes support passing additional data in the request body. You can then configure the validation of that additional data and consume them in the hooks of the workflow used in the API route.
For example:
1import { defineMiddlewares } from "@medusajs/framework/http"2import { z } from "@medusajs/framework/zod"3 4export default defineMiddlewares({5 routes: [6 {7 method: "POST",8 matcher: "/admin/products",9 additionalDataValidator: {10 brand: z.string().optional(),11 },12 },13 ],14})
In this example, you allow passing a brand property as additional data to the /admin/products API route.
You can learn more in the Additional Data chapter.
If a route doesn't support passing additional data, you need to replicate it to support your custom use case.
Events and Subscribers Changes#
Events and subscribers are similar in Medusa v1 and v2, but with minor changes.
You can learn more in the Events and Subscribers chapters. This section highlights the main changes in events and subscribers between v1 and v2.
Emitted Events
Medusa v2 doesn't emit the same events as v1. Refer to the Events Reference for the full list of events emitted in v2.
Subscriber Type Imports
In Medusa v1, you imported subscriber types from the @medusajs/medusa package.
In Medusa v2, you import them from the @medusajs/framework package. For example:
Subscriber Parameter Change
In Medusa v1, a subscriber function received an object parameter that has eventName and data properties.
In Medusa v2, the subscriber function receives an object parameter that has an event property. The event property contains the event name and data. For example:
1import { SubscriberArgs, type SubscriberConfig } from "@medusajs/framework"2 3export default async function orderPlacedHandler({4 event: { data },5 container,6}: SubscriberArgs<{ id: string }>) {7 // ...8}9 10export const config: SubscriberConfig = {11 event: `order.placed`,12}
Also, the pluginOptions property is no longer passed in the subscriber's parameter. Instead, you can access the options passed to a plugin within its modules' services, which you can resolve in a subscriber.
Learn more in the Events and Subscribers chapter.
Subscriber Implementation Change
In Medusa v1, you implemented functionalities, such as sending confirmation email, directly within a subscriber.
In Medusa v2, you should implement these functionalities in a workflow and call the workflow in the subscriber. By using workflows, you benefit from rollback mechanism, among other features.
For example:
1import { SubscriberArgs, type SubscriberConfig } from "@medusajs/framework"2import { 3 sendOrderConfirmationWorkflow,4} from "../workflows/send-order-confirmation"5 6export default async function orderPlacedHandler({7 event: { data },8 container,9}: SubscriberArgs<{ id: string }>) {10 await sendOrderConfirmationWorkflow(container)11 .run({12 input: {13 id: data.id,14 },15 })16}17 18export const config: SubscriberConfig = {19 event: `order.placed`,20}
Emitting Events
In Medusa v1, you emitted events in services and API routes by resolving the Event Module's service from the container.
In Medusa v2, you should emit events in workflows instead. For example:
1import { 2 createWorkflow,3} from "@medusajs/framework/workflows-sdk"4import {5 emitEventStep,6} from "@medusajs/medusa/core-flows"7 8const helloWorldWorkflow = createWorkflow(9 "hello-world",10 () => {11 // ...12 13 emitEventStep({14 eventName: "custom.created",15 data: {16 id: "123",17 // other data payload18 },19 })20 }21)
If you need to emit events in a service, you can add the Event Module as a dependency of your module. Then, you can resolve the Event Module's service from the module container and emit the event. This approach is only recommended for events related to under-the-hood processes.
Learn more in the Emit Events chapter.
Loader Changes#
In Medusa v1, you created loaders in the src/loaders directory to perform tasks at application startup.
In Medusa v2, loaders can only be created in a module. You can create loaders in the src/modules/<module-name>/loaders directory. That also means the loader can only access resources in the module's container.
Learn more in the Loaders chapter.
Loader Parameter Changes
In Medusa v1, a loader function receives two parameters: container and config. If the loader was created in a module, it also received a logger parameter.
In Medusa v2, a loader function receives a single object parameter that has a container and options properties. The options property contains the properties passed to the module.
For example:
1import {2 LoaderOptions,3} from "@medusajs/framework/types"4 5export default async function helloWorldLoader({6 container,7 options,8}: LoaderOptions) {9 const logger = container.resolve("logger")10 11 logger.info("[HELLO MODULE] Just started the Medusa application!")12}
Scheduled Job Changes#
Scheduled jobs are similar in Medusa v1 and v2, but with minor changes.
You can learn more about scheduled jobs in the Scheduled Jobs chapters. This section highlights the main changes in scheduled jobs between v1 and v2.
Scheduled Job Parameter Changes
In Medusa v1, a scheduled job function received an object of parameters.
In Medusa v2, a scheduled job function receives only the Medusa container as a parameter. For example:
1import { MedusaContainer } from "@medusajs/framework/types"2 3export default async function greetingJob(container: MedusaContainer) {4 const logger = container.resolve("logger")5 6 logger.info("Greeting!")7}8 9export const config = {10 name: "greeting-every-minute",11 schedule: "* * * * *",12}
The pluginOptions property is no longer available, as you can access the options passed to a plugin within its modules' services, which you can resolve in a scheduled job.
The data property is also no longer available, as you can't pass data in the scheduled job's configuration anymore.
Scheduled Job Configuration Changes
In Medusa v2, the data property is removed from the scheduled job's configuration object.
Scheduled Job Implementation Changes
In Medusa v1, you implemented functionalities directly in the job function.
In Medusa v2, you should implement these functionalities in a workflow and call the workflow in the scheduled job. By using workflows, you benefit from rollback mechanism, among other features.
For example:
1import { MedusaContainer } from "@medusajs/framework/types"2import { syncProductToErpWorkflow } from "../workflows/sync-products-to-erp"3 4export default async function syncProductsJob(container: MedusaContainer) {5 await syncProductToErpWorkflow(container)6 .run()7}8 9export const config = {10 name: "sync-products-job",11 schedule: "0 0 * * *",12}
Removed Concepts and Alternatives#
The following table highlights concepts that have been removed or changed in Medusa v2 and their alternatives:
Medusa v1 | Medusa v2 |
|---|---|
Batch Jobs and Strategies | |
File Service | |
Notification Provider Service | |
Search Service | Can be integrated as a module. |
Admin Customization Changes#
This section covers changes to the admin customizations between Medusa v1 and v2.
Custom Admin Environment Variables
In Medusa v1, you set custom environment variables to be passed to the admin dashboard by prefixing them with MEDUSA_ADMIN_.
In Medusa v2, you can set custom environment variables to be passed to the admin dashboard by prefixing them with VITE_. Learn more in the Admin Environment Variables chapter.
Admin Widgets
Due to design changes in the Medusa Admin, some widget injection zones may have been changed or removed. Refer to the Admin Widgets Injection Zones reference for the full list of injection zones in v2.
Also, In Medusa v1, you exported in the widget's file a config object with the widget's configurations, such as its injection zone.
In Medusa v2, you export a configuration object defined with defineWidgetConfig from the Admin Extension SDK. For example:
The function accepts an object with a zone property, indicating the zone to inject the widget.
Refer to the Admin Widgets chapter to learn more about creating widgets in Medusa v2.
Admin UI Routes#
In Medusa v1, UI Routes were prefixed by /a. For example, a route created at src/admin/routes/custom/page.tsx would be available at http://localhost:9000/a/custom.
In Medusa v2, the /a prefix has been removed. So, that same route would be available at http://localhost:9000/app/custom (where /app is the path to the admin dashboard, not a prefix).
Also, in v1, you exported a config object with the route's configurations to show the route in the dashboard's sidebar.
In v2, you export a configuration object defined with defineRouteConfig from the Admin Extension SDK. For example:
1import { defineRouteConfig } from "@medusajs/admin-sdk"2import { ChatBubbleLeftRight } from "@medusajs/icons"3 4const CustomPage = () => {5 // ...6}7 8export const config = defineRouteConfig({9 label: "Custom Route",10 icon: ChatBubbleLeftRight,11})12 13export default CustomPage
The defineRouteConfig function accepts an object with the following properties:
label: The label of the route to show in the sidebar.icon: The icon to use in the sidebar for the route.
Refer to the Admin UI Routes chapter to learn more about creating UI routes in Medusa v2.
Admin Setting Routes#
In Medusa v1, you created setting pages under the src/admin/settings directory with their own configurations.
In Medusa v2, setting pages are UI routes created under the src/admin/routes/settings directory.
For example, if you had a src/admin/settings/custom/page.tsx file in v1, you should move it to src/admin/routes/settings/custom/page.tsx in v2. The file's content will be the same as a UI route.
For example:
1import { defineRouteConfig } from "@medusajs/admin-sdk"2import { Container, Heading } from "@medusajs/ui"3 4const CustomSettingPage = () => {5 return (6 <Container className="divide-y p-0">7 <div className="flex items-center justify-between px-6 py-4">8 <Heading level="h1">Custom Setting Page</Heading>9 </div>10 </Container>11 )12}13 14export const config = defineRouteConfig({15 label: "Custom",16})17 18export default CustomSettingPage
In v1, you exported a config object that showed a setting page as a card in the settings page. In v2, you export the same configuration object as a UI route.
Learn more about creating setting pages in the Admin UI Routes chapter.
notify Props in Widgets, UI Routes, and Settings#
In Medusa v1, admin widgets, UI routes, and setting pages received a notify prop to show notifications in the admin dashboard.
This prop is no longer passed in v2. Instead, use the toast utility from Medusa UI to show notifications.
For example:
1import { toast } from "@medusajs/ui"2import { defineWidgetConfig } from "@medusajs/admin-sdk"3 4// The widget5const ProductWidget = () => {6 const handleOnClick = () => {7 toast.info("Info", {8 description: "The quick brown fox jumps over the lazy dog.",9 })10 }11 // ...12}13 14// The widget's configurations15export const config = defineWidgetConfig({16 zone: "product.details.before",17})18 19export default ProductWidget
Learn more about the toast utility in the Medusa UI Toasts documentation.
Sending Requests to Medusa Server#
In Medusa v1, you used Medusa React to send requests to the Medusa server.
Medusa v2 no longer supports Medusa React. Instead, you can use the JS SDK with Tanstack Query to send requests from your admin customizations to the Medusa server.
Learn more in the Admin Development Tips chapter.
Admin Languages#
Medusa Admin v2 supports different languages out-of-the-box, and you can contribute with new translations.
Refer to the User Guide for the list of languages supported in the Medusa Admin.
Commerce Features Changes#
In Medusa v2, commerce features are implemented as Commerce Modules. For example, the Product Module implements the product-related features, whereas the Cart Module implements the cart-related features.
So, it's difficult to cover all changes in commerce features between v1 and v2. Instead, this section will highlight changes to customizations that were documented in the Medusa v1 documentation.
To learn about all commerce features in Medusa v2, refer to the Commerce Modules documentation.
Providers are now Module Providers#
In Medusa v1, you created providers for payment, fulfillment, and tax in services under src/services.
In Medusa v2, you create these providers as module providers that belong to the Payment, Fulfillment, and Tax modules respectively.
Refer to the following guides to learn how to create these module providers:
Overridden Cart Completion#
In Medusa v1, you were able to override the cart completion strategy to customize the cart completion process.
In Medusa v2, the cart completion process is now implemented in the completeCartWorkflow. There are two ways you can customize the completion process:
- Consuming hooks like the validate hook. This is useful if you only want to make changes in key points of the cart completion process.
- You can view available hooks in the completeCartWorkflow reference
- For more complex use cases, you can create a new workflow with the desired functionality. Then, you can replicate the complete cart API route and use it in your storefront.
Overridden Tax Calculation#
In Medusa v1, you were able to override the tax calculation strategy to customize the tax calculation process.
In Medusa v2, the tax calculation process is now implemented in a Tax Module Provider. So, you can create a custom tax provider with the calculation logic you want, then use it in a tax region.
Overridden Price Selection#
In Medusa v1, you were able to override the price selection strategy to customize the price selection process.
In Medusa v2, the price selection process is now implemented in the Pricing Module's calculate method. The Pricing Module allows you to set flexible rules and tiers to support your use case.
If your use case is complex and these rules are not enough, you can create a new module with the necessary logic, then use that module in your custom workflows.
Prices are Stored in Major Units#
In Medusa v1, prices were stored in the smallest currency unit. For example, a price of $10.00 was stored as 1000 (cents).
In Medusa v2, prices are stored in the major unit. For example, a price of $10.00 is stored as 10 (dollars).
Learn more in the Pricing Concepts guide.
Gift Card Features#
Medusa v1 has gift card features out-of-the-box.
In Medusa v2, gift card features are now only available to Cloud users.
Deployment Changes#
The deployment process in Medusa v2 is similar to v1, but with some changes. For example, the Medusa server is now deployed with Medusa Admin.
Medusa also provides Cloud, a managed services offering that makes deploying and operating Medusa applications possible without having to worry about configuring, scaling, and maintaining infrastructure.
Refer to the Deployment documentation to learn about the deployment process for Medusa applications and Next.js Starter Storefront.