Add Newsletter Subscriptions with Mailchimp in Medusa
In this tutorial, you'll learn how to integrate Mailchimp with Medusa to manage newsletter subscribers and automate newsletters.
When you install a Medusa application, you get a fully-fledged commerce platform with a Framework for customization. Medusa's architecture facilitates integrating third-party services to customize Medusa's infrastructure for your business needs.
Medusa's Notification Module allows you to customize Medusa's infrastructure to send notifications using the third-party provider that fits your business needs, such as Mailchimp.
In this tutorial, you'll integrate Mailchimp with Medusa to allow customers to subscribe to your newsletter and automate sending newsletters.
Summary#
By following this tutorial, you'll learn how to:
- Install and set up Medusa.
- Integrate Mailchimp with Medusa.
- Allow customers to subscribe to your store's newsletter.
- Automate sending newsletters about new products to subscribed customers.
You can follow this tutorial whether you're new to Medusa or an advanced Medusa developer.

Step 1: Install a Medusa Application#
Start by installing the Medusa application on your machine with the following command:
First, you'll be asked for the project's name. Then, when prompted about installing the Next.js Starter Storefront, choose "Yes."
Afterwards, the installation process will start, which will install the Medusa application as a monorepository in a directory with your project's name. The backend is installed in the apps/backend directory, and the Next.js Starter Storefront is installed in the apps/storefront directory.
Once the installation finishes successfully, the Medusa Admin dashboard will open with a form to create a new user. Enter the user's credentials and submit the form. Afterwards, you can log in with the new user and explore the dashboard.
apps/backend directory of your Medusa project.Step 2: Create Mailchimp Module Provider#
To integrate third-party services into Medusa, you create a custom module. A module is a reusable package with functionalities related to a single feature or domain.
Medusa's Notification Module provides an interface to send notifications in your Medusa application. It delegates the actual sending of notifications to the underlying provider, such as Mailchimp.
In this step, you'll integrate Mailchimp as a Notification Module Provider. Later, you'll use it to handle newsletter subscriptions and send newsletters.
a. Install Mailchimp Marketing API SDK#
To interact with Mailchimp's APIs, you'll use their official Node.js SDK.
Run the following command to install the SDK with its types package in your Medusa application:
b. Create Module Directory#
A module is created under the src/modules directory of your Medusa application. So, create the directory src/modules/mailchimp.
c. Create Mailchimp Module's Service#
A module has a service that contains its logic. For Notification Module Providers, the service implements the logic to send notifications with a third-party service.
To create the service of the Mailchimp Notification Module Provider, create the file src/modules/mailchimp/service.ts with the following content:
1import { 2 AbstractNotificationProviderService, 3} from "@medusajs/framework/utils"4import mailchimpMarketingApi from "@mailchimp/mailchimp_marketing"5 6type Options = {7 apiKey: string8 server: string9 listId: string10 templates?: {11 new_products?: {12 subject_line?: string13 storefront_url?: string14 }15 }16}17 18type InjectedDependencies = {19}20 21class MailchimpNotificationProviderService extends AbstractNotificationProviderService {22 static identifier = "mailchimp"23 protected options: Options24 protected mailchimp: typeof mailchimpMarketingApi25 26 constructor(container: InjectedDependencies, options: Options) {27 super()28 this.options = options29 this.mailchimp = mailchimpMarketingApi30 this.mailchimp.setConfig({31 apiKey: options.apiKey,32 server: options.server,33 })34 }35}36 37export default MailchimpNotificationProviderService
A Notification Module Provider's service must extend the AbstractNotificationProviderService class. You'll implement its methods in the next sections.
The service must also have an identifier static property, which is a unique identifier for the module. This identifier is used when registering the module in the Medusa application.
The service's constructor receives two parameters:
container: The module's container that contains Framework resources available to the module. You don't need to use it for this tutorial.options: Options that are passed to the module provider when it's registered in Medusa's configurations. You define the following options:apiKey: The Mailchimp API key.server: The Mailchimp server prefix. For example,us10.listId: The ID of the Mailchimp audience list where subscribed customers will be added.templates: Optional template configurations for newsletters.
In the constructor, you set the options property and initialize the Mailchimp SDK with your API key and server.
In the next sections, you'll implement the methods of the MailchimpNotificationProviderService class.
d. Implement validateOptions Method#
The validateOptions method is used to validate the options passed to the module provider. If the method throws an error, the Medusa application won't start.
Add the validateOptions method to the MailchimpNotificationProviderService class:
1// other imports...2import { 3 MedusaError,4} from "@medusajs/framework/utils"5 6class MailchimpNotificationProviderService extends AbstractNotificationProviderService {7 // ...8 static validateOptions(options: Record<any, any>): void | never {9 if (!options.apiKey) {10 throw new MedusaError(11 MedusaError.Types.INVALID_ARGUMENT, 12 "API key is required"13 )14 }15 if (!options.server) {16 throw new MedusaError(17 MedusaError.Types.INVALID_ARGUMENT, 18 "Server is required"19 )20 }21 if (!options.listId) {22 throw new MedusaError(23 MedusaError.Types.INVALID_ARGUMENT, 24 "List ID is required"25 )26 }27 }28}
The validateOptions method receives the options passed to the module provider as a parameter.
In the method, you throw an error if the required options are not set.
e. Implement send Method#
When the Medusa application needs to send a notification through a channel (such as email), it calls the send method of the channel's module provider.
The send method can be used to send different types of notifications based on the template specified. So, you'll implement the helper methods that handle the different notification templates, then use them in the send method.
sendNewsletterSignup Method
The sendNewsletterSignup method adds an email to the Mailchimp audience list. You'll use this method when a customer subscribes to the newsletter.
Add the sendNewsletterSignup method to the MailchimpNotificationProviderService class:
1// other imports...2import { 3 ProviderSendNotificationResultsDTO, 4 ProviderSendNotificationDTO,5} from "@medusajs/framework/types"6 7class MailchimpNotificationProviderService extends AbstractNotificationProviderService {8 // ...9 async sendNewsletterSignup(10 notification: ProviderSendNotificationDTO11 ): Promise<ProviderSendNotificationResultsDTO> {12 const { to, data } = notification13 14 try {15 const response = await this.mailchimp.lists.addListMember(16 this.options.listId, {17 email_address: to,18 status: "subscribed",19 merge_fields: {20 FNAME: data?.first_name,21 LNAME: data?.last_name,22 },23 }24 )25 26 return {27 id: "id" in response ? response.id : "",28 }29 } catch (error) {30 throw new MedusaError(31 MedusaError.Types.UNEXPECTED_STATE, 32 `Failed to send newsletter signup: ${error.response.text}`33 )34 }35 }36}
This method receives the same parameter as the send method, which is an object containing the notification details including:
to: The email address to add to the Mailchimp audience list.data: An object containing additional data, such as the user's first and last name.
In the method, you use the mailchimp.lists.addListMember method to subscribe an email address to the Mailchimp audience list. You pass the listId from the module's options and the email address along with optional first and last names.
If the subscription is successful, the method returns an object with the id of the subscribed email. If it fails, it throws a MedusaError with the error message from Mailchimp.
You don't do any email sending in this method because later, in the Send Welcome Emails from Mailchimp section, you'll create an automation flow in Mailchimp that automatically sends a welcome email to new subscribers.
getNewProductsHtmlContent Method
The getNewProductsHtmlContent method will generate the HTML content for the "New Products" newsletter. You'll then use this method when sending the new products newsletter.
Add the getNewProductsHtmlContent method to the MailchimpNotificationProviderService class:
1class MailchimpNotificationProviderService extends AbstractNotificationProviderService {2 // ...3 private async getNewProductsHtmlContent(data: any): Promise<string> {4 return `5 <!DOCTYPE html>6 <html xmlns:mc="http://schemas.mailchimp.com/2006/hcm">7 <head>8 <meta charset="UTF-8">9 <title>${this.options.templates?.new_products?.subject_line}</title>10 <style>11 body {12 font-family: Arial, sans-serif;13 background-color: #f4f4f4;14 margin: 0;15 padding: 0;16 }17 .container {18 max-width: 600px;19 background: #ffffff;20 margin: 0 auto;21 padding: 20px;22 }23 .product {24 border-bottom: 1px solid #ddd;25 padding: 20px 0;26 display: flex;27 }28 .product img {29 max-width: 120px;30 margin-right: 20px;31 }32 .product-info {33 flex: 1;34 }35 .product-info h4 {36 margin: 0 0 10px;37 font-size: 18px;38 }39 .product-info p {40 margin: 0 0 5px;41 color: #555;42 }43 .cta-button {44 display: inline-block;45 margin-top: 10px;46 background-color: #007BFF;47 color: #ffffff;48 text-decoration: none;49 padding: 10px 15px;50 border-radius: 4px;51 font-size: 14px;52 }53 </style>54 </head>55 <body>56 <div class="container">57 <h2 style="text-align:center;">Check out our latest products</h2>58 59 <!-- Repeatable product block -->60 <table role="presentation" width="100%" cellspacing="0" cellpadding="0" border="0" mc:repeatable="product_block" mc:variant="Product Item">61 <tbody>62 ${data.products.map((product: any) => `63 <tr>64 <td class="product">65 <img mc:edit="product_image" src="${product.thumbnail}" alt="Product Image">66 <div class="product-info">67 <h4 mc:edit="product_title">${product.title}</h4>68 <p mc:edit="product_description">${product.description}</p>69 <a mc:edit="product_link" href="${this.options.templates?.new_products?.storefront_url}/products/${product.handle}" class="cta-button">View Product</a>70 </div>71 </td>72 </tr>73 `).join("")}74 </tbody>75 </table>76 77 </div>78 </body>79 </html>80 `81 }82}
This method receives the product data as a parameter and returns a string containing the HTML content for the newsletter. You show the products in a responsive layout with images, titles, descriptions, and a button to view the product.
Notice that the HTML template uses the template.new_products.storefront_url module option to generate the product links. This allows you to customize the storefront URL in the module's options.
sendNewProducts Method
The last helper method you'll add is sendNewProducts. This method will create and send a campaign in Mailchimp that showcases new products.
Add the sendNewProducts method to the MailchimpNotificationProviderService class:
1class MailchimpNotificationProviderService extends AbstractNotificationProviderService {2 // ...3 async sendNewProducts(4 notification: ProviderSendNotificationDTO5 ): Promise<ProviderSendNotificationResultsDTO> {6 const { data } = notification7 8 try {9 const list = await fetch(10 `https://${this.options.server}.api.mailchimp.com/3.0/lists/${this.options.listId}`, 11 {12 headers: {13 Authorization: `Bearer ${this.options.apiKey}`,14 },15 }16 ).then((res) => res.json()) as mailchimpMarketingApi.lists.List17 18 // create a campaign19 const campaign = await this.mailchimp.campaigns.create({20 type: "regular",21 recipients: {22 list_id: this.options.listId,23 },24 settings: {25 subject_line: 26 this.options.templates?.new_products?.subject_line || "New Products",27 from_name: list.campaign_defaults?.from_name,28 reply_to: list.campaign_defaults?.from_email,29 },30 }) as mailchimpMarketingApi.campaigns.Campaigns31 32 // set content33 await this.mailchimp.campaigns.setContent(campaign.id, {34 html: await this.getNewProductsHtmlContent(data),35 })36 37 // send campaign38 await this.mailchimp.campaigns.send(campaign.id)39 40 return {41 id: campaign.id,42 }43 } catch (error) {44 throw new MedusaError(45 MedusaError.Types.UNEXPECTED_STATE, 46 `Failed to send new products newsletter: ${47 error.response?.text || error48 }`49 )50 }51 }52}
This method receives the same parameter as the send method, which is an object containing the notification details.
In the method, you:
- Fetch the Mailchimp list details to get default sender information. You use the
fetchAPI because the Mailchimp SDK does not provide a method to fetch list details. - Create a new campaign in Mailchimp using the
mailchimp.campaigns.createmethod. You specify the list ID to ensure the subscribers of that list receive the campaign. You also set the subject line and sender information using the list's default settings. - Set the campaign content using the HTML returned by the
getNewProductsHtmlContentmethod. - Send the campaign using the
mailchimp.campaigns.sendmethod. - Return the campaign ID if successful.
You also throw a MedusaError if the method fails at any point, providing the error message from Mailchimp.
Implement send Method
You can now implement the required send method of the MailchimpNotificationProviderService class that sends a notification based on the template provided.
Add the send method to the MailchimpNotificationProviderService class:
1class MailchimpNotificationProviderService extends AbstractNotificationProviderService {2 // ...3 async send(4 notification: ProviderSendNotificationDTO5 ): Promise<ProviderSendNotificationResultsDTO> {6 const { template } = notification7 8 switch (template) {9 case "newsletter-signup":10 return this.sendNewsletterSignup(notification)11 case "new-products":12 return this.sendNewProducts(notification)13 default:14 throw new MedusaError(15 MedusaError.Types.INVALID_ARGUMENT, 16 "Invalid template"17 )18 }19 }20}
This method receives an object of notification details, including the template property that specifies which template to use for sending the notification.
In the method, you perform an action based on the template value:
- If the template is
newsletter-signup, you call thesendNewsletterSignupmethod to add a new subscriber to the Mailchimp audience list. - If the template is
new-products, you call thesendNewProductsmethod to create and send a campaign showcasing new products. - If the template is not recognized, you throw a
MedusaErrorindicating that the template is invalid.
f. Export Module Definition#
You've now finished implementing the necessary methods for the Mailchimp Notification Module Provider.
The final piece to a module is its definition, which you export in an index.ts file at the module's root directory. This definition tells Medusa the module's details, including its service.
To create the module's definition, create the file src/modules/mailchimp/index.ts with the following content:
You use ModuleProvider from the Modules SDK to create the module provider's definition. It accepts two parameters:
- The name of the module that this provider belongs to, which is
Modules.NOTIFICATIONin this case. - An object with a required property
servicesindicating the Module Provider's services.
g. Add Module Provider to Medusa's Configurations#
Once you finish building the module, add it to Medusa's configurations to start using it.
In medusa-config.ts, add a modules property to the configurations:
1module.exports = defineConfig({2 // ...3 modules: [4 {5 resolve: "@medusajs/medusa/notification",6 options: {7 providers: [8 {9 resolve: "./src/modules/mailchimp",10 id: "mailchimp",11 options: {12 channels: ["email"],13 apiKey: process.env.MAILCHIMP_API_KEY!,14 server: process.env.MAILCHIMP_SERVER!,15 listId: process.env.MAILCHIMP_LIST_ID!,16 templates: {17 new_products: {18 subject_line: process.env.MAILCHIMP_NEW_PRODUCTS_SUBJECT_LINE!,19 storefront_url: process.env.MAILCHIMP_NEW_PRODUCTS_STOREFRONT_URL!,20 },21 },22 },23 },24 ],25 },26 },27 ],28})
To pass a Module Provider to the Notification Module, you add the modules property to the Medusa configuration and pass the Notification Module in its value.
The Notification Module accepts a providers option, which is an array of Notification Module Providers to register.
To register the Mailchimp Notification Module Provider, you add an object to the providers array with the following properties:
resolve: The NPM package or path to the module provider. In this case, it's the path to thesrc/modules/mailchimpdirectory.id: The ID of the module provider. The Notification Module Provider is then registered with the IDnp_{identifier}_{id}, where:{identifier}: The identifier static property defined in the Module Provider's service, which ismailchimpin this case.{id}: The ID set in this configuration, which is alsomailchimpin this case.
options: The options to pass to the module provider. These are the options you defined in theOptionstype of the module provider's service.- You must also set a
channelsoption that indicates the channels this provider is used to send notifications.
- You must also set a
h. Set Environment Variables#
Next, you'll set the options you passed to the Mailchimp Notification Module Provider as environment variables.
Retrieve Mailchimp API Key
To retrieve your Mailchimp API key:
- On the Mailchimp dashboard, click on your profile icon at the top right.
- Choose "Account & billing" from the dropdown.

- Click on the "Extras" tab and select "API keys" from the dropdown.

- Scroll down to the "Your API keys" section and click on the "Create A Key" button.

- In the API key form, enter a name for the API key.
- Click the "Generate Key" button to create the API key.

Copy the generated API key and add it to the .env file in your Medusa application:
Retrieve Mailchimp Server Prefix
You can retrieve your Mailchimp server prefix from the URL of your Mailchimp dashboard. It should be in the format https://<server-prefix>.admin.mailchimp.com/. So, the server prefix will be something like us5, for example.
Then, add the server prefix to the .env file in your Medusa application:
Create Mailchimp Audience List
Next, you'll create a Mailchimp audience list to store your subscribers:
- On the Mailchimp dashboard, click on "Audience" in the left sidebar.
- Click on the dropdown next to the "Contacts" header and choose "Manage Audiences".

- Click on the "Create Audience" button at the top right.

- Enter the audience details, such as the audience name, default from email address, and default from name. These defaults are used in the created campaigns.

- Once you're done, click the "Save" button to create the audience. This will open the Audience's contacts page.
- Click on the "More options" button and select "Audience settings" from the dropdown.

- In the Audience settings page, copy the value of "Audience ID" from the first section.

Add the copied ID to the .env file in your Medusa application as the list ID:
Set Mailchimp Templates Options
Finally, you can optionally set the Mailchimp templates options in the .env file. These options are used when sending newsletters about new products.
Where:
MAILCHIMP_NEW_PRODUCTS_SUBJECT_LINE: The subject line for the new products newsletter.MAILCHIMP_NEW_PRODUCTS_STOREFRONT_URL: The URL of your storefront where users can view the new products. In development, the Next.js Starter Storefront runs onhttp://localhost:8000, so you can set it to that URL.
The Mailchimp integration is now ready. You'll test it out as you implement the subscription features in the next steps.
Optional Step: Send Welcome Emails from Mailchimp#
In the Mailchimp Notification Module Provider, you handle the newsletter-signup notification template by subscribing an email address to the Mailchimp audience list. However, you typically should also send a welcome email to the subscribed customer.
To do that, you can create an automation flow in Mailchimp that automatically sends emails whenever a new subscriber is added to the audience list.
To do that:
- On the Mailchimp dashboard, click on "Automations" in the sidebar.
- Click on the "Build from scratch" button to create a new automation flow.

- In the flow creation form, enter a name for the automation flow and choose the Audience you created earlier.
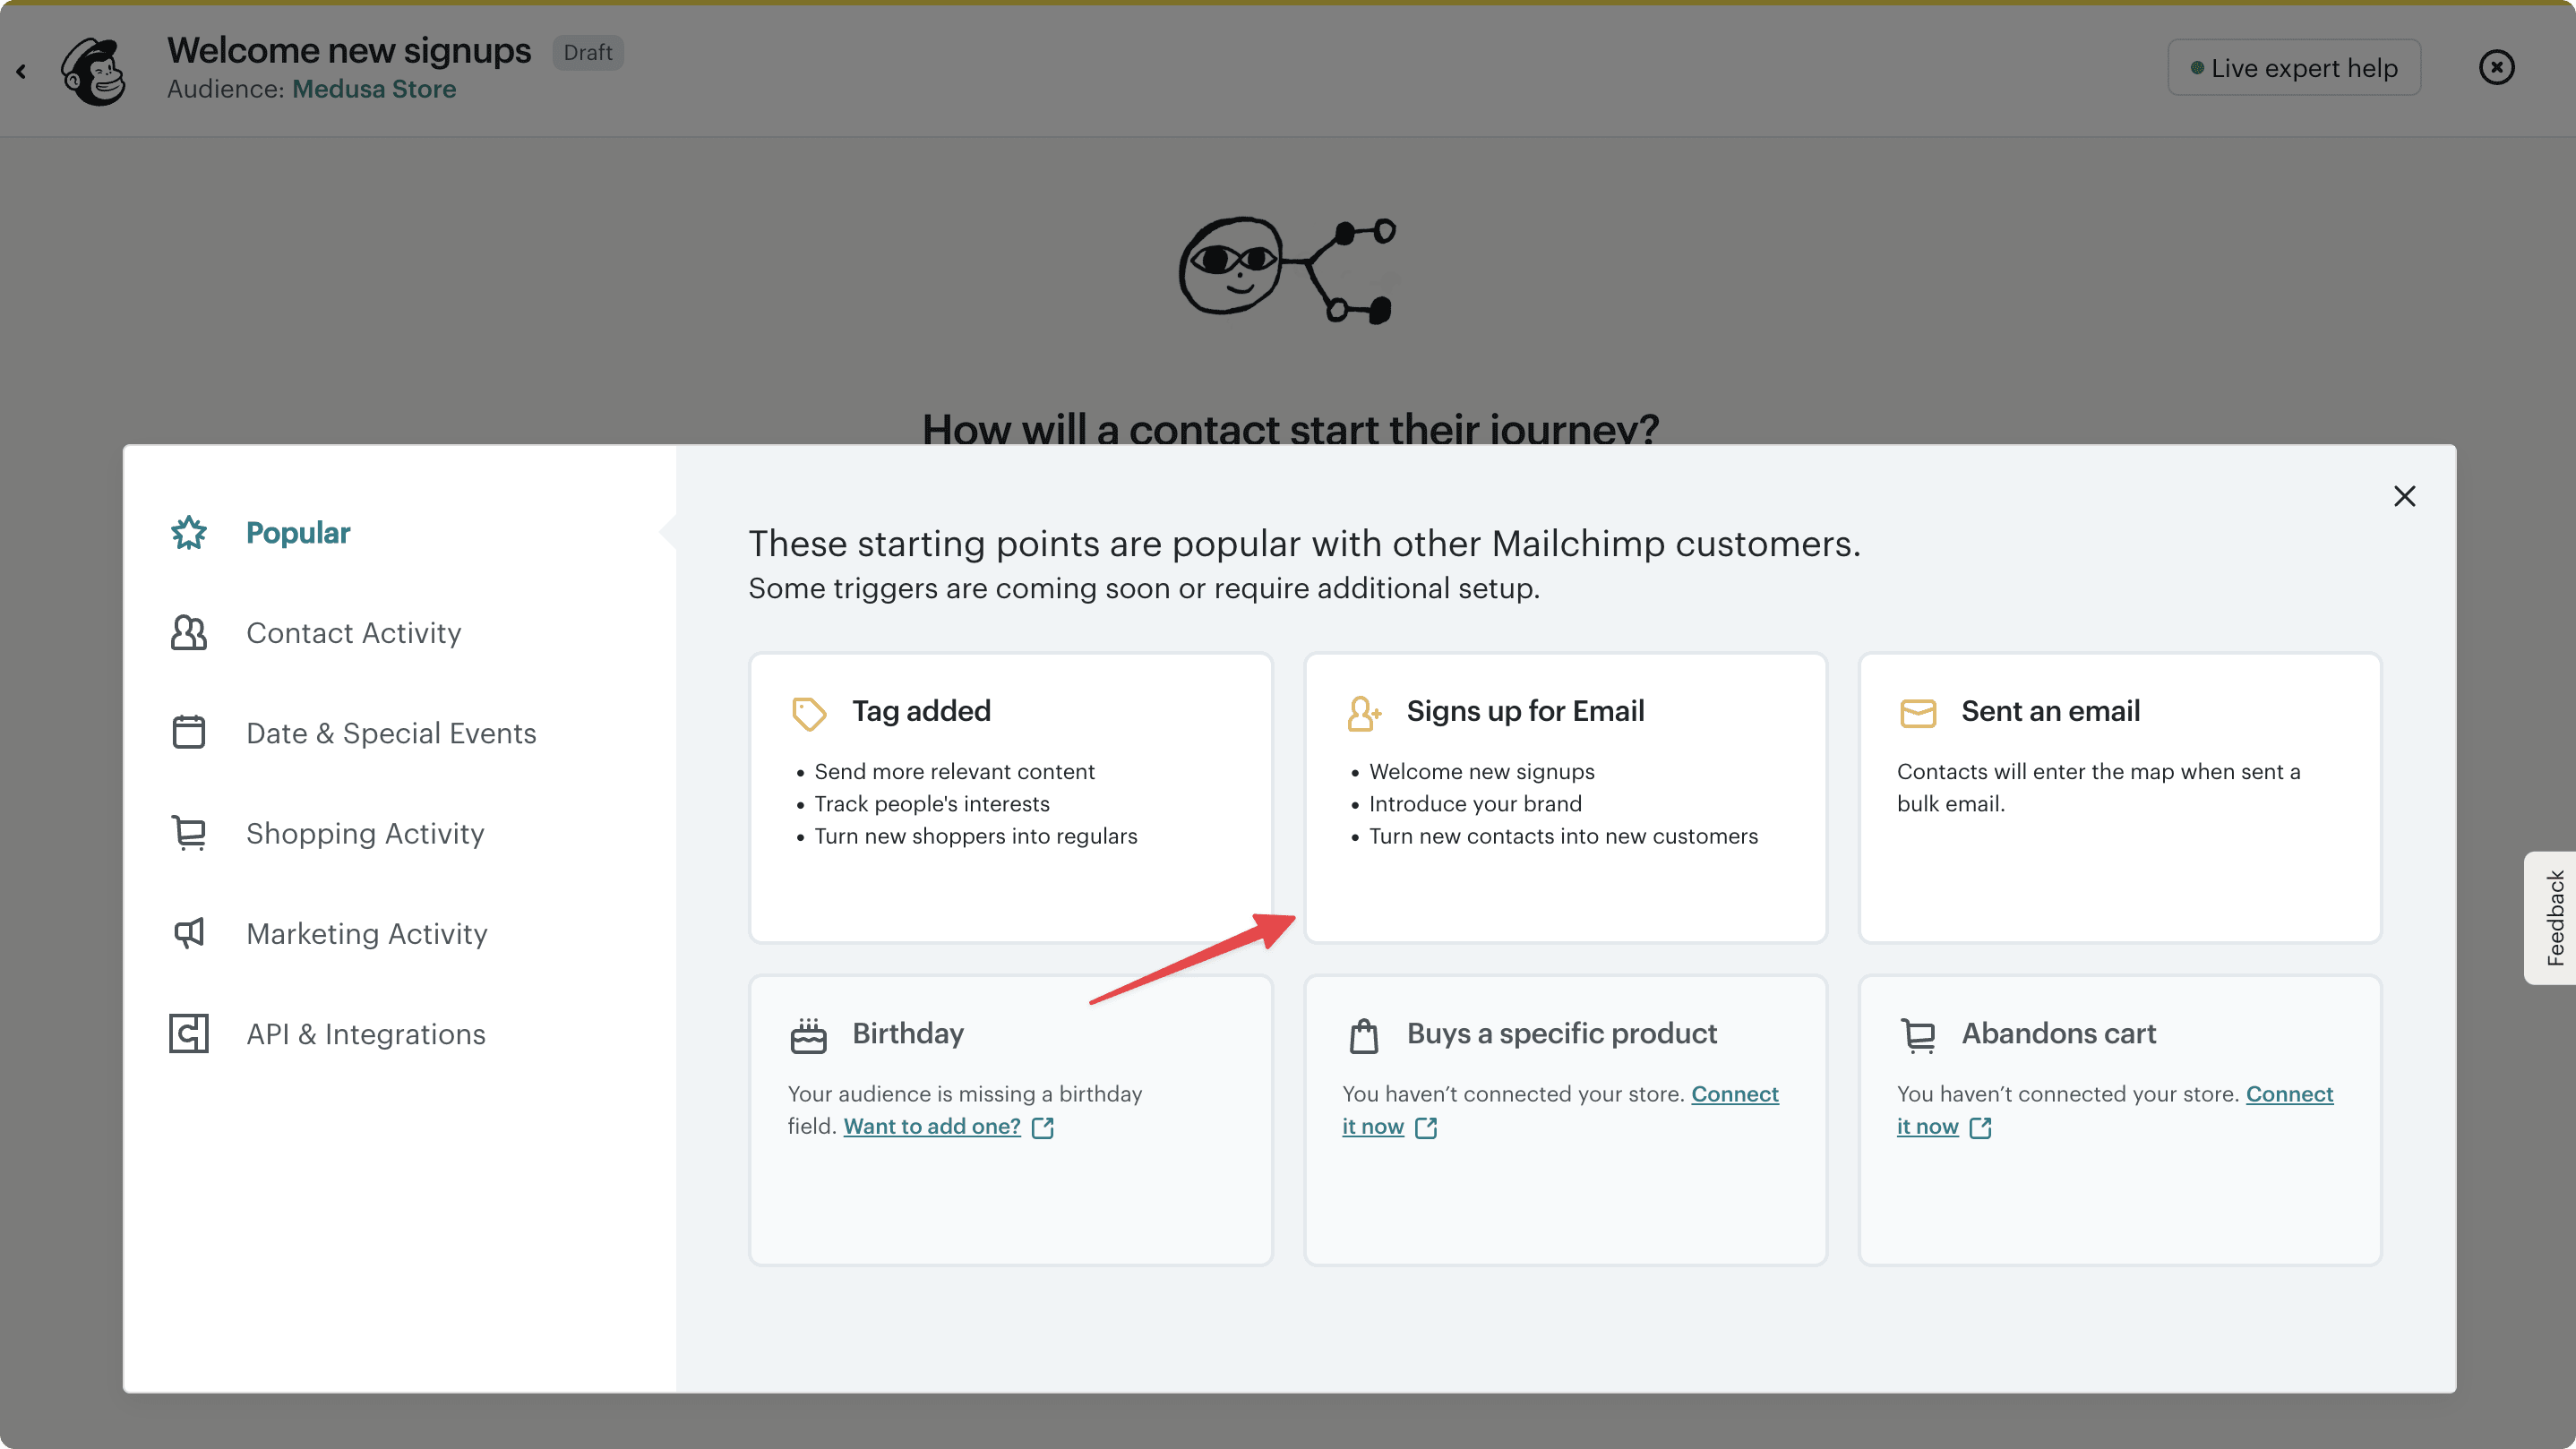
- Click the "Choose a starting point" button to select a template for the automation flow.

- A pop-up will open in the flow editor to choose a template to start from. Choose the "Signs up for Email" template.
- In the flow editor, drag the "Send Email" action to the flow canvas. This will open a pop-up to configure the email.
- In the email configuration pop-up, you can enter the email subject, from name, and from email address.

- To set the email content, click the "Select a template" link in the email configuration pop-up. You can then choose an existing template or paste your own HTML content.
Example HTML Content
- Once you're done, close the email configuration pop-up. The changes will be saved automatically.
- In the flow editor, click the "Continue" button at the top right.

- In the review pop-up, click the "Turn flow on" button to activate the automation flow.

Whenever a customer subscribes to the newsletter, Mailchimp will automatically send them a welcome email using the automation flow you created.
Step 3: Create Newsletter Subscription API Route#
Now that you've integrated Mailchimp with Medusa, you need to allow customers to subscribe to the newsletter.
In this step, you will:
- Create an API route to subscribe customers. An API Route is an endpoint that exposes commerce features to external applications and clients, such as storefronts.
- In the API route, you'll emit an event indicating that the customer is signing up for the newsletter.
- Create a subscriber that listens to the event emitted by the API route. The subscriber will use Mailchimp to subscribe the customer to the newsletter audience list.
a. Create the API Route#
An API route is created in a route.ts file under a sub-directory of the src/api directory. The path of the API route is the file's path relative to src/api.
So, to create an API route at the path /store/newsletter, create the file src/api/store/newsletter/route.ts with the following content:
1import { MedusaRequest, MedusaResponse } from "@medusajs/framework/http"2import { z } from "@medusajs/framework/zod"3 4export const newsletterSignupSchema = z.object({5 email: z.email(),6 first_name: z.string().optional(),7 last_name: z.string().optional(),8})9 10export async function POST(11 req: MedusaRequest<z.infer<typeof newsletterSignupSchema>>,12 res: MedusaResponse13) {14 const eventModuleService = req.scope.resolve("event_bus")15 16 await eventModuleService.emit({17 name: "newsletter.signup",18 data: {19 email: req.validatedBody.email,20 first_name: req.validatedBody.first_name,21 last_name: req.validatedBody.last_name,22 },23 })24 25 res.json({26 success: true,27 })28}
You first export a Zod schema object that you'll use to validate incoming request bodies. You expect the request body to have an email field, and optionally allow passing first_name and last_name fields.
Then, you export a POST route handler function. This will expose a POST API route at /store/newsletter. The route handler function accepts two parameters:
- A request object with details and context on the request, such as body parameters.
- A response object to manipulate and send the response.
In the route handler, you use the Medusa container to resolve the Event Module's service.
Then, you emit the newsletter.signup event, passing as the event payload the email, first name, and last name from the request body.
Finally, you send a JSON response indicating that the request was successful.
b. Add Validation Middleware#
To validate that requests sent to the /store/newsletter API route have the required body parameters, you'll add a validation middleware. A middleware is a function that is executed before an API route's handler when a request is made to the route.
To apply the validation middleware on the /store/newsletter API route, create the file src/api/middlewares.ts with the following content:
1import { 2 defineMiddlewares, 3 validateAndTransformBody,4} from "@medusajs/framework/http"5import { newsletterSignupSchema } from "./store/newsletter/route"6 7export default defineMiddlewares({8 routes: [9 {10 matcher: "/store/newsletter",11 methods: ["POST"],12 middlewares: [13 validateAndTransformBody(newsletterSignupSchema),14 ],15 },16 ],17})
You define middlewares using the defineMiddlewares function from the Medusa Framework. It accepts an object having a routes property, whose value is an array of middleware route objects. Each middleware route object has the following properties:
matcher: The path of the route the middleware applies to.methods: The HTTP methods the middleware applies to, which is in this casePOST.middlewares: An array of middleware functions to apply to the route. You apply thevalidateAndTransformBodymiddleware which ensures that a request's body has the parameters required by a route. You pass it the schema you defined earlier in the API route's file.
c. Create Subscriber#
Finally, you'll create a subscriber that listens to the newsletter.signup event emitted by the API route. The subscriber will create a notification with the newsletter-signup template. Under the hoode, the Mailchimp Notification Module Provider will handle the notification and subscribe the customer to the newsletter audience list.
Create the file src/subscribers/newsletter-signup.ts with the following content:
1import { SubscriberArgs, type SubscriberConfig } from "@medusajs/framework" 2 3export default async function orderPlacedHandler({4 event: { data },5 container,6}: SubscriberArgs<{ email: string, first_name: string, last_name: string }>) {7 const notificationModuleService = container.resolve("notification")8 9 await notificationModuleService.createNotifications({10 channel: "email",11 to: data.email,12 template: "newsletter-signup",13 data: {14 first_name: data.first_name,15 last_name: data.last_name,16 },17 })18}19 20export const config: SubscriberConfig = {21 event: `newsletter.signup`,22}
A subscriber file must export:
- An asynchronous function, which is the subscriber that is executed when the event is emitted.
- A configuration object that holds the name of the event the subscriber listens to, which is
newsletter.signupin this case.
The subscriber function receives an object as a parameter that has a container property, which is the Medusa container. The Medusa container holds Framework and commerce tools that you can resolve and use in your customizations.
In the subscriber function, you resolve the Notification Module's service from the Medusa container. Then, you call the createNotifications method to create a notification with the following properties:
channel: The channel to send the notification through, which isemailin this case. Since the Mailchimp Notification Module Provider is registered with the email channel, it will process the notification.to: The email address to subscribe to the newsletter.template: The template to use for the notification, which isnewsletter-signup.data: An object containing additional data to pass to the notification, such as the user's first and last names.
Now you have an API route that allows customers to subscribe to the newsletter. You'll test it when you customize the storefront in the next step.
Step 4: Add Newsletter Subscription Form in the Storefront#
In this step, you'll customize the Next.js Starter Storefront that you installed as part of the first step. You'll add a newsletter subscription form in the storefront's footer that allows customers to subscribe to the newsletter.
a. Add Subscribe to Newsletter Function#
You'll start by adding a server function that sends a request to the /store/newsletter API route you created in the previous step to subscribe a customer to the newsletter.
Create the file src/lib/data/newsletter.ts with the following content:
You use the JS SDK, which is already configured in the Next.js Starter Storefront, to send a POST request to the /store/newsletter API route. You pass the email address in the request body.
b. Create Newsletter Subscription Form#
Next, you'll create a newsletter subscription form component that allows customers to enter their email address and subscribe to the newsletter.
Create the file src/modules/layout/components/newsletter-form/index.tsx with the following content:
1"use client"2 3import { subscribeToNewsletter } from "@lib/data/newsletter"4import { SubmitButton } from "@modules/checkout/components/submit-button"5import Input from "@modules/common/components/input"6import { useState } from "react"7import { toast } from "@medusajs/ui"8 9const NewsletterForm = () => {10 const [email, setEmail] = useState("")11 const [loading, setLoading] = useState(false)12 13 const handleSubmit = async (e: React.FormEvent<HTMLFormElement>) => {14 e.preventDefault()15 setLoading(true)16 try {17 await subscribeToNewsletter(email)18 } catch (error) {19 console.error(error)20 // ignore, don't show error to user21 }22 toast.success("Thanks for subscribing!")23 setEmail("")24 setLoading(false)25 }26 27 return (28 <div className="flex flex-col lg:flex-row items-center justify-between gap-8">29 <div className="flex-1 max-w-md">30 <h3 className="txt-compact-large-plus mb-2 text-ui-fg-base">Subscribe to our newsletter</h3>31 <p className="text-base-regular text-ui-fg-subtle">32 Receive updates on our latest products and exclusive offers.33 </p>34 </div>35 <div className="flex-1 max-w-md w-full">36 <form onSubmit={handleSubmit} className="flex gap-x-2">37 <div className="flex-1">38 <Input39 label="Email"40 name="email"41 type="email"42 autoComplete="off"43 required44 data-testid="newsletter-email-input"45 value={email}46 onChange={(e) => setEmail(e.target.value)}47 disabled={loading}48 />49 </div>50 <div className="flex items-end">51 <SubmitButton data-testid="newsletter-submit-button">52 Subscribe53 </SubmitButton>54 </div>55 </form>56 </div>57 </div>58 )59}60 61export default NewsletterForm
You create a NewsletterForm component that renders a form with an email input and a submit button.
Once the customer enters their email and submits the form, you use the subscribeToNewsletter function you created to subscribe the customer to the newsletter.
You also show a toast notification to the customer indicating that they successfully subscribed to the newsletter.
The toast function is imported from Medusa UI, which requires adding Toaster component in the application's tree. So, import the Toaster component in the file src/app/[countryCode]/(main)/layout.tsx:
Then, in the PageLayout component's return statement, add the Toaster component after the Footer component:
c. Add Newsletter Form to the Footer#
Finally, you'll add the NewsletterForm component to the storefront's footer.
In the file src/modules/layout/components/footer/index.tsx, import the NewsletterForm component:
Then, in the Footer component's return statement, add the following before the div wrapping the copyright text:
This will show the newsletter subscription form in the footer of the storefront, before the copyright text.
Test out the Newsletter Subscription Form#
You'll now test out the newsletter subscription functionality.
First, run the following command in the apps/backend directory to start the Medusa server:
Then, in a separate terminal, run the following command in the Next.js Starter Storefront's directory to start the Next.js server:
Next, open your browser at http://localhost:8000 to view the storefront. If you scroll down to the footer, you should see the newsletter subscription form.

Enter an email address in the form and click the "Subscribe" button. You'll see a success toast message indicating that you successfully subscribed to the newsletter.
You can verify that the subscription was successful in your Mailchimp dashboard by going to the "Audience" page. You'll see the email address you entered in the newsletter subscription form listed in your audience.

If you set up the welcome email automation flow in Mailchimp, you'll receive a welcome email.

Step 5: Create Automated Product Newsletter#
Next, you'll schedule sending a newsletter for new products once a week. Customers subscribed to the newsletter will receive an email with the latest products added to your Medusa store.
To automate the newsletter, you will:
- Create a workflow that retrieves the latest products and sends a notification with the product data.
- Create a scheduled job that runs the workflow automatically once a week.
a. Create the Workflow#
A workflow is a series of actions, called steps, that complete a task with rollback and retry mechanisms. In Medusa, you build commerce features in workflows, then execute them in other customizations, such as subscribers, scheduled jobs, and API routes.
You'll create a workflow that retrieves the latest products added to your Medusa store, then creates a notification with the product data useful to send the newsletter.
Create the file src/workflows/send-newsletter.ts with the following content:
1import { 2 createWorkflow, 3 when, 4 WorkflowResponse,5} from "@medusajs/framework/workflows-sdk"6import { 7 sendNotificationsStep, 8 useQueryGraphStep,9} from "@medusajs/medusa/core-flows"10 11export const sendNewProductsNewsletter = createWorkflow(12 "send-new-products-newsletter", 13 (input) => {14 const { data: products } = useQueryGraphStep({15 entity: "product",16 fields: [17 "title",18 "handle",19 "thumbnail",20 "description",21 ],22 filters: {23 created_at: {24 // Get products created in the last 7 days25 // 7 days * 24 hours * 60 minutes * 60 seconds * 1000 milliseconds26 $gte: new Date(Date.now() - 7 * 24 * 60 * 60 * 1000),27 },28 },29 })30 31 when({ products }, ({ products }) => products.length > 0)32 .then(() => {33 sendNotificationsStep([34 {35 to: "audience", // will be filled in by provider36 channel: "email",37 template: "new-products",38 data: {39 products,40 },41 },42 ])43 })44 45 return new WorkflowResponse(void 0)46 }47)
You create a workflow using createWorkflow from the Workflows SDK. It accepts the workflow's unique name as a first parameter.
createWorkflow accepts as a second parameter a constructor function, which is the workflow's implementation.
In the workflow's constructor function, you:
- Use the useQueryGraphStep to retrieve products created in the last 7 days. You retrieve the product's title, handle, thumbnail, and description fields.
- Use the when-then utility to send the notification only if there are new products.
whenreceives two parameters:- An object to use in the condition function.
- A condition function that receives the first parameter object and returns a boolean indicating whether to execute the steps in the
thenblock.
- If the
whencondition is met, you use the sendNotificationsStep to create a notification with the following properties:to: The audience to send the notification to. This will be filled in by the Mailchimp Notification Module Provider, so you use a placeholder value.channel: The channel to send the notification through, which isemailin this case.template: The template to use for the notification, which isnew-products.data: An object containing the products retrieved from the query step.
Finally, you return an instance of WorkflowResponse indicating that the workflow was completed successfully.
when to perform typical operations that require accessing data values. Learn more about workflow constraints in the Workflow Constraints documentation.b. Create a Scheduled Job#
To automate executing a task at a specified interval, you can create a scheduled job. A scheduled job is a background task that runs at a specified interval, such as every hour or every day.
To create a scheduled job, create the file src/jobs/send-weekly-newsletter.ts with the following content:
1import {2 MedusaContainer,3} from "@medusajs/framework/types"4import { sendNewProductsNewsletter } from "../workflows/send-newsletter"5 6export default async function myCustomJob(container: MedusaContainer) {7 const logger = container.resolve("logger")8 9 logger.info("Sending weekly newsletter...")10 11 await sendNewProductsNewsletter(container)12 .run({13 input: {},14 })15 16 logger.info("Newsletter sent successfully")17}18 19export const config = {20 name: "send-weekly-newsletter",21 schedule: "0 0 * * 0", // Every Sunday at midnight22}
A scheduled job file must export:
- An asynchronous function that executes the job's logic. The function receives the Medusa container as a parameter.
- An object with the job's configuration, including the name and the schedule. The schedule is a cron job pattern as a string.
- You set the schedule to run the job every Sunday at midnight, which is represented by the cron pattern
0 0 * * 0.
- You set the schedule to run the job every Sunday at midnight, which is represented by the cron pattern
In the job function, you:
- Resolve the Logger utility from the Medusa container to log messages.
- Log a message indicating that the newsletter is being sent.
- Execute the
sendNewProductsNewsletterworkflow by invoking it, passing the Medusa container as a parameter, then calling itsrunmethod. - Log a message indicating that the newsletter was sent successfully.
Test Automated Newsletter#
To test the automated newsletter, change the schedule of the job in src/jobs/send-weekly-newsletter.ts to run every minute by changing the schedule property in the job's configuration:
Also, if you didn't create any products in the past week, make sure to create a few products in the Medusa Admin.
Then, run the following command in the apps/backend directory to start the Medusa server:
Wait for a minute for the scheduled job to run. You should see the following logs in the terminal:
This indicates that the scheduled job ran successfully.
To confirm that the newsletter was sent, check the Mailchimp dashboard by going to the "Campaigns" page. You'll find a new campaign with the title "New Products" and the date it was sent.

If you also subscribed to the newsletter, you should receive an email with the latest products added to your Medusa store.

Make sure to revert the job's schedule back to run every Sunday at midnight by changing the schedule property in the job's configuration:
Next Steps#
You've now integrated Mailchimp with Medusa to allow customers to subscribe to a newsletter and to send automated newsletters about new products.
You can expand this feature and integration to:
- Send newsletters about other events, such as new collections or special offers. Refer to the Events Reference for the list of events you can listen to.
- Customize the registration form in the storefront to add an "opt-in for newsletter" checkbox.
- Customize the notifications to match your business's brand, or use templates defined in Mailchimp instead.
If you're new to Medusa, check out the main documentation, where you'll get a more in-depth understanding of all the concepts you've used in this guide and more.
To learn more about the commerce features that Medusa provides, check out Medusa's Commerce Modules.
Troubleshooting#
If you encounter issues during your development, check out the troubleshooting guides.
Getting Help#
If you encounter issues not covered in the troubleshooting guides:
- Visit the Medusa GitHub repository to report issues or ask questions.
- Join the Medusa Discord community for real-time support from community members.
- Contact the sales team to get help from the Medusa team.