Implement Localization in Medusa by Integrating Contentful
In this tutorial, you'll learn how to localize your Medusa store's data with Contentful.
When you install a Medusa application, you get a fully-fledged commerce platform with a Framework for customization. While Medusa provides features essential for internationalization, such as support for multiple regions and currencies, it doesn't provide content localization.
However, Medusa's architecture supports the integration of third-party services to provide additional features, such as data localization. One service you can integrate is Contentful, a headless content management system (CMS) that allows you to manage and deliver content across multiple channels.
Summary#
By following this tutorial, you'll learn how to:
- Install and set up Medusa.
- Integrate Contentful with Medusa.
- Create content types in Contentful for Medusa models.
- Trigger syncing products and related data to Contentful when:
- A product is created.
- The admin user triggers syncing the products.
- Customize the Next.js Starter Storefront to fetch localized data from Contentful through Medusa.
- Listen to webhook events in Contentful to update Medusa's data accordingly.
You can follow this tutorial whether you're new to Medusa or an advanced Medusa developer.
Step 1: Install a Medusa Application#
Start by installing the Medusa application on your machine with the following command:
First, you'll be asked for the project's name. Then, when prompted about installing the Next.js Starter Storefront, choose "Yes."
Afterwards, the installation process will start, which will install the Medusa application as a monorepository in a directory with your project's name. The backend is installed in the apps/backend directory, and the Next.js Starter Storefront is installed in the apps/storefront directory.
Once the installation finishes successfully, the Medusa Admin dashboard will open with a form to create a new user. Enter the user's credentials and submit the form. Afterwards, you can log in with the new user and explore the dashboard.
apps/backend directory of your Medusa project.Step 2: Create Contentful Module#
To integrate third-party services into Medusa, you create a module. A module is a reusable package that provides functionalities related to a single feature or domain. Medusa integrates the module into your application without implications or side effects on your setup.
In this step, you'll create a module that provides the necessary functionalities to integrate Contentful with Medusa.
Install Contentful SDKs#
Before building the module, you need to install Contentful's management and delivery JS SDKs. So, run the following command in the apps/backend directory:
Where contentful is the delivery SDK and contentful-management is the management SDK.
Create Module Directory#
A module is created under the src/modules directory of your Medusa application. So, create the directory src/modules/contentful.
Create Loader#
When the Medusa application starts, you want to establish a connection to Contentful, then create the necessary content types if they don't exist in Contentful.
A module can specify a task to run on the Medusa application's startup using loaders. A loader is an asynchronous function that a module exports. Then, when the Medusa application starts, it runs the loader. The loader can be used to perform one-time tasks such as connecting to a database, creating content types, or initializing data.
Loaders are created in a TypeScript or JavaScript file under the loaders directory of a module. So, create the file src/modules/contentful/loader/create-content-models.ts with the following content:
1import { LoaderOptions } from "@medusajs/framework/types"2import { asValue } from "@medusajs/framework/awilix"3import { createClient } from "contentful-management"4import { MedusaError } from "@medusajs/framework/utils"5 6const { createClient: createDeliveryClient } = require("contentful")7 8export type ModuleOptions = {9 management_access_token: string10 delivery_token: string11 space_id: string12 environment: string13 default_locale?: string14}15 16export default async function syncContentModelsLoader({17 container,18 options,19}: LoaderOptions<ModuleOptions>) {20 if (21 !options?.management_access_token || !options?.delivery_token || 22 !options?.space_id || !options?.environment23 ) {24 throw new MedusaError(25 MedusaError.Types.INVALID_DATA,26 "Contentful access token, space ID and environment are required"27 )28 }29 30 const logger = container.resolve("logger")31 32 try {33 const managementClient = createClient({34 accessToken: options.management_access_token,35 }, {36 type: "plain",37 defaults: {38 spaceId: options.space_id,39 environmentId: options.environment,40 },41 })42 43 const deliveryClient = createDeliveryClient({44 accessToken: options.delivery_token,45 space: options.space_id,46 environment: options.environment,47 })48 49 50 // TODO try to create content types51 52 } catch (error) {53 logger.error(54 `Failed to connect to Contentful: ${error}`55 )56 throw error57 }58}
The loader file exports an asynchronous function that accepts an object having the following properties:
container: The Module container, which is a registry of resources available to the module. You can use it to resolve or register resources in the module's container.options: An object of options passed to the module. These options are useful to pass secrets or options that may change per environment. You'll learn how to pass these options later.- The Contentful Module expects the options to include the Contentful tokens for the management and delivery APIs, the space ID, environment, and optionally the default locale to use.
In the loader function, you validate the options passed to the module, and throw an error if they're invalid. Then, you resolve from the Module's container the Logger used to log messages in the terminal.
Finally, you create clients for Contentful's management and delivery APIs, passing them the necessary module's options. If the connection fails, an error is thrown, which is handled in the catch block.
Create Content Types
In the loader, you need to create content types in Contentful if they don't already exist.
In this tutorial, you'll only create content types for a product and its variants and options. However, you can create content types for other data models, such as categories or collections, by following the same approach.
To create the content type for products, replace the TODO in the loader with the following:
1// Try to create the product content type2try {3 await managementClient.contentType.get({4 contentTypeId: "product",5 })6} catch (error) {7 const productContentType = await managementClient.contentType.createWithId({8 contentTypeId: "product",9 }, {10 name: "Product",11 description: "Product content type synced from Medusa",12 displayField: "title",13 fields: [14 {15 id: "title", 16 name: "Title",17 type: "Symbol",18 required: true,19 localized: true,20 },21 {22 id: "handle",23 name: "Handle", 24 type: "Symbol",25 required: true,26 localized: false,27 },28 {29 id: "medusaId",30 name: "Medusa ID",31 type: "Symbol",32 required: true,33 localized: false,34 },35 {36 type: "RichText",37 name: "description", 38 id: "description",39 validations: [40 {41 enabledMarks: [42 "bold",43 "italic",44 "underline", 45 "code",46 "superscript",47 "subscript",48 "strikethrough",49 ],50 },51 {52 enabledNodeTypes: [53 "heading-1",54 "heading-2", 55 "heading-3",56 "heading-4",57 "heading-5",58 "heading-6",59 "ordered-list",60 "unordered-list",61 "hr",62 "blockquote",63 "embedded-entry-block",64 "embedded-asset-block",65 "table",66 "asset-hyperlink",67 "embedded-entry-inline",68 "entry-hyperlink",69 "hyperlink",70 ],71 },72 {73 nodes: {},74 },75 ],76 localized: true,77 required: true,78 },79 {80 type: "Symbol",81 name: "subtitle",82 id: "subtitle",83 localized: true,84 required: false,85 validations: [],86 },87 {88 type: "Array",89 items: {90 type: "Link",91 linkType: "Asset",92 validations: [],93 },94 name: "images",95 id: "images",96 localized: true,97 required: false,98 validations: [],99 },100 {101 id: "productVariants",102 name: "Product Variants",103 type: "Array",104 localized: false,105 required: false,106 items: {107 type: "Link",108 validations: [109 {110 linkContentType: ["productVariant"],111 },112 ],113 linkType: "Entry",114 },115 disabled: false,116 omitted: false,117 },118 {119 id: "productOptions",120 name: "Product Options",121 type: "Array",122 localized: false,123 required: false,124 items: {125 type: "Link",126 validations: [127 {128 linkContentType: ["productOption"],129 },130 ],131 linkType: "Entry",132 },133 disabled: false,134 omitted: false,135 },136 ],137 })138 139 await managementClient.contentType.publish({140 contentTypeId: "product",141 }, productContentType)142}143 144// TODO create product variant content type
In the above snippet, you first try to retrieve the product content type using Contentful's Management APIs. If the content type doesn't exist, an error is thrown, which you handle in the catch block.
In the catch block, you create the product content type with the following fields:
title: The product's title, which is a localized field.handle: The product's handle, which is used to create a human-readable URL for the product in the storefront.medusaId: The product's ID in Medusa, which is a non-localized field. You'll store in this field the ID of the product in Medusa.description: The product's description, which is a localized rich-text field.subtitle: The product's subtitle, which is a localized field.images: The product's images, which is a localized array of assets in Contentful.productVariants: The product's variants, which is an array that references content of theproductVariantcontent type.productOptions: The product's options, which is an array that references content of theproductOptioncontent type.
Next, you'll create the productVariant content type that represents a product's variant. A variant is a combination of the product's options that customers can purchase. For example, a "red" shirt is a variant whose color option is red.
To create the variant content type, replace the new TODO with the following:
1// Try to create the product variant content type2try {3 await managementClient.contentType.get({4 contentTypeId: "productVariant",5 })6} catch (error) {7 const productVariantContentType = await managementClient.contentType.createWithId({8 contentTypeId: "productVariant",9 }, {10 name: "Product Variant",11 description: "Product variant content type synced from Medusa",12 displayField: "title",13 fields: [14 {15 id: "title",16 name: "Title",17 type: "Symbol",18 required: true,19 localized: true,20 },21 {22 id: "product",23 name: "Product",24 type: "Link",25 required: true,26 localized: false,27 validations: [28 {29 linkContentType: ["product"],30 },31 ],32 disabled: false,33 omitted: false,34 linkType: "Entry",35 },36 {37 id: "medusaId",38 name: "Medusa ID",39 type: "Symbol",40 required: true,41 localized: false,42 },43 {44 id: "productOptionValues",45 name: "Product Option Values",46 type: "Array",47 localized: false,48 required: false,49 items: {50 type: "Link",51 validations: [52 {53 linkContentType: ["productOptionValue"],54 },55 ],56 linkType: "Entry",57 },58 disabled: false,59 omitted: false,60 },61 ],62 })63 64 await managementClient.contentType.publish({65 contentTypeId: "productVariant",66 }, productVariantContentType)67}68 69// TODO create product option content type
In the above snippet, you create the productVariant content type with the following fields:
title: The product variant's title, which is a localized field.product: References theproductcontent type, which is the product that the variant belongs to.medusaId: The product variant's ID in Medusa, which is a non-localized field. You'll store in this field the ID of the variant in Medusa.productOptionValues: The product variant's option values, which is an array that references content of theproductOptionValuecontent type.
Then, you'll create the productOption content type that represents a product's option, like size or color. Replace the new TODO with the following:
1// Try to create the product option content type2try {3 await managementClient.contentType.get({4 contentTypeId: "productOption",5 })6} catch (error) {7 const productOptionContentType = await managementClient.contentType.createWithId({8 contentTypeId: "productOption",9 }, {10 name: "Product Option",11 description: "Product option content type synced from Medusa",12 displayField: "title",13 fields: [14 {15 id: "title",16 name: "Title",17 type: "Symbol",18 required: true,19 localized: true,20 },21 {22 id: "product",23 name: "Product",24 type: "Link",25 required: true,26 localized: false,27 validations: [28 {29 linkContentType: ["product"],30 },31 ],32 disabled: false,33 omitted: false,34 linkType: "Entry",35 },36 {37 id: "medusaId",38 name: "Medusa ID",39 type: "Symbol",40 required: true,41 localized: false,42 },43 {44 id: "values",45 name: "Values",46 type: "Array",47 required: false,48 localized: false,49 items: {50 type: "Link",51 validations: [52 {53 linkContentType: ["productOptionValue"],54 },55 ],56 linkType: "Entry",57 },58 disabled: false,59 omitted: false,60 },61 ],62 })63 64 await managementClient.contentType.publish({65 contentTypeId: "productOption",66 }, productOptionContentType)67}68 69// TODO create product option value content type
In the above snippet, you create the productOption content type with the following fields:
title: The product option's title, which is a localized field.product: References theproductcontent type, which is the product that the option belongs to.medusaId: The product option's ID in Medusa, which is a non-localized field. You'll store in this field the ID of the option in Medusa.values: The product option's values, which is an array that references content of theproductOptionValuecontent type.
Finally, you'll create the productOptionValue content type that represents a product's option value, like "red" or "blue" for the color option. A variant references option values.
To create the option value content type, replace the new TODO with the following:
1// Try to create the product option value content type2try {3 await managementClient.contentType.get({4 contentTypeId: "productOptionValue",5 })6} catch (error) {7 const productOptionValueContentType = await managementClient.contentType.createWithId({8 contentTypeId: "productOptionValue",9 }, {10 name: "Product Option Value",11 description: "Product option value content type synced from Medusa",12 displayField: "value",13 fields: [14 {15 id: "value",16 name: "Value",17 type: "Symbol",18 required: true,19 localized: true,20 },21 {22 id: "medusaId",23 name: "Medusa ID",24 type: "Symbol",25 required: true,26 localized: false,27 },28 ],29})30 31await managementClient.contentType.publish({32 contentTypeId: "productOptionValue",33 }, productOptionValueContentType)34}35 36// TODO register clients in container
In the above snippet, you create the productOptionValue content type with the following fields:
value: The product option value, which is a localized field.medusaId: The product option value's ID in Medusa, which is a non-localized field. You'll store in this field the ID of the option value in Medusa.
You've now created all the necessary content types to localize products.
Register Clients in the Container#
The last step in the loader is to register the Contentful management and delivery clients in the module's container. This will allow you to resolve and use them in the module's service, which you'll create next.
To register resources in the container, you can use its register method, which accepts an object containing key-value pairs. The keys are the names of the resources in the container, and the values are the resources themselves.
To register the management and delivery clients, replace the last TODO in the loader with the following:
Now, you can resolve the management and delivery clients from the module's container using the keys contentfulManagementClient and contentfulDeliveryClient, respectively.
Create Service#
You define a module's functionality in a service. A service is a TypeScript or JavaScript class that the module exports. In the service's methods, you can connect to the database, which is useful if your module defines tables in the database, or perform actions with a third-party service.
In this section, you'll create the Contentful Module's service that can be used to retrieve content from Contentful, create content, and more.
To create the service, create the file src/modules/contenful/service.ts with the following content:
1import { ModuleOptions } from "./loader/create-content-models"2import { PlainClientAPI } from "contentful-management"3 4type InjectedDependencies = {5 contentfulManagementClient: PlainClientAPI;6 contentfulDeliveryClient: any;7}8 9export default class ContentfulModuleService {10 private managementClient: PlainClientAPI11 private deliveryClient: any12 private options: ModuleOptions13 14 constructor(15 { 16 contentfulManagementClient, 17 contentfulDeliveryClient,18 }: InjectedDependencies, 19 options: ModuleOptions20 ) {21 this.managementClient = contentfulManagementClient22 this.deliveryClient = contentfulDeliveryClient23 this.options = {24 ...options,25 default_locale: options.default_locale || "en-US",26 }27 }28 29 // TODO add methods30}
You export a class that will be the Contentful Module's main service. In the class, you define properties for the Contentful clients and options passed to the module.
You also add a constructor to the class. A service's constructor accepts the following params:
- The module's container, which you can use to resolve resources. You use it to resolve the Contentful clients you previously registered in the loader.
- The options passed to the module.
In the constructor, you assign the clients and options to the class properties. You also set the default locale to en-US if it's not provided in the module's options.
As you implement the syncing and content retrieval features later, you'll add the necessary methods for them.
Export Module Definition#
The final piece to a module is its definition, which you export in an index.ts file at the module's root directory. This definition tells Medusa the name of the module, its service, and optionally its loaders.
To create the module's definition, create the file src/modules/contentful/index.ts with the following content:
1import { Module } from "@medusajs/framework/utils"2import ContentfulModuleService from "./service"3import createContentModelsLoader from "./loader/create-content-models"4 5export const CONTENTFUL_MODULE = "contentful"6 7export default Module(CONTENTFUL_MODULE, {8 service: ContentfulModuleService,9 loaders: [10 createContentModelsLoader,11 ],12})
You use Module from the Modules SDK to create the module's definition. It accepts two parameters:
- The module's name, which is
contentful. - An object with a required property
serviceindicating the module's service. You also pass the loader you created to ensure it's executed when the application starts.
Aside from the module definition, you export the module's name as CONTENTFUL_MODULE so you can reference it later.
Add Module to Medusa's Configurations#
Once you finish building the module, add it to Medusa's configurations to start using it.
In medusa-config.ts, add a modules property and pass an array with your custom module:
1module.exports = defineConfig({2 // ...3 modules: [4 {5 resolve: "./src/modules/contentful",6 options: {7 management_access_token: process.env.CONTENTFUL_MANAGEMNT_ACCESS_TOKEN,8 delivery_token: process.env.CONTENTFUL_DELIVERY_TOKEN,9 space_id: process.env.CONTENTFUL_SPACE_ID,10 environment: process.env.CONTENTFUL_ENVIRONMENT,11 default_locale: "en-US",12 },13 },14 ],15})
Each object in the modules array has a resolve property, whose value is either a path to the module's directory, or an npm package's name.
You also pass an options property with the module's options, including the Contentful's tokens for the management and delivery APIs, the Contentful's space ID, environment, and default locale.
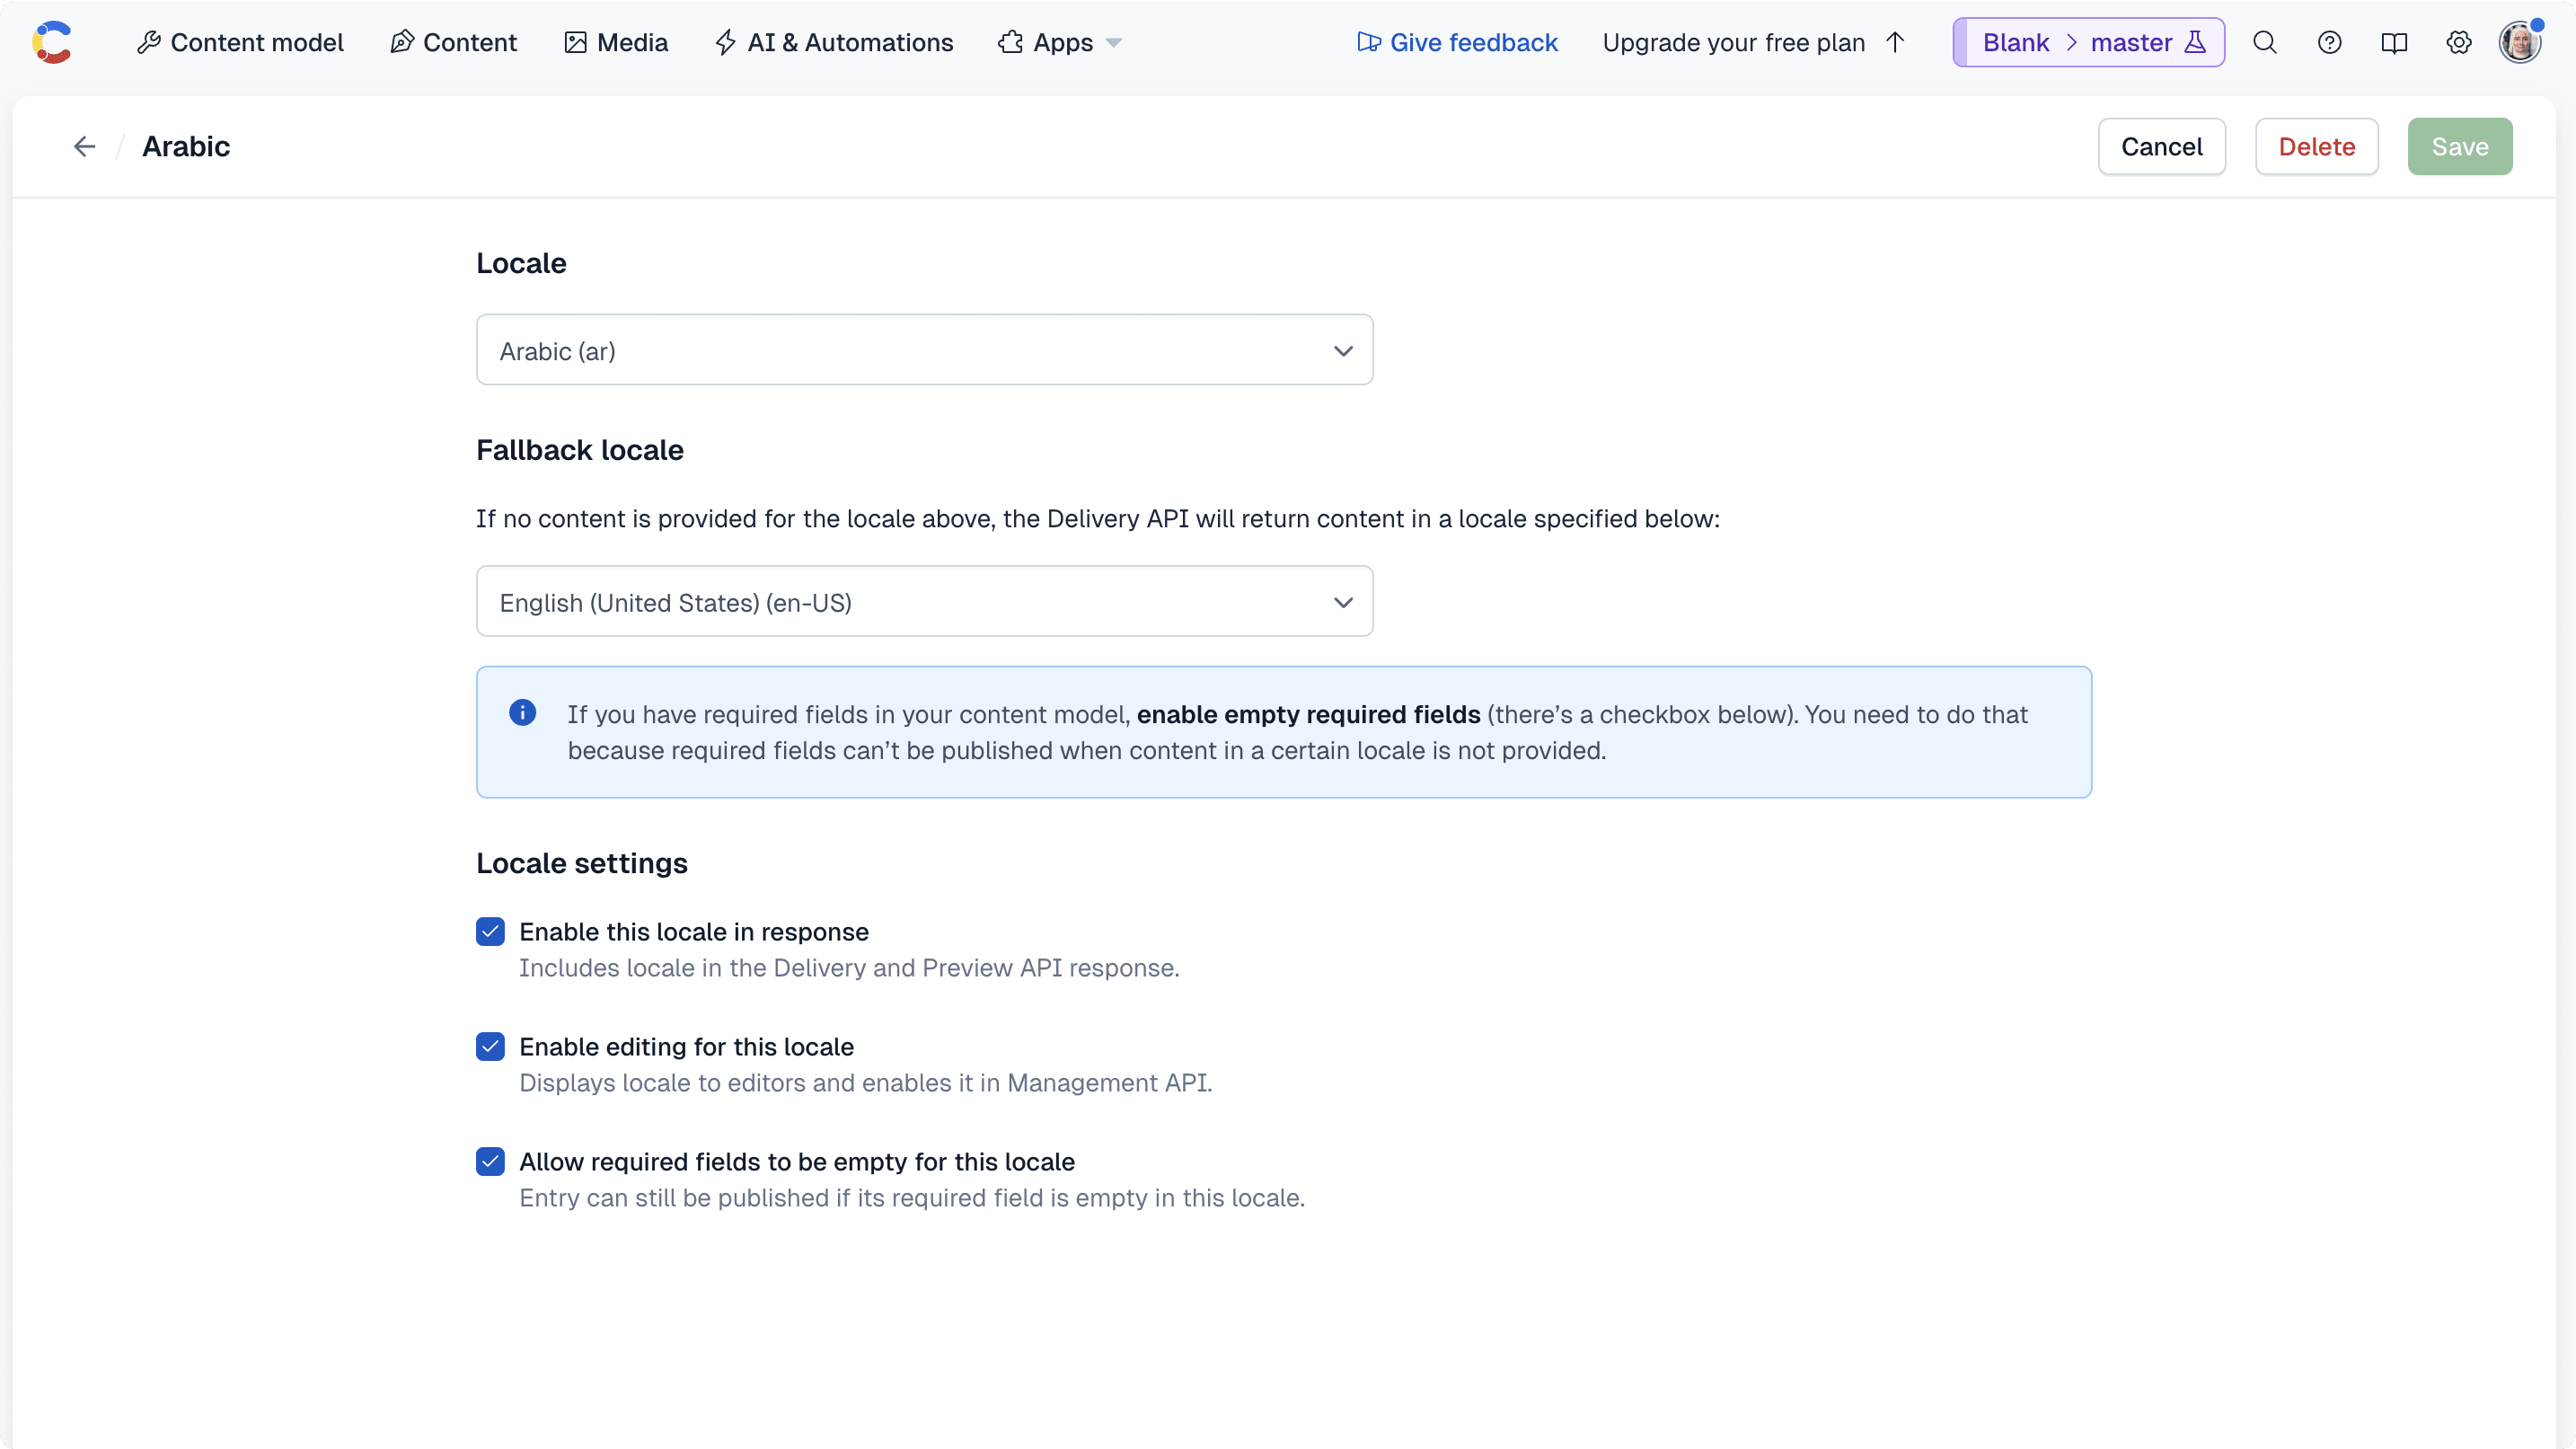
Note about Locales#
By default, your Contentful space will have one locale (for example, en-US). You can add locales as explained in the Contentful documentation.
When you add a locale, make sure to:
- Set the fallback locale to the default locale (for example,
en-US). This ensure that values are retrieved in the default locale if values for the requested locale are not available. - Allow the required fields to be empty for the locale. Otherwise, you'll have to specify the values for the localized fields in each locale when you create the products later.
Add Environment Variables#
Before you can start using the Contentful Module, you need to add the necessary environment variables used in the module's options.
Add the following environment variables to your .env file:
Where:
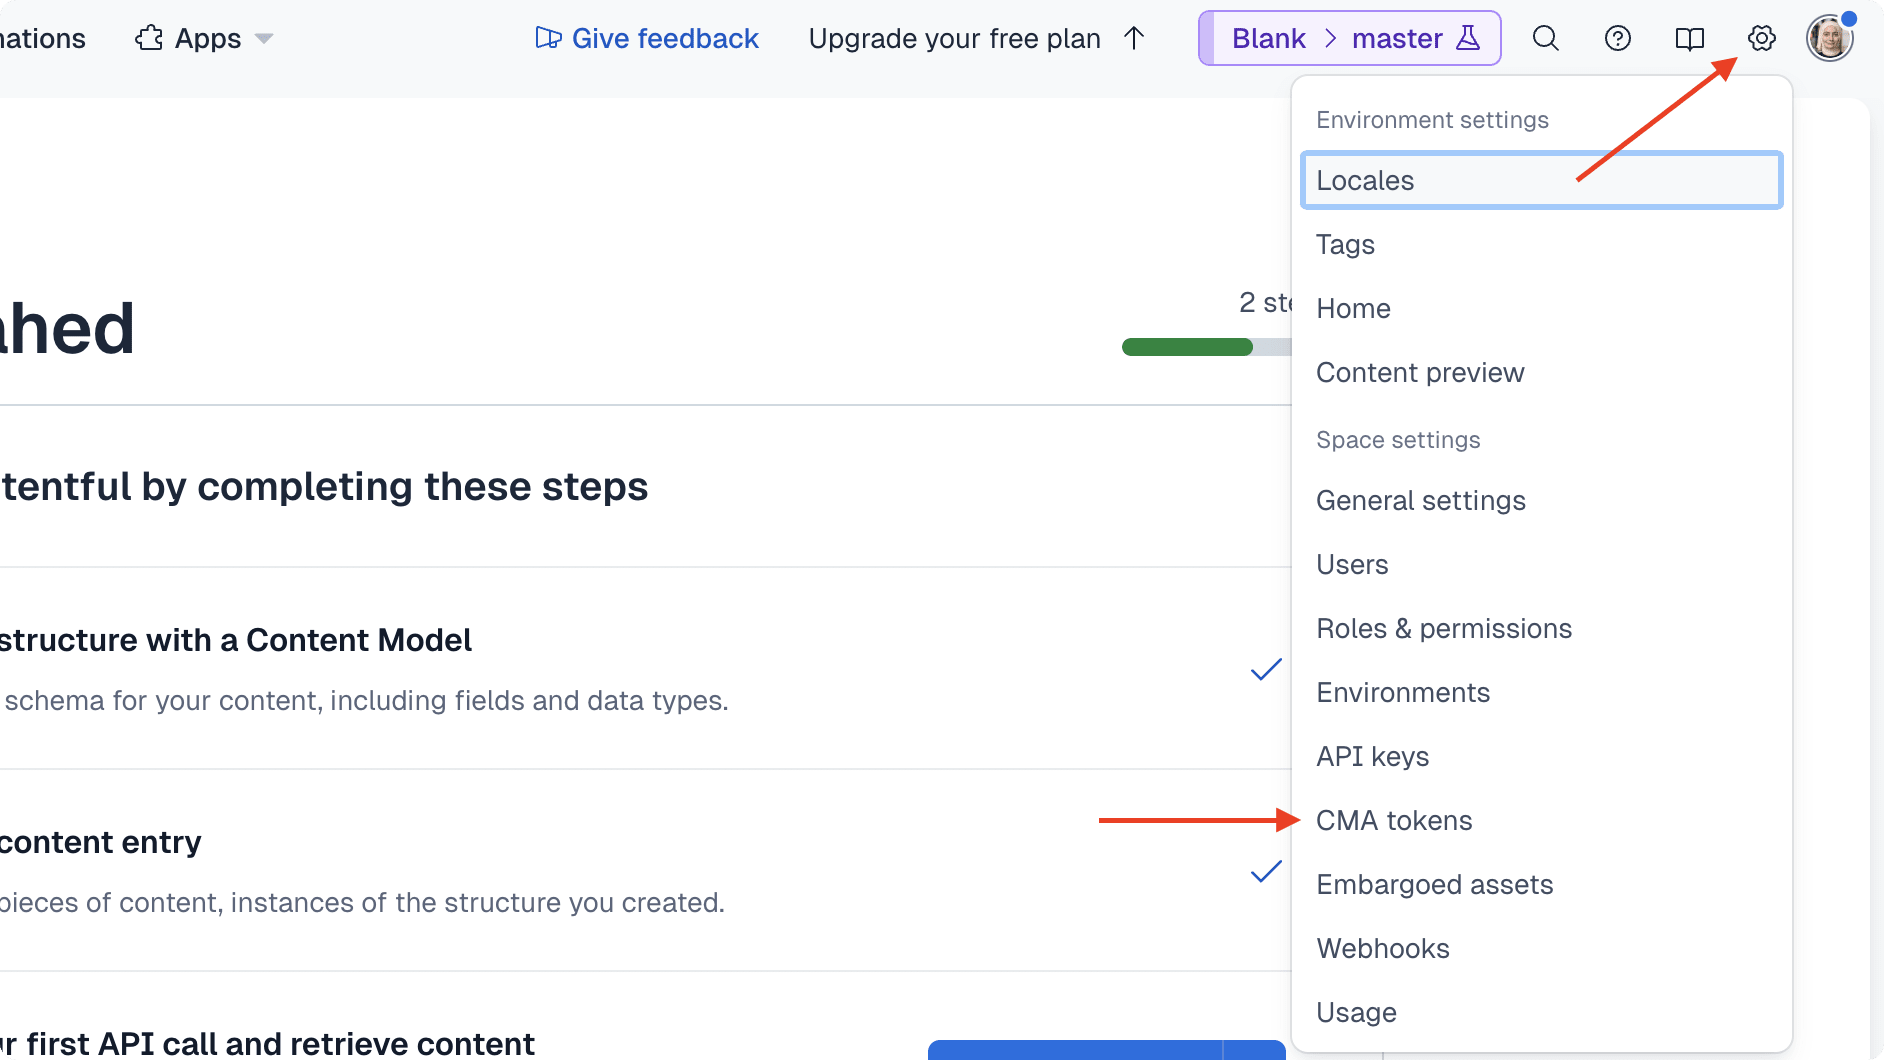
CONTENTFUL_MANAGEMNT_ACCESS_TOKEN: The Contentful management API access token. To create it on the Contentful dashboard:- Click on the cog icon at the top right, then choose "CMA tokens" from the dropdown.
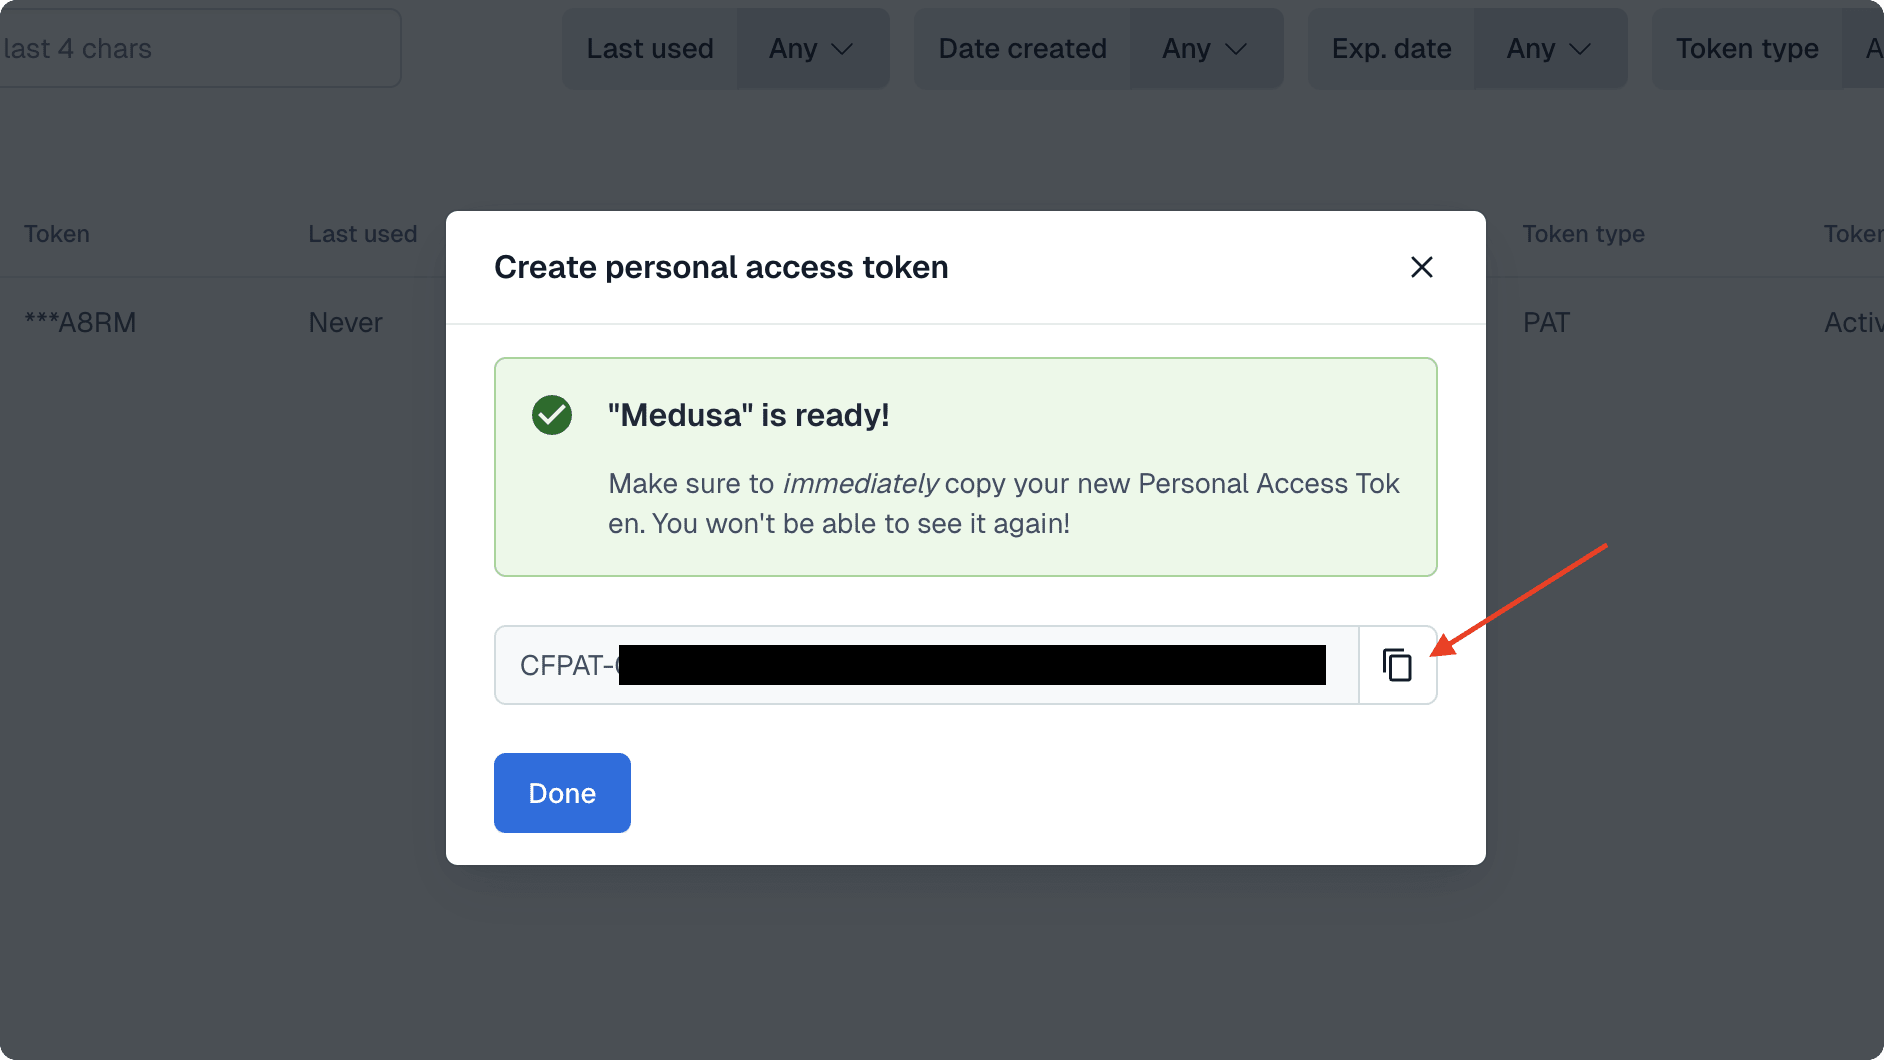
- In the CMA tokens page, click on the "Create personal access token" button.
- In the window that pops up, enter a name for the token, and choose an expiry date. Once you're done, click the Generate button.
- The token is generated and shown in the pop-up. Make sure to copy it and use it in the
.envfile, as you can't access it again.
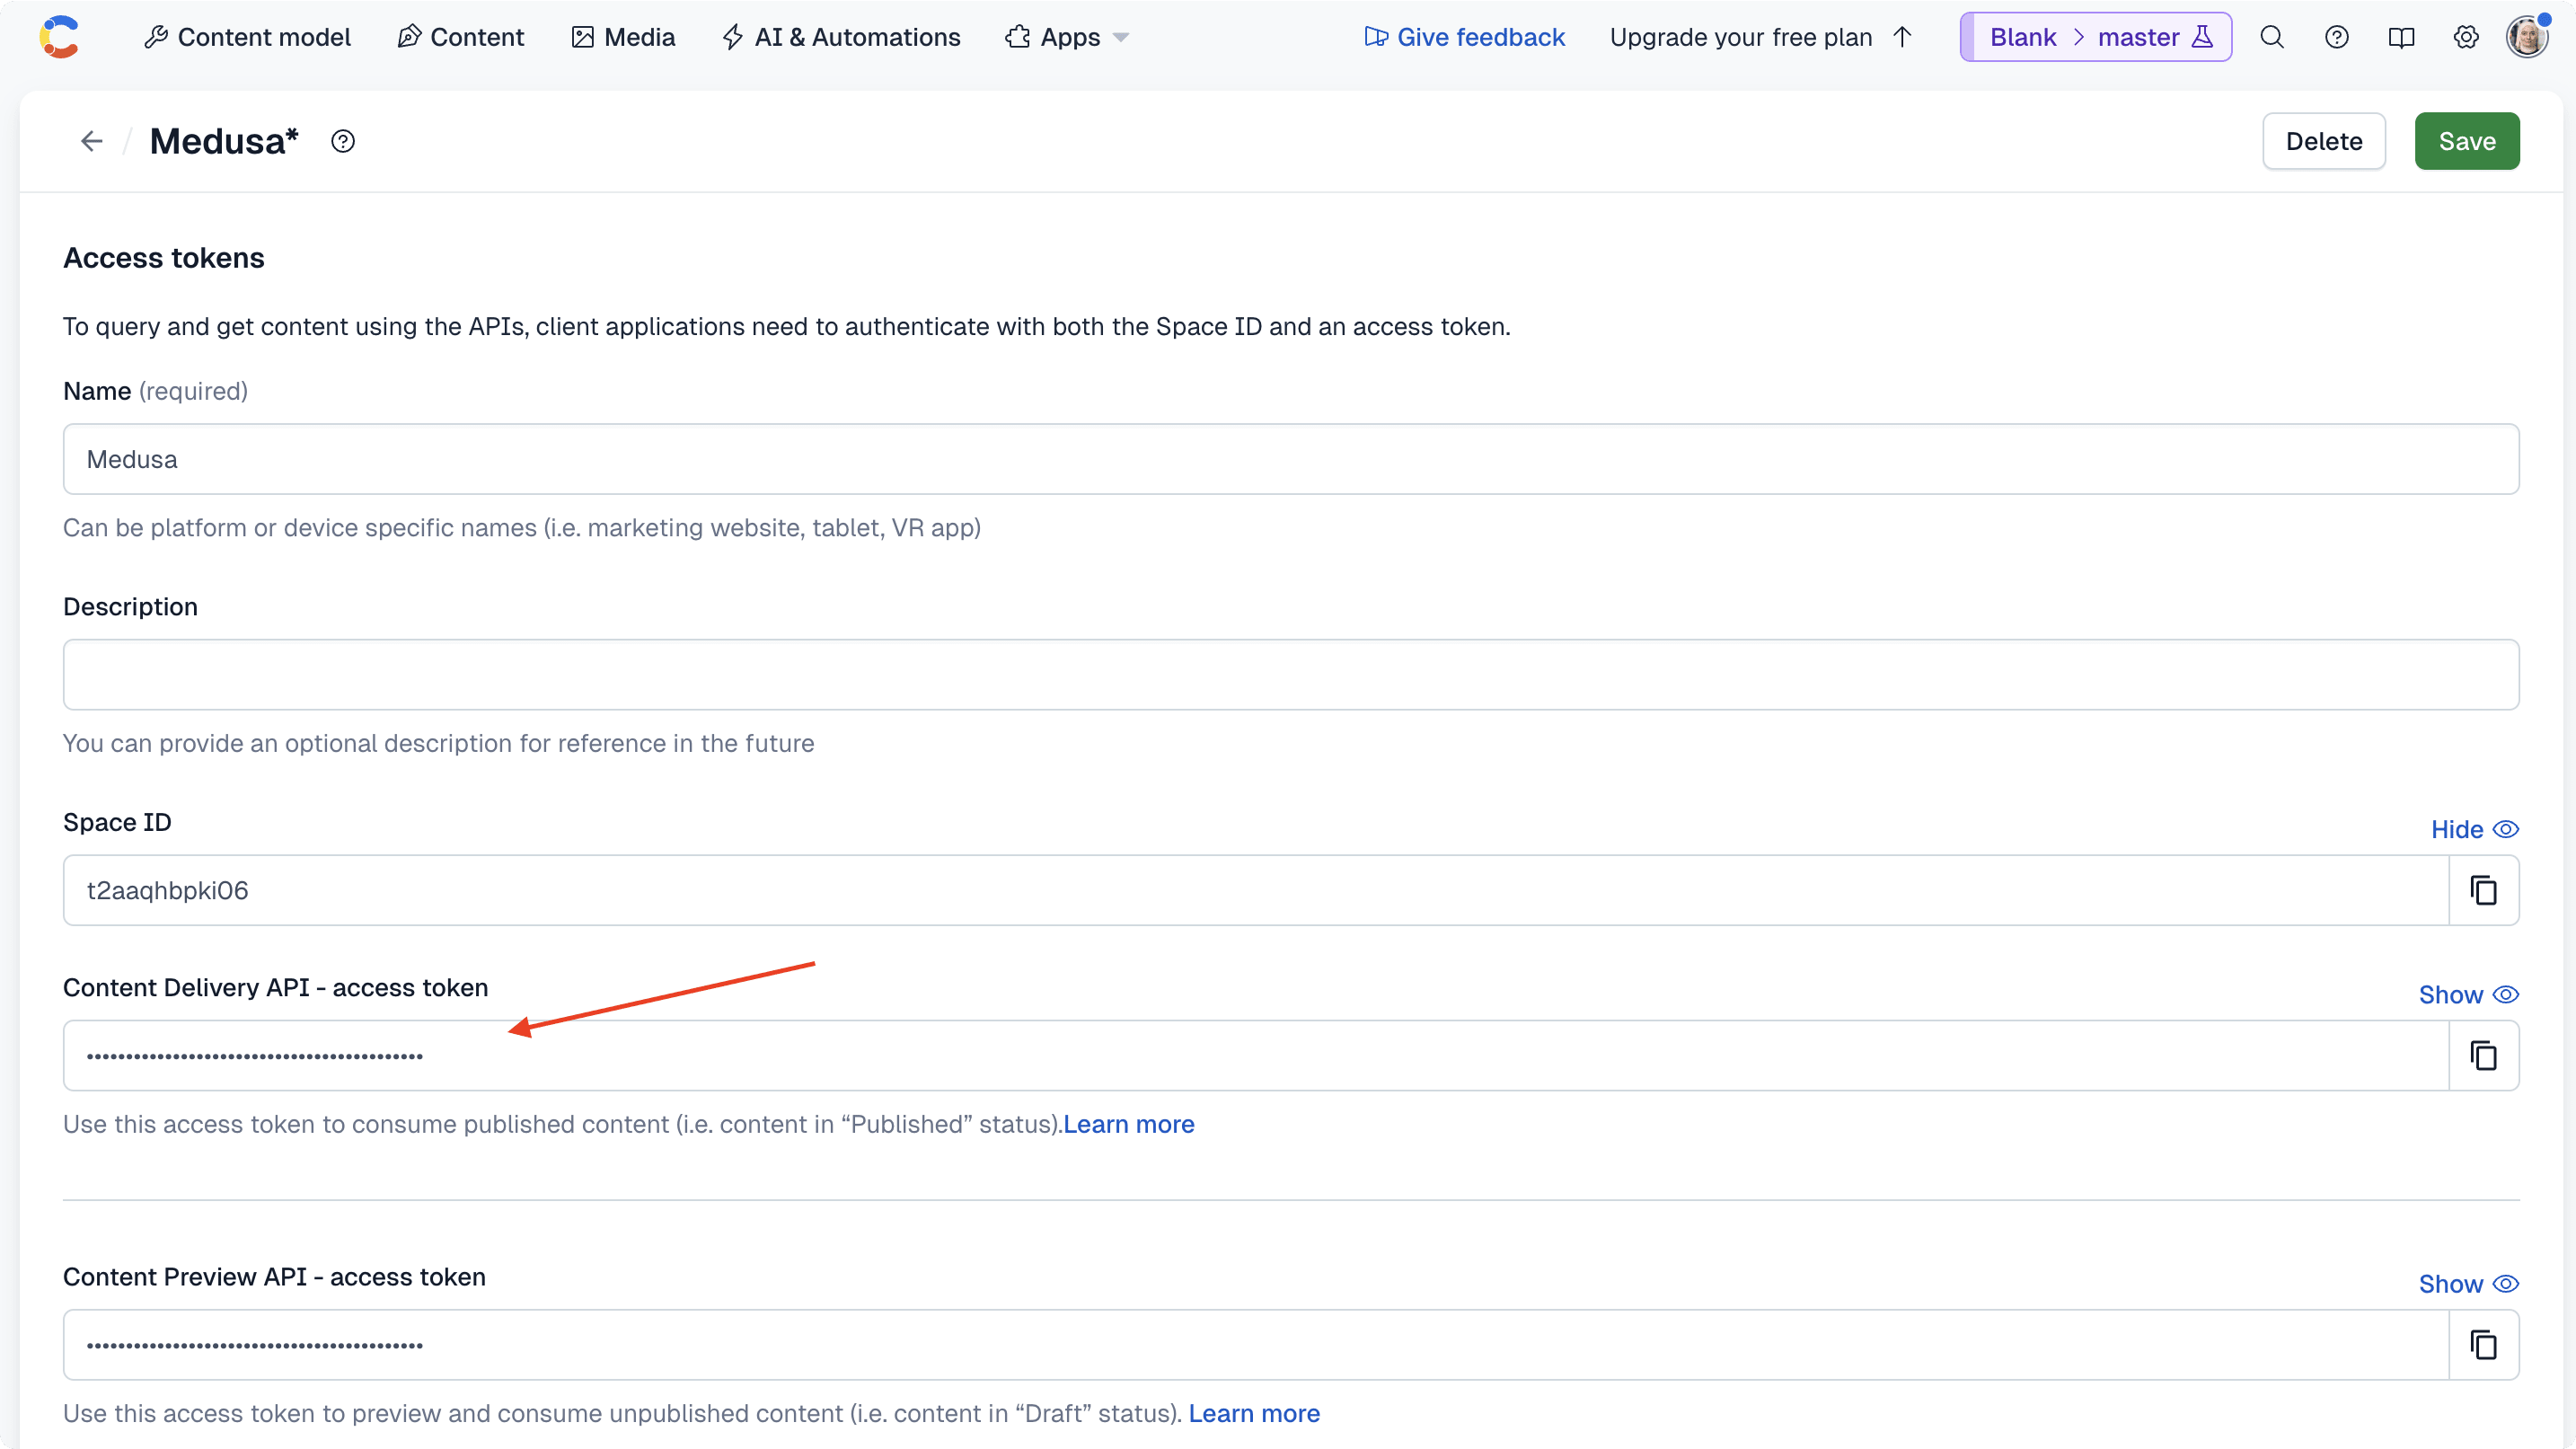
CONTENTFUL_DELIVERY_TOKEN: An API token that you can use with the delivery API. To create it on the Contentful dashboard:- Click on the cog icon at the top right, then choose "API keys" from the dropdown.
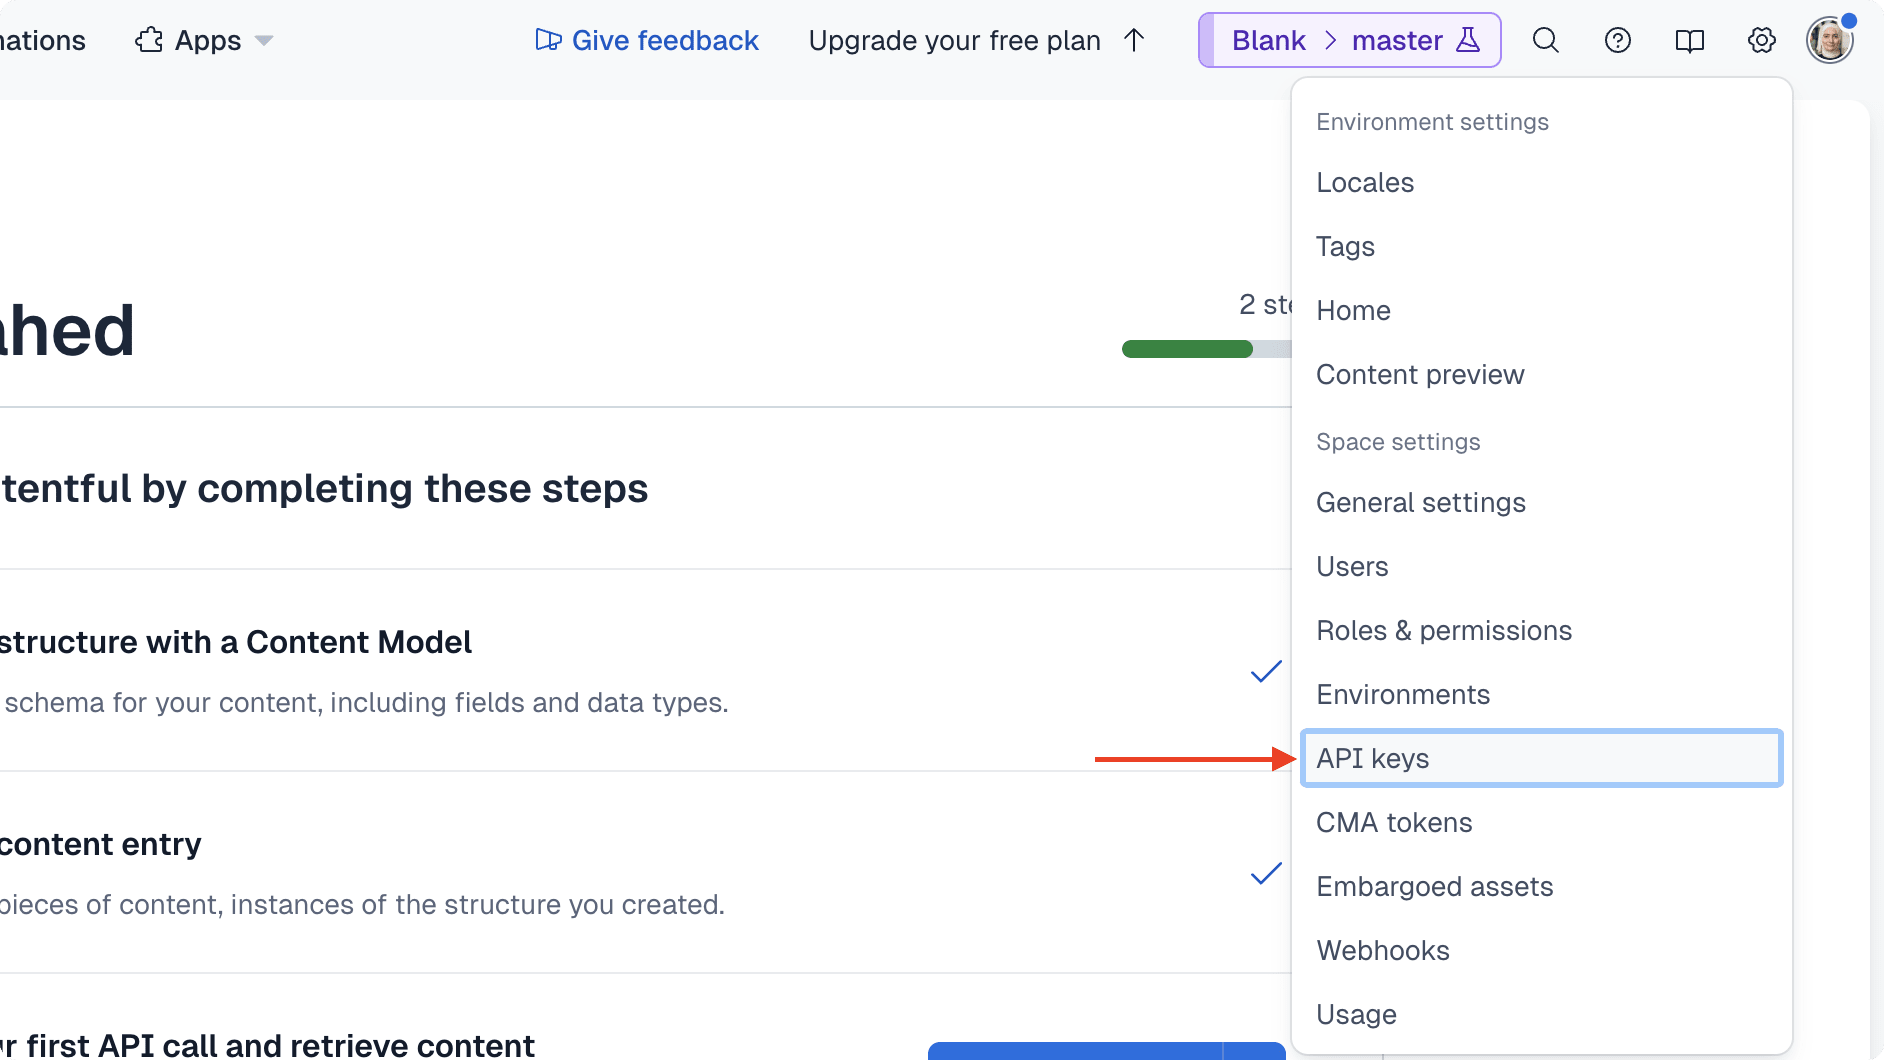
- In the APIs page, click on the "Add API key" button.
- In the window that pops up, enter a name for the token, then click the Add API Key button.
- This will create an API key and opens its page. On its page, copy the token for the "Content Delivery API" and use it as the value for
CONTENTFUL_DELIVERY_TOKEN.
CONTENTFUL_SPACE_ID: The ID of your Contentful space. You can copy this from the dashboard's URL which is of the formathttps://app.contentful.com/spaces/{space_id}/....CONTENTFUL_ENVIRONMENT: The environment to manage and retrieve the content in. By default, you have themasterenvironment which you can use. However, you can use another Contentful environment that you've created.
Your module is now ready for use.
Test the Module#
To test out the module, you'll start the Medusa application, which will run the module's loader.
To start the Medusa application, run the following command:
If the loader ran successfully, you'll see the following message in the terminal:
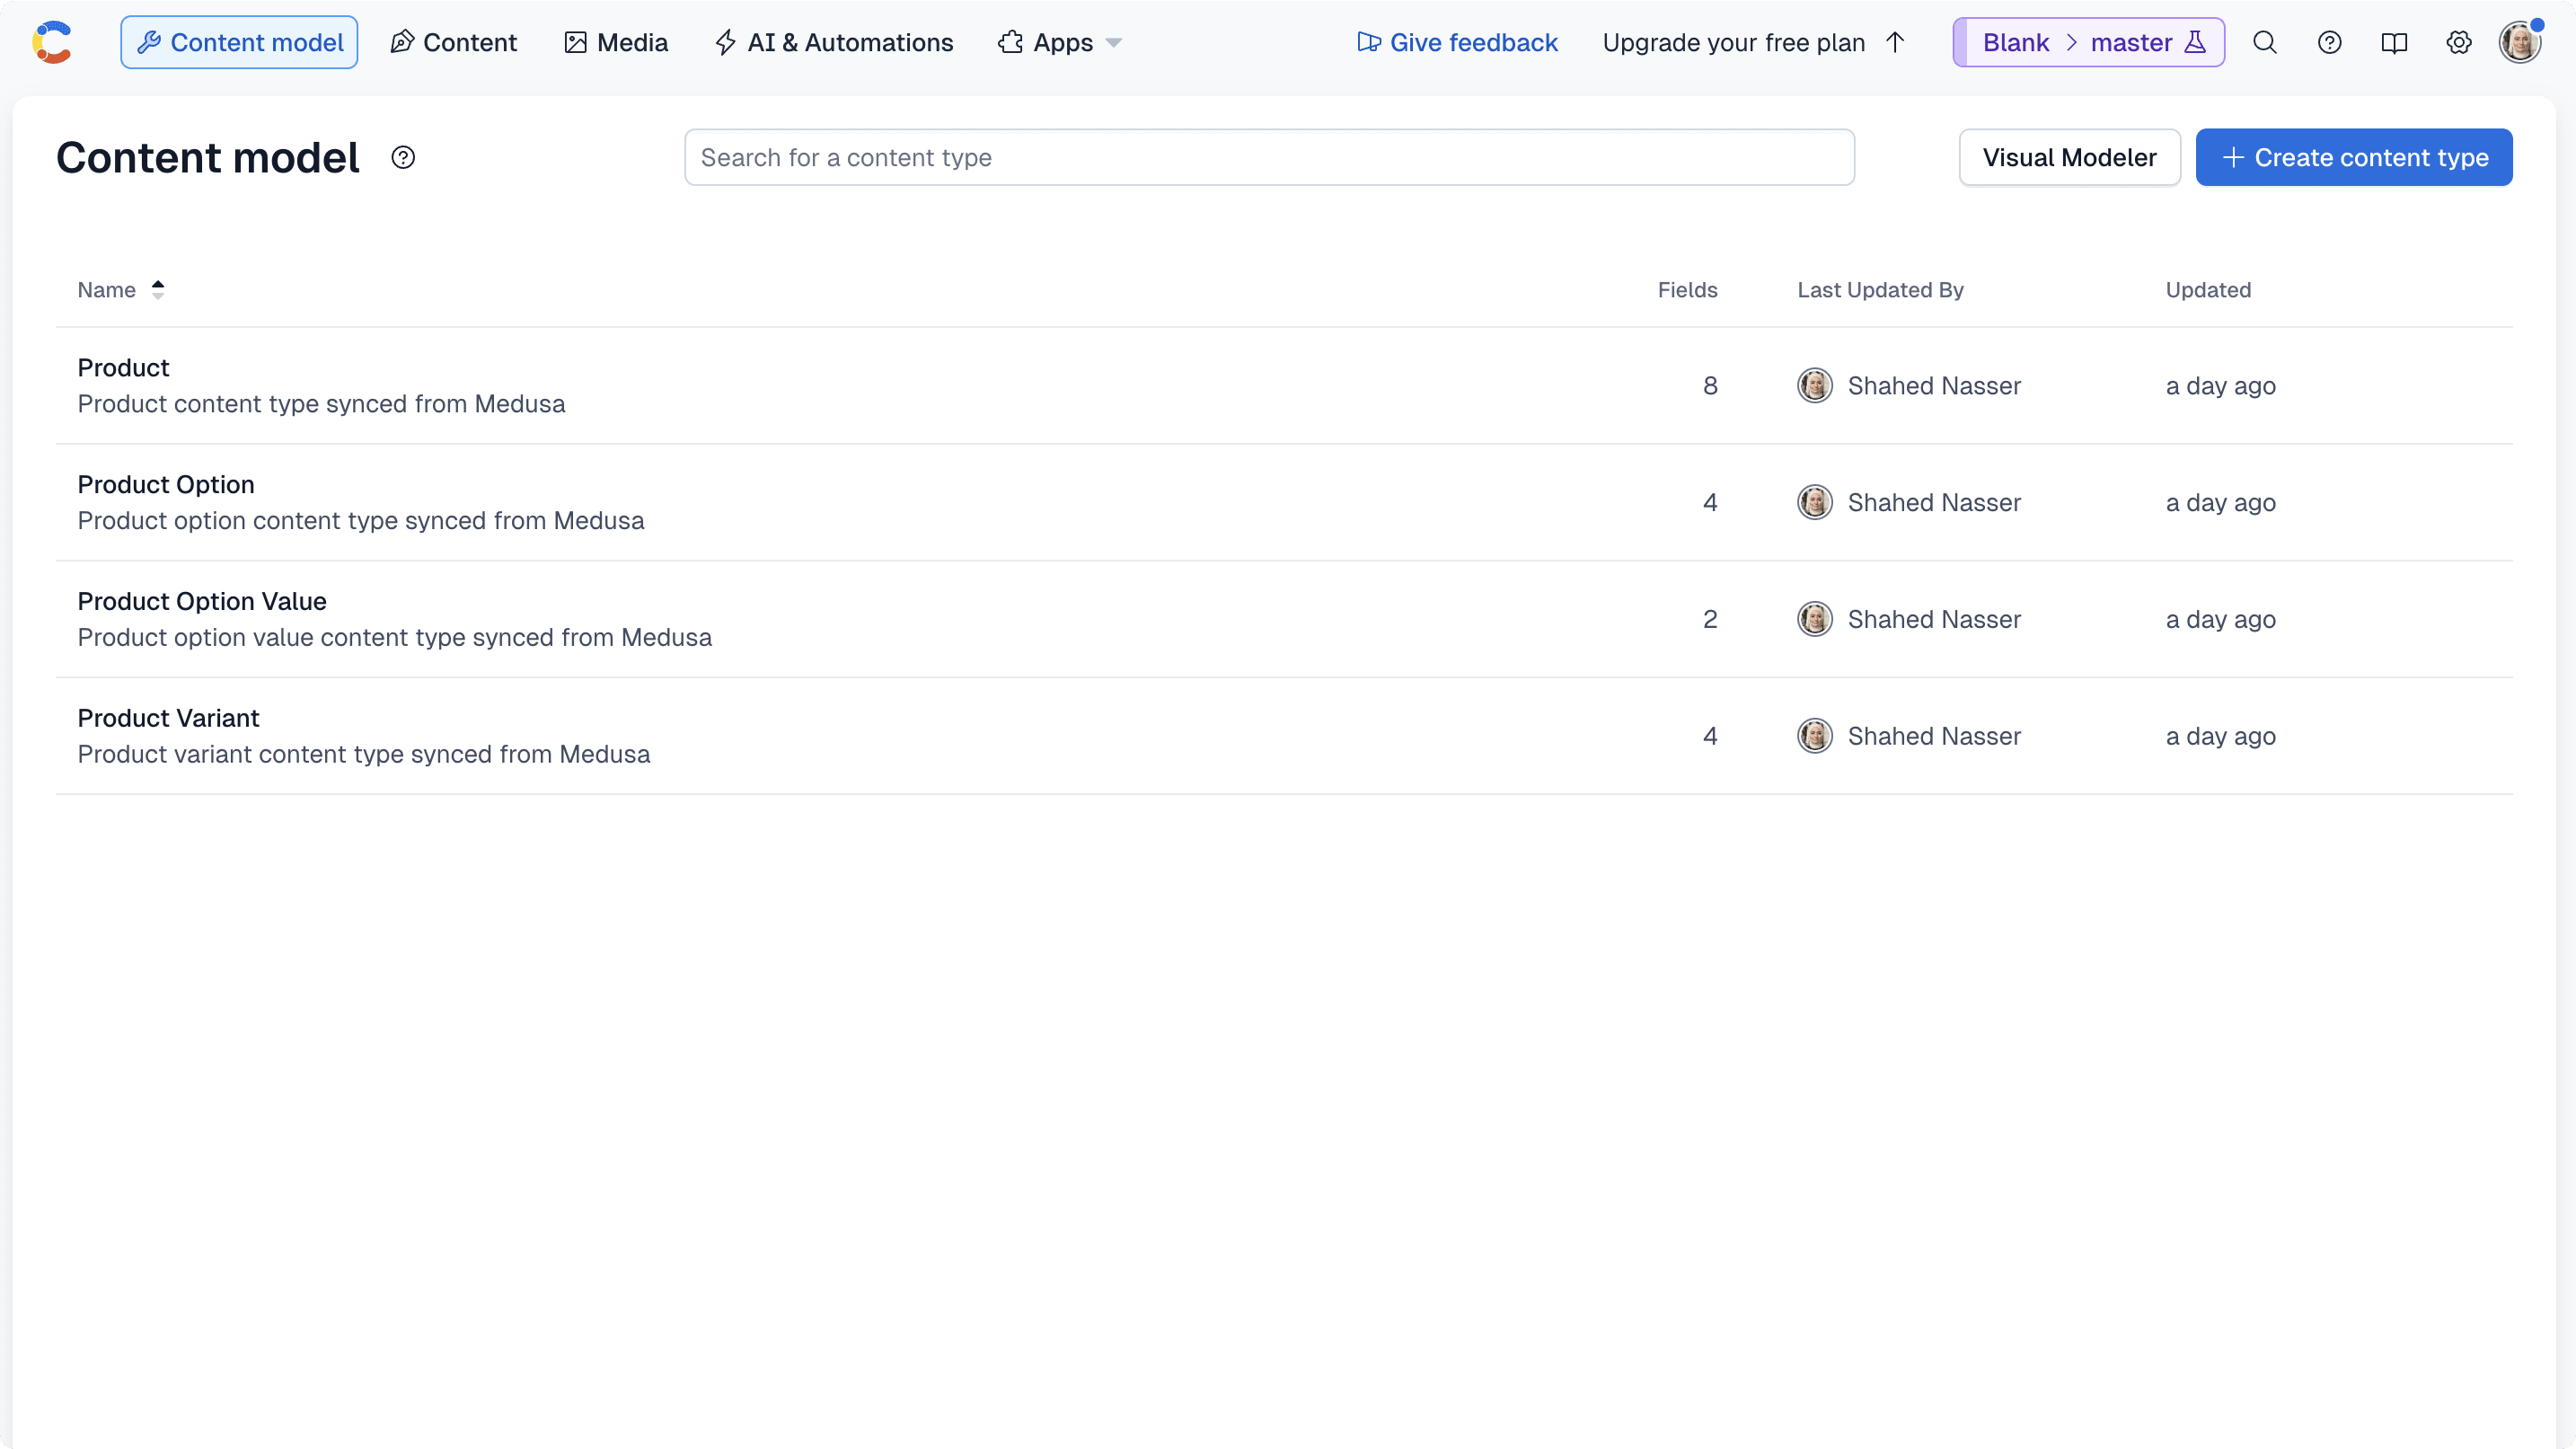
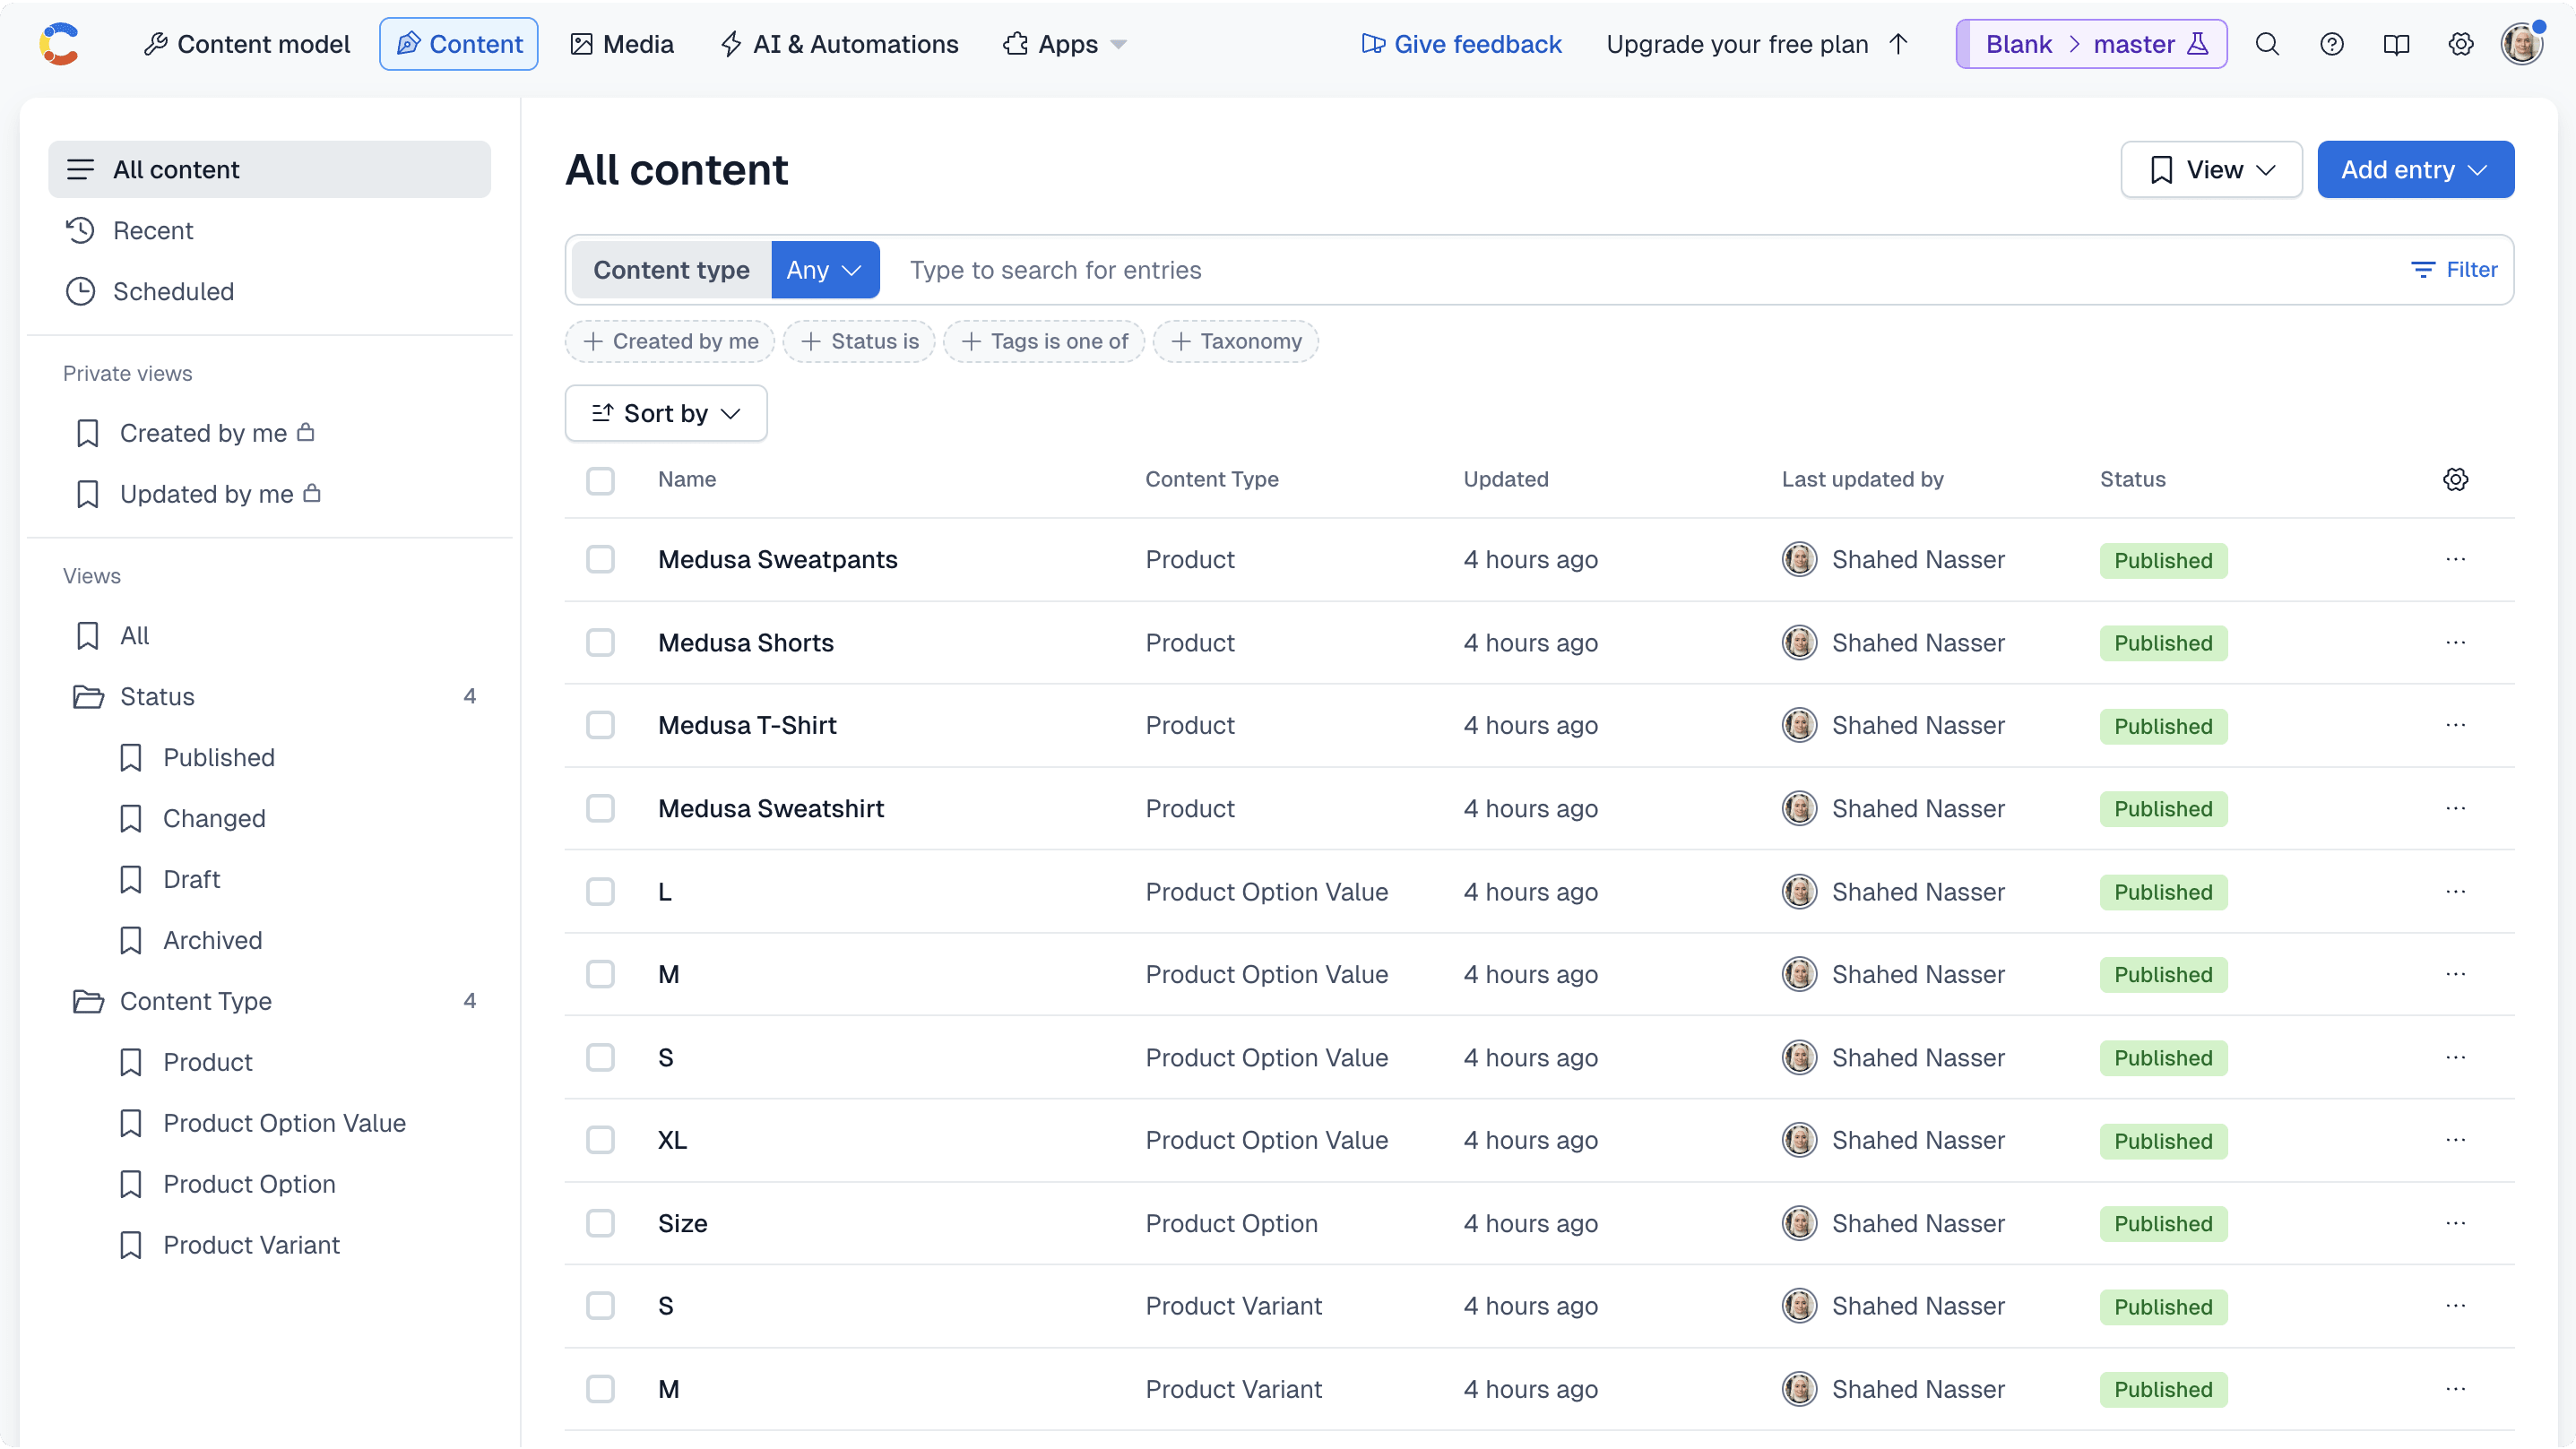
You can also see on the Contentful dashboard that the content types were created. To view them, go to the Content Model page.
Step 3: Create Products in Contentful#
Now that you have the Contentful Module ready for use, you can start creating products in Contentful.
In this step, you'll implement the logic to create products in Contentful. Later, you'll execute it when:
- A product is created in Medusa.
- The admin user triggers a sync manually.
Add Methods to Contentful Module Service#
To create products in Contentful, you need to add the necessary methods in the Contentful Module's service. Then, you can use these methods later when building the creation flow.
To create a product in Contentful, you'll need three methods: One to create the product's variants, another to create the product's options and values, and a third to create the product.
In the service at src/modules/contentful/service.ts, start by adding the method to create the product's variants:
1// imports...2import { ProductVariantDTO } from "@medusajs/framework/types"3import { EntryProps } from "contentful-management"4 5export default class ContentfulModuleService {6 // ...7 8 private async createProductVariant(9 variants: ProductVariantDTO[],10 productEntry: EntryProps11 ) {12 for (const variant of variants) {13 await this.managementClient.entry.createWithId(14 {15 contentTypeId: "productVariant",16 entryId: variant.id,17 },18 {19 fields: {20 medusaId: {21 [this.options.default_locale!]: variant.id,22 },23 title: {24 [this.options.default_locale!]: variant.title,25 },26 product: {27 [this.options.default_locale!]: {28 sys: {29 type: "Link",30 linkType: "Entry",31 id: productEntry.sys.id,32 },33 },34 },35 productOptionValues: {36 [this.options.default_locale!]: variant.options.map((option) => ({37 sys: {38 type: "Link",39 linkType: "Entry",40 id: option.id,41 },42 })),43 },44 },45 }46 )47 }48 }49}
You define a private method createProductVariant that accepts two parameters:
- The product's variants to create in Contentful.
- The product's entry in Contentful.
In the method, you iterate over the product's variants and create a new entry in Contentful for each variant. You set the fields based on the product variant content type you created earlier.
For each field, you specify the value for the default locale. In the Contentful dashboard, you can manage the values for other locales.
Next, add the method to create the product's options and values:
1// other imports...2import { ProductOptionDTO } from "@medusajs/framework/types"3 4export default class ContentfulModuleService {5 // ...6 private async createProductOption(7 options: ProductOptionDTO[],8 productEntry: EntryProps9 ) {10 for (const option of options) {11 const valueIds: {12 sys: {13 type: "Link",14 linkType: "Entry",15 id: string16 }17 }[] = []18 for (const value of option.values) {19 await this.managementClient.entry.createWithId(20 {21 contentTypeId: "productOptionValue",22 entryId: value.id,23 },24 {25 fields: {26 value: {27 [this.options.default_locale!]: value.value,28 },29 medusaId: {30 [this.options.default_locale!]: value.id,31 },32 },33 }34 )35 valueIds.push({36 sys: {37 type: "Link",38 linkType: "Entry",39 id: value.id,40 },41 })42 }43 await this.managementClient.entry.createWithId(44 {45 contentTypeId: "productOption",46 entryId: option.id,47 },48 {49 fields: {50 medusaId: {51 [this.options.default_locale!]: option.id,52 },53 title: {54 [this.options.default_locale!]: option.title,55 },56 product: {57 [this.options.default_locale!]: {58 sys: {59 type: "Link",60 linkType: "Entry",61 id: productEntry.sys.id,62 },63 },64 },65 values: {66 [this.options.default_locale!]: valueIds,67 },68 },69 }70 )71 }72 }73}
You define a private method createProductOption that accepts two parameters:
- The product's options, which is an array of objects.
- The product's entry in Contentful, which is an object.
In the method, you iterate over the product's options and create entries for each of its values. Then, you create an entry for the option, and reference the values you created in Contentful. You set the fields based on the option and value content types you created earlier.
Finally, add the method to create the product:
1// other imports...2import { ProductDTO } from "@medusajs/framework/types"3 4export default class ContentfulModuleService {5 // ...6 async createProduct(7 product: ProductDTO8 ) {9 try {10 // check if product already exists11 const productEntry = await this.managementClient.entry.get({12 environmentId: this.options.environment,13 entryId: product.id,14 })15 16 return productEntry17 } catch(e) {}18 19 // Create product entry in Contentful20 const productEntry = await this.managementClient.entry.createWithId(21 {22 contentTypeId: "product",23 entryId: product.id,24 },25 {26 fields: {27 medusaId: {28 [this.options.default_locale!]: product.id,29 },30 title: {31 [this.options.default_locale!]: product.title,32 },33 description: product.description ? {34 [this.options.default_locale!]: {35 nodeType: "document",36 data: {},37 content: [38 {39 nodeType: "paragraph",40 data: {},41 content: [42 {43 nodeType: "text",44 value: product.description,45 marks: [],46 data: {},47 },48 ],49 },50 ],51 },52 } : undefined,53 subtitle: product.subtitle ? {54 [this.options.default_locale!]: product.subtitle,55 } : undefined,56 handle: product.handle ? {57 [this.options.default_locale!]: product.handle,58 } : undefined,59 },60 }61 )62 63 // Create options if they exist64 if (product.options?.length) {65 await this.createProductOption(product.options, productEntry)66 }67 68 // Create variants if they exist69 if (product.variants?.length) {70 await this.createProductVariant(product.variants, productEntry)71 }72 73 // update product entry with variants and options74 await this.managementClient.entry.update(75 {76 entryId: productEntry.sys.id,77 },78 {79 sys: productEntry.sys,80 fields: {81 ...productEntry.fields,82 productVariants: {83 [this.options.default_locale!]: product.variants?.map((variant) => ({84 sys: {85 type: "Link",86 linkType: "Entry",87 id: variant.id,88 },89 })),90 },91 productOptions: {92 [this.options.default_locale!]: product.options?.map((option) => ({93 sys: {94 type: "Link",95 linkType: "Entry",96 id: option.id,97 },98 })),99 },100 },101 }102 )103 104 return productEntry105 }106}
You define a public method createProduct that accepts a product object as a parameter.
In the method, you first check if the product already exists in Contentful. If it does, you return the existing product entry. Otherwise, you create a new product entry with the fields based on the product content type you created earlier.
Next, you create entries for the product's options and variants using the methods you created earlier.
Finally, you update the product entry to reference the variants and options you created.
You now have all the methods to create products in Contentful. You'll also need one last method to delete a product in Contentful. This is useful when you implement the rollback mechanism in the flow that creates the products.
Add the following method to the service:
1// other imports...2import { MedusaError } from "@medusajs/framework/utils"3 4export default class ContentfulModuleService {5 // ...6 async deleteProduct(productId: string) {7 try {8 // Get the product entry9 const productEntry = await this.managementClient.entry.get({10 environmentId: this.options.environment,11 entryId: productId,12 })13 14 if (!productEntry) {15 return16 }17 18 // Delete the product entry19 await this.managementClient.entry.unpublish({20 environmentId: this.options.environment,21 entryId: productId,22 })23 24 await this.managementClient.entry.delete({25 environmentId: this.options.environment,26 entryId: productId,27 })28 29 // Delete the product variant entries30 for (const variant of productEntry.fields.productVariants[this.options.default_locale!]) {31 await this.managementClient.entry.unpublish({32 environmentId: this.options.environment,33 entryId: variant.sys.id,34 })35 36 await this.managementClient.entry.delete({37 environmentId: this.options.environment,38 entryId: variant.sys.id,39 })40 }41 42 // Delete the product options entries and values43 for (const option of productEntry.fields.productOptions[this.options.default_locale!]) {44 for (const value of option.fields.values[this.options.default_locale!]) {45 await this.managementClient.entry.unpublish({46 environmentId: this.options.environment,47 entryId: value.sys.id,48 })49 50 await this.managementClient.entry.delete({51 environmentId: this.options.environment,52 entryId: value.sys.id,53 })54 }55 56 await this.managementClient.entry.unpublish({57 environmentId: this.options.environment,58 entryId: option.sys.id,59 })60 61 await this.managementClient.entry.delete({62 environmentId: this.options.environment,63 entryId: option.sys.id,64 })65 }66 } catch (error) {67 throw new MedusaError(68 MedusaError.Types.INVALID_DATA,69 `Failed to delete product from Contentful: ${error.message}`70 )71 }72 }73}
You define a public method deleteProduct that accepts a product ID as a parameter.
In the method, you retrieve the product entry from Contentful with its variants, options, and values. For each entry, you must unpublish and delete it.
You now have all the methods necessary to build the creation flow.
Create Contentful Product Workflow#
To implement the logic that's triggered when a product is created in Medusa, or when the admin user triggers a sync manually, you need to create a workflow.
A workflow is a series of actions, called steps, that complete a task. You construct a workflow like you construct a function, but it's a special function that allows you to track its executions' progress, define roll-back logic, and configure other advanced features.
In this section, you'll create a workflow that creates Medusa products in Contentful using the Contentful Module.
The workflow has the following steps:
View step details
Medusa provides the useQueryGraphStep in its @medusajs/medusa/core-flows package. So, you only need to implement the second step.
createProductsContentfulStep
In the second step, you create the retrieved products in Contentful.
To create the step, create the file src/workflows/steps/create-products-contentful.ts with the following content:
npm run dev or yarn dev command to generate the necessary type definitions, as explained in the Automatically Generated Types guide.1import { ProductDTO } from "@medusajs/framework/types"2import { CONTENTFUL_MODULE } from "../../modules/contentful"3import { createStep, StepResponse } from "@medusajs/framework/workflows-sdk"4import ContentfulModuleService from "../../modules/contentful/service"5import { EntryProps } from "contentful-management"6 7type StepInput = {8 products: ProductDTO[]9}10 11export const createProductsContentfulStep = createStep(12 "create-products-contentful-step",13 async (input: StepInput, { container }) => {14 const contentfulModuleService: ContentfulModuleService = 15 container.resolve(CONTENTFUL_MODULE)16 17 const products: EntryProps[] = []18 19 try {20 for (const product of input.products) {21 products.push(await contentfulModuleService.createProduct(product))22 }23 } catch(e) {24 return StepResponse.permanentFailure(25 `Error creating products in Contentful: ${e.message}`,26 products27 )28 }29 30 return new StepResponse(31 products,32 products33 )34 },35 async (products, { container }) => {36 if (!products) {37 return38 }39 40 const contentfulModuleService: ContentfulModuleService = 41 container.resolve(CONTENTFUL_MODULE)42 43 for (const product of products) {44 await contentfulModuleService.deleteProduct(product.sys.id)45 }46 }47)
You create a step with createStep from the Workflows SDK. It accepts three parameters:
- The step's unique name, which is
create-products-contentful-step. - An async function that receives two parameters:
- The step's input, which is in this case an object holding an array of products to create in Contentful.
- An object that has properties including the Medusa container, which is a registry of Framework and commerce tools that you can access in the step.
- An optional compensation function that undoes the actions performed in the step if an error occurs in the workflow's execution. This mechanism ensures data consistency in your application, especially as you integrate external systems.
In the step function, you resolve the Contentful Module's service from the Medusa container using the name you exported in the module definition's file.
Then, you iterate over the products and create a new entry in Contentful for each product using the createProduct method you created earlier. If the creation of any product fails, you fail the step and pass the created products to the compensation function.
A step function must return a StepResponse instance. The StepResponse constructor accepts two parameters:
- The step's output, which is the product entries created in Contentful.
- Data to pass to the step's compensation function.
The compensation function accepts as a parameter the data passed from the step, and an object containing the Medusa container.
In the compensation function, you iterate over the created product entries and delete them from Contentful using the deleteProduct method you created earlier.
Create the Workflow
Now that you have all the necessary steps, you can create the workflow.
To create the workflow, create the file src/workflows/create-products-contentful.ts with the following content:
1import { createWorkflow, WorkflowResponse } from "@medusajs/framework/workflows-sdk"2import { useQueryGraphStep } from "@medusajs/medusa/core-flows"3import { createProductsContentfulStep } from "./steps/create-products-contentful"4import { ProductDTO } from "@medusajs/framework/types"5 6type WorkflowInput = {7 product_ids: string[]8}9 10export const createProductsContentfulWorkflow = createWorkflow(11 { name: "create-products-contentful-workflow" },12 (input: WorkflowInput) => {13 const { data } = useQueryGraphStep({14 entity: "product",15 fields: [16 "id",17 "title",18 "description",19 "subtitle",20 "status",21 "handle",22 "variants.*",23 "variants.options.*",24 "options.*",25 "options.values.*",26 ],27 filters: {28 id: input.product_ids,29 },30 })31 32 const contentfulProducts = createProductsContentfulStep({33 products: data as unknown as ProductDTO[],34 })35 36 return new WorkflowResponse(contentfulProducts)37 }38)
You create a workflow using createWorkflow from the Workflows SDK. It accepts the workflow's unique name as a first parameter.
It accepts as a second parameter a constructor function, which is the workflow's implementation. The function can accept input, which in this case the product IDs to create in Contentful.
In the workflow's constructor function, you:
- Retrieve the Medusa products using the
useQueryGraphStephelper step. This step uses Medusa's Query tool to retrieve data across modules. You pass it the product IDs to retrieve. - Create the product entries in Contentful using the
createProductsContentfulStepstep.
A workflow must return an instance of WorkflowResponse. The WorkflowResponse constructor accepts the workflow's output as a parameter, which is an object of the product entries created in Contentful.
You now have the workflow that you can execute when a product is created in Medusa, or when the admin user triggers a sync manually.
Step 4: Trigger Sync on Product Creation#
Medusa has an event system that allows you to listen for events, such as product.created, and perform an asynchronous action when the event is emitted.
You listen to events in a subscriber. A subscriber is an asynchronous function that listens to one or more events and performs actions when these events are emitted. A subscriber is useful when syncing data across systems, as the operation can be time-consuming and should be performed in the background.
In this step, you'll create a subscriber that listens to the product.created event and executes the createProductsContentfulWorkflow workflow.
To create a subscriber, create the file src/subscribers/create-product.ts with the following content:
1import {2 type SubscriberConfig,3 type SubscriberArgs,4} from "@medusajs/framework"5import { 6 createProductsContentfulWorkflow,7} from "../workflows/create-products-contentful"8 9export default async function handleProductCreate({10 event: { data },11 container,12}: SubscriberArgs<{ id: string }>) {13 await createProductsContentfulWorkflow(container)14 .run({15 input: {16 product_ids: [data.id],17 },18 })19 20 console.log("Product created in Contentful")21}22 23export const config: SubscriberConfig = {24 event: "product.created",25}
A subscriber file must export:
- An asynchronous function, which is the subscriber that is executed when the event is emitted.
- A configuration object that holds the name of the event the subscriber listens to, which is
product.createdin this case.
The subscriber function receives an object as a parameter that has the following properties:
event: An object that holds the event's data payload. The payload of theproduct.createdevent is an array of product IDs.container: The Medusa container to access the Framework and commerce tools.
In the subscriber function, you execute the createProductsContentfulWorkflow by invoking it, passing the Medusa container as a parameter. Then, you chain a run method, passing it the product ID from the event's data payload as input.
Finally, you log a message to the console to indicate that the product was created in Contentful.
Test the Subscriber#
To test out the subscriber, start the Medusa application:
Then, open the Medusa Admin dashboard and login.
Next, open the Products page and create a new product.
You should see the following message in the terminal:
You can also see the product in the Contentful dashboard by going to the Content page.
Step 5: Trigger Product Sync Manually#
The other way to sync products is when the admin user triggers a sync manually. This is useful when you already have products in Medusa and you want to sync them to Contentful.
To allow admin users to trigger a sync manually, you need:
- A subscriber that listens to a custom event.
- An API route that emits the custom event when a request is sent to it.
- A UI route in the Medusa Admin that displays a button to trigger the sync.
Create Manual Sync Subscriber#
You'll start by creating the subscriber that listens to a custom event to sync the Medusa products to Contentful.
To create the subscriber, create the file src/subscribers/sync-products.ts with the following content:
1import type { 2 SubscriberConfig,3 SubscriberArgs,4} from "@medusajs/framework"5import { ContainerRegistrationKeys } from "@medusajs/framework/utils"6import { 7 createProductsContentfulWorkflow,8} from "../workflows/create-products-contentful"9 10export default async function syncProductsHandler({11 container,12}: SubscriberArgs<Record<string, unknown>>) {13 const query = container.resolve(ContainerRegistrationKeys.QUERY)14 15 const batchSize = 10016 let hasMore = true17 let offset = 018 let totalCount = 019 20 while (hasMore) {21 const {22 data: products,23 metadata: { count } = {},24 } = await query.graph({25 entity: "product",26 fields: [27 "id",28 ],29 pagination: {30 skip: offset,31 take: batchSize,32 },33 })34 35 if (products.length) {36 await createProductsContentfulWorkflow(container).run({37 input: {38 product_ids: products.map((product) => product.id),39 },40 })41 }42 43 hasMore = products.length === batchSize44 offset += batchSize45 totalCount = count ?? 046 }47 48 console.log(`Synced ${totalCount} products to Contentful`)49}50 51export const config: SubscriberConfig = {52 event: "products.sync",53}
You create a subscriber that listens to the products.sync event.
In the subscriber function, you use Query to retrieve all the products in Medusa with pagination. Then, for each batch of products, you execute the createProductsContentfulWorkflow workflow, passing the product IDs to the workflow.
Finally, you log a message to the console to indicate that the products were synced to Contentful.
Create API Route to Trigger Sync#
Next, to allow the admin user to trigger the sync manually, you need to create an API route that emits the products.sync event.
An API Route is an endpoint that exposes commerce features to external applications and clients, such as storefronts.
An API route is created in a route.ts file under a sub-directory of the src/api directory. The path of the API route is the file's path relative to src/api.
So, to create an API route at the path /admin/contentful/sync, create the file src/api/admin/contentful/sync/route.ts with the following content:
1import {2 MedusaRequest,3 MedusaResponse,4} from "@medusajs/framework/http"5 6export const POST = async (7 req: MedusaRequest,8 res: MedusaResponse9) => {10 const eventService = req.scope.resolve("event_bus")11 12 await eventService.emit({13 name: "products.sync",14 data: {},15 })16 17 res.status(200).json({18 message: "Products sync triggered successfully",19 })20}
Since you export a POST route handler function, you expose an API route at /admin/contentful/sync. The route handler function accepts two parameters:
- A request object with details and context on the request, such as body parameters or authenticated user details.
- A response object to manipulate and send the response.
In the route handler, you resolve the Event Module's service from the Medusa container and emit the products.sync event.
Create UI Route to Trigger Sync#
Finally, you'll add a new page to the Medusa Admin dashboard that displays a button to trigger the sync. To add a page, you need to create a UI route.
A UI route is a React component that specifies the content to be shown in a new page of the Medusa Admin dashboard. You'll create a UI route to display a button that triggers product syncing to Contentful when clicked.
Configure JS SDK
Before creating the UI route, you'll configure Medusa's JS SDK so that you can use it to send requests to the Medusa server.
The JS SDK is installed by default in your Medusa application. To configure it, create the file src/admin/lib/sdk.ts with the following content:
You create an instance of the JS SDK using the Medusa class from the JS SDK. You pass it an object having the following properties:
baseUrl: The base URL of the Medusa server.debug: A boolean indicating whether to log debug information into the console.auth: An object specifying the authentication type. When using the JS SDK for admin customizations, you use thesessionauthentication type.
Create UI Route
UI routes are created in a page.tsx file under a sub-directory of src/admin/routes directory. The file's path relative to src/admin/routes determines its path in the dashboard.
So, create the file src/admin/routes/contentful/page.tsx with the following content:
1import { defineRouteConfig } from "@medusajs/admin-sdk"2import { Container, Heading, Button } from "@medusajs/ui"3import { useMutation } from "@tanstack/react-query"4import { sdk } from "../../lib/sdk"5import { toast } from "@medusajs/ui"6 7const ContentfulSettingsPage = () => {8 const { mutate, isPending } = useMutation({9 mutationFn: () => 10 sdk.client.fetch("/admin/contentful/sync", {11 method: "POST",12 }),13 onSuccess: () => {14 toast.success("Sync to Contentful triggered successfully")15 },16 })17 18 return (19 <Container className="p-6">20 <div className="flex flex-col gap-y-4">21 <div>22 <Heading level="h1">Contentful Settings</Heading>23 </div>24 <div>25 <Button26 variant="primary"27 onClick={() => mutate()}28 isLoading={isPending}29 >30 Sync to Contentful31 </Button>32 </div>33 </div>34 </Container>35 )36}37 38export const config = defineRouteConfig({39 label: "Contentful",40})41 42export default ContentfulSettingsPage
A UI route's file must export:
- A React component that defines the content of the page.
- A configuration object that specifies the route's label in the dashboard. This label is used to show a sidebar item for the new route.
In the React component, you use useMutation hook from @tanstack/react-query to create a mutation that sends a POST request to the API route you created earlier. In the mutation function, you use the JS SDK to send the request.
Then, in the return statement, you display a button that triggers the mutation when clicked, which sends a request to the API route you created earlier.
Test the Sync#
To test out the sync, start the Medusa application:
Then, open the Medusa Admin dashboard and login. In the sidebar, you'll find a new "Contentful" item. If you click on it, you'll see the page you created with the button to trigger the sync.
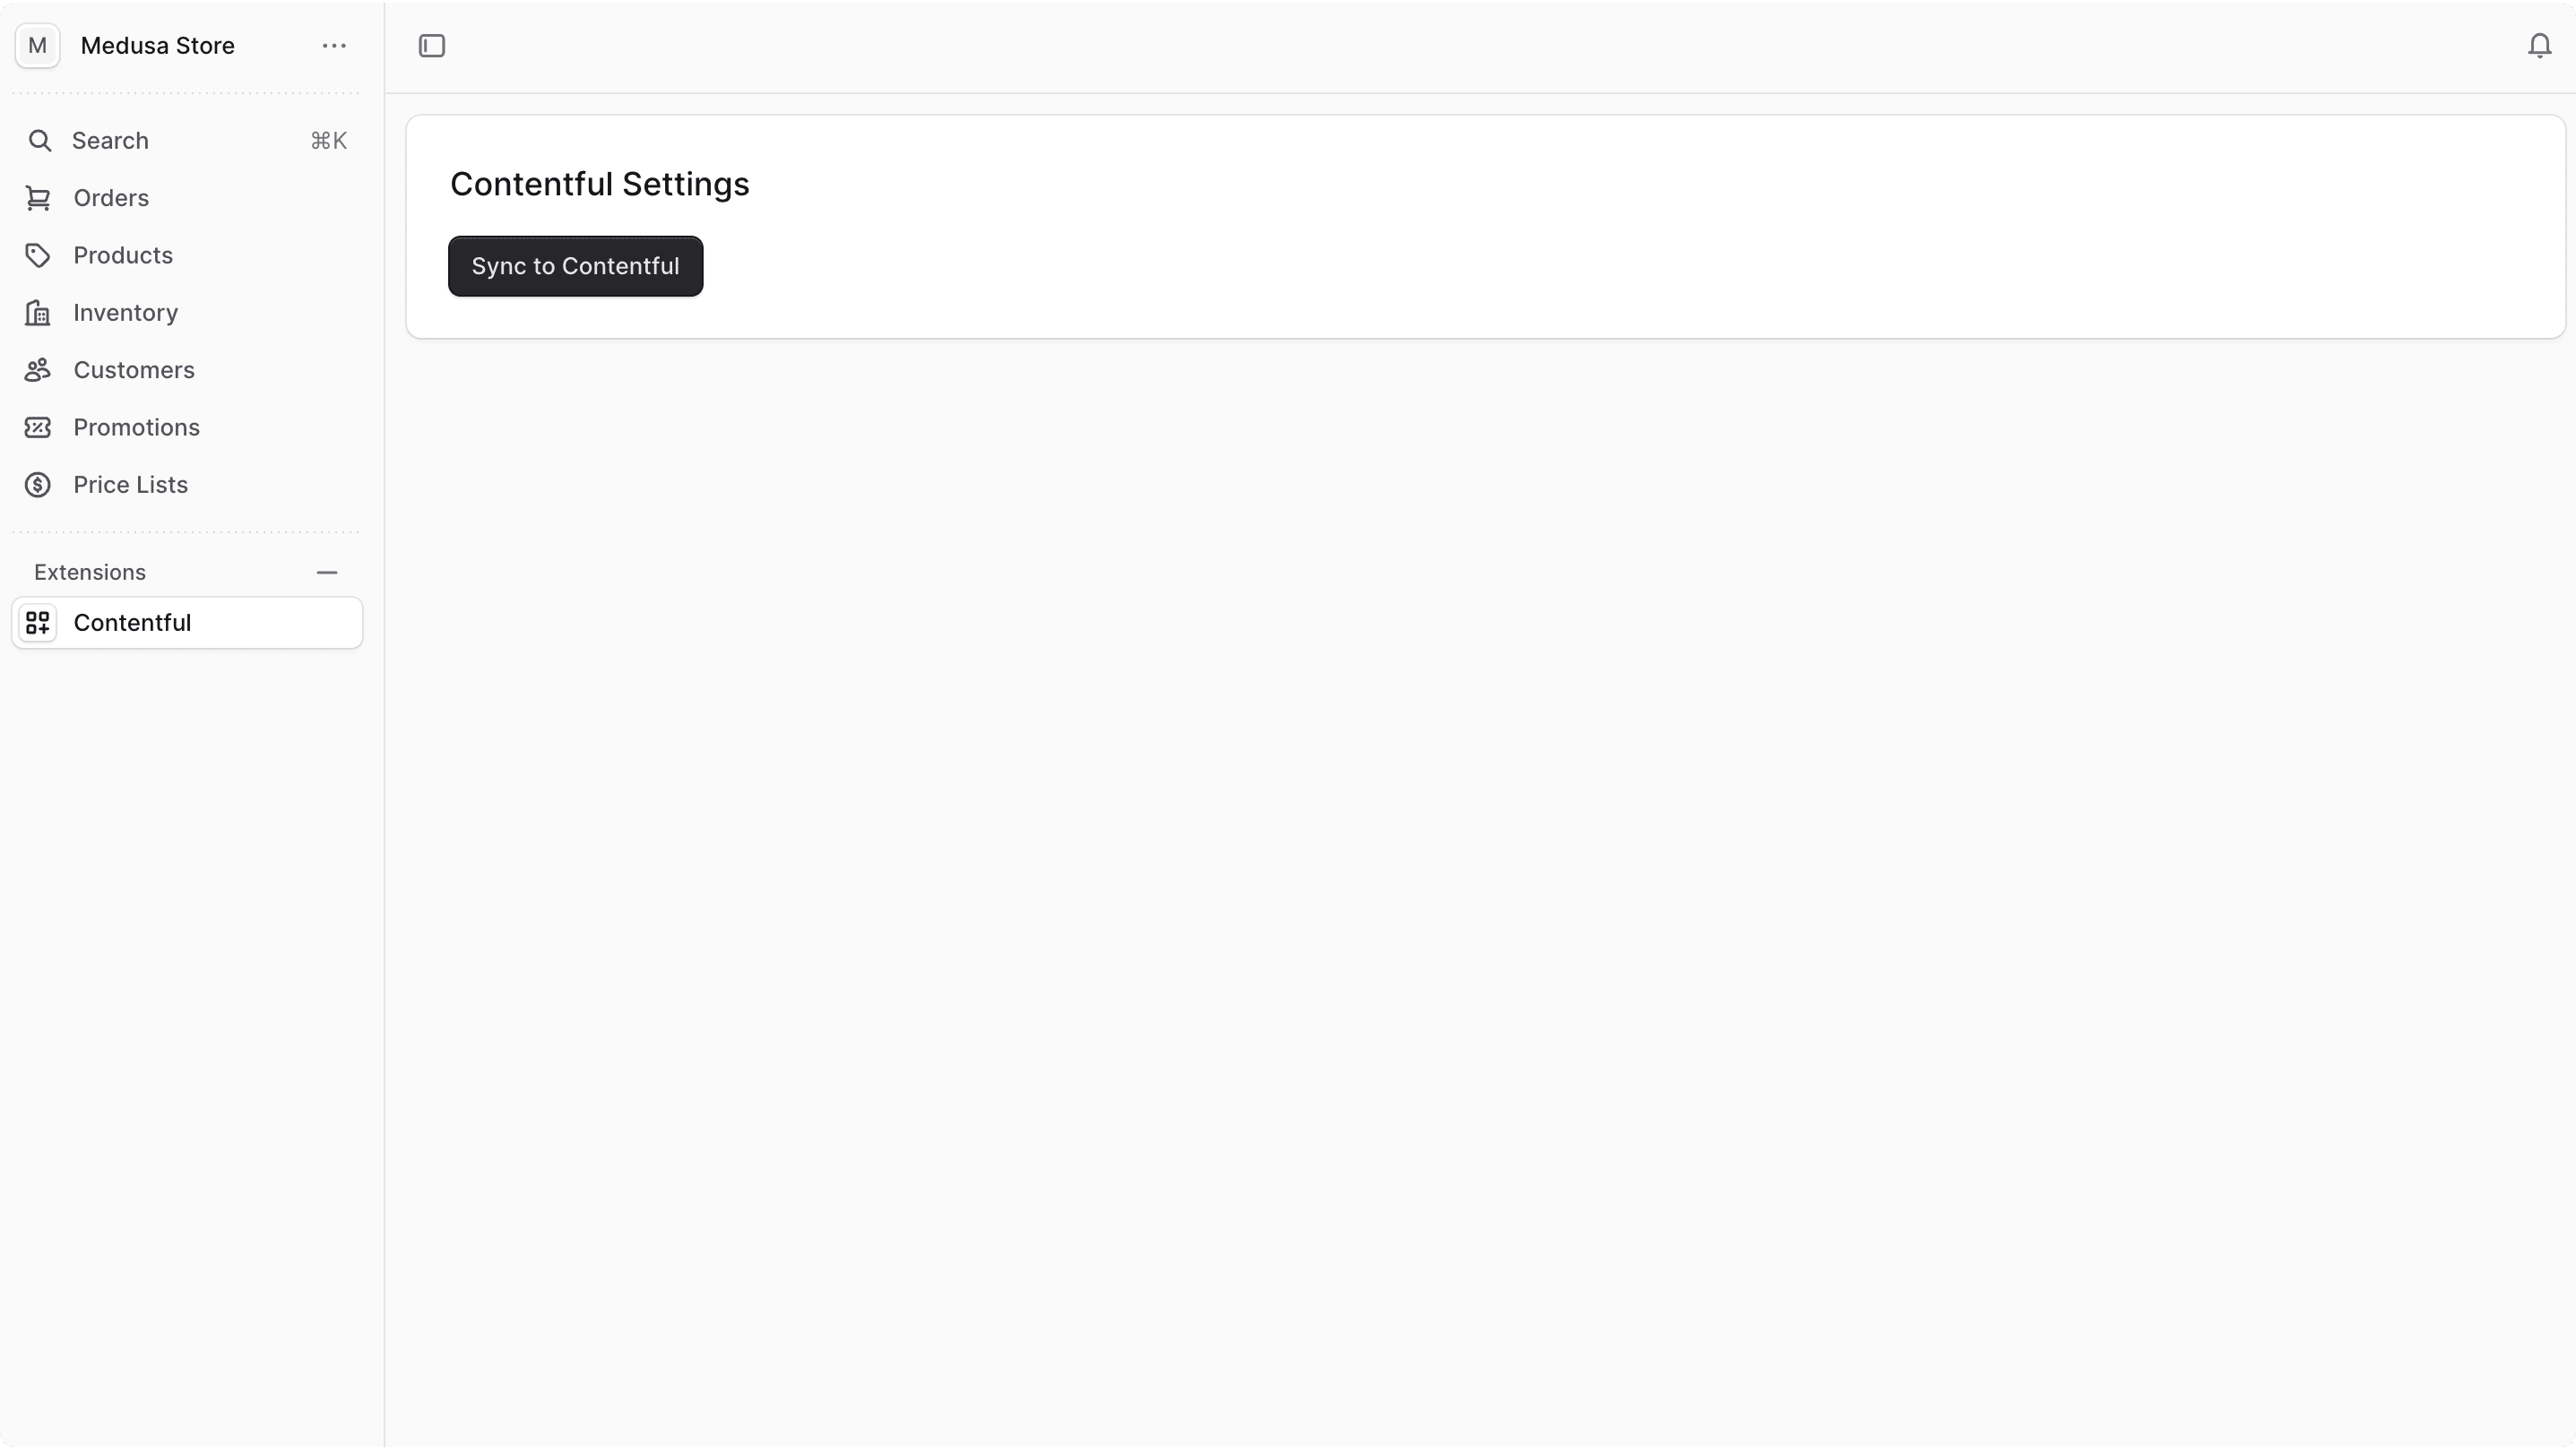
If you click on the button, you'll see the following message in the terminal:
Assuming you have 4 products in Medusa, the message indicates that the sync was successful.
You can also see the products in the Contentful dashboard.
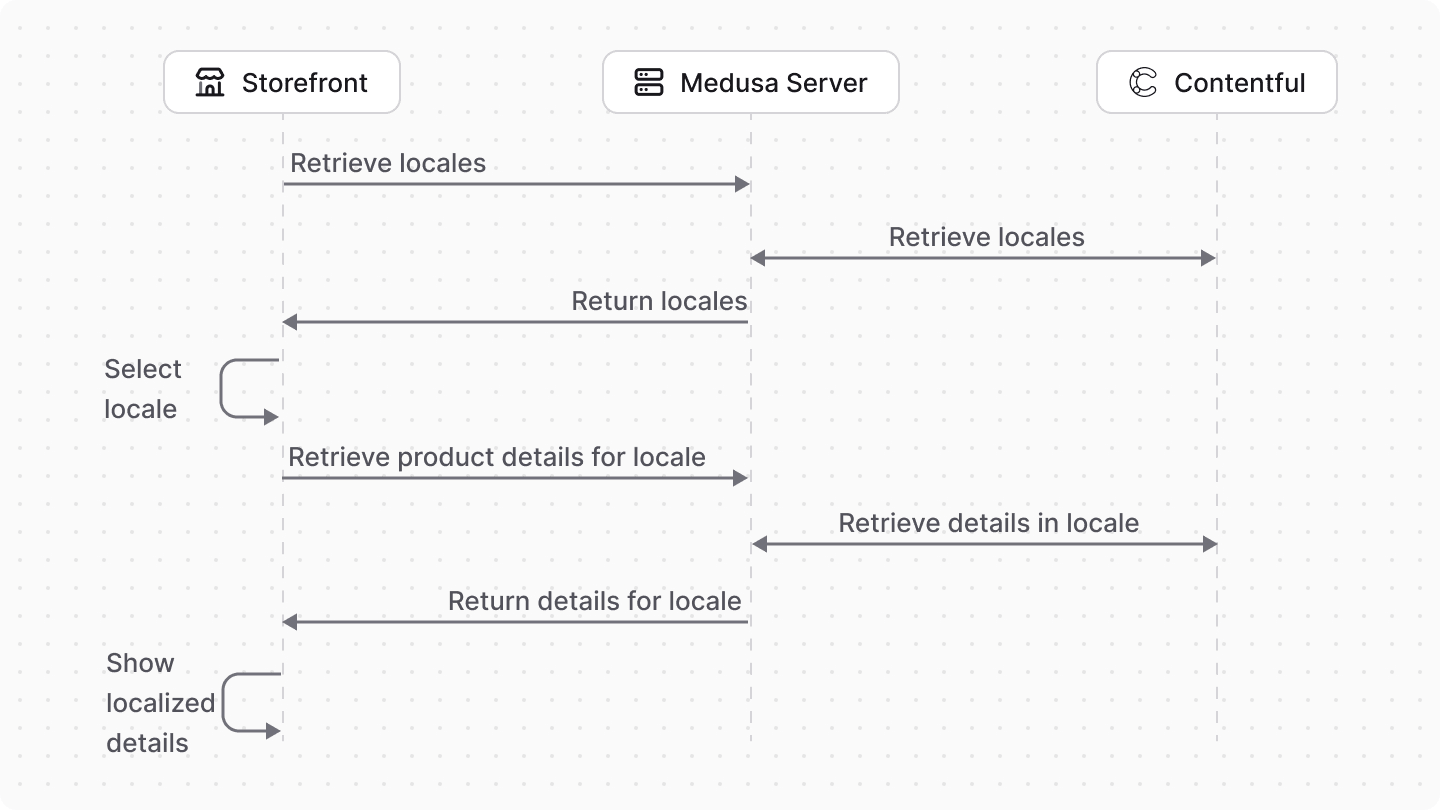
Step 6: Retrieve Locales API Route#
In the next steps, you'll implement customizations that are useful for storefronts. A storefront should show the customer a list of available locales and allow them to select from them.
In this step, you will:
- Add the logic to retrieve locales from Contentful in the Contentful Module's service.
- Create an API route that exposes the locales to the storefront.
- Customize the Next.js Starter Storefront to show the locales to customers.
Retrieve Locales from Contentful Method#
You'll start by adding two methods to the Contentful Module's service that are useful to retrieve locales from Contentful.
The first method retrieves all locales from Contentful. Add it to the service at src/modules/contentful/service.ts:
You use the locale.getMany method of the Contentful Management API client to retrieve all locales.
The second method returns the code of the default locale:
You return the default locale using the default_locale option you set in the module's options.
Create API Route to Retrieve Locales#
Next, you'll create an API route that exposes the locales to the storefront.
To create the API route, create the file src/api/store/locales/route.ts with the following content:
1import {2 MedusaRequest,3 MedusaResponse,4} from "@medusajs/framework/http"5import { CONTENTFUL_MODULE } from "../../../modules/contentful"6import ContentfulModuleService from "../../../modules/contentful/service"7 8export const GET = async (9 req: MedusaRequest,10 res: MedusaResponse11) => {12 const contentfulModuleService: ContentfulModuleService = req.scope.resolve(13 CONTENTFUL_MODULE14 )15 16 const locales = await contentfulModuleService.getLocales()17 const defaultLocaleCode = await contentfulModuleService.getDefaultLocaleCode()18 19 const formattedLocales = locales.items.map((locale) => {20 return {21 name: locale.name,22 code: locale.code,23 is_default: locale.code === defaultLocaleCode,24 }25 })26 27 res.json({28 locales: formattedLocales,29 })30}
Since you export a GET route handler function, you expose a GET route at /store/locales.
In the route handler, you resolve the Contentful Module's service from the Medusa container to retrieve the locales and the default locale code.
Then, you format the locales to include their name, code, and whether they are the default locale.
Finally, you return the formatted locales in the JSON response.
Customize Storefront to Show Locales#
In the first step of this tutorial, you installed the Next.js Starter Storefront along with the Medusa application. This storefront provides ecommerce features like a product catalog, a cart, and a checkout.
In this section, you'll customize the storefront to show the locales to customers and allow them to select from them. The selected locale will be stored in the browser's cookies, allowing you to use it later when retrieving a product's localized data.
Add Cookie Functions
You'll start by adding two functions that retrieve and set the locale in the browser's cookies.
In src/lib/data/cookies.ts add the following functions:
1export const getLocale = async () => {2 const cookies = await nextCookies()3 return cookies.get("_medusa_locale")?.value4}5 6export const setLocale = async (locale: string) => {7 const cookies = await nextCookies()8 cookies.set("_medusa_locale", locale, {9 maxAge: 60 * 60 * 24 * 7,10 })11}
The getLocale function retrieves the locale from the browser's cookies, and the setLocale function sets the locale in the browser's cookies.
Manage Locales Functions
Next, you'll add server actions to retrieve the locales and set the selected locale.
Create the file src/lib/data/locale.ts with the following content:
1"use server"2 3import { sdk } from "@lib/config"4import type { Document } from "@contentful/rich-text-types"5import { getLocale, setLocale } from "./cookies"6 7export type Locale = {8 name: string9 code: string10 is_default: boolean11}12 13export async function getLocales() {14 return await sdk.client.fetch<{15 locales: Locale[]16 }>("/store/locales")17}18 19export async function getSelectedLocale() {20 let localeCode = await getLocale()21 if (!localeCode) {22 const locales = await getLocales()23 localeCode = locales.locales.find((l) => l.is_default)?.code24 }25 return localeCode26}27 28export async function setSelectedLocale(locale: string) {29 await setLocale(locale)30}
You add the following functions:
getLocales: Retrieves the locales from the Medusa server using the API route you created earlier.getSelectedLocale: Retrieves the selected locale from the browser's cookies, or the default locale if no locale is selected.setSelectedLocale: Sets the selected locale in the browser's cookies.
You'll use these functions as you add the UI to show the locales next.
Show Locales in the Storefront
You'll now add the UI to show the locales to customers and allow them to select from them.
Create the file src/modules/layout/components/locale-select/index.tsx with the following content:
1"use client"2 3import { useState, useEffect, Fragment } from "react"4import { getLocales, Locale, getSelectedLocale, setSelectedLocale } from "../../../../lib/data/locale"5import { Listbox, ListboxButton, ListboxOption, ListboxOptions, Transition } from "@headlessui/react"6import { ArrowRightMini } from "@medusajs/icons"7import { clx } from "@medusajs/ui"8 9const LocaleSelect = () => {10 const [locales, setLocales] = useState<Locale[]>([])11 const [locale, setLocale] = useState<Locale | undefined>()12 const [open, setOpen] = useState(false)13 14 useEffect(() => {15 getLocales()16 .then(({ locales }) => {17 setLocales(locales)18 })19 }, [])20 21 useEffect(() => {22 if (!locales.length || locale) {23 return24 }25 26 getSelectedLocale().then((locale) => {27 const localeDetails = locales.find((l) => l.code === locale) 28 setLocale(localeDetails)29 })30 }, [locales])31 32 useEffect(() => {33 if (locale) {34 setSelectedLocale(locale.code)35 }36 }, [locale])37 38 const handleChange = (locale: Locale) => {39 setLocale(locale)40 setOpen(false)41 }42 43 // TODO add return statement44}45 46export default LocaleSelect
You create a LocaleSelect component with the following state variables:
locales: The list of locales retrieved from the Medusa server.locale: The selected locale.open: A boolean indicating whether the dropdown is open.
Then, you use three useEffect hooks:
- The first
useEffecthook retrieves the locales using thegetLocalesfunction and sets them in thelocalesstate variable. - The second
useEffecthook is triggered when thelocalesstate variable changes. It retrieves the selected locale using thegetSelectedLocalefunction and sets thelocalestate variable. - The third
useEffecthook is triggered when thelocalestate variable changes. It sets the selected locale in the browser's cookies using thesetSelectedLocalefunction.
You also create a handleChange function that sets the selected locale and closes the dropdown. You'll execute this function when the customer selects a locale from the dropdown.
Finally, you'll add a return statement that shows the locale dropdown. Replace the TODO with the following:
1return (2 <div3 className="flex justify-between"4 onMouseEnter={() => setOpen(true)}5 onMouseLeave={() => setOpen(false)}6 >7 <div>8 <Listbox as="span" onChange={handleChange} defaultValue={locale}>9 <ListboxButton className="py-1 w-full">10 <div className="txt-compact-small flex items-start gap-x-2">11 <span>Language:</span>12 {locale && (13 <span className="txt-compact-small flex items-center gap-x-2">14 {locale.name}15 </span>16 )}17 </div>18 </ListboxButton>19 <div className="flex relative w-full min-w-[320px]">20 <Transition21 show={open}22 as={Fragment}23 leave="transition ease-in duration-150"24 leaveFrom="opacity-100"25 leaveTo="opacity-0"26 >27 <ListboxOptions28 className="absolute -bottom-[calc(100%-36px)] left-0 xsmall:left-auto xsmall:right-0 max-h-[442px] overflow-y-scroll z-[900] bg-white drop-shadow-md text-small-regular uppercase text-black no-scrollbar rounded-rounded w-full"29 static30 >31 {locales?.map((l, index) => {32 return (33 <ListboxOption34 key={index}35 value={l}36 className="py-2 hover:bg-gray-200 px-3 cursor-pointer flex items-center gap-x-2"37 >38 {l.name}39 </ListboxOption>40 )41 })}42 </ListboxOptions>43 </Transition>44 </div>45 </Listbox>46 </div>47 <ArrowRightMini48 className={clx(49 "transition-transform duration-150",50 open ? "-rotate-90" : ""51 )}52 />53 </div>54)
You show the selected locale. Then, when the customer hovers over the locale, the dropdown is shown to select a different locale.
When the customer selects a locale, you execute the handleChange function, which sets the selected locale and closes the dropdown.
Add Locale Select to the Side Menu
The last step is to show the locale selector in the side menu after the country selector.
In src/modules/layout/components/side-menu/index.tsx, add the following import:
Then, add the LocaleSelect component in the return statement of the SideMenu component, after the div wrapping the country selector:
The locale selector will now show in the side menu after the country selector.
Test out the Locale Selector#
To test out all the changes made in this step, start the Medusa application by running the following command in the apps/backend directory:
Then, start the Next.js Starter Storefront by running the following command in the storefront's directory:
The storefront will run at http://localhost:8000. Open it in your browser, then click on "Menu" at the top right. You'll see at the bottom of the side menu the locale selector.
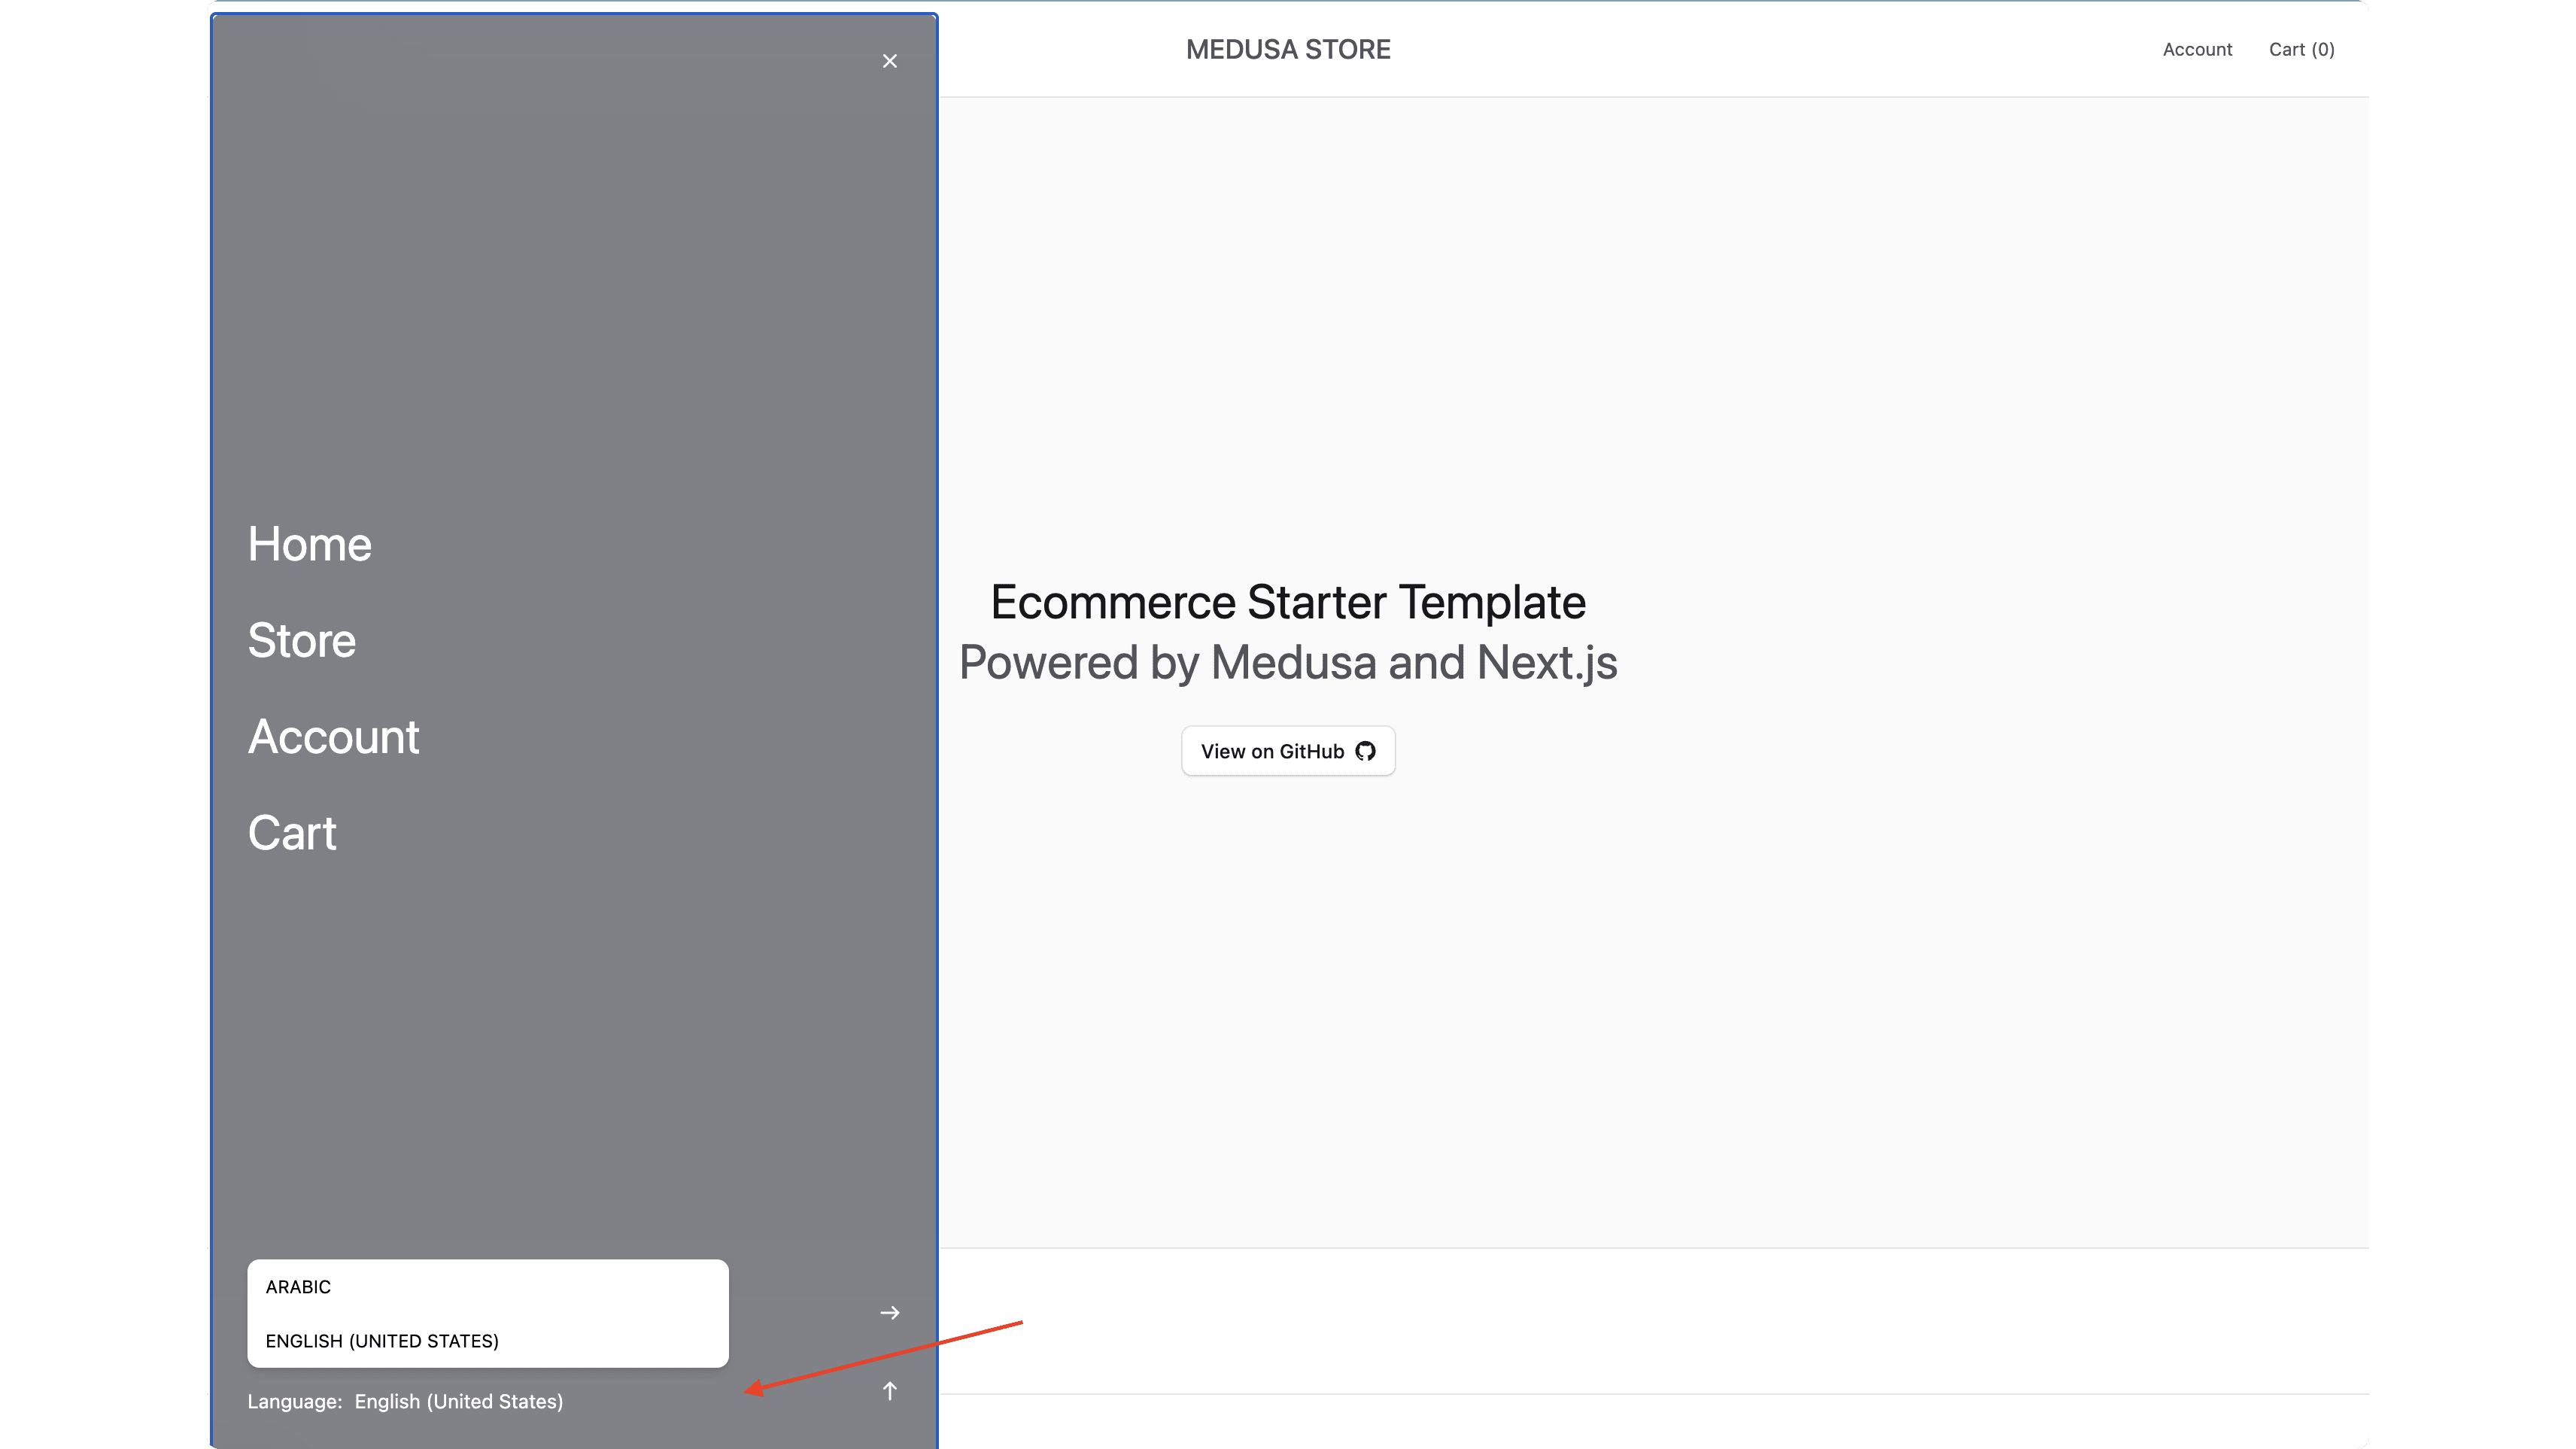
You can try selecting a different locale. The selected locale will be stored, but products will still be shown in the default locale. You'll implement the locale-based product retrieval in the next step.
Step 7: Retrieve Product Details for Locale#
The next feature you'll implement is retrieving and displaying product details for a selected locale.
You'll implement this feature by:
- Linking Medusa's product to Contentful's product.
- Adding the method to retrieve product details for a selected locale from Contentful.
- Adding a new route to retrieve the product details for a selected locale.
- Customizing the storefront to show the product details for the selected locale.
Link Medusa's Product to Contentful's Product#
Medusa facilitates retrieving data across systems using module links. A module link forms an association between data models of two modules while maintaining module isolation.
Not only do module links support Medusa data models, but they also support virtual data models that are not persisted in Medusa's database. In that case, you create a read-only module link that allows you to retrieve data across systems.
In this section, you'll define a read-only module link between Medusa's product and Contentful's product, allowing you to later retrieve a product's entry in Contentful within a single query.
Module links are defined in a TypeScript or JavaScript file under the src/links directory. So, create the file src/links/product-contentful.ts with the following content:
1import { defineLink } from "@medusajs/framework/utils"2import ProductModule from "@medusajs/medusa/product"3import { CONTENTFUL_MODULE } from "../modules/contentful"4 5export default defineLink(6 {7 linkable: ProductModule.linkable.product,8 field: "id",9 },10 {11 linkable: {12 serviceName: CONTENTFUL_MODULE,13 alias: "contentful_product",14 primaryKey: "product_id",15 },16 },17 {18 readOnly: true,19 }20)
You define a module link using defineLink from the Modules SDK. It accepts three parameters:
- An object with the linkable configuration of the data model in Medusa, and the field that will be passed as a filter to the Contentful Module's service.
- An object with the linkable configuration of the virtual data model in Contentful. This object must have the following properties:
serviceName: The name of the service, which is the Contentful Module's name. Medusa uses this name to resolve the module's service from the Medusa container.alias: The alias to use when querying the linked records. You'll see how that works in a bit.primaryKey: The field in Contentful's virtual data model that holds the ID of a product.
- An object with the
readOnlyproperty set totrue.
You'll see how the module link works in the upcoming steps.
List Contentful Products Method#
Next, you'll add a method that lists Contentful products for a given locale.
Add the following method to the Contentful Module's service at src/modules/contentful/service.ts:
1export default class ContentfulModuleService {2 // ...3 async list(4 filter: {5 id: string | string[]6 context?: {7 locale: string8 }9 }10 ) {11 const contentfulProducts = await this.deliveryClient.getEntries({12 limit: 15,13 content_type: "product",14 "fields.medusaId": filter.id,15 locale: filter.context?.locale,16 include: 3,17 })18 19 return contentfulProducts.items.map((product) => {20 // remove links21 const { productVariants: _, productOptions: __, ...productFields } = product.fields22 return {23 ...productFields,24 product_id: product.fields.medusaId,25 variants: product.fields.productVariants.map((variant) => {26 // remove circular reference27 const { product: _, productOptionValues: __, ...variantFields } = variant.fields28 return {29 ...variantFields,30 product_variant_id: variant.fields.medusaId,31 options: variant.fields.productOptionValues.map((option) => {32 // remove circular reference33 const { productOption: _, ...optionFields } = option.fields34 return {35 ...optionFields,36 product_option_id: option.fields.medusaId,37 }38 }),39 }40 }),41 options: product.fields.productOptions.map((option) => {42 // remove circular reference43 const { product: _, ...optionFields } = option.fields44 return {45 ...optionFields,46 product_option_id: option.fields.medusaId,47 values: option.fields.values.map((value) => {48 // remove circular reference49 const { productOptionValue: _, ...valueFields } = value.fields50 return {51 ...valueFields,52 product_option_value_id: value.fields.medusaId,53 }54 }),55 }56 }),57 }58 })59 }60}
You add a list method that accepts an object with the following properties:
id: The ID of the product(s) in Medusa to retrieve their entries in Contentful.context: An object with thelocaleproperty that holds the locale code to retrieve the product's entry in Contentful for that locale.
In the method, you use the Delivery API client's getEntries method to retrieve the products. You pass the following parameters:
limit: The maximum number of products to retrieve.content_type: The content type of the entries to retrieve, which isproduct.fields.medusaId: Filter the products by theirmedusaIdfield, which holds the ID of the product in Medusa.locale: The locale code to retrieve the fields of the product in that locale.include: The depth of the included nested entries. This ensures that you can retrieve the product's variants and options, and their values.
Then, you format the retrieved products to:
- Pass the product's ID in the
product_idproperty. This is essential to map a product in Medusa to its entry in Contentful. - Remove the circular references in the product's variants, options, and values to avoid infinite loops.
listAndCount method as explained in the Query Context documentation.Retrieve Product Details for Locale API Route#
You'll now create the API route that returns a product's details for a given locale.
You can create an API route that accepts path parameters by creating a directory within the route file's path whose name is of the format [param].
So, create the file src/api/store/products/[id]/[locale]/route.ts with the following content:
1import {2 MedusaRequest,3 MedusaResponse,4} from "@medusajs/framework/http"5import { QueryContext } from "@medusajs/framework/utils"6 7export const GET = async (8 req: MedusaRequest,9 res: MedusaResponse10) => {11 const { locale, id } = req.params12 13 const query = req.scope.resolve("query")14 15 const { data } = await query.graph({16 entity: "product",17 fields: [18 "id",19 "contentful_product.*",20 ],21 filters: {22 id,23 },24 context: {25 contentful_product: QueryContext({26 locale,27 }),28 },29 })30 31 res.json({32 product: data[0],33 }) 34}
Since you export a GET route handler function, you expose a GET route at /store/products/[id]/[locale]. The route accepts two path parameters: the product's ID and the locale code.
In the route handler, you retrieve the locale and id path parameters from the request. Then, you resolve Query from the Medusa container.
Next, you use Query to retrieve the localized details of the specified product. To do that, you pass an object with the following properties:
entity: The entity to retrieve, which isproduct.fields: The fields to retrieve. Notice that you include thecontentful_product.*field, which is available through the module link you created earlier.filters: The filter to apply on the retrieved products. You apply the product's ID as a filter.context: An additional context to be passed to the methods retrieving the data. To pass a context, you use Query Context.
By specifying contentful_product.* in the fields property, Medusa will retrieve the product's entry from Contentful using the list method you added to the Contentful Module's service.
Medusa passes the filters and context to the list method, and attaches the returned data to the Medusa product if its product_id matches the product's ID.
Finally, you return the product's details in the JSON response.
You can now use this route to retrieve a product's details for a given locale.
Show Localized Product Details in Storefront#
Now that you expose the localized product details, you can customize the storefront to show them.
Install Contentful Rich Text Package
When you retrieve the entries from Contentful, rich-text fields are returned as an object that requires special rendering. So, Contentful provides a package to render rich-text fields.
Install the package by running the following command:
You'll use this package to render the product's description.
Retrieve Localized Product Details Function
To retrieve a product's details for a given locale, you'll add a function that sends a request to the API route you created.
First, add the following import at the top of src/lib/data/locale.ts:
Then, add the following type and function at the end of the file:
1export type ProductLocaleDetails = {2 id: string3 contentful_product: {4 product_id: string5 title: string6 handle: string7 description: Document8 subtitle?: string9 variants: {10 title: string11 product_variant_id: string12 options: {13 value: string14 product_option_id: string15 }[]16 }[]17 options: {18 title: string19 product_option_id: string20 values: {21 title: string22 product_option_value_id: string23 }[]24 }[]25 }26}27 28export async function getProductLocaleDetails(29 productId: string30) {31 const localeCode = await getSelectedLocale()32 33 return await sdk.client.fetch<{34 product: ProductLocaleDetails35 }>(`/store/products/${productId}/${localeCode}`)36}
You define a ProductLocaleDetails type that describes the structure of a localized product's details.
You also define a getProductLocaleDetails function that sends a request to the API route you created and returns the localized product's details.
Show Localized Product Title in Products Listing
Next, you'll customize existing components to show the localized product details.
The component defined in src/modules/products/components/product-preview/index.tsx shows the product's details in the products listing page. You need to retrieve the localized product details and show the product's title in the selected locale.
In src/modules/products/components/product-preview/index.tsx, add the following import:
Then, in the ProductPreview component in the same file, add the following before the return statement:
This will retrieve the localized product details for the selected locale.
Finally, to show the localized product title, find in the ProductPreview component's return statement the following line:
And replace it with the following:
You'll test it out after the next step.
Show Localized Product Details in Product Page
Next, you'll customize the product page to show the localized product details.
The product's details page is defined in src/app/[countryCode]/(main)/products/[handle]/page.tsx. So, add the following import at the top of the file:
Then, in the ProductPage component in the same file, add the following before the return statement:
This will retrieve the localized product details for the selected locale.
Finally, in the ProductPage component in the same file, pass the following prop to ProductTemplate:
Next, you'll customize the ProductTemplate component to accept and use this prop.
In src/modules/products/templates/index.tsx, add the following import:
Then, update the ProductTemplateProps type to include the productLocaleDetails prop:
Next, update the ProductTemplate component to destructure the productLocaleDetails prop:
Finally, pass the productLocaleDetails prop to the ProductInfo component in the return statement:
The ProductInfo component shows the product's details. So, you need to update it to accept and use the productLocaleDetails prop.
In src/modules/products/templates/product-info/index.tsx, add the following imports:
Then, update the ProductInfoProps type to include the productLocaleDetails prop:
Next, update the ProductInfo component to destructure the productLocaleDetails prop:
Then, find the following line in the return statement:
And replace it with the following:
Also, find the following line:
And replace it with the following:
You use the documentToHtmlString function to render the rich-text field. The function returns an HTML string that you can use to render the description.
Test out the Localized Product Details#
You can now test out all the changes made in this step.
To do that, start the Medusa application by running the following command in the apps/backend directory:
Then, start the Next.js Starter Storefront by running the following command in the storefront's directory:
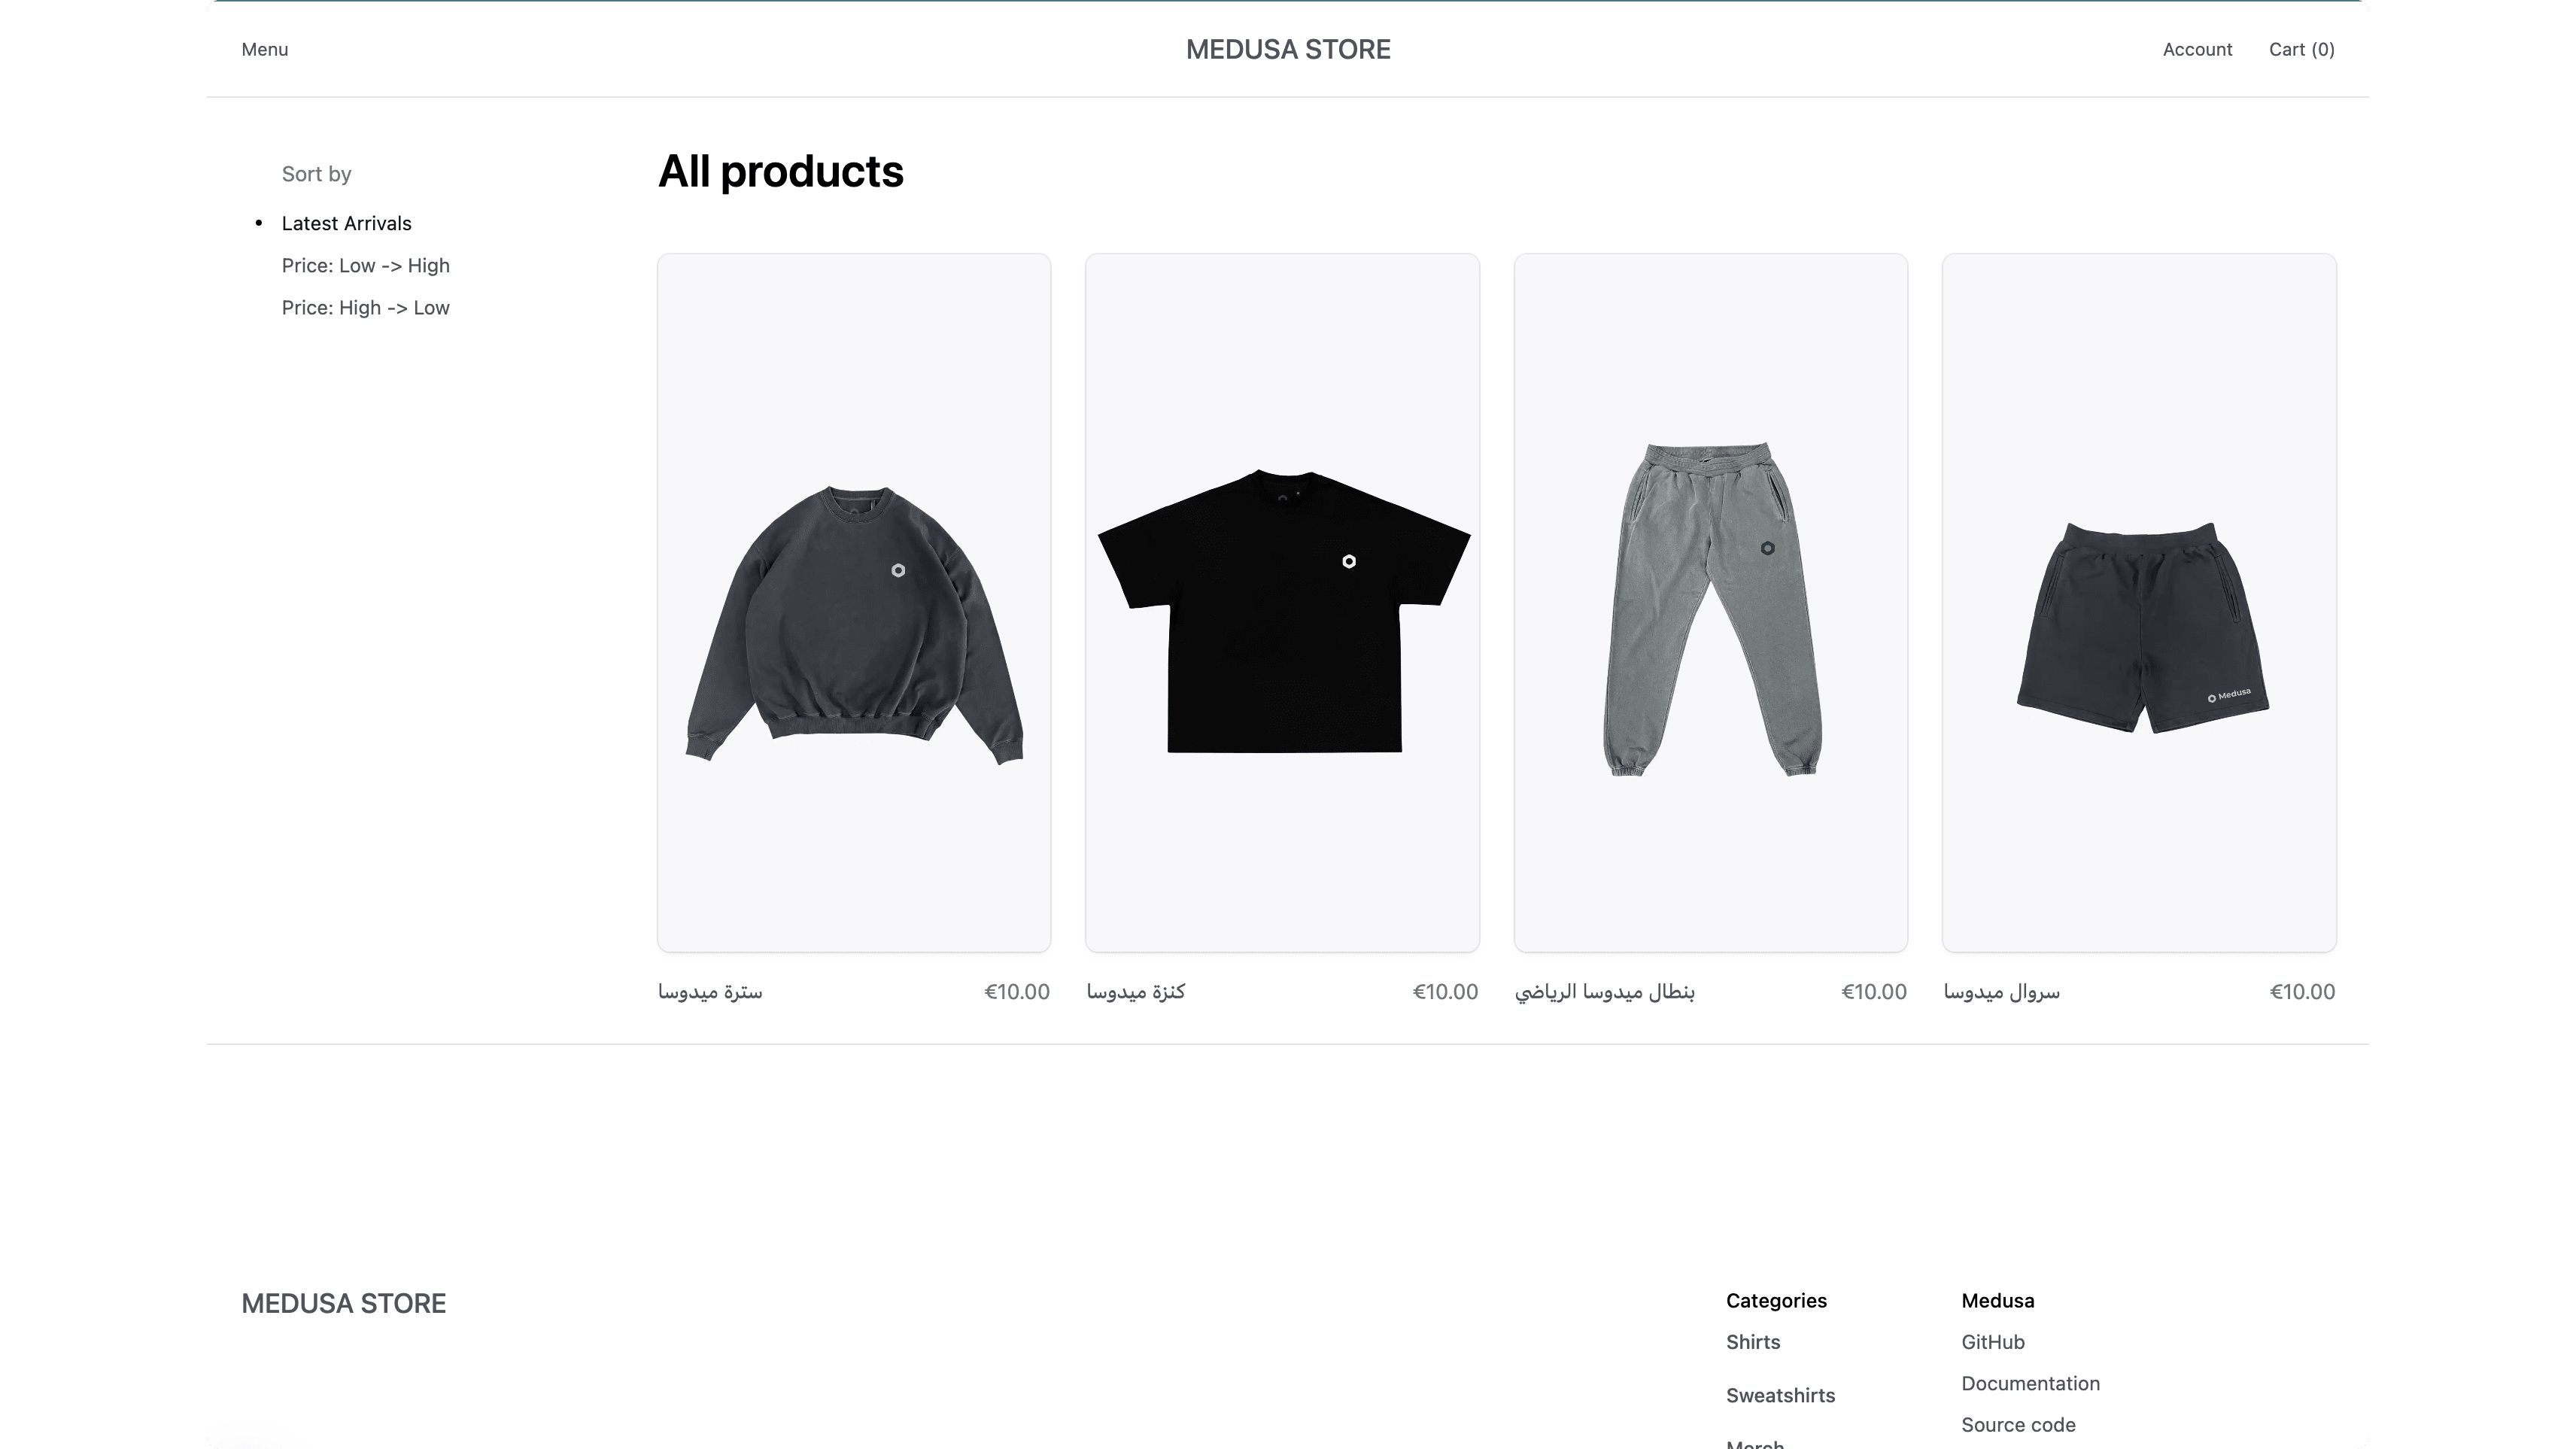
Open the storefront at http://localhost:8000 and select a different locale.
Then, open the products listing page by clicking on Menu -> Store. You'll see the product titles in the selected locale.
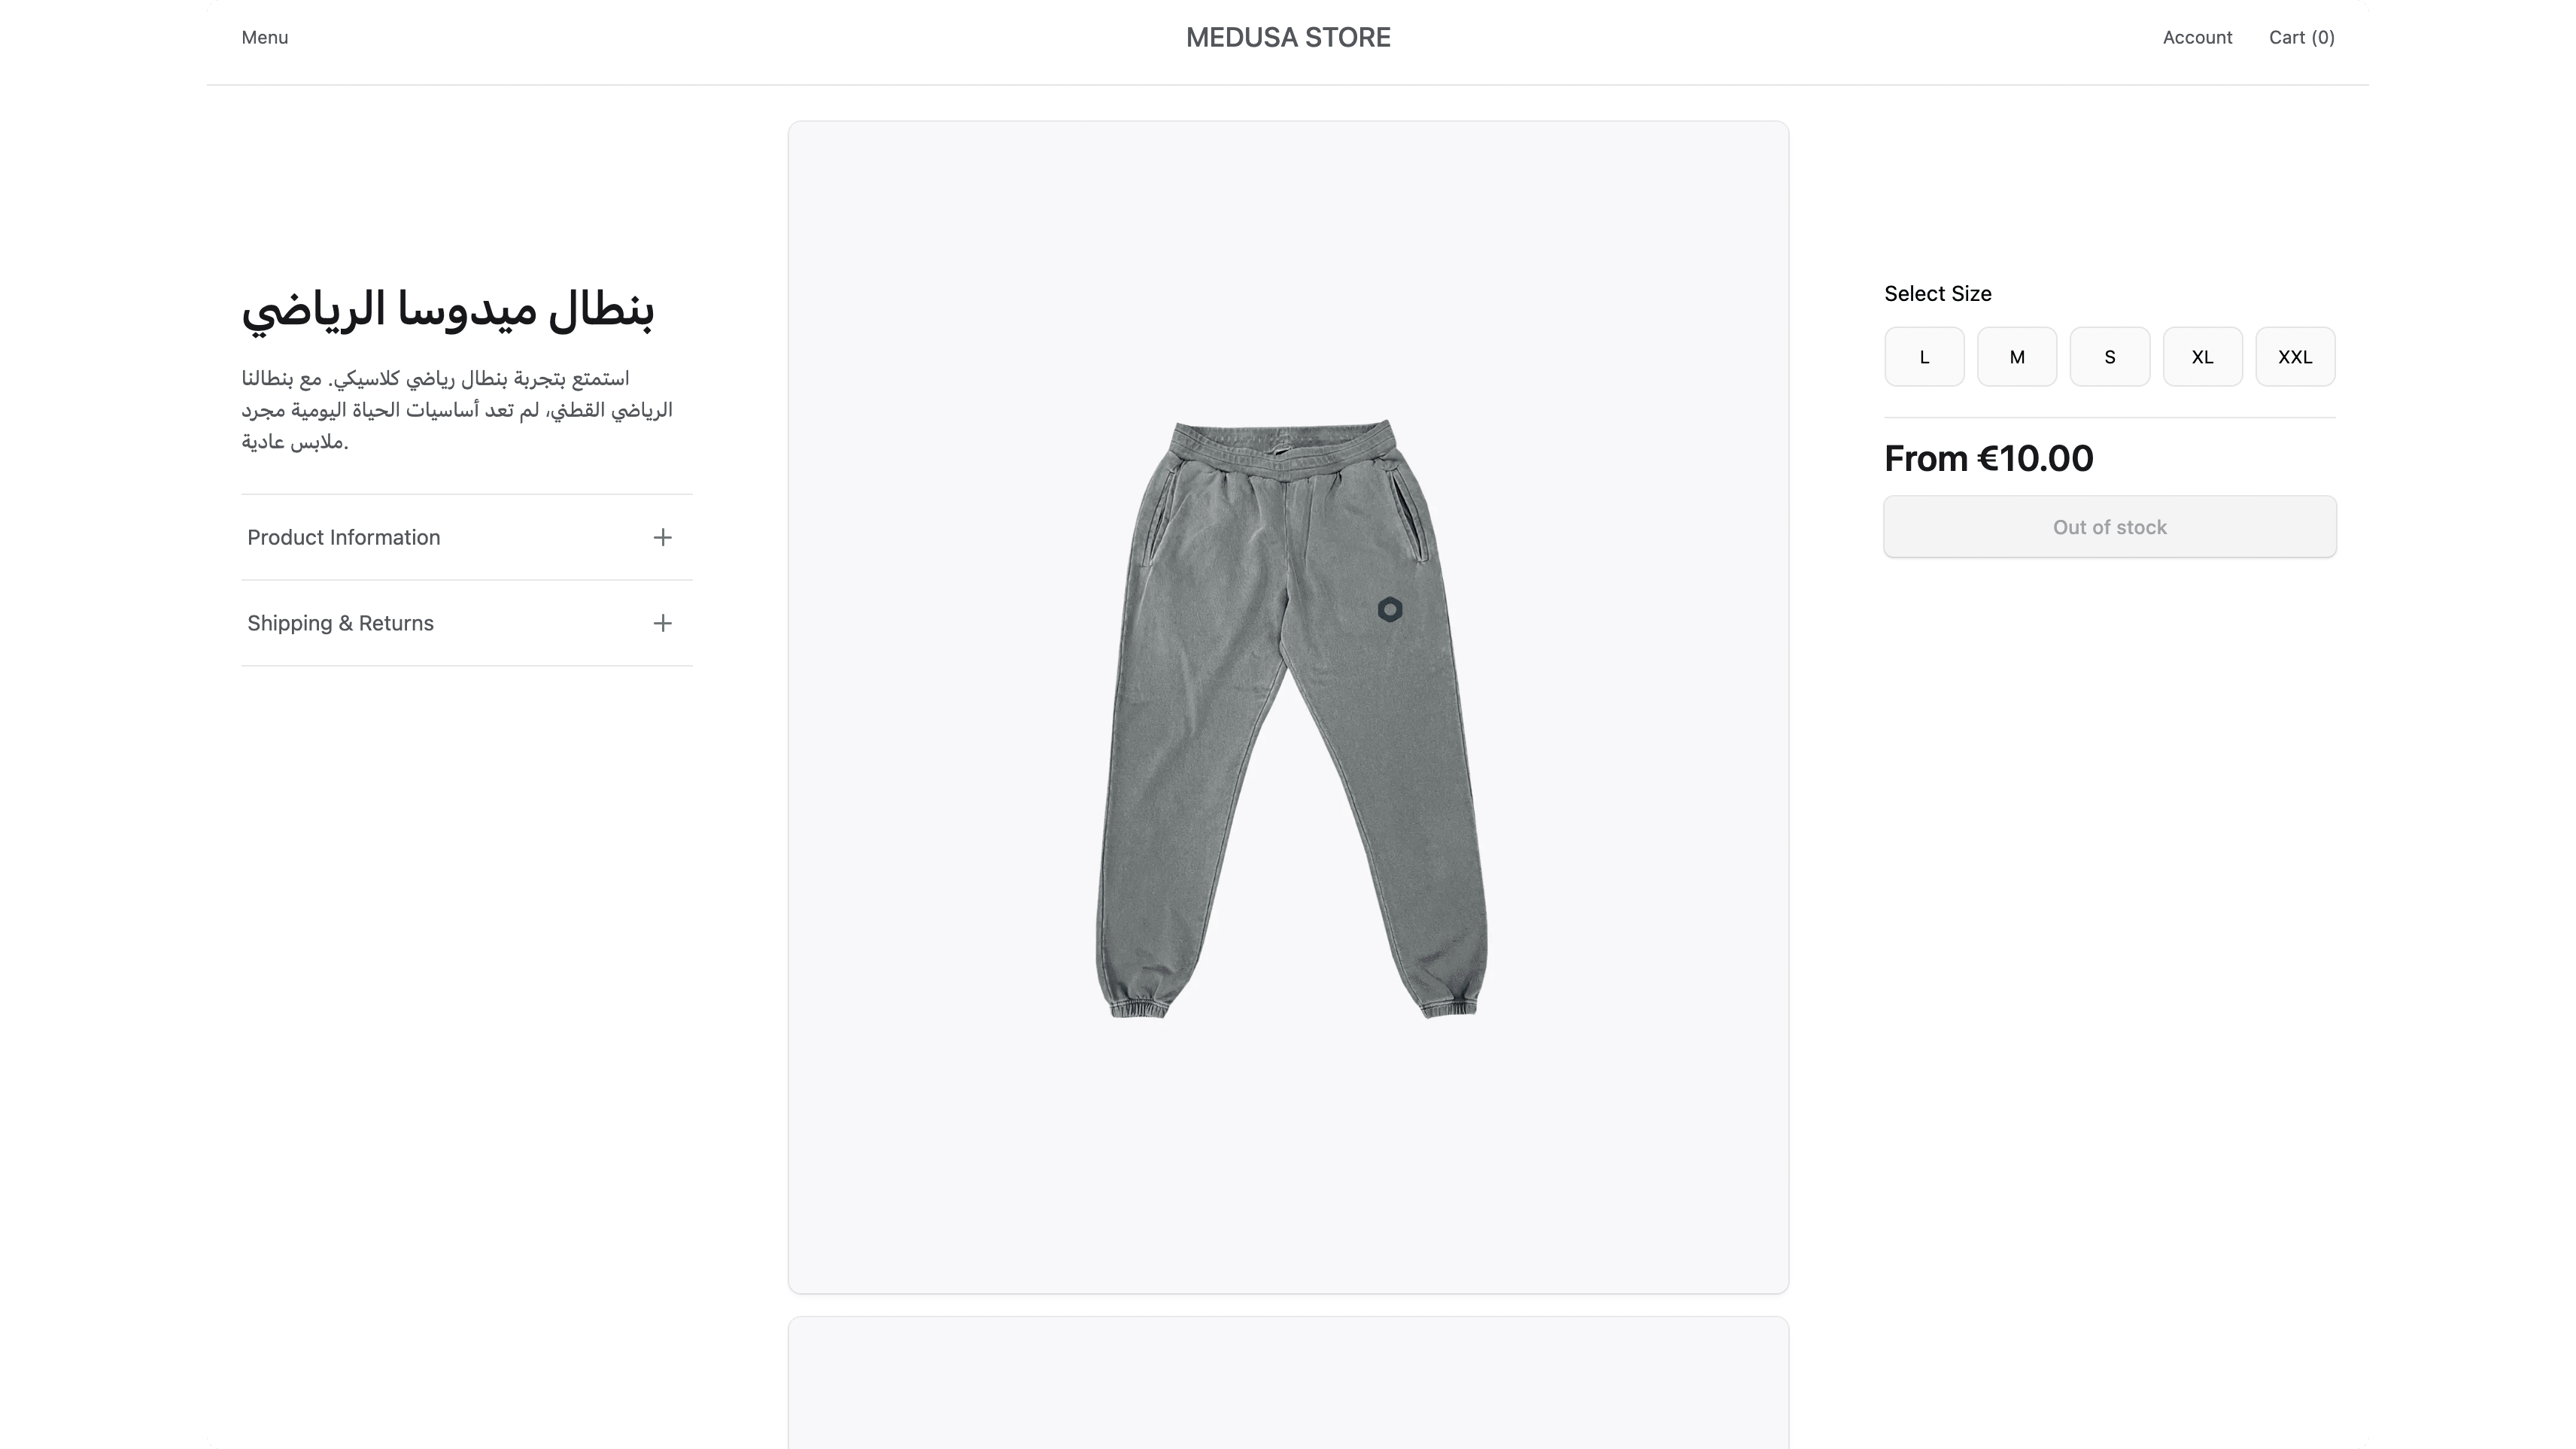
Then, if you click on a product, you'll see the product's title and description in the selected locale.
Step 8: Sync Changes from Contentful to Medusa#
The last feature you'll implement is syncing changes from Contentful to Medusa.
Contentful's webhooks allow you to listen to changes in your Contentful entries. You can then set up a webhook listener API route in Medusa that updates the product's data.
In this step, you'll set up a webhook listener that updates Medusa's product data when a Contentful entry is published.
Prerequisites: Public Server#
Webhooks can only trigger deployed listeners. So, you must either deploy your Medusa application, or use tools like ngrok to publicly expose your local application.
Set Up Webhooks in Contentful#
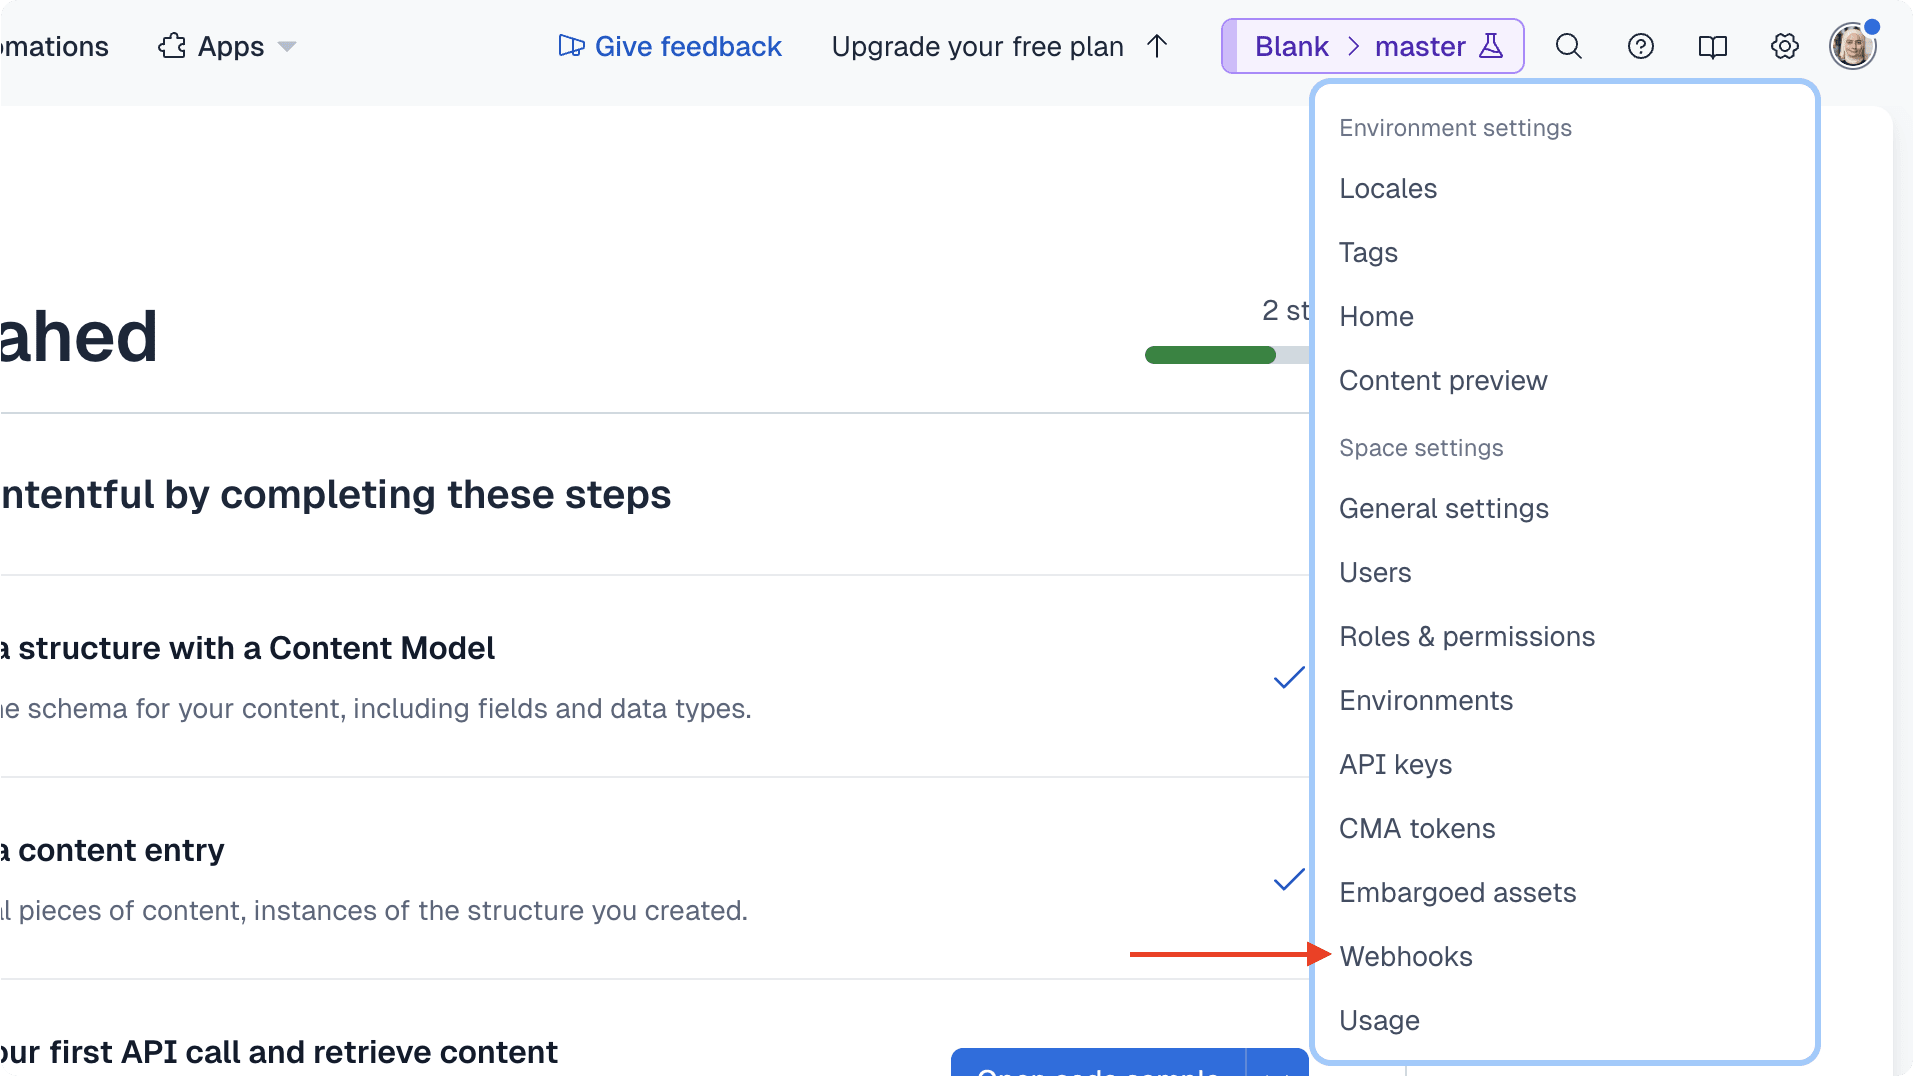
Before setting up the webhook listener, you need to set up a webhook in Contentful. To do that, on the Contentful dashboard:
- Click on the cog icon at the top right, then choose "Webhooks" from the dropdown.
- On the Webhooks page, click on the "Add Webhook" button.
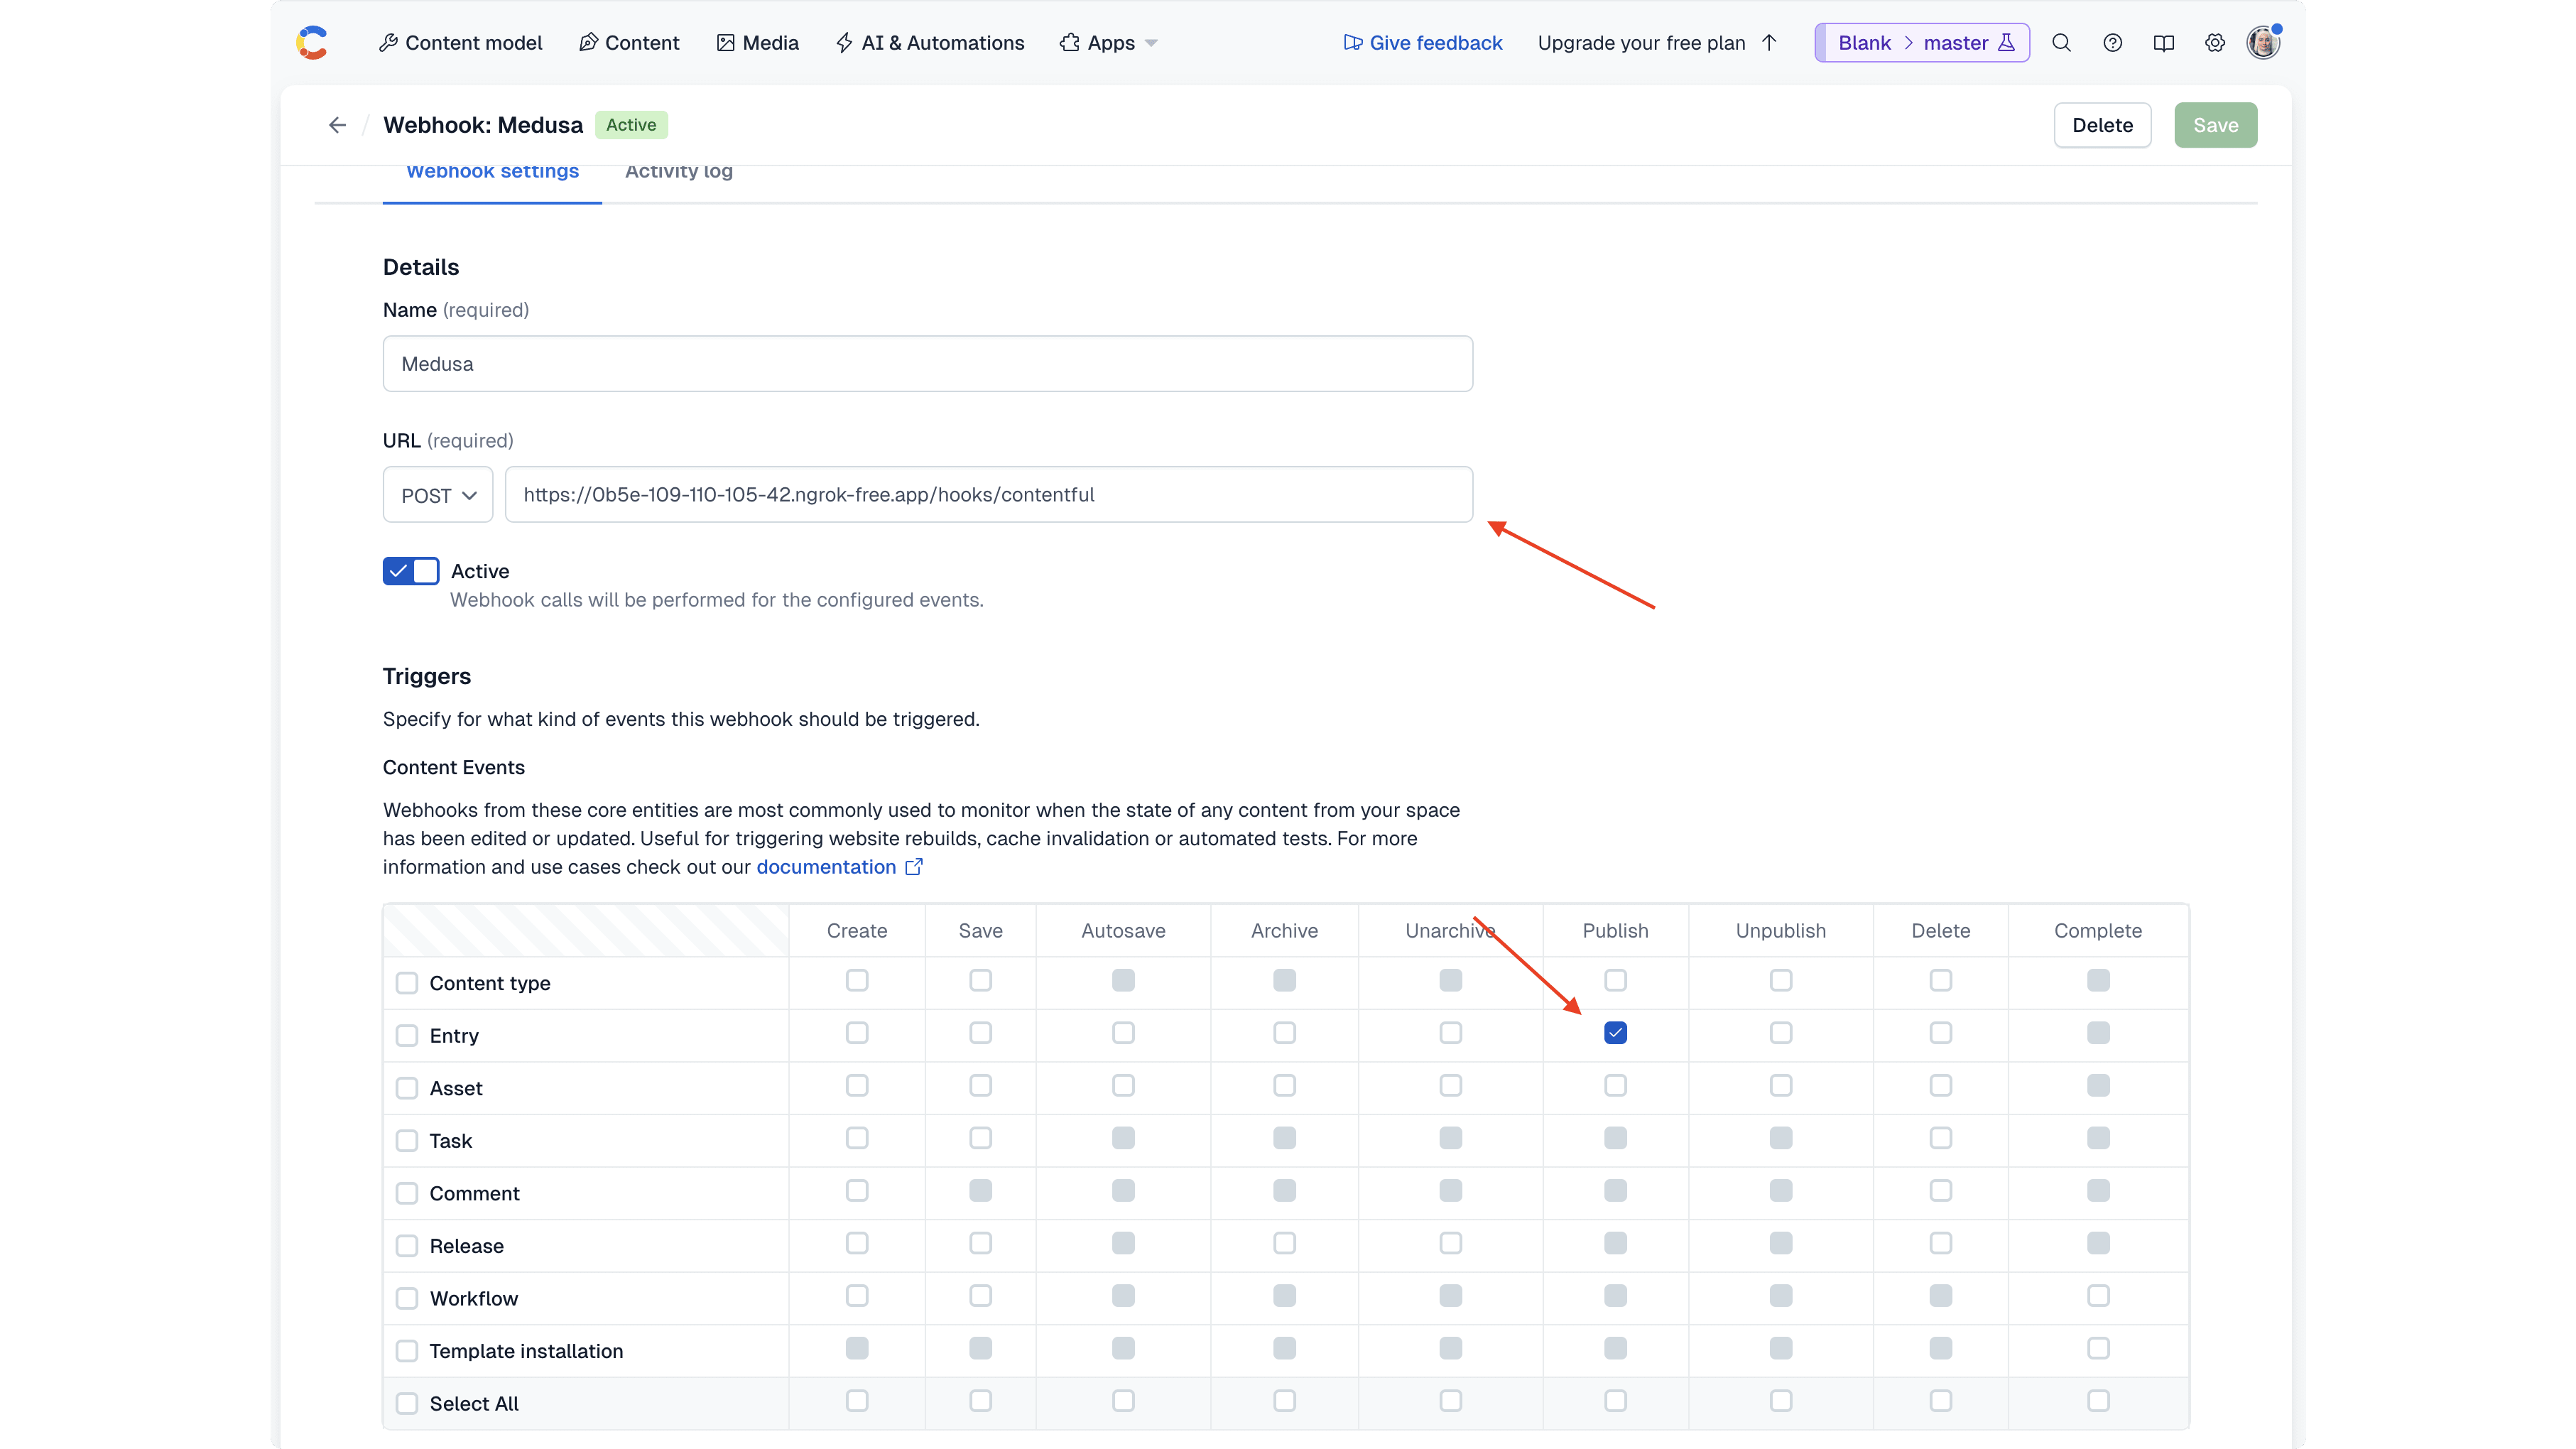
- In the webhook form:
- In the Name fields, enter a name, such as "Medusa".
- In the URL field, enter
{your_app}/hooks/contentful, where{your_app}is the public URL of your Medusa application. You'll create the/hooks/contentfulAPI route in a bit. - In the Triggers section, select the "Published" trigger for "Entry".
- Scroll down to the "Headers" section, and choose "application/json" for the "Content type" field.
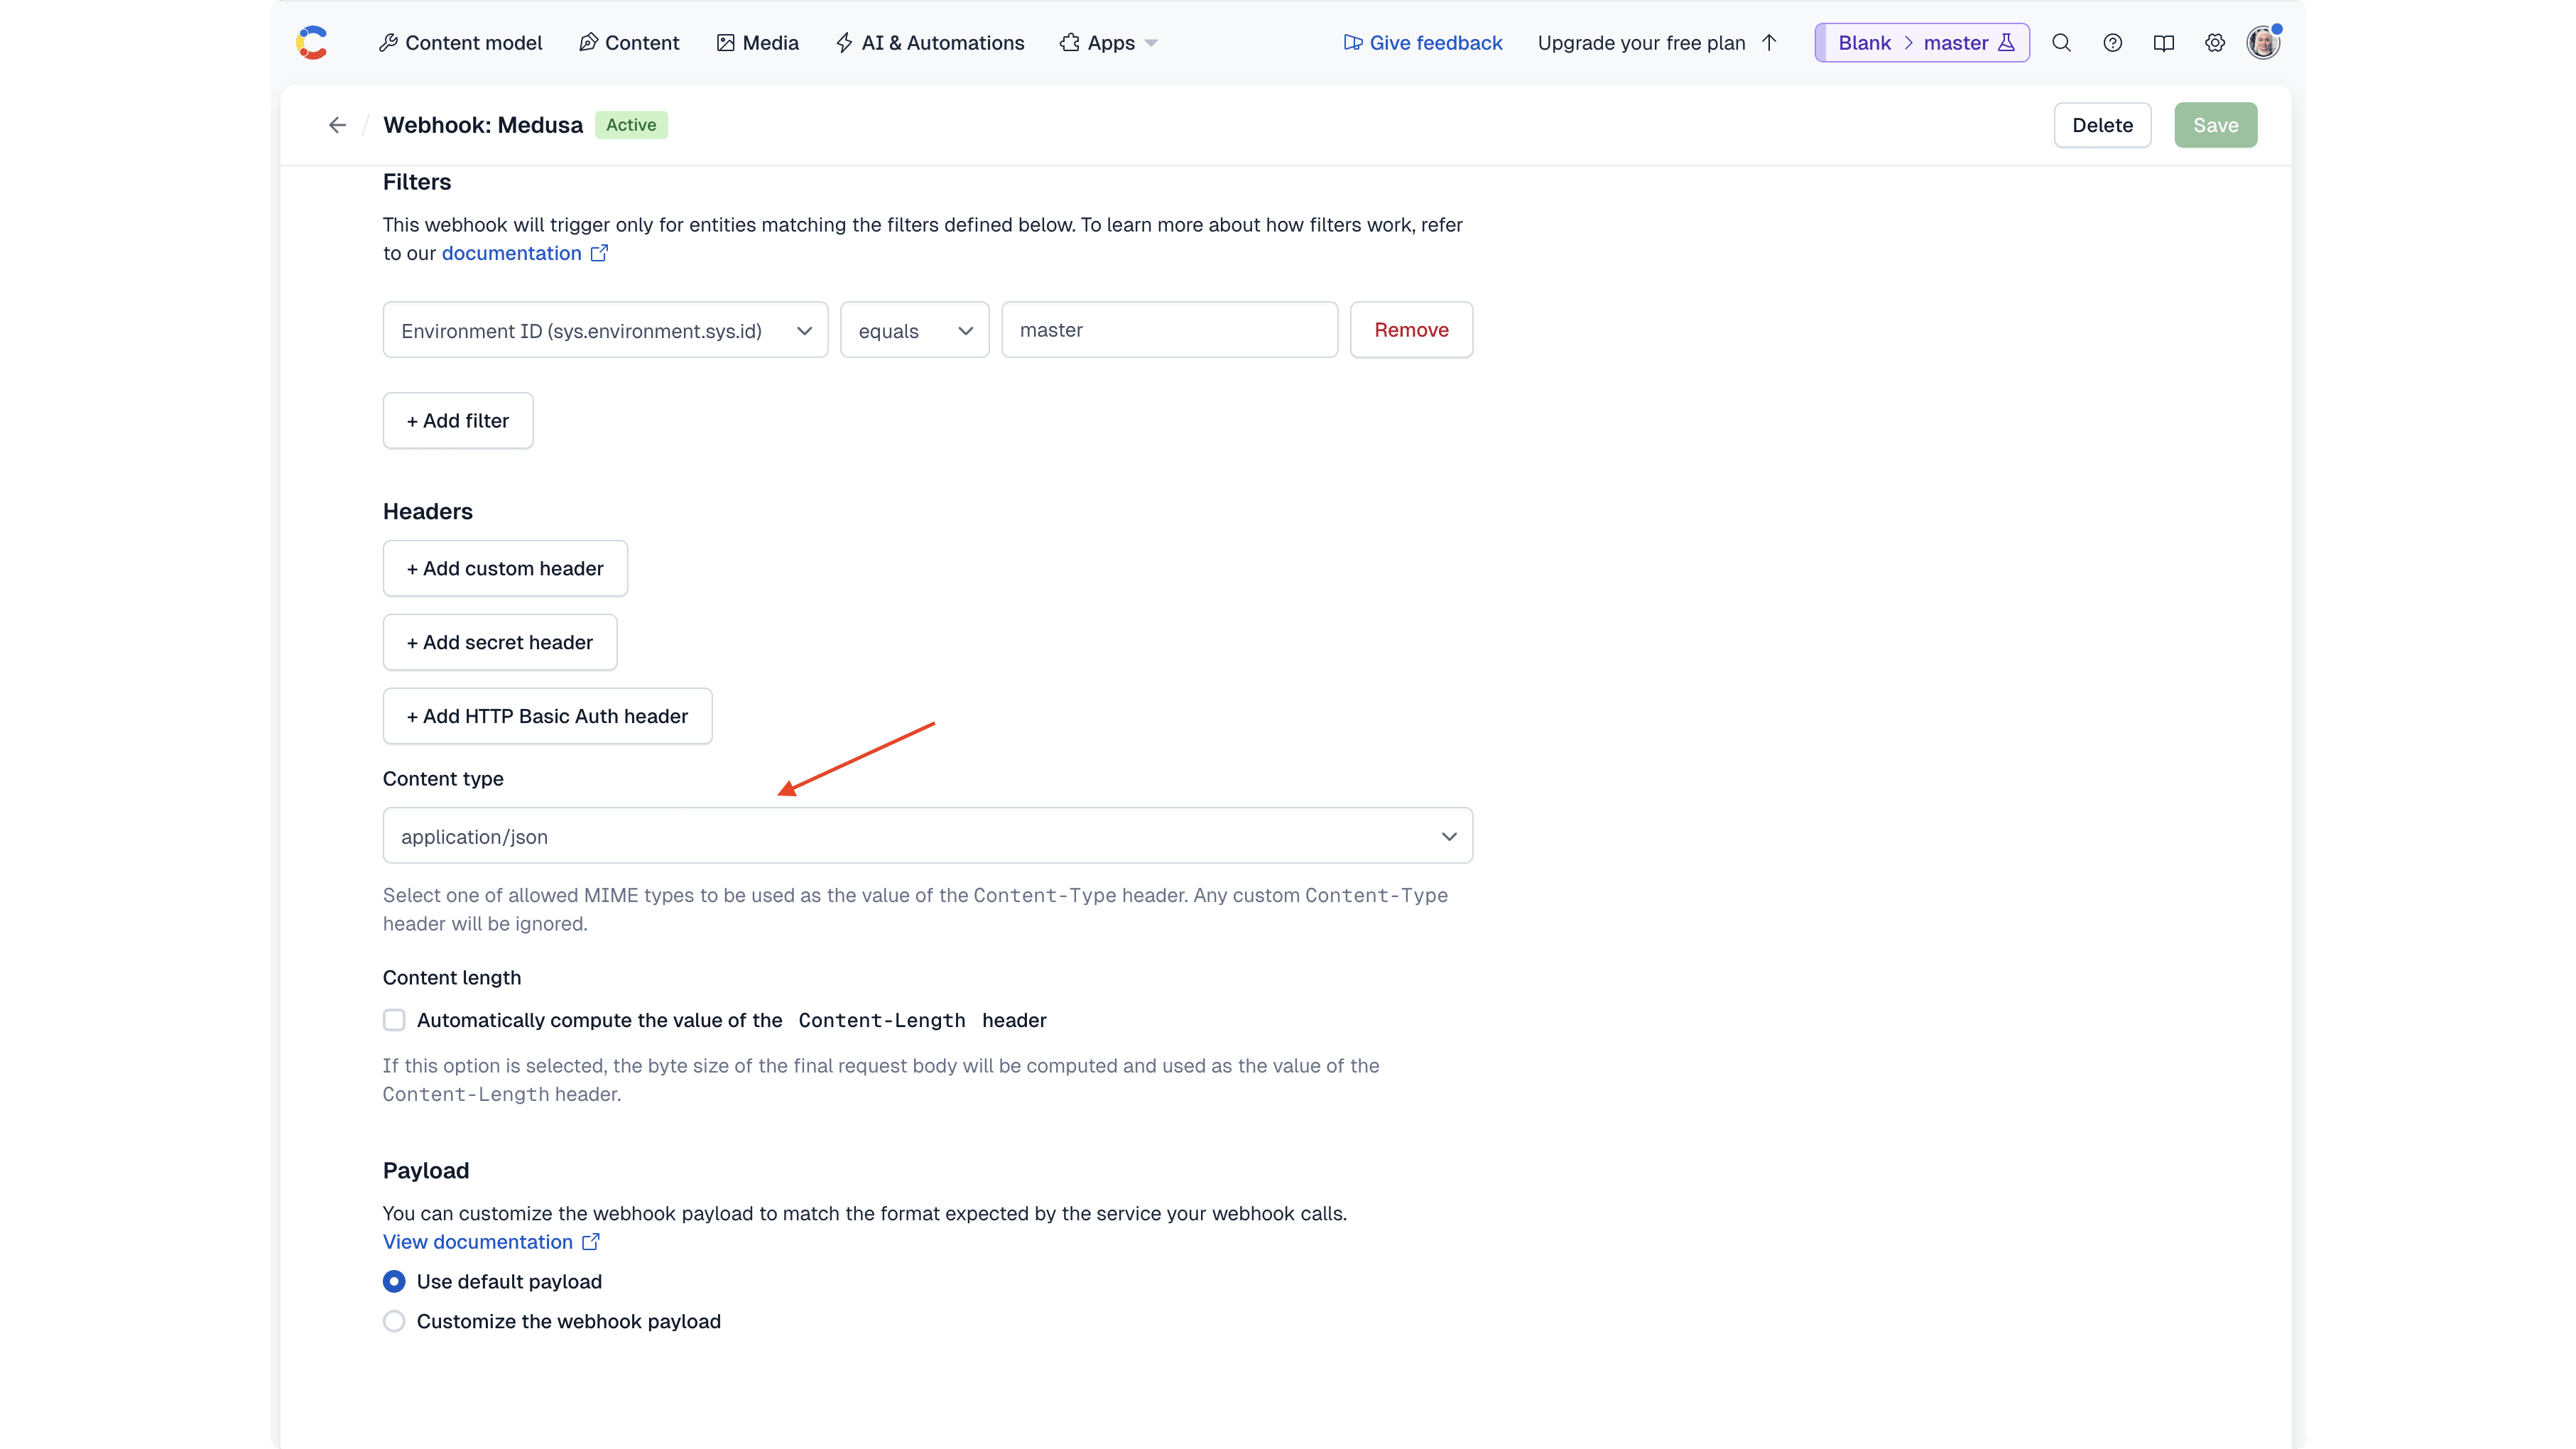
- Once you're done, click the Save button.
Setup Webhook Secret in Contentful#
You also need to add a webhook secret in Contentful. To do that, on the Contentful dashboard:
- Click on the cog icon at the top right, then choose "Webhooks" from the dropdown.
- On the Webhooks page, click on the "Settings" tab.
- Click on the "Enable request verification" button.
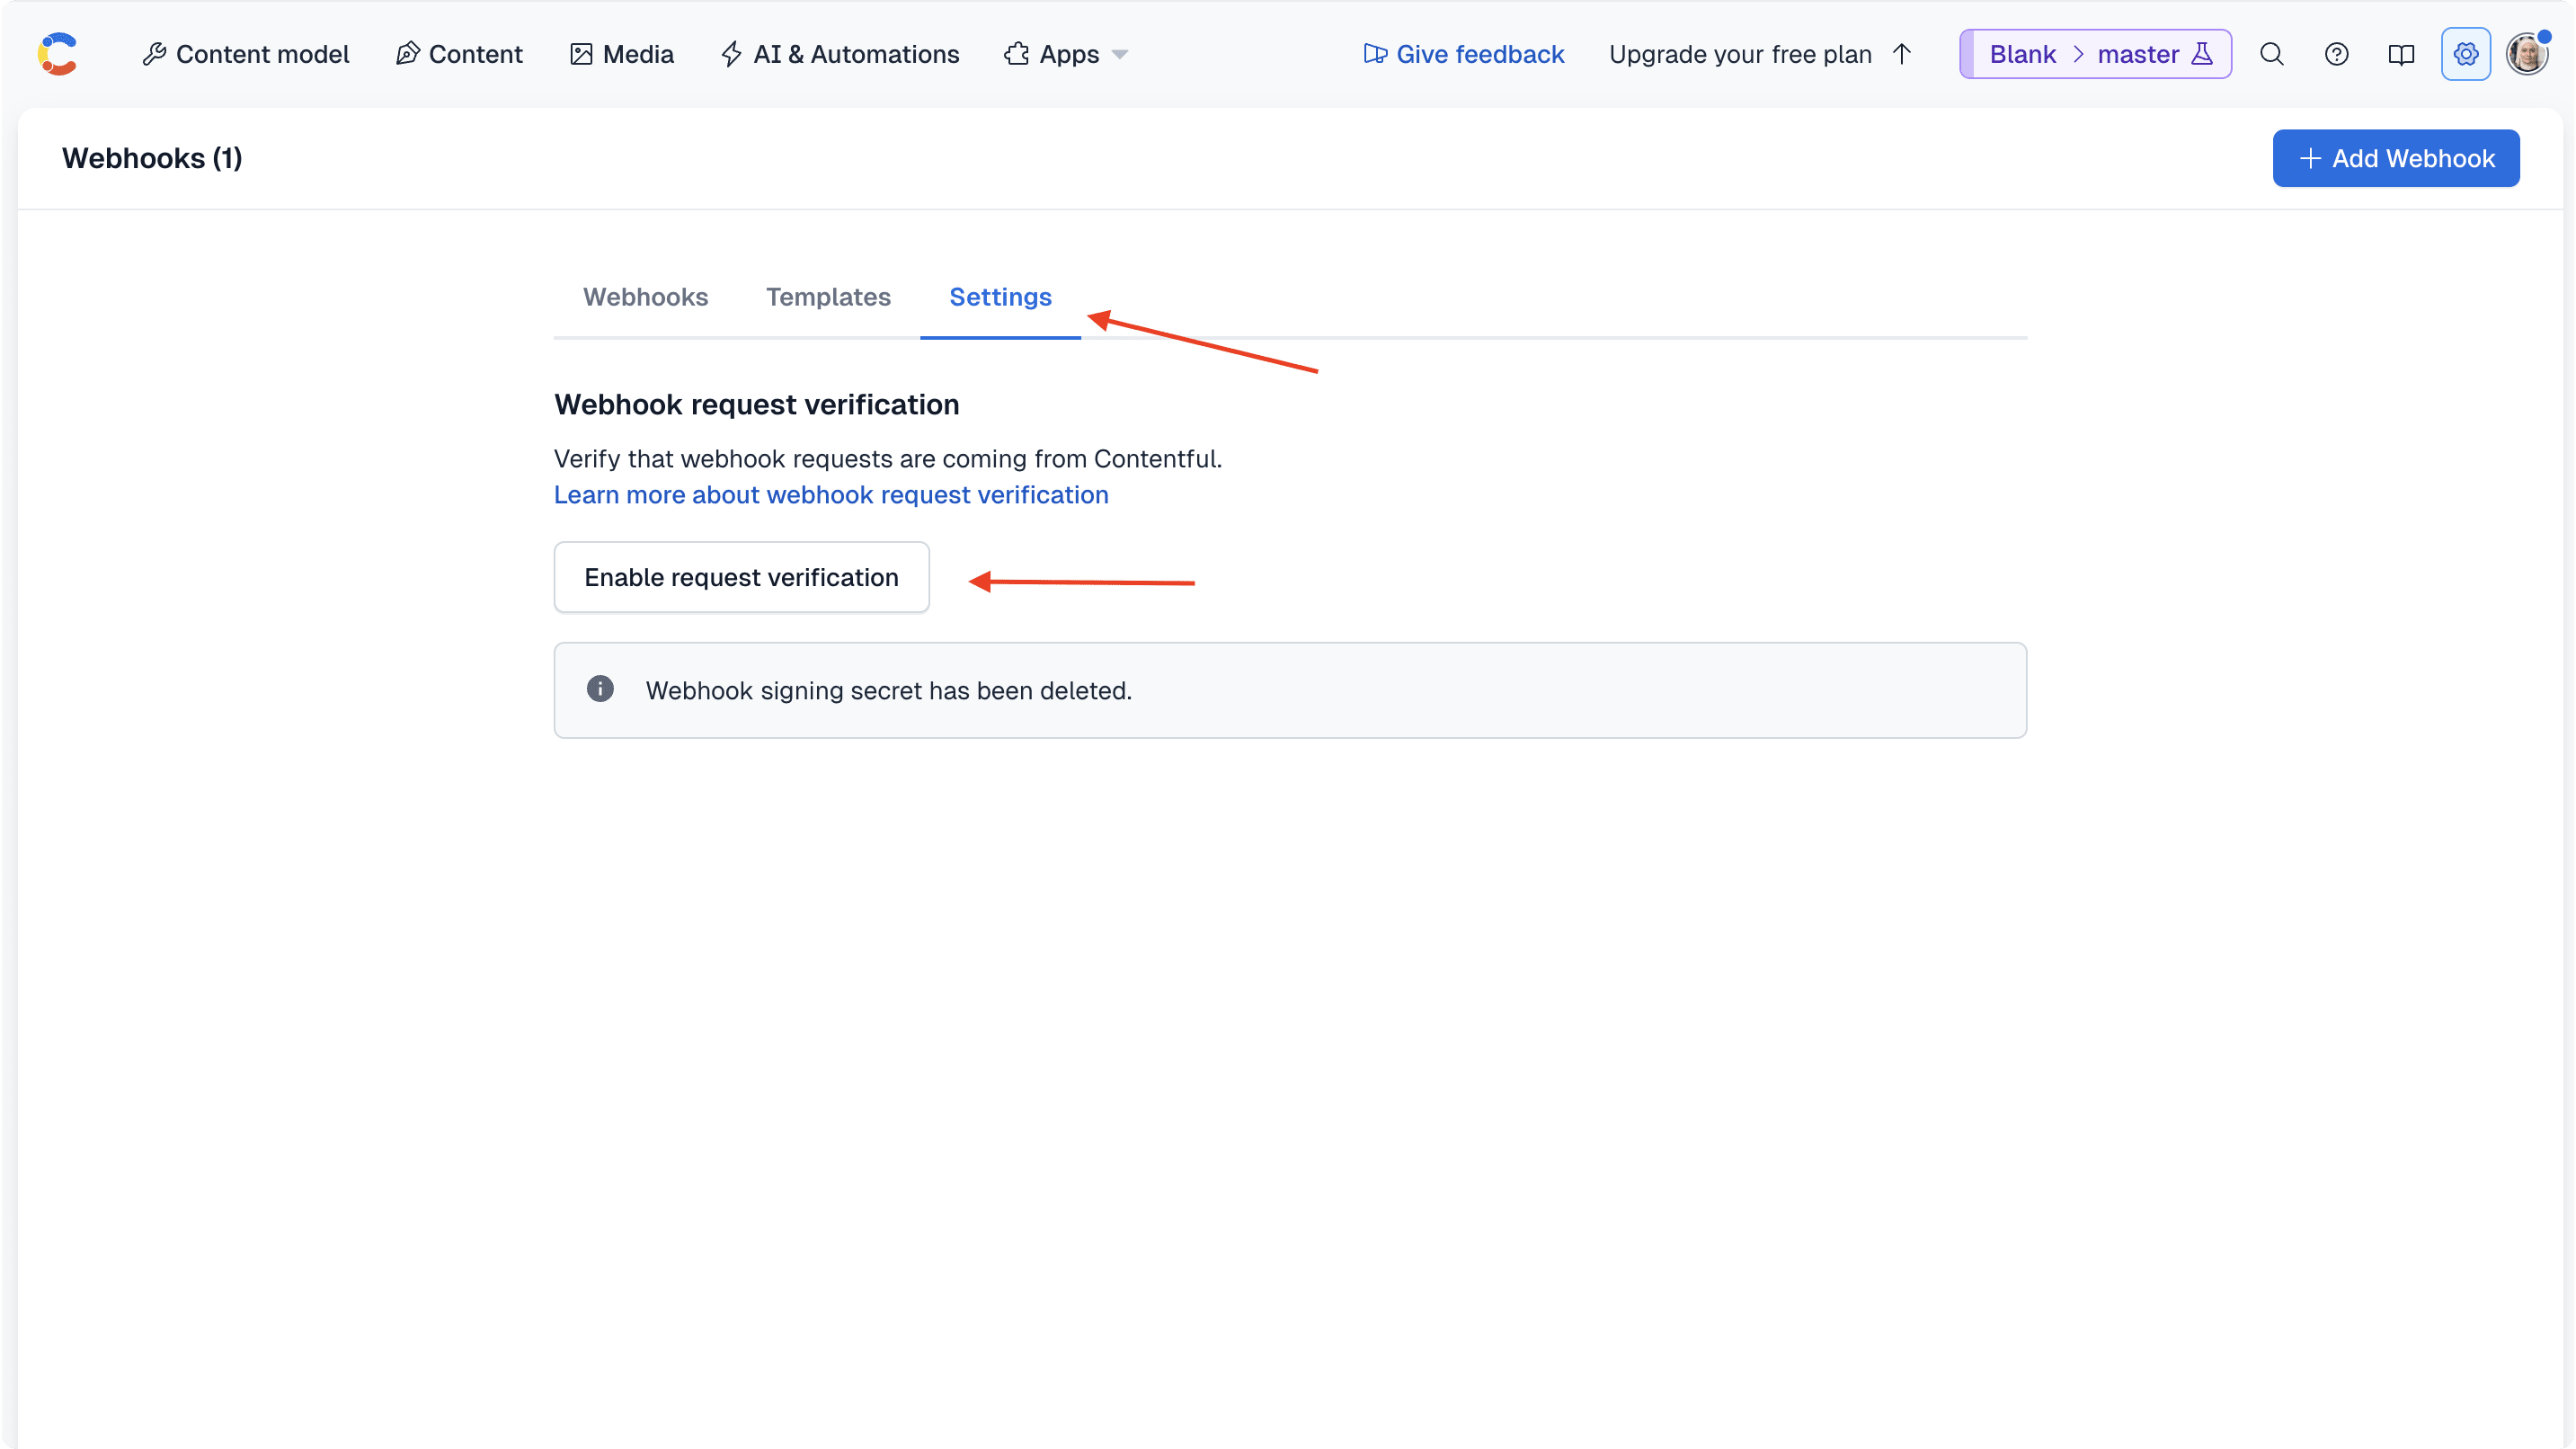
- Copy the secret that shows up. You can update it later but you can't see the same secret again.
You'll use the secret to verify the webhook request in Medusa next.
Update Contentful Module Options#
First, add the webhook secret as an environment variable in the Medusa application's .env file:
Next, add the webhook secret to the Contentful Module options in the Medusa application's medusa-config.ts file:
Finally, update the ModuleOptions type in src/modules/contentful/loader/create-content-models.ts to include the webhook_secret option:
Add Verify Request Method#
Next, you'll add a method to the Contentful Module's service that verifies a webhook request.
To verify the request, you'll need the @contentful/node-apps-toolkit package that provides utility functions for Node.js applications.
So, run the following command to install it:
Then, add the following method to the Contentful Module's service in src/modules/contentful/service.ts:
1// other imports...2import { 3 CanonicalRequest, 4 verifyRequest,5} from "@contentful/node-apps-toolkit"6 7export default class ContentfulModuleService {8 // ...9 async verifyWebhook(request: CanonicalRequest) {10 if (!this.options.webhook_secret) {11 throw new MedusaError(12 MedusaError.Types.INVALID_DATA, 13 "Webhook secret is not set"14 )15 }16 return verifyRequest(this.options.webhook_secret, request, 0)17 }18}
You add a verifyWebhook method that verifies a webhook request using the verifyRequest function.
You pass to the verifyRequest function the webhook secret from the module's options with the request's details. You also disable time-to-live (TTL) check by passing 0 as the third argument.
Handle Contentful Webhook Workflow#
Before you add the webhook listener, the last piece you need is to add a workflow that handles the necessary updates based on the webhook event.
The workflow will have the following steps:
Workflow hook
Step conditioned by when
View step details
You only need to implement the first step, as Medusa provides the other workflows (running as steps) in the @medusajs/medusa/core-flows package.
prepareUpdateDataStep
The first step receives the webhook data payload and, based on the entry type, returns the data necessary for the update.
To create the step, create the file src/workflows/steps/prepare-update-data.ts with the following content:
1import { createStep, StepResponse } from "@medusajs/framework/workflows-sdk"2import { EntryProps } from "contentful-management"3import ContentfulModuleService from "../../modules/contentful/service"4import { CONTENTFUL_MODULE } from "../../modules/contentful"5 6type StepInput = {7 entry: EntryProps8}9 10export const prepareUpdateDataStep = createStep(11 "prepare-update-data",12 async ({ entry }: StepInput, { container }) => {13 const contentfulModuleService: ContentfulModuleService = 14 container.resolve(CONTENTFUL_MODULE)15 16 const defaultLocale = await contentfulModuleService.getDefaultLocaleCode()17 18 let data: Record<string, unknown> = {}19 20 switch (entry.sys.contentType.sys.id) {21 case "product":22 data = {23 id: entry.fields.medusaId[defaultLocale!],24 title: entry.fields.title[defaultLocale!],25 subtitle: entry.fields.subtitle?.[defaultLocale!] || undefined,26 handle: entry.fields.handle[defaultLocale!],27 }28 break29 case "productVariant":30 data = {31 id: entry.fields.medusaId[defaultLocale!],32 title: entry.fields.title[defaultLocale!],33 }34 break35 case "productOption":36 data = {37 selector: {38 id: entry.fields.medusaId[defaultLocale!],39 },40 update: {41 title: entry.fields.title[defaultLocale!],42 },43 }44 break45 }46 47 return new StepResponse(data)48 }49)
You define a prepareUpdateDataStep function that receives the webhook data payload as an input.
In the step, you resolve the Contentful Module's service and use it to retrieve the default locale code. You need it to find the value to update the fields in Medusa.
Next, you prepare the data to return based on the entry type:
product: The product's ID, title, subtitle, and handle.productVariant: The product variant's ID and title.productOption: The product option's ID and title.
The data is prepared based on the expected input for the workflows that will be used to update the data.
Create the Workflow
You can now create the workflow that handles the webhook event.
Create the file src/workflows/handle-contentful-hook.ts with the following content:
13} from "@medusajs/framework/types"14 15export type WorkflowInput = {16 entry: EntryProps17}18 19export const handleContentfulHookWorkflow = createWorkflow(20 { name: "handle-contentful-hook-workflow" },21 (input: WorkflowInput) => {22 const prepareUpdateData = prepareUpdateDataStep({23 entry: input.entry,24 })25 26 when(input, (input) => input.entry.sys.contentType.sys.id === "product")27 .then(() => {28 updateProductsWorkflow.runAsStep({29 input: {30 products: [prepareUpdateData as UpsertProductDTO],31 },32 })33 })34 35 when(input, (input) => 36 input.entry.sys.contentType.sys.id === "productVariant"37 )38 .then(() => {39 updateProductVariantsWorkflow.runAsStep({40 input: {41 product_variants: [prepareUpdateData as UpsertProductVariantDTO],42 },43 })44 })45 46 when(input, (input) => 47 input.entry.sys.contentType.sys.id === "productOption"48 )49 .then(() => {50 updateProductOptionsWorkflow.runAsStep({51 input: prepareUpdateData as unknown as UpdateProductOptionsWorkflowInput,52 })53 })54 }55)
You define a handleContentfulHookWorkflow function that receives the webhook data payload as an input.
In the workflow, you:
- Prepare the data for the update using the
prepareUpdateDataStepstep. - Use a when condition to check if the entry type is a
product, and if so, update the product using theupdateProductsWorkflow. - Use a
whencondition to check if the entry type is aproductVariant, and if so, update the product variant using theupdateProductVariantsWorkflow. - Use a
whencondition to check if the entry type is aproductOption, and if so, update the product option using theupdateProductOptionsWorkflow.
when to perform typical operations that requires accessing data values. Learn more about workflow constraints in the Workflow Constraints documentation.Add the Webhook Listener API Route#
You can finally add the API route that acts as a webhook listener.
To add the API route, create the file src/api/hooks/contentful/route.ts with the following content:
9import ContentfulModuleService from "../../../modules/contentful/service"10 11export const POST = async (12 req: MedusaRequest,13 res: MedusaResponse14) => {15 const contentfulModuleService: ContentfulModuleService = 16 req.scope.resolve(CONTENTFUL_MODULE)17 18 const isValid = await contentfulModuleService.verifyWebhook({19 path: req.path,20 method: req.method.toUpperCase(),21 headers: req.headers,22 body: JSON.stringify(req.body),23 } as unknown as CanonicalRequest)24 25 if (!isValid) {26 throw new MedusaError(27 MedusaError.Types.UNAUTHORIZED, 28 "Invalid webhook request"29 )30 }31 32 await handleContentfulHookWorkflow(req.scope).run({33 input: {34 entry: req.body,35 } as unknown as HandleContentfulHookWorkflowInput,36 })37 38 res.status(200).send("OK")39}
Since you export a POST route handler function, you expose a POST route at /hooks/contentful.
In the route, you first use the verifyWebhook method of the Contentful Module's service to verify the request. If the request is invalid, you throw an error.
Then, you run the handleContentfulHookWorkflow passing the request's body, which is the webhook data payload, as an input.
Finally, you return a 200 response to Contentful to confirm that the webhook was received and processed.
Test the Webhook Listener#
To test out the webhook listener, start the Medusa application:
Then, try updating a product's title (in the default locale) in Contentful. You should see the product's title updated in Medusa.
Next Steps#
You've now integrated Contentful with Medusa and supported localized product details. You can expand on the features in this tutorial to:
- Add support for other data types, such as product categories or collections.
- Refer to the data model references for each Commerce Module to figure out the content types you need to create in Contentful.
- Listen to other product events and update the Contentful entries accordingly.
- Refer to the Events Reference for details on all events emitted in Medusa.
- Add localization for the entire Next.js Starter Storefront. You can either:
- Create content types in Contentful for different sections in the storefront, then use them to retrieve the localized content;
- Or use the approaches recommended in the Next.js documentation.
If you're new to Medusa, check out the main documentation, where you'll get a more in-depth learning of all the concepts you've used in this guide and more.
To learn more about the commerce features that Medusa provides, check out Medusa's Commerce Modules.
Troubleshooting#
If you encounter issues during your development, check out the troubleshooting guides.
Getting Help#
If you encounter issues not covered in the troubleshooting guides:
- Visit the Medusa GitHub repository to report issues or ask questions.
- Join the Medusa Discord community for real-time support from community members.
- Contact the sales team to get help from the Medusa team.