Implement Phone Authentication and Integrate Twilio SMS
In this tutorial, you will learn how to implement phone number authentication in your Medusa application.
When you install a Medusa application, you get a fully-fledged commerce platform with a Framework for customization. The Medusa application's commerce features are built around Commerce Modules, which are available out-of-the-box. These features include authentication with custom providers and for custom user or actor types.
In this tutorial, you'll learn how to implement a custom authentication provider that allows customers to log in with their phone number. You'll also integrate Twilio to send SMS messages to those customers with the one-time password (OTP) for authentication.
Summary#
By following this tutorial, you will learn how to:
- Install and set up Medusa.
- Implement a custom phone authentication provider.
- Integrate Twilio to send OTPs by SMS.
- Customize the Next.js Starter Storefront to allow customers to log in with their phone numbers.
You can follow this tutorial whether you're new to Medusa or an advanced Medusa developer.

Step 1: Install a Medusa Application#
Start by installing the Medusa application on your machine with the following command:
You'll first be asked for the project's name. Then, when asked whether you want to install the Next.js Starter Storefront, choose Yes.
Afterward, the installation process will start, which will install the Medusa application as a monorepository in a directory with your project's name. The backend is installed in the apps/backend directory, and the Next.js Starter Storefront is installed in the apps/storefront directory.
Once the installation finishes successfully, the Medusa Admin dashboard will open with a form to create a new user. Enter the user's credentials and submit the form. Afterward, you can log in with the new user and explore the dashboard.
apps/backend directory of your Medusa project.Step 2: Implement Phone Authentication Module Provider#
In Medusa, you integrate custom authentication providers by creating an Authentication Module Provider. Then, you can use that provider to authenticate users using custom logic.
In this step, you'll create a Phone Authentication Module Provider that allows users to log in with their phone numbers and an OTP. Later, you'll integrate Twilio to send the OTPs to the users, and customize the storefront to allow customers to log in with their phone numbers.
Prerequisite: Install jsonwebtoken#
In the Phone Authentication Module Provider, you'll use the jsonwebtoken package to sign and verify the OTPs.
To install the package, run the following command in the Medusa application directory:
a. Create Module Directory#
Modules are created under the src/modules directory. So, start by creating the directory src/modules/phone-auth.
b. Create Auth Module Provider Service#
A module has a service that contains its logic. For Authentication Module Providers, the service implements the logic to authenticate users.
To create the service of the Phone Authentication Module Provider, create the file src/modules/phone-auth/service.ts with the following content:
1import { 2 AbstractAuthModuleProvider, 3 AbstractEventBusModuleService, 4} from "@medusajs/framework/utils"5import { 6 Logger, 7} from "@medusajs/types"8 9type InjectedDependencies = {10 logger: Logger11 event_bus: AbstractEventBusModuleService12}13 14type Options = {15 jwtSecret: string16}17 18class PhoneAuthService extends AbstractAuthModuleProvider {19 static DISPLAY_NAME = "Phone Auth"20 static identifier = "phone-auth"21 private options: Options22 private logger: Logger23 private event_bus: AbstractEventBusModuleService24 25 constructor(container: InjectedDependencies, options: Options) {26 // @ts-ignore27 super(...arguments)28 29 this.options = options30 this.logger = container.logger31 this.event_bus = container.event_bus32 }33}34 35export default PhoneAuthService
An Authentication Module Provider's service must extend the AbstractAuthModuleProvider class. You'll get a type error about implementing the abstract methods of that class, which you'll add in the next steps.
An Authentication Module Provider must also have the following static properties:
identifier: A unique identifier for the provider.DISPLAY_NAME: A human-readable name for the provider. This name is used for display purposes.
A module provider's constructor receives two parameters:
container: The module's container that contains Framework resources available to the module. You access the following resources:logger: A Logger class to log debug messages.event_bus: The Event Module's service to emit events.
options: Options that are passed to the module provider when it's registered in Medusa's configurations. You define the following option:jwtSecret: A secret used to sign and verify the OTPs.
In the constructor, you set the class's properties to the injected dependencies and options.
In the next sections, you'll implement the methods of the AbstractAuthModuleProvider class.
c. Implement validateOptions Method#
The validateOptions method is used to validate the options passed to the module provider. If the method throws an error, the Medusa application won't start.
So, add the validateOptions method to the PhoneAuthService class:
1// other imports...2import { 3 MedusaError,4} from "@medusajs/framework/utils"5 6class PhoneAuthService extends AbstractAuthModuleProvider {7 // ...8 static validateOptions(options: Record<any, any>): void | never {9 if (!options.jwtSecret) {10 throw new MedusaError(11 MedusaError.Types.INVALID_DATA,12 "JWT secret is required"13 )14 }15 }16}
The validateOptions method receives the options passed to the module provider as a parameter.
In the method, you throw an error if the jwtSecret option is not set.
d. Implement register Method#
When a customer (or another actor type) registers in your application, they must also have an auth identity that allows them to login.
The register method of an auth provider uses custom logic to create the auth identity for the actor type (such as customer). In the method, you can perform custom validation and specify the custom authentication details to store for the user's auth identity.
Medusa uses the register method to create an auth identity that will be associated with the customer when they register. You can learn more in the Authentication Flows documentation.

So, add the register method to the PhoneAuthService class:
1// other imports...2import { 3 AuthenticationInput, 4 AuthIdentityProviderService, 5 AuthenticationResponse, 6} from "@medusajs/types"7 8class PhoneAuthService extends AbstractAuthModuleProvider {9 // ...10 async register(11 data: AuthenticationInput,12 authIdentityProviderService: AuthIdentityProviderService13 ): Promise<AuthenticationResponse> {14 const { phone } = data.body || {}15 16 if (!phone) {17 return {18 success: false,19 error: "Phone number is required",20 }21 }22 23 try {24 await authIdentityProviderService.retrieve({25 entity_id: phone,26 })27 28 return {29 success: false,30 error: "User with phone number already exists",31 }32 } catch (error) {33 const user = await authIdentityProviderService.create({34 entity_id: phone,35 })36 37 return {38 success: true,39 authIdentity: user,40 }41 }42 }43}
Parameters
The register method receives an object parameter with the following properties:
data: An object containing properties likebodythat holds request-body parameters. Clients will pass relevant authentication data, such as the user's phone number, in the request body.authIdentityProviderService: A service injected by the Auth Module that allows you to manage auth identities.
Method Logic
In the method, you extract the phone property from the request body, and return an error if it's not provided. You also return an error if another user is using the same phone number.
Otherwise, you create a new auth identity for the user. You set the phone number as the entity_id of the auth identity, which is a unique identifier.
Return Value
Finally, you return an object with the following properties:
success: A boolean indicating whether the registration was successful.authIdentity: The created auth identity of the user. This property is only set if the registration was successful.error: An error message if the registration failed.
e. Implement authenticate Method#
When a customer (or another actor type) logs in, the authenticate method of an auth provider is called. This method uses custom logic to authenticate the user.
Authentication providers may implement one of the following flows:
- Direct authentication, where the user is authenticated using this method only. For example, authenticating with an email and password.
- Authentication with callback verification, where the user is authenticated using this method and then a callback is used to verify additional information.
For the Phone Authentication Module Provider, you'll implement the second flow. The user will first be authenticated using the authenticate method to make sure the user exists and generate an OTP. Then, they need to supply the OTP to verify their identity.

So, add the authenticate method to the PhoneAuthService class:
1// other imports...2import { 3 AuthIdentityDTO,4} from "@medusajs/types"5import jwt from "jsonwebtoken"6 7class PhoneAuthService extends AbstractAuthModuleProvider {8 // ...9 async authenticate(10 data: AuthenticationInput,11 authIdentityProviderService: AuthIdentityProviderService12 ): Promise<AuthenticationResponse> {13 const { phone } = data.body || {}14 15 if (!phone) {16 return {17 success: false,18 error: "Phone number is required",19 }20 }21 22 try {23 await authIdentityProviderService.retrieve({24 entity_id: phone,25 })26 } catch (error) {27 return {28 success: false,29 error: "User with phone number does not exist",30 }31 }32 33 const { hashedOTP, otp } = await this.generateOTP()34 35 await authIdentityProviderService.update(phone, {36 provider_metadata: {37 otp: hashedOTP,38 },39 })40 41 await this.event_bus.emit({42 name: "phone-auth.otp.generated",43 data: {44 otp,45 phone,46 },47 }, {})48 49 return {50 success: true,51 location: "otp",52 }53 }54 55 async generateOTP(): Promise<{ hashedOTP: string, otp: string }> {56 // Generate a 6-digit OTP57 const otp = Math.floor(100000 + Math.random() * 900000).toString()58 59 // for debug60 this.logger.info(`Generated OTP: ${otp}`)61 62 const hashedOTP = jwt.sign({ otp }, this.options.jwtSecret, {63 expiresIn: "60s",64 })65 66 return { hashedOTP, otp }67 }68}
You add two methods: the authenticate method, and a helper generateOTP method.
authenticate Parameters
The authenticate method receives an object parameter with the following properties:
data: An object containing properties likebodythat holds request-body parameters. Clients will pass relevant authentication data, such as the user's phone number, in the request body.authIdentityProviderService: A service injected by the Auth Module that allows you to manage auth identities.
authenticate Logic
In the method, you return an error if the phone property is not provided in the request body, or if a user with that phone number doesn't exist.
Next, you generate a 6-digit OTP using the generateOTP method. Notice that you currently log the OTP for debugging purposes. You can remove this line later once you integrate Twilio.
The OTP is hashed and stored in the provider_metadata property of the user's auth identity. The provider_metadata property is a JSON object that stores additional information about the auth identity.
Then, you emit an event with the generated OTP and the user's phone number. This allows you later to handle the event and send the OTP to the user using services like Twilio.
authenticate Return Value
Finally, you return an object with the following properties:
success: A boolean indicating whether the authentication was successful.location: A string indicating a URL to perform additional actions in. In this case, you set the location tootp, indicating that the user should verify with the OTP.error: An error message if the authentication failed.
f. Implement validateCallback Method#
When an authentication provider requires a callback to verify the user, the Medusa application calls the validateCallback method.
You can use this method to verify the OTP that the user entered. If valid, you return the logged in user, and the Medusa application will return a JWT token that the user can use to authenticate in the application.

So, add the validateCallback method to the PhoneAuthService class:
1class PhoneAuthService extends AbstractAuthModuleProvider {2 // ...3 async validateCallback(4 data: AuthenticationInput,5 authIdentityProviderService: AuthIdentityProviderService6 ): Promise<AuthenticationResponse> {7 const { phone, otp } = data.query || {}8 9 if (!phone || !otp) {10 return {11 success: false,12 error: "Phone number and OTP are required",13 }14 }15 16 const user = await authIdentityProviderService.retrieve({17 entity_id: phone,18 })19 20 if (!user) {21 return {22 success: false,23 error: "User with phone number does not exist",24 }25 }26 27 // verify that OTP is correct28 const userProvider = user.provider_identities?.find((provider) => provider.provider === this.identifier)29 if (!userProvider || !userProvider.provider_metadata?.otp) {30 return {31 success: false,32 error: "User with phone number does not have a phone auth provider",33 }34 }35 36 try {37 const decodedOTP = jwt.verify(38 userProvider.provider_metadata.otp as string, 39 this.options.jwtSecret40 ) as { otp: string }41 42 if (decodedOTP.otp !== otp) {43 throw new Error("Invalid OTP")44 }45 } catch (error) {46 return {47 success: false,48 error: error.message || "Invalid OTP",49 }50 }51 52 const updatedUser = await authIdentityProviderService.update(phone, {53 provider_metadata: {54 otp: null,55 },56 })57 58 return {59 success: true,60 authIdentity: updatedUser,61 }62 }63}
Parameters
The validateCallback method receives an object parameter with the following properties:
data: An object containing properties likequerythat holds query parameters. Clients will pass relevant authentication data, such as the user's phone number and OTP, in the request query.authIdentityProviderService: A service injected by the Auth Module that allows you to manage auth identities.
Method Logic
In the method, you return an error if the phone and otp aren't provided in the request query, or if a user with that phone number doesn't exist.
Next, you verify that the OTP provided by the user is correct. You retrieve the hashed OTP from the provider_metadata property of the user's auth identity. If the OTP is not valid, you return an error.
After that, you update the user's auth identity to remove the OTP from the provider_metadata property.
Return Value
Finally, you return an object with the following properties:
success: A boolean indicating whether the authentication was successful.authIdentity: The user's auth identity. This property is only set if the authentication was successful.error: An error message if the authentication failed.
g. Export Module Definition#
You've now finished implementing the necessary methods for the Phone Authentication Module Provider.
The final piece to a module is its definition, which you export in an index.ts file at the module's root directory. This definition tells Medusa the name of the module, its service, and optionally its loaders.
To create the module's definition, create the file src/modules/phone-auth/index.ts with the following content:
You use ModuleProvider from the Modules SDK to create the module provider's definition. It accepts two parameters:
- The name of the module that this provider belongs to, which is
Modules.AUTHin this case. - An object with a required property
servicesindicating the module provider's services. Each of these services will be registered as authentication providers in Medusa.
h. Add Module Provider to Medusa's Configurations#
Once you finish building the module, add it to Medusa's configurations to start using it.
In medusa-config.ts, add a modules property:
1// other imports...2import { Modules, ContainerRegistrationKeys } from "@medusajs/framework/utils"3 4module.exports = defineConfig({5 // ...6 modules: [7 {8 resolve: "@medusajs/medusa/auth",9 dependencies: [10 Modules.CACHE, 11 ContainerRegistrationKeys.LOGGER, 12 Modules.EVENT_BUS,13 ],14 options: {15 providers: [16 // default provider17 {18 resolve: "@medusajs/medusa/auth-emailpass",19 id: "emailpass",20 },21 {22 resolve: "./src/modules/phone-auth",23 id: "phone-auth",24 options: {25 jwtSecret: process.env.PHONE_AUTH_JWT_SECRET || "supersecret",26 },27 },28 ],29 },30 },31 ],32})
To pass an Auth Module Provider to the Auth Module, you add the modules property to the Medusa configuration and pass the Auth Module in its value.
The Auth Module accepts a dependencies option, allowing you to inject dependencies into the containers of the module and its providers. The Auth Module requires passing the Cache Module and Logger, but you also inject the event_bus dependency to use the Event Module's service in the Phone Authentication Module Provider.
The Auth Module also accepts a providers option, which is an array of Auth Module Providers to register. You register the emailpass provider, which is registered by default when you don't provide any other providers.
To register the Phone Authentication Module Provider, you add an object to the providers array with the following properties:
resolve: The NPM package or path to the module provider. In this case, it's the path to thesrc/modules/phone-authdirectory.id: The ID of the module provider. The auth provider is then registered with the IDau_{id}.options: The options to pass to the module provider. These are the options you defined in theOptionsinterface of the module provider's service.
i. Enable Phone Authentication for Customers#
By default, customers and admin users can be authenticated using the emailpass provider. When you add a new provider, you need to specify which actor types can use it.
In medusa-config.ts, add to projectConfig.http a new authMethodsPerActor property:
The authMethodsPerActor property is an object whose keys are actor types. The values are arrays of authentication method IDs that can be used for that actor type.
In this case, you enable the phone-auth provider for customers. You can also enable it for other actor types, such as admin users or vendors.
Test Out Phone Authentication#
In this section, you'll test out the Phone Authentication Module Provider using Medusa's API routes. You can, instead, test it out later using the Next.js Starter Storefront.
First, start the Medusa application with the following command:
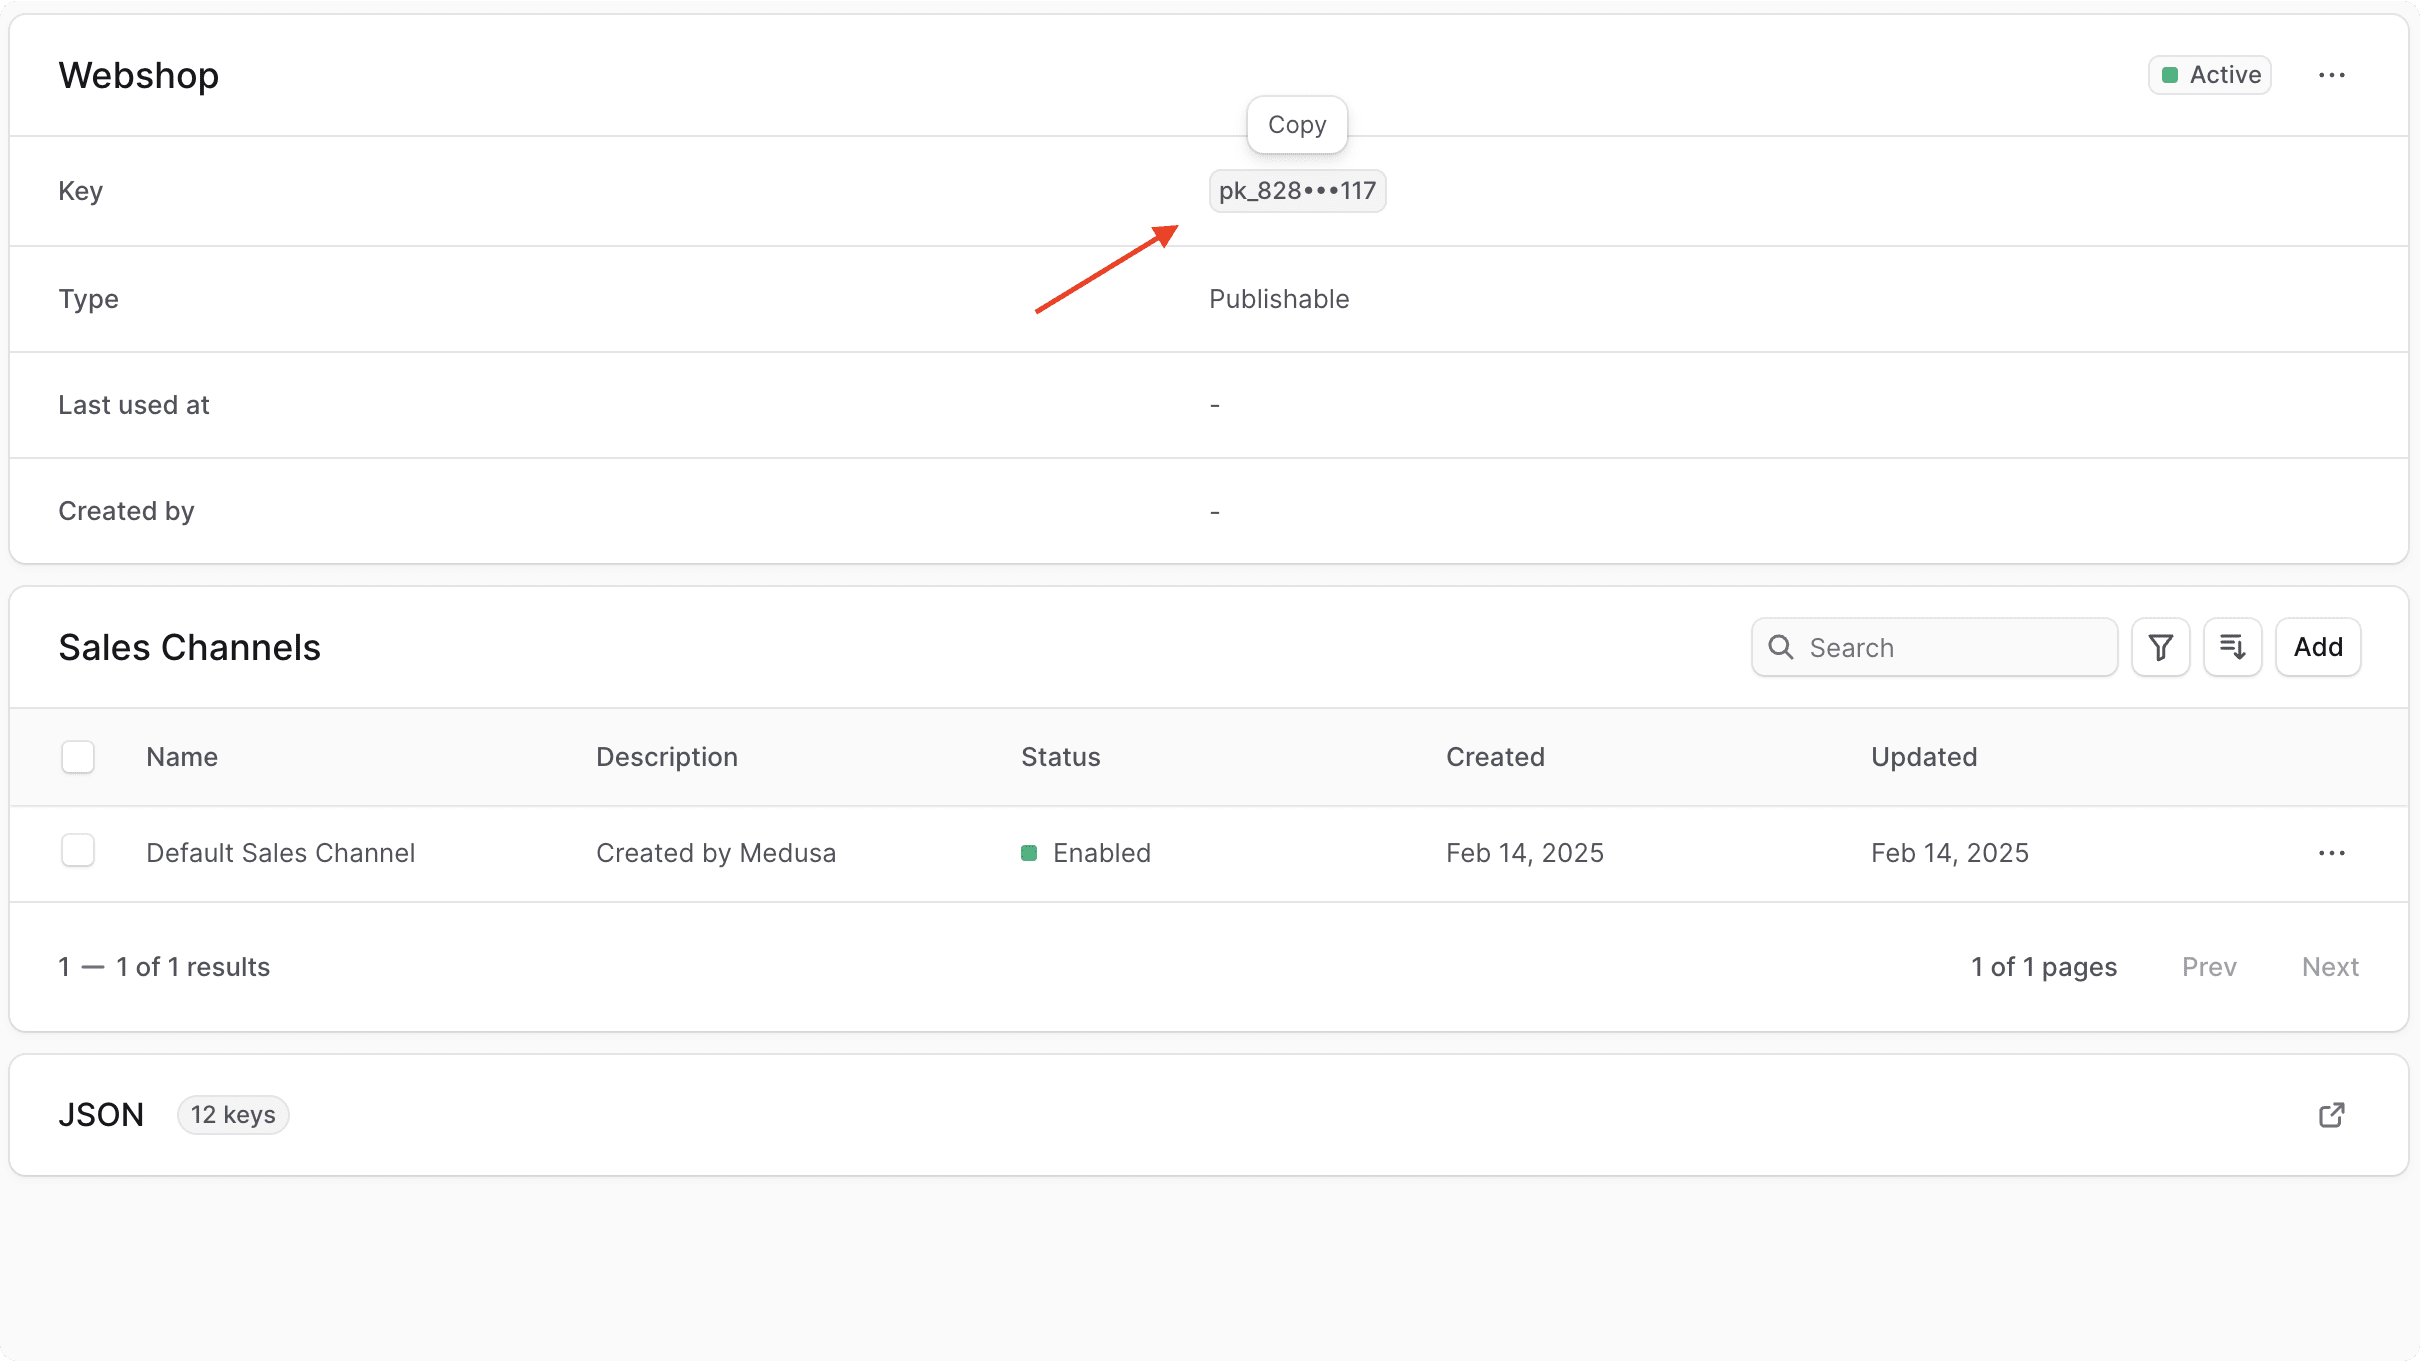
Prerequisite: Retrieve Publishable API Key
Before you start testing the authentication provider using the API routes, you need to retrieve your application's publishable API key. This key is necessary to send requests to API routes starting with /store.
To retrieve the publishable API key:
- Open the Medusa Admin dashboard at
http://localhost:9000/adminand log in. - Go to Settings -> Publishable API Keys.
- Click on the API key in the table.
- In its details page, click on the API key to copy it.
a. Retrieve Registration Token
The first step is to retrieve a registration token for a new customer. This token will allow them to register in the application.
To retrieve the registration token, send a POST request to /auth/customer/phone-auth/register:
Make sure to replace the phone number with the one you want to use.
This will return a token in the response:
b. Register Customer
Next, you'll register the customer using the Register Customer API route. You'll pass the registration token you received in the previous step in the header of this request.
So, send a POST request to /store/customers:
1curl -X POST 'http://localhost:9000/store/customers' \2--header 'x-publishable-api-key: {publishable_api_key}' \3--header 'Content-Type: application/json' \4--header 'Authorization: Bearer {reg_token}' \5--data-raw '{6 "email": "+19077890116@gmail.com",7 "phone": "19077890116",8 "first_name": "John",9 "last_name": "Smith"10}'
Make sure to replace:
{publishable_api_key}with the publishable API key you retrieved from the Medusa Admin dashboard.{reg_token}with the registration token you received in the previous step.- The customer details in the request body with the ones you want to use. Use the same phone number you used in the previous step.
- You pass the email because it's required by the Register Customer API route. You set it to the phone number with a
gmail.comdomain.
- You pass the email because it's required by the Register Customer API route. You set it to the phone number with a
The request will return the created customer's details:
1{2 "customer": {3 "id": "cus_01JVPESW5SM1MSVPNM2MSC0ZEC",4 "email": "+19077890116@gmail.com",5 "company_name": null,6 "first_name": "John",7 "last_name": "Smith",8 "phone": "19077890116",9 "metadata": null,10 "has_account": true,11 "deleted_at": null,12 "created_at": "2025-05-20T09:01:13.273Z",13 "updated_at": "2025-05-20T09:01:13.273Z",14 "addresses": []15 }16}
The customer can now authenticate using the phone number and OTP.
c. Authenticate Customer
Next, you'll authenticate the customer using the Authenticate Customer API route. This would send the customer an OTP to their phone number (which you'll implement in the next step).
So, send a POST request to /auth/customer/phone-auth:
Make sure to replace the phone number with the one you used to register the customer.
This will return a location in the response:
Indicating that the user should verify their OTP.
d. Verify OTP
If you check the logs of the Medusa application, you'll see that the OTP was generated and logged:
As mentioned before, this is only for debugging purposes. In the next step, you'll implement the logic to send the OTP to the user using Twilio.
So, to verify the OTP, you'll send a request to the Verify Callback API route:
You pass the following query parameters:
phone: The phone number of the customer. Make sure to use the same phone number you used to register the customer, and to encode it. For example, the+sign should be encoded as%2B.otp: The OTP that the customer received. Make sure to use the same OTP shown in the logs.
If the OTP is valid, you'll receive a JWT token in the response:
You can use this token to authenticate the customer in the application. For example, you can use the token to retrieve the customer's details.
Step 3: Integrate Twilio SMS#
Similar to the Auth Module, the Notification Module allows registering custom providers to send notifications, such as SMS or email.
In this step, you'll create a Twilio Notification Module Provider, then use it to send the OTP to the customer.
a. Install Twilio SDK#
Before you start implementing the Twilio Notification Module Provider, install the Twilio SDK to interact with the Twilio API.
Run the following command in the Medusa application directory:
You'll use the Twilio SDK in the Notification Module Provider's service.
b. Create Module Directory#
Create the directory src/modules/twilio-sms to create the Twilio Notification Module Provider.
c. Create Notification Module Provider Service#
A Notification Module Provider has a service that contains the sending logic. The service must extend the AbstractNotificationProviderService class.
So, create the file src/modules/twilio-sms/service.ts with the following content:
1import { 2 AbstractNotificationProviderService,3} from "@medusajs/framework/utils"4import { Twilio } from "twilio"5 6type InjectedDependencies = {}7 8type TwilioSmsServiceOptions = {9 accountSid: string10 authToken: string11 from: string12}13 14class TwilioSmsService extends AbstractNotificationProviderService {15 static readonly identifier = "twilio-sms"16 private readonly client: Twilio17 private readonly from: string18 19 constructor(container: InjectedDependencies, options: TwilioSmsServiceOptions) {20 super()21 22 this.client = new Twilio(options.accountSid, options.authToken)23 this.from = options.from24 }25}
You'll get a type error about implementing the abstract methods of the AbstractNotificationProviderService class, which you'll add in the next steps.
A Notification Module Provider must have an identifier static property, which is a unique identifier for the module. This identifier is used to register the module in the Medusa application.
A module provider's constructor receives two parameters:
container: The module's container that contains Framework resources available to the module. You don't need to access any resources for this provider.options: Options that are passed to the module provider when it's registered in Medusa's configurations. You define the following option:accountSid: The Twilio account SID.authToken: The Twilio auth token.from: The Twilio phone number to send the SMS from.
In the constructor, you set the class's properties to the injected dependencies and options.
In the next sections, you'll implement the methods of the AbstractNotificationProviderService class.
d. Implement validateOptions Method#
The validateOptions method is used to validate the options passed to the module provider. If the method throws an error, the Medusa application won't start.
So, add the validateOptions method to the TwilioSmsService class:
1class TwilioSmsService extends AbstractNotificationProviderService {2 // ...3 static validateOptions(options: Record<any, any>): void | never {4 if (!options.accountSid) {5 throw new Error("Account SID is required")6 }7 if (!options.authToken) {8 throw new Error("Auth token is required")9 }10 if (!options.from) {11 throw new Error("From is required")12 }13 }14}
The validateOptions method receives the options passed to the module provider as a parameter.
In the method, you throw an error if any of the options are not set.
e. Implement send Method#
The only required method for a Notification Module Provider is the send method. When the Medusa application needs to send a notification using the provider's channel (such as SMS), it calls this method of the registered provider.
So, add the send method to the TwilioSmsService class:
1// other imports...2import { 3 ProviderSendNotificationDTO, 4 ProviderSendNotificationResultsDTO,5} from "@medusajs/types"6 7class TwilioSmsService extends AbstractNotificationProviderService {8 // ...9 async send(10 notification: ProviderSendNotificationDTO11 ): Promise<ProviderSendNotificationResultsDTO> {12 const { to, content, template, data } = notification13 const contentText = content?.text || await this.getTemplateContent(14 template, data15 )16 17 const message = await this.client.messages.create({18 body: contentText,19 from: this.from,20 to,21 })22 23 return {24 id: message.sid,25 }26 }27 28 async getTemplateContent(29 template: string, 30 data?: Record<string, unknown> | null31 ): Promise<string> {32 switch (template) {33 case "otp-template":34 if (!data?.otp) {35 throw new Error("OTP is required for OTP template")36 }37 38 return `Your OTP is ${data.otp}`39 default:40 throw new Error(`Template ${template} not found`)41 }42 }43}
You implement the send method and a helper getTemplateContent method.
send Parameters
The send method receives an object parameter with the following properties:
to: The phone number to send the SMS to.content: An object containing the content of the SMS. Thetextproperty is the text to send.template: The template to use for the SMS. This is used to retrieve the fallback content of the SMS ifcontent.textis not provided.data: An object containing the data to use in the template. This is used to replace placeholders in the template with actual values.
send Method Logic
In the method, you set the SMS content either to the text property of the content object or to the template content. You define a getTemplateContent method that retrieves the content for a template.
Then, you use the messages.create method of the Twilio client to send the SMS. You pass the following parameters:
body: The content of the SMS.from: The Twilio phone number to send the SMS from.to: The phone number to send the SMS to.
send Return Value
Finally, you return an object that has an id property with the ID of the sent SMS. This ID is stored in the notification record in the database.
f. Export Module Definition#
You've now finished implementing the necessary methods for the Twilio Notification Module Provider. You only need to export its definition.
To create the module's definition, create the file src/modules/twilio-sms/index.ts with the following content:
You use ModuleProvider from the Modules SDK to create the module provider's definition passing it two parameters:
- The name of the module that this provider belongs to, which is
Modules.NOTIFICATIONin this case. - An object with a required property
servicesindicating the module provider's services. Each of these services will be registered as notification providers in Medusa.
g. Add Module Provider to Medusa's Configurations#
You'll now add the Twilio Notification Module Provider to Medusa's configurations to start using it.
In medusa-config.ts, add the following to the modules property:
1module.exports = defineConfig({2 // ...3 modules: [4 // ...5 {6 resolve: "@medusajs/medusa/notification",7 options: {8 providers: [9 // default provider10 {11 resolve: "@medusajs/medusa/notification-local",12 id: "local",13 options: {14 name: "Local Notification Provider",15 channels: ["feed"],16 },17 },18 {19 resolve: "./src/modules/twilio-sms",20 id: "twilio-sms",21 options: {22 channels: ["sms"],23 accountSid: process.env.TWILIO_ACCOUNT_SID,24 authToken: process.env.TWILIO_AUTH_TOKEN,25 from: process.env.TWILIO_FROM,26 },27 },28 ],29 },30 },31 ],32})
You pass the Notification Module in the modules property to register the Twilio Notification Module Provider.
The Notification Module accepts a providers option, which is an array of Notification Module Providers to register. You register the local provider, which is registered by default when you don't provide any other providers.
To register the Twilio Notification Module Provider, you add an object with the following properties:
resolve: The path to the module provider.id: The ID of the module provider. The notification provider is then registered with the IDnp_{identifier}_{id}.options: The options to pass to the module provider. These include the options you defined in theOptionsinterface of the module provider's service.channels: The channels that the notification provider supports. In this case, you set it tosms, which is the channel used to send SMS notifications.accountSid: The Twilio account SID.authToken: The Twilio auth token.from: The Twilio phone number to send the SMS from.
h. Add Environment Variables#
To set the value of the Twilio options, add the following environment variables to your .env file:
Where:
TWILIO_ACCOUNT_SID: The Twilio account SID.TWILIO_AUTH_TOKEN: The Twilio auth token.TWILIO_FROM: The Twilio phone number to send the SMS from. Make sure to use the phone number you purchased from Twilio.
You can retrieve these information from the Twilio Console homepage.

i. Handle OTP Generated Event#
Now that you have integrated Twilio into Medusa, you can use it to send the OTP to the customer. To do that, you need to handle the phone-auth.otp.generated event that you emitted in the authenticate method of the Phone Authentication Module Provider.
You can listen to events in a subscriber. A subscriber is an asynchronous function that listens to events to perform actions when the event is emitted.
In this step, you'll create a subscriber that listens to the phone-auth.otp.generated event and sends an SMS to the customer with the OTP.
Subscribers are created in a TypeScript or JavaScript file under the src/subscribers directory. So, to create a subscriber, create the file src/subscribers/send-otp.ts with the following content:
1import {2 SubscriberArgs,3 type SubscriberConfig,4} from "@medusajs/medusa"5import { Modules } from "@medusajs/framework/utils"6 7export default async function sendOtpHandler({8 event: { data: {9 phone,10 otp,11 } },12 container,13}: SubscriberArgs<{ phone: string, otp: string }>) {14 const notificationModuleService = container.resolve(15 Modules.NOTIFICATION16 )17 18 await notificationModuleService.createNotifications({19 to: phone,20 channel: "sms",21 template: "otp-template",22 data: {23 otp,24 },25 })26}27 28export const config: SubscriberConfig = {29 event: "phone-auth.otp.generated",30}
The subscriber file must export:
- An asynchronous subscriber function that's executed whenever the associated event is triggered.
- A configuration object with an event property whose value is the event the subscriber is listening to, which is
phone-auth.otp.generated.
The subscriber function accepts an object with the following properties:
event: An object with the event's data payload. In theauthenticatemethod, you emitted the event with the following data:phone: The phone number of the user.otp: The OTP that was generated.
container: The Medusa container, which you can use to resolve Framework and commerce resources.
In the subscriber function, you resolve the Notification Module's service from the Medusa container. Then, you use its createNotifications method to send the OTP to the user.
Under the hood, the Notification Module's service delegates the sending to the Notification Module Provider of the sms channel, which is the Twilio Notification Module Provider in this case.
The createNotifications method accepts an object with the following properties:
to: The phone number to send the notification to. You use the phone number from the event's data payload.channel: The channel to use to send the notification, which issms.template: The template to use for the notification content, which isotp-template.data: An object containing the data to use in the template. You pass the OTP to the template.
j. Test it Out#
To test out the Twilio Notification Module Provider, you can follow the steps in the Test Out Phone Authentication section.
After you authenticate the customer, the OTP will be sent to the customer's phone number using Twilio. Then, you can use the OTP to verify the authentication and receive a JWT token.
Alternatively, you can also test it out after customizing the Next.js Starter Storefront, which you'll do in the next step.
generateOTP method of the Phone Authentication Module Provider's service now that you have integrated Twilio.Step 4: Use Phone Authentication in the Next.js Starter Storefront#
In this step, you'll customize the Next.js Starter Storefront to allow customers to authenticate using their phone number and OTP.
By default, the Next.js Starter Storefront supports email and password authentication. You'll replace it with phone authentication, but you can also keep both authentication methods if you want to.
a. Install Phone Input Package#
To easily show a phone input where the user can enter their phone number, install the react-phone-number-input package:
You'll use it in the login and registration forms to show a phone input.
b. Add Authenticate Function#
Before adding the forms, you'll add the functions that send requests to the Medusa API to authenticate the customer.
The first one you'll add is the authenticateWithPhone function, which sends a request to the /auth/customer/phone-auth API route to authenticate the customer using their phone number.
In src/lib/data/customer.ts, add the following function:
1export const authenticateWithPhone = async (phone: string) => {2 try {3 const response = await sdk.auth.login("customer", "phone-auth", {4 phone,5 })6 7 if (8 typeof response === "string" || 9 !response.location || 10 response.location !== "otp"11 ) {12 throw new Error("Failed to login")13 }14 15 return true16 } catch (error: any) {17 return error.toString()18 }19}
The function accepts the phone number as a parameter.
In the function, you use the JS SDK, which is configured within the Next.js Starter Storefront, to send a request to the /auth/customer/phone-auth API route. You pass the phone number in the request body.
If the request doesn't return a location property set to otp, you throw an error. Otherwise, you return true to indicate that the request was successful.
c. add Verify OTP Function#
Next, you'll add the verifyOTP function, which sends a request to the /auth/customer/phone-auth/callback API route to verify the OTP.
In src/lib/data/customer.ts, add the following function:
1export const verifyOtp = async ({2 otp,3 phone,4}: {5 otp: string6 phone: string7}) => {8 try {9 const token = await sdk.auth.callback("customer", "phone-auth", {10 phone,11 otp,12 })13 14 await setAuthToken(token)15 16 const customerCacheTag = await getCacheTag("customers")17 revalidateTag(customerCacheTag)18 19 await transferCart()20 21 return true22 } catch (e: any) {23 return e.toString()24 } 25}
The function accepts an object with the following properties:
otp: The OTP to verify.phone: The phone number of the customer.
In the function, you use the JS SDK to send a request to the /auth/customer/phone-auth/callback API route. You pass the phone number and OTP in the request body.
If the request is successful and you receive a token, you set the token in the cookies and refresh the customer cache. This ensures that all customer-related UI is updated after logging in, such as showing the customer's profile when accessing the /account page.
Then, you call the transferCart function to transfer the cart from the guest user to the authenticated customer.
Finally, you return true to indicate that the request was successful.
d. Add Registration Function#
The last function you'll add is the registerWithPhone function, which will register the customer using their phone number.
In src/lib/data/customer.ts, add the following function:
1export const registerWithPhone = async ({2 firstName,3 lastName,4 phone,5}: {6 firstName: string7 lastName: string8 phone: string9}) => {10 try {11 const { token: regToken } = await sdk.client.fetch<12 { token: string }13 >(`/auth/customer/phone-auth/register`, {14 method: "POST",15 body: {16 phone,17 },18 })19 20 await setAuthToken(regToken as string)21 const headers = {22 ...(await getAuthHeaders()),23 }24 25 const email = `${phone}@gmail.com`26 const customerData = {27 email,28 first_name: firstName,29 last_name: lastName,30 phone,31 }32 33 await sdk.store.customer.create(34 customerData,35 {},36 headers37 )38 39 return await authenticateWithPhone(phone)40 } catch (error: any) {41 return error.toString()42 }43}
The function accepts an object with the following properties:
firstName: The first name of the customer.lastName: The last name of the customer.phone: The phone number of the customer.
In the function, you retrieve a registration token for the customer using the /auth/customer/phone-auth/register API route. You pass the phone number in the request body.
Then, after setting the registration token in the cookies, you create a customer using the Create Customer API route. You pass the following properties in the request body:
email: The email of the customer. You set it to the phone number with a@gmail.comdomain.first_name: The first name of the customer.last_name: The last name of the customer.phone: The phone number of the customer.
Finally, you call the authenticateWithPhone function to authenticate the customer using their phone number. At this step, the customer would receive an OTP to login.
e. Add OTP Form#
Next, you'll add an OTP form that allows the customer to enter the OTP they receive after login or registration. Later, you'll reuse this form in both the login and registration pages.
Create the file src/modules/account/components/otp/index.tsx with the following content:
1"use client"2 3import { Input } from "@medusajs/ui"4import { useState, useRef, useEffect } from "react"5import { authenticateWithPhone, verifyOtp } from "../../../../lib/data/customer"6import ErrorMessage from "../../../checkout/components/error-message"7 8type Props = {9 phone: string10}11 12export const Otp = ({ phone }: Props) => {13 const [otp, setOtp] = useState<string>("")14 const [error, setError] = useState<string>("")15 const [isLoading, setIsLoading] = useState<boolean>(false)16 const [countdown, setCountdown] = useState<number>(60)17 const inputRefs = useRef<(HTMLInputElement | null)[]>([])18 19 const handleSubmit = async () => {20 setIsLoading(true)21 const response = await verifyOtp({22 otp,23 phone,24 })25 setOtp("")26 setIsLoading(false)27 28 if (typeof response === "string") {29 setError(response)30 }31 }32 33 const handleResend = async () => {34 authenticateWithPhone(phone)35 setCountdown(60)36 }37 38 const handlePaste = (e: React.ClipboardEvent) => {39 e.preventDefault()40 const pastedData = e.clipboardData.getData("text")41 const numericValue = pastedData.replace(/\D/g, "").slice(0, 6)42 43 if (numericValue) {44 setOtp(numericValue)45 // Focus the next empty input after pasted content46 const nextEmptyIndex = Math.min(numericValue.length, 5)47 inputRefs.current[nextEmptyIndex]?.focus()48 }49 }50 51 // TODO add use effects52}
You create an Otp component that accepts the phone number as a prop.
In the component, you define the following state variables:
otp: The OTP entered by the customer.error: The error message to show if the OTP verification fails.isLoading: A boolean indicating whether the OTP verification is in progress.countdown: The countdown timer for resending the OTP.inputRefs: A ref to store the input elements for the OTP digits. You'll show six input elements for the OTP digits.
You also define the following functions:
handleSubmit: This function is called when the customer submits the OTP. It calls theverifyOtpfunction to verify the OTP entered by the customer.handleResend: This function is called when the customer clicks the "Resend OTP" button that you'll add later. It calls theauthenticateWithPhonefunction to resend the OTP to the customer's phone number.handlePaste: This function is called when the customer pastes the OTP in the input field. It improves the experience of pasting the OTP without having to enter it manually.
Handle Variable Changes
Next, you'll add useEffect hooks to handle changes in the state variables.
Replace the TODO with the following:
1useEffect(() => {2 if (inputRefs.current[0]) {3 inputRefs.current[0].focus()4 }5}, [inputRefs.current])6 7useEffect(() => {8 if (otp.length !== 6 || isLoading) {9 return10 }11 12 handleSubmit()13}, [otp, isLoading])14 15useEffect(() => {16 const timer = setInterval(() => {17 setCountdown((prev) => {18 return prev > 0 ? prev - 1 : 019 })20 }, 1000)21 22 return () => clearInterval(timer)23}, [])24 25// TODO render form
You add three useEffect hooks:
- The first one focuses the first input element when the component mounts.
- The second one automatically submits the OTP when the customer enters six digits.
- The third one adds an interval to update the countdown timer every second.
f. Render OTP Form#
Lastly, you'll render the OTP form with the input elements and the resend button.
Replace the TODO with the following:
1return (2 <div3 className="max-w-sm flex flex-col items-center"4 data-testid="otp-page"5 >6 <h1 className="text-large-semi uppercase mb-6">7 Verify Phone Number8 </h1>9 <p className="text-center text-base-regular text-ui-fg-base mb-4">10 Enter the code sent to your phone number to login.11 </p>12 <div className="flex gap-2 mb-4">13 {[...Array(6)].map((_, index) => (14 <Input15 key={index}16 type="text"17 maxLength={1}18 pattern="\d*"19 inputMode="numeric"20 disabled={isLoading}21 className="w-10 h-10 text-center"22 ref={(el) => {23 inputRefs.current[index] = el24 }}25 onPaste={handlePaste}26 value={otp[index] || ""}27 onChange={(e) => {28 const elm = e.target29 const value = elm.value30 setOtp((prev) => {31 const newOtp = prev.split("")32 newOtp[index] = value33 return newOtp.join("")34 })35 if (value && /^\d+$/.test(value)) {36 // Move focus to next input37 const nextInput = elm.parentElement?.nextElementSibling?.querySelector("input")38 nextInput?.focus()39 }40 }}41 onKeyDown={(e) => {42 if (e.key === "Backspace" && !e.currentTarget.value) {43 // Move focus to previous input on backspace44 const prevInput = e.currentTarget.parentElement?.previousElementSibling?.querySelector("input")45 prevInput?.focus()46 }47 }}48 />49 ))} 50 </div>51 <div className="flex items-center gap-x-2 mb-4">52 <button53 className="text-small-regular text-ui-fg-interactive disabled:text-ui-fg-disabled disabled:cursor-not-allowed"54 onClick={handleResend}55 disabled={countdown > 0}56 >57 {countdown > 0 ? `Resend code in ${countdown}s` : "Resend Code"}58 </button>59 </div>60 <ErrorMessage error={error} />61 </div>62)
You show six input elements for the OTP digits. When a value is entered in an input, the focus moves to the next input. In addition, when the customer presses backspace on an empty input, the focus moves to the previous input.
You also show a resend button that allows the customer to resend the OTP once the countdown timer reaches zero.
You now have an OTP form that you can use in both the login and registration pages.
g. Add Registration Form#
You'll now add a registration form that allows the customer to register using their phone number.
First, in src/modules/account/templates/login-template.tsx, update the LOGIN_VIEW to the following:
By default, the login template supports switching between the login and registration views for email and password authentication. With the above change, you add two new views: login and registration with phone number.
Then, to add the registration form, create the file src/modules/account/components/register-phone/index.tsx with the following content:
1"use client"2 3import { useState } from "react"4import Input from "@modules/common/components/input"5import { LOGIN_VIEW } from "@modules/account/templates/login-template"6import ErrorMessage from "@modules/checkout/components/error-message"7import LocalizedClientLink from "@modules/common/components/localized-client-link"8import { registerWithPhone } from "@lib/data/customer"9import "react-phone-number-input/style.css"10import PhoneInput from "react-phone-number-input"11import { Otp } from "../otp"12import { useParams } from "next/navigation"13import { Button } from "@medusajs/ui"14 15type Props = {16 setCurrentView: (view: LOGIN_VIEW) => void17}18 19const RegisterPhone = ({ setCurrentView }: Props) => {20 const [firstName, setFirstName] = useState("")21 const [lastName, setLastName] = useState("")22 const [phone, setPhone] = useState("")23 const [error, setError] = useState("")24 const [loading, setLoading] = useState(false)25 const [enterOtp, setEnterOtp] = useState(false)26 const { countryCode } = useParams() as { countryCode: string }27 28 const handleSubmit = async (e: React.FormEvent<HTMLFormElement>) => {29 e.preventDefault()30 setLoading(true)31 const response = await registerWithPhone({32 firstName,33 lastName,34 phone,35 })36 setLoading(false)37 if (typeof response === "string") {38 setError(response)39 return40 }41 42 setEnterOtp(true)43 }44 45 if (enterOtp) {46 return <Otp phone={phone} />47 }48 49 // TODO render form50}51 52export default RegisterPhone
You create a RegisterPhone component that accepts a setCurrentView prop to switch between the login and registration views.
In the component, you define the following state variables:
firstName,lastName, andphoneto store the form inputs' values.error: The error message to show if the registration fails.loading: A boolean indicating whether the registration is in progress.enterOtp: A boolean indicating whether to show the OTP form. This is enabled once the customer is registered and they need to authenticate using the OTP.countryCode: The country code of the customer, which is retrieved from the URL parameters. You'll use this to show the phone input with a default selected country.
You also define a handleSubmit function that handles the form submission. It calls the registerWithPhone function to register the customer using their phone number.
If the registration is successful, you set enterOtp to true to show the OTP form. Otherwise, you set the error message.
Render Registration Form
Next, you'll render the registration form with the input fields and the submit button.
Replace the TODO with the following:
1return (2 <div3 className="max-w-sm flex flex-col items-center"4 data-testid="register-page"5 >6 <h1 className="text-large-semi uppercase mb-6">7 Become a Medusa Store Member8 </h1>9 <p className="text-center text-base-regular text-ui-fg-base mb-4">10 Create your Medusa Store Member profile, and get access to an enhanced11 shopping experience.12 </p>13 <form className="w-full flex flex-col" onSubmit={handleSubmit}>14 <div className="flex flex-col w-full gap-y-2">15 <Input16 label="First name"17 name="first_name"18 required19 autoComplete="given-name"20 data-testid="first-name-input"21 value={firstName}22 onChange={(e) => setFirstName(e.target.value)}23 />24 <Input25 label="Last name"26 name="last_name"27 required28 autoComplete="family-name"29 data-testid="last-name-input"30 value={lastName}31 onChange={(e) => setLastName(e.target.value)}32 />33 <PhoneInput34 placeholder="Enter phone number"35 value={phone}36 onChange={(value) => setPhone(value as string)}37 name="phone"38 required39 autoComplete="off"40 // @ts-ignore41 defaultCountry={countryCode.toUpperCase()}42 />43 </div>44 <ErrorMessage error={error} data-testid="register-error" />45 <span className="text-center text-ui-fg-base text-small-regular mt-6">46 By creating an account, you agree to Medusa Store's{" "}47 <LocalizedClientLink48 href="/content/privacy-policy"49 className="underline"50 >51 Privacy Policy52 </LocalizedClientLink>{" "}53 and{" "}54 <LocalizedClientLink55 href="/content/terms-of-use"56 className="underline"57 >58 Terms of Use59 </LocalizedClientLink>60 .61 </span>62 <Button 63 className="w-full mt-6" 64 type="submit"65 size="large"66 variant="primary"67 isLoading={loading}68 >69 Join70 </Button>71 </form>72 <span className="text-center text-ui-fg-base text-small-regular mt-6">73 Already a member?{" "}74 <button75 onClick={() => setCurrentView(LOGIN_VIEW.SIGN_IN_PHONE)}76 className="underline"77 >78 Sign in79 </button>80 .81 </span>82 </div>83)
You render the registration form with input fields for the first name, last name, and phone number.
For the phone number input, you use the PhoneInput component from the react-phone-number-input package. You set the defaultCountry prop to the country code retrieved from the URL parameters.
You also show a submit button that calls the handleSubmit function when clicked, and a button to switch to the login form.
Add to Login Template
Next, you'll add the RegisterPhone component to the login template.
In src/modules/account/templates/login-template.tsx, add the following import:
Then, change the return statement of the LoginTemplate component to the following:
1return (2 <div className="w-full flex justify-start px-8 py-8">3 {currentView === "sign-in" ? (4 <Login setCurrentView={setCurrentView} />5 ) : currentView === "register" ? (6 <Register setCurrentView={setCurrentView} />7 ) : currentView === "register-phone" ? (8 <RegisterPhone setCurrentView={setCurrentView} />9 ) : (10 // TODO: Add login phone view11 <></>12 )}13 </div>14)
You show the registration form when the currentView is set to register-phone. You'll also add the login form later.
h. Add Login Form#
Next, you'll add a login form that allows the customer to log in using their phone number.
To create the form, create the file src/modules/account/components/login-phone/index.tsx with the following content:
1"use client"2 3import { authenticateWithPhone } from "@lib/data/customer"4import { LOGIN_VIEW } from "@modules/account/templates/login-template"5import ErrorMessage from "@modules/checkout/components/error-message"6import { useState } from "react"7import "react-phone-number-input/style.css"8import PhoneInput from "react-phone-number-input"9import { Otp } from "../otp"10import { useParams } from "next/navigation"11import { Button } from "@medusajs/ui"12 13type Props = {14 setCurrentView: (view: LOGIN_VIEW) => void15}16 17const LoginPhone = ({ setCurrentView }: Props) => {18 const [phone, setPhone] = useState("")19 const [error, setError] = useState("")20 const [loading, setLoading] = useState(false)21 const [enterOtp, setEnterOtp] = useState(false)22 const { countryCode } = useParams() as { countryCode: string }23 24 const handleSubmit = async (e: React.FormEvent<HTMLFormElement>) => {25 e.preventDefault()26 setLoading(true)27 const response = await authenticateWithPhone(phone)28 setLoading(false)29 if (typeof response === "string") {30 setError(response)31 return32 }33 34 setEnterOtp(true)35 }36 37 if (enterOtp) {38 return <Otp phone={phone} />39 }40 41 // TODO render form42}43 44export default LoginPhone
You create a LoginPhone component that accepts a setCurrentView prop to switch between the login and registration views.
In the component, you define the following state variables:
phone: The phone number entered by the customer.error: The error message to show if the login fails.loading: A boolean indicating whether the login is in progress.enterOtp: A boolean indicating whether to show the OTP form. This is enabled after the form is submitted.countryCode: The country code of the customer, which is retrieved from the URL parameters. You'll use this to show the phone input with a default selected country.
You also define a handleSubmit function that handles the form submission. It calls the authenticateWithPhone function to authenticate the customer using their phone number. Then, it enables enterOtp to show the OTP form.
Render Login Form
Next, you'll render the login form with the input field and the submit button.
Replace the TODO with the following:
1return (2 <div3 className="max-w-sm w-full flex flex-col items-center"4 data-testid="login-page"5 >6 <h1 className="text-large-semi uppercase mb-6">Welcome back</h1>7 <p className="text-center text-base-regular text-ui-fg-base mb-8">8 Sign in to access an enhanced shopping experience.9 </p>10 <form className="w-full" onSubmit={handleSubmit}>11 <div className="flex flex-col w-full gap-y-2">12 <PhoneInput13 placeholder="Enter phone number"14 value={phone}15 onChange={(value) => setPhone(value as string)}16 name="phone"17 required18 // @ts-ignore19 defaultCountry={countryCode.toUpperCase()}20 />21 </div>22 {error && <ErrorMessage error={error} data-testid="login-error-message" />}23 <Button 24 className="w-full mt-6" 25 disabled={loading}26 type="submit"27 size="large"28 variant="primary"29 isLoading={loading}30 >31 Sign in32 </Button>33 </form>34 <span className="text-center text-ui-fg-base text-small-regular mt-6">35 Not a member?{" "}36 <button37 onClick={() => setCurrentView(LOGIN_VIEW.REGISTER_PHONE)}38 className="underline"39 data-testid="register-button"40 >41 Join us42 </button>43 .44 </span>45 </div>46)
You render the login form with an input field for the phone number. You also show a submit button that calls the handleSubmit function when clicked.
i. Add to Login Template#
Next, you'll add the LoginPhone component to the login template.
In src/modules/account/templates/login-template.tsx, add the following import:
Next, in the LoginTemplate component, change the default value of the currentView state to LOGIN_VIEW.SIGN_IN_PHONE:
This ensures the phone login form is shown by default.
Finally, replace the return statement of the LoginTemplate component to the following:
1return (2 <div className="w-full flex justify-start px-8 py-8">3 {currentView === "sign-in" ? (4 <Login setCurrentView={setCurrentView} />5 ) : currentView === "register" ? (6 <Register setCurrentView={setCurrentView} />7 ) : currentView === "register-phone" ? (8 <RegisterPhone setCurrentView={setCurrentView} />9 ) : (10 <LoginPhone setCurrentView={setCurrentView} />11 )}12 </div>13)
You show the login form when the currentView is set to sign-in-phone.
Test it Out#
You can now test out the phone authentication feature in the Next.js Starter Storefront.
First, start the Medusa application by running the following command in the Medusa project's directory:
Then, start the Next.js Starter Storefront by running the following command in the storefront project's directory:
Open your browser, navigate to http://localhost:8000, and click on the "Account" link at the top right. This will show the login form with just the phone number input.

You can also switch to the registration form by clicking on the "Join" link below the login form.

You can try to login with the account you created before, or register with a new one. Once successful, you'll see the OTP form to enter the OTP you received as SMS.

After you enter the six digits, you'll be logged in and you'll see your profile page.

Step 5: Disallow Phone Updates#
The phone authentication feature is now complete, but there are two improvements you can make:
- Show the phone number in the profile page: Currently, it shows the email address, which is a fake address you've set.
- Disable phone and email updates: Currently, the customer can update their phone number, which is not allowed for phone authentication.
a. Show Phone Number in Profile Page#
To show the phone number in the profile page instead of the email, in src/modules/account/components/overview/index.tsx, find the following in the return statement:
And replace it with the following:
If you check the profile page now, you'll see the phone number instead of the email address at the top right.

b. Remove Email and Phone Fields#
Next, you'll remove the fields to update email and phone number from the profile page.
In src/app/[countryCode]/(main)/account/@dashboard/profile/page.tsx, find the following lines to remove from the return statement:
If you go to your profile page and click on "Profile" in the sidebar, the email and phone number sections will be removed.

c. Disable Phone Updates in Medusa#
While removing the email and phone fields from the profile page prevents customers using the storefront from updating their phone number, it doesn't prevent them from updating it using Medusa's API.
In this section, you'll add a middleware to the /store/customers/me API route that prevents customers from updating their phone number.
A middleware is a function that's executed whenever a request is sent to an API route. It's executed before the route handler, allowing you to validate requests, apply authentication guards, and more.
To add a middleware in your Medusa application, create the file src/api/middlewares.ts with the following content:
1import { defineMiddlewares } from "@medusajs/framework/http"2 3export default defineMiddlewares({4 routes: [5 {6 matcher: "/store/customers/me",7 method: ["POST"],8 middlewares: [9 async (req, res, next) => {10 const { phone } = req.body as Record<string, string>11 12 if (phone) {13 return res.status(400).json({14 error: "Phone number is not allowed to be updated",15 })16 }17 18 next()19 },20 ],21 },22 ],23})
You define middlewares using the defineMiddlewares function. It accepts an object having a routes property that holds all middlewares applied to API routes.
Each object in routes has the following properties:
matcher: The API route path to apply the middleware on. You set it to/store/customers/me.method: The HTTP method to apply the middleware to. You set it toPOSTso that the middleware is applied only onPOSTrequests sent to the/store/customers/meroute.middlewares: An array of middlewares to apply on the route. You add a middleware that throws an error if the request body contains aphoneproperty. This prevents customers from updating their phone number using the API.
Any POST request to the /store/customers/me route will now be validated to ensure it's not updating the phone number.
Next Steps#
You've now implemented phone authentication in Medusa with Twilio integration. You can further customize the phone authentication feature based on your business use case.
Authenticate Other Actor Types#
This tutorial focused on authenticating customers using their phone number. However, you can also authenticate other actor types, such as admin users and vendors.
To do that, first, enable the phone-auth authentication strategy in medusa-config.ts for the actor types. For example:
Then, when sending requests to the authentication API routes mentioned in the Test Out Phone Authentication section, replace customer in the API route paths with the actor type you want to authenticate:
/auth/customer/phone-auth/register->/auth/user/phone-auth/register/auth/customer/phone-auth->/auth/user/phone-auth/auth/customer/phone-auth/callback->/auth/user/phone-auth/callback
Finally, update the UI to show the phone authentication option for the actor type you want to authenticate. This depends on the UI you're using, but you can follow an approach similar to the Next.js Starter Storefront customizations.
Learn More about Medusa#
If you're new to Medusa, check out the main documentation, where you'll get a more in-depth learning of all the concepts you've used in this guide and more.
To learn more about the commerce features that Medusa provides, check out Medusa's Commerce Modules.
Troubleshooting#
If you encounter issues during your development, check out the troubleshooting guides.
Getting Help#
If you encounter issues not covered in the troubleshooting guides:
- Visit the Medusa GitHub repository to report issues or ask questions.
- Join the Medusa Discord community for real-time support from community members.
- Contact the sales team to get help from the Medusa team.