Integrate Segment (Analytics) with Medusa
In this tutorial, you'll learn how to integrate Segment with Medusa to track events and analytics.
When you install a Medusa application, you get a fully-fledged commerce platform with a Framework for customization. Medusa's architecture facilitates integrating third-party services to customize Medusa's infrastructure for your business needs.
To track analytics in your Medusa application, you can integrate Segment, a service that collects analytics from multiple sources and sends them to various destinations. This tutorial will help you set up Segment in your Medusa application and track common events.
Summary#
By following this tutorial, you'll learn how to:
- Install and set up Medusa.
- Integrate Segment with your Medusa application.
- Handle Medusa's
order.placedevent to track order placements. - Track custom events in your Medusa application with Segment.
You can follow this tutorial whether you're new to Medusa or an advanced Medusa developer.

Step 1: Install a Medusa Application#
Start by installing the Medusa application on your machine with the following command:
First, you'll be asked for the project's name. Then, when prompted about installing the Next.js Starter Storefront, choose "Yes."
Afterwards, the installation process will start, which will install the Medusa application as a monorepository in a directory with your project's name. The backend is installed in the apps/backend directory, and the Next.js Starter Storefront is installed in the apps/storefront directory.
Once the installation finishes successfully, the Medusa Admin dashboard will open with a form to create a new user. Enter the user's credentials and submit the form. Afterwards, you can log in with the new user and explore the dashboard.
apps/backend directory of your Medusa project.Step 2: Create Segment Module Provider#
To integrate third-party services into Medusa, you create a custom module. A module is a reusable package with functionalities related to a single feature or domain.
Medusa's Analytics Module provides an interface to track events in your Medusa application. It delegates the actual tracking to the configured Analytics Module Provider.
In this step, you'll integrate Segment as an Analytics Module Provider. Later, you'll use it to track events in your Medusa application.
a. Install Segment Node SDK#
Before you create the Segment Module Provider, you'll install the Segment Node SDK to interact with Segment's API.
Run the following command in your apps/backend directory:
You'll use the SDK in the next steps.
b. Create Module Directory#
A module is created under the src/modules directory of your Medusa application. So, create the directory src/modules/segment.
c. Create Segment Module's Service#
A module has a service that contains its logic. For Analytics Module Providers, the service implements the logic to track events in the third-party service.
To create the service of the Segment Analytics Module Provider, create the file src/modules/segment/service.ts with the following content:
1import { 2 AbstractAnalyticsProviderService,3 MedusaError,4} from "@medusajs/framework/utils"5import { Analytics } from "@segment/analytics-node"6 7type Options = {8 writeKey: string9}10 11type InjectedDependencies = {}12 13class SegmentAnalyticsProviderService extends AbstractAnalyticsProviderService {14 private client: Analytics15 static identifier = "segment"16 17 constructor(container: InjectedDependencies, options: Options) {18 super()19 if (!options.writeKey) {20 throw new MedusaError(21 MedusaError.Types.INVALID_DATA,22 "Segment write key is required"23 )24 }25 this.client = new Analytics({ writeKey: options.writeKey })26 }27}28 29export default SegmentAnalyticsProviderService
An Analytics Module Provider's service must extend the AbstractAnalyticsProviderService class. It must also have an identifier static property with the unique identifier of the provider.
A module provider's constructor receives two parameters:
container: The module's container that contains Framework resources available to the module. In this tutorial, you don't need to resolve any resources.options: Options that are passed to the module provider when it's registered in Medusa's configurations. You define the following option:writeKey: The Segment write key. You'll learn how to retrieve and set this option in the Add Module Provider to Medusa's Configurations section.
In the constructor, you create a Segment client using the Segment Node SDK. You pass the writeKey option to the client.
You'll use this client to implement the service's methods in the next sections.
d. Implement identify Method#
The identify method is used to identify a user in Segment. It associates the user's ID with their profile information, such as name and email.
Add the identify method to the SegmentAnalyticsProviderService class:
1// other imports...2import { ProviderIdentifyAnalyticsEventDTO } from "@medusajs/types"3 4class SegmentAnalyticsProviderService extends AbstractAnalyticsProviderService {5 // ...6 async identify(data: ProviderIdentifyAnalyticsEventDTO): Promise<void> {7 const anonymousId = data.properties && "anonymousId" in data.properties ? 8 data.properties.anonymousId : undefined9 const traits = data.properties && "traits" in data.properties ? 10 data.properties.traits : undefined11 12 if ("group" in data) {13 this.client.group({14 groupId: data.group.id,15 userId: data.actor_id,16 anonymousId,17 traits,18 context: data.properties,19 })20 } else {21 this.client.identify({22 userId: data.actor_id,23 anonymousId,24 traits,25 context: data.properties,26 })27 }28 }29}
Parameters
The identify method receives an object with the following properties:
actor_id: The ID of the user being identified.group: Alternatively, the group being identified. If this property is present, theactor_idis ignored.properties: Additional properties to associate with the user or group. This can include traits like name, email, and so on.
Method Logic
In the method, if the group property is present, you call the group method of the Segment client to identify a group. Otherwise, you call the identify method to identify a user.
For both methods, you extract the anonymousId and traits from the properties object if they are present. You also pass the actor_id as the userId, and group.id for groups.
e. Implement track Method#
The track method is used to track events in Segment. It can track events like order placements, cart updates, and more.
Add the track method to the SegmentAnalyticsProviderService class:
1// other imports...2import { ProviderTrackAnalyticsEventDTO } from "@medusajs/types"3 4class SegmentAnalyticsProviderService extends AbstractAnalyticsProviderService {5 // ...6 async track(data: ProviderTrackAnalyticsEventDTO): Promise<void> {7 const userId = "group" in data ? 8 data.actor_id || data.group?.id : data.actor_id9 const anonymousId = data.properties && "anonymousId" in data.properties ? 10 data.properties.anonymousId : undefined11 12 if (!userId && !anonymousId) {13 throw new MedusaError(14 MedusaError.Types.INVALID_DATA, 15 `Actor or group ID is required for event ${data.event}`16 )17 }18 19 this.client.track({20 userId,21 anonymousId,22 event: data.event,23 properties: data.properties,24 timestamp: data.properties && "timestamp" in data.properties ? 25 new Date(data.properties.timestamp) : undefined,26 })27 }28}
Parameters
The track method receives an object with the following properties:
actor_id: The ID of the user performing the event.group: Alternatively, the group performing the event. If this property is present, theactor_idis ignored.event: The name of the event being tracked.properties: Additional properties associated with the event. This can include details like product ID, order ID, and so on.
Method Logic
In the method, you set the user ID either to the actor or group ID. You also check if the anonymous ID is present in the properties to use it.
Next, you call the track method of the Segment client, passing it the user ID, anonymous ID, event name, properties, and timestamp (if present in the properties).
f. Implement shutdown Method#
The shutdown method is used to gracefully shut down the Segment client when the Medusa application is stopped. It allows you to send all pending events to Segment before the application exits.
Add the following method to the SegmentAnalyticsProviderService class:
Method Logic
In the method, you call the flush method of the Segment client with the close option set to true. This method will send all pending events to Segment and close the client connection.
g. Export Module Definition#
You've now finished implementing the necessary methods for the Segment Analytics Module Provider.
The final piece to a module is its definition, which you export in an index.ts file at the module's root directory. This definition tells Medusa the module's details, including its service.
To create the module's definition, create the file src/modules/segment/index.ts with the following content:
You use ModuleProvider from the Modules SDK to create the module provider's definition. It accepts two parameters:
- The name of the module that this provider belongs to, which is
Modules.ANALYTICSin this case. - An object with a required property
servicesindicating the Module Provider's services.
h. Add Module Provider to Medusa's Configurations#
Once you finish building the module, add it to Medusa's configurations to start using it.
In medusa-config.ts, add a modules property:
To pass an Analytics Module Provider to the Analytics Module, you add the modules property to the Medusa configuration and pass the Analytics Module in its value.
The Analytics Module accepts a providers option, which is an array of Analytics Module Providers to register. However, you can only register one analytics provider in your Medusa application.
To register the Segment Analytics Module Provider, you add an object to the providers array with the following properties:
resolve: The NPM package or path to the module provider. In this case, it's the path to thesrc/modules/segmentdirectory.id: The ID of the module provider. The Analytics Module Provider is then registered with the IDaly_{identifier}_{id}, where:{identifier}: The identifier static property defined in the Module Provider's service, which issegmentin this case.{id}: The ID set in this configuration, which is alsosegmentin this case.
options: The options to pass to the module provider. These are the options you defined in theOptionsinterface of the module provider's service.
i. Set Option as Environment Variable#
Next, you'll set the Segment write key as an environment variable.
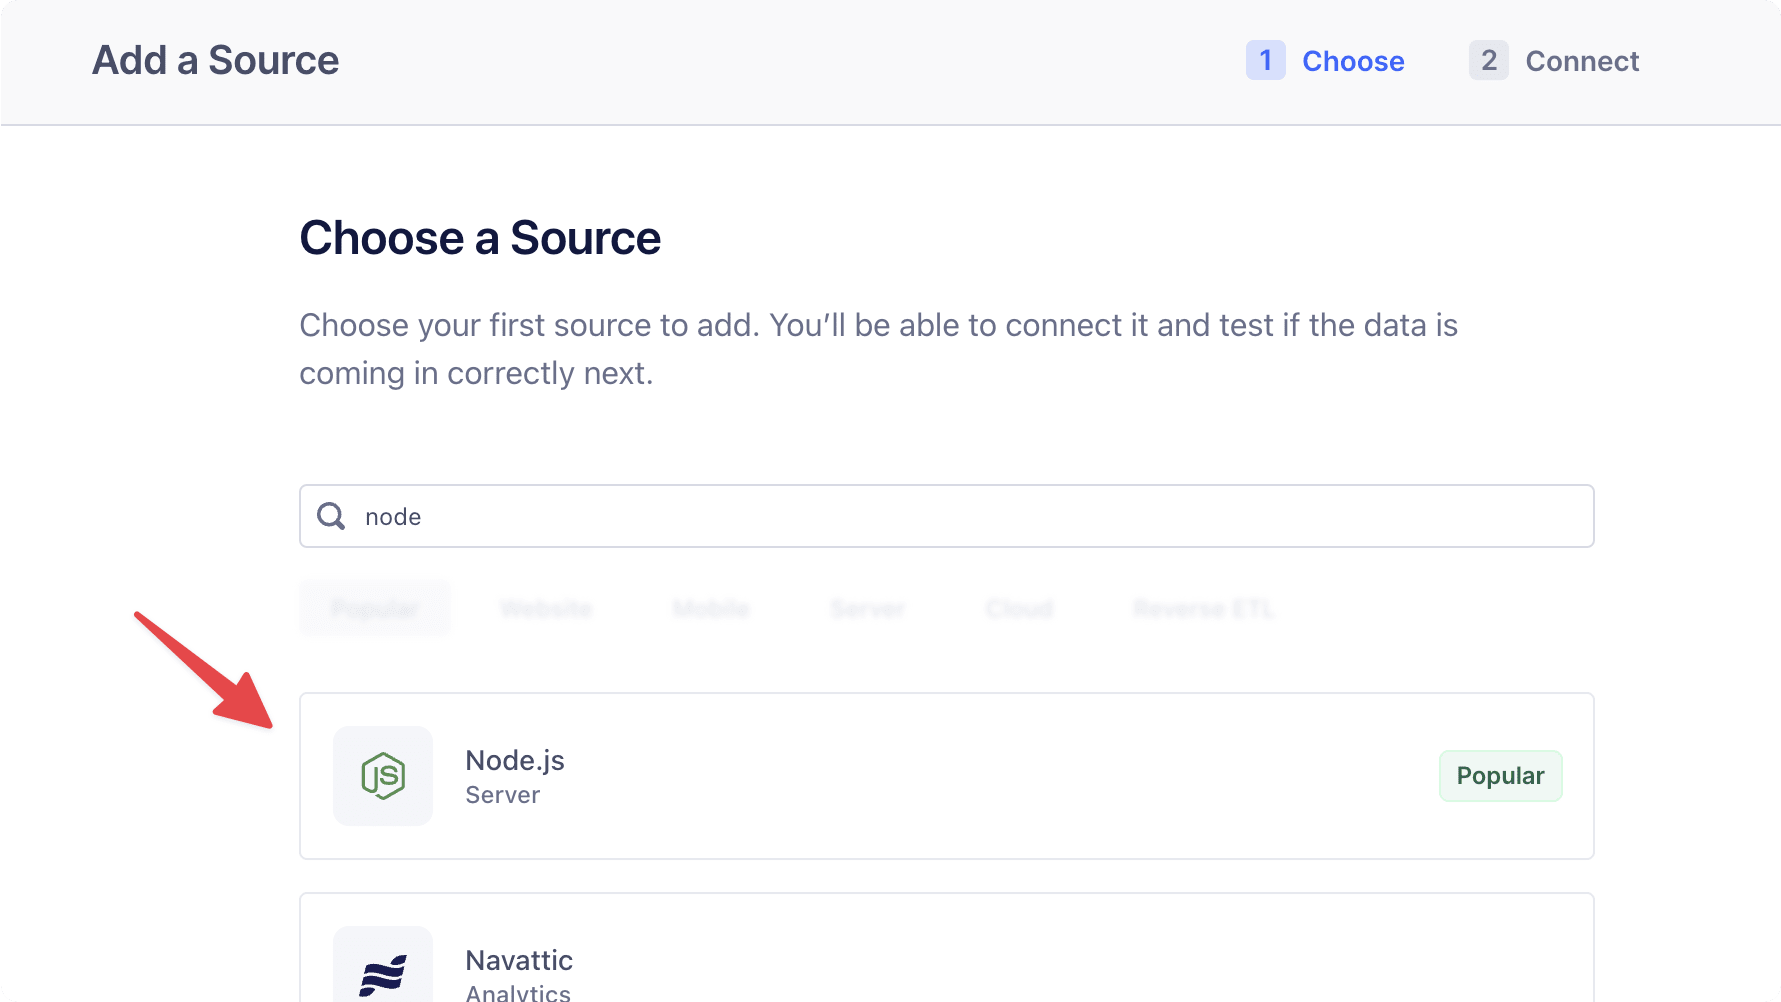
To retrieve the Segment write key:
- Log into your Segment account.
- Go to the Connections page and click the "Add More" button next to the "Sources" section.

- In the "Choose a Source" step, select "Node.js" and click the "Next" button.
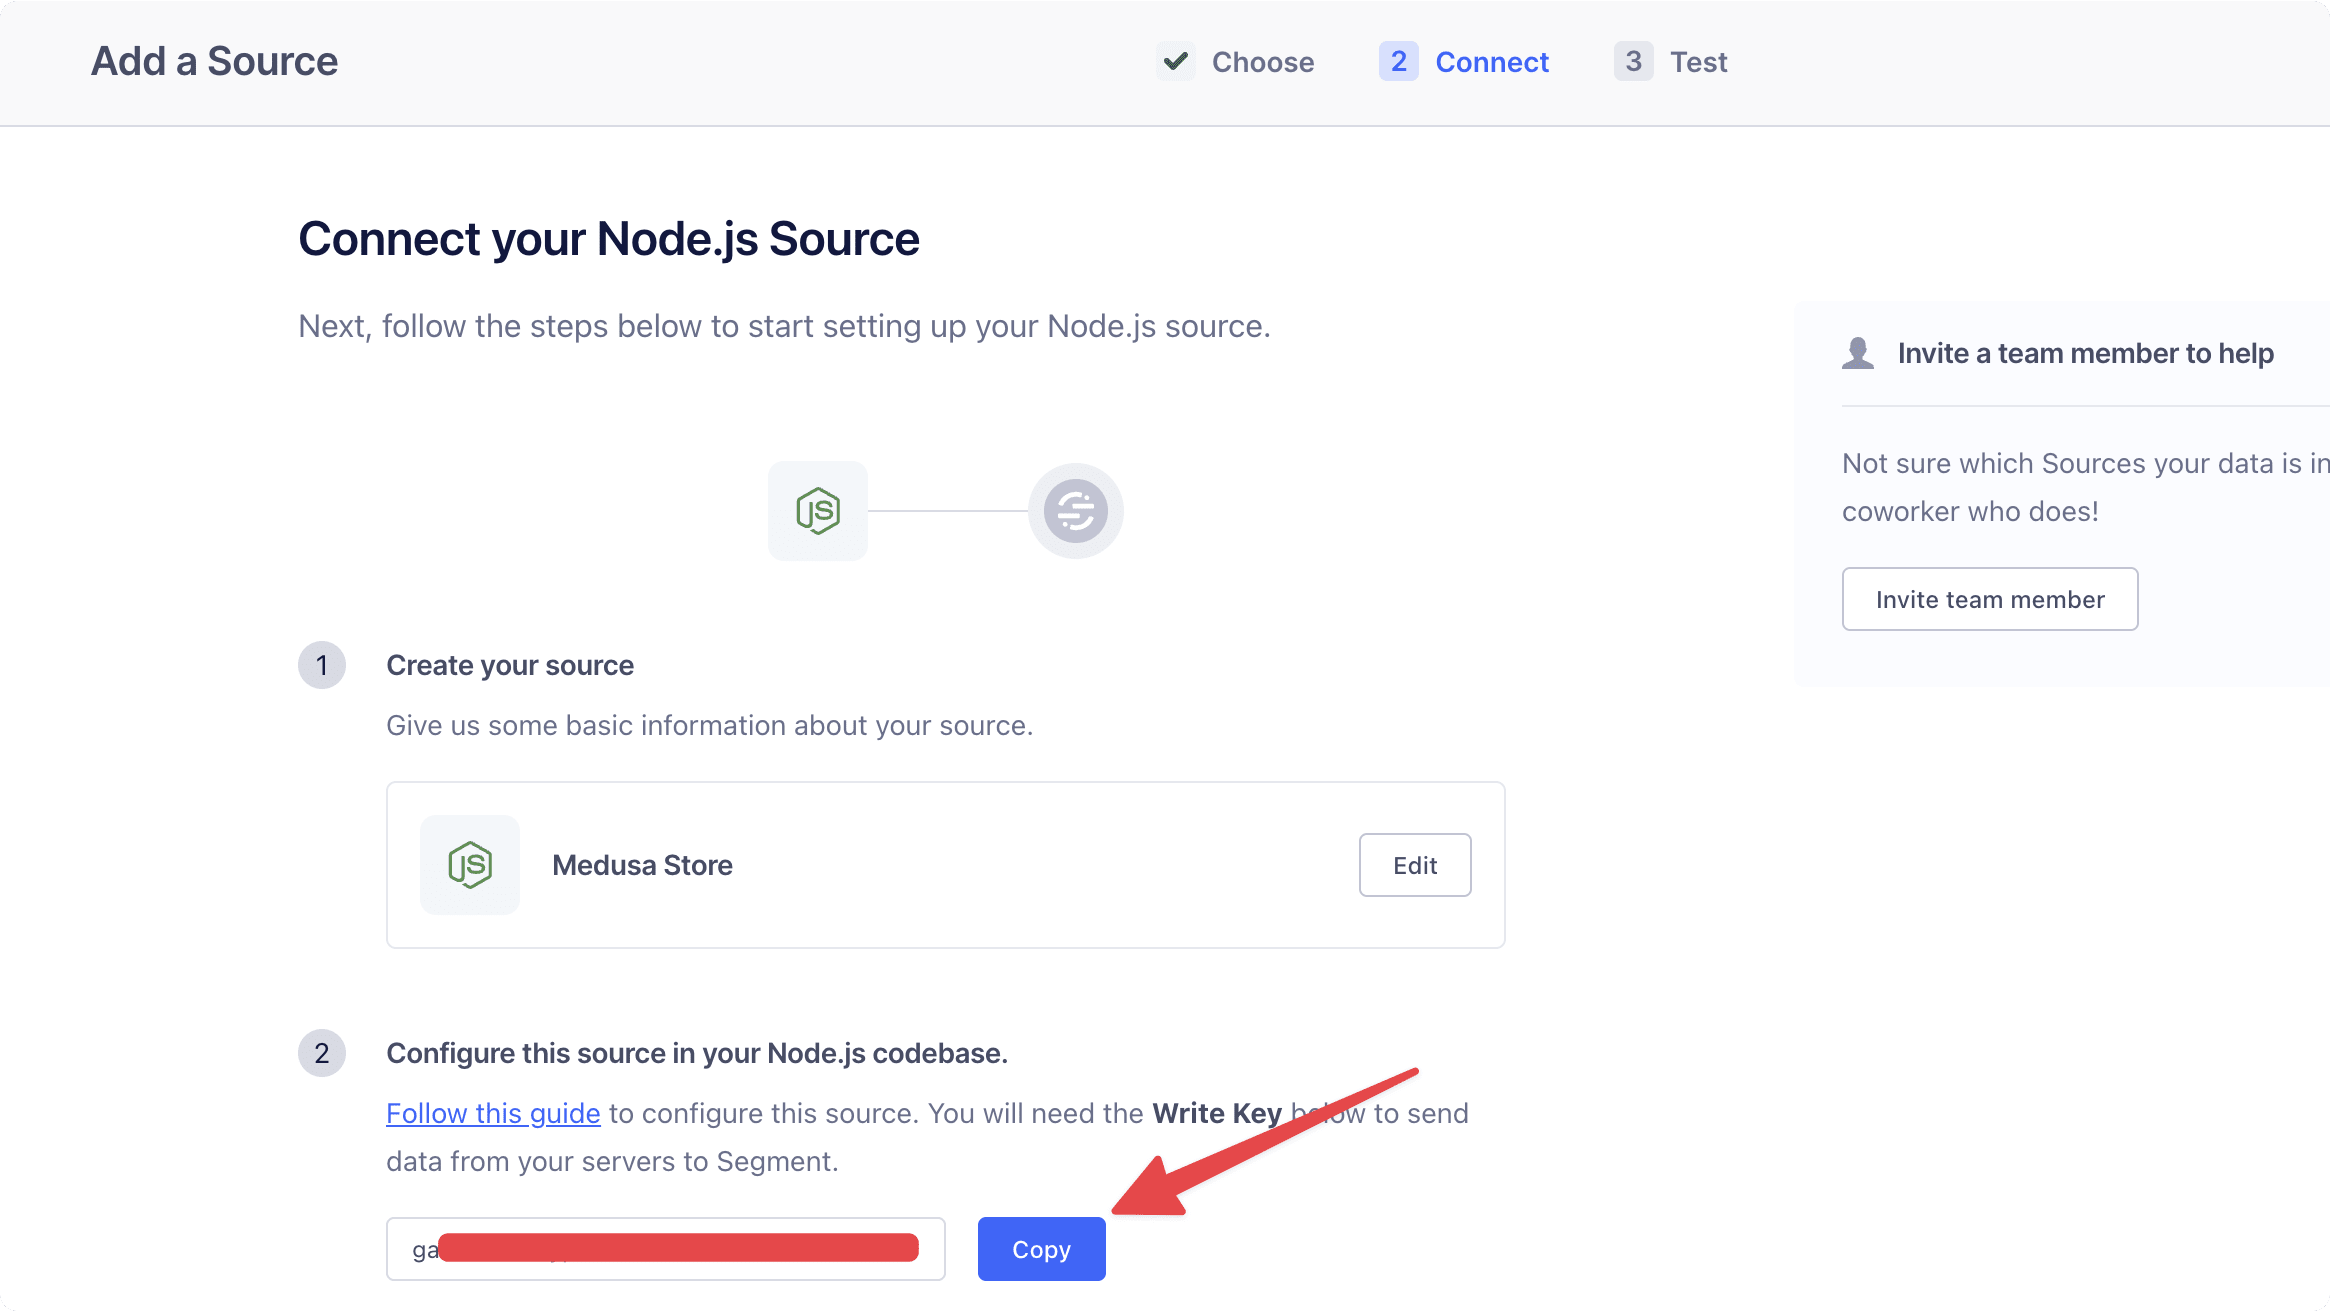
- In the "Connect your Node.js Source" step, enter a name for the source and click the "Create Source" button. This will show you the write key to copy.
You can skip the next step of testing out the source for now.
Then, add the following environment variable to your .env file:
Replace 123... with the write key you copied from Segment.
You'll test out the integration as you set up event tracking in the next steps.
Step 3: Track Order Placement Event#
You'll first track the order-placement event, which is triggered natively in the Medusa application.
Medusa's events system allows you to listen to events triggered by the Medusa application and execute custom logic asynchronously in a subscriber.
In the subscriber, you execute functionalities created in workflows. A workflow is a series of actions, called steps, that complete a task.
In this step, you'll create a workflow that tracks the order.placed event in Segment. Then, you'll create a subscriber that listens to this event and executes the workflow.
a. Create Track Event Step#
Before you create the workflow, you'll create a step that tracks an event in Segment. Later, you'll use this step in the workflows that track events, such as the order-placement event.
To create a step, create the file src/workflows/steps/track-event.ts with the following content:
1import { createStep } from "@medusajs/framework/workflows-sdk"2 3type TrackEventStepInput = {4 event: string5 userId?: string6 properties?: Record<string, unknown>7 timestamp?: Date8}9 10export const trackEventStep = createStep(11 "track-event",12 async (input: TrackEventStepInput, { container }) => {13 const analyticsModuleService = container.resolve(14 "analytics"15 )16 17 if (!input.userId) {18 // generate a random user id19 input.properties = {20 ...input.properties,21 anonymousId: Math.random().toString(36).substring(2, 15) + 22 Math.random().toString(36).substring(2, 15),23 }24 }25 26 await analyticsModuleService.track({27 event: input.event,28 actor_id: input.userId,29 properties: input.properties,30 })31 }32)
You create a step with createStep from the Workflows SDK. It accepts two parameters:
- The step's unique name, which is
track-event. - An async function that receives two parameters:
- The step's input, which is in this case an object with the following properties:
event: The name of the event to track.userId: The ID of the user performing the event.properties: Additional properties associated with the event.timestamp: The timestamp of the event (optional).
- An object that has properties including the Medusa container, which is a registry of Framework and commerce tools that you can access in the step.
- The step's input, which is in this case an object with the following properties:
In the step function, you resolve the Analytics Module's service from the Medusa container. This service is the interface to track events with the configured Analytics Module Provider, which is Segment in this case.
If the userId is not provided, you generate a random anonymous ID and add it to the properties. This is useful for tracking events from users who are not logged in.
Finally, you call the track method of the Analytics Module's service, passing it the event name, user ID, and properties.
b. Create Track Order Placed Workflow#
Next, you'll create the workflow that tracks the order placement event.
To create the workflow, create the file src/workflows/track-order-placed.ts with the following content:
1import { 2 createWorkflow,3 transform,4} from "@medusajs/framework/workflows-sdk"5import { useQueryGraphStep } from "@medusajs/medusa/core-flows"6import { trackEventStep } from "./steps/track-event"7 8type WorkflowInput = {9 id: string10}11 12export const trackOrderPlacedWorkflow = createWorkflow(13 "track-order-placed",14 ({ id }: WorkflowInput) => {15 const { data: orders } = useQueryGraphStep({16 entity: "order",17 fields: [18 "id",19 "email",20 "total",21 "currency_code",22 "items.*",23 "customer.id",24 "customer.email",25 "customer.first_name",26 "customer.last_name",27 "created_at",28 ],29 filters: {30 id,31 },32 })33 34 const order = transform({35 order: orders[0],36 }, ({ order }) => ({37 orderId: order.id,38 email: order.email,39 total: order.total,40 currency: order.currency_code,41 items: order.items?.map((item) => ({42 id: item?.id,43 title: item?.title,44 quantity: item?.quantity,45 variant: item?.variant,46 unit_price: item?.unit_price,47 })),48 customer: {49 id: order.customer?.id,50 email: order.customer?.email,51 firstName: order.customer?.first_name,52 lastName: order.customer?.last_name,53 },54 timestamp: order.created_at,55 }))56 57 trackEventStep({58 event: "order.placed",59 userId: order.customer?.id,60 properties: order,61 })62 }63)
You create a workflow using createWorkflow from the Workflows SDK. It accepts the workflow's unique name as a first parameter.
It accepts as a second parameter a constructor function, which is the workflow's implementation. The function can accept input, which in this case an object holding the ID of the order placed.
In the workflow's constructor function, you:
- Retrieve the Medusa order using the
useQueryGraphStephelper step. This step uses Medusa's Query tool to retrieve data across modules. You pass it the order ID to retrieve. - Use transform to prepare the tracking data, as direct data and variable manipulation isn't allowed in workflows. Learn more in the Data Manipulation documentation.
- Send the tracking event to Segment using the
trackEventStepyou created in the previous step.
You now have the workflow that tracks the order placement event.
c. Handle order.placed Event#
Next, you'll create a subscriber that listens to the order.placed event and executes the workflow you created in the previous step.
To create the subscriber, create the file src/subscribers/order-placed.ts with the following content:
1import { SubscriberArgs, type SubscriberConfig } from "@medusajs/framework"2import { trackOrderPlacedWorkflow } from "../workflows/track-order-placed"3 4export default async function orderPlacedHandler({5 event: { data },6 container,7}: SubscriberArgs<{ id: string }>) {8 await trackOrderPlacedWorkflow(container)9 .run({10 input: {11 id: data.id,12 },13 })14}15 16export const config: SubscriberConfig = {17 event: "order.placed",18}
A subscriber file must export:
- An asynchronous function, which is the subscriber that is executed when the event is emitted.
- A configuration object that holds the name of the event that the subscriber listens to, which is
order.placedin this case.
The subscriber function receives an object as a parameter that has the following properties:
event: An object that holds the event's data payload. The payload of theorder.placedevent is the ID of the order placed.container: The Medusa container to access the Framework and commerce tools.
In the subscriber function, you execute the trackOrderPlacedWorkflow by invoking it, passing the Medusa container as a parameter. Then, you chain a run method, passing it the order ID from the event's data payload as input.
Test it Out#
You'll now test out the segment integration by placing an order using the Next.js Starter Storefront.
First, run the following command in your apps/backend directory to start the Medusa server:
Then, run the following command in your Next.js Starter Storefront's directory to start the storefront:
In the storefront, add a product to the cart and proceed to checkout. Once you place the order, open the Segment dashboard to view the order event:
- Go to Connections > Sources.
- Click on the Node.js source you created earlier.
- Click on the "Debugger" tab at the top of the page.
- You should see the
order.placedevent with the order details.

Track Custom Event#
In your Medusa application, you often need to track custom events that are relevant to your business use case. For example, a B2B business may want to track whenever a user requests a quote.
In Medusa, you can emit custom events in your workflows when an action occurs. Then, you can create a subscriber that listens to the custom event and executes a workflow to track it in Segment.
For example, if you have a createQuoteWorkflow, you can use Medusa's emitEventStep to emit a custom event after the quote is created:
1import { 2 createWorkflow,3} from "@medusajs/framework/workflows-sdk"4import {5 emitEventStep,6} from "@medusajs/medusa/core-flows"7 8const createQuoteWorkflow = createWorkflow(9 "create-quote",10 () => {11 // ...12 13 emitEventStep({14 eventName: "quote.created",15 data: {16 id: "123",17 // other data payload18 },19 })20 }21)
You can then create a subscriber that listens to the quote.created event and executes a workflow to track it in Segment:
1import { SubscriberArgs, type SubscriberConfig } from "@medusajs/framework"2import { trackQuoteWorkflow } from "../workflows/track-order-placed"3 4export default async function orderPlacedHandler({5 event: { data },6 container,7}: SubscriberArgs<{ id: string }>) {8 await trackQuoteWorkflow(container)9 .run({10 input: {11 id: data.id,12 },13 })14}15 16export const config: SubscriberConfig = {17 event: "quote.created",18}
The above example assumes you have a trackQuoteWorkflow that tracks the quote creation event in Segment, similar to the trackOrderPlacedWorkflow you created earlier.
Next Steps#
You've now integrated Segment with your Medusa application and tracked common events like order placement. You can expand on the features in this tutorial to:
- Track more events in your Medusa application, such as user sign-ups, cart additions, and more. You can refer to the Events Reference for a full list of events emitted by Medusa.
- Emit custom events that are relevant for your business use case, and track them in Segment.
- Add destinations to Segment to benefit from the data collected. Segment supports various destinations, such as Google Analytics, Metabase, and more.
If you're new to Medusa, check out the main documentation, where you'll get a more in-depth understanding of all the concepts you've used in this guide and more.
To learn more about the commerce features that Medusa provides, check out Medusa's Commerce Modules.
Troubleshooting#
If you encounter issues during your development, check out the troubleshooting guides.
Getting Help#
If you encounter issues not covered in the troubleshooting guides:
- Visit the Medusa GitHub repository to report issues or ask questions.
- Join the Medusa Discord community for real-time support from community members.
- Contact the sales team to get help from the Medusa team.