Implement a Ticket Booking System with Medusa
In this tutorial, you'll learn how to implement a ticket booking system using Medusa.
When you install a Medusa application, you get a fully-fledged commerce platform with a Framework for customization. The Medusa application's commerce features are built around Commerce Modules that are available out-of-the-box.
Medusa's Framework facilitates customizing Medusa's core features for your specific use case, such as ticket booking.
Summary#
By following this tutorial, you will learn how to:
- Install and set up Medusa with the Next.js Starter Storefront.
- Create data models for venues and tickets, and link them to Medusa's data models.
- Customize the Medusa Admin to manage venues and shows or events.
- Implement custom validation and flows for ticket booking.
- Generate QR codes for tickets and verify them at the venue.
- Extend the Next.js Starter Storefront to allow booking tickets and choosing seats: This part of the tutorial is covered separately.
Step 1: Install a Medusa Application#
Start by installing the Medusa application on your machine with the following command:
You'll first be asked for the project's name. Then, when asked whether you want to install the Next.js Starter Storefront, choose Yes.
the installation process will start, which will install the Medusa application as a monorepository in a directory with your project's name. The backend is installed in the apps/backend directory, and the Next.js Starter Storefront is installed in the apps/storefront directory.
Once the installation finishes successfully, the Medusa Admin dashboard will open with a form to create a new user. Enter the user's credentials and submit the form. Afterward, you can log in with the new user and explore the dashboard.
apps/backend directory of your Medusa project.Step 2: Create Ticket Booking Module#
In Medusa, you can build custom features in a module. A module is a reusable package with the data models and functionality related to a single feature or domain. Medusa integrates the module into your application without implications or side effects on your setup.
In this step, you'll build a Ticket Booking Module that defines the data models and logic to manage venues and tickets. Later, you'll build commerce flows related to ticket booking around the module.
a. Create Module Directory#
Create the directory src/modules/ticket-booking that will hold the Ticket Booking Module's code.
b. Define Data Models#
A data model represents a table in the database. You create data models using Medusa's Data Model Language (DML). It simplifies defining a table's columns, relations, and indexes with straightforward methods and configurations.
You'll define data models to represent venues, tickets, and purchases. Later, you'll link these data models to Medusa's data models, such as products and orders.
Venue Model
The Venue data model represents a venue where shows or events take place.
To create the Venue data model, create the file src/modules/ticket-booking/models/venue.ts with the following content:
1import { model } from "@medusajs/framework/utils"2import { VenueRow } from "./venue-row"3 4export const Venue = model.define("venue", {5 id: model.id().primaryKey(),6 name: model.text(),7 address: model.text().nullable(),8 rows: model.hasMany(() => VenueRow, {9 mappedBy: "venue",10 }),11})12.cascades({13 delete: ["rows"],14})15 16export default Venue
The Venue data model has the following properties:
id: The primary key of the table.name: The name of the venue.address: The address of the venue.rows: A one-to-many relation with theVenueRowdata model, which you'll create next.
VenueRow Model
The VenueRow data model represents a row in a venue, each with a specific type and number of seats.
To create the VenueRow data model, create the file src/modules/ticket-booking/models/venue-row.ts with the following content:
1import { model } from "@medusajs/framework/utils"2import { Venue } from "./venue"3 4export enum RowType {5 PREMIUM = "premium",6 BALCONY = "balcony",7 STANDARD = "standard",8 VIP = "vip"9}10 11export const VenueRow = model.define("venue_row", {12 id: model.id().primaryKey(),13 row_number: model.text(),14 row_type: model.enum(RowType),15 seat_count: model.number(),16 venue: model.belongsTo(() => Venue, {17 mappedBy: "rows",18 }),19})20.indexes([21 {22 on: ["venue_id", "row_number"],23 unique: true,24 },25])26 27export default VenueRow
The VenueRow data model has the following properties:
id: The primary key of the table.row_number: The identifier of the row, such as "A" and "B", or "1" and "2".row_type: The type of the row, which can be "premium", "balcony", "standard", or "vip".seat_count: The number of seats in the row.venue: A many-to-one relation with theVenuedata model, which represents the venue that the row belongs to.
You also add a unique index on the combination of venue_id and row_number to ensure that each row number is unique within a venue.
TicketProduct Model
The TicketProduct data model represents a product purchased as a ticket, such as a show or event. It will be linked to Medusa's Product data model.
To create the TicketProduct data model, create the file src/modules/ticket-booking/models/ticket-product.ts with the following content:
1import { model } from "@medusajs/framework/utils"2import { Venue } from "./venue"3import { TicketProductVariant } from "./ticket-product-variant"4import { TicketPurchase } from "./ticket-purchase"5 6export const TicketProduct = model.define("ticket_product", {7 id: model.id().primaryKey(),8 product_id: model.text().unique(),9 venue: model.belongsTo(() => Venue),10 dates: model.array(),11 variants: model.hasMany(() => TicketProductVariant, {12 mappedBy: "ticket_product",13 }),14 purchases: model.hasMany(() => TicketPurchase, {15 mappedBy: "ticket_product",16 }),17})18.indexes([19 {20 on: ["venue_id", "dates"],21 },22])23 24export default TicketProduct
The TicketProduct data model has the following properties:
id: The primary key of the table.product_id: The ID of the linked product in Medusa'sProductdata model.venue: A many-to-one relation with theVenuedata model, which represents the venue where the show takes place.dates: An array of dates when the show takes place.variants: A one-to-many relation with theTicketProductVariantdata model, which you'll create next.purchases: A one-to-many relation with theTicketPurchasedata model, which you'll create next.
You also add an index on the combination of venue_id and dates to optimize queries that filter by these fields.
Product and ProductVariant data models or their linked records. So, you don't need to duplicate this information in the TicketProduct data model.TicketProductVariant Model
The TicketProductVariant data model represents a variant of a ticket product, such as a specific row type. It will be linked to Medusa's ProductVariant data model.
To create the TicketProductVariant data model, create the file src/modules/ticket-booking/models/ticket-product-variant.ts with the following content:
1import { model } from "@medusajs/framework/utils"2import { TicketProduct } from "./ticket-product"3import { RowType } from "./venue-row"4import { TicketPurchase } from "./ticket-purchase"5 6export const TicketProductVariant = model.define("ticket_product_variant", {7 id: model.id().primaryKey(),8 product_variant_id: model.text().unique(),9 ticket_product: model.belongsTo(() => TicketProduct, {10 mappedBy: "variants",11 }),12 row_type: model.enum(RowType),13 purchases: model.hasMany(() => TicketPurchase, {14 mappedBy: "ticket_variant",15 }),16})17.indexes([18 {19 on: ["ticket_product_id", "row_type"],20 },21])22 23export default TicketProductVariant
The TicketProductVariant data model has the following properties:
id: The primary key of the table.product_variant_id: The ID of the linked product variant in Medusa'sProductVariantdata model.ticket_product: A many-to-one relation with theTicketProductdata model, which represents the ticket product the variant belongs to.row_type: The type of the row associated with the variant, which can be "premium", "balcony", "standard", or "vip".purchases: A one-to-many relation with theTicketPurchasedata model, which you'll create next.
TicketPurchase Model
The TicketPurchase data model represents the purchase of a seat for a specific TicketProduct. It will be linked to Medusa's Order data model.
To create the TicketPurchase data model, create the file src/modules/ticket-booking/models/ticket-purchase.ts with the following content:
1import { model } from "@medusajs/framework/utils"2import { TicketProduct } from "./ticket-product"3import { TicketProductVariant } from "./ticket-product-variant"4import { VenueRow } from "./venue-row"5 6export const TicketPurchase = model.define("ticket_purchase", {7 id: model.id().primaryKey(),8 order_id: model.text(),9 ticket_product: model.belongsTo(() => TicketProduct),10 ticket_variant: model.belongsTo(() => TicketProductVariant),11 venue_row: model.belongsTo(() => VenueRow),12 seat_number: model.text(),13 show_date: model.dateTime(),14 status: model.enum(["pending", "scanned"]).default("pending"),15})16.indexes([17 {18 on: ["order_id"],19 },20 {21 on: ["ticket_product_id", "venue_row_id", "seat_number", "show_date"],22 unique: true,23 },24])25 26export default TicketPurchase
The TicketPurchase data model has the following properties:
id: The primary key of the table.order_id: The ID of the linked order in Medusa'sOrderdata model.ticket_product: A many-to-one relation with theTicketProductdata model, which represents the ticket product purchased.ticket_variant: A many-to-one relation with theTicketProductVariantdata model, which represents the variant (row type) of the ticket product purchased.venue_row: A many-to-one relation with theVenueRowdata model, which represents the row of the seat purchased.seat_number: The number of the seat purchased.show_date: The date of the show for which the ticket was purchased.status: The status of the ticket purchase, which can be "pending" or "scanned". This is useful later when you add QR scanning functionality.
You also add two indexes:
- An index on the
order_idfield to optimize queries that filter by this field. - A unique index on the combination of
ticket_product_id,venue_row_id,seat_number, andshow_dateto ensure that a specific seat for a specific show date can only be purchased once.
c. Create Module's Service#
You can manage your module's data models in a service.
A service is a TypeScript class that the module exports. In the service's methods, you can connect to the database, allowing you to manage your data models, or connect to third-party services, which is useful if you're integrating with external services.
To create the Ticket Booking Module's service, create the file src/modules/ticket-booking/service.ts with the following content:
1import { MedusaService } from "@medusajs/framework/utils"2import Venue from "./models/venue"3import VenueRow from "./models/venue-row"4import TicketProduct from "./models/ticket-product"5import TicketProductVariant from "./models/ticket-product-variant"6import TicketPurchase from "./models/ticket-purchase"7 8export class TicketBookingModuleService extends MedusaService({9 Venue,10 VenueRow,11 TicketProduct,12 TicketProductVariant,13 TicketPurchase,14}) { }15 16export default TicketBookingModuleService
The TicketBookingModuleService extends MedusaService, which generates a class with data-management methods for your module's data models. This saves you time on implementing Create, Read, Update, and Delete (CRUD) methods.
The TicketBookingModuleService class now has methods like createTicketProducts and retrieveVenue.
d. Export Module Definition#
The final piece of a module is its definition, which you export in an index.ts file at its root directory. This definition tells Medusa the name of the module and its service.
So, create the file src/modules/ticket-booking/index.ts with the following content:
You use the Module function to create the module's definition. It accepts two parameters:
- The module's name, which is
ticketBooking. - An object with a required property
serviceindicating the module's service.
You also export the module's name as TICKET_BOOKING_MODULE so you can reference it later.
e. Add Module to Medusa's Configurations#
Once you finish building the module, add it to Medusa's configurations to start using it.
In medusa-config.ts, add a modules property and pass an array with your custom module:
Each object in the modules array has a resolve property, whose value is either a path to the module's directory, or an npm package’s name.
f. Generate Migrations#
Since data models represent tables in the database, you define how they're created in the database with migrations. A migration is a TypeScript class that defines database changes made by a module.
Medusa's CLI tool can generate the migrations for you. To generate a migration for the Ticket Booking Module, run the following command in your Medusa application's directory:
The db:generate command of the Medusa CLI accepts the name of the module to generate the migration for. You'll now have a migrations directory under src/modules/ticket-booking that holds the generated migration.
Then, to reflect these migrations on the database, run the following command:
The tables for the Ticket Booking Module's data models are now created in the database.
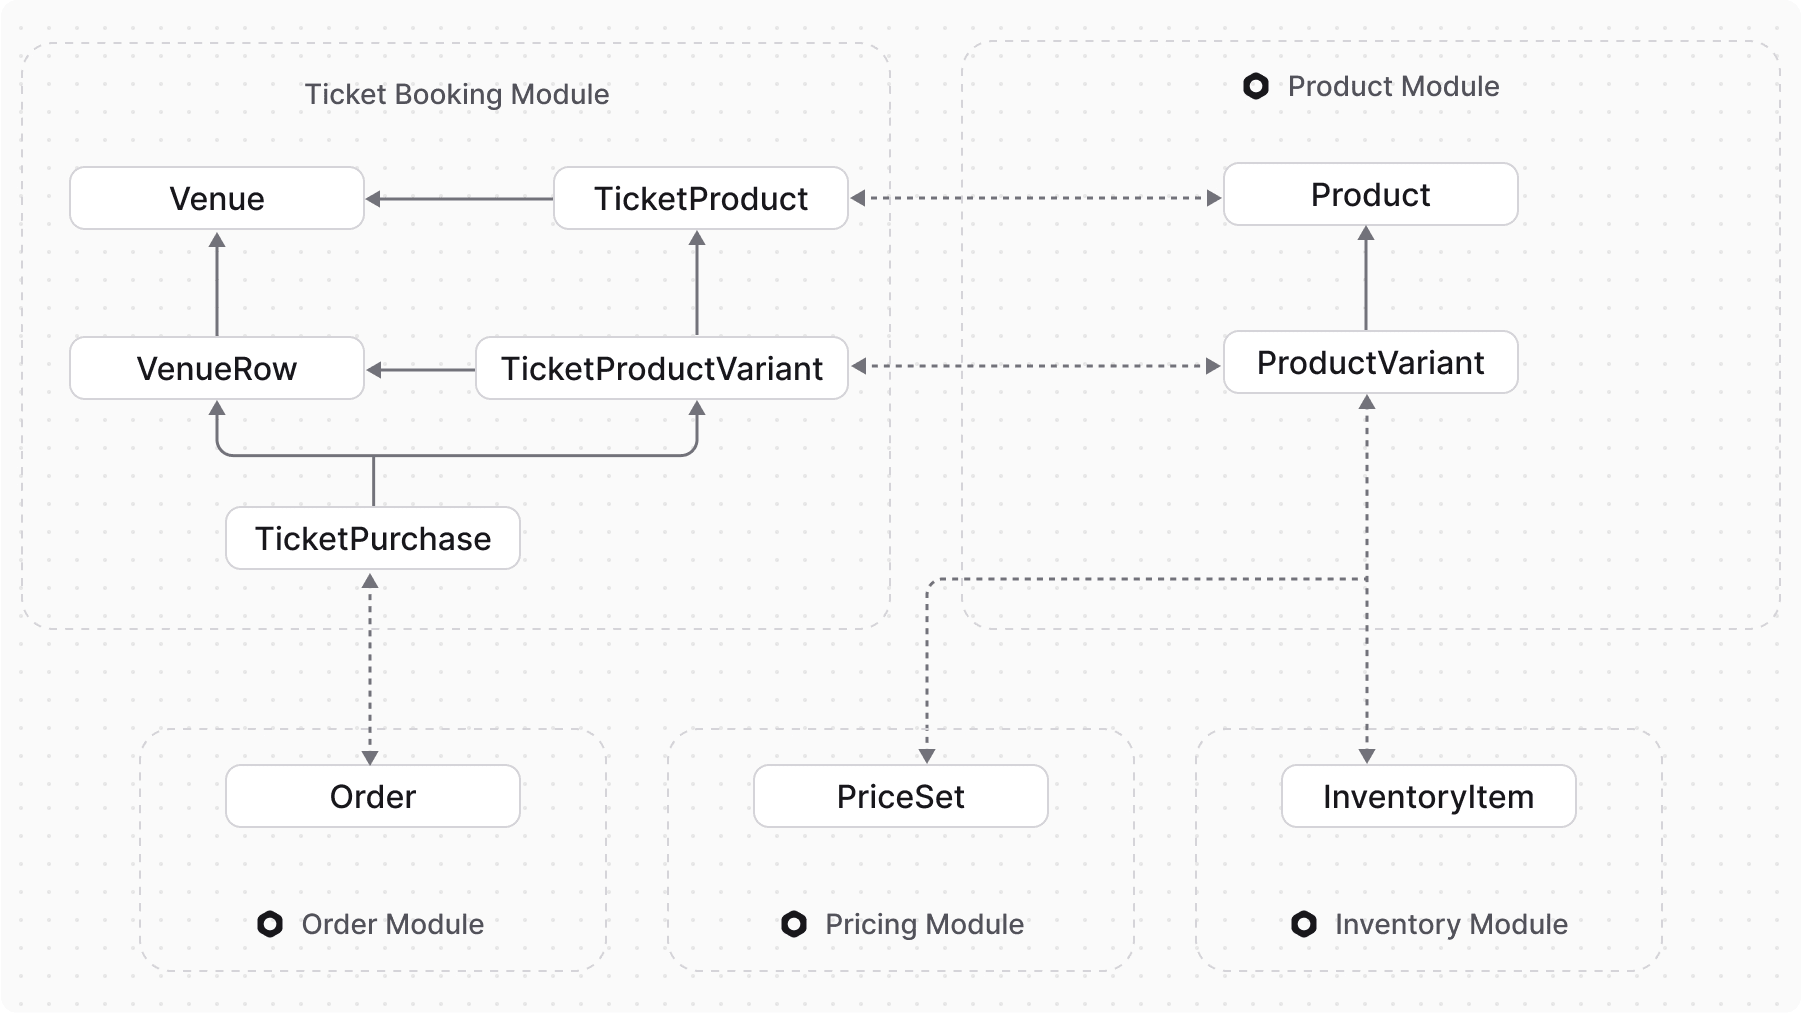
Step 3: Link Ticket Booking to Medusa Data Models#
Since Medusa isolates modules to integrate them into your application without side effects, you can't directly create relationships between data models of different modules.
Instead, Medusa provides a mechanism to define links between data models and retrieve and manage linked records while maintaining module isolation.
In this step, you'll define a link between the data models in the Ticket Booking Module and Medusa's Commerce Modules.
a. TicketProduct <> Product Link#
To define a link between the TicketProduct data model and Medusa's Product data model, create the file src/links/ticket-product.ts with the following content:
1import TicketingModule from "../modules/ticket-booking"2import ProductModule from "@medusajs/medusa/product"3import { defineLink } from "@medusajs/framework/utils"4 5export default defineLink(6 {7 linkable: TicketingModule.linkable.ticketProduct,8 deleteCascade: true,9 },10 ProductModule.linkable.product11)
You define a link using the defineLink function. It accepts two parameters:
- An object indicating the first data model part of the link. A module has a special
linkableproperty that contains link configurations for its data models. You pass the linkable configurations of the Ticket Booking Module'sTicketProductdata model. You also set thedeleteCascadeproperty totrue, indicating that a ticket product should be deleted if its linked product is deleted. - An object indicating the second data model part of the link. You pass the linkable configurations of the Product Module's
Productdata model.
In later steps, you'll learn how this link allows you to retrieve and manage ticket products and their related Medusa products.
b. TicketProductVariant <> ProductVariant Link#
To define a link between the TicketProductVariant data model and Medusa's ProductVariant data model, create the file src/links/ticket-product-variant.ts with the following content:
1import TicketingModule from "../modules/ticket-booking"2import ProductModule from "@medusajs/medusa/product"3import { defineLink } from "@medusajs/framework/utils"4 5export default defineLink(6 {7 linkable: TicketingModule.linkable.ticketProductVariant,8 deleteCascade: true,9 },10 ProductModule.linkable.productVariant11)
You define a link in a similar way as the previous link, but this time between the TicketProductVariant and ProductVariant data models.
c. TicketPurchase <> Order Link#
Finally, to define a link between the TicketPurchase data model and Medusa's Order data model, create the file src/links/ticket-purchase-order.ts with the following content:
1import TicketingModule from "../modules/ticket-booking"2import OrderModule from "@medusajs/medusa/order"3import { defineLink } from "@medusajs/framework/utils"4 5export default defineLink(6 {7 linkable: TicketingModule.linkable.ticketPurchase,8 deleteCascade: true,9 isList: true,10 },11 OrderModule.linkable.order12)
You define a link in a similar way as the previous links, but this time between the TicketPurchase and Order data models. You also set the isList property to true for the TicketPurchase data model, indicating that an order can have multiple ticket purchases.
d. Sync Links to Database#
After defining links, you need to sync them to the database. This creates the necessary tables to manage the links.
To sync the links to the database, run the migrations command again in the Medusa application's directory:
This command will create the necessary tables to manage the links between the Ticket Booking Module's data models and Medusa's data models.
Step 4: Create Venue#
In this step, you'll implement the logic to create a venue.
When you build commerce features in Medusa that can be consumed by client applications, such as the Medusa Admin dashboard or storefront, you need to implement:
- A workflow with steps that define the business logic of the feature.
- An API route that exposes the workflow's functionality to client applications.
In this step, you'll implement the workflow and API route for creating a venue.
a. Create Venue Workflow#
A workflow is a series of queries and actions, called steps, that complete a task. A workflow is similar to a function, but it allows you to track its executions' progress, define roll-back logic, and configure other advanced features.
The workflow to create a venue will have the following steps:
Loading...The useQueryGraphStep is available through Medusa's @medusajs/medusa/core-flows package. You'll implement other steps in the workflow.
createVenueStep
The createVenueStep creates a venue.
To create the step, create the file src/workflows/steps/create-venue.ts with the following content:
1import { createStep, StepResponse } from "@medusajs/framework/workflows-sdk"2import { TICKET_BOOKING_MODULE } from "../../modules/ticket-booking"3 4export type CreateVenueStepInput = {5 name: string6 address?: string7}8 9export const createVenueStep = createStep(10 "create-venue",11 async (input: CreateVenueStepInput, { container }) => {12 const ticketBookingModuleService = container.resolve(TICKET_BOOKING_MODULE)13 14 const venue = await ticketBookingModuleService.createVenues(input)15 16 return new StepResponse(venue, venue)17 },18 async (venue, { container }) => {19 if (!venue) {return}20 21 const ticketBookingModuleService = container.resolve(TICKET_BOOKING_MODULE)22 23 await ticketBookingModuleService.deleteVenues(venue.id)24 }25)
You create a step with the createStep function. It accepts three parameters:
- The step's unique name.
- An async function that receives two parameters:
- The step's input, which is an object with the
nameandaddressproperties of the venue to create. - An object that has properties including the Medusa container, which is a registry of Framework and commerce tools that you can access in the step.
- The step's input, which is an object with the
- An async compensation function that undoes the actions performed by the step function. This function is only executed if an error occurs during the workflow's execution.
In the step function, you resolve the Ticket Booking Module's service from the Medusa container using its resolve method, passing it the module's name as a parameter.
Then, you use the generated createVenues method of the Ticket Booking Module's service to create a venue with the provided input.
Finally, a step function must return a StepResponse instance. The StepResponse constructor accepts two parameters:
- The step's output, which is the venue created.
- Data to pass to the step's compensation function.
In the compensation function, you undo creating the venue by deleting it using the generated deleteVenues method of the Ticket Booking Module's service.
createVenueRowsStep
The createVenueRowsStep creates rows in a venue.
To create the step, create the file src/workflows/steps/create-venue-rows.ts with the following content:
1import { createStep, StepResponse } from "@medusajs/framework/workflows-sdk"2import { TICKET_BOOKING_MODULE } from "../../modules/ticket-booking"3import { RowType } from "../../modules/ticket-booking/models/venue-row"4 5export type CreateVenueRowsStepInput = {6 rows: {7 venue_id: string8 row_number: string9 row_type: RowType10 seat_count: number11 }[]12}13 14export const createVenueRowsStep = createStep(15 "create-venue-rows",16 async (input: CreateVenueRowsStepInput, { container }) => {17 const ticketBookingModuleService = container.resolve(TICKET_BOOKING_MODULE)18 19 const venueRows = await ticketBookingModuleService.createVenueRows(20 input.rows21 )22 23 return new StepResponse(venueRows, venueRows)24 },25 async (venueRows, { container }) => {26 if (!venueRows) {return}27 28 const ticketBookingModuleService = container.resolve(TICKET_BOOKING_MODULE)29 30 await ticketBookingModuleService.deleteVenueRows(31 venueRows.map((row) => row.id)32 )33 }34)
This step receives the rows to create as an input.
In the step function, you create the rows and return them.
In the compensation function, you undo creating the rows by deleting them.
Create Venue Workflow
You can now create the workflow that uses the steps you implemented.
To create the workflow, create the file src/workflows/create-venue.ts with the following content:
1import { createWorkflow, transform, WorkflowResponse } from "@medusajs/framework/workflows-sdk"2import { createVenueStep } from "./steps/create-venue"3import { createVenueRowsStep } from "./steps/create-venue-rows"4import { RowType } from "../modules/ticket-booking/models/venue-row"5import { useQueryGraphStep } from "@medusajs/core-flows"6 7export type CreateVenueWorkflowInput = {8 name: string9 address?: string10 rows: Array<{11 row_number: string12 row_type: RowType13 seat_count: number14 }>15}16 17export const createVenueWorkflow = createWorkflow(18 "create-venue",19 (input: CreateVenueWorkflowInput) => {20 const venue = createVenueStep({21 name: input.name,22 address: input.address,23 })24 25 const venueRowsData = transform({26 venue,27 input,28 }, (data) => {29 return data.input.rows.map((row) => ({30 venue_id: data.venue.id,31 row_number: row.row_number,32 row_type: row.row_type,33 seat_count: row.seat_count,34 }))35 })36 37 createVenueRowsStep({38 rows: venueRowsData,39 })40 41 const { data: venues } = useQueryGraphStep({42 entity: "venue",43 fields: ["id", "name", "address", "rows.*"],44 filters: {45 id: venue.id,46 },47 })48 49 return new WorkflowResponse({50 venue: venues[0],51 })52 }53)
You create a workflow using the createWorkflow function. It accepts the workflow's unique name as a first parameter.
It accepts as a second parameter a constructor function that holds the workflow's implementation. The function accepts an input object containing the details of the venue and its rows.
In the workflow, you:
- Create a venue using the
createVenueStep. - Prepare the data to create the venue's rows.
- Create the venue's rows using the
createVenueRowsStep. - Retrieve the created venue with its rows using the
useQueryGraphStep.- This step uses Query under the hood. It allows you to retrieve data across modules.
A workflow must return an instance of WorkflowResponse that accepts the data to return to the workflow's executor. You return the created venue with its rows.
transform allows you to access the values of data during execution. Learn more in the Data Manipulation documentation.b. Create Venue API Route#
Next, you'll create an API route that exposes the functionality of the createVenueWorkflow to client applications.
An API route is created in a route.ts file under a sub-directory of the src/api directory. The path of the API route is the file's path relative to src/api.
Create the file src/api/admin/venues/route.ts with the following content:
1import { MedusaRequest, MedusaResponse } from "@medusajs/framework/http"2import { createVenueWorkflow } from "../../../workflows/create-venue"3import { RowType } from "../../../modules/ticket-booking/models/venue-row"4import { z } from "@medusajs/framework/zod"5 6export const CreateVenueSchema = z.object({7 name: z.string(),8 address: z.string().optional(),9 rows: z.array(z.object({10 row_number: z.string(),11 row_type: z.enum(RowType),12 seat_count: z.number(),13 })),14})15 16type CreateVenueSchema = z.infer<typeof CreateVenueSchema>17 18export async function POST(19 req: MedusaRequest<CreateVenueSchema>,20 res: MedusaResponse21) {22 const { result } = await createVenueWorkflow(req.scope).run({23 input: req.validatedBody,24 })25 26 res.json(result)27}
You use Zod to create the CreateVenueSchema that is used to validate request bodies sent to this API route.
Then, you export a POST route handler function, which will expose a POST API route at /admin/venues.
In the route handler, you execute the createVenueWorkflow, passing it the request body as an input.
Finally, you return the created venue with its rows in the response.
You'll test this API route later when you customize the Medusa Admin.
Add Validation Middleware for Create Venue API Route
To validate the body parameters of requests sent to the API route, you need to apply a middleware.
To apply a middleware to a route, create the file src/api/middlewares.ts with the following content:
1import { 2 defineMiddlewares, 3 validateAndTransformBody,4} from "@medusajs/framework/http"5import { CreateVenueSchema } from "./admin/venues/route"6 7export default defineMiddlewares({8 routes: [9 {10 matcher: "/admin/venues",11 methods: ["POST"],12 middlewares: [13 validateAndTransformBody(CreateVenueSchema),14 ],15 },16 ],17})
You apply Medusa's validateAndTransformBody middleware to POST requests sent to the /admin/venues route.
The middleware function accepts a Zod schema, which you created in the API route's file.
Step 5: List Venues API Route#
In this step, you'll add an API route to retrieve a list of venues. You'll use this API route later to display a list of venues in the Medusa Admin.
To create the API route, add the following to the src/api/admin/venues/route.ts file:
1export async function GET(2 req: MedusaRequest,3 res: MedusaResponse4) {5 const query = req.scope.resolve("query")6 7 const { 8 data: venues,9 metadata,10 } = await query.graph({11 entity: "venue",12 ...req.queryConfig,13 })14 15 res.json({ 16 venues,17 count: metadata?.count,18 limit: metadata?.take,19 offset: metadata?.skip,20 })21}
You export a GET route handler function, which will expose a GET API route at /admin/venues.
In the route handler, you resolve Query from the Medusa container and use it to retrieve a list of venues.
Notice that you spread the req.queryConfig object into the query.graph method. This allows clients to pass query parameters for pagination and configure returned fields. You'll learn how to set these configurations in a bit.
Finally, you return the list of venues and pagination details in the response.
You'll test out this API route later when you customize the Medusa Admin.
Add Validation Middleware for List Venues API Route#
To validate the query parameters of requests sent to the API route, and to allow clients to configure pagination and returned fields, you need to apply a middleware.
To apply a middleware to the route, add the following imports at the top of the src/api/middlewares.ts file:
Then, add the following object to the routes array passed to defineMiddlewares:
You apply the validateAndTransformQuery middleware to GET requests sent to the /admin/venues route. This allows you to validate query parameters and set configurations for pagination and returned fields.
The middleware function accepts two parameters:
- A Zod schema to validate the query parameters. You use Medusa's
createFindParamsutility function to create a schema that validates common query parameters likelimit,offset,fields, andorder. - Query configurations that you use in the API route using the
req.queryConfigobject. You set the following configurations:isList: Set totrueto indicate that the API route returns a list of records.defaults: An array of fields to return by default if the client doesn't specify any fields in the request.
Step 6: Manage Venues in Medusa Admin#
In this step, you'll customize the Medusa Admin to allow admin users to manage venues.
The Medusa Admin dashboard is customizable, allowing you to insert widgets into existing pages, or create new pages.
In this step, you'll create a new page or UI route in the Medusa Admin to view a list of venues and create new venues.
a. Initialize JS SDK#
To send requests to the Medusa server, you'll use the JS SDK. It's already installed in your Medusa project, but you need to initialize it before using it in your customizations.
Create the file src/admin/lib/sdk.ts with the following content:
Learn more about the initialization options in the JS SDK reference.
b. Define Types#
Next, you'll define types that you'll use in your admin customizations.
Create the file src/admin/types.ts with the following content:
1export enum RowType {2 PREMIUM = "premium",3 BALCONY = "balcony",4 STANDARD = "standard",5 VIP = "vip"6}7 8export interface VenueRow {9 id: string10 row_number: string11 row_type: RowType12 seat_count: number13 venue_id: string14 created_at: string15 updated_at: string16}17 18export interface Venue {19 id: string20 name: string21 address?: string22 rows: VenueRow[]23 created_at: string24 updated_at: string25}26 27export interface CreateVenueRequest {28 name: string29 address?: string30 rows: {31 row_number: string32 row_type: RowType33 seat_count: number34 }[]35}36 37export interface VenuesResponse {38 venues: Venue[]39 count: number40 limit: number41 offset: number42}
You define types for the RowType enum, VenueRow and Venue data models, as well as types for API request and response bodies.
c. Create Venues Page#
You can now create a page that shows a list of venues in a table.
You create a page by creating a UI route. A UI route is a React component defined under the src/admin/routes directory in a page.tsx file. The path of the UI route is the file's path relative to src/admin/routes.
To create the venues page, create the file src/admin/routes/venues/page.tsx with the following content:
A UI route file must export:
- A React component as the default export. This component is rendered when the user navigates to the UI route.
- A route configuration object defined using the
defineRouteConfigfunction. This object configures the UI route's label and icon in the sidebar.
In the VenuesPage component, you'll display the list of venues in a Data Table component.
To define the columns of the data table, add the following before the VenuesPage component:
1const columnHelper = createDataTableColumnHelper<Venue>()2 3const columns = [4 columnHelper.accessor("name", {5 header: "Name",6 cell: ({ row }) => (7 <div>8 <div className="txt-small-plus">{row.original.name}</div>9 {row.original.address && (10 <div className="txt-small text-gray-500">{row.original.address}</div>11 )}12 </div>13 ),14 }),15 columnHelper.accessor("rows", {16 header: "Total Capacity",17 cell: ({ row }) => {18 const totalCapacity = row.original.rows.reduce(19 (sum, rowItem) => sum + rowItem.seat_count,20 021 )22 return <span className="txt-small-plus">{totalCapacity} seats</span>23 },24 }),25 columnHelper.accessor("address", {26 header: "Address",27 cell: ({ row }) => (28 <span>{row.original.address || "-"}</span>29 ),30 }),31]
You define three columns: Name, Total Capacity, and Address.
Next, to show the data table, replace the VenuesPage component with the following:
1const VenuesPage = () => {2 const limit = 153 const [pagination, setPagination] = useState<DataTablePaginationState>({4 pageSize: limit,5 pageIndex: 0,6 })7 8 const queryClient = useQueryClient()9 10 const offset = useMemo(() => {11 return pagination.pageIndex * limit12 }, [pagination])13 14 const { data, isLoading } = useQuery<{15 venues: Venue[]16 count: number17 limit: number18 offset: number19 }>({20 queryKey: ["venues", offset, limit],21 queryFn: () => sdk.client.fetch("/admin/venues", {22 query: {23 offset: pagination.pageIndex * pagination.pageSize,24 limit: pagination.pageSize,25 order: "-created_at",26 },27 }),28 })29 30 const table = useDataTable({31 columns,32 data: data?.venues || [],33 rowCount: data?.count || 0,34 isLoading,35 pagination: {36 state: pagination,37 onPaginationChange: setPagination,38 },39 getRowId: (row) => row.id,40 })41 42 return (43 <Container className="divide-y p-0">44 <DataTable instance={table}>45 <DataTable.Toolbar className="flex flex-col items-start justify-between gap-2 md:flex-row md:items-center">46 <Heading>47 Venues48 </Heading>49 </DataTable.Toolbar>50 <DataTable.Table />51 <DataTable.Pagination />52 </DataTable>53 </Container>54 )55}
In the component, you use React Query's useQuery hook to fetch the list of venues from the GET /admin/venues API route you created earlier. You pass the offset and limit query parameters to paginate the results.
Then, you use the useDataTable hook from Medusa UI to create a data table instance with the fetched venues and the columns you defined earlier.
Finally, you render the data table.
d. Create Venue Modal#
Next, you'll add a component that shows a form in a modal to create a new venue. You'll open this modal when the user clicks a button on the venues page.
Before adding the modal, you'll add a component that visualizes the venue rows in a seat chart. You'll use this component in the modal to help admin users visualize the rows they're adding to the venue.
To create the seat chart component, create the file src/admin/components/seat-chart.tsx with the following content:
1import React from "react"2import { Heading } from "@medusajs/ui"3import { RowType, VenueRow } from "../types"4 5interface ChartVenueRow extends Pick<VenueRow, "row_number" | "row_type" | "seat_count"> {}6 7interface SeatChartProps {8 rows: ChartVenueRow[]9 className?: string10}11 12const getRowTypeColor = (rowType: RowType): string => {13 switch (rowType) {14 case RowType.VIP:15 return "bg-purple-500"16 case RowType.PREMIUM:17 return "bg-orange-500"18 case RowType.BALCONY:19 return "bg-blue-500"20 case RowType.STANDARD:21 return "bg-gray-500"22 default:23 return "bg-gray-300"24 }25}26 27const getRowTypeLabel = (rowType: RowType): string => {28 switch (rowType) {29 case RowType.VIP:30 return "VIP"31 case RowType.PREMIUM:32 return "Premium"33 case RowType.BALCONY:34 return "Balcony"35 case RowType.STANDARD:36 return "Standard"37 default:38 return "Unknown"39 }40}41 42export const SeatChart = ({ rows, className = "" }: SeatChartProps) => {43 if (rows.length === 0) {44 return (45 <div className={`p-8 text-center text-gray-500 ${className}`}>46 <p>No rows added yet. Add rows to see the seat chart.</p>47 </div>48 )49 }50 51 // Sort rows by row_number for consistent display52 const sortedRows = [...rows].sort((a, b) => a.row_number.localeCompare(b.row_number))53 54 return (55 <div className={`space-y-4 ${className}`}>56 <div className="flex items-center justify-between">57 <Heading level="h3">Seat Chart Preview</Heading>58 <div className="flex items-center gap-4 txt-small">59 <div className="flex items-center gap-2">60 <div className="w-4 h-4 bg-purple-500 rounded"></div>61 <span>VIP</span>62 </div>63 <div className="flex items-center gap-2">64 <div className="w-4 h-4 bg-orange-500 rounded"></div>65 <span>Premium</span>66 </div>67 <div className="flex items-center gap-2">68 <div className="w-4 h-4 bg-blue-500 rounded"></div>69 <span>Balcony</span>70 </div>71 <div className="flex items-center gap-2">72 <div className="w-4 h-4 bg-gray-500 rounded"></div>73 <span>Standard</span>74 </div>75 </div>76 </div>77 78 <div className="border rounded-lg p-4 bg-gray-50">79 <div className="grid grid-cols-[auto_auto_1fr_auto] gap-4 items-center">80 {/* Header row */}81 <div className="txt-small-plus text-gray-700 text-center">Row</div>82 <div className="txt-small-plus text-gray-700 text-center">Type</div>83 <div className="txt-small-plus text-gray-700 text-center">Seats</div>84 <div className="txt-small-plus text-gray-700 text-center">Count</div>85 86 {/* Data rows */}87 {sortedRows.map((row) => (88 <React.Fragment key={row.row_number}>89 <div className="txt-small-plus text-gray-700 text-center">90 {row.row_number}91 </div>92 <div className="flex items-center justify-center gap-2">93 <div className={`w-4 h-4 rounded ${getRowTypeColor(row.row_type)}`}></div>94 <span className="txt-small text-ui-fg-subtle">95 {getRowTypeLabel(row.row_type)}96 </span>97 </div>98 <div className="flex justify-center gap-1 flex-wrap">99 {Array.from({ length: row.seat_count }, (_, i) => (100 <div101 key={i}102 className={`w-3 h-3 rounded-sm ${getRowTypeColor(row.row_type)} opacity-70`}103 />104 ))}105 </div>106 <div className="txt-small text-gray-500 text-center">107 {row.seat_count}108 </div>109 </React.Fragment>110 ))}111 </div>112 </div>113 114 <div className="txt-small text-gray-500">115 Total capacity: {rows.reduce((sum, row) => sum + row.seat_count, 0)} seats116 </div>117 </div>118 )119}
This component accepts a list of venue rows and visualizes them in a seat chart.
Then, to create the component for the modal, create the file src/admin/components/create-venue-modal.tsx with the following content:
13import { SeatChart } from "./seat-chart"14 15interface NewVenueRow extends Pick<VenueRow, "row_number" | "row_type" | "seat_count"> {}16 17interface CreateVenueModalProps {18 open: boolean19 onOpenChange: (open: boolean) => void20 onSubmit: (data: CreateVenueRequest) => Promise<void>21}22 23export const CreateVenueModal = ({24 open,25 onOpenChange,26 onSubmit,27}: CreateVenueModalProps) => {28 const [name, setName] = useState("")29 const [address, setAddress] = useState("")30 const [rows, setRows] = useState<NewVenueRow[]>([])31 const [newRow, setNewRow] = useState({32 row_number: "",33 row_type: RowType.VIP,34 seat_count: 10,35 })36 const [isLoading, setIsLoading] = useState(false)37 38 // TODO add functions to manage venue rows39}
You create a CreateVenueModal component that accepts three props:
open: A boolean indicating whether the modal is open or closed.onOpenChange: A function called when the modal's open state changes.onSubmit: A function called when the user submits the form to create a venue.
In the component, you define state variables to hold the venue's name, address, rows, a new row being added, and a loading state.
In the form, admin users should be able to add multiple rows to the venue. So, you'll add methods to manage rows, such as adding and removing rows.
Replace the TODO in the CreateVenueModal component with the following:
1const addRow = () => {2 if (!newRow.row_number.trim()) {3 toast.error("Row number is required")4 return5 }6 7 if (rows.some((row) => row.row_number === newRow.row_number)) {8 toast.error("Row number already exists")9 return10 }11 12 if (newRow.seat_count <= 0) {13 toast.error("Seat count must be greater than 0")14 return15 }16 17 setRows([...rows, {18 row_number: newRow.row_number,19 row_type: newRow.row_type,20 seat_count: newRow.seat_count,21 }])22 setNewRow({23 row_number: "",24 row_type: RowType.VIP,25 seat_count: 10,26 })27}28 29const removeRow = (rowNumber: string) => {30 setRows(rows.filter((row) => row.row_number !== rowNumber))31}32 33const formatRowType = (rowType: RowType) => {34 switch (rowType) {35 case RowType.VIP:36 return "VIP"37 default:38 return rowType.charAt(0).toUpperCase() + rowType.slice(1).toLowerCase()39 }40}41 42// TODO handle form submission and modal close
You add the addRow function to add a new row to the venue, and the removeRow function to remove a row by its row number. You also add the formatRowType function to format the row type for display.
Next, you'll implement the logic to submit the form to create a venue and to close the modal and reset the form when the user closes it.
Replace the TODO in the CreateVenueModal component with the following:
1const handleClose = () => {2 setName("")3 setAddress("")4 setRows([])5 setNewRow({6 row_number: "",7 row_type: RowType.VIP,8 seat_count: 10,9 })10 onOpenChange(false)11}12 13const handleSubmit = async (e: React.FormEvent) => {14 e.preventDefault()15 16 if (!name.trim()) {17 toast.error("Venue name is required")18 return19 }20 21 if (rows.length === 0) {22 toast.error("At least one row is required")23 return24 }25 26 setIsLoading(true)27 try {28 await onSubmit({29 name: name.trim(),30 address: address.trim() || undefined,31 rows: rows.map((row) => ({32 row_number: row.row_number,33 row_type: row.row_type,34 seat_count: row.seat_count,35 })),36 })37 handleClose()38 } catch (error: any) {39 toast.error(error.message)40 } finally {41 setIsLoading(false)42 }43}44 45// TODO render modal
You add the handleClose function to reset the form and call the onOpenChange prop to close the modal. You'll trigger this function when users close the modal or after successfully creating a venue.
You also add the handleSubmit function to validate the form data, call the onSubmit prop with the venue data, and handle loading and error states.
Finally, you'll render the modal with the form. Replace the TODO in the CreateVenueModal component with the following:
1return (2 <FocusModal open={open} onOpenChange={handleClose}>3 <FocusModal.Content>4 <form onSubmit={handleSubmit} className="flex h-full flex-col overflow-hidden">5 <FocusModal.Header>6 <Heading level="h1">Create New Venue</Heading>7 </FocusModal.Header>8 <FocusModal.Body className="p-6 overflow-auto">9 <div className="max-w-[720px] mx-auto">10 <div className="space-y-4 w-fit mx-auto">11 <div>12 <Label htmlFor="name">Venue Name</Label>13 <Input14 id="name"15 value={name}16 onChange={(e) => setName(e.target.value)}17 placeholder="Enter venue name"18 />19 </div>20 21 <div>22 <Label htmlFor="address">23 Address24 <span className="text-ui-fg-muted txt-compact-small"> (Optional)</span>25 </Label>26 <Textarea27 id="address"28 value={address}29 onChange={(e) => setAddress(e.target.value)}30 placeholder="Enter venue address"31 rows={3}32 />33 </div>34 35 <div className="border-t pt-4">36 <Heading level="h3" className="mb-2">Add Rows</Heading>37 38 <div className="space-y-3">39 <div className="grid grid-cols-3 gap-3">40 <div>41 <Label htmlFor="row_number">Row Number</Label>42 <Input43 id="row_number"44 value={newRow.row_number}45 onChange={(e) => setNewRow({ ...newRow, row_number: e.target.value })}46 placeholder="A, B, 1, 2..."47 />48 </div>49 50 <div>51 <Label htmlFor="row_type">Row Type</Label>52 <Select53 value={newRow.row_type}54 onValueChange={(value) => setNewRow({ ...newRow, row_type: value as RowType })}55 >56 <Select.Trigger>57 <Select.Value />58 </Select.Trigger>59 <Select.Content>60 <Select.Item value={RowType.VIP}>VIP</Select.Item>61 <Select.Item value={RowType.PREMIUM}>Premium</Select.Item>62 <Select.Item value={RowType.BALCONY}>Balcony</Select.Item>63 <Select.Item value={RowType.STANDARD}>Standard</Select.Item>64 </Select.Content>65 </Select>66 </div>67 68 <div>69 <Label htmlFor="seat_count">Seat Count</Label>70 <Input71 id="seat_count"72 type="number"73 min="1"74 value={newRow.seat_count}75 onChange={(e) => setNewRow({ ...newRow, seat_count: parseInt(e.target.value) || 0 })}76 />77 </div>78 </div>79 80 <Button81 type="button"82 variant="secondary"83 onClick={addRow}84 disabled={!newRow.row_number.trim()}85 >86 Add Row87 </Button>88 </div>89 90 {rows.length > 0 && (91 <div className="mt-4">92 <h4 className="txt-small-plus mb-2">Added Rows</h4>93 <div className="space-y-2">94 {rows.map((row) => (95 <div key={row.row_number} className="flex items-center justify-between p-2 bg-ui-bg-subtle rounded">96 <span className="txt-small">97 Row {row.row_number} - {formatRowType(row.row_type)} ({row.seat_count} seats)98 </span>99 <Button100 type="button"101 variant="danger"102 size="small"103 onClick={() => removeRow(row.row_number)}104 >105 Remove106 </Button>107 </div>108 ))}109 </div>110 </div>111 )}112 </div>113 </div>114 115 <hr className="my-10" />116 117 <div>118 <SeatChart rows={rows} />119 </div>120 </div>121 </FocusModal.Body>122 <FocusModal.Footer>123 124 <Button125 type="submit"126 variant="primary"127 isLoading={isLoading}128 disabled={!name.trim() || rows.length === 0}129 >130 Create Venue131 </Button>132 </FocusModal.Footer>133 </form>134 </FocusModal.Content>135 </FocusModal>136)
You use Medusa UI's FocusModal component to render the modal. Inside the modal, you render a form with input fields for the venue's name and address, and fields to add rows.
You also render the SeatChart component to visualize the added rows.
Now that the CreateVenueModal component is ready, you'll use it in the VenuesPage component.
In src/admin/routes/venues/page.tsx, add the following imports at the top of the file:
Then, in the VenuesPage component, add the following state variable to manage the modal's open state:
Next, add the following functions before the return statement to handle opening and closing the modal, and to handle creating a venue:
1const VenuesPage = () => {2 // ...3 const handleCloseModal = () => {4 setIsModalOpen(false)5 }6 7 const handleCreateVenue = async (data: CreateVenueRequest) => {8 try {9 await sdk.client.fetch("/admin/venues", {10 method: "POST",11 body: data,12 })13 queryClient.invalidateQueries({ queryKey: ["venues"] })14 handleCloseModal()15 } catch (error: any) {16 throw new Error(`Failed to create venue: ${error.message}`)17 }18 }19 // ...20}
You add the handleCloseModal function to close the modal by setting the isModalOpen state to false.
You also add the handleCreateVenue function to send a POST request to the /admin/venues API route you created earlier.
Then, to trigger opening the modal, add the following button as the last child of <DataTable.Toolbar> in the return statement:
Finally, render the CreateVenueModal component as the last child of the <Container> component in the return statement:
You render the CreateVenueModal component, passing it the isModalOpen state, and the handleCloseModal and handleCreateVenue functions as props.
Test the Venues Page#
You can now test the venues page in the Medusa Admin.
Run the following command to start the Medusa server:
Then, open http://localhost:9000/app in your browser to access the Medusa Admin. Log in with the admin user you created earlier.
You should see a new "Venues" item in the sidebar. Click on it to navigate to the venues page. You'll see an empty table with a "Create Venue" button.

To create a venue:
- Click the "Create Venue" button to open the modal.
- In the modal, enter a name for the venue, and optionally an address.
- Add rows and visualize them in the seat chart.
- Once you're done, click the "Create Venue" button to create the venue.

After creating the venue, you can see it listed in the table.
Step 7: Create Ticket Product#
In this step, you'll add functionality to create a ticket product for a show. You'll create a workflow and an API route to handle ticket product creation.
a. Create Create Ticket Product Workflow#
The workflow that creates a ticket product will also create the Medusa product and its variants. It will create a variant for each show date and row type. For example, if a show has two dates and three row types, the workflow will create six variants for the Medusa product.
The workflow will also create inventory items for each variant, ensuring that customers can't purchase more tickets than the venue's capacity.
The workflow will have the following steps:
Loading...You only need to implement the validateVenueAvailabilityStep, createTicketProductsStep, and createTicketProductVariantsStep steps. The other steps are provided by Medusa.
validateVenueAvailabilityStep
The validateVenueAvailabilityStep validates that the selected venue is available for the show's date and time.
To create the step, create the file src/workflows/steps/validate-venue-availability.ts with the following content:
1import { createStep, StepResponse } from "@medusajs/framework/workflows-sdk"2import { TICKET_BOOKING_MODULE } from "../../modules/ticket-booking"3import { MedusaError } from "@medusajs/framework/utils"4 5export type ValidateVenueAvailabilityStepInput = {6 venue_id: string7 dates: string[]8}9 10export const validateVenueAvailabilityStep = createStep(11 "validate-venue-availability",12 async (input: ValidateVenueAvailabilityStepInput, { container }) => {13 const ticketBookingModuleService = container.resolve(TICKET_BOOKING_MODULE)14 15 // Get all existing ticket products for this venue16 const existingTicketProducts = await ticketBookingModuleService17 .listTicketProducts({18 venue_id: input.venue_id,19 })20 21 const hasConflict = existingTicketProducts.some((ticketProduct) => 22 ticketProduct.dates.some((date) => input.dates.includes(date))23 )24 25 if (hasConflict) {26 throw new MedusaError(27 MedusaError.Types.INVALID_DATA, 28 `Venue has conflicting shows on dates: ${input.dates.join(", ")}`29 )30 }31 32 return new StepResponse({ valid: true })33 }34)
In the step, you retrieve all existing ticket products for the selected venue and throw an error if any of the existing ticket products has a date that conflicts with the new show's dates.
createTicketProductsStep
The createTicketProductsStep creates ticket products.
To create the step, create the file src/workflows/steps/create-ticket-products.ts with the following content:
1import { createStep, StepResponse } from "@medusajs/framework/workflows-sdk"2import { TICKET_BOOKING_MODULE } from "../../modules/ticket-booking"3 4export type CreateTicketProductsStepInput = {5 ticket_products: {6 product_id: string7 venue_id: string8 dates: string[]9 }[]10}11 12export const createTicketProductsStep = createStep(13 "create-ticket-products",14 async (input: CreateTicketProductsStepInput, { container }) => {15 const ticketBookingModuleService = container.resolve(TICKET_BOOKING_MODULE)16 17 // Create the main ticket product18 const ticketProducts = await ticketBookingModuleService19 .createTicketProducts(20 input.ticket_products21 )22 23 return new StepResponse(24 { 25 ticket_products: ticketProducts,26 },27 { 28 ticket_products: ticketProducts,29 }30 )31 },32 async (compensationData, { container }) => {33 if (!compensationData?.ticket_products) {return}34 35 const ticketBookingModuleService = container.resolve(TICKET_BOOKING_MODULE)36 37 // Delete the ticket product38 await ticketBookingModuleService.deleteTicketProducts(39 compensationData.ticket_products.map((tp) => tp.id)40 )41 }42)
This step receives an array of ticket products to create. It creates the ticket products and returns them.
In the compensation function, you delete the created ticket products if an error occurs in the workflow.
createTicketProductVariantsStep
The createTicketProductVariantsStep creates ticket product variants.
To create the step, create the file src/workflows/steps/create-ticket-product-variants.ts with the following content:
1import { createStep, StepResponse } from "@medusajs/framework/workflows-sdk"2import { TICKET_BOOKING_MODULE } from "../../modules/ticket-booking"3import { RowType } from "../../modules/ticket-booking/models/venue-row"4 5export type CreateTicketProductVariantsStepInput = {6 variants: {7 ticket_product_id: string8 product_variant_id: string9 row_type: RowType10 }[]11}12 13export const createTicketProductVariantsStep = createStep(14 "create-ticket-product-variants",15 async (input: CreateTicketProductVariantsStepInput, { container }) => {16 const ticketBookingModuleService = container.resolve(TICKET_BOOKING_MODULE)17 18 // Create ticket product variants for each Medusa variant19 const ticketVariants = await ticketBookingModuleService20 .createTicketProductVariants(21 input.variants22 )23 24 return new StepResponse(25 {26 ticket_product_variants: ticketVariants,27 },28 {29 ticket_product_variants: ticketVariants,30 }31 )32 },33 async (compensationData, { container }) => {34 if (!compensationData?.ticket_product_variants) {return}35 36 const ticketBookingModuleService = container.resolve(TICKET_BOOKING_MODULE)37 38 await ticketBookingModuleService.deleteTicketProductVariants(39 compensationData.ticket_product_variants.map((v) => v.id)40 )41 }42)
This step receives an array of ticket product variants to create. It creates the ticket product variants and returns them.
In the compensation function, you delete the created ticket product variants if an error occurs in the workflow.
Create Ticket Product Workflow
You can now create the workflow that creates a ticket product.
To create the workflow, create the file src/workflows/create-ticket-product.ts with the following content:
9import { createTicketProductVariantsStep } from "./steps/create-ticket-product-variants"10 11export type CreateTicketProductWorkflowInput = {12 name: string13 venue_id: string14 dates: string[]15 variants: Array<{16 row_type: RowType17 seat_count: number18 prices: CreateMoneyAmountDTO[]19 }>20}21 22export const createTicketProductWorkflow = createWorkflow(23 "create-ticket-product",24 (input: CreateTicketProductWorkflowInput) => {25 validateVenueAvailabilityStep({26 venue_id: input.venue_id,27 dates: input.dates,28 })29 30 const { data: stores } = useQueryGraphStep({31 entity: "store",32 fields: ["id", "default_location_id", "default_sales_channel_id"],33 })34 35 // TODO create inventory items for each variant36 }37)
You create the createTicketProductWorkflow workflow that accepts the details of the ticket product and its variants.
In the workflow, you validate the venue's availability using the validateVenueAvailabilityStep.
Then, you retrieve the default store configuration using the useQueryGraphStep. These configurations are useful when creating the Medusa inventory items and product.
Next, you'll create inventory items for each variant before creating the Medusa product. Replace the TODO with the following:
1const inventoryItemsData = transform({2 input,3 stores,4}, (data) => {5 const inventoryItems: any[] = []6 7 for (const date of data.input.dates) {8 for (const variant of data.input.variants) {9 inventoryItems.push({10 sku: `${data.input.name}-${date}-${variant.row_type}`,11 title: `${data.input.name} - ${date} - ${variant.row_type}`,12 description: `Ticket for ${data.input.name} on ${date} in ${variant.row_type} seating`,13 location_levels: [{14 location_id: data.stores[0].default_location_id,15 stocked_quantity: variant.seat_count,16 }],17 requires_shipping: false,18 })19 }20 }21 22 return inventoryItems23})24 25const inventoryItems = createInventoryItemsWorkflow.runAsStep({26 input: {27 items: inventoryItemsData,28 },29})30 31// TODO create the Medusa product
You prepare the inventory items to be created using the transform function. You create an inventory item for each combination of show date and variant.
Notice that for each inventory item, you set the stocked_quantity to the seat_count of the variant, ensuring that the inventory reflects the venue's seating capacity. You also set requires_shipping to false, allowing you to skip the shipping step during checkout.
Then, you create the inventory items using the createInventoryItemsWorkflow.
Next, you'll create the Medusa product and variants. Replace the TODO with the following:
1const productData = transform({2 input,3 inventoryItems,4 stores,5}, (data) => {6 const rowTypes = [...new Set(7 data.input.variants.map((variant: any) => variant.row_type)8 )]9 10 const product: CreateProductWorkflowInputDTO = {11 title: data.input.name,12 status: "published",13 options: [14 {15 title: "Date",16 values: data.input.dates,17 },18 {19 title: "Row Type", 20 values: rowTypes,21 },22 ],23 variants: [] as any[],24 }25 26 if (data.stores[0].default_sales_channel_id) {27 product.sales_channels = [28 {29 id: data.stores[0].default_sales_channel_id,30 },31 ]32 }33 34 // Create variants for each date and row type combination35 let inventoryIndex = 036 for (const date of data.input.dates) {37 for (const variant of data.input.variants) {38 product.variants!.push({39 title: `${data.input.name} - ${date} - ${variant.row_type}`,40 options: {41 Date: date,42 "Row Type": variant.row_type,43 },44 manage_inventory: true,45 inventory_items: [{46 inventory_item_id: data.inventoryItems[inventoryIndex].id,47 }],48 prices: variant.prices,49 })50 inventoryIndex++51 }52 }53 54 return [product]55})56 57const medusaProduct = createProductsWorkflow.runAsStep({58 input: {59 products: productData,60 },61})62 63// TODO create the ticket product and variants
You prepare the Medusa product data using the transform function. You create options for "Date" and "Row Type" and create a variant for each combination of show date and row type.
You associate each variant with the corresponding inventory item created earlier, ensuring that the inventory is correctly linked to the product variants.
Then, you create the Medusa product using the createProductsWorkflow.
Next, you'll create the ticket product and its variants. Replace the TODO with the following:
1const ticketProductData = transform({2 medusaProduct,3 input,4}, (data) => {5 return {6 ticket_products: data.medusaProduct.map((product: any) => ({7 product_id: product.id,8 venue_id: data.input.venue_id,9 dates: data.input.dates,10 })),11 }12})13 14const { ticket_products } = createTicketProductsStep(15 ticketProductData16)17 18const ticketVariantsData = transform({19 medusaProduct,20 ticket_products,21 input,22}, (data) => {23 return {24 variants: data.medusaProduct[0].variants.map((variant: any) => {25 const rowType = variant.options.find(26 (opt: any) => opt.option?.title === "Row Type"27 )?.value28 return {29 ticket_product_id: data.ticket_products[0].id,30 product_variant_id: variant.id,31 row_type: rowType,32 }33 }),34 }35})36 37const { ticket_product_variants } = createTicketProductVariantsStep(38 ticketVariantsData39)40 41// TODO create links and retrieve the created ticket product
You prepare the ticket product data using the transform function, then create the ticket product using the createTicketProductsStep.
You also prepare the ticket product variants data, then create the ticket product variants using the createTicketProductVariantsStep.
Finally, you'll create links between the ticket product and variants and the Medusa product and variants, and retrieve the created ticket product with its relations. Replace the TODO with the following:
1const linksData = transform({2 medusaProduct,3 ticket_products,4 ticket_product_variants,5}, (data) => {6 // Create links between ticket product and Medusa product7 const productLinks = [{8 [TICKET_BOOKING_MODULE]: {9 ticket_product_id: data.ticket_products[0].id,10 },11 [Modules.PRODUCT]: {12 product_id: data.medusaProduct[0].id,13 },14 }]15 16 // Create links between ticket variants and Medusa variants17 const variantLinks = data.ticket_product_variants.map((variant) => ({18 [TICKET_BOOKING_MODULE]: {19 ticket_product_variant_id: variant.id,20 },21 [Modules.PRODUCT]: {22 product_variant_id: variant.product_variant_id,23 },24 }))25 26 return [...productLinks, ...variantLinks]27})28 29createRemoteLinkStep(linksData)30 31const { data: finalTicketProduct } = useQueryGraphStep({32 entity: "ticket_product",33 fields: [34 "id",35 "product_id",36 "venue_id",37 "dates",38 "venue.*",39 "product.*",40 "variants.*",41 ],42 filters: {43 id: ticket_products[0].id,44 },45}).config({ name: "retrieve-ticket-product" })46 47return new WorkflowResponse({48 ticket_product: finalTicketProduct[0],49})
You create links between the ticket product and the Medusa product, and between the ticket product variants and the Medusa product variants using the createRemoteLinkStep.
Then, you retrieve the created ticket product with its relations using the useQueryGraphStep.
Finally, you return the created ticket product in the workflow response.
b. Create Ticket Product API Route#
Next, you'll create an API route that allows admin users to create a ticket product.
To create the API route, create the file src/api/admin/ticket-products/route.ts with the following content:
6import { z } from "@medusajs/framework/zod"7 8export const CreateTicketProductSchema = z.object({9 name: z.string().min(1, "Name is required"),10 venue_id: z.string().min(1, "Venue ID is required"),11 dates: z.array(z.string()).min(1, "At least one date is required"),12 variants: z.array(z.object({13 row_type: z.enum(RowType),14 seat_count: z.number().min(1, "Seat count must be at least 1"),15 prices: z.array(z.object({16 currency_code: z.string().min(1, "Currency code is required"),17 amount: z.number().min(0, "Amount must be non-negative"),18 min_quantity: z.number().optional(),19 max_quantity: z.number().optional(),20 })).min(1, "At least one price is required"),21 })).min(1, "At least one variant is required"),22})23 24type CreateTicketProductSchema = z.infer<typeof CreateTicketProductSchema>25 26export async function POST(27 req: MedusaRequest<CreateTicketProductSchema>,28 res: MedusaResponse29) {30 const { result } = await createTicketProductWorkflow(req.scope).run({31 input: req.validatedBody,32 })33 34 res.json(result)35}
You define the validation schema CreateTicketProductSchema that will be used to validate the request body.
Then, you export a POST route handler function, which will expose a POST API route at /admin/ticket-products.
In the route handler, you execute the createTicketProductWorkflow and return the created ticket product in the response.
You'll test the API route when you customize the Medusa Admin later.
c. Create Ticket Product Validation Middleware#
To validate the request body against the schema you defined for creating ticket products, you'll apply a validation middleware to the API route.
In src/api/middlewares.ts, add the following import at the top of the file:
Then, add a new object to the routes array passed to the defineMiddlewares function:
You apply the validateAndTransformBody middleware to the POST /admin/ticket-products route, passing it the CreateTicketProductSchema for validation.
Step 8: List Ticket Products API Route#
In this step, you'll add an API route to list ticket products. This will be useful when you customize the Medusa Admin to display ticket products.
To create the API route, add the following to the src/api/admin/ticket-products/route.ts file:
1export async function GET(2 req: MedusaRequest,3 res: MedusaResponse4) {5 const query = req.scope.resolve("query")6 7 const {8 data: ticketProducts,9 metadata,10 } = await query.graph({11 entity: "ticket_product",12 ...req.queryConfig,13 })14 15 res.json({16 ticket_products: ticketProducts,17 count: metadata?.count,18 limit: metadata?.take,19 offset: metadata?.skip,20 })21}
You export a GET route handler function, which will expose a GET API route at /admin/ticket-products.
In the route handler, you use Query to retrieve ticket products. You pass the req.queryConfig object to support pagination and field selection based on query configurations and parameters.
Finally, you return the ticket products along with pagination metadata in the response.
You'll test the API route when you customize the Medusa Admin later.
Add Validation Middleware for List Ticket Products API Route#
To validate the query parameters of requests sent to the API route, and to allow clients to configure pagination and returned fields, you need to apply a query validation middleware.
To apply a middleware to the route, in src/api/middlewares.ts, add the following object to the routes array passed to the defineMiddlewares function:
1export default defineMiddlewares({2 routes: [3 // ...4 {5 matcher: "/admin/ticket-products",6 methods: ["GET"],7 middlewares: [8 validateAndTransformQuery(createFindParams(), {9 isList: true,10 defaults: [11 "id", 12 "product_id", 13 "venue_id", 14 "dates", 15 "venue.*", 16 "variants.*", 17 "product.*",18 ],19 }),20 ],21 },22 ],23})
You apply the validateAndTransformQuery middleware to GET requests sent to the /admin/ticket-products route. You pass it the createFindParams function to allow passing pagination and field selection parameters.
You also define the default fields of a ticket product to be returned in the response.
Step 9: Manage Ticket Products in Medusa Admin#
In this step, you'll customize the Medusa Admin to add a new page that shows a list of ticket products and allows creating new ticket products.
a. Define Ticket Product Type#
Before you customize the Medusa Admin, you'll define a type for the ticket product to use in your customizations.
In src/admin/types.ts, add the following interface at the end of the file:
1export interface TicketProduct {2 id: string3 product_id: string4 venue_id: string5 dates: string[]6 venue: {7 id: string8 name: string9 address?: string10 }11 product: {12 id: string13 title: string14 }15 variants: Array<{16 id: string17 row_type: string18 }>19 created_at: string20 updated_at: string21}
You define the TicketProduct interface that describes the shape of a ticket product object.
b. Create Ticket Products Page#
Next, you'll create the UI route for the ticket products page.
Create the file src/admin/routes/ticket-products/page.tsx with the following content:
19const columnHelper = createDataTableColumnHelper<TicketProduct>()20 21const columns = [22 columnHelper.accessor("product.title", {23 header: "Name",24 }),25 columnHelper.accessor("venue.name", {26 header: "Venue",27 }),28 columnHelper.accessor("dates", {29 header: "Dates",30 cell: ({ row }) => {31 const dates = row.original.dates || []32 // Show first and last dates33 const displayDates = [dates[0], dates[dates.length - 1]]34 return (35 <div className="flex flex-wrap gap-1 items-center">36 {displayDates.map((date, index) => (37 <React.Fragment key={date}>38 <Badge color="grey" size="small">39 {new Date(date).toLocaleDateString()}40 </Badge>41 {index < displayDates.length - 1 && (42 <span className="text-gray-500 txt-small">43 -44 </span>45 )}46 </React.Fragment>47 ))}48 </div>49 )50 },51 }),52 columnHelper.accessor("product_id", {53 header: "Product",54 cell: ({ row }) => {55 return (56 <Link to={`/products/${row.original.product_id}`}>57 View Product Details58 </Link>59 )60 },61 }),62]63 64const TicketProductsPage = () => {65 // TODO show table66}67 68export const config = defineRouteConfig({69 label: "Shows",70 icon: ReceiptPercent,71})72 73export default TicketProductsPage
First, you define the columns for the data table that will display ticket products. You create columns for the ticket product's name, venue, dates, and a link to view the associated Medusa product.
Then, you create the TicketProductsPage component and export a configuration object that defines the route's sidebar label and icon.
Next, you'll implement the TicketProductsPage component to show the table of ticket products. Replace the TicketProductsPage component with the following:
1const TicketProductsPage = () => {2 const limit = 153 const [pagination, setPagination] = useState<DataTablePaginationState>({4 pageSize: limit,5 pageIndex: 0,6 })7 8 const queryClient = useQueryClient()9 10 const offset = useMemo(() => {11 return pagination.pageIndex * limit12 }, [pagination])13 14 const { data, isLoading } = useQuery<{15 ticket_products: TicketProduct[]16 count: number17 limit: number18 offset: number19 }>({20 queryKey: ["ticket-products", offset, limit],21 queryFn: () => sdk.client.fetch("/admin/ticket-products", {22 query: {23 offset: pagination.pageIndex * pagination.pageSize,24 limit: pagination.pageSize,25 order: "-created_at",26 },27 }),28 })29 30 const table = useDataTable({31 columns,32 data: data?.ticket_products || [],33 rowCount: data?.count || 0,34 isLoading,35 pagination: {36 state: pagination,37 onPaginationChange: setPagination,38 },39 getRowId: (row) => row.id,40 })41 42 return (43 <Container className="divide-y p-0">44 <DataTable instance={table}>45 <DataTable.Toolbar className="flex flex-col items-start justify-between gap-2 md:flex-row md:items-center">46 <Heading>47 Shows48 </Heading>49 </DataTable.Toolbar>50 <DataTable.Table />51 <DataTable.Pagination />52 </DataTable>53 </Container>54 )55}
In the component, you define variables to manage pagination in the data table. You also use Tanstack Query and the JS SDK to retrieve the ticket products from the GET /admin/ticket-products API route you created earlier.
Then, you use Medusa UI's DataTable component to render the table of ticket products.
c. Create Ticket Product Modal#
Next, you'll create a modal component that allows creating a new ticket product. You'll show the modal when a button is clicked on the ticket products page.
The modal form is made up of two steps: one to select the venue and show dates, and another to set the prices of each row type. So, you'll create the components for each step first.
Create Product Details Step
To create the first step component, create the file src/admin/components/product-details-step.tsx with the following content:
12import { XMark } from "@medusajs/icons"13import { Venue } from "../types"14 15interface ProductDetailsStepProps {16 name: string17 setName: (name: string) => void18 selectedVenueId: string19 setSelectedVenueId: (venueId: string) => void20 selectedDates: string[]21 setSelectedDates: (dates: string[]) => void22 venues: Venue[]23}24 25export const ProductDetailsStep = ({26 name,27 setName,28 selectedVenueId,29 setSelectedVenueId,30 selectedDates,31 setSelectedDates,32 venues,33}: ProductDetailsStepProps) => {34 const selectedVenue = venues.find((v) => v.id === selectedVenueId)35 36 // Local state for start and end dates37 const [startDate, setStartDate] = useState<Date | undefined>(38 selectedDates.length > 0 ? new Date(selectedDates[0] + "T00:00:00") : undefined39 )40 const [endDate, setEndDate] = useState<Date | undefined>(41 selectedDates.length > 1 ? new Date(selectedDates[selectedDates.length - 1] + "T00:00:00") : undefined42 )43 44 // TODO handle date selection45}
You define the ProductDetailsStep component that accepts props for managing the form state, including the ticket product name, selected venue, and selected dates.
In the component, you also define local state for the start and end dates used in the date picker.
Next, you'll add functions that handle selecting dates. Admins can select a start and end date, which will select the range of dates in between. Admins can also delete any date from the range.
Replace the TODO with the following:
1const generateDateRange = (start: Date, end?: Date) => {2 const dates: string[] = []3 const currentDate = new Date(start)4 5 do {6 // Use local date formatting to avoid timezone issues7 const year = currentDate.getFullYear()8 const month = String(currentDate.getMonth() + 1).padStart(2, "0")9 const day = String(currentDate.getDate()).padStart(2, "0")10 dates.push(`${year}-${month}-${day}`)11 currentDate.setDate(currentDate.getDate() + 1)12 } while (end && currentDate <= end)13 14 return dates15}16 17const handleStartDateChange = (date: Date | null) => {18 const dateValue = date || undefined19 setStartDate(dateValue)20 setSelectedDates(21 dateValue ? generateDateRange(dateValue, endDate) : []22 )23}24 25const handleEndDateChange = (date: Date | null) => {26 const dateValue = date || undefined27 setEndDate(dateValue)28 if (startDate && dateValue) {29 setSelectedDates(generateDateRange(startDate, dateValue))30 } else if (dateValue) {31 setSelectedDates(generateDateRange(dateValue))32 } else {33 setSelectedDates([])34 }35}36 37const removeDate = (dateToRemove: string) => {38 setSelectedDates(selectedDates.filter((d) => d !== dateToRemove))39}40 41// TODO render form
You define the following functions:
generateDateRange: Generates an array of date strings between a start and optional end date.handleStartDateChange: Handles changes to the start date, updating the selected dates accordingly.handleEndDateChange: Handles changes to the end date, updating the selected dates accordingly.removeDate: Removes a specific date from the selected dates.
Finally, you'll render the form for the product details step. Replace the TODO with the following:
1return (2 <div className="space-y-6">3 <Heading level="h2">Show Details</Heading>4 <div>5 <Label htmlFor="name">Name</Label>6 <Input7 id="name"8 value={name}9 onChange={(e) => setName(e.target.value)}10 placeholder="Enter name"11 />12 </div>13 14 <div>15 <Label htmlFor="venue">Venue</Label>16 <Select17 value={selectedVenueId}18 onValueChange={setSelectedVenueId}19 >20 <Select.Trigger>21 <Select.Value placeholder="Select a venue" />22 </Select.Trigger>23 <Select.Content>24 {venues.map((venue) => (25 <Select.Item key={venue.id} value={venue.id}>26 {venue.name}27 </Select.Item>28 ))}29 </Select.Content>30 </Select>31 </div>32 33 {selectedVenue && (34 <div className="p-4 bg-gray-50 rounded-lg">35 <Text className="txt-small-plus mb-2">Selected Venue: {selectedVenue.name}</Text>36 {selectedVenue.address && (37 <Text className="txt-small text-ui-fg-subtle mb-2">{selectedVenue.address}</Text>38 )}39 <Text className="txt-small text-ui-fg-subtle">40 Rows: {[...new Set(selectedVenue.rows.map((row) => row.row_type))].join(", ")}<br/>41 Total Seats: {selectedVenue.rows.reduce((acc, row) => acc + row.seat_count, 0)}42 </Text>43 </div>44 )}45 46 <hr className="my-6" />47 48 <div>49 <Heading level="h2">Dates</Heading>50 <div className="mt-2 space-y-4">51 <div className="grid grid-cols-1 md:grid-cols-2 gap-4">52 <div>53 <Label htmlFor="start-date">Start Date</Label>54 <DatePicker55 value={startDate}56 onChange={handleStartDateChange}57 maxValue={endDate}58 />59 </div>60 <div>61 <Label htmlFor="end-date">End Date</Label>62 <DatePicker63 value={endDate}64 onChange={handleEndDateChange}65 minValue={startDate}66 />67 </div>68 </div>69 70 {selectedDates.length > 0 && (71 <div className="space-y-2">72 <Text className="txt-small-plus">73 Selected Dates ({selectedDates.length} day{selectedDates.length !== 1 ? "s" : ""}):74 </Text>75 <div className="flex flex-wrap gap-2">76 {selectedDates.map((date) => (77 <Badge78 key={date}79 color="blue"80 >81 <span>{new Date(date).toLocaleDateString()}</span>82 <Button83 variant="transparent"84 size="small"85 onClick={() => removeDate(date)}86 className="p-1 hover:bg-transparent"87 >88 <XMark />89 </Button>90 </Badge>91 ))}92 </div>93 </div>94 )}95 </div>96 </div>97 </div>98)
You render the form for the product details step, including inputs for the ticket product name, venue selection, and date selection.
Pricing Step
Next, you'll create the second step component for setting prices for each row type.
To create the step component, create the file src/admin/components/pricing-step.tsx with the following content:
9import { RowType, Venue } from "../types"10 11export interface CurrencyRegionCombination {12 currency: string13 region_id?: string14 region_name?: string15 is_store_currency: boolean16}17 18interface PricingStepProps {19 selectedVenue: Venue | undefined20 currencyRegionCombinations: CurrencyRegionCombination[]21 prices: Record<string, Record<string, number>>22 setPrices: (prices: Record<string, Record<string, number>>) => void23}24 25export const PricingStep = ({26 selectedVenue,27 currencyRegionCombinations,28 prices,29 setPrices,30}: PricingStepProps) => {31 if (!selectedVenue) {32 return (33 <div className="text-center py-8">34 <Text>Please select a venue in the previous step</Text>35 </div>36 )37 }38 39 // TODO add price and row type functions40}
You define the PricingStep component that accepts props for the selected venue, currency-region combinations, and prices.
In the component, if no venue is selected, you display a message prompting the user to select a venue in the previous step.
Next, you'll add functions for formatting and to handle price changes. Replace the TODO with the following:
1const updatePrice = (2 rowType: string, 3 currency: string, 4 regionId: string | undefined, 5 amount: number6) => {7 const key = regionId ? `${currency}_${regionId}` : `${currency}_store`8 setPrices({9 ...prices,10 [rowType]: {11 ...prices[rowType],12 [key]: amount,13 },14 })15}16 17const getRowTypeColor = (18 type: RowType19): "purple" | "orange" | "blue" | "grey" => {20 switch (type) {21 case RowType.VIP:22 return "purple"23 case RowType.PREMIUM:24 return "orange"25 case RowType.BALCONY:26 return "blue"27 default:28 return "grey"29 }30}31 32const getRowTypeLabel = (type: RowType) => {33 switch (type) {34 case RowType.VIP:35 return "VIP"36 default:37 return type.charAt(0).toUpperCase() + type.slice(1)38 }39}40 41// Get unique row types from venue42const rowTypes = [...new Set(selectedVenue.rows.map((row) => row.row_type))]43 44// TODO render form
You define the following functions:
updatePrice: Updates the price for a specific row type and currency-region combination.getRowTypeColor: Returns a color based on the row type for styling purposes.getRowTypeLabel: Returns a formatted label for the row type.
You also extract the unique row types from the selected venue to use in the form.
Finally, you'll render the form for the pricing step. Replace the TODO with the following:
1return (2 <div className="space-y-6">3 <div>4 <Heading level="h3">Set Prices for Each Row Type</Heading>5 <Text className="text-ui-fg-subtle">6 Enter prices for each row type by region and currency. All prices are optional.7 </Text>8 </div>9 10 <div className="space-y-4">11 {rowTypes.map((rowType) => {12 const totalSeats = selectedVenue.rows13 .filter((row) => row.row_type === rowType)14 .reduce((sum, row) => sum + row.seat_count, 0)15 16 return (17 <Container key={rowType} className="p-4">18 <div className="flex items-center gap-3 mb-4">19 <Badge color={getRowTypeColor(rowType as RowType)} size="small">20 {getRowTypeLabel(rowType)}21 </Badge>22 <Text className="txt-small text-ui-fg-subtle">23 {totalSeats} seats total24 </Text>25 </div>26 27 <div className="grid grid-cols-1 md:grid-cols-2 lg:grid-cols-3 gap-4">28 {currencyRegionCombinations.map((combo) => {29 const key = combo.region_id ? `${combo.currency}_${combo.region_id}` : `${combo.currency}_store`30 return (31 <div key={key}>32 <Label htmlFor={`${rowType}-${key}`}>33 {combo.currency.toUpperCase()} - {combo.region_name || "Store"}34 </Label>35 <Input36 id={`${rowType}-${key}`}37 type="number"38 min="0"39 step="0.01"40 value={prices[rowType]?.[key] || ""}41 onChange={(e) => {42 const amount = parseFloat(e.target.value) || 043 updatePrice(rowType, combo.currency, combo.region_id, amount)44 }}45 placeholder="0.00"46 />47 </div>48 )49 })}50 </div>51 </Container>52 )53 })}54 </div>55 </div>56)
You render the form for the pricing step, including sections for each row type with inputs for setting prices in different currencies and regions.
Create Ticket Product Modal
You can now create the modal component that shows a multi-step form to create a ticket product.
Create the file src/admin/components/create-ticket-product-modal.tsx with the following content:
12import { CurrencyRegionCombination, PricingStep } from "./pricing-step"13 14interface CreateTicketProductModalProps {15 open: boolean16 onOpenChange: (open: boolean) => void17 onSubmit: (data: any) => Promise<void>18}19 20export const CreateTicketProductModal = ({21 open,22 onOpenChange,23 onSubmit,24}: CreateTicketProductModalProps) => {25 const [currentStep, setCurrentStep] = useState("0")26 const [isLoading, setIsLoading] = useState(false)27 28 // Step 1 data29 const [name, setName] = useState("")30 const [selectedVenueId, setSelectedVenueId] = useState("")31 const [selectedDates, setSelectedDates] = useState<string[]>([])32 33 // Step 2 data - prices[rowType][currency_region] = amount34 const [prices, setPrices] = useState<Record<string, Record<string, number>>>({})35 36 // TODO fetch venues and currency-region combinations37}
You define the CreateTicketProductModal component that accepts props for managing the modal's open state and handling form submission.
In the component, you define state variables to manage the current step, loading state, and form data for both steps.
Next, you'll fetch the list of venues, regions, and store currencies from the Medusa backend. Replace the TODO with the following:
1// Fetch venues2const { data: venuesData } = useQuery<{3 venues: Venue[]4 count: number5}>({6 queryKey: ["venues"],7 queryFn: () => sdk.client.fetch("/admin/venues"),8})9 10// Fetch regions11const { data: regionsData } = useQuery({12 queryKey: ["regions"],13 queryFn: () => sdk.admin.region.list(),14})15 16// Fetch stores17const { data: storesData } = useQuery({18 queryKey: ["stores"],19 queryFn: () => sdk.admin.store.list(),20})21 22const venues = venuesData?.venues || []23const regions = regionsData?.regions || []24const stores = storesData?.stores || []25const selectedVenue = venues?.find((v) => v.id === selectedVenueId)26 27// TODO prepare currency-region combinations
You use Tanstack Query and the JS SDK to fetch the list of venues from the GET /admin/venues API route, and the list of regions and stores from admin API routes.
Next, you'll prepare the currency-region combinations based on the store and region data fetched. Replace the TODO with the following:
1const currencyRegionCombinations = React.useMemo(() => {2 const combinations: Array<CurrencyRegionCombination> = []3 4 // Add combinations from regions5 regions.forEach((region: any) => {6 combinations.push({7 currency: region.currency_code,8 region_id: region.id,9 region_name: region.name,10 is_store_currency: false,11 })12 })13 14 // Add combinations from stores (all supported currencies)15 stores.forEach((store) => { 16 // Add all supported currencies17 store.supported_currencies.forEach((currency) => {18 combinations.push({19 currency: currency.currency_code,20 region_id: undefined, // No region for store currencies21 is_store_currency: true,22 })23 })24 })25 26 return combinations27}, [regions, stores])28 29// TODO handle form actions
You create a memoized array of currency-region combinations by iterating over the fetched regions and stores. You add combinations for each region's currency and each store's supported currencies.
Next, you'll add functions to handle form actions like resetting the form or moving between steps. Replace the TODO with the following:
1const resetForm = () => {2 setName("")3 setSelectedVenueId("")4 setSelectedDates([])5 setPrices({})6 setCurrentStep("0")7}8 9const handleCloseModal = (open: boolean) => {10 if (!open) {11 resetForm()12 }13 onOpenChange(open)14}15 16const handleStep1Next = () => {17 if (!name.trim()) {18 toast.error("Name is required")19 return20 }21 if (!selectedVenueId) {22 toast.error("Please select a venue")23 return24 }25 if (selectedDates.length === 0) {26 toast.error("Please select at least one date")27 return28 }29 setCurrentStep("1")30}31 32const handleStep2Submit = async () => {33 if (!selectedVenue) {34 toast.error("Venue not found")35 return36 }37 38 // Prepare variants data39 // combine rows with the same row_type40 const combinedRows: Record<RowType, { seat_count: number }> = {41 premium: { seat_count: 0 },42 balcony: { seat_count: 0 },43 standard: { seat_count: 0 },44 vip: { seat_count: 0 },45 }46 selectedVenue.rows.forEach((row) => {47 if (!combinedRows[row.row_type]) {48 combinedRows[row.row_type] = { seat_count: 0 }49 }50 combinedRows[row.row_type].seat_count += row.seat_count51 })52 const variants = Object.keys(combinedRows).map((rowType) => ({53 row_type: rowType as RowType,54 seat_count: combinedRows[rowType as RowType].seat_count,55 prices: currencyRegionCombinations.map((combo) => {56 const key = combo.region_id ? `${combo.currency}_${combo.region_id}` : `${combo.currency}_store`57 const amount = prices[rowType as RowType]?.[key] || 058 59 const price: any = {60 currency_code: combo.currency,61 amount: amount,62 }63 64 // Only add rules for region-based currencies65 if (combo.region_id && !combo.is_store_currency) {66 price.rules = {67 region_id: combo.region_id,68 }69 }70 71 return price72 }).filter((price) => price.amount > 0), // Only include prices > 073 })).filter((variant) => variant.seat_count > 0) // Only create variants for row types with seats74 75 setIsLoading(true)76 try {77 await onSubmit({78 name,79 venue_id: selectedVenueId,80 dates: selectedDates,81 variants,82 })83 toast.success("Show created successfully")84 handleCloseModal(false)85 } catch (error: any) {86 toast.error(error.message || "Failed to create show")87 } finally {88 setIsLoading(false)89 }90}91 92// TODO define steps
You define the following functions:
resetForm: Resets the form state to its initial values.handleCloseModal: Handles closing the modal and resets the form if it's being closed.handleStep1Next: Validates the inputs in the first step before moving to the next step.handleStep2Submit: Prepares the data from both steps and calls theonSubmitprop to create the ticket product.
Before submitting the form, you combine rows with the same row_type to create variants and prepare the prices for each variant based on the selected currency-region combinations.
Next, you'll define step variables useful to render the multi-step form. Replace the TODO with the following:
1// Check if step 1 (Product Details) is completed2const isStep1Completed = name.trim() && selectedVenueId && selectedDates.length > 03 4// Check if step 2 (Pricing) is completed5const hasAnyPrices = Object.values(prices).some((rowPrices) => 6 Object.values(rowPrices).some((amount) => amount > 0)7)8const isStep2Completed = isStep1Completed && hasAnyPrices9 10const steps = [11 {12 label: "Product Details",13 value: "0",14 status: isStep1Completed ? "completed" as const : undefined,15 content: (16 <ProductDetailsStep17 name={name}18 setName={setName}19 selectedVenueId={selectedVenueId}20 setSelectedVenueId={setSelectedVenueId}21 selectedDates={selectedDates}22 setSelectedDates={setSelectedDates}23 venues={venues}24 />25 ),26 },27 {28 label: "Pricing",29 value: "1",30 status: isStep2Completed ? "completed" as const : undefined,31 content: (32 <PricingStep33 selectedVenue={selectedVenue}34 currencyRegionCombinations={currencyRegionCombinations}35 prices={prices}36 setPrices={setPrices}37 />38 ),39 },40]41 42// TODO render modal
You define variables to check if each step is completed based on the form inputs. You also define an array of step objects, each containing a label, value, status, and content component.
Finally, you'll render the modal with the multi-step form. Replace the TODO with the following:
1return (2 <FocusModal open={open} onOpenChange={handleCloseModal}>3 <FocusModal.Content>4 <FocusModal.Header className="justify-start py-0">5 <div className="flex flex-col gap-4 w-full">6 <ProgressTabs7 value={currentStep}8 onValueChange={setCurrentStep}9 className="w-full"10 >11 <ProgressTabs.List className="w-full">12 {steps.map((step) => (13 <ProgressTabs.Trigger 14 key={step.value} 15 value={step.value}16 status={step.status}17 >18 {step.label}19 </ProgressTabs.Trigger>20 ))}21 </ProgressTabs.List>22 </ProgressTabs>23 </div>24 </FocusModal.Header>25 <FocusModal.Body className="flex flex-1 flex-col p-6">26 <ProgressTabs27 value={currentStep}28 onValueChange={setCurrentStep}29 className="flex-1 w-full mx-auto"30 >31 {steps.map((step) => (32 <ProgressTabs.Content key={step.value} value={step.value} className="flex-1">33 <div className="max-w-[720px] mx-auto">34 {step.content}35 </div>36 </ProgressTabs.Content>37 ))}38 </ProgressTabs>39 </FocusModal.Body>40 <FocusModal.Footer>41 <Button42 variant="secondary"43 onClick={() => setCurrentStep(currentStep === "1" ? "0" : "0")}44 disabled={currentStep === "0"}45 >46 Previous47 </Button>48 49 {currentStep === "0" ? (50 <Button51 variant="primary"52 onClick={handleStep1Next}53 >54 Next55 </Button>56 ) : (57 <Button58 variant="primary"59 onClick={handleStep2Submit}60 isLoading={isLoading}61 >62 Create Show63 </Button>64 )}65 </FocusModal.Footer>66 </FocusModal.Content>67 </FocusModal>68)
You render the FocusModal component with a header containing progress tabs for navigation between steps, a body displaying the content of the current step, and a footer with buttons to navigate between steps or submit the form.
d. Add Modal to Ticket Products Page#
You can now render the CreateTicketProductModal component in the TicketProductsPage component.
In src/admin/routes/ticket-products/page.tsx, add the following imports at the top of the file:
Then, in the TicketProductsPage component, add the following state variable to manage the modal's open state:
Next, before the return statement, add the following functions to handle closing the modal and submitting the form:
1const TicketProductsPage = () => {2 // ...3 const handleCloseModal = () => {4 setIsModalOpen(false)5 }6 7 const handleCreateTicketProduct = async (data: any) => {8 try {9 await sdk.client.fetch("/admin/ticket-products", {10 method: "POST",11 body: data,12 })13 queryClient.invalidateQueries({ queryKey: ["ticket-products"] })14 handleCloseModal()15 } catch (error: any) {16 toast.error(`Failed to create show: ${error.message}`)17 }18 }19 // ...20}
You define the handleCloseModal function to close the modal, and the handleCreateTicketProduct function to submit the form data to the POST /admin/ticket-products API route you created earlier.
Finally, in the return statement, add a button to open the modal as the last child of DataTable.Toolbar:
And add the CreateTicketProductModal component as the last child of the Container component:
Test the Ticket Products Page#
You can now test the ticket products page in the Medusa Admin.
Start the Medusa server if it isn't already running. If you open the Medusa Admin and log in, you should see a new "Shows" item in the sidebar. If you click on it, you can see a table of ticket products with a button to create a new show.

To create a new show (or ticket product):
- Click the "Create Show" button to open the modal.
- In the "Product Details" step, enter a name for the show, select a venue, and select one or more dates using the date pickers.
- Click "Next" to go to the "Pricing" step.

- In the "Pricing" step, set prices for each row type. You can set prices in different currencies and regions. All prices are optional.
- Once you're done, click "Create Show" to submit the form.
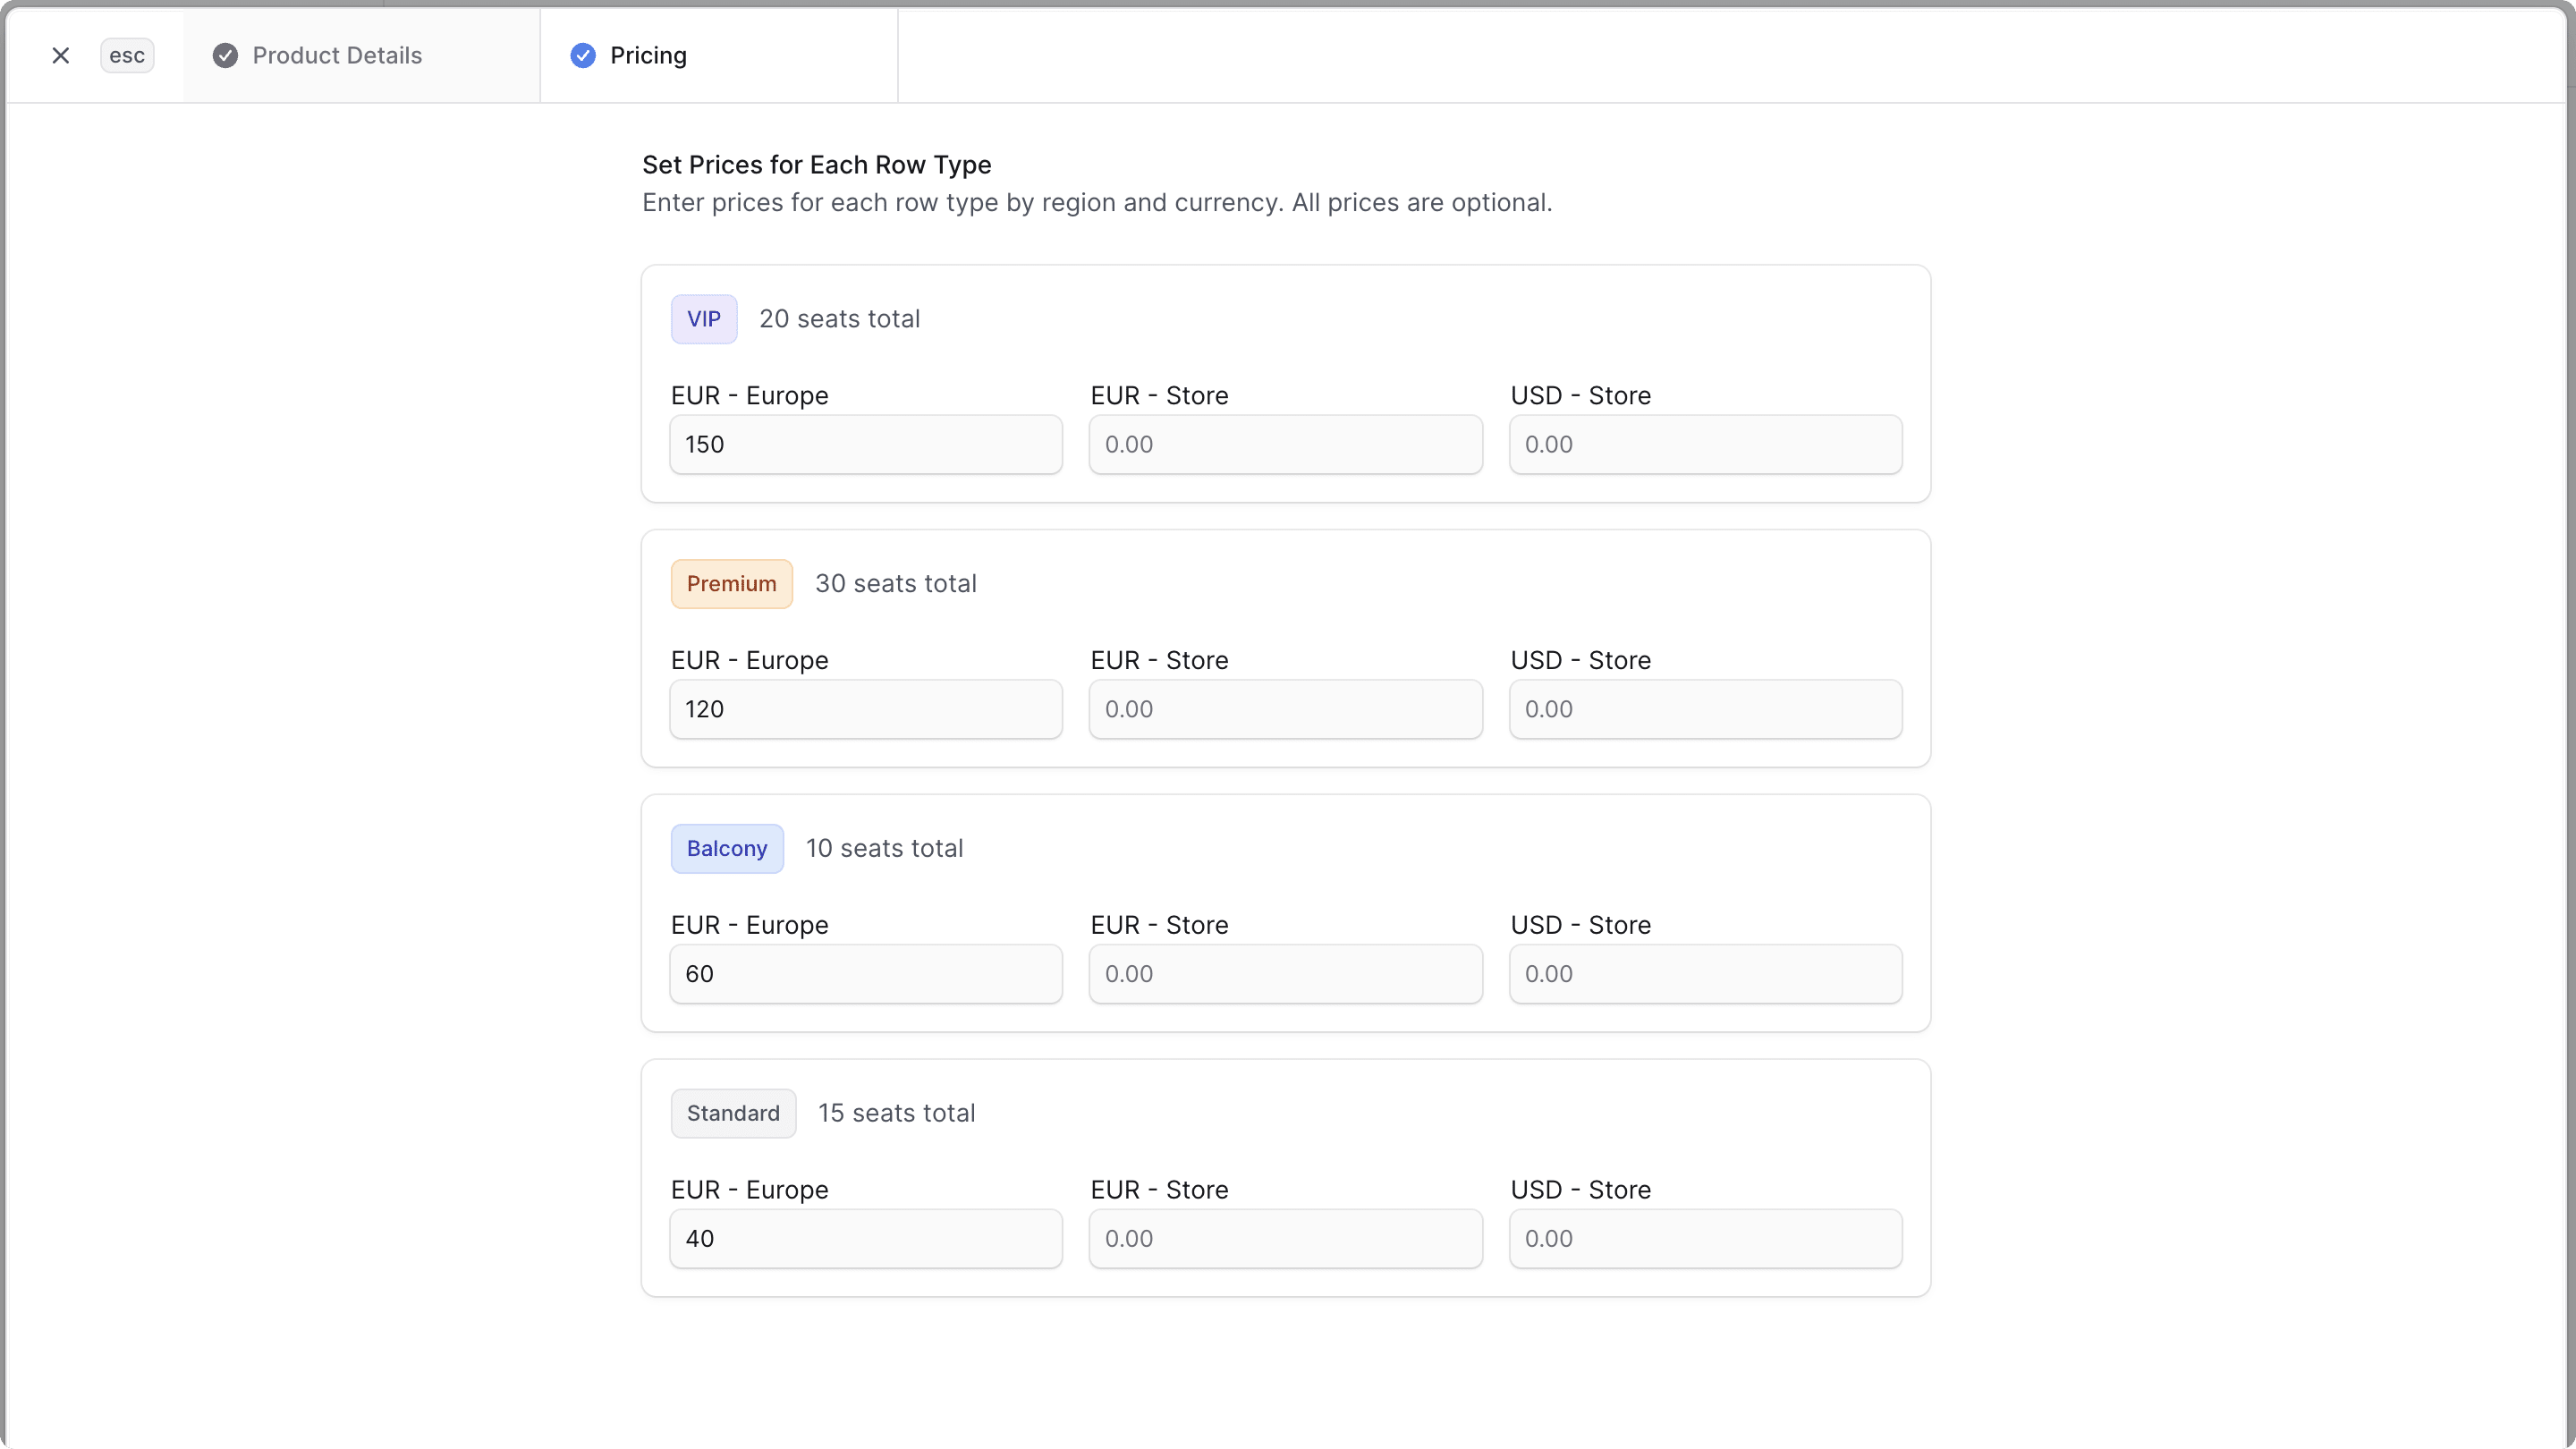
This will create a new ticket product with a Medusa product. You can view the ticket product in the table, and you can click the link to view the associated Medusa product.
You can edit the associated Medusa product to add images, descriptions, and other details for the show.
Step 10: Validate Ticket on Add to Cart#
In this step, you'll add custom validation to the core add-to-cart operation that ensures a seat isn't purchased more than once for the same date.
Medusa implements cart operations in workflows. Specifically, you'll focus on the addToCartWorkflow. Medusa allows you to inject custom logic into workflows using hooks.
A workflow hook is a point in a workflow where you can inject custom functionality as a step function.
To consume the validate hook of the addToCartWorkflow that holds the add-to-cart logic, create the file src/workflows/hooks/add-to-cart-validation.ts with the following content:
1import { addToCartWorkflow } from "@medusajs/medusa/core-flows"2import { MedusaError } from "@medusajs/framework/utils"3 4// Hook for addToCartWorkflow to validate seat availability5addToCartWorkflow.hooks.validate(6 async ({ input }, { container }) => {7 const items = input.items8 const query = container.resolve("query")9 10 // Get the product variant to check if it's a ticket product variant11 const { data: productVariants } = await query.graph({12 entity: "product_variant",13 fields: ["id", "product_id", "ticket_product_variant.purchases.*"],14 filters: {15 id: items.map((item) => item.variant_id).filter(Boolean) as string[],16 },17 })18 19 // Get existing cart items to check for conflicts20 const { data: [cart] } = await query.graph({21 entity: "cart",22 fields: ["items.*"],23 filters: {24 id: input.cart_id,25 },26 }, {27 throwIfKeyNotFound: true,28 })29 30 // Check each item being added to cart31 for (const item of items) {32 if (item.quantity !== 1) {33 throw new MedusaError(34 MedusaError.Types.INVALID_DATA, 35 "You can only purchase one ticket for a seat."36 )37 }38 const productVariant = productVariants.find(39 (variant) => variant.id === item.variant_id40 )41 42 if (!productVariant || !item.metadata?.seat_number) {continue}43 44 if (!item.metadata?.show_date) {45 throw new MedusaError(46 MedusaError.Types.INVALID_DATA,47 `Show date is required for seat ${item.metadata?.seat_number} in product ${productVariant.product_id}`48 )49 }50 51 // Check if seat has already been purchased52 const existingPurchase = productVariant.ticket_product_variant?.purchases.find(53 (purchase) => purchase?.seat_number === item.metadata?.seat_number 54 && purchase?.show_date === item.metadata?.show_date55 )56 57 if (existingPurchase) {58 throw new MedusaError(59 MedusaError.Types.INVALID_DATA,60 `Seat ${item.metadata?.seat_number} has already been purchased for show date ${item.metadata?.show_date}`61 )62 }63 64 // Check if seat is already in the cart65 const existingCartItem = cart.items.find(66 (cartItem) => cartItem?.metadata?.seat_number === item.metadata?.seat_number 67 && cartItem?.metadata?.show_date === item.metadata?.show_date68 )69 70 if (existingCartItem) {71 throw new MedusaError(72 MedusaError.Types.INVALID_DATA,73 `Seat ${item.metadata?.seat_number} is already in your cart for show date ${item.metadata?.show_date}`74 )75 }76 }77 }78)
You consume the hook by calling addToCartWorkflow.hooks.validate, passing it a step function.
In the step function, you:
- Retrieve the product variants being added to the cart with their associated ticket product variant purchases.
- Retrieve the existing cart items to check for conflicts.
- Throw an error if:
- The quantity of any item being added is more than 1 (you can only purchase one ticket for a seat).
- The show date is missing in the item metadata.
- The seat has already been purchased for the same show date.
- The seat is already in the cart for the same show date.
If the hook throws an error, the add-to-cart operation will be aborted and the error message will be returned to the client.
You can test out the hook when you customize the storefront.
Step 11: Custom Complete Cart#
In this step, you'll create a custom complete cart workflow that wraps the default completeCartWorkflow to add logic that creates ticket purchases for each ticket product variant in the cart. Then, you'll execute that workflow in a custom API route.
a. Custom Complete Cart Workflow#
The custom workflow that completes the cart has the following steps:
Loading...You only need to implement the createTicketPurchasesStep and validateTicketOrderStep steps, as the other steps and workflows are provided by Medusa.
createTicketPurchasesStep
The createTicketPurchasesStep creates ticket purchases for each ticket product variant in a cart.
To create the step, create the file src/workflows/steps/create-ticket-purchases.ts with the following content:
9import TicketProductVariant from "../../modules/ticket-booking/models/ticket-product-variant"10 11export type CreateTicketPurchasesStepInput = {12 order_id: string13 cart: CartDTO & {14 items: CartLineItemDTO & {15 variant?: ProductVariantDTO & {16 ticket_product_variant?: InferTypeOf<typeof TicketProductVariant>17 }18 }[]19 }20}21 22export const createTicketPurchasesStep = createStep(23 "create-ticket-purchases",24 async (input: CreateTicketPurchasesStepInput, { container }) => {25 const { order_id, cart } = input26 const ticketBookingModuleService = container.resolve(TICKET_BOOKING_MODULE)27 28 const ticketPurchasesToCreate: {29 order_id: string30 ticket_product_id: string31 ticket_variant_id: string32 venue_row_id: string33 seat_number: string34 show_date: Date35 }[] = []36 37 // Process each item in the cart38 for (const item of cart.items) {39 if (40 !item?.variant?.ticket_product_variant || 41 !item?.metadata?.venue_row_id || 42 !item?.metadata?.seat_number43 ) {continue}44 45 ticketPurchasesToCreate.push({46 order_id,47 ticket_product_id: item.variant.ticket_product_variant.ticket_product_id,48 ticket_variant_id: item.variant.ticket_product_variant.id,49 venue_row_id: item?.metadata.venue_row_id as string,50 seat_number: item?.metadata.seat_number as string,51 show_date: new Date(52 item?.variant.options.find(53 (option: any) => option.option.title === "Date"54 )?.value as string55 ),56 })57 }58 59 const ticketPurchases = await ticketBookingModuleService.createTicketPurchases(60 ticketPurchasesToCreate61 )62 63 return new StepResponse(64 ticketPurchases,65 ticketPurchases66 )67 },68 async (ticketPurchases, { container }) => {69 if (!ticketPurchases) {return}70 71 const ticketBookingModuleService = container.resolve(TICKET_BOOKING_MODULE)72 73 // Delete the created ticket purchases74 await ticketBookingModuleService.deleteTicketPurchases(75 ticketPurchases.map((ticketPurchase) => ticketPurchase.id)76 )77 }78)
The createTicketPurchasesStep accepts the cart and order ID as input.
In the step function, you prepare the ticket purchases to be created, create the ticket purchases, and return them.
In the compensation function, you delete the created ticket purchases if an error occurs in the workflow.
validateTicketOrderStep
The validateTicketOrderStep validates that the tickets can be purchased based on their availability.
To create the step, create the file src/workflows/steps/validate-ticket-order.ts with the following content:
1import { MedusaError } from "@medusajs/framework/utils"2import { createStep, StepResponse } from "@medusajs/framework/workflows-sdk"3import { cancelOrderWorkflow } from "@medusajs/medusa/core-flows"4 5export type ValidateTicketOrderStepInput = {6 items: {7 id: string8 variant_id: string9 metadata: Record<string, unknown>10 quantity: number11 variant?: {12 id: string13 product_id: string14 ticket_product_variant?: {15 purchases?: {16 seat_number: string17 show_date: Date18 }[]19 }20 }21 }[]22 order_id: string23}24 25export const validateTicketOrderStep = createStep(26 "validate-ticket-order",27 async ({ items, order_id }: ValidateTicketOrderStepInput, { container }) => {28 // Check for duplicate seats within the cart29 const seatDateCombinations = new Set<string>()30 31 for (const item of items) {32 if (item.quantity !== 1) {33 throw new MedusaError(34 MedusaError.Types.INVALID_DATA, 35 "You can only purchase one ticket for a seat."36 )37 }38 39 if (!item.variant || !item.metadata?.seat_number) {continue}40 41 if (!item.metadata?.show_date) {42 throw new MedusaError(43 MedusaError.Types.INVALID_DATA, 44 `Show date is required for seat ${item.metadata?.seat_number} in product ${item.variant.product_id}`45 )46 }47 48 // Create a unique key for seat and date combination49 const seatDateKey = `${item.metadata?.seat_number}-${item.metadata?.show_date}`50 51 // Check if this seat-date combination already exists in the cart52 if (seatDateCombinations.has(seatDateKey)) {53 throw new MedusaError(54 MedusaError.Types.INVALID_DATA, 55 `Duplicate seat ${item.metadata?.seat_number} found for show date ${item.metadata?.show_date} in cart`56 )57 }58 59 // Add to the set to track this combination60 seatDateCombinations.add(seatDateKey)61 62 // Check if seat has already been purchased63 const existingPurchase = item.variant.ticket_product_variant?.purchases?.find(64 (purchase) => purchase?.seat_number === item.metadata?.seat_number 65 && purchase?.show_date === item.metadata?.show_date66 )67 68 if (existingPurchase) {69 throw new MedusaError(70 MedusaError.Types.INVALID_DATA, 71 `Seat ${item.metadata?.seat_number} has already been purchased for show date ${item.metadata?.show_date}`72 )73 }74 }75 76 return new StepResponse({ validated: true }, order_id)77 },78 async (order_id, { container, context }) => {79 if (!order_id) {return}80 81 cancelOrderWorkflow(container).run({82 input: {83 order_id,84 },85 context,86 container,87 })88 }89)
The validateTicketOrderStep accepts the cart items and order ID as input.
In the step function, you validate that:
- No seat is purchased more than once for the same date within the cart.
- No seat has already been purchased for the same date.
If any validation fails, you throw an error to abort the workflow.
The step also has a compensation function that cancels the order if an error occurs later in the workflow. This is important to ensure that if ticket purchase creation fails, the order is not left in a completed state.
Custom Complete Cart Workflow
You can now create the custom workflow that completes the cart and creates ticket purchases.
Create the file src/workflows/complete-cart-with-tickets.ts with the following content:
13import { validateTicketOrderStep, ValidateTicketOrderStepInput } from "./steps/validate-ticket-order"14 15export type CompleteCartWithTicketsWorkflowInput = {16 cart_id: string17}18 19export const completeCartWithTicketsWorkflow = createWorkflow(20 "complete-cart-with-tickets",21 (input: CompleteCartWithTicketsWorkflowInput) => {22 acquireLockStep({23 key: input.cart_id,24 timeout: 2,25 ttl: 10,26 })27 const order = completeCartWorkflow.runAsStep({28 input: {29 id: input.cart_id,30 },31 })32 33 const { data: carts } = useQueryGraphStep({34 entity: "cart",35 fields: [36 "id", 37 "items.variant.*",38 "items.variant.options.*",39 "items.variant.options.option.*",40 "items.variant.ticket_product_variant.*",41 "items.variant.ticket_product_variant.ticket_product.*",42 "items.variant.ticket_product_variant.purchases.*",43 "items.metadata",44 "items.quantity",45 ],46 filters: {47 id: input.cart_id,48 },49 options: {50 throwIfKeyNotFound: true,51 },52 })53 54 const { data: existingLinks } = useQueryGraphStep({55 entity: ticketPurchaseOrderLink.entryPoint,56 fields: ["ticket_purchase.id"],57 filters: { order_id: order.id },58 }).config({ name: "retrieve-existing-links" })59 60 when({ existingLinks }, (data) => data.existingLinks.length === 0)61 .then(() => {62 validateTicketOrderStep({63 items: carts[0].items,64 order_id: order.id,65 } as unknown as ValidateTicketOrderStepInput)66 const ticketPurchases = createTicketPurchasesStep({67 order_id: order.id,68 cart: carts[0],69 } as unknown as CreateTicketPurchasesStepInput)70 71 const linkData = transform({72 order,73 ticketPurchases,74 }, (data) => {75 return data.ticketPurchases.map((purchase) => ({76 [TICKET_BOOKING_MODULE]: {77 ticket_purchase_id: purchase.id,78 },79 [Modules.ORDER]: {80 order_id: data.order.id,81 },82 }))83 })84 85 createRemoteLinkStep(linkData)86 })87 88 const { data: refetchedOrder } = useQueryGraphStep({89 entity: "order",90 fields: [91 "id",92 "currency_code",93 "email",94 "customer.*",95 "billing_address.*",96 "payment_collections.*",97 "items.*",98 "total",99 "subtotal",100 "tax_total",101 "shipping_total",102 "discount_total",103 "created_at",104 "updated_at",105 ],106 filters: {107 id: order.id,108 },109 }).config({ name: "refetch-order" })110 111 releaseLockStep({112 key: input.cart_id,113 })114 115 return new WorkflowResponse({116 order: refetchedOrder[0],117 })118 }119)
The completeCartWithTicketsWorkflow accepts the cart ID as input.
In the workflow function, you:
- Acquire a lock on the cart to prevent concurrent modifications using the
acquireLockStep. - Complete the cart using Medusa's
completeCartWorkflow. - Retrieve the cart details using the
useQueryGraphStep. - Retrieve existing ticket purchases linked to the order to ensure idempotency using the
useQueryGraphStep.- This is important because if the workflow is retried, you don't want to create duplicate ticket purchases.
- Use
whento check that there are no existing links between the order and ticket purchases. If so, you:- Validate that the ticket order can be processed using the
validateTicketOrderStep. - Create ticket purchases for each ticket product variant in the cart using the
createTicketPurchasesStep. - Create links between the order and the created ticket purchases using the
createRemoteLinkStep.
- Validate that the ticket order can be processed using the
- Retrieve the order details using the
useQueryGraphStep. - Release the lock on the cart using the
releaseLockStep.
Finally, you return the order details.
b. Custom Complete Cart API Route#
Next, you'll create a custom API route that executes the completeCartWithTicketsWorkflow to complete the cart and create ticket purchases.
Create the file src/api/store/carts/[id]/complete-tickets/route.ts with the following content:
1import { MedusaRequest, MedusaResponse } from "@medusajs/framework/http"2import { completeCartWithTicketsWorkflow } from "../../../../../workflows/complete-cart-with-tickets"3 4export async function POST(5 req: MedusaRequest,6 res: MedusaResponse7) {8 const { result } = await completeCartWithTicketsWorkflow(req.scope).run({9 input: {10 cart_id: req.params.id,11 },12 })13 14 res.json({15 type: "order",16 order: result.order,17 })18}
Since you export a POST route handler function, you expose a POST API route at /store/carts/{id}/complete-tickets.
In the route handler, you execute the completeCartWithTicketsWorkflow and return the created order in the response.
You'll test out this API route when you customize the storefront.
Step 12: Storefront API Routes#
To customize the storefront in the next part, you need two API routes that the storefront will consume:
- An API route to fetch the available dates for a ticket product.
- An API route to fetch the seating layout for a venue, including details on which seats are already booked for a specific date.
You'll test these API routes when you customize the storefront.
a. Available Dates API Route#
The first API route you'll create fetches the available dates for a ticket product.
Create the file src/api/store/ticket-products/[id]/availability/route.ts with the following content:
1import { MedusaRequest, MedusaResponse } from "@medusajs/framework/http"2import { MedusaError } from "@medusajs/framework/utils"3 4export const GET = async (req: MedusaRequest, res: MedusaResponse) => {5 const { id } = req.params6 const query = req.scope.resolve("query")7 8 const { data: [ticketProduct] } = await query.graph({9 entity: "ticket_product",10 fields: [11 "id",12 "product_id",13 "dates",14 "venue.*",15 "venue.rows.*",16 "variants.*",17 "variants.product_variant.*",18 "variants.product_variant.options.*",19 "variants.product_variant.options.option.*",20 "variants.product_variant.ticket_product_variant.*",21 "variants.product_variant.ticket_product_variant.purchases.*",22 ],23 filters: {24 product_id: id,25 },26 })27 28 if (!ticketProduct) {29 throw new MedusaError(MedusaError.Types.NOT_FOUND, "Ticket product not found")30 }31 32 // Calculate availability for each date and row type33 const availability = ticketProduct.dates.map((date: string) => {34 // Group rows by row_type to get total seats per row type35 const rowTypeGroups = ticketProduct.venue.rows.reduce((groups: any, row: any) => {36 if (!groups[row.row_type]) {37 groups[row.row_type] = {38 row_type: row.row_type,39 total_seats: 0,40 rows: [],41 }42 }43 groups[row.row_type].total_seats += row.seat_count44 groups[row.row_type].rows.push(row)45 return groups46 }, {})47 48 const dateAvailability = {49 date,50 row_types: Object.values(rowTypeGroups).map((group: any) => {51 // Find the variant for this date and row type52 const variant = ticketProduct.variants.find((v: any) => {53 const variantDate = v.product_variant.options.find((opt: any) => 54 opt.option?.title === "Date"55 )?.value56 const variantRowType = v.product_variant.options.find((opt: any) => 57 opt.option?.title === "Row Type"58 )?.value59 60 return variantDate === date && variantRowType === group.row_type61 })62 63 if (!variant) {64 return {65 row_type: group.row_type,66 total_seats: group.totalSeats,67 available_seats: 0,68 soldOut: true,69 }70 }71 72 // Count purchased seats for this variant73 const purchasedSeats = variant.product_variant?.ticket_product_variant?.purchases?.length || 074 const availableSeats = Math.max(0, group.total_seats - purchasedSeats)75 const soldOut = availableSeats === 076 77 return {78 row_type: group.row_type,79 total_seats: group.total_seats,80 available_seats: availableSeats,81 sold_out: soldOut,82 }83 }),84 }85 86 // Check if the entire date is sold out87 const totalAvailableSeats = dateAvailability.row_types.reduce(88 (sum, rowType) => sum + rowType.available_seats, 089 )90 const dateSoldOut = totalAvailableSeats === 091 92 return {93 ...dateAvailability,94 sold_out: dateSoldOut,95 }96 })97 98 return res.json({99 ticket_product: ticketProduct,100 availability,101 })102}
You expose a GET API route at /store/ticket-products/{id}/availability.
In the route handler, you:
- Retrieve the ticket product by its associated Medusa product ID, including its dates, venue, variants, and purchases.
- For each show date, you group the venue rows by
row_typeto calculate the total seats per row type. - For each row type, you find the corresponding variant for the date and row type, count the purchased seats, and calculate the available seats.
- You also determine if a row type or an entire date is sold out.
- Finally, you return the ticket product and its availability in the response.
b. Seating Layout API Route#
The second API route you'll create fetches the seating layout for a venue, including details on which seats are already booked for a specific date.
Create the file src/api/store/ticket-products/[id]/seats/route.ts with the following content:
1import { MedusaRequest, MedusaResponse } from "@medusajs/framework/http"2import { MedusaError } from "@medusajs/framework/utils"3import { z } from "@medusajs/framework/zod"4 5export const GetTicketProductSeatsSchema = z.object({6 date: z.string(),7})8 9export const GET = async (req: MedusaRequest, res: MedusaResponse) => {10 const { id } = req.params11 const { date } = req.validatedQuery12 const query = req.scope.resolve("query")13 14 const { data: [ticketProduct] } = await query.graph({15 entity: "ticket_product",16 fields: [17 "id",18 "product_id",19 "venue.*",20 "venue.rows.*",21 "variants.*",22 "variants.product_variant.*",23 "variants.product_variant.options.*",24 "variants.product_variant.options.option.*",25 "variants.product_variant.ticket_product_variant.*",26 "variants.product_variant.ticket_product_variant.purchases.*",27 ],28 filters: {29 product_id: id,30 },31 })32 33 if (!ticketProduct) {34 throw new MedusaError(MedusaError.Types.NOT_FOUND, "Ticket product not found")35 }36 37 // Build seat map for the specified date38 const seatMap = ticketProduct.venue.rows.map((row: any) => {39 // Find the variant for this date and row type40 const variant = ticketProduct.variants.find((v: any) => {41 const variantDate = v.product_variant.options.find((opt: any) => 42 opt.option?.title === "Date"43 )?.value44 const variantRowType = v.product_variant.options.find((opt: any) => 45 opt.option?.title === "Row Type"46 )?.value47 48 return variantDate === date && variantRowType === row.row_type49 })50 51 // Get purchased seats for this variant52 const purchasedSeats = variant?.product_variant?.ticket_product_variant?.purchases?.map(53 (purchase) => purchase?.seat_number54 ).filter(Boolean) || []55 56 // Generate seat numbers for this row57 const seats = Array.from({ length: row.seat_count }, (_, index) => {58 const seatNumber = (index + 1).toString()59 const isPurchased = purchasedSeats.includes(seatNumber)60 61 return {62 number: seatNumber,63 is_purchased: isPurchased,64 variant_id: variant?.product_variant?.id || null,65 }66 })67 68 return {69 row_number: row.row_number,70 row_type: row.row_type,71 seats,72 }73 })74 75 return res.json({76 venue: ticketProduct.venue,77 date,78 seat_map: seatMap,79 })80}
You expose a GET API route at /store/ticket-products/{id}/seats. You also define a Zod schema to validate the date query parameter.
In the route handler, you:
- Retrieve the ticket product by its associated Medusa product ID, including its venue, rows, variants, and purchases.
- For each venue row, you find the corresponding variant for the specified date and row type.
- You get the purchased seats for that variant and generate a list of seats for the row, marking which seats are already purchased.
- Finally, you return the venue details, the specified date, and the seat map in the response.
You also need to apply a middleware to validate the query parameters using the Zod schema you defined. So, in src/api/middlewares.ts, add the following import at the top of the file:
Then, pass a new object to the routes array passed to the defineMiddlewares function:
You apply the validateAndTransformQuery middleware to the /store/ticket-products/:id/seats route for GET requests. You pass the GetTicketProductSeatsSchema to validate the query parameters.
Step 13: Send Order Confirmation Email with Tickets#
The last step is to send order confirmation emails to customers with their tickets as QR codes.
To send an email in Medusa when an order is placed, you'll need:
- A Notification Module Provider to handle sending emails. For example, SendGrid or Resend.
- You also need to define an email template for the order confirmation email in the provider.
- A method in the Ticket Booking Module's service that generates the ticket QR codes.
- A Subscriber that listens to the
order.placedevent and sends an email with the order details. - A workflow and API route to handle verifying scanned QR codes at the event entrance.
a. Set Up Notification Module#
First, set up a Notification Module Provider in your Medusa application.
For example, to set up the SendGrid Notification Module Provider, add it to medusa-config.ts:
1module.exports = defineConfig({2 // ...3 modules: [4 // ...5 {6 resolve: "@medusajs/medusa/notification",7 options: {8 providers: [9 {10 resolve: "@medusajs/medusa/notification-sendgrid",11 id: "sendgrid",12 options: {13 channels: ["email"],14 api_key: process.env.SENDGRID_API_KEY,15 from: process.env.SENDGRID_FROM,16 },17 },18 ],19 },20 },21 ],22})
Make sure to set the SENDGRID_API_KEY and SENDGRID_FROM environment variables in your .env file, as explained in the SendGrid Notification Module Provider guide.
You also need to define an email template for the order confirmation email in SendGrid. The following is a dynamic template you can use:
1<!doctype html>2<html lang="en" style="margin:0;padding:0;">3<head>4 <meta charset="utf-8" />5 <meta name="viewport" content="width=device-width, initial-scale=1" />6 <title>Order Confirmation – {{brand_name}}</title>7 <style>8 /* Dark mode friendly neutrals, safe for most clients */9 :root { color-scheme: light dark; supported-color-schemes: light dark; }10 body { margin:0; padding:0; background:#f6f7f9; -webkit-text-size-adjust:100%; }11 .wrapper { width:100%; table-layout:fixed; background:#f6f7f9; padding:24px 0; }12 .container { margin:0 auto; width:100%; max-width:640px; background:#ffffff; border-radius:12px; overflow:hidden; }13 .header { padding:24px; text-align:left; background:#0e1116; color:#ffffff; }14 .brand { font: 600 20px/1.2 system-ui, -apple-system, Segoe UI, Roboto, "Helvetica Neue", Arial, sans-serif; }15 .content { padding:24px; color:#0e1116; font: 400 16px/1.5 system-ui, -apple-system, Segoe UI, Roboto, "Helvetica Neue", Arial, sans-serif; }16 .muted { color:#6b7280; font-size:14px; }17 .section-title { font-weight:600; margin:24px 0 8px; }18 .card { border:1px solid #e5e7eb; border-radius:12px; padding:16px; }19 .divider { height:1px; background:#e5e7eb; margin:24px 0; }20 .btn {21 display:inline-block; text-decoration:none; background:#0e1116; color:#ffffff !important;22 padding:12px 18px; border-radius:10px; font-weight:600;23 }24 /* QR grid */25 .qr-grid { display:grid; grid-template-columns: repeat(2, 1fr); gap:16px; }26 @media (max-width:480px) { .qr-grid { grid-template-columns: 1fr; } }27 .qr-item { border:1px solid #e5e7eb; border-radius:10px; padding:14px; text-align:center; }28 .qr-item img { display:block; margin:0 auto 10px; width:220px; height:220px; object-fit:contain; }29 .qr-label { font-weight:600; margin-bottom:2px; }30 .qr-meta { font-size:13px; color:#6b7280; }31 .ticket-note { font-size:13px; color:#374151; margin-top:8px; }32 /* Small print */33 .footer { padding:18px 24px 28px; text-align:center; color:#6b7280; font-size:12px; }34 .nowrap { white-space:nowrap; }35 a { color:#0e63ff; }36 </style>37</head>38<body>39 <table role="presentation" class="wrapper" cellpadding="0" cellspacing="0" width="100%">40 <tr>41 <td align="center">42 <table role="presentation" class="container" cellpadding="0" cellspacing="0" width="100%">43 <!-- Header -->44 <tr>45 <td class="header">46 <div class="brand">Medusa</div>47 </td>48 </tr>49 50 <!-- Greeting & Summary -->51 <tr>52 <td class="content">53 <p>Hi {{customer.first_name}},</p>54 <p>Thanks for your order! Your tickets for <strong>{{show.name}}</strong> are confirmed.</p>55 56 <div class="card">57 <div><strong>Order #:</strong> {{order.display_id}}</div>58 <div><strong>Date:</strong> {{order.created_at}}</div>59 {{#if order.email}}60 <div><strong>Sent to:</strong> {{order.email}}</div>61 {{/if}}62 {{#if show.date}}63 <div><strong>Event:</strong> {{show.date}}</div>64 {{/if}}65 {{#if show.venue}}66 <div><strong>Venue:</strong> {{show.venue}}</div>67 {{/if}}68 </div>69 70 <div class="divider"></div>71 72 <!-- QR Codes -->73 <h3 class="section-title">Your Tickets (QR Codes)</h3>74 <p class="muted" style="margin-top:0;">Show each QR code at the entrance. Each QR admits one person unless noted otherwise.</p>75 76 <div class="qr-grid">77 {{#each tickets}}78 <div class="qr-item">79 <!-- `qr` can be a full https URL or a data URI (e.g. data:image/png;base64,...) -->80 <img src="{{this.qr}}" alt="QR code for {{this.label}}" width="220" height="220" />81 <div class="qr-label">{{this.label}}</div>82 {{#if this.seat}}83 <div class="qr-meta">Seat: {{this.seat}}</div>84 {{/if}}85 {{#if this.row}}86 <div class="qr-meta">Row: {{this.row}}</div>87 {{/if}}88 </div>89 {{/each}}90 </div>91 92 <p class="muted" style="margin-top:18px;">Please arrive at least 15 minutes before showtime and have your tickets ready.</p>93 94 <div class="divider"></div>95 96 <!-- Billing snippet -->97 <h3 class="section-title">Billing</h3>98 <div class="card">99 {{#if billing_address}}100 <div><strong>Billing address</strong><br/>101 {{billing_address.first_name}} {{billing_address.last_name}}<br/>102 {{billing_address.address_1}}{{#if billing_address.address_2}}, {{billing_address.address_2}}{{/if}}<br/>103 {{billing_address.city}}, {{billing_address.province}} {{billing_address.postal_code}}<br/>104 {{billing_address.country_code}}105 </div>106 {{/if}}107 </div>108 109 <p style="margin-top:24px;">Enjoy the show!</p>110 </td>111 </tr>112 </table>113 </td>114 </tr>115 </table>116</body>117</html>
You can customize the template to fit your brand and requirements. If you change any variable names or add new variables, make sure to update the code in the next sections accordingly.
b. Generate Ticket QR Codes#
Next, you'll add a method in the Ticket Booking Module's service that generates the ticket QR codes.
Start by installing the qrcode package in your Medusa application with the following command:
Then, in src/modules/ticket-booking/service.ts, add the following imports at the top of the file:
And add the following method to TicketBookingModuleService:
1export class TicketBookingModuleService extends MedusaService({2 Venue,3 VenueRow,4 TicketProduct,5 TicketProductVariant,6 TicketPurchase,7}) {8 async generateTicketQRCodes(9 ticketPurchaseIds: string[]10 ): Promise<Record<string, string>> {11 const ticketPurchases = await this.listTicketPurchases({12 id: ticketPurchaseIds,13 })14 const qrCodeData: Record<string, string> = {}15 16 await promiseAll(17 ticketPurchases.map(async (ticketPurchase) => {18 qrCodeData[ticketPurchase.id] = await QRCode.toDataURL(19 ticketPurchase.id20 )21 })22 )23 24 return qrCodeData25 }26}
The generateTicketQRCodes method takes an array of ticket purchase IDs. It retrieves the ticket purchases and generates a QR code for each ticket purchase using the qrcode package.
The QR code encodes the ticket purchase ID, which can be used later for verification at the event entrance.
c. Create Order Placed Subscriber#
Next, you'll create a subscriber that listens to the order.placed event and sends an order confirmation email with the tickets.
A subscriber is an asynchronous function that is executed when its associated event is emitted.
To create a subscriber that sends a notification to the customer when an order is placed, create the file src/subscribers/order-placed.ts with the following content:
1import { SubscriberArgs, type SubscriberConfig } from "@medusajs/medusa"2import { TICKET_BOOKING_MODULE } from "../modules/ticket-booking"3 4export default async function handleOrderPlaced({5 event: { data },6 container,7}: SubscriberArgs<{ id: string }>) {8 const query = container.resolve("query")9 const notificationModuleService = container.resolve("notification")10 const ticketBookingModuleService = container.resolve(TICKET_BOOKING_MODULE)11 12 const { data: [order] } = await query.graph({13 entity: "order",14 fields: [15 "id", 16 "email", 17 "created_at",18 "items.*",19 "ticket_purchases.*",20 "ticket_purchases.ticket_product.*",21 "ticket_purchases.ticket_product.product.*",22 "ticket_purchases.ticket_product.venue.*",23 "ticket_purchases.venue_row.*",24 "customer.*",25 "billing_address.*",26 ],27 filters: {28 id: data.id,29 },30 })31 32 const ticketPurchaseIds: string[] = order.ticket_purchases?.33 map((purchase) => purchase?.id).filter(Boolean) as string[] || []34 35 const qrCodes = await ticketBookingModuleService.generateTicketQRCodes(36 ticketPurchaseIds37 )38 const firstTicketPurchase = order.ticket_purchases?.[0]39 40 await notificationModuleService.createNotifications({41 to: order.email || "",42 channel: "feed",43 // TODO replace with a proper template44 template: "order.placed",45 data: {46 customer: {47 first_name: order.customer?.first_name || 48 order.billing_address?.first_name,49 last_name: order.customer?.last_name || 50 order.billing_address?.last_name,51 },52 order: {53 display_id: order.id,54 created_at: order.created_at,55 email: order.email,56 },57 show: {58 name: firstTicketPurchase?.ticket_product?.product?.title || 59 "Your Event",60 date: firstTicketPurchase?.show_date.toLocaleString(),61 venue: firstTicketPurchase?.ticket_product?.venue?.name || 62 "Venue Name",63 },64 tickets: order.ticket_purchases?.map((purchase) => ({65 label: purchase?.venue_row.row_type.toUpperCase(),66 seat: purchase?.seat_number,67 row: purchase?.venue_row.row_number,68 qr: qrCodes[purchase?.id || ""] || "",69 })),70 billing_address: order.billing_address,71 },72 })73}74 75export const config: SubscriberConfig = {76 event: "order.placed",77}
A subscriber file must export:
- An asynchronous function that is executed when its associated event is emitted.
- An object that indicates the event that the subscriber is listening to.
The subscriber receives among its parameters the data payload of the emitted event, which includes the order ID.
In the subscriber, you:
- Retrieve the order details, including ticket purchases, customer information, and billing address.
- Extract the ticket purchase IDs from the order.
- Generate QR codes for the ticket purchases.
- Use the Notification Module's service to send an email to the customer with the order details and tickets.
- The
dataobject contains the variables used in the email template you defined earlier. - Make sure to change the
templateproperty to match the template ID you created in your Notification Module Provider. For example, the ID of the dynamic template in SendGrid.
- The
Test Order Confirmation Email#
To test the order confirmation email, customize the storefront first. Then, start the Medusa application and the Next.js Starter Storefront.
Place an order with at least one ticket product. After placing the order, you'll see the following message in your Medusa application's terminal:
If no errors occur, you should receive an order confirmation email at the email address you used when placing the order. The email should contain the order details and the tickets with QR codes.
d. Verify Ticket QR Code Workflow#
In this section, you'll implement functionality to verify QR codes, which is useful for checking tickets at event entrances.
To implement this functionality, you'll create a workflow and then execute it in an API route.
The workflow that verifies a ticket QR code has the following steps:
Loading...You need to implement both steps.
verifyTicketPurchaseStep
The verifyTicketPurchaseStep verifies that a ticket purchase is valid and has not been used yet.
To create the step, create the file src/workflows/steps/verify-ticket-purchase-step.ts with the following content:
1import { createStep, StepResponse } from "@medusajs/framework/workflows-sdk"2import { TICKET_BOOKING_MODULE } from "../../modules/ticket-booking"3import { MedusaError } from "@medusajs/framework/utils"4 5export type VerifyTicketPurchaseStepInput = {6 ticket_purchase_id: string7}8 9export const verifyTicketPurchaseStep = createStep(10 "verify-ticket-purchase",11 async (input: VerifyTicketPurchaseStepInput, { container }) => {12 const ticketBookingService = container.resolve(TICKET_BOOKING_MODULE)13 14 const ticketPurchase = await ticketBookingService.retrieveTicketPurchase(15 input.ticket_purchase_id16 )17 18 if (ticketPurchase.status !== "pending") {19 throw new MedusaError(20 MedusaError.Types.NOT_ALLOWED,21 "Ticket has already been scanned"22 )23 }24 25 if (ticketPurchase.show_date < new Date()) {26 throw new MedusaError(27 MedusaError.Types.NOT_ALLOWED,28 "Ticket is expired or show date has passed"29 )30 }31 32 return new StepResponse(true)33 }34)
The step takes the ticket purchase ID as input. In the step, you throw an error if the ticket has already been scanned or if the show date has passed.
updateTicketPurchaseStatusStep
The updateTicketPurchaseStatusStep updates the status of a ticket purchase.
To create the step, create the file src/workflows/steps/update-ticket-purchase-status-step.ts with the following content:
1import { createStep, StepResponse } from "@medusajs/framework/workflows-sdk"2import { TICKET_BOOKING_MODULE } from "../../modules/ticket-booking"3 4export type UpdateTicketPurchaseStatusStepInput = {5 ticket_purchase_id: string6 status: "pending" | "scanned"7}8 9export const updateTicketPurchaseStatusStep = createStep(10 "update-ticket-purchase-status",11 async (input: UpdateTicketPurchaseStatusStepInput, { container }) => {12 const ticketBookingService = container.resolve(TICKET_BOOKING_MODULE)13 14 const currentTicket = await ticketBookingService.retrieveTicketPurchase(15 input.ticket_purchase_id16 )17 18 const updatedTicket = await ticketBookingService.updateTicketPurchases({19 id: input.ticket_purchase_id,20 status: input.status,21 })22 23 return new StepResponse(updatedTicket, {24 id: input.ticket_purchase_id,25 previousStatus: currentTicket.status,26 })27 },28 async (compensationData, { container }) => {29 if (!compensationData) {return}30 31 const ticketBookingService = container.resolve(TICKET_BOOKING_MODULE)32 await ticketBookingService.updateTicketPurchases({33 id: compensationData.id,34 status: compensationData.previousStatus,35 })36 }37)
The step receives the ticket purchase ID and the new status as input.
In the step, you update the ticket purchase status. In the compensation function, you undo the update if an error occurs in the workflow.
Verify Ticket QR Code Workflow
You can now create the workflow that verifies a ticket QR code.
Create the file src/workflows/verify-ticket-purchase.ts with the following content:
1import { createWorkflow, WorkflowResponse } from "@medusajs/framework/workflows-sdk"2import { verifyTicketPurchaseStep } from "./steps/verify-ticket-purchase-step"3import { updateTicketPurchaseStatusStep } from "./steps/update-ticket-purchase-status-step"4 5export type VerifyTicketPurchaseWorkflowInput = {6 ticket_purchase_id: string7}8 9export const verifyTicketPurchaseWorkflow = createWorkflow(10 "verify-ticket-purchase",11 function (input: VerifyTicketPurchaseWorkflowInput) {12 verifyTicketPurchaseStep(input)13 14 const ticketPurchase = updateTicketPurchaseStatusStep({15 ticket_purchase_id: input.ticket_purchase_id,16 status: "scanned",17 })18 19 return new WorkflowResponse(ticketPurchase)20 }21)
The workflow receives the ticket purchase ID as input.
In the workflow, you verify the ticket purchase and then update its status to scanned.
e. Verify Ticket API Route#
Finally, you'll create an API route that executes the verifyTicketPurchaseWorkflow workflow to verify a ticket QR code. A QR scanner can call this API route when scanning a ticket at the event entrance.
To create the API route, create the file src/api/tickets/[id]/verify/route.ts with the following content:
1import { MedusaRequest, MedusaResponse } from "@medusajs/framework/http"2import { verifyTicketPurchaseWorkflow } from "../../../../workflows/verify-ticket-purchase"3 4export async function POST(req: MedusaRequest, res: MedusaResponse) {5 const { id } = req.params6 7 await verifyTicketPurchaseWorkflow(req.scope).run({8 input: {9 ticket_purchase_id: id,10 },11 })12 13 res.json({14 success: true,15 })16}
You expose a POST API route at /tickets/:id/verify. In the route handler, you execute the verifyTicketPurchaseWorkflow workflow with the ticket purchase ID from the URL parameters.
If the ticket is valid, the route returns a success response with 200 status code. If the ticket is invalid, an error is thrown with 400 status code.
Test Ticket Verification#
To test the ticket verification functionality, start the Medusa application.
Then, place an order with at least one ticket product. After placing the order, check your email for the order confirmation email containing the tickets with QR codes.
Next, decode the QR code to get the ticket purchase ID. You can use an online QR code decoder or a QR code scanner app on your phone.
Finally, make a POST request to the /tickets/:id/verify API route with the ticket purchase ID:
Replace {ticket_purchase_id} with the actual ticket purchase ID you obtained from the QR code.
If the ticket is valid, you'll receive a success response. Otherwise, you'll receive an error response indicating the ticket is invalid or has already been scanned.
Next Steps#
You've now implemented the ticket booking functionality in the backend. Follow the Ticket Booking Storefront tutorial to customize the Next.js Starter Storefront for ticket booking.
You can expand on this tutorial by adding more features, such as:
- Provide more management features for venues and ticket products, such as updating and deleting them.
- Allow purchasing tickets for specific times in a day.
- Handle order events, such as
order.canceled, to make changes to ticket purchases.
Learn More about Medusa#
If you're new to Medusa, check out the main documentation, where you'll get a more in-depth understanding of all the concepts you've used in this guide and more.
To learn more about the commerce features that Medusa provides, check out Medusa's Commerce Modules.
Troubleshooting#
If you encounter issues during your development, check out the troubleshooting guides.
Getting Help#
If you encounter issues not covered in the troubleshooting guides:
- Visit the Medusa GitHub repository to report issues or ask questions.
- Join the Medusa Discord community for real-time support from community members.