Implement First-Purchase Discount in Medusa
In this tutorial, you'll learn how to implement first-purchase discounts in Medusa.
When you install a Medusa application, you get a fully-fledged commerce platform with a Framework for customization. The Medusa application's commerce features are built around Commerce Modules, which are available out-of-the-box. These features include promotion and cart management features.
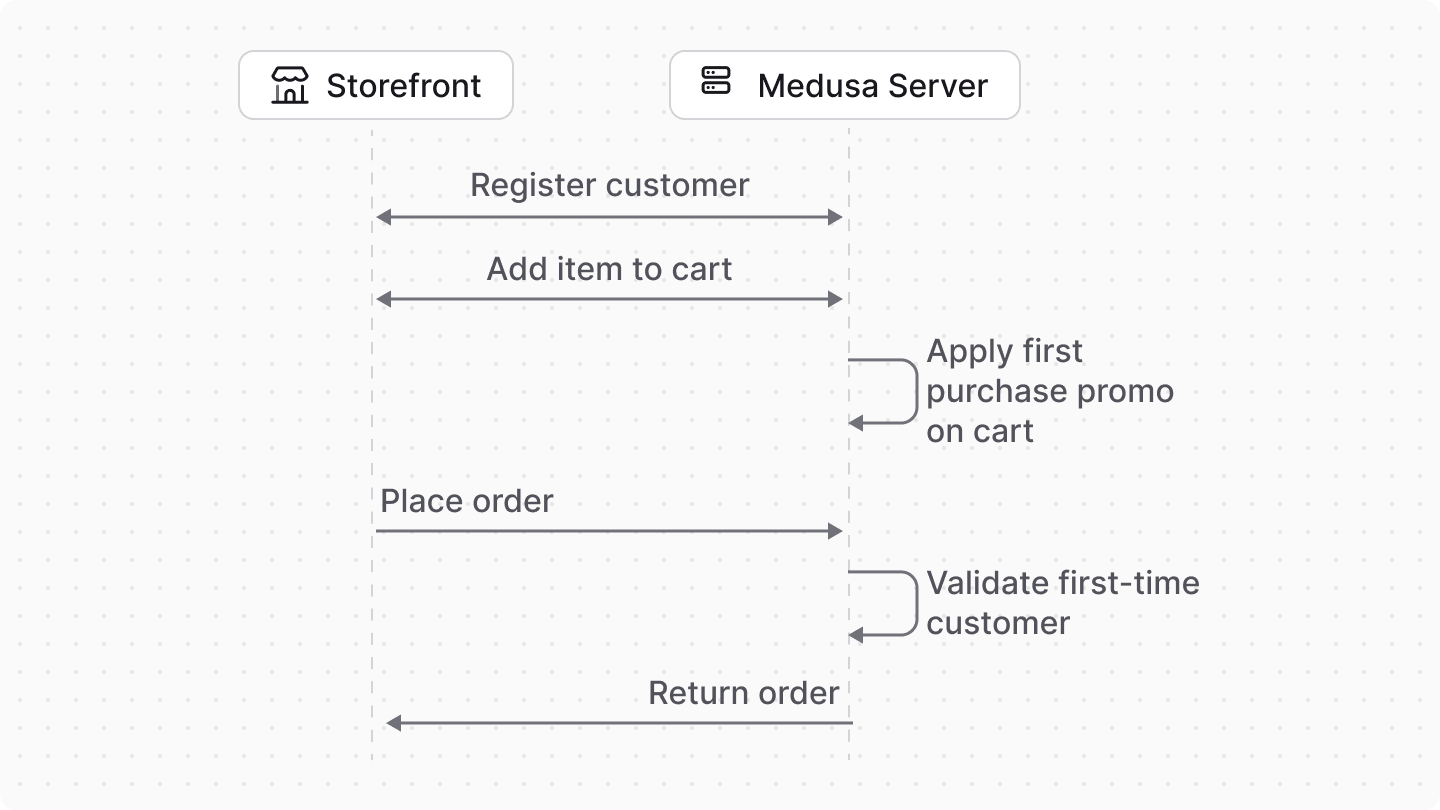
The first-purchase discount feature encourages customers to sign up and make their first purchase by offering them a discount. In this tutorial, you'll learn how to implement this feature in Medusa.
Summary#
By following this tutorial, you'll learn how to:
- Install and set up Medusa.
- Apply a first-purchase discount to a customer's cart if they are a first-time customer.
- Add custom validation to ensure the discount is only used by first-time customers.
- Customize the Next.js Starter Storefront to display a pop-up encouraging first-time customers to sign up and receive a discount.
You can follow this tutorial whether you're new to Medusa or an advanced Medusa developer.
Step 1: Install a Medusa Application#
Start by installing the Medusa application on your machine with the following command:
First, you'll be asked for the project's name. Then, when prompted about installing the Next.js Starter Storefront, choose "Yes."
Afterward, the installation process will start, which will install the Medusa application in a directory with your project's name and the Next.js Starter Storefront in a separate directory named {project-name}-storefront.
Once the installation finishes successfully, the Medusa Admin dashboard will open with a form to create a new user. Enter the user's credentials and submit the form. Afterward, you can log in with the new user and explore the dashboard.
Step 2: Create a First-Purchase Promotion#
Before you apply the first-purchase discount or promotion to a customer's cart, you need to create the promotion that will be applied.
Start your Medusa application with the following command:
Then, open the Medusa Admin dashboard at http://localhost:9000/app and log in with the user you created in the previous step.
Next, click on the "Promotions" tab in the left sidebar, then click on the "Create Promotion" button to create a new promotion.
You can customize the promotion based on your use case. For example, it can be a 10% off the entire order, or a fixed amount off specific items.
Make sure to set the promotion's code to FIRST_PURCHASE, as you'll be using this code in your Medusa customization. If you want to use a different code, make sure to update the code in the next steps accordingly.
Once you create and publish the promotion, you can proceed to the next steps.

Step 3: Apply the First-Purchase Discount to Cart#
In this step, you'll customize the Medusa application to automatically apply the first-purchase promotion to a cart.
To build this feature, you need to:
- Create a workflow that implements the logic to apply the first-purchase promotion to a cart.
- Execute the workflow in a subscriber that is triggered when a cart is created, or when it's transferred to a customer.
a. Store the First-Purchase Promotion Code#
Since you'll refer to the first-purchase promotion code in multiple places, it's a good idea to store it as a constant in your Medusa application.
So, create the file src/constants.ts with the following content:
You'll reference this constant in the next steps.
b. Create the Workflow#
Next, you'll create the workflow that implements the logic to apply the first-purchase promotion to a cart.
A workflow is a series of actions, called steps, that complete a task with rollback and retry mechanisms. In Medusa, you build commerce features in workflows, then execute them in other customizations, such as subscribers, scheduled jobs, and API routes.
The workflow you'll build will have the following steps:
Workflow hook
Step conditioned by when
View step details
Medusa provides all these steps in its @medusajs/medusa/core-flows package, so you can implement the workflow right away.
To create the workflow, create the file src/workflows/apply-first-purchase-promo.ts with the following content:
1import { createWorkflow, when, WorkflowResponse } from "@medusajs/framework/workflows-sdk"2import { updateCartPromotionsStep, useQueryGraphStep } from "@medusajs/medusa/core-flows"3import { FIRST_PURCHASE_PROMOTION_CODE } from "../constants"4import { PromotionActions } from "@medusajs/framework/utils"5 6type WorkflowInput = {7 cart_id: string8}9 10export const applyFirstPurchasePromoWorkflow = createWorkflow(11 "apply-first-purchase-promo",12 (input: WorkflowInput) => {13 const { data: carts } = useQueryGraphStep({14 entity: "cart",15 fields: ["promotions.*", "customer.*", "customer.orders.*"],16 filters: {17 id: input.cart_id,18 },19 })20 21 const { data: promotions } = useQueryGraphStep({22 entity: "promotion",23 fields: ["code"],24 filters: {25 code: FIRST_PURCHASE_PROMOTION_CODE,26 },27 }).config({ name: "retrieve-promotions" })28 29 when({ 30 carts,31 promotions,32 }, (data) => {33 return data.promotions.length > 0 && 34 !data.carts[0].promotions?.some((promo) => promo?.id === data.promotions[0].id) && 35 data.carts[0].customer !== null && 36 data.carts[0].customer.orders?.length === 037 })38 .then(() => {39 updateCartPromotionsStep({40 id: carts[0].id,41 promo_codes: [promotions[0].code!],42 action: PromotionActions.ADD,43 })44 })45 46 // retrieve updated cart47 const { data: updatedCarts } = useQueryGraphStep({48 entity: "cart",49 fields: ["*", "promotions.*"],50 filters: {51 id: input.cart_id,52 },53 }).config({ name: "retrieve-updated-cart" })54 55 return new WorkflowResponse(updatedCarts[0])56 }57)
You create a workflow using createWorkflow from the Workflows SDK. It accepts the workflow's unique name as a first parameter.
createWorkflow accepts as a second parameter a constructor function, which is the workflow's implementation. The function accepts as an input an object with the ID of the cart to apply the first-purchase promotion to.
In the workflow's constructor function, you:
- Retrieve the cart's details, including its promotions and customer, using the useQueryGraphStep.
- Retrieve the details of the first-purchase promotion using the
useQueryGraphStep.- You pass the
FIRST_PURCHASE_PROMOTION_CODEconstant to thefiltersoption to retrieve the promotion.
- You pass the
- Use the when-then utility to only apply the promotion if the first-purchase promotion exists, the cart doesn't have the promotion, and the customer doesn't have any orders.
whenreceives two parameters:- An object to use in the condition function.
- A condition function that receives the first parameter object and returns a boolean indicating whether to execute the steps in the
thenblock.
- Retrieve the updated cart's details, including its promotions, using the
useQueryGraphStepagain.
Finally, you return a WorkflowResponse with the updated cart's details.
when to perform typical operations that require accessing data values. Learn more about workflow constraints in the Workflow Constraints documentation.c. Create the Subscriber#
Next, you'll create a subscriber that executes the workflow when a cart is created or transferred to a customer.
A subscriber is an asynchronous function that listens to events to perform a task. In this case, you'll create a subscriber that listens to the cart.created and cart.customer_transferred events to execute the workflow.
To create the subscriber, create the file src/subscribers/apply-first-purchase.ts with the following content:
1import { SubscriberArgs, type SubscriberConfig } from "@medusajs/framework"2import { applyFirstPurchasePromoWorkflow } from "../workflows/apply-first-purchase-promo"3 4export default async function cartCreatedHandler({5 event: { data },6 container,7}: SubscriberArgs<{8 id: string9}>) {10 await applyFirstPurchasePromoWorkflow(container)11 .run({12 input: {13 cart_id: data.id,14 },15 })16}17 18export const config: SubscriberConfig = {19 event: ["cart.created", "cart.customer_transferred"],20}
A subscriber file must export:
- An asynchronous function, which is the subscriber that is executed when the event is emitted.
- A configuration object that holds the names of the events the subscriber listens to, which are
cart.createdandcart.customer_transferredin this case.
The subscriber function receives an object as a parameter that has a container property, which is the Medusa container. The Medusa container holds Framework and commerce tools that you can resolve and use in your customizations.
In the subscriber function, you execute the applyFirstPurchasePromoWorkflow by invoking it, passing it the Medusa container, then calling its run method. You pass the cart_id from the event payload as an input to the workflow.
Test it Out#
You can now test the automatic application of the first-purchase promotion to a cart. To do that, you'll use the Next.js Starter Storefront you installed in the first step.
The Next.js Starter Storefront was installed in a separate directory from Medusa. The directory's name is {your-project}-storefront.
So, if your Medusa application's directory is medusa-first-promo, you can find the storefront by going back to the parent directory and changing to the medusa-first-promo-storefront directory:
First, start the Medusa application with the following command:
Then, start the Next.js Starter Storefront with the following command:
The storefront will run at http://localhost:8000. Open it in your browser and click on Account at the top right to register.
After you register, add a product to the cart, then go to the cart page. You'll find that the FIRST_PURCHASE promotion has been applied to the cart automatically.

Step 4: Validate First-Purchase Discount Usage#
You now automatically apply the first-purchase promotion to a cart, but any customer can use the promotion code at the moment.
So, you need to add custom validation to ensure that the first-purchase promotion is only used by first-time customers.
In this step, you'll customize Medusa's existing workflows to validate the first-purchase promotion usage. You can do that by consuming the workflows' hooks. A workflow hook is a point in a workflow where you can inject custom functionality as a step function.
You'll consume the hooks of the following workflows:
- updateCartPromotionsWorkflow: This workflow is used to add or remove promotions from a cart. You'll check that the customer is a first-time customer before allowing the promotion to be added.
- completeCartWorkflow: This workflow is used to complete a cart and place an order. You'll validate that the first-purchase promotion is only used by first-time customers before allowing the order to be placed.
a. Consume updateCartPromotionsWorkflow.validate Hook#
You'll start by consuming the validate hook of the updateCartPromotionsWorkflow. This hook is called before any operations are performed in the workflow.
To consume the hook, create the file src/workflows/hooks/validate-promotion.ts with the following content:
1import { 2 updateCartPromotionsWorkflow,3} from "@medusajs/medusa/core-flows"4import { FIRST_PURCHASE_PROMOTION_CODE } from "../../constants"5import { MedusaError } from "@medusajs/framework/utils"6 7updateCartPromotionsWorkflow.hooks.validate(8 (async ({ input, cart }, { container }) => {9 const hasFirstPurchasePromo = input.promo_codes?.some(10 (code) => code === FIRST_PURCHASE_PROMOTION_CODE11 )12 13 if (!hasFirstPurchasePromo) {14 return15 }16 17 if (!cart.customer_id) {18 throw new MedusaError(19 MedusaError.Types.INVALID_DATA,20 "First purchase discount can only be applied to carts with a customer"21 )22 }23 const query = container.resolve("query")24 25 const { data: [customer] } = await query.graph({26 entity: "customer",27 fields: ["orders.*", "has_account"],28 filters: {29 id: cart.customer_id,30 },31 })32 33 if (!customer.has_account || (customer?.orders?.length || 0) > 0) {34 throw new MedusaError(35 MedusaError.Types.INVALID_DATA,36 "First purchase discount can only be applied to carts with no previous orders"37 )38 }39 })40)
You consume a workflow's hook by calling the hooks property of the workflow, then calling the hook you want to consume. In this case, you call the validate hook of the updateCartPromotionsWorkflow.
The validate hook receives a step function as a parameter. The function receives two parameters:
- The hook's input, which differs based on the workflow. In this case, it receives the following properties:
input: The input of theupdateCartPromotionsWorkflow, which includes thepromo_codesto add or remove from the cart.cart: The cart being updated.
- The hook or step context object. Most notably, it has a
containerproperty, which is the Medusa container.
In the step function, you check if the FIRST_PURCHASE_PROMOTION_CODE is being applied to the cart. If so, you validate that:
- The cart is associated with a customer.
- The customer has an account.
- The customer has no previous orders.
If any of these validations fail, you throw a MedusaError with the appropriate error message. This will prevent the promotion from being applied to the cart.
b. Consume completeCartWorkflow.validate Hook#
Next, you'll consume the validate hook of the completeCartWorkflow. This workflow is used to complete a cart and place an order. You'll validate that the first-purchase promotion is only used by first-time customers before allowing the order to be placed.
In the same src/workflows/hooks/validate-promotion.ts file, add the following import at the top of the file:
Then, consume the hook at the end of the file:
1completeCartWorkflow.hooks.validate(2 (async ({ input, cart }, { container }) => {3 const hasFirstPurchasePromo = cart.promotions?.some(4 (promo) => promo?.code === FIRST_PURCHASE_PROMOTION_CODE5 )6 7 if (!hasFirstPurchasePromo) {8 return9 }10 11 if (!cart.customer_id) {12 throw new MedusaError(13 MedusaError.Types.INVALID_DATA,14 "First purchase discount can only be applied to carts with a customer"15 )16 }17 18 const query = container.resolve("query")19 20 const { data: [customer] } = await query.graph({21 entity: "customer",22 fields: ["orders.*", "has_account"],23 filters: {24 id: cart.customer_id,25 },26 })27 28 if (!customer.has_account || (customer?.orders?.length || 0) > 0) {29 throw new MedusaError(30 MedusaError.Types.INVALID_DATA,31 "First purchase discount can only be applied to carts with no previous orders"32 )33 }34 })35)
You consume the validate hook of the completeCartWorkflow in the same way as the previous hook. The step function receives the cart being completed as an input.
In the step function, you check if the FIRST_PURCHASE_PROMOTION_CODE is applied to the cart. If so, you validate that:
- The cart is associated with a customer.
- The customer has an account.
- The customer has no previous orders.
If any of these validations fail, you throw a MedusaError with the appropriate error message. This will prevent the order from being placed if the first-purchase promotion is used by a customer who is not a first-time customer.
Test it Out#
To test the custom validation, start the Medusa application and the Next.js Starter Storefront as you did in the previous steps.
Then, register a new customer in the storefront, and place an order. The first-purchase promotion will be applied to the cart automatically and the order will be placed successfully.
Try to place another order with the same customer. The first-purchase promotion will not be automatically applied to the cart. If you also try to apply the first-purchase promotion manually, you'll receive an error message indicating that the promotion can only be applied to first-time customers.
Step 5: Show Discount Pop-Up in Storefront#
The first-time purchase promotion is now fully functional. However, you need to inform first-time customers about the discount and encourage them to sign up.
To do that, you'll customize the Next.js Starter Storefront to show a pop-up when a first-time customer visits the storefront.
a. Create the Pop-Up Component#
You'll first create the pop-up component that will be displayed to first-time customers.
Create the file src/modules/common/components/discount-popup/index.tsx with the following content:
1"use client"2 3import { Button, Heading, Text } from "@medusajs/ui"4import Modal from "@modules/common/components/modal"5import useToggleState from "@lib/hooks/use-toggle-state"6import { useEffect } from "react"7import LocalizedClientLink from "@modules/common/components/localized-client-link"8 9const DISCOUNT_POPUP_KEY = "discount_popup_shown"10 11const DiscountPopup = () => {12 const { state, open, close } = useToggleState(false)13 14 useEffect(() => {15 // Check if the popup has been shown before16 const hasBeenShown = localStorage.getItem(DISCOUNT_POPUP_KEY)17 18 if (!hasBeenShown) {19 open()20 // Mark as shown21 localStorage.setItem(DISCOUNT_POPUP_KEY, "true")22 }23 }, [open])24 25 return (26 <Modal isOpen={state} close={close} size="small" data-testid="discount-popup">27 <div className="relative overflow-hidden bg-gradient-to-br from-amber-50 to-amber-100 rounded-t-lg px-6 pt-8 pb-6">28 {/* Decorative elements */}29 <div className="absolute top-0 right-0 w-20 h-20 bg-amber-200 rounded-full -mr-10 -mt-10 opacity-50"></div>30 <div className="absolute bottom-0 left-0 w-16 h-16 bg-amber-200 rounded-full -ml-8 -mb-8 opacity-40"></div>31 32 <div className="relative">33 {/* Sale tag */}34 <div className="absolute -top-2 -right-2 bg-rose-500 text-white text-xs font-bold px-3 py-1 rounded-full transform rotate-12 shadow-md">35 SAVE 10%36 </div>37 38 <Heading level="h2" className="text-2xl font-bold text-center text-amber-900">39 Limited Time Offer!40 </Heading>41 42 <div className="flex justify-center my-4">43 <div className="relative">44 <div className="text-5xl font-bold text-rose-600">10%</div>45 <div className="text-lg font-semibold text-amber-900 mt-1">OFF YOUR FIRST ORDER</div>46 <div className="absolute top-1/2 left-1/2 transform -translate-x-1/2 -translate-y-1/2 text-8xl text-amber-200 opacity-20 font-bold -z-10">47 %48 </div>49 </div>50 </div>51 </div>52 </div>53 54 <Modal.Body>55 <div className="flex flex-col items-center gap-y-6 py-6 px-6 bg-white">56 <Text className="text-center text-gray-700">57 Sign up now to receive an exclusive 10% discount on your first purchase. Join our community of satisfied customers!58 </Text>59 60 <div className="flex flex-col gap-y-4 w-full">61 <LocalizedClientLink href="/account" className="w-full">62 <Button 63 variant="primary" 64 className="w-full h-12 font-semibold text-base shadow-md hover:shadow-lg transition-all"65 onClick={close}66 >67 Register & Save 10%68 </Button>69 </LocalizedClientLink>70 71 <Button 72 variant="secondary" 73 className="w-full h-10 font-medium"74 onClick={close}75 >76 Maybe Later77 </Button>78 </div>79 80 <div className="text-xs text-gray-400 text-center mt-2">81 *Discount applies to your first order only82 </div>83 </div>84 </Modal.Body>85 </Modal>86 )87}88 89export default DiscountPopup
This component uses the Modal component that is already available in the Next.js Starter Storefront. It displays a pop-up with a discount offer and two buttons: one to register and save the discount, and another to close the pop-up.
The pop-up will only be shown to first-time customers. Once the pop-up is shown, a discount_popup_shown key is stored in the local storage to prevent it from being shown again.
b. Add the Pop-Up to Layout#
To ensure that the pop-up is displayed when the customer visits the storefront, you need to add the DiscountPopup component to the main layout of the Next.js Starter Storefront.
In src/app/[countryCode]/(main)/layout.tsx, add the following import at the top of the file:
Then, in the return statement of the PageLayout component, add the DiscountPopup component before rendering props.children:
Notice that you only display the pop-up if the customer is not logged in. This way, the pop-up will only be shown to first-time customers.
c. Show Registration Form Before Login#
If you go to the /account page in the Next.js Starter Storefront as a guest customer, you'll see the login form. However, in this case, you want to show the registration form first instead.
To change this behavior, in src/modules/account/templates/login-template.tsx, change the default value of currentView to "register":
This way, when a guest customer visits the /account page, they will see the registration form instead of the login form.
Test it Out#
To test the pop-up, start the Medusa application and the Next.js Starter Storefront as you did in the previous steps.
Then, open the storefront in your browser. If you're a first-time customer, you'll see the discount pop-up encouraging you to sign up and receive the first-purchase discount.

Next Steps#
You've now implemented the first-purchase discount feature in Medusa. You can add more features to build customer loyalty, such as a loyalty points system or product reviews.
If you're new to Medusa, check out the main documentation, where you'll get a more in-depth understanding of all the concepts you've used in this guide and more.
To learn more about the commerce features that Medusa provides, check out Medusa's Commerce Modules.
Troubleshooting#
If you encounter issues during your development, check out the troubleshooting guides.
Getting Help#
If you encounter issues not covered in the troubleshooting guides:
- Visit the Medusa GitHub repository to report issues or ask questions.
- Join the Medusa Discord community for real-time support from community members.