Implement Loyalty Points System in Medusa
In this tutorial, you'll learn how to implement a loyalty points system in Medusa.
When you install a Medusa application, you get a fully-fledged commerce platform with a Framework for customization. The Medusa application's commerce features are built around Commerce Modules, which are available out-of-the-box. These features include management capabilities related to carts, orders, promotions, and more.
A loyalty point system allows customers to earn points for purchases, which can be redeemed for discounts or rewards. In this tutorial, you'll learn how to customize the Medusa application to implement a loyalty points system.
You can follow this tutorial whether you're new to Medusa or an advanced Medusa developer.
Summary#
By following this tutorial, you will learn how to:
- Install and set up Medusa.
- Define models to store loyalty points and the logic to manage them.
- Build flows that allow customers to earn and redeem points during checkout.
- Points are redeemed through dynamic promotions specific to the customer.
- Customize the cart completion flow to validate applied loyalty points.

Step 1: Install a Medusa Application#
Start by installing the Medusa application on your machine with the following command:
You'll first be asked for the project's name. Then, when asked whether you want to install the Next.js Starter Storefront, choose Yes.
Afterward, the installation process will start, which will install the Medusa application as a monorepository in a directory with your project's name. The backend is installed in the apps/backend directory, and the Next.js Starter Storefront is installed in the apps/storefront directory.
Once the installation finishes successfully, the Medusa Admin dashboard will open with a form to create a new user. Enter the user's credentials and submit the form. Afterward, you can log in with the new user and explore the dashboard.
apps/backend directory of your Medusa project.Step 2: Create Loyalty Module#
In Medusa, you can build custom features in a module. A module is a reusable package with functionalities related to a single feature or domain. Medusa integrates the module into your application without implications or side effects on your setup.
In the module, you define the data models necessary for a feature and the logic to manage these data models. Later, you can build commerce flows around your module.
In this step, you'll build a Loyalty Module that defines the necessary data models to store and manage loyalty points for customers.
Create Module Directory#
Modules are created under the src/modules directory of your Medusa application. So, create the directory src/modules/loyalty.
Create Data Models#
A data model represents a table in the database. You create data models using Medusa's Data Model Language (DML). It simplifies defining a table's columns, relations, and indexes with straightforward methods and configurations.
For the Loyalty Module, you need to define a LoyaltyPoint data model that represents a customer's loyalty points. So, create the file src/modules/loyalty/models/loyalty-point.ts with the following content:
1import { model } from "@medusajs/framework/utils"2 3const LoyaltyPoint = model.define("loyalty_point", {4 id: model.id().primaryKey(),5 points: model.number().default(0),6 customer_id: model.text().unique("IDX_LOYALTY_CUSTOMER_ID"), 7})8 9export default LoyaltyPoint
You define the LoyaltyPoint data model using the model.define method of the DML. It accepts the data model's table name as a first parameter, and the model's schema object as a second parameter.
The LoyaltyPoint data model has the following properties:
id: A unique ID for the loyalty points.points: The number of loyalty points a customer has.customer_id: The ID of the customer who owns the loyalty points. This property has a unique index to ensure that each customer has only one record in theloyalty_pointtable.
Create Module's Service#
You now have the necessary data model in the Loyalty Module, but you'll need to manage its records. You do this by creating a service in the module.
A service is a TypeScript or JavaScript class that the module exports. In the service's methods, you can connect to the database, allowing you to manage your data models, or connect to a third-party service, which is useful if you're integrating with external services.
To create the Loyalty Module's service, create the file src/modules/loyalty/service.ts with the following content:
1import { MedusaError, MedusaService } from "@medusajs/framework/utils"2import LoyaltyPoint from "./models/loyalty-point"3import { InferTypeOf } from "@medusajs/framework/types"4 5type LoyaltyPoint = InferTypeOf<typeof LoyaltyPoint>6 7class LoyaltyModuleService extends MedusaService({8 LoyaltyPoint,9}) {10 // TODO add methods11}12 13export default LoyaltyModuleService
The LoyaltyModuleService extends MedusaService from the Modules SDK which generates a class with data-management methods for your module's data models. This saves you time on implementing Create, Read, Update, and Delete (CRUD) methods.
So, the LoyaltyModuleService class now has methods like createLoyaltyPoints and retrieveLoyaltyPoint.
Add Methods to the Service
Aside from the basic CRUD methods, you need to add methods that handle custom functionalities related to loyalty points.
First, you need a method that adds loyalty points for a customer. Add the following method to the LoyaltyModuleService:
1class LoyaltyModuleService extends MedusaService({2 LoyaltyPoint,3}) {4 async addPoints(customerId: string, points: number): Promise<LoyaltyPoint> {5 const existingPoints = await this.listLoyaltyPoints({6 customer_id: customerId,7 })8 9 if (existingPoints.length > 0) {10 return await this.updateLoyaltyPoints({11 id: existingPoints[0].id,12 points: existingPoints[0].points + points,13 })14 }15 16 return await this.createLoyaltyPoints({17 customer_id: customerId,18 points,19 })20 }21}
You add an addPoints method that accepts two parameters: the ID of the customer and the points to add.
In the method, you retrieve the customer's existing loyalty points using the listLoyaltyPoints method, which is automatically generated by the MedusaService. If the customer has existing points, you update them with the new points using the updateLoyaltyPoints method.
Otherwise, if the customer doesn't have existing loyalty points, you create a new record with the createLoyaltyPoints method.
The next method you'll add deducts points from the customer's loyalty points, which is useful when the customer redeems points. Add the following method to the LoyaltyModuleService:
1class LoyaltyModuleService extends MedusaService({2 LoyaltyPoint,3}) {4 // ...5 async deductPoints(customerId: string, points: number): Promise<LoyaltyPoint> {6 const existingPoints = await this.listLoyaltyPoints({7 customer_id: customerId,8 })9 10 if (existingPoints.length === 0 || existingPoints[0].points < points) {11 throw new MedusaError(12 MedusaError.Types.NOT_ALLOWED,13 "Insufficient loyalty points"14 )15 }16 17 return await this.updateLoyaltyPoints({18 id: existingPoints[0].id,19 points: existingPoints[0].points - points,20 })21 }22}
The deductPoints method accepts the customer ID and the points to deduct.
In the method, you retrieve the customer's existing loyalty points using the listLoyaltyPoints method. If the customer doesn't have existing points or if the points to deduct are greater than the existing points, you throw an error.
Otherwise, you update the customer's loyalty points with the new value using the updateLoyaltyPoints method, which is automatically generated by MedusaService.
Next, you'll add the method that retrieves the points of a customer. Add the following method to the LoyaltyModuleService:
The getPoints method accepts the customer ID and retrieves the customer's loyalty points using the listLoyaltyPoints method. If the customer has no points, it returns 0.
Add Method to Map Points to Discount
Finally, you'll add a method that implements the logic of mapping loyalty points to a discount amount. This is useful when the customer wants to redeem their points during checkout.
The mapping logic may differ for each use case. For example, you may need to use a third-party service to map the loyalty points discount amount, or use some custom calculation.
To simplify the logic in this tutorial, you'll use a simple calculation that maps 1 point to 1 currency unit. For example, 100 points = $100 discount.
Add the following method to the LoyaltyModuleService:
1class LoyaltyModuleService extends MedusaService({2 LoyaltyPoint,3}) {4 // ...5 async calculatePointsFromAmount(amount: number): Promise<number> {6 // Convert amount to points using a standard conversion rate7 // For example, $1 = 1 point8 // Round down to nearest whole point9 const points = Math.floor(amount)10 11 if (points < 0) {12 throw new MedusaError(13 MedusaError.Types.INVALID_DATA,14 "Amount cannot be negative"15 )16 }17 18 return points19 }20}
The calculatePointsFromAmount method accepts the amount and converts it to the nearest whole number of points. If the amount is negative, it throws an error.
You'll use this method later to calculate the amount discounted when a customer redeems their loyalty points.
Export Module Definition#
The final piece to a module is its definition, which you export in an index.ts file at its root directory. This definition tells Medusa the name of the module and its service.
So, create the file src/modules/loyalty/index.ts with the following content:
You use the Module function from the Modules SDK to create the module's definition. It accepts two parameters:
- The module's name, which is
loyalty. - An object with a required property
serviceindicating the module's service.
You also export the module's name as LOYALTY_MODULE so you can reference it later.
Add Module to Medusa's Configurations#
Once you finish building the module, add it to Medusa's configurations to start using it.
In medusa-config.ts, add a modules property and pass an array with your custom module:
Each object in the modules array has a resolve property, whose value is either a path to the module's directory, or an npm package’s name.
Generate Migrations#
Since data models represent tables in the database, you define how they're created in the database with migrations. A migration is a TypeScript or JavaScript file that defines database changes made by a module.
Medusa's CLI tool can generate the migrations for you. To generate a migration for the Loyalty Module, run the following command in the apps/backend directory:
The db:generate command of the Medusa CLI accepts the name of the module to generate the migration for. You'll now have a migrations directory under src/modules/loyalty that holds the generated migration.
Then, to reflect these migrations on the database, run the following command:
The table for the LoyaltyPoint data model is now created in the database.
Step 3: Change Loyalty Points Flow#
Now that you have a module that stores and manages loyalty points in the database, you'll start building flows around it that allow customers to earn and redeem points.
The first flow you'll build will either add points to a customer's loyalty points or deduct them based on a purchased order. If the customer hasn't redeemed points, the points are added to their loyalty points. Otherwise, the points are deducted from their loyalty points.
To build custom commerce features in Medusa, you create a workflow. A workflow is a series of queries and actions, called steps, that complete a task. You construct a workflow like you construct a function, but it's a special function that allows you to track its executions' progress, define roll-back logic, and configure other advanced features. Then, you execute the workflow from other customizations, such as in an endpoint.
In this section, you'll build the workflow that adds or deducts loyalty points for an order's customer. Later, you'll execute this workflow when an order is placed.
The workflow will have the following steps:
Workflow hook
Step conditioned by when
View step details
Medusa provides the useQueryGraphStep and updatePromotionsStep in its @medusajs/medusa/core-flows package. So, you'll only implement the other steps.
validateCustomerExistsStep#
In the workflow, you first need to validate that the customer is registered. Only registered customers can earn and redeem loyalty points.
To do this, create the file src/workflows/steps/validate-customer-exists.ts with the following content:
1import { CustomerDTO } from "@medusajs/framework/types"2import { createStep } from "@medusajs/framework/workflows-sdk"3import { MedusaError } from "@medusajs/framework/utils"4 5export type ValidateCustomerExistsStepInput = {6 customer: CustomerDTO | null | undefined7}8 9export const validateCustomerExistsStep = createStep(10 "validate-customer-exists",11 async ({ customer }: ValidateCustomerExistsStepInput) => {12 if (!customer) {13 throw new MedusaError(14 MedusaError.Types.INVALID_DATA, 15 "Customer not found"16 )17 }18 19 if (!customer.has_account) {20 throw new MedusaError(21 MedusaError.Types.INVALID_DATA, 22 "Customer must have an account to earn or manage points"23 )24 }25 }26)
You create a step with createStep from the Workflows SDK. It accepts two parameters:
- The step's unique name, which is
validate-customer-exists. - An async function that receives two parameters:
- The step's input, which is in this case an object with the customer's details.
- An object that has properties including the Medusa container, which is a registry of Framework and commerce tools that you can access in the step.
In the step function, you validate that the customer is defined and that it's registered based on its has_account property. Otherwise, you throw an error.
getCartLoyaltyPromoStep#
Next, you'll need to retrieve the loyalty promotion applied on the cart, if there's any. This is useful to determine whether the customer has redeemed points.
Before you create a step, you'll create a utility function that the step uses to retrieve the loyalty promotion of a cart. You'll create it as a separate utility function to use it later in other customizations.
Create the file src/utils/promo.ts with the following content:
1import { PromotionDTO, CustomerDTO, CartDTO } from "@medusajs/framework/types"2 3export type CartData = CartDTO & {4 promotions?: PromotionDTO[]5 customer?: CustomerDTO6 metadata: {7 loyalty_promo_id?: string8 }9}10 11export function getCartLoyaltyPromotion(12 cart: CartData13): PromotionDTO | undefined {14 if (!cart?.metadata?.loyalty_promo_id) {15 return16 }17 18 return cart.promotions?.find(19 (promotion) => promotion.id === cart.metadata.loyalty_promo_id20 )21}
You create a getCartLoyaltyPromotion function that accepts the cart's details as an input and returns the loyalty promotion if it exists. You retrieve the loyalty promotion if its ID is stored in the cart's metadata.loyalty_promo_id property.
You can now create the step that uses this utility to retrieve a carts loyalty points promotion. To create the step, create the file src/workflows/steps/get-cart-loyalty-promo.ts with the following content:
1import { createStep, StepResponse } from "@medusajs/framework/workflows-sdk"2import { CartData, getCartLoyaltyPromotion } from "../../utils/promo"3import { MedusaError } from "@medusajs/framework/utils"4 5type GetCartLoyaltyPromoStepInput = {6 cart: CartData,7 throwErrorOn?: "found" | "not-found"8}9 10export const getCartLoyaltyPromoStep = createStep(11 "get-cart-loyalty-promo",12 async ({ cart, throwErrorOn }: GetCartLoyaltyPromoStepInput) => {13 const loyaltyPromo = getCartLoyaltyPromotion(cart)14 15 if (throwErrorOn === "found" && loyaltyPromo) {16 throw new MedusaError(17 MedusaError.Types.INVALID_DATA,18 "Loyalty promotion already applied to cart"19 )20 } else if (throwErrorOn === "not-found" && !loyaltyPromo) {21 throw new MedusaError(22 MedusaError.Types.INVALID_DATA,23 "No loyalty promotion found on cart"24 )25 }26 27 return new StepResponse(loyaltyPromo)28 }29)
You create a step that accepts an object having the following properties:
cart: The cart's details.throwErrorOn: An optional property that indicates whether to throw an error if the loyalty promotion is found or not found.
The throwErrorOn property is useful to make the step reusable in different scenarios, allowing you to use it in later workflows.
In the step, you call the getCartLoyaltyPromotion utility to retrieve the loyalty promotion. If the throwErrorOn property is set to found and the loyalty promotion is found, you throw an error.
Otherwise, if the throwErrorOn property is set to not-found and the loyalty promotion is not found, you throw an error.
To return data from a step, you return an instance of StepResponse from the Workflows SDK. It accepts as a parameter the data to return, which is the loyalty promotion in this case.
deductPurchasePointsStep#
If the order's cart has a loyalty promotion, you need to deduct points from the customer's loyalty points. To do this, create the file src/workflows/steps/deduct-purchase-points.ts with the following content:
npm run dev or yarn dev command to generate the necessary type definitions, as explained in the Automatically Generated Types guide.6import LoyaltyModuleService from "../../modules/loyalty/service"7 8type DeductPurchasePointsInput = {9 customer_id: string10 amount: number11}12 13export const deductPurchasePointsStep = createStep(14 "deduct-purchase-points",15 async ({ 16 customer_id, amount,17 }: DeductPurchasePointsInput, { container }) => {18 const loyaltyModuleService: LoyaltyModuleService = container.resolve(19 LOYALTY_MODULE20 )21 22 const pointsToDeduct = await loyaltyModuleService.calculatePointsFromAmount(23 amount24 )25 26 const result = await loyaltyModuleService.deductPoints(27 customer_id,28 pointsToDeduct29 )30 31 return new StepResponse(result, {32 customer_id,33 points: pointsToDeduct,34 })35 },36 async (data, { container }) => {37 if (!data) {38 return39 }40 41 const loyaltyModuleService: LoyaltyModuleService = container.resolve(42 LOYALTY_MODULE43 )44 45 // Restore points in case of failure46 await loyaltyModuleService.addPoints(47 data.customer_id,48 data.points49 )50 }51)
You create a step that accepts an object having the following properties:
customer_id: The ID of the customer to deduct points from.amount: The promotion's amount, which will be used to calculate the points to deduct.
In the step, you resolve the Loyalty Module's service from the Medusa container. Then, you use the calculatePointsFromAmount method to calculate the points to deduct from the promotion's amount.
After that, you call the deductPoints method to deduct the points from the customer's loyalty points.
Finally, you return a StepResponse with the result of the deductPoints.
Compensation Function
This step has a compensation function, which is passed as a third parameter to the createStep function.
The compensation function undoes the actions performed in a step. Then, if an error occurs during the workflow's execution, the compensation functions of executed steps are called to roll back the changes. This mechanism ensures data consistency in your application, especially as you integrate external systems.
The compensation function accepts two parameters:
- Data passed from the step function to the compensation function. The data is passed as a second parameter of the returned
StepResponseinstance. - An object that has properties including the Medusa container.
In the compensation function, you resolve the Loyalty Module's service from the Medusa container. Then, you call the addPoints method to restore the points deducted from the customer's loyalty points if an error occurs.
addPurchaseAsPointsStep#
The last step you'll create adds points to the customer's loyalty points. You'll use this step if the customer didn't redeem points during checkout.
To create the step, create the file src/workflows/steps/add-purchase-as-points.ts with the following content:
6import LoyaltyModuleService from "../../modules/loyalty/service"7 8type StepInput = {9 customer_id: string10 amount: number11}12 13export const addPurchaseAsPointsStep = createStep(14 "add-purchase-as-points",15 async (input: StepInput, { container }) => {16 const loyaltyModuleService: LoyaltyModuleService = container.resolve(17 LOYALTY_MODULE18 )19 20 const pointsToAdd = await loyaltyModuleService.calculatePointsFromAmount(21 input.amount22 )23 24 const result = await loyaltyModuleService.addPoints(25 input.customer_id,26 pointsToAdd27 )28 29 return new StepResponse(result, {30 customer_id: input.customer_id,31 points: pointsToAdd,32 })33 },34 async (data, { container }) => {35 if (!data) {36 return37 }38 39 const loyaltyModuleService: LoyaltyModuleService = container.resolve(40 LOYALTY_MODULE41 )42 43 await loyaltyModuleService.deductPoints(44 data.customer_id,45 data.points46 )47 }48)
You create a step that accepts an object having the following properties:
customer_id: The ID of the customer to add points to.amount: The order's amount, which will be used to calculate the points to add.
In the step, you resolve the Loyalty Module's service from the Medusa container. Then, you use the calculatePointsFromAmount method to calculate the points to add from the order's amount.
After that, you call the addPoints method to add the points to the customer's loyalty points.
Finally, you return a StepResponse with the result of the addPoints.
You also pass to the compensation function the customer's ID and the points added. In the compensation function, you deduct the points if an error occurs.
Add Utility Functions#
Before you create the workflow, you need a utility function that checks whether an order's cart has a loyalty promotion. This is useful to determine whether the customer redeemed points during checkout, allowing you to decide which steps to execute.
To add the utility function, add the following to src/utils/promo.ts:
1import { OrderDTO } from "@medusajs/framework/types"2 3export type OrderData = OrderDTO & {4 promotion?: PromotionDTO[]5 customer?: CustomerDTO6 cart?: CartData7}8 9export const CUSTOMER_ID_PROMOTION_RULE_ATTRIBUTE = "customer_id"10 11export function orderHasLoyaltyPromotion(order: OrderData): boolean {12 const loyaltyPromotion = getCartLoyaltyPromotion(13 order.cart as unknown as CartData14 )15 16 return loyaltyPromotion?.rules?.some((rule) => {17 return rule?.attribute === CUSTOMER_ID_PROMOTION_RULE_ATTRIBUTE && (18 rule?.values?.some((value) => value.value === order.customer?.id) || false19 )20 }) || false21}
You first define an OrderData type that extends the OrderDTO type. This type has the order's details, including the cart, customer, and promotions details.
Then, you define a constant CUSTOMER_ID_PROMOTION_RULE_ATTRIBUTE that represents the attribute used in the promotion rule to check whether the customer ID is valid.
Finally, you create the orderHasLoyaltyPromotion function that accepts an order's details and checks whether it has a loyalty promotion. It returns true if:
- The order's cart has a loyalty promotion. You use the
getCartLoyaltyPromotionutility to try to retrieve the loyalty promotion. - The promotion's rules include the
customer_idattribute and its value matches the order's customer ID.- When you create the promotion for the cart later, you'll see how to set this rule.
You'll use this utility in the workflow next.
Create the Workflow#
Now that you have all the steps, you can create the workflow that uses them.
To create the workflow, create the file src/workflows/handle-order-points.ts with the following content:
8import { getCartLoyaltyPromoStep } from "./steps/get-cart-loyalty-promo"9 10type WorkflowInput = {11 order_id: string12}13 14export const handleOrderPointsWorkflow = createWorkflow(15 "handle-order-points",16 ({ order_id }: WorkflowInput) => {17 const { data: orders } = useQueryGraphStep({18 entity: "order",19 fields: [20 "id", 21 "customer.*", 22 "total", 23 "cart.*",24 "cart.promotions.*",25 "cart.promotions.rules.*",26 "cart.promotions.rules.values.*",27 "cart.promotions.application_method.*",28 ],29 filters: {30 id: order_id,31 },32 options: {33 throwIfKeyNotFound: true,34 },35 })36 37 validateCustomerExistsStep({38 customer: orders[0].customer,39 } as ValidateCustomerExistsStepInput)40 41 const loyaltyPointsPromotion = getCartLoyaltyPromoStep({42 cart: orders[0].cart as unknown as CartData,43 })44 45 when(orders, (orders) => 46 orderHasLoyaltyPromotion(orders[0] as unknown as OrderData) && 47 loyaltyPointsPromotion !== undefined48 )49 .then(() => {50 deductPurchasePointsStep({51 customer_id: orders[0].customer!.id,52 amount: loyaltyPointsPromotion.application_method!.value as number,53 })54 55 updatePromotionsStep([56 {57 id: loyaltyPointsPromotion.id,58 status: "inactive",59 },60 ])61 })62 63 64 when(65 orders, 66 (order) => !orderHasLoyaltyPromotion(order[0] as unknown as OrderData)67 )68 .then(() => {69 addPurchaseAsPointsStep({70 customer_id: orders[0].customer!.id,71 amount: orders[0].total,72 })73 })74 }75)
You create a workflow using createWorkflow from the Workflows SDK. It accepts the workflow's unique name as a first parameter.
It accepts as a second parameter a constructor function, which is the workflow's implementation. The function can accept input, which in this case is an object with the order's ID.
In the workflow's constructor function, you:
- Use
useQueryGraphStepto retrieve the order's details. You pass the order's ID as a filter to retrieve the order.- This step uses Query, which is a tool that retrieves data across modules.
- Validate that the customer is registered using the
validateCustomerExistsStep. - Retrieve the cart's loyalty promotion using the
getCartLoyaltyPromoStep. - Use
whento check whether the order's cart has a loyalty promotion.- Since you can't perform data manipulation in a workflow's constructor function,
whenallows you to perform steps if a condition is satisfied. - You pass as a first parameter the object to perform the condition on, which is the order in this case. In the second parameter, you pass a function that returns a boolean value, indicating whether the condition is satisfied.
- To specify the steps to perform if a condition is satisfied, you chain a
thenmethod to thewhenmethod. You can perform any step within thethenmethod. - In this case, if the order's cart has a loyalty promotion, you call the
deductPurchasePointsStepto deduct points from the customer's loyalty points. You also call theupdatePromotionsStepto deactivate the cart's loyalty promotion.
- Since you can't perform data manipulation in a workflow's constructor function,
- You use another
whento check whether the order's cart doesn't have a loyalty promotion.- If the condition is satisfied, you call the
addPurchaseAsPointsStepto add points to the customer's loyalty points.
- If the condition is satisfied, you call the
You'll use this workflow next when an order is placed.
when method and how to use it in a workflow.Step 4: Handle Order Placed Event#
Now that you have the workflow that handles adding or deducting loyalty points for an order, you need to execute it when an order is placed.
Medusa has an event system that allows you to listen to events emitted by the Medusa server using a subscriber. A subscriber is an asynchronous function that's executed when its associated event is emitted. In a subscriber, you can execute a workflow that performs actions in result of the event.
In this step, you'll create a subscriber that listens to the order.placed event and executes the handleOrderPointsWorkflow workflow.
Subscribers are created in a TypeScript or JavaScript file under the src/subscribers directory. So, to create a subscriber, create the file src/subscribers/order-placed.ts with the following content:
1import type {2 SubscriberArgs,3 SubscriberConfig,4} from "@medusajs/framework"5import { handleOrderPointsWorkflow } from "../workflows/handle-order-points"6 7export default async function orderPlacedHandler({8 event: { data },9 container,10}: SubscriberArgs<{ id: string }>) {11 await handleOrderPointsWorkflow(container).run({12 input: {13 order_id: data.id,14 },15 })16}17 18export const config: SubscriberConfig = {19 event: "order.placed",20}
The subscriber file must export:
- An asynchronous subscriber function that's executed whenever the associated event, which is
order.placedis triggered. - A configuration object with an event property whose value is the event the subscriber is listening to. You can also pass an array of event names to listen to multiple events in the same subscriber.
The subscriber function accepts an object with the following properties:
event: An object with the event's data payload. For example, theorder.placedevent has the order's ID in its data payload.container: The Medusa container, which you can use to resolve services and tools.
In the subscriber function, you execute the handleOrderPointsWorkflow by invoking it, passing it the Medusa container, then using its run method, passing it the workflow's input.
Whenever an order is placed now, the subscriber will be executed, which in turn will execute the workflow that handles the loyalty points flow.
Test it Out#
To test out the loyalty points flow, you'll use the Next.js Starter Storefront that you installed in the first step. The storefront is available in the apps/storefront directory of your project.
So, run the following command in the apps/backend directory to start the Medusa server:
Then, run the following command in the Next.js Starter Storefront's directory to start the Next.js server:
The Next.js Starter Storefront will be running on http://localhost:8000, and the Medusa server will be running on http://localhost:9000.
Open the Next.js Starter Storefront in your browser and create a new account by going to Account at the top right.
Once you're logged in, add an item to the cart and go through the checkout flow.
After you place the order, you'll see the following message in your Medusa application's terminal:
This message indicates that the order.placed event was emitted, and that your subscriber was executed.
Since you didn't redeem any points during checkout, loyalty points will be added to your account. You'll implement an API route that allows you to retrieve the loyalty points in the next step.
Step 5: Retrieve Loyalty Points API Route#
Next, you want to allow customers to view their loyalty points. You can show them on their profile page, or during checkout.
To expose a feature to clients, you create an API route. An API Route is an endpoint that exposes commerce features to external applications and clients, such as storefronts.
You'll create an API route at the path /store/customers/me/loyalty-points that returns the loyalty points of the authenticated customer.
An API route is created in a route.ts file under a sub-directory of the src/api directory. The path of the API route is the file's path relative to src/api.
So, to create an API route at the path /store/customers/me/loyalty-points, create the file src/api/store/customers/me/loyalty-points/route.ts with the following content:
1import { 2 AuthenticatedMedusaRequest, 3 MedusaResponse,4} from "@medusajs/framework/http"5import { LOYALTY_MODULE } from "../../../../../modules/loyalty"6import LoyaltyModuleService from "../../../../../modules/loyalty/service"7 8export async function GET(9 req: AuthenticatedMedusaRequest,10 res: MedusaResponse11) {12 const loyaltyModuleService: LoyaltyModuleService = req.scope.resolve(13 LOYALTY_MODULE14 )15 16 const points = await loyaltyModuleService.getPoints(17 req.auth_context.actor_id18 )19 20 res.json({21 points,22 })23}
Since you export a GET route handler function, you're exposing a GET endpoint at /store/customers/me/loyalty-points. The route handler function accepts two parameters:
- A request object with details and context on the request, such as body parameters or authenticated customer details.
- A response object to manipulate and send the response.
In the route handler, you resolve the Loyalty Module's service from the Medusa container (which is available at req.scope).
Then, you call the service's getPoints method to retrieve the authenticated customer's loyalty points. Note that routes starting with /store/customers/me are only accessible by authenticated customers. You can access the authenticated customer ID from the request's context, which is available at req.auth_context.actor_id.
Finally, you return the loyalty points in the response.
You'll test out this route as you customize the Next.js Starter Storefront next.
Step 6: Show Loyalty Points During Checkout#
Now that you have the API route to retrieve the loyalty points, you can show them during checkout.
In this step, you'll customize the Next.js Starter Storefront to show the loyalty points in the checkout page.
First, you'll add a server action function that retrieves the loyalty points from the route you created earlier. In src/lib/data/customer.ts, add the following function:
1export const getLoyaltyPoints = async () => {2 const headers = {3 ...(await getAuthHeaders()),4 }5 6 return sdk.client.fetch<{ points: number }>(7 `/store/customers/me/loyalty-points`,8 {9 method: "GET",10 headers,11 }12 )13 .then(({ points }) => points)14 .catch(() => null)15}
You add a getLoyaltyPoints function that retrieves the authenticated customer's loyalty points from the API route you created earlier. You pass the authentication headers using the getAuthHeaders function, which is a utility function defined in the Next.js Starter Storefront.
If the customer isn't authenticated, the request will fail. So, you catch the error and return null in that case.
Next, you'll create a component that shows the loyalty points in the checkout page. Create the file src/modules/checkout/components/loyalty-points/index.tsx with the following content:
1"use client"2 3import { HttpTypes } from "@medusajs/types"4import { useEffect, useMemo, useState } from "react"5import { getLoyaltyPoints } from "../../../../lib/data/customer"6import { Button, Heading } from "@medusajs/ui"7import Link from "next/link"8 9type LoyaltyPointsProps = {10 cart: HttpTypes.StoreCart & {11 promotions: HttpTypes.StorePromotion[]12 }13}14 15const LoyaltyPoints = ({ cart }: LoyaltyPointsProps) => {16 const isLoyaltyPointsPromoApplied = useMemo(() => {17 return cart.promotions.find(18 (promo) => promo.id === cart.metadata?.loyalty_promo_id19 ) !== undefined20 }, [cart])21 const [loyaltyPoints, setLoyaltyPoints] = useState<22 number | null23 >(null)24 25 useEffect(() => {26 getLoyaltyPoints()27 .then((points) => {28 console.log(points)29 setLoyaltyPoints(points)30 })31 }, [])32 33 const handleTogglePromotion = async (34 e: React.MouseEvent<HTMLButtonElement, MouseEvent>35 ) => {36 e.preventDefault()37 // TODO apply or remove loyalty promotion38 }39 40 return (41 <>42 <div className="h-px w-full border-b border-gray-200 my-4" />43 <div className="flex flex-col">44 <Heading className="txt-medium mb-2">45 Loyalty Points46 </Heading>47 {loyaltyPoints === null && (48 <Link href="/account" className="txt-medium text-ui-fg-interactive hover:text-ui-fg-interactive-hover">49 Sign up to get and use loyalty points50 </Link>51 )}52 {loyaltyPoints !== null && (53 <div className="flex items-center justify-between my-6 gap-1">54 <Button55 variant="secondary"56 className="w-1/2"57 onClick={handleTogglePromotion}58 >59 {isLoyaltyPointsPromoApplied ? "Remove" : "Apply"} Loyalty Points60 </Button>61 <span className="txt-medium text-ui-fg-subtle">62 You have {loyaltyPoints} loyalty points63 </span>64 </div>65 )}66 </div>67 </>68 )69}70 71export default LoyaltyPoints
You create a LoyaltyPoints component that accepts the cart's details as a prop. In the component, you:
- Create a
isLoyaltyPointsPromoAppliedmemoized value that checks whether the cart has a loyalty promotion applied. You use thecart.metadata.loyalty_promo_idproperty to check this. - Create a
loyaltyPointsstate to store the customer's loyalty points. - Call the
getLoyaltyPointsfunction in auseEffecthook to retrieve the loyalty points from the API route you created earlier. You set theloyaltyPointsstate with the retrieved points. - Define
handleTogglePromotionthat, when clicked, would either apply or remove the promotion. You'll implement these functionalities later. - Render the loyalty points in the component. If the customer isn't authenticated, you show a link to the account page to sign up. Otherwise, you show the loyalty points and a button to apply or remove the promotion.
Next, you'll show this component at the end of the checkout's summary component. So, import the component in src/modules/checkout/templates/checkout-summary/index.tsx:
Then, in the return statement of the CheckoutSummary component, add the following after the div wrapping the DiscountCode:
This will show the loyalty points component at the end of the checkout summary.
Test it Out#
To test out the customizations to the checkout flow, make sure both the Medusa application and Next.js Starter Storefront are running.
Then, as an authenticated customer, add an item to cart and proceed to checkout. You'll find a new "Loyalty Points" section at the end of the checkout summary.
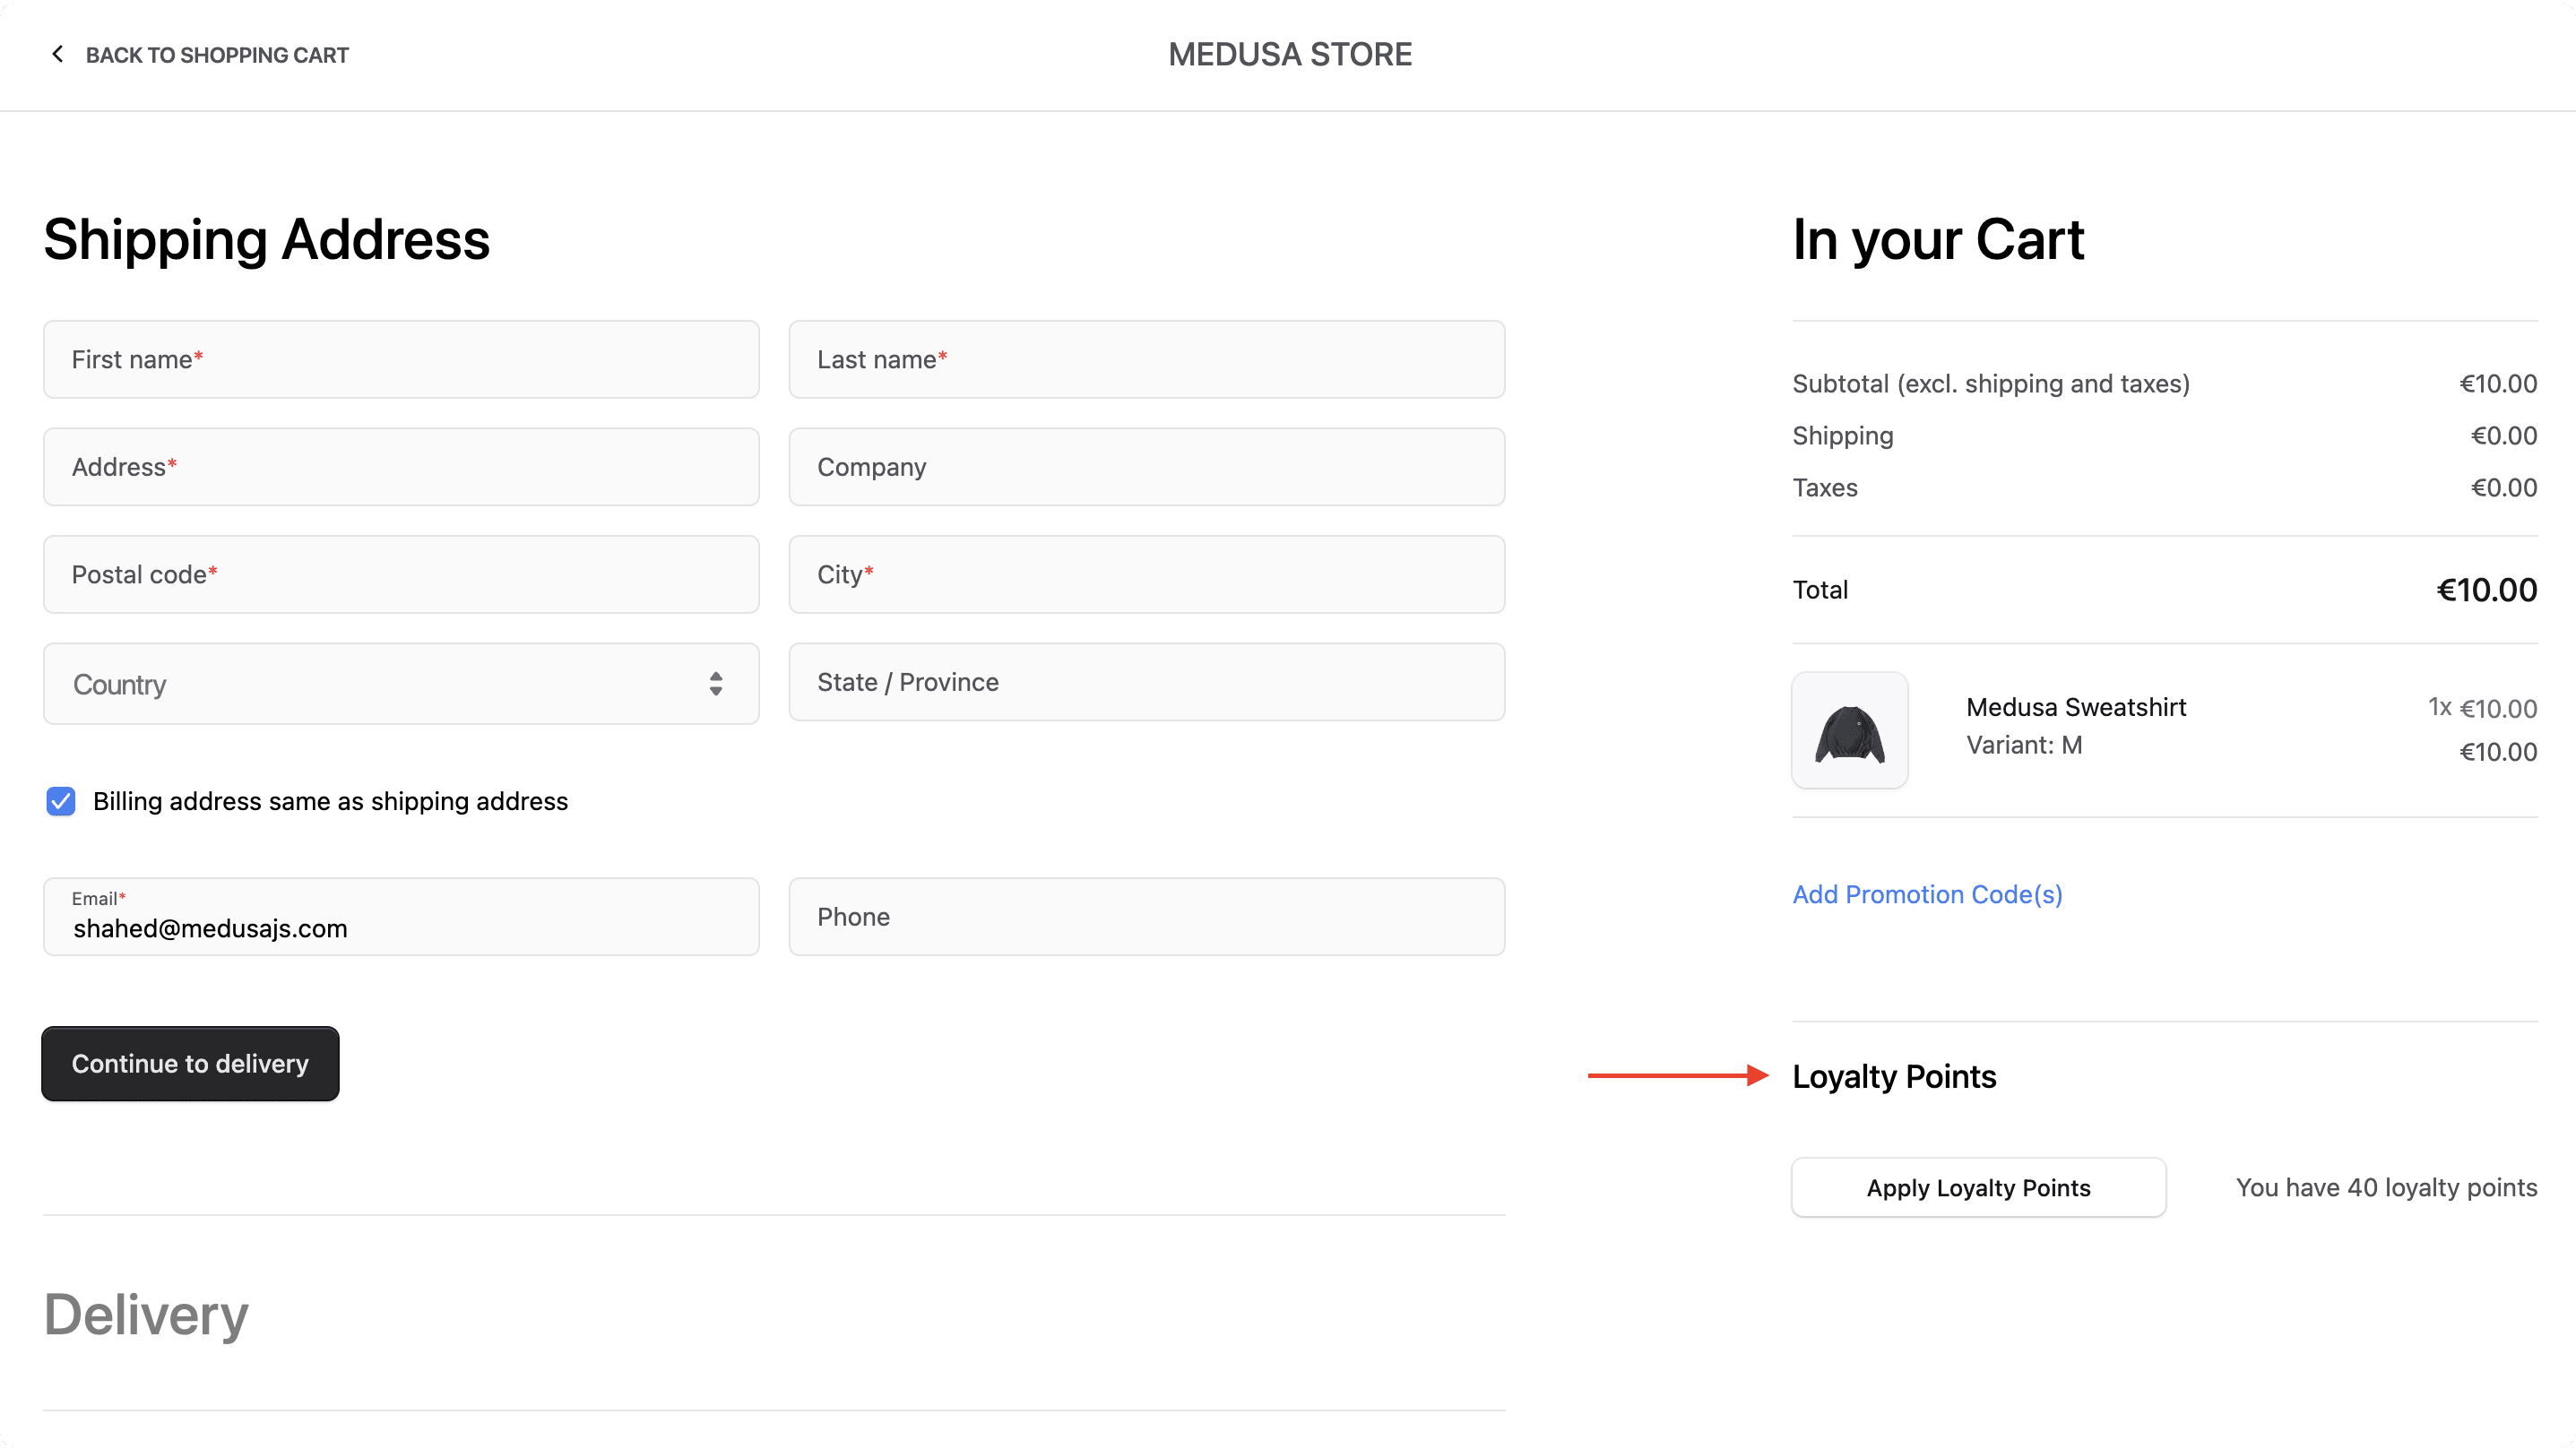
If you made a purchase before, you can see your loyalty points. You'll also see the "Apply Loyalty Points" button, which doesn't yet do anything. You'll add the functionality next.
Step 7: Apply Loyalty Points to Cart#
The next feature you'll implement allows the customer to apply their loyalty points during checkout. To implement the feature, you need:
- A workflow that implements the steps of the apply loyalty points flow.
- An API route that exposes the workflow's functionality to clients. You'll then send a request to this API route to apply the loyalty points on the customer's cart.
- A function in the Next.js Starter Storefront that sends the request to the API route you created earlier.
The workflow will have the following steps:
Workflow hook
Step conditioned by when
View step details
Most of the workflow's steps are either provided by Medusa in the @medusajs/medusa/core-flows package or steps you've already implemented. You only need to implement the getCartLoyaltyPromoAmountStep step.
getCartLoyaltyPromoAmountStep#
The fourth step in the workflow is the getCartLoyaltyPromoAmountStep, which retrieves the amount to be discounted based on the loyalty points. This step is useful to determine how much discount to apply to the cart.
To create the step, create the file src/workflows/steps/get-cart-loyalty-promo-amount.ts with the following content:
1import { PromotionDTO, CustomerDTO } from "@medusajs/framework/types"2import { MedusaError } from "@medusajs/framework/utils"3import { createStep, StepResponse } from "@medusajs/framework/workflows-sdk"4import LoyaltyModuleService from "../../modules/loyalty/service"5import { LOYALTY_MODULE } from "../../modules/loyalty"6 7export type GetCartLoyaltyPromoAmountStepInput = {8 cart: {9 id: string10 customer: CustomerDTO11 promotions?: PromotionDTO[]12 total: number13 }14}15 16export const getCartLoyaltyPromoAmountStep = createStep(17 "get-cart-loyalty-promo-amount",18 async ({ cart }: GetCartLoyaltyPromoAmountStepInput, { container }) => {19 // Check if customer has any loyalty points20 const loyaltyModuleService: LoyaltyModuleService = container.resolve(21 LOYALTY_MODULE22 )23 const loyaltyPoints = await loyaltyModuleService.getPoints(24 cart.customer.id25 )26 27 if (loyaltyPoints <= 0) {28 throw new MedusaError(29 MedusaError.Types.INVALID_DATA,30 "Customer has no loyalty points"31 )32 }33 34 const pointsAmount = await loyaltyModuleService.calculatePointsFromAmount(35 loyaltyPoints36 )37 38 const amount = Math.min(pointsAmount, cart.total)39 40 return new StepResponse(amount)41 }42)
You create a step that accepts an object having the cart's details.
In the step, you resolve the Loyalty Module's service from the Medusa container. Then, you call the getPoints method to retrieve the customer's loyalty points. If the customer has no loyalty points, you throw an error.
Next, you call the calculatePointsFromAmount method to calculate the amount to be discounted based on the loyalty points. You use the Math.min function to ensure that the amount doesn't exceed the cart's total.
Finally, you return a StepResponse with the amount to be discounted.
Create the Workflow#
You can now create the workflow that applies a loyalty promotion to the cart.
To create the workflow, create the file src/workflows/apply-loyalty-on-cart.ts with the following content:
25import { getCartLoyaltyPromoStep } from "./steps/get-cart-loyalty-promo"26 27type WorkflowInput = {28 cart_id: string29}30 31const fields = [32 "id",33 "customer.*",34 "promotions.*",35 "promotions.application_method.*",36 "promotions.rules.*",37 "promotions.rules.values.*",38 "currency_code",39 "total",40 "metadata",41]42 43export const applyLoyaltyOnCartWorkflow = createWorkflow(44 "apply-loyalty-on-cart",45 (input: WorkflowInput) => {46 const { data: carts } = useQueryGraphStep({47 entity: "cart",48 fields,49 filters: {50 id: input.cart_id,51 },52 options: {53 throwIfKeyNotFound: true,54 },55 })56 57 validateCustomerExistsStep({58 customer: carts[0].customer,59 } as ValidateCustomerExistsStepInput)60 61 getCartLoyaltyPromoStep({62 cart: carts[0] as unknown as CartData,63 throwErrorOn: "found",64 })65 66 acquireLockStep({67 key: input.cart_id,68 timeout: 2,69 ttl: 10,70 })71 72 const amount = getCartLoyaltyPromoAmountStep({73 cart: carts[0],74 } as unknown as GetCartLoyaltyPromoAmountStepInput)75 76 // TODO create and apply the promotion on the cart77 }78)
You create a workflow that accepts an object with the cart's ID as input.
So far, you:
- Use
useQueryGraphStepto retrieve the cart's details. You pass the cart's ID as a filter to retrieve the cart. - Validate that the customer is registered using the
validateCustomerExistsStep. - Check whether the cart has a loyalty promotion using the
getCartLoyaltyPromoStep. You pass thethrowErrorOnparameter with the valuefoundto throw an error if a loyalty promotion is found in the cart. - Acquire a lock on the cart using the
acquireLockStepto prevent concurrent modifications. - Retrieve the amount to be discounted based on the loyalty points using the
getCartLoyaltyPromoAmountStep.
Next, you need to create a new loyalty promotion for the cart. First, you'll prepare the data of the promotion to be created.
Replace the TODO with the following:
1const promoToCreate = transform({2 carts,3 amount,4}, (data) => {5 const randomStr = Math.random().toString(36).substring(2, 8)6 const uniqueId = (7 "LOYALTY-" + data.carts[0].customer?.first_name + "-" + randomStr8 ).toUpperCase()9 return {10 code: uniqueId,11 type: "standard",12 status: "active",13 application_method: {14 type: "fixed",15 value: data.amount,16 target_type: "order",17 currency_code: data.carts[0].currency_code,18 allocation: "across",19 },20 rules: [21 {22 attribute: CUSTOMER_ID_PROMOTION_RULE_ATTRIBUTE,23 operator: "eq",24 values: [data.carts[0].customer!.id],25 },26 ],27 campaign: {28 name: uniqueId,29 description: "Loyalty points promotion for " + data.carts[0].customer!.email,30 campaign_identifier: uniqueId,31 budget: {32 type: "usage",33 limit: 1,34 },35 },36 }37})38 39// TODO create promotion and apply it on cart
Since data manipulation isn't allowed in a workflow constructor, you use the transform function from the Workflows SDK. It accepts two parameters:
- The data to perform manipulation on. In this case, you pass the cart's details and the amount to be discounted.
- A function that receives the data from the first parameter, and returns the transformed data.
In the transformation function, you prepare th data of the loyalty promotion to be created. Some key details include:
- You set the discount amount in the application method of the promotion.
- You add a rule to the promotion that ensures it can be used only in carts having their
customer_idequal to this customer's ID. This prevents other customers from using this promotion. - You create a campaign for the promotion, and you set the campaign budget to a single usage. This prevents the customer from using the promotion again.
You can now use the returned data to create a promotion and apply it to the cart. Replace the new TODO with the following:
1const loyaltyPromo = createPromotionsStep([2 promoToCreate,3] as CreatePromotionDTO[])4 5const { metadata, ...updatePromoData } = transform({6 carts,7 promoToCreate,8 loyaltyPromo,9}, (data) => {10 const promos = [11 ...(data.carts[0].promotions?.map((promo) => promo?.code).filter(Boolean) || []) as string[],12 data.promoToCreate.code,13 ]14 15 return {16 cart_id: data.carts[0].id,17 promo_codes: promos,18 action: PromotionActions.ADD,19 metadata: {20 loyalty_promo_id: data.loyaltyPromo[0].id,21 },22 }23})24 25updateCartPromotionsWorkflow.runAsStep({26 input: updatePromoData,27})28 29updateCartsStep([30 {31 id: input.cart_id,32 metadata,33 },34])35 36// retrieve cart with updated promotions37const { data: updatedCarts } = useQueryGraphStep({38 entity: "cart",39 fields,40 filters: { id: input.cart_id },41}).config({ name: "retrieve-cart" })42 43releaseLockStep({44 key: input.cart_id,45})46 47return new WorkflowResponse(updatedCarts[0])
In the rest of the workflow, you:
- Create the loyalty promotion using the data you prepared earlier using the
createPromotionsStep. - Use the
transformfunction to prepare the data to update the cart's promotions. You add the new loyalty promotion code to the cart's promotions codes, and set theloyalty_promo_idin the cart's metadata. - Update the cart's promotions with the new loyalty promotion using the
updateCartPromotionsWorkflowworkflow. - Update the cart's metadata with the loyalty promotion ID using the
updateCartsStep. - Retrieve the cart's details again using
useQueryGraphStepto get the updated cart with the new loyalty promotion. - Release the lock on the cart using the
releaseLockStep.
To return data from the workflow, you must return an instance of WorkflowResponse. You pass it the data to be returned, which is in this case the cart's details.
Create the API Route#
Next, you'll create the API route that executes this workflow.
To create the API route, create the file src/api/store/carts/[id]/loyalty-points/route.ts with the following content:
1import { MedusaRequest, MedusaResponse } from "@medusajs/framework/http"2import { applyLoyaltyOnCartWorkflow } from "../../../../../workflows/apply-loyalty-on-cart"3 4export async function POST(5 req: MedusaRequest,6 res: MedusaResponse7) {8 const { id: cart_id } = req.params9 10 const { result: cart } = await applyLoyaltyOnCartWorkflow(req.scope)11 .run({12 input: {13 cart_id,14 },15 })16 17 res.json({ cart })18}
Since you export a POST route handler, you expose a POST API route at /store/carts/[id]/loyalty-points.
In the route handler, you execute the applyLoyaltyOnCartWorkflow workflow, passing it the cart ID as an input. You return the cart's details in the response.
You can now use this API route in the Next.js Starter Storefront.
Apply Loyalty Points in the Storefront#
In the Next.js Starter Storefront, you need to add a server action function that sends a request to the API route you created earlier. Then, you'll use that function when the customer clicks the "Apply Loyalty Points" button.
To add the function, add the following to src/lib/data/cart.ts in the Next.js Starter Storefront:
1export async function applyLoyaltyPointsOnCart() {2 const cartId = await getCartId()3 const headers = {4 ...(await getAuthHeaders()),5 }6 7 return await sdk.client.fetch<{8 cart: HttpTypes.StoreCart & {9 promotions: HttpTypes.StorePromotion[]10 }11 }>(`/store/carts/${cartId}/loyalty-points`, {12 method: "POST",13 headers,14 })15 .then(async (result) => {16 const cartCacheTag = await getCacheTag("carts")17 revalidateTag(cartCacheTag)18 19 return result20 })21}
You create an applyLoyaltyPointsOnCart function that sends a request to the API route you created earlier.
In the function, you retrieve the cart ID stored in the cookie using the getCartId function, which is available in the Next.js Starter Storefront.
Then, you send the request. Once the request is resolved successfully, you revalidate the cart cache tag to ensure that the cart's details are updated and refetched by other components. This ensures that the applied promotion is shown in the checkout summary without needing to refresh the page.
Finally, you'll use this function in the handleTogglePromotion function in the LoyaltyPoints component you created earlier.
At the top of src/modules/checkout/components/loyalty-points/index.tsx, import the function:
Then, replace the handleTogglePromotion function with the following:
1const handleTogglePromotion = async (2 e: React.MouseEvent<HTMLButtonElement, MouseEvent>3) => {4 e.preventDefault()5 if (!isLoyaltyPointsPromoApplied) {6 await applyLoyaltyPointsOnCart()7 } else {8 // TODO remove loyalty points9 }10}
In the handleTogglePromotion function, you call the applyLoyaltyPointsOnCart function if the cart doesn't have a loyalty promotion. This will send a request to the API route you created earlier, which will execute the workflow that applies the loyalty promotion to the cart.
You'll implement removing the loyalty points promotion in a later step.
Test it Out#
To test out applying the loyalty points on the cart, start the Medusa application and Next.js Starter Storefront.
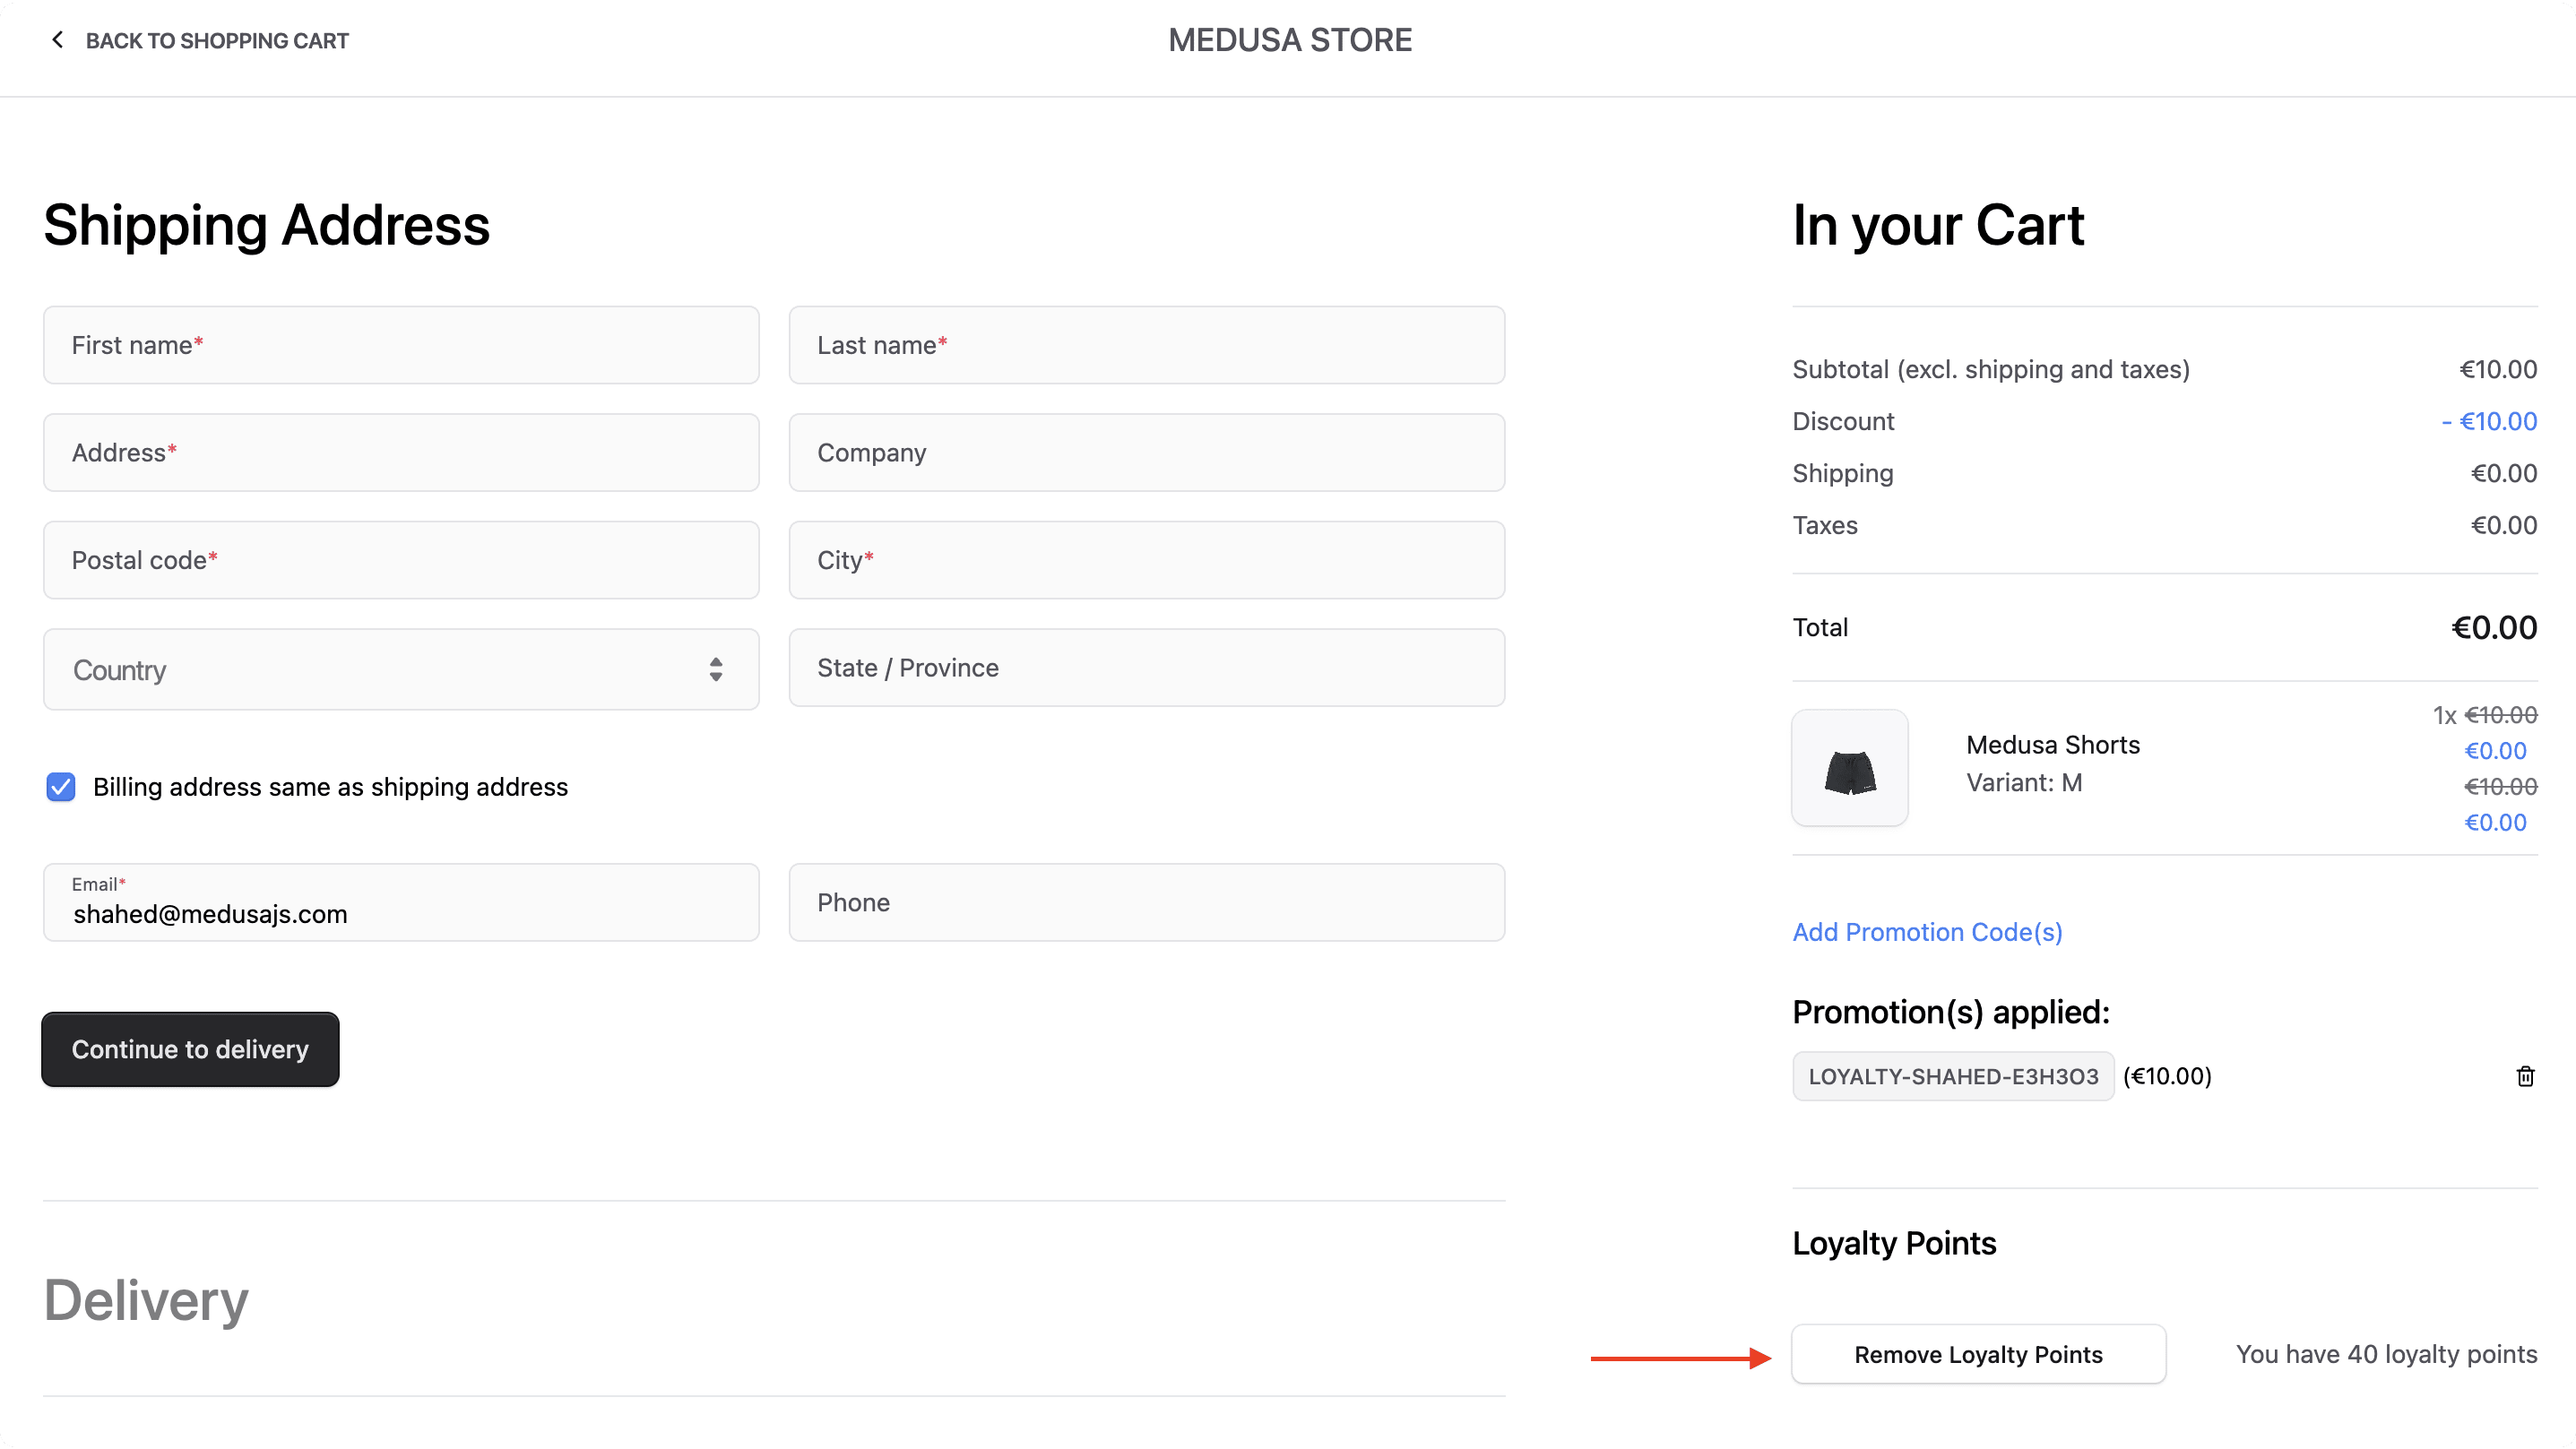
Then, in the checkout flow as an authenticated customer, click on the "Apply Loyalty Points" button. The checkout summary will be updated with the applied promotion and the discount amount.
src/modules/checkout/components/discount-code/index.tsx to not show a promotion matching cart.metadata.loyalty_promo_id.
Step 8: Remove Loyalty Points From Cart#
In this step, you'll implement the functionality to remove the loyalty points promotion from the cart. This is useful if the customer changes their mind and wants to remove the promotion.
To implement this functionality, you'll need to:
- Create a workflow that removes the loyalty points promotion from the cart.
- Create an API route that executes the workflow.
- Create a function in the Next.js Starter Storefront that sends a request to the API route you created earlier.
- Use the function in the
handleTogglePromotionfunction in theLoyaltyPointscomponent you created earlier.
Create the Workflow#
The workflow will have the following steps:
Workflow hook
Step conditioned by when
View step details
Since you already have all the steps, you can create the workflow.
To create the workflow, create the file src/workflows/remove-loyalty-from-cart.ts with the following content:
14import { getCartLoyaltyPromoStep } from "./steps/get-cart-loyalty-promo"15import { PromotionActions } from "@medusajs/framework/utils"16import { CartData } from "../utils/promo"17 18type WorkflowInput = {19 cart_id: string20}21 22const fields = [23 "id",24 "customer.*",25 "promotions.*",26 "promotions.application_method.*",27 "promotions.rules.*",28 "promotions.rules.values.*",29 "currency_code",30 "total",31 "metadata",32]33 34export const removeLoyaltyFromCartWorkflow = createWorkflow(35 "remove-loyalty-from-cart",36 (input: WorkflowInput) => {37 const { data: carts } = useQueryGraphStep({38 entity: "cart",39 fields,40 filters: {41 id: input.cart_id,42 },43 options: {44 throwIfKeyNotFound: true,45 },46 })47 48 const loyaltyPromo = getCartLoyaltyPromoStep({49 cart: carts[0] as unknown as CartData,50 throwErrorOn: "not-found",51 })52 53 acquireLockStep({54 key: input.cart_id,55 timeout: 2,56 ttl: 10,57 })58 59 updateCartPromotionsWorkflow.runAsStep({60 input: {61 cart_id: input.cart_id,62 promo_codes: [loyaltyPromo.code!],63 action: PromotionActions.REMOVE,64 },65 })66 67 const newMetadata = transform({68 carts,69 }, (data) => {70 const { loyalty_promo_id, ...rest } = data.carts[0].metadata || {}71 72 return {73 ...rest,74 loyalty_promo_id: null,75 }76 })77 78 updateCartsStep([79 {80 id: input.cart_id,81 metadata: newMetadata,82 },83 ])84 85 updatePromotionsStep([86 {87 id: loyaltyPromo.id,88 status: "inactive",89 },90 ])91 92 // retrieve cart with updated promotions93 const { data: updatedCarts } = useQueryGraphStep({94 entity: "cart",95 fields,96 filters: { id: input.cart_id },97 }).config({ name: "retrieve-cart" })98 99 releaseLockStep({100 key: input.cart_id,101 })102 103 return new WorkflowResponse(updatedCarts[0])104 }105)
You create a workflow that accepts an object with the cart's ID as input.
In the workflow, you:
- Use
useQueryGraphStepto retrieve the cart's details. You pass the cart's ID as a filter to retrieve the cart. - Check whether the cart has a loyalty promotion using the
getCartLoyaltyPromoStep. You pass thethrowErrorOnparameter with the valuenot-foundto throw an error if a loyalty promotion isn't found in the cart. - Acquire a lock on the cart using the
acquireLockStepto prevent concurrent modifications. - Update the cart's promotions using the
updateCartPromotionsWorkflow, removing the loyalty promotion. - Use the
transformfunction to prepare the new metadata of the cart. You remove theloyalty_promo_idfrom the metadata. - Update the cart's metadata with the new metadata using the
updateCartsStep. - Deactivate the loyalty promotion using the
updatePromotionsStep. - Retrieve the cart's details again using
useQueryGraphStepto get the updated cart with the new loyalty promotion. - Release the lock on the cart using the
releaseLockStep. - Return the cart's details in a
WorkflowResponseinstance.
Create the API Route#
Next, you'll create the API route that executes this workflow.
To create the API route, add the following in src/api/store/carts/[id]/loyalty-points/route.ts:
1// other imports...2import { removeLoyaltyFromCartWorkflow } from "../../../../../workflows/remove-loyalty-from-cart"3 4// ...5export async function DELETE(6 req: MedusaRequest,7 res: MedusaResponse8) {9 const { id: cart_id } = req.params10 11 const { result: cart } = await removeLoyaltyFromCartWorkflow(req.scope)12 .run({13 input: {14 cart_id,15 },16 })17 18 res.json({ cart })19}
You export a DELETE route handler, which exposes a DELETE API route at /store/carts/[id]/loyalty-points.
In the route handler, you execute the removeLoyaltyFromCartWorkflow workflow, passing it the cart ID as an input. You return the cart's details in the response.
You can now use this API route in the Next.js Starter Storefront.
Remove Loyalty Points in the Storefront#
In the Next.js Starter Storefront, you need to add a server action function that sends a request to the API route you created earlier. Then, you'll use that function when the customer clicks the "Remove Loyalty Points" button, which shows when the cart has a loyalty promotion applied.
To add the function, add the following to src/lib/data/cart.ts:
1export async function removeLoyaltyPointsOnCart() {2 const cartId = await getCartId()3 const headers = {4 ...(await getAuthHeaders()),5 }6 const next = {7 ...(await getCacheOptions("carts")),8 }9 10 return await sdk.client.fetch<{11 cart: HttpTypes.StoreCart & {12 promotions: HttpTypes.StorePromotion[]13 }14 }>(`/store/carts/${cartId}/loyalty-points`, {15 method: "DELETE",16 headers,17 })18 .then(async (result) => {19 const cartCacheTag = await getCacheTag("carts")20 revalidateTag(cartCacheTag)21 22 return result23 })24}
You create a removeLoyaltyPointsOnCart function that sends a request to the API route you created earlier.
In the function, you retrieve the cart ID stored in the cookie using the getCartId function, which is available in the Next.js Starter Storefront.
Then, you send the request to the API route. Once the request is resolved successfully, you revalidate the cart cache tag to ensure that the cart's details are updated and refetched by other components. This ensures that the promotion is removed from the checkout summary without needing to refresh the page.
Finally, you'll use this function in the handleTogglePromotion function in the LoyaltyPoints component you created earlier.
At the top of src/modules/checkout/components/loyalty-points/index.tsx, add the following import:
Then, replace the TODO in handleTogglePromotion with the following:
In the handleTogglePromotion function, you call the removeLoyaltyPointsOnCart function if the cart has a loyalty promotion. This will send a request to the API route you created earlier, which will execute the workflow that removes the loyalty promotion from the cart.
Test it Out#
To test out removing the loyalty points from the cart, start the Medusa application and Next.js Starter Storefront.
Then, in the checkout flow as an authenticated customer, after applying the loyalty points, click on the "Remove Loyalty Points" button. The checkout summary will be updated with the removed promotion and the discount amount.
Step 9: Validate Loyalty Points on Cart Completion#
After the customer applies the loyalty points to the cart and places the order, you need to validate that the customer actually has the loyalty points. This prevents edge cases where the customer may have applied the loyalty points previously but they don't have them anymore.
So, in this step, you'll hook into Medusa's cart completion flow to perform the validation.
Since Medusa uses workflows in its API routes, it allows you to hook into them and perform custom functionalities using Workflow Hooks. A workflow hook is a point in a workflow where you can inject custom functionality as a step function, called a hook handler.
Medusa uses the completeCartWorkflow hook to complete the cart and place an order. This workflow has a validate hook that allows you to perform custom validation before the cart is completed.
To consume the validate hook, create the file src/workflows/hooks/complete-cart.ts with the following content:
5import { MedusaError } from "@medusajs/framework/utils"6 7completeCartWorkflow.hooks.validate(8 async ({ cart }, { container }) => {9 const query = container.resolve("query")10 const loyaltyModuleService: LoyaltyModuleService = container.resolve(11 LOYALTY_MODULE12 )13 14 const { data: carts } = await query.graph({15 entity: "cart",16 fields: [17 "id", 18 "promotions.*", 19 "customer.*", 20 "promotions.rules.*", 21 "promotions.rules.values.*", 22 "promotions.application_method.*", 23 "metadata",24 ],25 filters: {26 id: cart.id,27 },28 }, {29 throwIfKeyNotFound: true,30 })31 32 const loyaltyPromo = getCartLoyaltyPromotion(33 carts[0] as unknown as CartData34 )35 36 if (!loyaltyPromo) {37 return38 }39 40 const customerLoyaltyPoints = await loyaltyModuleService.getPoints(41 carts[0].customer!.id42 )43 const requiredPoints = await loyaltyModuleService.calculatePointsFromAmount(44 loyaltyPromo.application_method!.value as number45 )46 47 if (customerLoyaltyPoints < requiredPoints) {48 throw new MedusaError(49 MedusaError.Types.INVALID_DATA,50 `Customer does not have enough loyalty points. Required: ${51 requiredPoints52 }, Available: ${customerLoyaltyPoints}`53 )54 }55 }56)
Workflows have a special hooks property that includes all the hooks that you can consume in that workflow. You consume the hook by invoking it from the workflow's hooks property.
Since the hook is essentially a step function, it accepts the following parameters:
- The hook's input passed from the workflow, which differs for each hook. The
validatehook receives an object having the cart's details. - The step context object, which contains the Medusa container. You can use it to resolve services and perform actions.
In the hook, you resolve Query and the Loyalty Module's service. Then, you use Query to retrieve the cart's necessary details, including its promotions, customer, and metadata.
After that, you retrieve the customer's loyalty points and calculate the required points to apply the loyalty promotion.
If the customer doesn't have enough loyalty points, you throw an error. This will prevent the cart from being completed if the customer doesn't have enough loyalty points.
Test Out Cart Completion with Loyalty Points#
Since you now have the entire loyalty points flow implemented, you can test it out by going through the checkout flow, applying the loyalty points to the cart.
When you place the order, if the customer has sufficient loyalty points, the validation hook will pass.
Then, the order.placed event will be emitted, which will execute the subscriber that calls the handleOrderPointsWorkflow.
In the workflow, since the order's cart has a loyalty promotion, the points equivalent to the promotion will be deducted, and the promotion becomes inactive.
You can confirm that the loyalty points were deducted either by sending a request to the retrieve loyalty points API route, or by going through the checkout process again in the storefront.
Next Steps#
You've now implement a loyalty points system in Medusa. There's still more that you can implement based on your use case:
- Add loyalty points on registration or other events. Refer to the Events Reference for a full list of available events you can listen to.
- Show the customer their loyalty point usage history. This will require adding another data model in the Loyalty Module that records the usage history. You can create records of that data model when an order that has a loyalty promotion is placed, then customize the storefront to show a new page for loyalty points history.
- Customize the Medusa Admin to show a new page or UI Route for loyalty points information and analytics.
If you're new to Medusa, check out the main documentation, where you'll get a more in-depth learning of all the concepts you've used in this guide and more.
To learn more about the commerce features that Medusa provides, check out Medusa's Commerce Modules.