Implement Product Reviews in Medusa
In this tutorial, you'll learn how to implement product reviews in Medusa.
When you install a Medusa application, you get a fully-fledged commerce platform with a Framework for customization. The Medusa application's commerce features are built around Commerce Modules which are available out-of-the-box. The features include product-management features.
Medusa doesn't provide product reviews out-of-the-box, but the Medusa Framework facilitates implementing customizations like product reviews. In this tutorial, you'll learn how to customize the Medusa server, Admin dashboard, and Next.js Starter Storefront to implement product reviews.
You can follow this guide whether you're new to Medusa or an advanced Medusa developer.
Summary#
By following this tutorial, you'll learn how to:
- Install and set up Medusa.
- Define product reviews models and implement their management features in the Medusa server.
- Customize the Medusa Admin to allow merchants to view and manage product reviews.
- Customize the Next.js Starter Storefront to display product reviews and allow customers to submit reviews.
Step 1: Install a Medusa Application#
Start by installing the Medusa application on your machine with the following command:
You'll first be asked for the project's name. Then, when asked whether you want to install the Next.js Starter Storefront, choose Yes.
Afterwards, the installation process will start, which will install the Medusa application as a monorepository in a directory with your project's name. The backend is installed in the apps/backend directory, and the Next.js Starter Storefront is installed in the apps/storefront directory.
Once the installation finishes successfully, the Medusa Admin dashboard will open with a form to create a new user. Enter the user's credentials and submit the form. Afterwards, you can log in with the new user and explore the dashboard.
apps/backend directory of your Medusa project.Step 2: Add Product Review Module#
In Medusa, you can build custom features in a module. A module is a reusable package with functionalities related to a single feature or domain. Medusa integrates the module into your application without implications or side effects on your setup.
In the module, you define the data models necessary for a feature and the logic to manage these data models. Later, you can build commerce flows around your module.
In this step, you'll build a Product Review Module that defines the necessary data models to store and manage product reviews.
Create Module Directory#
A module is created under the src/modules directory of your Medusa application. So, create the directory src/modules/product-review.
Create Data Models#
A data model represents a table in the database. You create data models using Medusa's Data Model Language (DML). It simplifies defining a table's columns, relations, and indexes with straightforward methods and configurations.
For the Product Review Module, you need to define a Review data model that represents a product review. So, create the file src/modules/product-review/models/review.ts with the following content:
1import { model } from "@medusajs/framework/utils"2 3const Review = model.define("review", {4 id: model.id().primaryKey(),5 title: model.text().nullable(),6 content: model.text(),7 rating: model.float(),8 first_name: model.text(),9 last_name: model.text(),10 status: model.enum(["pending", "approved", "rejected"]).default("pending"),11 product_id: model.text().index("IDX_REVIEW_PRODUCT_ID"),12 customer_id: model.text().nullable(),13})14.checks([15 {16 name: "rating_range", 17 expression: (columns) => `${columns.rating} >= 1 AND ${columns.rating} <= 5`,18 },19])20 21export default Review
You define the Review data model using the model.define method of the DML. It accepts the data model's table name as a first parameter, and the model's schema object as a second parameter.
The Review data model has the following properties:
id: A unique ID for the review.title: The review's title.content: The review's content.rating: The review's rating. You also add a check constraint to ensure the rating is between 1 and 5.first_name: The first name of the reviewer.last_name: The last name of the reviewer.status: The review's status, which can bepending,approved, orrejected.product_id: The ID of the product the review is for.customer_id: The ID of the customer who submitted the review.
Create Module's Service#
You now have the necessary data model in the Review Module, but you'll need to manage its records. You do this by creating a service in the module.
A service is a TypeScript or JavaScript class that the module exports. In the service's methods, you can connect to the database, allowing you to manage your data models, or connect to a third-party service, which is useful if you're integrating with external services.
To create the Review Module's service, create the file src/modules/product-review/service.ts with the following content:
The ProductReviewModuleService extends MedusaService from the Modules SDK which generates a class with data-management methods for your module's data models. This saves you time on implementing Create, Read, Update, and Delete (CRUD) methods.
So, the ProductReviewModuleService class now has methods like createReviews and retrieveReview.
You'll use this service later when you implement custom flows for product reviews.
Export Module Definition#
The final piece to a module is its definition, which you export in an index.ts file at its root directory. This definition tells Medusa the name of the module and its service.
So, create the file src/modules/product-review/index.ts with the following content:
You use the Module function from the Modules SDK to create the module's definition. It accepts two parameters:
- The module's name, which is
productReview. - An object with a required property
serviceindicating the module's service.
You also export the module's name as PRODUCT_REVIEW_MODULE so you can reference it later.
Add Module to Medusa's Configurations#
Once you finish building the module, add it to Medusa's configurations to start using it.
In medusa-config.ts, add a modules property and pass an array with your custom module:
Each object in the modules array has a resolve property, whose value is either a path to the module's directory, or an npm package’s name.
Generate Migrations#
Since data models represent tables in the database, you define how they're created in the database with migrations. A migration is a TypeScript or JavaScript file that defines database changes made by a module.
Medusa's CLI tool can generate the migrations for you. To generate a migration for the Review Module, run the following command in the apps/backend directory:
The db:generate command of the Medusa CLI accepts the name of the module to generate the migration for. You'll now have a migrations directory under src/modules/product-review that holds the generated migration.
Then, to reflect these migrations on the database, run the following command:
The table for the Review data model is now created in the database.
Step 3: Define Review <> Product Link#
When you defined the Review data model, you added properties that store the ID of records managed by other modules. For example, the product_id property stores the ID of the product this review is for, but products are managed by the Product Module.
Medusa integrates modules into your application without implications or side effects by isolating modules from one another. This means you can't directly create relationships between data models in your module and data models in other modules.
Instead, Medusa provides the mechanism to define links between data models, and retrieve and manage linked records while maintaining module isolation. Links are useful to define associations between data models in different modules, or extend a model in another module to associate custom properties with it.
In this step, you'll define a link between the Product Review Module's Review data model, and the Product Module's Product data model. You'll then use this link to retrieve the product associated with a review.
Review data model and the Customer data model to retrieve the customer who submitted the review in a similar manner.You can define links between data models in a TypeScript or JavaScript file under the src/links directory. So, create the file src/links/review-product.ts with the following content:
1import { defineLink } from "@medusajs/framework/utils"2import ProductReviewModule from "../modules/product-review"3import ProductModule from "@medusajs/medusa/product"4 5export default defineLink(6 {7 linkable: ProductReviewModule.linkable.review,8 field: "product_id",9 isList: false,10 },11 ProductModule.linkable.product,12 {13 readOnly: true,14 }15)
You define a link using the defineLink function from the Modules SDK. It accepts three parameters:
- An object indicating the first data model part of the link. A module has a special
linkableproperty that contains link configurations for its data models. So, you can pass the link configurations for theReviewdata model from the Product Review module, specifying that itsproduct_idproperty holds the ID of the linked record. You also specifyisListasfalsesince a review can only have one product. - An object indicating the second data model part of the link. You pass the linkable configurations of the Product Module's
Productdata model. - An optional object with additional configurations for the link. By default, Medusa creates a table in the database to represent the link you define. However, when you only want to retrieve the linked records without managing and storing the links, you can set the
readOnlyoption totrue.
You can now retrieve the product of a review, as you'll see in later steps.
Step 4: Create Review Workflow#
You're now ready to start implementing product-review features. The first one you'll implement is the ability for customers to create a product review.
To build custom commerce features in Medusa, you create a workflow. A workflow is a series of queries and actions, called steps, that complete a task. You construct a workflow like you construct a function, but it's a special function that allows you to track its executions' progress, define roll-back logic, and configure other advanced features. Then, you execute the workflow from other customizations, such as in an endpoint.
So, in this section, you'll learn how to create a workflow that creates a review. Later, you'll execute this workflow in an API route.
The workflow will have the following steps:
Loading...The useQueryGraphStep step is provided by Medusa in its @medusajs/medusa/core-flows package. So, you only need to implement the createReviewStep step.
createReviewStep#
In the second step of the workflow, you create the review. To create a step, create the file src/workflows/steps/create-review.ts with the following content:
npm run dev or yarn dev command to generate the necessary type definitions, as explained in the Automatically Generated Types guide.1import {2 createStep,3 StepResponse,4} from "@medusajs/framework/workflows-sdk"5import { PRODUCT_REVIEW_MODULE } from "../../modules/product-review"6import ProductReviewModuleService from "../../modules/product-review/service"7 8export type CreateReviewStepInput = {9 title?: string10 content: string11 rating: number12 product_id: string13 customer_id?: string14 first_name: string15 last_name: string16 status?: "pending" | "approved" | "rejected"17}18 19export const createReviewStep = createStep(20 "create-review",21 async (input: CreateReviewStepInput, { container }) => {22 const reviewModuleService: ProductReviewModuleService = container.resolve(23 PRODUCT_REVIEW_MODULE24 )25 26 const review = await reviewModuleService.createReviews(input)27 28 return new StepResponse(review, review.id)29 },30 async (reviewId, { container }) => {31 if (!reviewId) {32 return33 }34 35 const reviewModuleService: ProductReviewModuleService = container.resolve(36 PRODUCT_REVIEW_MODULE37 )38 39 await reviewModuleService.deleteReviews(reviewId)40 }41)
You create a step with createStep from the Workflows SDK. It accepts two parameters:
- The step's unique name, which is
create-review. - An async function that receives two parameters:
- The step's input, which is in this case an object with the review's properties.
- An object that has properties including the Medusa container, which is a registry of Framework and commerce tools that you can access in the step.
In the step function, you resolve the Review Module's service from the Medusa container using its resolve method, passing it the module's name as a parameter.
Then, you create the review using the createReviews method. As you remember, the Review Module's service extends the MedusaService which generates data-management methods for you.
A step function must return a StepResponse instance. The StepResponse constructor accepts two parameters:
- The step's output, which is the review created.
- Data to pass to the step's compensation function.
Compensation Function
The compensation function undoes the actions performed in a step. Then, if an error occurs during the workflow's execution, the compensation functions of executed steps are called to roll back the changes. This mechanism ensures data consistency in your application, especially as you integrate external systems.
The compensation function accepts two parameters:
- The data passed from the step in the second parameter of
StepResponse, which in this case is the ID of the created review. - An object that has properties including the Medusa container.
In the compensation function, you resolve the Review Module's service from the Medusa container and call the deleteReviews method to delete the review created in the step.
Add createReviewWorkflow#
You can now create the workflow using the step provided by Medusa and your custom step.
To create the workflow, create the file src/workflows/create-review.ts with the following content:
1import { 2 createWorkflow,3 WorkflowResponse,4} from "@medusajs/framework/workflows-sdk"5import { createReviewStep } from "./steps/create-review"6import { useQueryGraphStep } from "@medusajs/medusa/core-flows"7 8type CreateReviewInput = {9 title?: string10 content: string11 rating: number12 product_id: string13 customer_id?: string14 first_name: string15 last_name: string16 status?: "pending" | "approved" | "rejected"17}18 19export const createReviewWorkflow = createWorkflow(20 "create-review",21 (input: CreateReviewInput) => {22 // Check product exists23 useQueryGraphStep({24 entity: "product",25 fields: ["id"],26 filters: {27 id: input.product_id,28 },29 options: {30 throwIfKeyNotFound: true,31 },32 })33 34 // Create the review35 const review = createReviewStep(input)36 37 return new WorkflowResponse({38 review,39 })40 }41)
You create a workflow using createWorkflow from the Workflows SDK. It accepts the workflow's unique name as a first parameter.
It accepts as a second parameter a constructor function, which is the workflow's implementation. The function can accept input, which in this case is an object of the review's details.
In the workflow's constructor function, you:
- use
useQueryGraphStepto retrieve the product. By setting theoptions.throwIfKeyNotFoundtotrue, the step throws an error if the product doesn't exist. - Call the
createReviewStepstep to create the review.
useQueryGraphStep uses Query, which allows you to retrieve data across modules. For example, in the above snippet you're retrieving the product, which is managed in the Product Module, by passing id to the fields array.A workflow must return an instance of WorkflowResponse. The WorkflowResponse constructor accepts the workflow's output as a parameter, which is an object holding the created review in this case.
In the next step, you'll learn how to execute this workflow in an API route.
Step 5: Create Review API Route#
Now that you have the logic to create a product review, you need to expose it so that frontend clients, such as a storefront, can use it. You do this by creating an API route.
An API Route is an endpoint that exposes commerce features to external applications and clients, such as storefronts. You'll create an API route at the path /store/reviews that executes the workflow from the previous step.
Implement API Route#
An API route is created in a route.ts file under a sub-directory of the src/api directory. The path of the API route is the file's path relative to src/api.
So, to create an API route at the path /store/reviews, create the file src/api/store/reviews/route.ts with the following content:
1import type {2 AuthenticatedMedusaRequest,3 MedusaResponse,4} from "@medusajs/framework/http"5import { createReviewWorkflow } from "../../../workflows/create-review"6 7import { z } from "@medusajs/framework/zod"8 9export const PostStoreReviewSchema = z.object({10 title: z.string().optional(),11 content: z.string(),12 rating: z.preprocess(13 (val) => {14 if (val && typeof val === "string") {15 return parseInt(val)16 }17 return val18 },19 z.number().min(1).max(5)20 ),21 product_id: z.string(),22 first_name: z.string(),23 last_name: z.string(),24})25 26type PostStoreReviewReq = z.infer<typeof PostStoreReviewSchema>27 28export const POST = async (29 req: AuthenticatedMedusaRequest<PostStoreReviewReq>,30 res: MedusaResponse31) => {32 const input = req.validatedBody33 34 const { result } = await createReviewWorkflow(req.scope)35 .run({36 input: {37 ...input,38 customer_id: req.auth_context?.actor_id,39 },40 })41 42 res.json(result)43}
You first define a Zod schema for the request body of the API route. You'll later use this schema to enforce validation on the API route.
Then, since you export a POST function, you're exposing a POST API route at the path /store/reviews. The route handler function accepts two parameters:
- A request object with details and context on the request, such as body parameters or authenticated customer details.
- A response object to manipulate and send the response.
AuthenticatedMedusaRequest accepts the request body's type as a type argument.In the route handler, you execute the createReviewWorkflow workflow by invoking it, passing it the Medusa container (which is stored in the scope property of a request object). Then, you call its run method, passing to the workflow the request body as input.
Apply Validation and Authentication Middlewares#
Now that you have the API route, you need to enforce validation of the request body, and require authentication to access the route. You can do this with a middleware. A middleware is a function executed when a request is sent to an API Route. It's executed before the route handler.
Middlewares are created in the src/api/middlewares.ts file. So create the file src/api/middlewares.ts with the following content:
1import { 2 defineMiddlewares,3 authenticate,4 validateAndTransformBody,5} from "@medusajs/framework/http"6import { PostStoreReviewSchema } from "./store/reviews/route"7 8 9export default defineMiddlewares({10 routes: [11 {12 method: ["POST"], 13 matcher: "/store/reviews",14 middlewares: [15 authenticate("customer", ["session", "bearer"]),16 validateAndTransformBody(PostStoreReviewSchema),17 ],18 },19 ],20})
To export the middlewares, you use the defineMiddlewares function. It accepts an object having a routes property, whose value is an array of middleware route objects. Each middleware route object has the following properties:
method: The HTTP methods the middleware applies to, which is in this casePOST.matcher: The path of the route the middleware applies to.middlewares: An array of middleware functions to apply to the route. In this case, you apply two middlewares:authenticate: ensures the request is authenticated as a customer with a session or bearer token.validateAndTransformBody: validates that the request body parameters match the Zod schema passed as a parameter.
The create product review route is now ready for use.
Test the API Route#
To test out the API route, start the Medusa application:
Then, open the Medusa Admin dashboard at http://localhost:9000/app and login using the credentials you set up earlier.
Retrieve Publishable API Key
All requests sent to routes starting with /store must have a publishable API key in their header. This ensures that the request is scoped to a specific sales channel of your storefront.
To retrieve the publishable API key from the Medusa Admin, refer to this user guide.
Retrieve Customer Authentication Token
As mentioned before, the API route you added requires the customer to be authenticated. So, you'll first create a customer, then retrieve their authentication token to use in the request.
Before creating the customer, retrieve a registration token using the Retrieve Registration JWT Token API route:
Make sure to replace the email and password with the credentials you want.
Then, register the customer using the Create Customer API route:
Make sure to replace:
{token}with the registration token you received from the previous request.{your_publishable_api_key}with the publishable API key you retrieved from the Medusa Admin.
Also, if you changed the email in the first request, make sure to change it here as well.
The customer is now registered. Lastly, you need to retrieve its authenticated token by sending a request to the Authenticate Customer API route:
Copy the returned token to use it in the next requests.
Retrieve Product ID
Before creating a review, you need the ID of a product. You can either copy one from the Medusa Admin, or send the following request:
Make sure to replace {your_publishable_api_key} with the publishable API key you retrieved from the Medusa Admin.
Create a Review
You can now create a review for the product you chose. To do that, send the following request:
1curl --location 'http://localhost:9000/store/reviews' \2--header 'x-publishable-api-key: {your_publishable_api_key}' \3--header 'Content-Type: application/json' \4-H 'Authorization: Bearer {token}' \5--data '{6 "product_id": "{product_id}",7 "title": "Really good",8 "content": "The material is nice",9 "rating": 5,10 "first_name": "John",11 "last_name": "Smith"12}'
Make sure to replace:
{your_publishable_api_key}with the publishable API key you retrieved from the Medusa Admin.{token}with the authentication token you retrieved from the previous request.{product_id}with the ID of the product you chose.
If the request is successful, you'll receive a response with the created review. Notice that the review is in the pending status. In the upcoming steps, you'll allow admin users to approve or reject reviews.
Step 6: List Reviews Admin API Route#
In this step, you'll create an API route that lists the reviews of a product. You'll use this route in the Medusa Admin customizations to allow admin users to view and manage product reviews.
Create API Route#
To create the API route that retrieves a paginated list of reviews, create the file src/api/admin/reviews/route.ts with the following content:
1import {2 MedusaRequest,3 MedusaResponse,4} from "@medusajs/framework/http"5import { createFindParams } from "@medusajs/medusa/api/utils/validators"6 7export const GetAdminReviewsSchema = createFindParams()8 9export const GET = async (10 req: MedusaRequest,11 res: MedusaResponse12) => {13 const query = req.scope.resolve("query")14 15 const { 16 data: reviews, 17 metadata: { count, take, skip } = {18 count: 0,19 take: 20,20 skip: 0,21 },22 } = await query.graph({23 entity: "review",24 ...req.queryConfig,25 })26 27 res.json({ 28 reviews,29 count,30 limit: take,31 offset: skip,32 })33}
You first define a GetAdminReviewsSchema schema that will allow clients to pass the following query parameters:
limit: The number of reviews to retrieve.offset: The number of items to skip before retrieving the reviews.order: The fields to sort the reviews by in ascending or descending order.
Then, you export a GET function, which exposes a GET API Route at the path /admin/reviews. In the route handler you resolve Query from the Medusa container, which allows you to retrieve data across modules.
Next, you retrieve all reviews using Query. Notice that you pass in query.graph the req.queryConfig object. This object holds the fields to retrieve and the pagination configurations.
Finally, you return the reviews with pagination fields.
Apply Query Configurations Middleware#
After adding the API route, you need to add a middleware that validates the query parameters passed to the request, and sets the default Query configurations.
/admin are protected by default. So, you don't need to add the authenticate middleware to enforce authentication.In src/api/middlewares.ts, add a new middleware:
1// other imports...2import { 3 validateAndTransformQuery,4} from "@medusajs/framework/http"5import { GetAdminReviewsSchema } from "./admin/reviews/route"6 7export default defineMiddlewares({8 routes: [9 {10 matcher: "/admin/reviews",11 method: ["GET"],12 middlewares: [13 validateAndTransformQuery(GetAdminReviewsSchema, {14 isList: true,15 defaults: [16 "id",17 "title",18 "content",19 "rating",20 "product_id",21 "customer_id",22 "status",23 "created_at",24 "updated_at",25 "product.*",26 ],27 }),28 ],29 },30 ],31})
You use the validateAndTransformQuery middleware to enforce validation on the query parameters passed to the request. The middleware accepts two parameters:
- The Zod schema to validate the query parameters, which is the
GetAdminReviewsSchemaschema you defined earlier. - The Query configurations, which is an object with the following properties:
isList: A boolean that indicates whether the query is a list query.defaults: An array of fields to retrieve by default.
You'll test the API route as you customize the Medusa Admin in the next step.
product.* in the fields to retrieve, allowing you to retrieve the product associated with each review. This is possible because you defined a link between the Review data model and the Product data model in a previous step.Step 7: Add Reviews UI Route#
Now that you have an API route that retrieves reviews, you'll customize the Medusa Admin to add a new "Reviews" page by creating a UI Route.
A UI route is a React component that specifies the content to be shown in a new page in the Medusa Admin dashboard. You'll create a UI route to display the list of reviews in the Medusa Admin.
Configure JS SDK#
Medusa provides a JS SDK that you can use to send requests to the Medusa server from any client application, including your Medusa Admin customizations.
The JS SDK is installed by default in your Medusa application. To configure it, create the file src/admin/lib/sdk.ts with the following content:
You create an instance of the JS SDK using the Medusa class from the JS SDK. You pass it an object having the following properties:
baseUrl: The base URL of the Medusa server.debug: A boolean indicating whether to log debug information into the console.auth: An object specifying the authentication type. When using the JS SDK for admin customizations, you use thesessionauthentication type.
Create UI Route#
You'll now create the UI Route that lists the reviews. To do this, create the file src/admin/routes/reviews/page.tsx with the following content:
17import { Link } from "react-router-dom"18 19type Review = {20 id: string21 title?: string22 content: string23 rating: number24 product_id: string25 customer_id?: string26 status: "pending" | "approved" | "rejected"27 created_at: Date28 updated_at: Date29 product?: HttpTypes.AdminProduct30 customer?: HttpTypes.AdminCustomer31}32 33 34const columnHelper = createDataTableColumnHelper<Review>()35 36const columns = [37 columnHelper.accessor("id", {38 header: "ID",39 }),40 columnHelper.accessor("title", {41 header: "Title",42 }),43 columnHelper.accessor("rating", {44 header: "Rating", 45 }),46 columnHelper.accessor("content", {47 header: "Content",48 }),49 columnHelper.accessor("status", {50 header: "Status",51 cell: ({ row }) => {52 const color = row.original.status === "approved" ? 53 "green" : row.original.status === "rejected" 54 ? "red" : "grey"55 return (56 <StatusBadge color={color}>57 {row.original.status.charAt(0).toUpperCase() + row.original.status.slice(1)}58 </StatusBadge>59 )60 },61 }),62 columnHelper.accessor("product", {63 header: "Product",64 cell: ({ row }) => {65 return (66 <Link67 to={`/products/${row.original.product_id}`}68 >69 {row.original.product?.title}70 </Link>71 )72 },73 }),74]75 76// TODO add component
Before defining the component, you define a Review type, then define the columns of the table you'll show on the page.
To display the table, you'll use the DataTable component from Medusa UI. To define the columns of the table, you use the createDataTableColumnHelper function from Medusa UI, which returns a columnHelper object. You then use the columnHelper object to define the table's columns.
Next, you'll add the component that renders the content of the page. Replace the TODO with the following:
1const limit = 152 3const ReviewsPage = () => {4 const [pagination, setPagination] = useState<DataTablePaginationState>({5 pageSize: limit,6 pageIndex: 0,7 })8 9 const offset = useMemo(() => {10 return pagination.pageIndex * limit11 }, [pagination])12 13 const { data, isLoading, refetch } = useQuery<{14 reviews: Review[]15 count: number16 limit: number17 offset: number18 }>({19 queryKey: ["reviews", offset, limit],20 queryFn: () => sdk.client.fetch("/admin/reviews", {21 query: {22 offset: pagination.pageIndex * pagination.pageSize,23 limit: pagination.pageSize,24 order: "-created_at",25 },26 }),27 })28 29 const table = useDataTable({30 columns,31 data: data?.reviews || [],32 rowCount: data?.count || 0,33 isLoading,34 pagination: {35 state: pagination,36 onPaginationChange: setPagination,37 },38 getRowId: (row) => row.id,39 })40 41 return (42 <Container>43 <DataTable instance={table}>44 <DataTable.Toolbar className="flex flex-col items-start justify-between gap-2 md:flex-row md:items-center">45 <Heading>46 Reviews47 </Heading>48 </DataTable.Toolbar>49 <DataTable.Table />50 <DataTable.Pagination />51 </DataTable>52 <Toaster />53 </Container>54 )55}56 57export const config = defineRouteConfig({58 label: "Reviews",59 icon: ChatBubbleLeftRight,60})61 62export default ReviewsPage
You create a ReviewPage component, which holds the UI route's content. In the component, you:
- Define state variables to configure pagination.
- Use the
useQueryhook from@tanstack/react-queryto fetch the reviews from the API route. In the query function, you use the JS SDK to send a request to the/admin/reviewsAPI route. The JS SDK has aclient.fetchmethod that has a similar signature to JavaScript's Fetch API. You can use it to send requests to custom routes. - Use the
useDataTablehook from Medusa UI to create a DataTable instance. You pass the columns, data, and pagination configurations to the hook. - Render the DataTable component, passing the DataTable instance to the
instanceprop. You also render the DataTable's toolbar, table, and pagination components.
The file also exports a configuration object created with defineRouteConfig. You export this object to tell Medusa that you want to add the new route to the Medusa Admin's sidebar. You specify the sidebar's item and title.
Test the UI Route#
To test out the UI route, start the Medusa application:
Then, open the Medusa Admin dashboard at http://localhost:9000/app and login using the credentials you set up earlier.
You'll find a new sidebar item Review. Click on it to view the list of reviews. In the upcoming steps, you'll add functionality to approve or reject reviews.

Step 8: Change Review Status API Route#
Next, you want to allow the admin user to approve or reject reviews. To do this, you'll create a workflow that updates a review's status, then use it in an API route that exposes the functionality.
Update Review Step#
The workflow to update a review's status will have on step that updates the review. To create the step, create the file src/workflows/steps/update-review.ts with the following content:
1import {2 createStep,3 StepResponse,4} from "@medusajs/framework/workflows-sdk"5import { PRODUCT_REVIEW_MODULE } from "../../modules/product-review"6import ProductReviewModuleService from "../../modules/product-review/service"7 8export type UpdateReviewsStepInput = {9 id: string10 status: "pending" | "approved" | "rejected"11}[]12 13export const updateReviewsStep = createStep(14 "update-review-step",15 async (input: UpdateReviewsStepInput, { container }) => {16 const reviewModuleService: ProductReviewModuleService = container.resolve(17 PRODUCT_REVIEW_MODULE18 )19 20 // Get original review before update21 const originalReviews = await reviewModuleService.listReviews({22 id: input.map((review) => review.id),23 })24 25 const reviews = await reviewModuleService.updateReviews(input)26 27 return new StepResponse(reviews, originalReviews)28 },29 async (originalData, { container }) => {30 if (!originalData) {31 return32 }33 34 const reviewModuleService: ProductReviewModuleService = container.resolve(35 PRODUCT_REVIEW_MODULE36 )37 38 // Restore original review status39 await reviewModuleService.updateReviews(originalData)40 }41)
This step receives an array of objects, each with the ID of the review to update and its new status.
In the step function, you first retrieve the original reviews before the update. Then, you update the reviews using the updateReviews method of the Review Module's service.
After that, you return the updated reviews, and you pass the original reviews to the compensation function.
In the compensation function, you restore the original reviews' status if an error occurs.
Update Review Workflow#
You can now create the workflow that uses the above step to update the review. To create the workflow, create the file src/workflows/update-review.ts with the following content:
1import {2 createWorkflow,3 WorkflowResponse,4} from "@medusajs/framework/workflows-sdk"5import { updateReviewsStep } from "./steps/update-review"6 7export type UpdateReviewInput = {8 id: string9 status: "pending" | "approved" | "rejected"10}[]11 12export const updateReviewWorkflow = createWorkflow(13 "update-review",14 (input: UpdateReviewInput) => {15 const reviews = updateReviewsStep(input)16 17 return new WorkflowResponse({18 reviews,19 })20 }21)
The workflow receives an array of objects, each with the ID of the review to update and its new status. It uses the updateReviewsStep to update the reviews, then returns the updated reviews.
Create API Route#
Next, you'll create the API route that exposes the workflow's functionality. Create the file src/api/admin/reviews/status/route.ts with the following content:
1import type {2 MedusaRequest,3 MedusaResponse,4} from "@medusajs/framework/http"5import { updateReviewWorkflow } from "../../../../workflows/update-review"6import { z } from "@medusajs/framework/zod"7 8export const PostAdminUpdateReviewsStatusSchema = z.object({9 ids: z.array(z.string()),10 status: z.enum(["pending", "approved", "rejected"]),11})12 13export async function POST(14 req: MedusaRequest<z.infer<typeof PostAdminUpdateReviewsStatusSchema>>, 15 res: MedusaResponse16) {17 const { ids, status } = req.validatedBody18 19 const { result } = await updateReviewWorkflow(req.scope).run({20 input: ids.map((id) => ({21 id,22 status,23 })),24 })25 26 res.json(result)27}
You first define a Zod schema for the request body of the API route. You'll later use this schema to enforce validation on the API route. The request body must include the following parameters:
ids: An array of review IDs to update.status: The new status to set for the reviews.
Then, since you export a POST function, you're exposing a POST API route at the path /admin/reviews/status. In the route handler you execute the updateReviewWorkflow workflow, passing it the data from the request body.
Finally, you return the updated reviews.
Apply Validation Middlewares#
The last step is to add the validation middleware that enforces validation the body parameters of requests sent to the API route.
In src/api/middlewares.ts, add a new middleware:
1// other imports...2import { PostAdminUpdateReviewsStatusSchema } from "./admin/reviews/status/route"3 4export default defineMiddlewares({5 routes: [6 // ...7 {8 matcher: "/admin/reviews/status",9 method: ["POST"],10 middlewares: [11 validateAndTransformBody(PostAdminUpdateReviewsStatusSchema),12 ],13 },14 ],15})
You use the validateAndTransformBody middleware to enforce validation on an incoming request's body parameters. You pass the Zod schema you defined in the API route's file to the middleware.
In the next step, you'll customize the UI route you added earlier to allow the admin user to approve or reject reviews.
Step 9: Approve and Reject Reviews in UI Route#
You'll now customize the UI route you added earlier to allow the admin user to approve or reject reviews. You'll add a checkbox column to the table that allows the admin user to select multiple reviews, then choose to approve or reject them.
The DataTable component from Medusa UI supports a command bar that is triggered by a select (or checkbox) column in the table.
Start by adding the necessary imports at the top of src/admin/routes/reviews/page.tsx:
Then, in the columns array, add a new select column as the first item in the array:
The select column adds a checkbox to each row in the table, allowing the admin user to select multiple reviews.
Next, you need to add the commands that allow the admin user to approve or reject the selected reviews. So, add the following after the columns array:
1const commandHelper = createDataTableCommandHelper()2 3const useCommands = (refetch: () => void) => {4 return [5 commandHelper.command({6 label: "Approve",7 shortcut: "A",8 action: async (selection) => {9 const reviewsToApproveIds = Object.keys(selection)10 11 sdk.client.fetch("/admin/reviews/status", {12 method: "POST",13 body: {14 ids: reviewsToApproveIds,15 status: "approved",16 },17 }).then(() => {18 toast.success("Reviews approved")19 refetch()20 }).catch(() => {21 toast.error("Failed to approve reviews")22 })23 },24 }),25 commandHelper.command({26 label: "Reject",27 shortcut: "R",28 action: async (selection) => {29 const reviewsToRejectIds = Object.keys(selection)30 31 sdk.client.fetch("/admin/reviews/status", {32 method: "POST",33 body: {34 ids: reviewsToRejectIds,35 status: "rejected",36 },37 }).then(() => {38 toast.success("Reviews rejected")39 refetch()40 }).catch(() => {41 toast.error("Failed to reject reviews")42 })43 },44 }),45 ]46}
You first initialize the command helper using the createDataTableCommandHelper function from Medusa UI. Then, you create a custom hook useCommands that returns an array of commands created with the command helper.
You add Approve and Reject commands, and both of them send a request to the /admin/reviews/status API route to update the reviews' status, but each with a different status in the request body.
Next, add the following state variable in the ReviewsPage component:
This state variable will hold the selected reviews in the table.
Then, call the useCommands hook and pass new properties to the useDataTable hook:
You call the useCommands hook and pass it the refetch function (returned by useQuery). The refetch function allows you to refetch the reviews after approving or rejecting them to ensure their status in the table is updated.
Then, you pass the commands and row selection configurations (from the state variables you added) to the useDataTable hook.
Finally, in the return statement, add the command bar after the pagination component:
This command bar will show the actions to perform on the selected reviews.
Test the UI Route#
To test out the UI route, start the Medusa application:
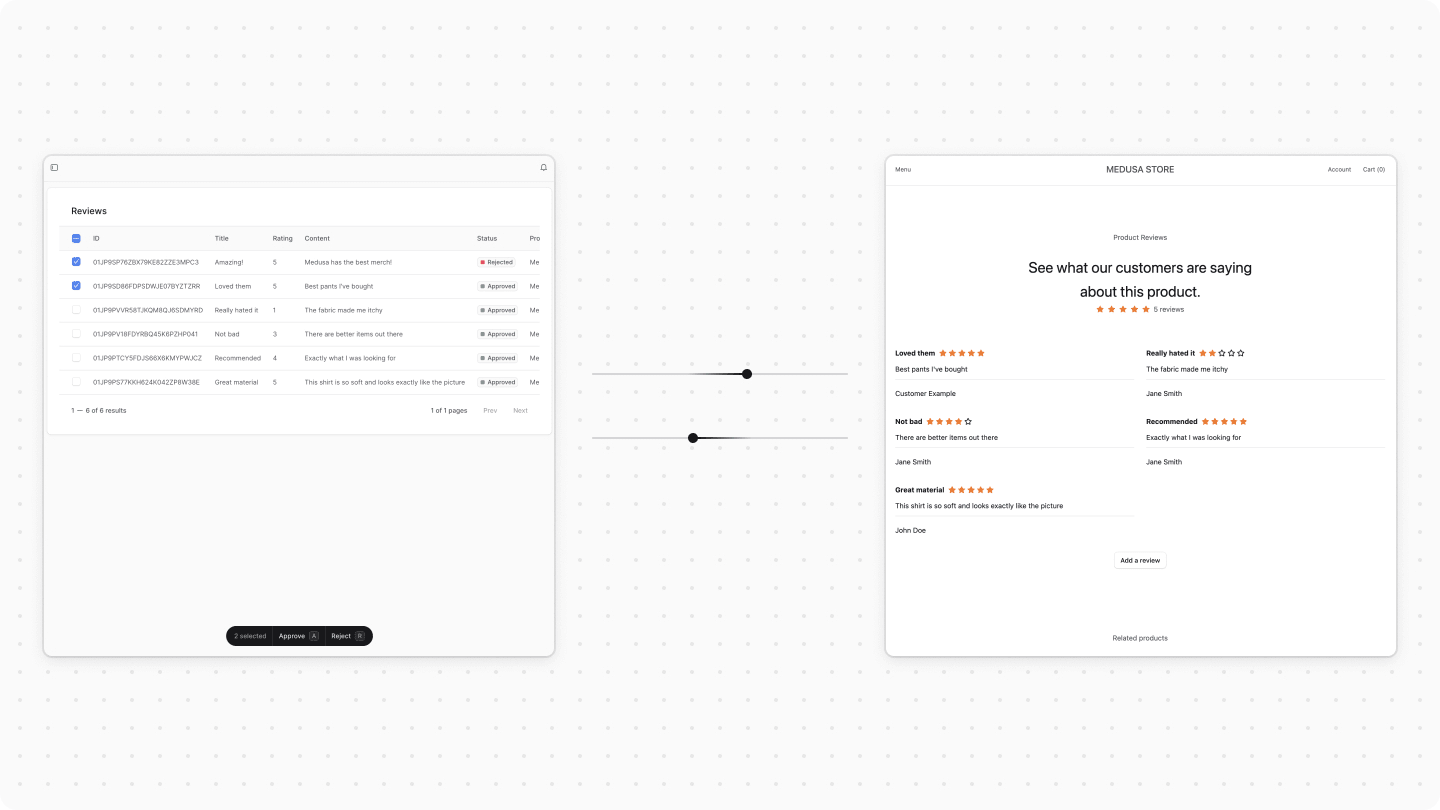
Then, open the Medusa Admin dashboard and go to the Reviews page. You'll see a new column with checkboxes that allow you to select multiple reviews.
If you try selecting multiple reviews, you'll see a command bar at the bottom center of the page that allows you to approve or reject the selected reviews.
If you choose to approve or reject the reviews, the status of the selected reviews will change, and the table will update to reflect the new status.

Step 10: List Reviews Store API Route#
In the upcoming steps, you'll start customizing the storefront to show the reviews of a product and allow logged-in customers to add reviews.
Before doing that, you need to add an API route that retrieves the list of approved reviews. You'll later show these in the storefront.
Add Average Rating Method in Service#
On the product's page, you want to display the average rating of a product. To do this, you'll add a method that retrieves the average rating of a product's reviews in the Review Module's service.
In src/modules/product-review/service.ts, add the following methods to the ProductReviewModuleService class:
1import { InjectManager, MedusaService, MedusaContext } from "@medusajs/framework/utils"2import Review from "./models/review"3import { Context } from "@medusajs/framework/types"4import { EntityManager } from "@medusajs/framework/mikro-orm/knex"5 6class ProductReviewModuleService extends MedusaService({7 Review,8}) {9 @InjectManager() 10 async getAverageRating(11 productId: string,12 @MedusaContext() sharedContext?: Context<EntityManager>13 ): Promise<number> { 14 const result = await sharedContext?.manager?.execute(15 `SELECT AVG(rating) as average 16 FROM review 17 WHERE product_id = '${productId}' AND status = 'approved'`18 )19 20 return parseFloat(parseFloat(result?.[0]?.average ?? 0).toFixed(2))21 }22}23 24export default ProductReviewModuleService
To run queries on the database in a service's method, you need to:
- Add the
InjectManagerdecorator to the method. - Pass as the last parameter a context parameter that has the
MedusaContextdecorator.
By doing the above, Medusa injects the method with a context parameter that has a manger property whose value is a forked entity manager.
Then, you run a raw SQL query to calculate the average rating of the reviews for a product with the given ID. You also filter the reviews by the status approved.
You'll use this method next in the API route.
Create API Route#
To create the API route that lists the reviews of a product with average rating, create the file src/api/store/products/[id]/reviews/route.ts with the following content:
8import { createFindParams } from "@medusajs/medusa/api/utils/validators"9 10export const GetStoreReviewsSchema = createFindParams()11 12export const GET = async (13 req: MedusaRequest,14 res: MedusaResponse15) => {16 const { id } = req.params17 18 const query = req.scope.resolve(ContainerRegistrationKeys.QUERY)19 const reviewModuleService: ProductReviewModuleService = req.scope.resolve(PRODUCT_REVIEW_MODULE)20 21 // Get reviews for product22 const { data: reviews, metadata: {23 count,24 take,25 skip,26 } = { count: 0, take: 10, skip: 0 } } = await query.graph({27 entity: "review",28 filters: {29 product_id: id,30 status: "approved",31 },32 ...req.queryConfig,33 })34 35 res.json({36 reviews,37 count,38 limit: take,39 offset: skip,40 average_rating: await reviewModuleService.getAverageRating(id),41 })42}
You first define a GetStoreReviewsSchema schema that will allow clients to pass the following query parameters:
limit: The number of reviews to retrieve.offset: The number of items to skip before retrieving the reviews.order: The fields to sort the reviews by in ascending or descending order.
Then, you export a GET function, and that exposes a GET API Route at the path /store/products/[id]/reviews. In the route handler you resolve Query from the Medusa container, which allows you to retrieve data across modules.
Next, you retrieve the approved reviews of a product using Query. Notice that you pass in query.graph the req.queryConfig object. This object holds the fields to retrieve and the pagination configurations. You'll configure this object in a bit.
Finally, you return the reviews with pagination fields and the average rating of the product.
Apply Query Configurations Middleware#
The last step is to add a middleware that validates the query parameters passed to the request, and sets the default Query configurations.
In src/api/middlewares.ts, add a new middleware:
1// other imports2import { 3 validateAndTransformQuery,4} from "@medusajs/framework/http"5import { GetStoreReviewsSchema } from "./store/products/[id]/reviews/route"6 7export default defineMiddlewares({8 routes: [9 // ...10 {11 matcher: "/store/products/:id/reviews",12 methods: ["GET"],13 middlewares: [14 validateAndTransformQuery(GetStoreReviewsSchema, {15 isList: true,16 defaults: [17 "id", 18 "rating", 19 "title", 20 "first_name", 21 "last_name", 22 "content", 23 "created_at",24 ],25 }),26 ],27 },28 ],29})
You apply the validateAndTransformQuery middleware to the GET API route at the path /store/products/:id/reviews. Similar to before, you pass to the middleware:
- The validation schema of the request's query parameters, which is the
GetStoreReviewsSchemayou created earlier. - An object of Query configurations. It has the following properties:
isList: A boolean indicating whether the route returns a list of items. This enables the pagination configurations.defaults: An array of fields to retrieve by default.
By adding this middleware, you allow clients to pass pagination query parameters to the API route, and set default fields to retrieve.
You'll use this API route next as you customize the Next.js Starter Storefront.
Step 11: Customize Next.js Starter Storefront#
In this step, you'll customize the Next.js Starter Storefront to:
- Display a product's review and average rating on its page.
- Allow authenticated customers to submit a review for a product.
Add Product Review Types#
Before implementing the customizations, you'll add a type definition for the product review which you'll re-use in the storefront.
In src/types/global.ts, add the following types:
You define the type of a product review object and the properties it has.
Add Functions to Fetch and Submit Reviews#
Next, you'll add two functions that fetch and submit reviews using the API routes you created earlier. To send requests to the API routes, you can use Medusa's JS SDK.
In src/lib/data/products.ts, add the following functions:
1import { StoreProductReview } from "../../types/global"2 3// ...4 5export const getProductReviews = async ({6 productId,7 limit = 10,8 offset = 0,9}: {10 productId: string11 limit?: number12 offset?: number 13}) => {14 const headers = {15 ...(await getAuthHeaders()),16 }17 18 const next = {19 ...(await getCacheOptions(`product-reviews-${productId}`)),20 }21 22 return sdk.client.fetch<{23 reviews: StoreProductReview[]24 average_rating: number25 limit: number26 offset: number27 count: number28 }>(`/store/products/${productId}/reviews`, {29 headers,30 query: {31 limit,32 offset,33 order: "-created_at",34 },35 next,36 cache: "force-cache",37 })38}39 40export const addProductReview = async (input: {41 title?: string42 content: string43 first_name: string44 last_name: string45 rating: number,46 product_id: string47}) => {48 const headers = {49 ...(await getAuthHeaders()),50 }51 52 return sdk.client.fetch(`/store/reviews`, {53 method: "POST",54 headers,55 body: input,56 next: {57 ...(await getCacheOptions(`product-reviews-${input.product_id}`)),58 },59 cache: "no-store",60 })61}
You define two functions:
getProductReviews: Fetches the reviews of a product with the given ID. It accepts an object with the product ID, and optional limit and offset parameters, allowing you to paginate the reviews.addProductReview: Submits a review for a product. It accepts an object with the review's details.
To send requests to your custom API routes, you use the JS SDK's client.fetch method.
Add Product Review Form#
You'll now create a component that shows the product review form for authenticated customers. Afterwards, you'll display this component on the product's page.
To create the form component, create the file src/modules/products/components/product-reviews/form.tsx with the following content:
1"use client"2 3import { useState } from "react"4 5import { useEffect } from "react"6import { retrieveCustomer } from "../../../../lib/data/customer"7import { HttpTypes } from "@medusajs/types"8import { Button, Input, Label, Textarea, toast, Toaster } from "@medusajs/ui"9import { Star, StarSolid } from "@medusajs/icons"10import { addProductReview } from "../../../../lib/data/products"11 12type ProductReviewsFormProps = {13 productId: string14}15 16export default function ProductReviewsForm({ productId }: ProductReviewsFormProps) {17 const [customer, setCustomer] = useState<HttpTypes.StoreCustomer | null>(null)18 const [isLoading, setIsLoading] = useState(false)19 const [showForm, setShowForm] = useState(false)20 const [title, setTitle] = useState("")21 const [content, setContent] = useState("")22 const [rating, setRating] = useState(0)23 24 useEffect(() => {25 if (customer) {26 return27 }28 29 retrieveCustomer().then(setCustomer)30 }, [])31 32 if (!customer) {33 return <></>34 }35 36 const handleSubmit = async (e: React.FormEvent<HTMLFormElement>) => {37 if (!content || !rating) {38 toast.error("Error", {39 description: "Please fill in required fields.",40 })41 return42 }43 44 e.preventDefault()45 setIsLoading(true)46 addProductReview({47 title,48 content,49 rating,50 first_name: customer.first_name || "",51 last_name: customer.last_name || "",52 product_id: productId,53 }).then(() => {54 setShowForm(false)55 setTitle("")56 setContent("")57 setRating(0)58 toast.success("Success", {59 description: "Your review has been submitted and is awaiting approval.",60 })61 }).catch(() => {62 toast.error("Error", {63 description: "An error occurred while submitting your review. Please try again later.",64 })65 }).finally(() => {66 setIsLoading(false)67 })68 }69 70 // TODO render form71}
You create a ProductReviewsForm component that accepts the product's ID as a prop. In the component, you:
- Fetch the authenticated customer's details. If the customer is not authenticated, you return an empty fragment.
- Implement a
handleSubmitfunction that submits the review when the form is submitted.
Next, you'll add a return statement that shows the form when the customer is authenticated. Replace the TODO with the following:
1return (2 <div className="product-page-constraint mt-8">3 {!showForm && (4 <div className="flex justify-center">5 <Button variant="secondary" onClick={() => setShowForm(true)}>Add a review</Button>6 </div>7 )}8 {showForm && (9 <div className="flex flex-col gap-y-4">10 <div className="flex flex-col gap-y-2">11 <span className="text-xl-regular text-ui-fg-base">12 Add a review13 </span>14 15 <form onSubmit={handleSubmit} className="flex flex-col gap-y-4">16 <div className="flex flex-col gap-y-2">17 <Label>Title</Label>18 <Input name="title" value={title} onChange={(e) => setTitle(e.target.value)} placeholder="Title" />19 </div>20 <div className="flex flex-col gap-y-2">21 <Label>Content</Label>22 <Textarea name="content" value={content} onChange={(e) => setContent(e.target.value)} placeholder="Content" />23 </div>24 <div className="flex flex-col gap-y-2">25 <Label>Rating</Label>26 <div className="flex gap-x-1">27 {Array.from({ length: 5 }).map((_, index) => (28 <Button key={index} variant="transparent" onClick={(e) => {29 e.preventDefault()30 setRating(index + 1)31 }} className="p-0">32 {rating >= index + 1 ? <StarSolid className="text-ui-tag-orange-icon" /> : <Star />}33 </Button>34 ))}35 </div>36 </div>37 <Button type="submit" disabled={isLoading} variant="primary">Submit</Button>38 </form>39 </div>40 </div>41 )}42 <Toaster />43 </div>44)
In the return statement, you:
- Show an "Add a review" button. When clicked, the form is displayed.
- In the form, you show the customer fields for the title, content, and rating for the review. The rating input is displayed as stars, and the customer can click on a star to set the rating.
- When the form is submitted, you call the
handleSubmitfunction to submit the review.
Display Product Reviews#
Now, you'll add the components to display the product reviews and the product review form on the product's page.
Create the file src/modules/products/components/product-reviews/index.tsx with the following content:
1"use client"2 3import { getProductReviews } from "../../../../lib/data/products"4import { Star, StarSolid } from "@medusajs/icons"5import { StoreProductReview } from "../../../../types/global"6import { Button } from "@medusajs/ui"7import { useState, useEffect } from "react"8import ProductReviewsForm from "./form"9type ProductReviewsProps = {10 productId: string11}12 13export default function ProductReviews({14 productId,15}: ProductReviewsProps) {16 const [page, setPage] = useState(1)17 const defaultLimit = 1018 const [reviews, setReviews] = useState<StoreProductReview[]>([])19 const [rating, setRating] = useState(0)20 const [hasMoreReviews, setHasMoreReviews] = useState(false)21 const [count, setCount] = useState(0)22 23 useEffect(() => {24 getProductReviews({25 productId,26 limit: defaultLimit,27 offset: (page - 1) * defaultLimit,28 }).then(({ reviews: paginatedReviews, average_rating, count, limit }) => {29 setReviews((prev) => {30 const newReviews = paginatedReviews.filter(31 (review) => !prev.some((r) => r.id === review.id)32 )33 return [...prev, ...newReviews]34 })35 setRating(Math.round(average_rating))36 console.log(count, limit, page, count > limit * page)37 setHasMoreReviews(count > limit * page)38 setCount(count)39 })40 }, [page])41 42 // TODO add return statement43}
You create a ProductReviews component that accepts the product's ID as a prop. In the component, you:
- Define state variables related to the reviews and pagination.
- When the page changes, you fetch the reviews of the product with the given ID.
Before adding the return statement that will show the reviews and the create-review form, you'll add a component that renders a single review.
Add the following component after the ProductReviews component:
1function Review({ review }: { review: StoreProductReview }) {2 return (3 <div className="flex flex-col gap-y-2 text-base-regular text-ui-fg-base">4 <div className="flex gap-x-2 items-center">5 {review.title && <strong>{review.title}</strong>}6 <div className="flex gap-x-1">7 {Array.from({ length: 5 }).map((_, index) => (8 <span key={index}>9 {index <= review.rating ? (10 <StarSolid className="text-ui-tag-orange-icon" />11 ) : (12 <Star />13 )}14 </span>15 ))}16 </div>17 </div>18 <div>{review.content}</div>19 <div className="border-t border-ui-border-base pt-4 text-sm-regular">20 {review.first_name} {review.last_name}21 </div>22 </div>23 )24}
You add a Review component that accepts a review object as a prop. In the component, you render the review's title, rating, content, and the reviewer's name.
Next, replace the TODO in the ProductReviews component with the following:
1return (2 <div className="product-page-constraint">3 <div className="flex flex-col items-center text-center mb-16">4 <span className="text-base-regular text-gray-600 mb-6">5 Product Reviews6 </span>7 <p className="text-2xl-regular text-ui-fg-base max-w-lg">8 See what our customers are saying about this product.9 </p>10 <div className="flex gap-x-2 justify-center items-center">11 <div className="flex gap-x-2">12 {Array.from({ length: 5 }).map((_, index) => (13 <span key={index}>14 {!rating || index > rating ? (15 <Star />16 ) : (17 <StarSolid className="text-ui-tag-orange-icon" />18 )}19 </span>20 ))}21 </div>22 <span className="text-base-regular text-gray-600">23 {count} reviews24 </span>25 </div>26 </div>27 28 <div className="grid grid-cols-1 small:grid-cols-2 gap-x-6 gap-y-8">29 {reviews.map((review) => (30 <Review key={review.id} review={review} />31 ))}32 </div>33 34 {hasMoreReviews && (35 <div className="flex justify-center mt-8">36 <Button variant="secondary" onClick={() => setPage(page + 1)}>37 Load more reviews38 </Button>39 </div>40 )}41 42 <ProductReviewsForm productId={productId} />43 </div>44)
You show the average rating of the product and the number of reviews. Then, you show every review loaded. You also show a "Load more reviews" button if there are more reviews to load, which changes the page and fetches more reviews.
After the reviews, you show the ProductReviewsForm component to allow authenticated customers to submit a review.
Display Product Reviews on Product Page#
Finally, you'll customize the product's page to show the ProductReviews component.
In src/modules/products/templates/index.tsx, import the ProductReviews component at the top of the file:
Then, add the ProductReviews component before the div wrapping the RelatedProducts component:
This will show the product reviews after the product's image and details, but before the related products.
Test the Customizations#
To test out both the server and storefront customizations, first, start the Medusa application by running the following command in its directory:
Then, start the Next.js Starter Storefront by running the following command in its directory:
The storefront will run at http://localhost:8000. Open it, then click on Menu -> Store. This will show you the list of products.
If you click on one of them and scroll down below the images, you'll find a section showing the average rating and reviews of the product.

To add a review, you first need to log in as a customer. You can do so by clicking on Account at the top right of the page. In the new page, either enter the credentials of the customer you created earlier, or create a new customer.
Afterwards, go back to the product's page, you'll see the "Add a review" button below the reviews.
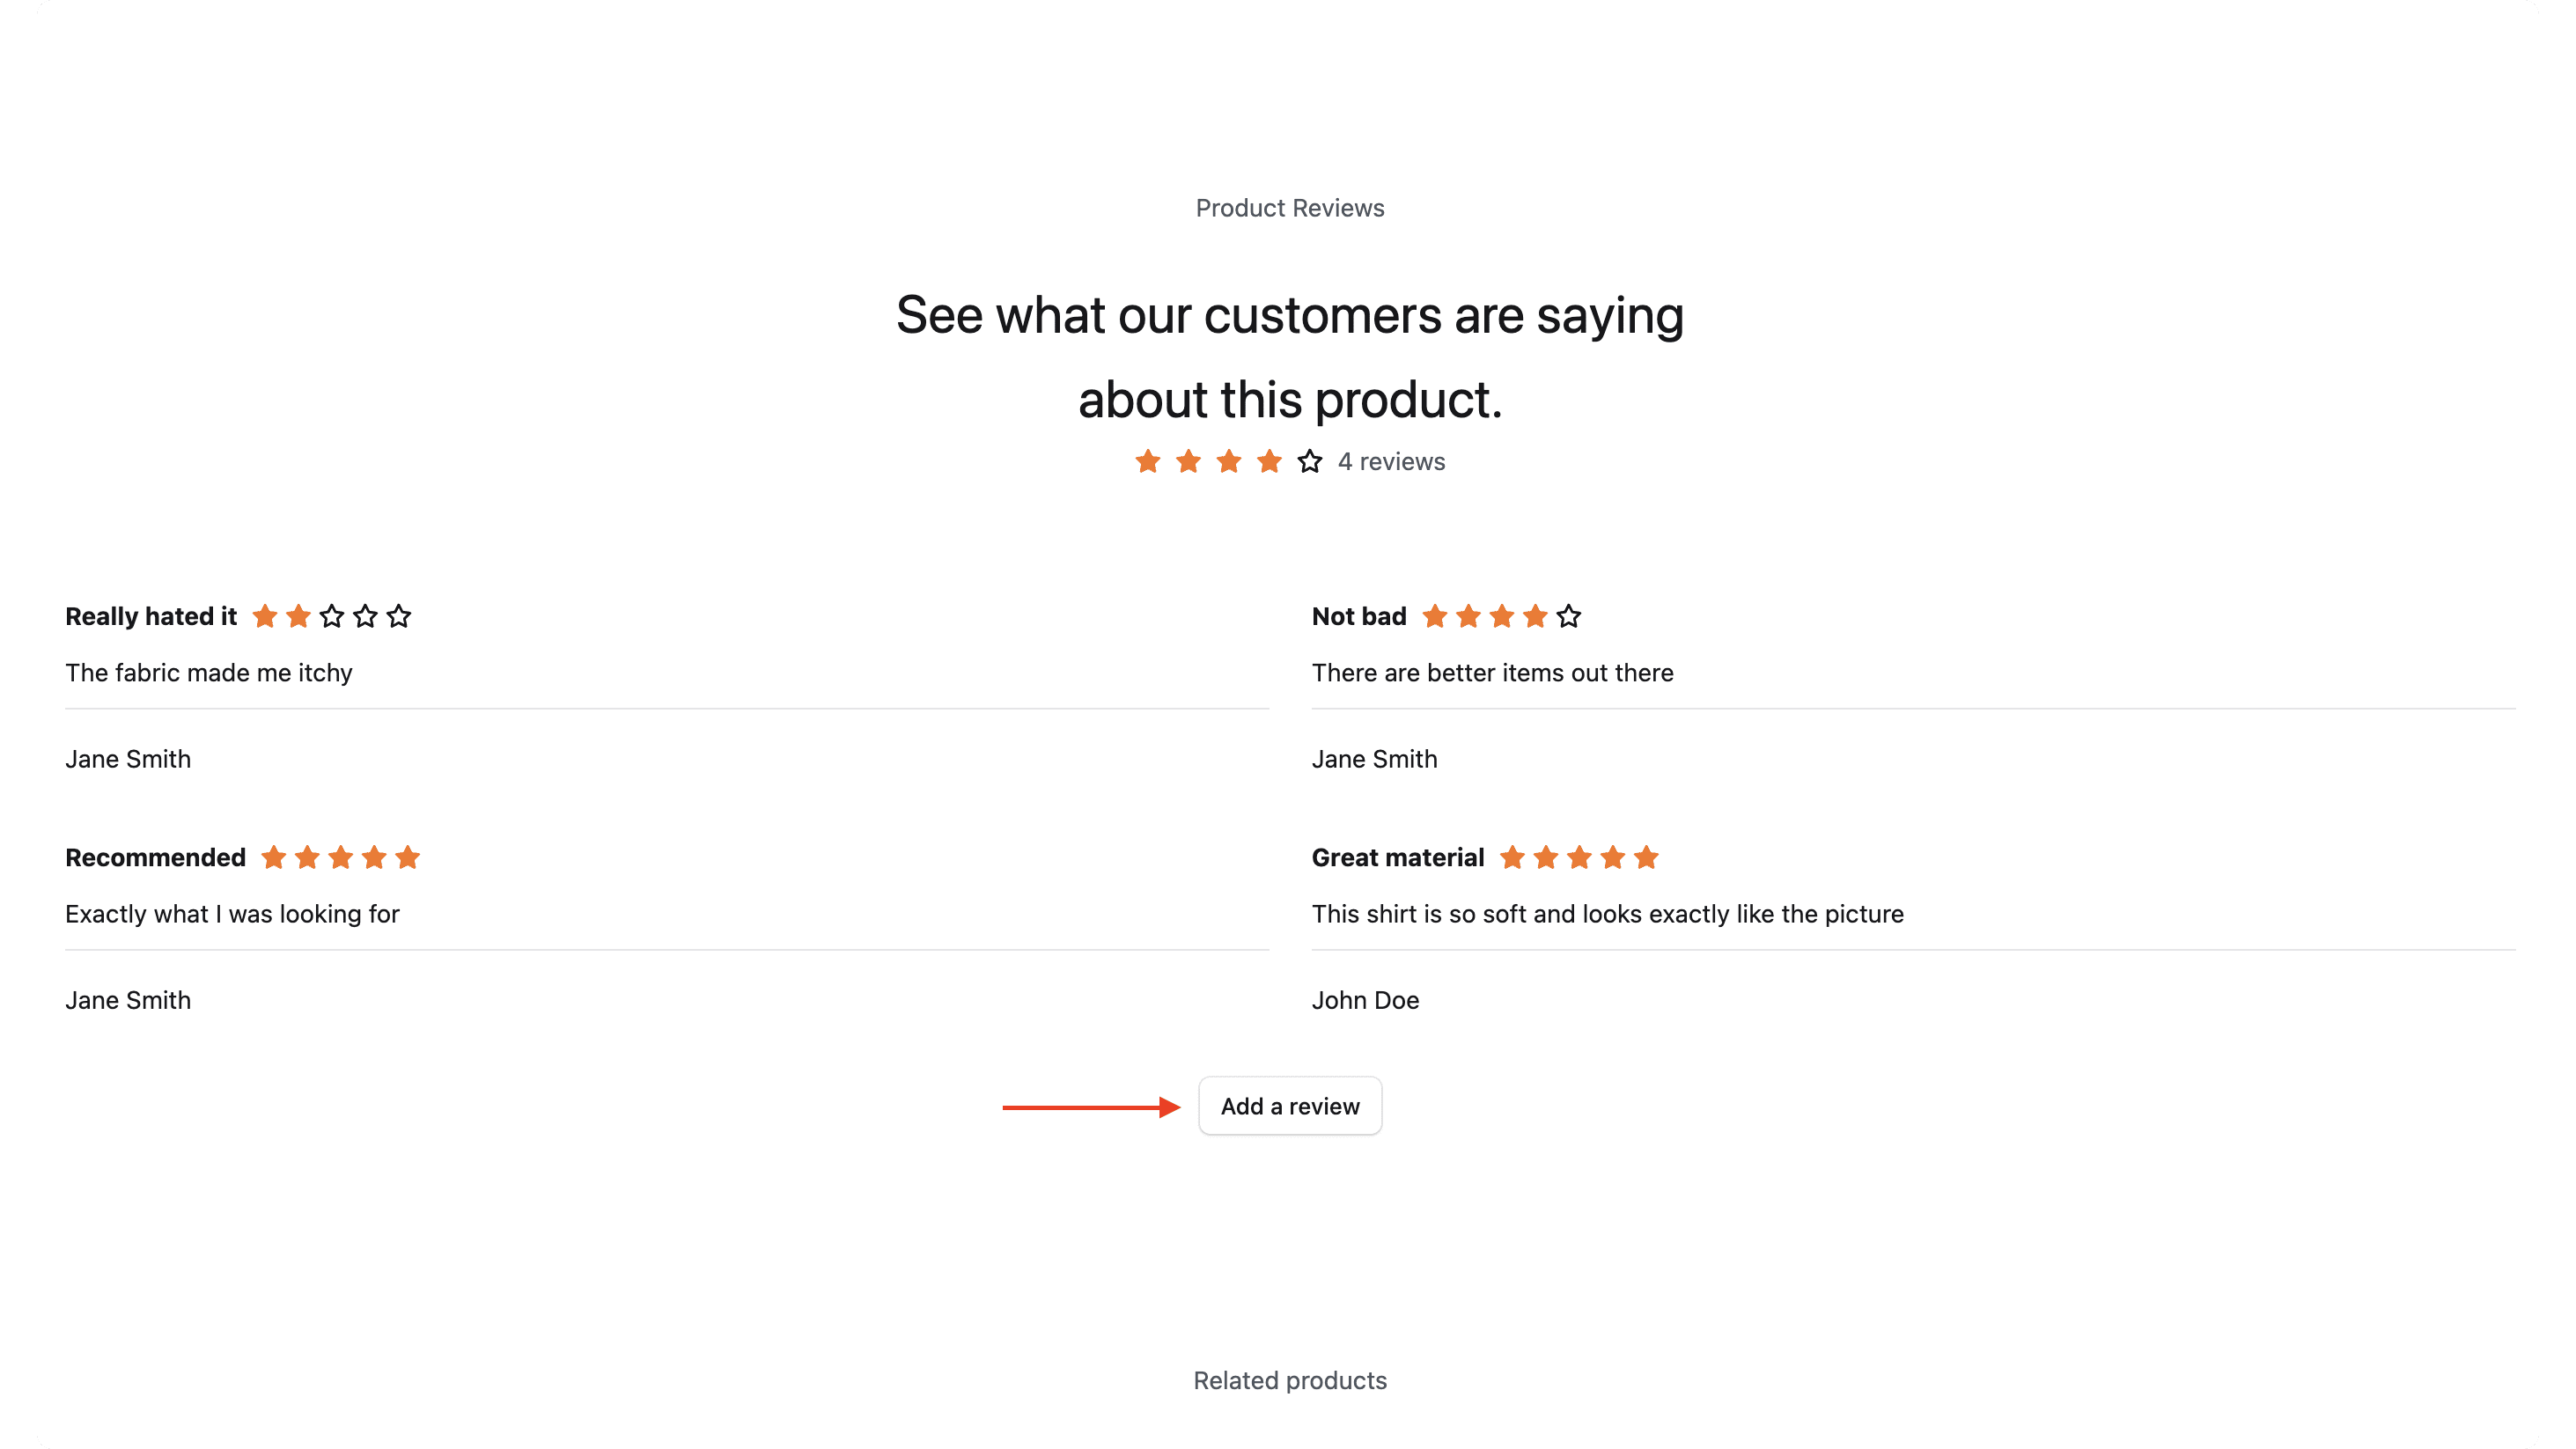
If you click on the button, a form will appear where you can fill in the review's details and submit it.

After submitting the review, you can approve or reject it from the Medusa Admin dashboard.
Next Steps#
You've now implemented product-review features in Medusa. There's still more that you can implement to enhance these features:
- Link a Review to a customer as you did in Step 3 and customize the storefront to show the customer's reviews on their profile.
- Add a feature to allow customers to upvote or downvote reviews.
- Allow customers to add images to their reviews.
If you're new to Medusa, check out the main documentation, where you'll get a more in-depth learning of all the concepts you've used in this guide and more.
To learn more about the commerce features that Medusa provides, check out Medusa's Commerce Modules.