Third-Party or Social Login in Storefront
In this guide, you'll learn how to implement third-party or social login in your storefront. You'll implement the flow using Google as an example.
Summary#
By following the steps in this guide, you'll learn how to:
- Create a login page with a button that starts the third-party login process. This redirects customers to the third-party service for authentication.
- Create a callback page that the third-party service redirects to after authentication. This page receives query parameters from the third-party service and uses them to validate the authentication in Medusa.
These are the pages you need in your storefront to allow customers to log in or create an account using a third-party service.

Step 1: Login Button in Storefront#
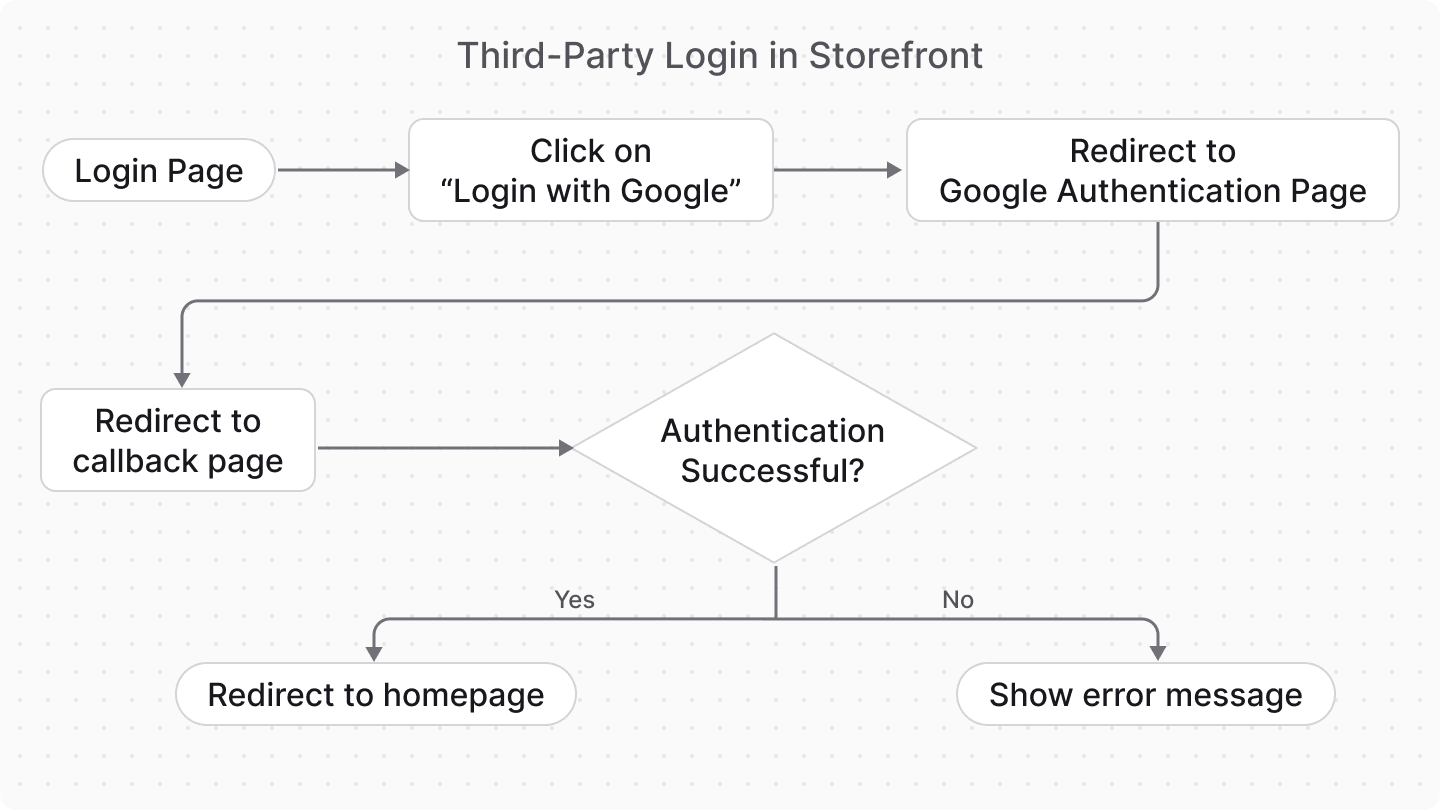
In your storefront, you'll have a login page with different login options. One of those options will be a button that starts the third-party login process. For example, a "Login with Google" button.
When the customer clicks the "Login with Google" button, send a request to the Authenticate Customer API route. This returns the URL to redirect the customer to Google for authentication.
For example:
You define a loginWithGoogle function that:
- Sends a request to the
/auth/customer/googleAPI route using the JS SDK'sauth.loginmethod.- If you're using a provider other than Google, replace
googlein theloginmethod with your provider ID.
- If you're using a provider other than Google, replace
- If the response is an object with a
locationproperty, redirect to the returned page for authentication with the third-party service. - If the response is not an object or a string, the authentication has failed.
- If the response is a string, it's the customer's authentication token. This means the customer has been authenticated before.
- All subsequent requests by the JS SDK are now authenticated. As an example, you can retrieve the customer's details using the
store.customer.retrievemethod.
- All subsequent requests by the JS SDK are now authenticated. As an example, you can retrieve the customer's details using the
Step 2: Callback Page in Storefront#
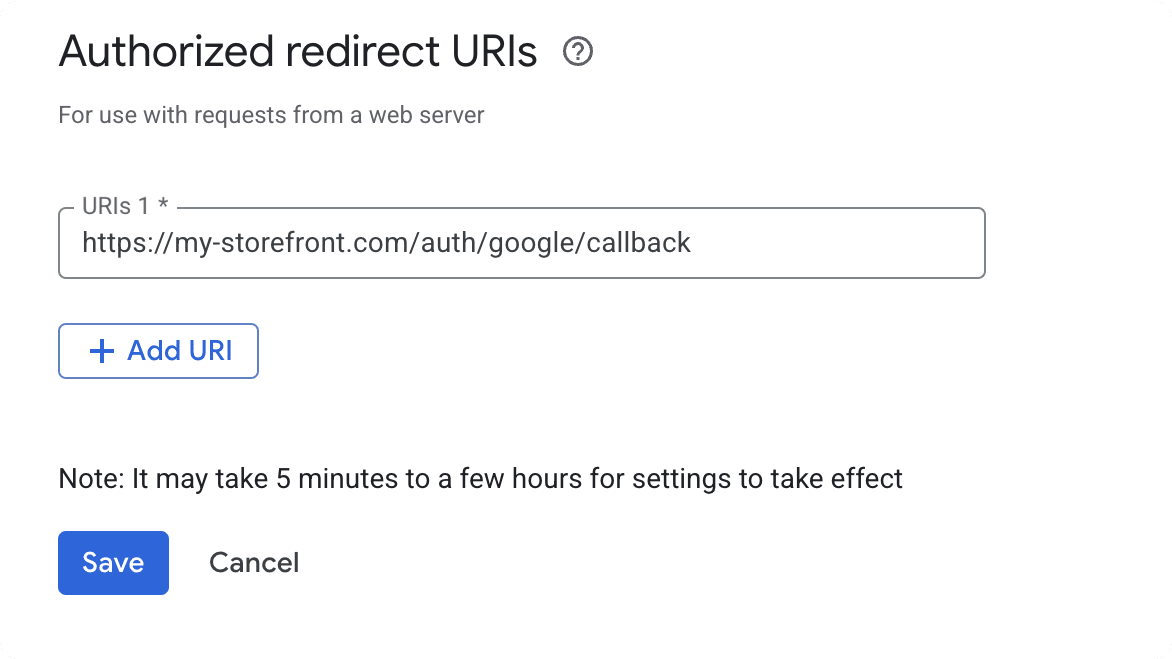
After the customer clicks the "Login with Google" button, they're redirected to Google to authenticate. Once they authenticate with Google, they're redirected back to your storefront to the callback page. You set this page's URL in Google's OAuth credentials configurations.

In this step, you'll create the callback page that handles the response from Google and creates or retrieves the customer account. You'll implement the page step-by-step to explain the different parts of the flow. You can copy the full page code from the Full Code Example for Third-Party Login Callback Page section.
a. Install the React-JWT Library#
First, install the react-jwt library in your storefront:
You'll use it to decode the token that Medusa returns after validating the authentication callback.
b. Implement the Callback Page#
Then, create a new page in your storefront that will be used as the callback/redirect URI destination:
You add a new page. In the page's component, you define the sendCallback function that sends a request to the Validate Callback API route, passing it all query parameters received from Google. These include the code and state parameters.
c. Create Customer Function#
Next, you'll add to the page a function that creates a customer. You'll use this function if the customer is authenticating with the third-party service for the first time.
Replace the TODO after the sendCallback function with the following:
You add the function createCustomer which creates a customer when this is the first time the customer is authenticating with the third-party service.
d. Refresh Token Function#
Next, you'll add to the page a function that refreshes the authentication token after creating the customer. This is necessary to ensure that the token includes the created customer's details.
Replace the new TODO with the following:
You add the function refreshToken that sends a request to the Refresh Token API route to retrieve a new token for the created customer.
The refreshToken method also updates the token stored by the JS SDK, ensuring that subsequent requests use that token.
e. Validate Callback Function#
Finally, you'll add to the page a function that validates the authentication callback in Medusa and creates or retrieves the customer account. It will use the functions added earlier.
Add in the place of the new TODO the validateCallback function that runs when the page first loads to validate the authentication:
1const validateCallback = async () => {2 const token = await sendCallback()3 4 const decodedToken = decodeToken(token) as { actor_id: string, user_metadata: Record<string, unknown> }5 6 const shouldCreateCustomer = decodedToken.actor_id === ""7 8 if (shouldCreateCustomer) {9 await createCustomer(decodedToken.user_metadata.email as string)10 11 await refreshToken()12 }13 14 // use token to send authenticated requests15 const { customer: customerData } = await sdk.store.customer.retrieve()16 17 setCustomer(customerData)18 setLoading(false)19}20 21// TODO run validateCallback when the page loads
The validateCallback function uses the functions added earlier to implement the following flow:
- Send a request to the Validate Callback API route. This returns an authentication token.
- The
sendCallbackfunction also sets the token in the JS SDK. This passes the token in subsequent requests.
- The
- Decode the token to check if it has an
actor_idproperty.
- If the property exists, the customer is already registered. The authentication token can be used for subsequent authenticated requests.
- If the property doesn't exist, this is the first time the customer is authenticating with the third-party service. So:
- Create a customer. The
user_metadatain the decoded token will hold the customer's information in the third-party provider, such as theiremail. You can use this value as the customer's email in Medusa. - Refetch the customer's authentication token.
- Use the token for subsequent authenticated requests.
- Create a customer. The
- Retrieve the customer's details as an example of testing authentication.
f. Run the Callback Validation on Page Load#
Finally, you need to run the validateCallback function when the page first loads. In React, you can do that using the useEffect hook.
For example, replace the last TODO with the following:
This runs the validateCallback function when the page first loads. If the validation is successful, the customer is authenticated.
You can show a success message or redirect the customer to another page. For example, use another useEffect hook to redirect the customer to the homepage after successful authentication:
Full Code Example for Third-Party Login Callback Page#
Deep Dive: Third-Party Login Flow in Storefront#
In this section, you'll find a general overview of the third-party login flow in the storefront. This is useful if you're not using the JS SDK or want to understand the flow better.
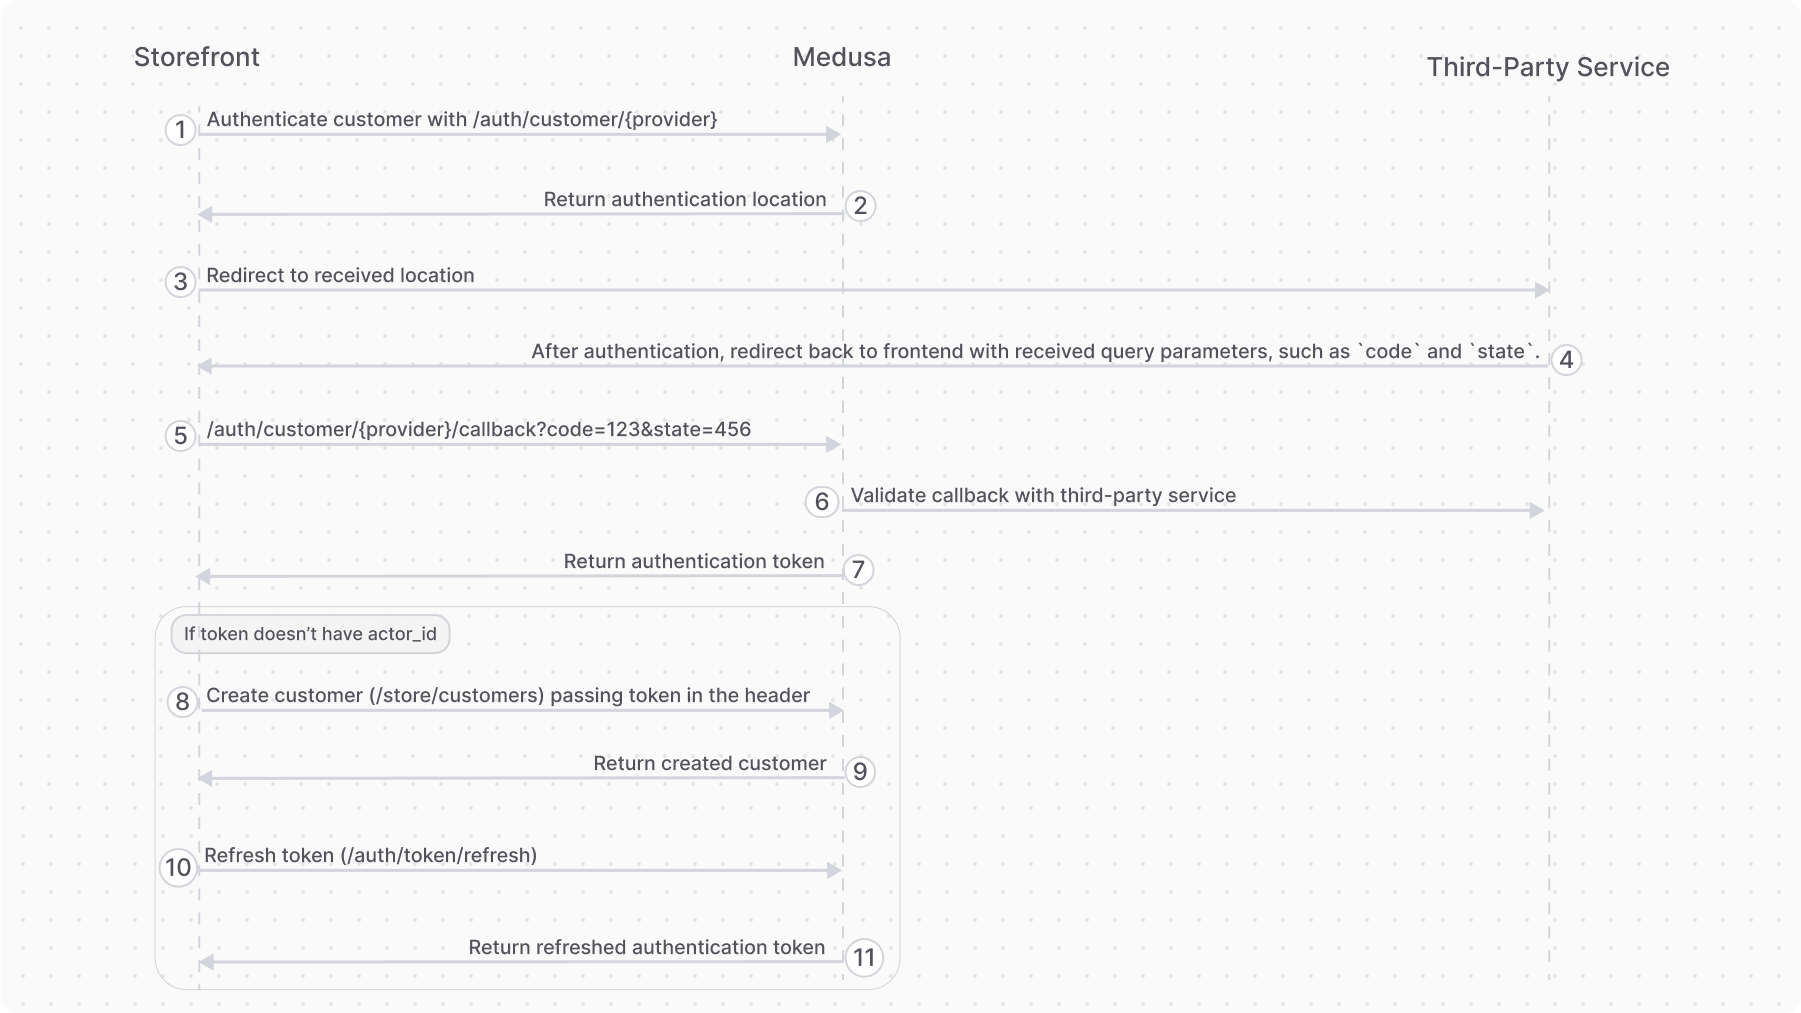
If you already set up the Auth Module Provider in your Medusa application, you can log in a customer with a third-party service, such as Google or GitHub, using the following flow:

- Authenticate the customer with the Authenticate Customer API route. It may return:
- A URL in a
locationproperty to authenticate with a third-party service, such as Google. When you receive this property, redirect to the returned location. - A token in a
tokenproperty. In this case, the customer was previously logged in with the third-party service. No additional actions are required. You can use the token to send subsequent authenticated requests.
- A URL in a
- Once authentication with the third-party service finishes, it redirects back to the storefront with query parameters such as
codeandstate. Make sure your third-party service is configured to redirect to your storefront's callback page after successful authentication. - In the storefront's callback page, send a request to the Validate Authentication Callback API route. Pass the query parameters (
code,state, etc.) received from the third-party service.- Medusa validates the authentication with the third-party service.
- If the callback validation is successful, you'll receive the authentication token. Decode the received token in the storefront using tools like react-jwt.
- If the decoded data has an
actor_idproperty, the customer is already registered. Use this token for subsequent authenticated requests. - If not, follow the rest of the steps.
- If the decoded data has an
- The customer is not registered yet. Use the received token from the Validate Authentication Callback API route to create the customer using the Create Customer API route.
- Send a request to the Refresh Token Route to retrieve a new token for the customer. Pass the token from the Validate Authentication Callback API in the header.
- Use the token for subsequent authenticated requests, such as retrieving the customer's details using the Retrieve Customer API route.