Integrate Payload CMS with Medusa
In this tutorial, you'll learn how to integrate Payload with Medusa.
When you install a Medusa application, you get a fully-fledged commerce platform with a Framework for customization. Medusa also facilitates integrating third-party services that enrich your application with features specific to your unique business use case.
By integrating Payload, you can manage your products' content with powerful content management capabilities, such as managing custom fields, media, localization, and more.
Summary#
By following this tutorial, you'll learn how to:
- Install and set up Medusa.
- Set up Payload in the Next.js Starter Storefront.
- Integrate Payload with Medusa to sync product data.
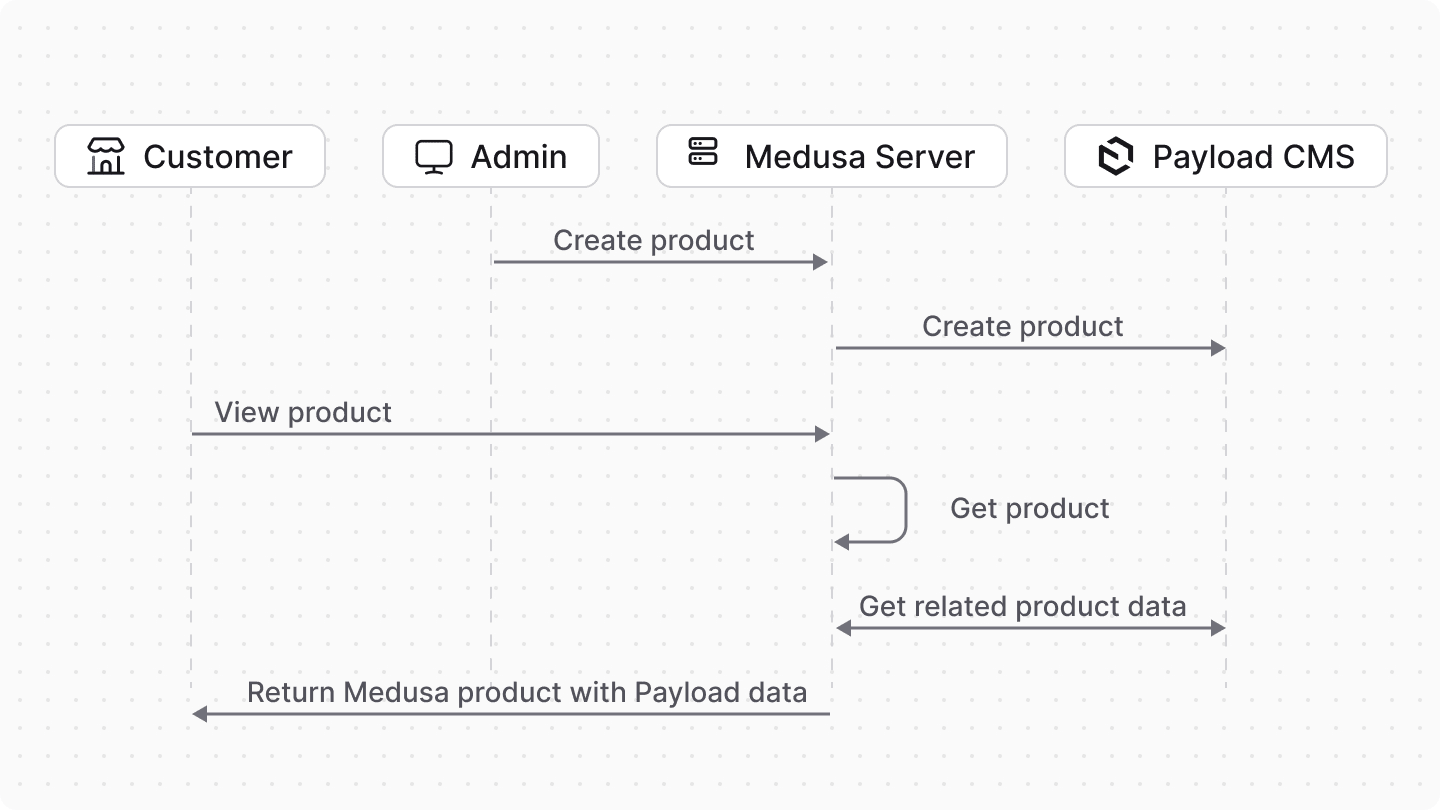
- You'll sync product data when triggered manually by admin users, or as a result of product events in Medusa.
- Display product data from Payload in the Next.js Starter Storefront.
You can follow this tutorial whether you're new to Medusa or an advanced Medusa developer.
Step 1: Install a Medusa Application#
Start by installing the Medusa application on your machine with the following command:
First, you'll be asked for the project's name. Then, when prompted about installing the Next.js Starter Storefront, choose "Yes."
Afterwards, the installation process will start, which will install the Medusa application as a monorepository in a directory with your project's name. The backend is installed in the apps/backend directory, and the Next.js Starter Storefront is installed in the apps/storefront directory.
Once the installation finishes successfully, the Medusa Admin dashboard will open with a form to create a new user. Enter the user's credentials and submit the form. Afterwards, you can log in with the new user and explore the dashboard.
apps/backend directory of your Medusa project.Step 2: Set Up Payload in the Next.js Starter Storefront#
In this step, you'll set up Payload in the Next.js Starter Storefront. This requires installing the necessary dependencies, configuring Payload, and creating collections for products and other types.
a. Install Dependencies#
In the directory of the Next.js Starter Storefront, run the following command to install the necessary dependencies:
b. Add Resolution for undici#
Payload uses the undici package, but some versions of it cause an error in the Payload CLI.
To avoid these errors, add the following resolution and override to the package.json file of the Next.js Starter Storefront:
Then, re-install the dependencies to ensure the correct version of undici is used:
c. Copy Payload Template Files#
Next, you'll need to copy the Payload template files into the Next.js Starter Storefront. These files allow you to access the Payload admin from the Next.js Starter Storefront.
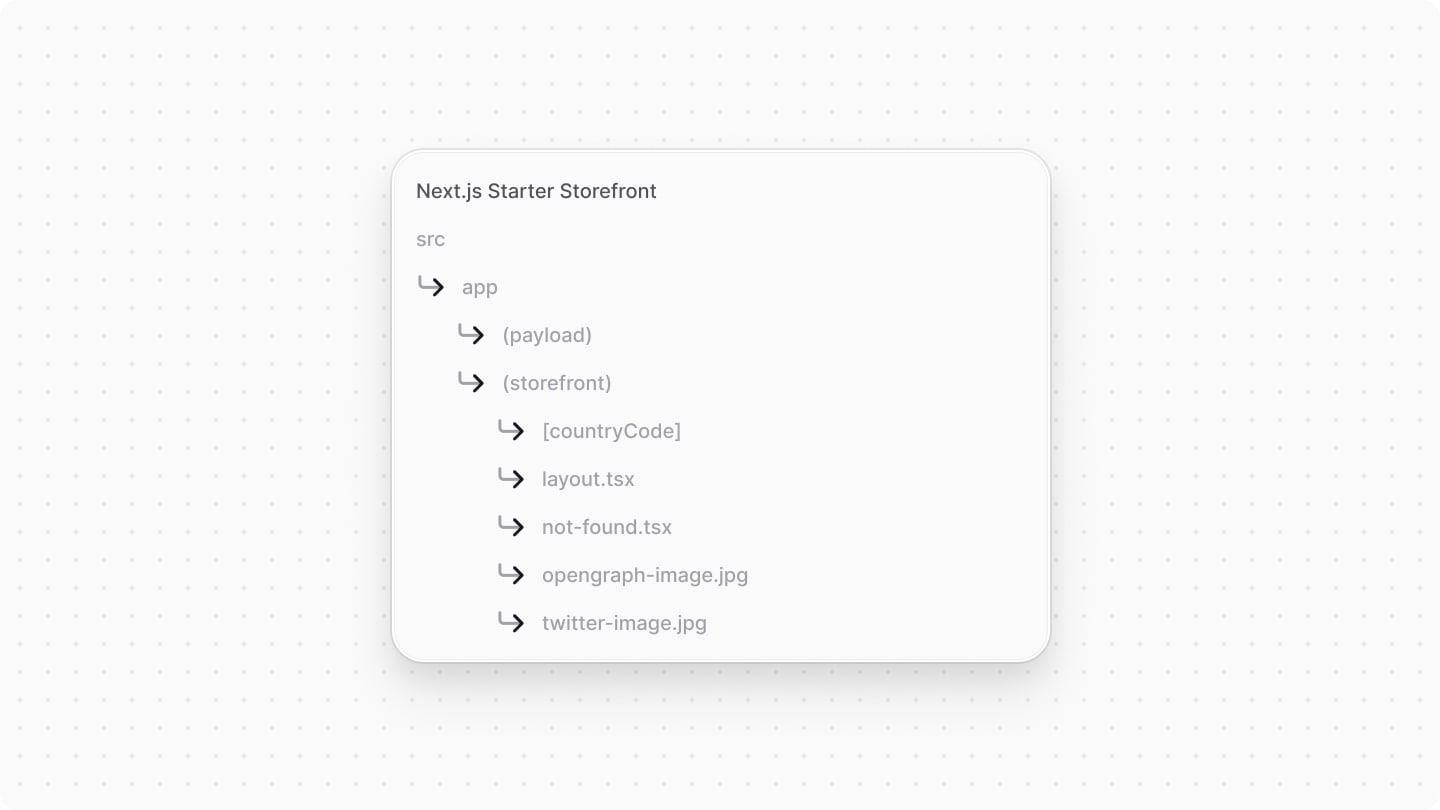
You can find the files in the examples GitHub repository. Copy these files into a new src/app/(payload) directory in the Next.js Starter Storefront.
Then, move all previous files that were under the src/app directory into a new src/app/(storefront) directory. This will ensure that the Payload admin is accessible at the /admin route, and the storefront is still accessible at the root route.
So, the src/app directory should now only include the (payload) and (storefront) directories, each containing their respective files.
d. Modify Next.js Middleware#
The Next.js Starter Storefront uses a middleware to prefix all route paths with the first region's country code. While this is useful for storefront routes, it's unnecessary for the Payload admin routes.
So, you'll modify the middleware to exclude the /admin routes.
In src/middleware.ts, change the config object to include /admin in the matcher regex pattern:
e. Add Payload Configuration#
Next, you'll add the necessary configuration to run Payload in the Next.js Starter Storefront.
Create the file src/payload.config.ts with the following content:
1import sharp from "sharp"2import { lexicalEditor } from "@payloadcms/richtext-lexical"3import { postgresAdapter } from "@payloadcms/db-postgres"4import { buildConfig } from "payload"5 6export default buildConfig({7 editor: lexicalEditor(),8 collections: [9 // TODO add collections10 ],11 12 secret: process.env.PAYLOAD_SECRET || "",13 db: postgresAdapter({14 pool: {15 connectionString: process.env.PAYLOAD_DATABASE_URL || "",16 },17 }),18 sharp,19})
The configurations are mostly default Payload configurations. You configure Payload to use PostgreSQL as the database adapter. Later, you'll add collections for products and other types.
In the configurations, you use two environment variables. To set them, add the following in your storefront's .env.local file:
Where:
PAYLOAD_DATABASE_URLis the connection string to the PostgreSQL database that Payload will use. You don't need to create the database beforehand, as Payload will create it automatically.PAYLOAD_SECRETis your Payload secret. In production, you should use a complex and secure string.
You also need to add a path alias to the payload.config.ts file, as Payload will try to import it using @payload-config.
In tsconfig.json, add the following path alias:
The baseUrl in the tsconfig.json file is set to "./src", so the path alias will resolve to src/payload.config.ts.
f. Customize Next.js Configurations#
You also need to customize the Next.js configurations to ensure that Payload works correctly with the Next.js Starter Storefront.
In next.config.js, add the following require statement at the top of the file:
Then, find the module.exports statement and replace it with the following:
You wrap the Next.js configuration with the withPayload function to ensure that Payload works correctly with Next.js.
g. Add Collections to Payload#
Now that Payload is set up in your storefront, you'll create the following collections:
User: A Payload user with API key authentication, allowing you later to sync product data from Medusa to Payload.Media: A collection for media files, allowing you to manage product images and other media.Product: A collection for products, which will be synced with Medusa's product data.
Once you're done, you'll add the collections to src/payload.config.ts.
User Collection
To create the User collection, create the file src/collections/Users.ts with the following content:
The Users collection allows you to manage users that can log into the Payload admin with email and API key authentication.
Media Collection
To create the Media collection, create the file src/collections/Media.ts with the following content:
1import { CollectionConfig } from "payload"2 3export const Media: CollectionConfig = {4 slug: "media",5 upload: {6 staticDir: "public",7 imageSizes: [8 {9 name: "thumbnail",10 width: 400,11 height: 300,12 position: "centre",13 },14 {15 name: "card",16 width: 768,17 height: 1024,18 position: "centre",19 },20 {21 name: "tablet",22 width: 1024,23 height: undefined,24 position: "centre",25 },26 ],27 adminThumbnail: "thumbnail",28 mimeTypes: ["image/*"],29 pasteURL: {30 allowList: [31 {32 protocol: "http",33 hostname: "localhost",34 },35 {36 protocol: "https",37 hostname: "medusa-public-images.s3.eu-west-1.amazonaws.com",38 },39 {40 protocol: "https",41 hostname: "medusa-server-testing.s3.amazonaws.com",42 },43 {44 protocol: "https",45 hostname: "medusa-server-testing.s3.us-east-1.amazonaws.com",46 },47 ],48 },49 },50 fields: [51 {52 name: "alt",53 type: "text",54 label: "Alt Text",55 required: false,56 },57 ],58}
The Media collection will store media files, such as product images. You can upload files to the Storage Adapters configured in Payload, such as AWS S3 or local storage. The above configurations point to the public directory of the Next.js Starter Storefront as the upload directory.
Note that you allow pasting URLs from specific sources, such as the Medusa public images S3 bucket. This allows you to paste Medusa's stock image URLs in the Payload admin.
Product Collection
Finally, you'll add the Product collection, which will be synced with Medusa's product data.
Create the file src/collections/Products.ts with the following content:
1import { CollectionConfig } from "payload"2 3export const Products: CollectionConfig = {4 slug: "products",5 admin: {6 useAsTitle: "title",7 },8 fields: [9 {10 name: "medusa_id",11 type: "text",12 label: "Medusa Product ID",13 required: true,14 unique: true,15 admin: {16 description: "The unique identifier from Medusa",17 hidden: true, // Hide this field in the admin UI18 },19 access: {20 update: ({ req }) => !!req.query.is_from_medusa,21 },22 },23 {24 name: "title",25 type: "text",26 label: "Title",27 required: true,28 admin: {29 description: "The product title",30 },31 },32 {33 name: "handle",34 type: "text",35 label: "Handle",36 required: true,37 admin: {38 description: "URL-friendly unique identifier",39 },40 validate: (value: any) => {41 // validate URL-friendly handle42 if (typeof value !== "string") {43 return "Handle must be a string"44 }45 if (!/^[a-z0-9]+(?:-[a-z0-9]+)*$/.test(value)) {46 return "Handle must be URL-friendly (lowercase letters, numbers, and hyphens only)"47 }48 return true49 },50 },51 {52 name: "subtitle",53 type: "text",54 label: "Subtitle",55 required: false,56 admin: {57 description: "Product subtitle",58 },59 },60 {61 name: "description",62 type: "richText",63 label: "Description",64 required: false,65 admin: {66 description: "Detailed product description",67 },68 },69 {70 name: "thumbnail",71 type: "upload",72 relationTo: "media" as any,73 label: "Thumbnail",74 required: false,75 admin: {76 description: "Product thumbnail image",77 },78 },79 {80 name: "images",81 type: "array",82 label: "Product Images",83 required: false,84 fields: [85 {86 name: "image",87 type: "upload",88 relationTo: "media" as any,89 required: true,90 },91 ],92 admin: {93 description: "Gallery of product images",94 },95 },96 {97 name: "seo",98 type: "group",99 label: "SEO",100 fields: [101 {102 name: "meta_title",103 type: "text",104 label: "Meta Title",105 required: false,106 },107 {108 name: "meta_description",109 type: "textarea",110 label: "Meta Description",111 required: false,112 },113 {114 name: "meta_keywords",115 type: "text",116 label: "Meta Keywords",117 required: false,118 },119 ],120 admin: {121 description: "SEO-related fields for better search visibility",122 },123 },124 {125 name: "options",126 type: "array",127 fields: [128 {129 name: "title",130 type: "text",131 label: "Option Title",132 required: true,133 },134 {135 name: "medusa_id",136 type: "text",137 label: "Medusa Option ID",138 required: true,139 admin: {140 description: "The unique identifier for the option from Medusa",141 hidden: true, // Hide this field in the admin UI142 },143 access: {144 update: ({ req }) => !!req.query.is_from_medusa,145 },146 },147 ],148 validate: (value: any, { req, previousValue }) => {149 // TODO add validation to ensure that the number of options cannot be changed150 },151 },152 {153 name: "variants",154 type: "array",155 fields: [156 {157 name: "title",158 type: "text",159 label: "Variant Title",160 required: true,161 },162 {163 name: "medusa_id",164 type: "text",165 label: "Medusa Variant ID",166 required: true,167 admin: {168 description: "The unique identifier for the variant from Medusa",169 hidden: true, // Hide this field in the admin UI170 },171 access: {172 update: ({ req }) => !!req.query.is_from_medusa,173 },174 },175 {176 name: "option_values",177 type: "array",178 fields: [179 {180 name: "medusa_id",181 type: "text",182 label: "Medusa Option Value ID",183 required: true,184 admin: {185 description: "The unique identifier for the option value from Medusa",186 hidden: true, // Hide this field in the admin UI187 },188 access: {189 update: ({ req }) => !!req.query.is_from_medusa,190 },191 },192 {193 name: "medusa_option_id",194 type: "text",195 label: "Medusa Option ID",196 required: true,197 admin: {198 description: "The unique identifier for the option from Medusa",199 hidden: true, // Hide this field in the admin UI200 },201 access: {202 update: ({ req }) => !!req.query.is_from_medusa,203 },204 },205 {206 name: "value",207 type: "text",208 label: "Value",209 required: true,210 },211 ],212 },213 ],214 validate: (value: any, { req, previousValue }) => {215 // TODO add validation to ensure that the number of variants cannot be changed216 },217 },218 ],219 hooks: {220 // TODO add 221 },222 access: {223 create: ({ req }) => !!req.query.is_from_medusa,224 delete: ({ req }) => !!req.query.is_from_medusa,225 },226}
You create a Products collection having the following fields:
medusa_id: The product's ID in Medusa, which is useful when syncing data between Payload and Medusa.title: The product's title.handle: A URL-friendly unique identifier for the product.subtitle: An optional subtitle for the product.description: A rich text description of the product.thumbnail: An optional thumbnail image for the product.images: An array of images for the product.seo: A group of fields for SEO-related information, such as meta title, description, and keywords.options: An array of product options, such as size or color.variants: An array of product variants, each with its own title and option values.
All of these fields will be filled from Medusa.
In addition, you also add the following access-control configurations:
- You disallow creating or deleting products from the Payload admin, as these actions should only be performed from Medusa.
- You disallow updating the
medusa_idfields from the Payload admin, as these fields are managed by Medusa.
Add Validation for Options and Variants
Payload admin users can only manage the content of product options and variants, but they shouldn't be able to remove or add new options or variants.
To ensure this behavior, you'll add validation to the options and variants fields in the Products collection.
First, replace the validate function in the options field with the following:
1export const Products: CollectionConfig = {2 // other configurations...3 fields: [4 // other fields...5 {6 name: "options",7 // other configurations...8 validate: (value: any, { req, previousValue }) => {9 if (req.query.is_from_medusa) {10 return true // Skip validation if the request is from Medusa11 }12 13 if (!Array.isArray(value)) {14 return "Options must be an array"15 }16 17 const optionsChanged = value.length !== previousValue?.length || value.some((option) => {18 return !option.medusa_id || !previousValue?.some(19 (prevOption) => (prevOption as any).medusa_id === option.medusa_id20 )21 })22 23 // Prevent update if the number of options is changed24 return !optionsChanged || "Options cannot be changed in number"25 },26 },27 ],28}
If the request is from Medusa (which is indicated by the is_from_medusa query parameter), the validation is skipped.
Otherwise, you only allow updating the options if the number of options remains the same and each option has a medusa_id that matches an existing option in the previous value.
Next, replace the validate function in the variants field with the following:
1export const Products: CollectionConfig = {2 // other configurations...3 fields: [4 // other fields...5 {6 name: "variants",7 // other configurations...8 validate: (value: any, { req, previousValue }) => {9 if (req.query.is_from_medusa) {10 return true // Skip validation if the request is from Medusa11 }12 13 if (!Array.isArray(value)) {14 return "Variants must be an array"15 }16 17 const changedVariants = value.length !== previousValue?.length || value.some((variant: any) => {18 return !variant.medusa_id || !previousValue?.some(19 (prevVariant: any) => prevVariant.medusa_id === variant.medusa_id20 )21 })22 23 if (changedVariants) {24 // Prevent update if the number of variants is changed25 return "Variants cannot be changed in number"26 }27 28 const changedOptionValues = value.some((variant: any) => {29 if (!Array.isArray(variant.option_values)) {30 return true // Invalid structure31 }32 33 const previousVariant = previousValue?.find(34 (v: any) => v.medusa_id === variant.medusa_id35 ) as Record<string, any> | undefined36 37 return variant.option_values.length !== previousVariant?.option_values.length || 38 variant.option_values.some((optionValue: any) => {39 return !optionValue.medusa_id || !previousVariant?.option_values.some(40 (prevOptionValue: any) => prevOptionValue.medusa_id === optionValue.medusa_id41 )42 })43 })44 45 return !changedOptionValues || "Option values cannot be changed in number"46 },47 },48 ],49}
If the request is from Medusa, the validation is skipped.
Otherwise, the function validates that:
- The number of variants is the same as the previous value.
- Each variant has a
medusa_idthat matches an existing variant in the previous value. - The number of option values for each variant is the same as the previous value.
- Each option value has a
medusa_idthat matches an existing option value in the previous value.
If any of these validations fail, an error message is returned, preventing the update.
Add Hooks to Normalize Product Data
Next, you'll add a beforeChange hook to the Products collection that will normalize incoming description data to rich-text format.
In src/collections/Products.ts, add the following import statement at the top of the file:
Then, in the Products collection, add a beforeChange property to the hooks configuration:
1export const Products: CollectionConfig = {2 // other configurations...3 hooks: {4 beforeChange: [5 async ({ data, req }) => {6 if (typeof data.description === "string") {7 data.description = convertMarkdownToLexical({8 editorConfig: await editorConfigFactory.default({9 config: req.payload.config,10 }),11 markdown: data.description,12 })13 }14 15 return data16 },17 ],18 },19}
This hook checks if the description field is a string and converts it to rich-text format. This ensures that a description coming from Medusa is properly formatted when stored in Payload.
Add Collections to Payload's Configurations
Now that you've created the collections, you need to add them to Payload's configurations.
In src/payload.config.ts, add the following imports at the top of the file:
Then, add the collections to the collections array of the buildConfig function:
i. Generate Payload Imports Map#
Before running the Payload admin, you need to generate the imports map that Payload uses to resolve the collections and other configurations.
Run the following command in the Next.js Starter Storefront directory:
This command generates the src/app/(payload)/admin/importMap.js file that Payload needs.
j. Run the Payload Admin#
You can now run the Payload admin in the Next.js Starter Storefront and create an admin user.
To start the Next.js Starter Storefront, run the following command in the Next.js Starter Storefront directory:
Then, open the Payload admin in your browser at http://localhost:8000/admin. The first time you access it, Payload will create a database at the connection URL you provided in the .env.local file.
Then, you'll see a form to create a new admin user. Enter the user's credentials and submit the form.
Once you're logged in, you can see the Products, Users, and Media collections in the Payload admin.

Step 3: Integrate Payload with Medusa#
Now that Payload is set up in the Next.js Starter Storefront, you'll create a Payload Module to integrate it with Medusa.
A module is a reusable package that provides functionalities related to a single feature or domain. Medusa integrates the module into your application without implications or side effects on your setup.
a. Create Module Directory#
A module is created under the src/modules directory of your Medusa application. So, create the directory src/modules/payload.
b. Create Types for the Module#
Next, you'll create a types file that will hold the types for the module's options and service methods.
Create the file src/modules/payload/types.ts with the following content:
For now, the file only contains the PayloadModuleOptions interface, which defines the options that the module will receive. It includes:
serverUrl: The URL of the Payload server.apiKey: The API key for authenticating with the Payload server.userCollection: The name of the user collection in Payload. This is optional and defaults tousers. It's useful for the authentication header when sending requests to the Payload API.
c. Create Service#
A module has a service that contains its logic. So, the Payload Module's service will contain the logic to create, update, retrieve, and delete data in Payload.
Create the file src/modules/payload/service.ts with the following content:
1import {2 PayloadModuleOptions,3} from "./types"4import { MedusaError } from "@medusajs/framework/utils"5 6type InjectedDependencies = {7 // inject any dependencies you need here8};9 10export default class PayloadModuleService {11 private baseUrl: string12 private headers: Record<string, string>13 private defaultOptions: Record<string, any> = {14 is_from_medusa: true,15 }16 17 constructor(18 container: InjectedDependencies,19 options: PayloadModuleOptions20 ) {21 this.validateOptions(options)22 this.baseUrl = `${options.serverUrl}/api`23 24 this.headers = {25 "Content-Type": "application/json",26 "Authorization": `${27 options.userCollection || "users"28 } API-Key ${options.apiKey}`,29 }30 }31 32 validateOptions(options: Record<any, any>): void | never {33 if (!options.serverUrl) {34 throw new MedusaError(35 MedusaError.Types.INVALID_ARGUMENT,36 "Payload server URL is required"37 )38 }39 40 if (!options.apiKey) {41 throw new MedusaError(42 MedusaError.Types.INVALID_ARGUMENT,43 "Payload API key is required"44 )45 }46 }47}
The constructor of a module's service receives the following parameters:
- The Module container that allows you to resolve module and Framework resources. You don't need to resolve any resources in this module, so you can leave it empty.
- The module options, which you'll pass to the module when you register it later in the Medusa application.
In the constructor, you validate the module options and set up the Payload base URL and headers that are necessary to send requests to Payload.
c. Add Methods to the Service#
Next, you'll add methods to the service that allow you to create, update, retrieve, and delete products in Payload.
makeRequest Method
The makeRequest private method is a utility function that makes HTTP requests to the Payload API. You'll use this method in other public methods that perform operations in Payload.
Add the makeRequest method to the PayloadModuleService class:
1export default class PayloadModuleService {2 // ...3 private async makeRequest<T = any>(4 endpoint: string,5 options: RequestInit = {}6 ): Promise<T> {7 const url = `${this.baseUrl}${endpoint}`8 9 try {10 const response = await fetch(url, {11 ...options,12 headers: {13 ...this.headers,14 ...options.headers,15 },16 })17 18 if (!response.ok) {19 const errorData = await response.json().catch(() => ({}))20 throw new MedusaError(21 MedusaError.Types.UNEXPECTED_STATE,22 `Payload API error: ${response.status} ${response.statusText}. ${23 errorData.message || ""24 }`25 )26 }27 28 return await response.json()29 } catch (error) {30 throw new MedusaError(31 MedusaError.Types.UNEXPECTED_STATE,32 `Failed to communicate with Payload: ${JSON.stringify(error)}`33 )34 }35 }36}
The makeRequest method receives the endpoint to call and the options for the request. It constructs the full URL, makes the request, and returns the response data as JSON.
If the request fails, it throws a MedusaError with the error message.
create Method
The create method will allow you to create an entry in a Payload collection, such as Products.
Before you create the method, you'll need to add necessary types for its parameters and return value.
In src/modules/payload/types.ts, add the following types:
1export interface PayloadCollectionItem {2 id: string;3 createdAt: string;4 updatedAt: string;5 medusa_id: string;6 [key: string]: any;7}8 9export interface PayloadUpsertData {10 [key: string]: any;11}12 13export interface PayloadQueryOptions {14 depth?: number;15 locale?: string;16 fallbackLocale?: string;17 select?: string;18 populate?: string;19 limit?: number;20 page?: number;21 sort?: string;22 where?: Record<string, any>;23}24 25export interface PayloadItemResult<T = PayloadCollectionItem> {26 doc: T;27 message: string;28}
You define the following types:
PayloadCollectionItem: an item in a Payload collection.PayloadUpsertData: the data required to create or update an item in a Payload collection.PayloadQueryOptions: the options for querying items in a Payload collection, which you can learn more about in the Payload documentation.PayloadItemResult: the result of a querying or performing an operation on a Payload item, which includes the item and a message.
Next, add the following import statements at the top of the src/modules/payload/service.ts file:
You import the types you just defined and the qs library, which you'll use to stringify query options.
Then, add the create method to the PayloadModuleService class:
1export default class PayloadModuleService {2 // ... other methods3 async create<T extends PayloadCollectionItem = PayloadCollectionItem>(4 collection: string,5 data: PayloadUpsertData,6 options: PayloadQueryOptions = {}7 ): Promise<PayloadItemResult<T>> {8 9 const stringifiedQuery = qs.stringify({10 ...options,11 ...this.defaultOptions,12 }, {13 addQueryPrefix: true,14 })15 16 const endpoint = `/${collection}/${stringifiedQuery}`17 18 const result = await this.makeRequest<PayloadItemResult<T>>(endpoint, {19 method: "POST",20 body: JSON.stringify(data),21 })22 return result23 }24}
The create method receives the following parameters:
collection: the slug of the collection in Payload where you want to create an item. For example,products.data: the data for the new item you want to create.options: optional query options for the request.
In the method, you use the makeRequest method to send a POST request to Payload, passing it the endpoint and request body data.
Finally, you return the result of the request that contains the created item and a message.
update Method
Next, you'll add the update method that allows you to update an existing item in a Payload collection.
Add the update method to the PayloadModuleService class:
1export default class PayloadModuleService {2 // ... other methods3 async update<T extends PayloadCollectionItem = PayloadCollectionItem>(4 collection: string,5 data: PayloadUpsertData,6 options: PayloadQueryOptions = {}7 ): Promise<PayloadItemResult<T>> {8 9 const stringifiedQuery = qs.stringify({10 ...options,11 ...this.defaultOptions,12 }, {13 addQueryPrefix: true,14 })15 16 const endpoint = `/${collection}/${stringifiedQuery}`17 18 const result = await this.makeRequest<PayloadItemResult<T>>(endpoint, {19 method: "PATCH",20 body: JSON.stringify(data),21 })22 23 return result24 }25}
Similar to the create method, the update method receives the collection slug, the data to update, and optional query options.
In the method, you use the makeRequest method to send a PATCH request to Payload, passing it the endpoint and request body data.
Finally, you return the result of the request that contains the updated item and a message.
delete Method
Next, you'll add the delete method that allows you to delete an item from a Payload collection.
First, add the following type to src/modules/payload/types.ts:
This represents a generic response from Payload, which can include data, errors, and a message.
Then, add the following import statement at the top of the src/modules/payload/service.ts file:
After that, add the delete method to the PayloadModuleService class:
1export default class PayloadModuleService {2 // ... other methods3 async delete(4 collection: string,5 options: PayloadQueryOptions = {}6 ): Promise<PayloadApiResponse> {7 8 const stringifiedQuery = qs.stringify({9 ...options,10 ...this.defaultOptions,11 }, {12 addQueryPrefix: true,13 })14 15 const endpoint = `/${collection}/${stringifiedQuery}`16 17 const result = await this.makeRequest<PayloadApiResponse>(endpoint, {18 method: "DELETE",19 })20 21 return result22 }23}
The delete method receives as parameters the collection slug and optional query options.
In the method, you use the makeRequest method to send a DELETE request to Payload, passing it the endpoint.
Finally, you return the result of the request that contains any data, errors, or a message.
find Method
The last method you'll add for now is the find method, which allows you to retrieve items from a Payload collection.
First, add the following type to src/modules/payload/types.ts:
1export interface PayloadBulkResult<T = PayloadCollectionItem> {2 docs: T[];3 totalDocs: number;4 limit: number;5 page: number;6 totalPages: number;7 hasNextPage: boolean;8 hasPrevPage: boolean;9 nextPage: number | null;10 prevPage: number | null;11 pagingCounter: number;12}
This type represents the result of a bulk query to a Payload collection, which includes an array of documents and pagination information.
Then, add the following import statement at the top of the src/modules/payload/service.ts file:
After that, add the find method to the PayloadModuleService class:
1export default class PayloadModuleService {2 async find(3 collection: string,4 options: PayloadQueryOptions = {}5 ): Promise<PayloadBulkResult<PayloadCollectionItem>> {6 7 const stringifiedQuery = qs.stringify({8 ...options,9 ...this.defaultOptions,10 }, {11 addQueryPrefix: true,12 })13 14 const endpoint = `/${collection}${stringifiedQuery}`15 16 const result = await this.makeRequest<17 PayloadBulkResult<PayloadCollectionItem>18 >(endpoint)19 20 return result21 }22}
The find method receives the collection slug and optional query options.
In the method, you use the makeRequest method to send a GET request to Payload, passing it the endpoint with the query options.
Finally, you return the result of the request that contains an array of documents and pagination information.
d. Export Module Definition#
The final piece to a module is its definition, which you export in an index.ts file at the module's root directory. This definition tells Medusa the name of the module, its service, and optionally its loaders.
To create the module's definition, create the file src/modules/payload/index.ts with the following content:
You use Module from the Modules SDK to create the module's definition. It accepts two parameters:
- The module's name, which is
payload. - An object with a required property
serviceindicating the module's service. You also pass the loader you created to ensure it's executed when the application starts.
Aside from the module definition, you export the module's name as PAYLOAD_MODULE so you can reference it later.
e. Add Module to Medusa's Configurations#
Once you finish building the module, add it to Medusa's configurations to start using it.
In medusa-config.ts, add a modules property and pass an array with your custom module:
1module.exports = defineConfig({2 // ...3 modules: [4 {5 resolve: "./src/modules/payload",6 options: {7 serverUrl: process.env.PAYLOAD_SERVER_URL || "http://localhost:8000",8 apiKey: process.env.PAYLOAD_API_KEY,9 userCollection: process.env.PAYLOAD_USER_COLLECTION || "users",10 },11 },12 ],13})
Each object in the modules array has a resolve property, whose value is either a path to the module's directory, or an npm package's name.
You also pass an options property with the module's options. You'll set the values of these options next.
f. Set Environment Variables#
To use the Payload Module, you need to set the module options in the environment variables of your Medusa application.
One of these options is the API key of a Payload admin user. To get the API key:
- Start the Next.js Starter Storefront with the following command:
- Open
localhost:8000/adminin your browser and log in with the admin user you created earlier. - Click on the "Users" collection in the sidebar.
- Choose your admin user from the list.
- Click on the "Enable API key" checkbox and copy the API key that appears.
- Click the "Save" button to save the changes.

Next, add the following environment variables to your Medusa application's .env file:
Make sure to replace your_api_key_here with the API key you copied from the Payload admin.
The Payload Module is now ready for use. You'll add customizations next to sync product data between Medusa and Payload.
Step 4: Create Virtual Read-Only Link to Products#
Medusa's Module Links feature allows you to virtually link data models from external services to modules in your Medusa application. Then, when you retrieve data from Medusa, you can also retrieve the linked data from the third-party service automatically.
In this step, you'll define a virtual read-only link between the Products collection in Payload and the Product model in Medusa. Later, you'll be able to retrieve products from Payload while retrieving products in Medusa.
a. Define the Link#
To define a virtual read-only link, create the file src/links/product-payload.ts with the following content:
1import { defineLink } from "@medusajs/framework/utils"2import ProductModule from "@medusajs/medusa/product"3import { PAYLOAD_MODULE } from "../modules/payload"4 5export default defineLink(6 {7 linkable: ProductModule.linkable.product,8 field: "id",9 },10 {11 linkable: {12 serviceName: PAYLOAD_MODULE,13 alias: "payload_product",14 primaryKey: "product_id",15 },16 },17 {18 readOnly: true,19 }20)
The defineLink function accepts three parameters:
- An object of the first data model that is part of the link. In this case, it's the
Productmodel from Medusa's Product Module. - An object of the second data model that is part of the link. In this case, it's the
Productscollection from the Payload Module. You set the following properties:serviceName: the name of the Payload Module, which ispayload.alias: an alias for the linked data model, which ispayload_product. You'll use this alias to reference the linked data model in queries.primaryKey: the primary key of the linked data model, which isproduct_id. Medusa will look for this field in the retrievedProductsfrom payload to match it with theidfield of theProductmodel.
- An object with the
readOnlyproperty set totrue, indicating that this link is read-only. This means you can only retrieve the linked data, but you don't manage the link in the database.
b. Add list Method to the Payload Module Service#
When you retrieve products from Medusa with their payload_product link, Medusa will call the list method of the Payload Module's service to retrieve the linked products from Payload.
So, in src/modules/payload/service.ts, add a list method to the PayloadModuleService class:
1export default class PayloadModuleService {2 // ... other methods3 async list(4 filter: {5 product_id: string | string[]6 }7 ) {8 const collection = filter.product_id ? "products" : "unknown"9 const ids = Array.isArray(filter.product_id) ? filter.product_id : [filter.product_id]10 const result = await this.find(11 collection,12 {13 where: {14 medusa_id: {15 in: ids.join(","),16 },17 },18 depth: 2,19 }20 )21 22 return result.docs.map((doc) => ({23 ...doc,24 product_id: doc.medusa_id,25 }))26 }27}
The list method receives a filter object with an product_id property, which is the Medusa product ID(s) to retrieve their corresponding data from Payload.
In the method, you call the find method of the Payload Module's service to retrieve products from the products collection in Payload. You pass a where query parameter to filter products by their medusa_id field.
Finally, you return an array of the payload products. You set the product_id field to the value of the medusa_id field, which is used to match the linked data in Medusa.
You can now retrieve products from Payload while retrieving products in Medusa. You'll learn how to do this in the upcoming steps.
list method is implemented to be re-usable with different collections and data models. For example, if you add a Categories collection in Payload, you can use the same list method to retrieve categories by their medusa_id field. In that case, the filter object would have a category_id property instead of product_id, and you can set the collection variable to "categories".Step 5: Create Payload Product Workflow#
In this step, you'll create the functionality to create a Medusa product in Payload. You'll later execute that functionality either when triggered by an admin user, or automatically when a product is created in Medusa.
You create custom commerce features in workflows. A workflow is a series of queries and actions, called steps, that complete a task. A workflow is similar to a function, but it allows you to track its executions' progress, define roll-back logic, and configure other advanced features.
The workflow to create a Payload product will have the following steps:
View step details
You only need to create the createPayloadItemsStep, as the other two steps are already available in Medusa.
createPayloadItemsStep#
The createPayloadItemsStep will create an item in a Payload collection, such as Products.
To create the step, create the file src/workflows/steps/create-payload-items.ts with the following content:
npm run dev or yarn dev command to generate the necessary type definitions, as explained in the Automatically Generated Types guide.1import { createStep, StepResponse } from "@medusajs/framework/workflows-sdk"2import { PayloadUpsertData } from "../../modules/payload/types"3import { PAYLOAD_MODULE } from "../../modules/payload"4 5type StepInput = {6 collection: string7 items: PayloadUpsertData[]8}9 10export const createPayloadItemsStep = createStep(11 "create-payload-items",12 async ({ items, collection }: StepInput, { container }) => {13 const payloadModuleService = container.resolve(PAYLOAD_MODULE)14 15 const createdItems = await Promise.all(16 items.map(async (item) => await payloadModuleService.create(17 collection,18 item19 ))20 )21 22 return new StepResponse({23 items: createdItems.map((item) => item.doc),24 }, {25 ids: createdItems.map((item) => item.doc.id),26 collection,27 })28 },29 async (data, { container }) => {30 if (!data) {31 return32 }33 const { ids, collection } = data34 35 const payloadModuleService = container.resolve(PAYLOAD_MODULE)36 37 await payloadModuleService.delete(38 collection,39 {40 where: {41 id: {42 in: ids.join(","),43 },44 },45 }46 )47 }48)
You create a step with the createStep function. It accepts three parameters:
- The step's unique name.
- An async function that receives two parameters:
- The step's input, which is an object holding the collection slug and an array of items to create in Payload.
- An object that has properties including the Medusa container, which is a registry of Framework and commerce tools that you can access in the step.
- An async compensation function that undoes the actions performed by the step function. This function is only executed if an error occurs during the workflow's execution.
In the step function, you resolve the Payload Module's service from the container. Then, you use its create method to create the items in Payload.
A step function must return a StepResponse instance. The StepResponse constructor accepts two parameters:
- The step's output, which is an object that contains the created items.
- Data to pass to the step's compensation function.
In the compensation function, you again resolve the Payload Module's service from the Medusa container, then delete the created items from Payload.
Create Payload Product Workflow#
You can now create the workflow that creates products in Payload.
To create the workflow, create the file src/workflows/create-payload-products.ts with the following content:
1import { createWorkflow, transform, WorkflowResponse } from "@medusajs/framework/workflows-sdk"2import { createPayloadItemsStep } from "./steps/create-payload-items"3import { updateProductsWorkflow, useQueryGraphStep } from "@medusajs/medusa/core-flows"4 5type WorkflowInput = {6 product_ids: string[]7}8 9export const createPayloadProductsWorkflow = createWorkflow(10 "create-payload-products",11 (input: WorkflowInput) => {12 const { data: products } = useQueryGraphStep({13 entity: "product",14 fields: [15 "id",16 "title",17 "handle",18 "subtitle",19 "description",20 "created_at",21 "updated_at",22 "options.*",23 "variants.*",24 "variants.options.*",25 "thumbnail",26 "images.*",27 ],28 filters: {29 id: input.product_ids,30 },31 options: {32 throwIfKeyNotFound: true,33 },34 })35 36 const createData = transform({37 products,38 }, (data) => {39 return {40 collection: "products",41 items: data.products.map((product) => ({42 medusa_id: product.id,43 createdAt: product.created_at as string,44 updatedAt: product.updated_at as string,45 title: product.title,46 handle: product.handle,47 subtitle: product.subtitle,48 description: product.description || "",49 options: product.options.map((option) => ({50 title: option.title,51 medusa_id: option.id,52 })),53 variants: product.variants.map((variant) => ({54 title: variant.title,55 medusa_id: variant.id,56 option_values: variant.options.map((option) => ({57 medusa_id: option.id,58 medusa_option_id: option.option?.id,59 value: option.value,60 })),61 })),62 })),63 }64 })65 66 const { items } = createPayloadItemsStep(67 createData68 )69 70 const updateData = transform({71 items,72 }, (data) => {73 return data.items.map((item) => ({74 id: item.medusa_id,75 metadata: {76 payload_id: item.id,77 },78 }))79 })80 81 updateProductsWorkflow.runAsStep({82 input: {83 products: updateData,84 },85 })86 87 return new WorkflowResponse({88 items,89 })90 }91)
You create a workflow using the createWorkflow function. It accepts the workflow's unique name as a first parameter.
It accepts a second parameter: a constructor function that holds the workflow's implementation. The function accepts an input object holding the IDs of the products to create in Payload.
In the workflow, you:
- Retrieve the products from Medusa using the
useQueryGraphStep.- This step uses Query to retrieve data across modules.
- Prepare the data to create the products in Payload.
- To manipulate data in a workflow, you need to use the
transformfunction. Learn more in the Data Manipulation documentation.
- To manipulate data in a workflow, you need to use the
- Create the products in Payload using the
createPayloadItemsStepyou created earlier. - Prepare the data to update the products in Medusa with the Payload product IDs.
- You store the payload ID in the
metadatafield of the Medusa product.
- You store the payload ID in the
- Update the products in Medusa using the
updateProductsWorkflow.
A workflow must return an instance of WorkflowResponse that accepts the data to return to the workflow's executor.
You'll use this workflow in the next steps to create Medusa products in Payload.
Step 6: Trigger Product Creation in Payload#
In this step, you'll allow Medusa Admin users to trigger the creation of Medusa products in Payload. To implement this, you'll create:
- An API route that emits a
products.sync-payloadevent. - A subscriber that listens to the
products.sync-payloadevent and executes thecreatePayloadProductsWorkflow. - A setting page in the Medusa Admin that allows admin users to trigger the product creation in Payload.
a. Trigger Product Sync API Route#
An API route is a REST endpoint that exposes functionalities to clients, such as storefronts and the Medusa Admin.
An API route is created in a route.ts file under a sub-directory of the src/api directory. The path of the API route is the file's path relative to src/api.
Create the file src/api/admin/payload/sync/[collection]/route.ts with the following content:
1import { MedusaRequest, MedusaResponse } from "@medusajs/framework/http"2 3export const POST = async (4 req: MedusaRequest,5 res: MedusaResponse6) => {7 const { collection } = req.params8 const eventModuleService = req.scope.resolve("event_bus")9 10 await eventModuleService.emit({11 name: `${collection}.sync-payload`,12 data: {},13 })14 15 return res.status(200).json({16 message: `Syncing ${collection} with Payload`,17 })18}
Since you export a POST route handler function, you're exposing a POST API route at /admin/payload/sync/[collection], where [collection] is a path parameter that represents the collection slug in Payload.
In the function, you resolve the Event Module's service and emit a {collection}.sync-payload event, where {collection} is the collection slug passed in the request.
Finally, you return a success response with a message indicating that the collection is being synced with Payload.
b. Create Subscriber for the Event#
Next, you'll create a subscriber that listens to the products.sync-payload event and executes the createPayloadProductsWorkflow.
A subscriber is an asynchronous function that is executed whenever its associated event is emitted.
To create a subscriber, create the file src/subscribers/products-sync-payload.ts with the following content:
1import { SubscriberArgs, type SubscriberConfig } from "@medusajs/framework"2import { createPayloadProductsWorkflow } from "../workflows/create-payload-products"3 4export default async function productSyncPayloadHandler({5 container,6}: SubscriberArgs) {7 const query = container.resolve("query")8 9 const limit = 100010 let offset = 011 let count = 012 13 do {14 const { 15 data: products,16 metadata: { count: totalCount } = {},17 } = await query.graph({18 entity: "product",19 fields: [20 "id",21 "metadata",22 ],23 pagination: {24 take: limit,25 skip: offset,26 },27 })28 29 count = totalCount || 030 offset += limit31 const filteredProducts = products.filter((product) => !product.metadata?.payload_id)32 33 if (filteredProducts.length === 0) {34 break35 }36 37 await createPayloadProductsWorkflow(container)38 .run({39 input: {40 product_ids: filteredProducts.map((product) => product.id),41 },42 })43 44 } while (count > offset + limit)45}46 47export const config: SubscriberConfig = {48 event: "products.sync-payload",49}
A subscriber file must export:
- An asynchronous function, which is the subscriber function that is executed when the event is emitted.
- A configuration object that defines the event the subscriber listens to.
In the subscriber, you use Query to retrieve all products from Medusa.
Then, you filter the products to only include those that don't have a payload product ID set in product.metadata.payload_id, and you execute the createPayloadProductsWorkflow with the filtered products' IDs.
Whenever the products.sync-payload event is emitted, the subscriber will be executed, which will create the products in Payload.
c. Create Setting Page in Medusa Admin#
Next, you'll create a setting page in the Medusa Admin that allows admin users to trigger syncing products with Payload.
Initialize JS SDK
To send requests from your Medusa Admin customizations to the Medusa server, you need to initialize the JS SDK.
Create the file src/admin/lib/sdk.ts with the following content:
Refer to the JS SDK documentation to learn more about initializing the SDK.
Create the Setting Page
A setting page is a UI route that adds a custom page to the Medusa Admin under the Settings section. The UI route is a React component that renders the page's content.
To create the setting page, create the file src/admin/routes/settings/payload/page.tsx with the following content:
1import { defineRouteConfig } from "@medusajs/admin-sdk"2import { Button, Container, Heading, toast } from "@medusajs/ui"3import { useMutation } from "@tanstack/react-query"4import { sdk } from "../../../lib/sdk"5 6const PayloadSettingsPage = () => {7 const { 8 mutateAsync: syncProductsToPayload,9 isPending: isSyncingProductsToPayload,10 } = useMutation({11 mutationFn: (collection: string) => 12 sdk.client.fetch(`/admin/payload/sync/${collection}`, {13 method: "POST",14 }),15 onSuccess: () => toast.success(`Triggered syncing collection data with Payload`),16 })17 18 return (19 <Container className="divide-y p-0">20 <div className="flex items-center justify-between px-6 py-4">21 <Heading level="h1">Payload Settings</Heading>22 </div>23 <div className="flex flex-col gap-4 px-6 py-4">24 <p>25 This page allows you to trigger syncing your Medusa data with Payload. It26 will only create items not in Payload.27 </p>28 <Button29 variant="primary"30 onClick={() => syncProductsToPayload("products")}31 isLoading={isSyncingProductsToPayload}32 >33 Sync Products to Payload34 </Button>35 </div>36 </Container>37 )38}39 40export const config = defineRouteConfig({41 label: "Payload",42})43 44export default PayloadSettingsPage
A settings page file must export:
- A React component that renders the page. This is the file's default export.
- A configuration object created with the
defineRouteConfigfunction. It accepts an object with properties that define the page's configuration, such as its sidebar label.
In the page's component, you define a mutation function using Tanstack Query and the JS SDK. This function will send a POST request to the API route you created earlier to trigger syncing products with Payload.
Then, you render a button that, when clicked, calls the mutation function to trigger the syncing process.
d. Test Product Syncing#
You can now test syncing products from Medusa to Payload. To do that:
- Start your Medusa application with the following command:
- Run the Next.js Starter Storefront with the command:
- Open the Medusa Admin at
localhost:9000/appand log in with your admin user. - Go to Settings -> Payload.
- On the setting page, click the "Sync Products to Payload" button.

You'll see a success message indicating that the products are being synced with Payload. You can also confirm that the event was triggered by checking the Medusa server logs for the following message:
To check that the products were created in Payload, open the Payload admin at localhost:8000/admin and go to "Products" from the sidebar. You should see your Medusa products listed there.

If you click on a product, you can edit its details, such as its title or description.
Step 7: Automatically Create Product in Payload#
In this step, you'll handle the product.created event to automatically create a product in Payload whenever a product is created in Medusa.
You already have the workflow to create a product in Payload, so you only need to create a subscriber that listens to the product.created event and executes the createPayloadProductsWorkflow.
Create the file src/subscribers/product-created.ts with the following content:
1import { SubscriberArgs, type SubscriberConfig } from "@medusajs/framework"2import { createPayloadProductsWorkflow } from "../workflows/create-payload-products"3 4export default async function productCreatedHandler({5 event: { data },6 container,7}: SubscriberArgs<{8 id: string9}>) {10 await createPayloadProductsWorkflow(container)11 .run({12 input: {13 product_ids: [data.id],14 },15 })16}17 18export const config: SubscriberConfig = {19 event: "product.created",20}
This subscriber listens to the product.created event and executes the createPayloadProductsWorkflow with the created product's ID.
Test Automatic Product Creation#
To test out the automatic product creation in Payload, make sure that both the Medusa application and the Next.js Starter Storefront are running.
Then, create a product in Medusa using the Medusa Admin. If you check the Products collection in the Payload admin, you should see the newly created product there as well.
Step 8: Customize Storefront to Display Payload Products#
Now that you've integrated Payload with Medusa, you can customize the Next.js Starter Storefront to display product content from Payload. By doing so, you can show product content and assets that are optimized for the storefront.
In this step, you'll customize the Next.js Starter Storefront to show the product title, description, images, and option values from Payload.
a. Fetch Payload Data with Product Data#
When you fetch product data in the Next.js Starter Storefront from the Medusa server, you can also retrieve the linked product data from Payload.
To do this, go to src/lib/data/products.ts in your Next.js Starter Storefront. You'll find a listProducts function that uses the JS SDK to fetch products from the Medusa server.
Find the sdk.client.fetch call and add *payload_product to the fields query parameter:
1export const listProducts = async ({2 // ...3}: {4 //...5}): Promise<{6 // ...7}> => {8 // ...9 return sdk.client10 .fetch<{ products: HttpTypes.StoreProduct[]; count: number }>(11 `/store/products`,12 {13 method: "GET",14 query: {15 limit,16 offset,17 region_id: region?.id,18 fields:19 "*variants.calculated_price,+variants.inventory_quantity,+metadata,+tags,*payload_product",20 ...queryParams,21 },22 headers,23 next,24 cache: "force-cache",25 }26 )27 // ...28}
Passing this field is possible because you defined the virtual read-only link between the Product model in Medusa and the Products collection in Payload.
Medusa will now return the payload data of a product from Payload and include it in the payload_product field of the product object.
b. Define Payload Product Type#
Next, you'll define a TypeScript type that adds the payload_product property to Medusa's StoreProduct type.
In src/types/global.ts, add the following imports at the top of the file:
Then, add the following type definition at the end of the file:
1export type StoreProductWithPayload = StoreProduct & {2 payload_product?: {3 medusa_id: string4 title: string5 handle: string6 subtitle?: string7 description?: SerializedEditorState8 thumbnail?: {9 id: string10 url: string11 }12 images: {13 id: string14 image: {15 id: string16 url: string17 }18 }[]19 options: {20 medusa_id: string21 title: string22 }[]23 variants: {24 medusa_id: string25 title: string26 option_values: {27 medusa_option_id: string28 value: string29 }[]30 }[]31 }32}
The StoreProductWithPayload type extends the StoreProduct type from Medusa and adds the payload_product property. This property contains the product data from Payload, including its title, description, images, options, and variants.
c. Display Payload Product Title and Description#
Next, you'll customize the product details page to display the product title and description from Payload.
To do that, you need to customize the ProductInfo component in src/modules/products/templates/product-info/index.tsx.
First, add the following import statement at the top of the file:
Then, change the type of the product prop to StoreProductWithPayload:
Next, find in the ProductInfo component's return statement where the product title is displayed and replace it with the following:
1return (2 <div id="product-info">3 <div className="flex flex-col...">4 {/* ... */}5 <Heading6 level="h2"7 className="text-3xl leading-10 text-ui-fg-base"8 data-testid="product-title"9 >10 {product?.payload_product?.title || product.title}11 </Heading>12 {/* ... */}13 </div>14 </div>15)
Also, find where the product description is displayed and replace it with the following:
1return (2 <div id="product-info">3 <div className="flex flex-col...">4 {/* ... */}5 {product?.payload_product?.description !== undefined && 6 <RichText data={product.payload_product.description} />7 }8 9 {product?.payload_product?.description === undefined && (10 <Text11 className="text-medium text-ui-fg-subtle whitespace-pre-line"12 data-testid="product-description"13 >14 {product.description}15 </Text>16 )}17 {/* ... */}18 </div>19 </div>20)
If the product has a description in Payload, it will be displayed using Payload's RichText component, which renders the rich text content. Otherwise, it will display the product description from Medusa.
d. Display Payload Product Images#
Next, you'll display the product images from Payload in the product details page and in the product preview component that is shown in the product list.
Add Image Utility Functions
You'll first create utility functions useful for retrieving the images of a product.
Create the file src/lib/util/payload-images.ts with the following content:
1import { StoreProductWithPayload } from "../../types/global"2 3export function getProductImages(product: StoreProductWithPayload) {4 return product?.payload_product?.images?.map((image) => ({5 id: image.id,6 url: formatPayloadImageUrl(image.image.url),7 })) || product.images || []8}9 10export function formatPayloadImageUrl(url: string): string {11 return url.replace(/^\/api\/media\/file/, "")12}
You define two functions:
getProductImages: This function accepts a product and returns either the images from Payload or the images from Medusa if the product doesn't have images in Payload.formatPayloadImageUrl: This function formats the image URL from Payload by removing the/api/media/fileprefix, which is not needed for displaying the image in the storefront.
Update ImageGallery Props
Next, you'll update the type of the ImageGallery component's props to receive an array of objects rather than an array of Medusa images. This ensures the component can accept images from Payload.
In src/modules/products/components/image-gallery/index.tsx, update the ImageGalleryProps type to the following:
The ImageGallery component can now accept an array of image objects, each with an id and a url.
Display Images in Product Details Page
To display the product images in the product details page, add the following imports at the top of src/modules/products/templates/index.tsx:
Next, change the type of the product prop to StoreProductWithPayload:
Then, add the following before the ProductTemplate component's return statement:
You retrieve the images to display using the getProductImages function you created earlier.
Finally, update the images prop of the ImageGallery component in the return statement:
The images on the product's details page will now be the images from Payload if available, or the images from Medusa if not.
Display Images in Product Preview
To display the product images in the product preview component that is displayed in the product list, add the following imports at the top of src/modules/products/components/product-preview/index.tsx:
Then, change the type of the product prop to StoreProductWithPayload:
Next, add the following before the return statement:
You retrieve the images to display using the getProductImages function you created earlier.
After that, update the thumbnail and images props of the Thumbnail component in the return statement:
1return (2 <LocalizedClientLink href={`/products/${product.handle}`} className="group">3 {/* ... */}4 <Thumbnail5 thumbnail={product.payload_product?.thumbnail ? 6 formatPayloadImageUrl(product.payload_product.thumbnail.url) : 7 product.thumbnail8 }9 images={productImages}10 size="full"11 isFeatured={isFeatured}12 />13 {/* ... */}14 </LocalizedClientLink>15)
The thumbnail shown in the product listing will now use the thumbnail from Payload if available, or the thumbnail from Medusa if not.
You'll also display the product title from Payload in the product preview. Find the following lines in the return statement:
And replace them with the following:
1return (2 <LocalizedClientLink href={`/products/${product.handle}`} className="group">3 {/* ... */}4 <Text className="text-ui-fg-subtle" data-testid="product-title">5 {product.payload_product?.title || product.title}6 </Text>7 {/* ... */}8 </LocalizedClientLink>9)
The product title in the product preview will now be the title from Payload if available, or the title from Medusa if not.
e. Display Product Options and Values#
The last change you'll make is to display the title of product options and their values from Payload in the product details page.
In src/modules/products/components/product-actions/index.tsx, add the following import at the top of the file:
Then, change the type of the product prop to StoreProductWithPayload:
Next, find the optionsAsKeymap function and replace it with the following:
1const optionsAsKeymap = (2 variantOptions: HttpTypes.StoreProductVariant["options"],3 payloadData: StoreProductWithPayload["payload_product"]4) => {5 const firstVariant = payloadData?.variants?.[0]6 return variantOptions?.reduce((acc: Record<string, string>, varopt: any) => {7 acc[varopt.option_id] = firstVariant?.option_values.find(8 (v) => v.medusa_option_id === varopt.id9 )?.value || varopt.value10 return acc11 }, {})12}
You update the function to receive a payloadData parameter, which is the product data from Payload. This allows you to retrieve the option values from Payload instead of Medusa.
Then, in the ProductActions component, update all usages of the optionsAsKeymap function to pass the product.payload_product data:
Finally, in the return statement, find the loop over product.options and replace it with the following:
1return (2 <>3 {/* ... */}4 {(product.options || []).map((option) => {5 const payloadOption = product.payload_product?.options?.find(6 (o) => o.medusa_id === option.id7 )8 return (9 <div key={option.id}>10 <OptionSelect11 option={option}12 current={options[option.id]}13 updateOption={setOptionValue}14 title={payloadOption?.title || option.title || ""}15 data-testid="product-options"16 disabled={!!disabled || isAdding}17 />18 </div>19 )20 })}21 {/* ... */}22 </>23)
You change the title prop of the OptionSelect component to use the title from Payload if available, or the Medusa option title if not.
Now, the product options and values will be displayed using the data from Payload, if available.
Test Storefront Customization#
To test out the storefront customization, make sure that both the Medusa application and the Next.js Starter Storefront are running.
Then, open the storefront at localhost:8000 and click on Menu -> Store. In the products listing page, you'll see thumbnails and titles of the products from Payload.

If you click on a product, you'll see the product details page with the product title, description, images, and options from Payload.

Step 9: Handle Medusa Product Events#
In this step, you'll create subscribers and workflows to handle the following Medusa product events:
- product.deleted: Delete the product in Payload when a product is deleted in Medusa.
- product-variant.created: Add a product variant to a product in Payload when a product variant is created in Medusa.
- product-variant.updated: Update a product variant's option values in Payload when a product variant is updated in Medusa.
- product-variant.deleted: Remove a product's variant in Payload when a product variant is deleted in Medusa.
- product-option.created: Add a product option to a product in Payload when a product option is created in Medusa.
- product-option.deleted: Remove a product's option in Payload when a product option is deleted in Medusa.
a. Handle Product Deletions#
To handle the product.deleted event, you'll create a workflow that deletes the product from Payload, then create a subscriber that executes the workflow when the event is emitted.
The workflow will have the following steps:
View step details
deletePayloadItemsStep
First, you need to create the deletePayloadItemsStep that allows you to delete items from a Payload collection.
Create the file src/workflows/steps/delete-payload-items.ts with the following content:
1import { createStep, StepResponse } from "@medusajs/framework/workflows-sdk"2import { PAYLOAD_MODULE } from "../../modules/payload"3 4type StepInput = {5 collection: string;6 where: Record<string, any>;7}8 9export const deletePayloadItemsStep = createStep(10 "delete-payload-items",11 async ({ where, collection }: StepInput, { container }) => {12 const payloadModuleService = container.resolve(PAYLOAD_MODULE)13 14 const prevData = await payloadModuleService.find(collection, {15 where,16 })17 18 await payloadModuleService.delete(collection, {19 where,20 })21 22 return new StepResponse({}, {23 prevData,24 collection,25 })26 },27 async (data, { container }) => {28 if (!data) {29 return30 }31 const { prevData, collection } = data32 33 const payloadModuleService = container.resolve(PAYLOAD_MODULE)34 35 for (const item of prevData.docs) {36 await payloadModuleService.create(37 collection,38 item39 )40 }41 }42)
This step accepts a collection slug and a where condition to specify which items to delete from Payload.
In the step, you first retrieve the existing items that match the where condition using the find method in the Payload Module's service. You pass these items to the compensation function so that you can restore them if an error occurs in the workflow.
Then, you delete the items using the delete method of the Payload Module's service.
Delete Payload Products Workflow
Next, to create the workflow that deletes products from Payload, create the file src/workflows/delete-payload-products.ts with the following content:
1import { createWorkflow, transform, WorkflowResponse } from "@medusajs/framework/workflows-sdk"2import { deletePayloadItemsStep } from "./steps/delete-payload-items"3 4type WorkflowInput = {5 product_ids: string[]6}7 8export const deletePayloadProductsWorkflow = createWorkflow(9 "delete-payload-products",10 ({ product_ids }: WorkflowInput) => {11 const deleteProductsData = transform({12 product_ids,13 }, (data) => {14 return {15 collection: "products",16 where: {17 medusa_id: {18 in: data.product_ids.join(","),19 },20 },21 }22 })23 24 deletePayloadItemsStep(deleteProductsData)25 26 return new WorkflowResponse(void 0)27 }28)
This workflow receives the IDs of the products to delete from Payload.
In the workflow, you prepare the data to delete from Payload using the transform function, then call the deletePayloadItemsStep to delete the products from Payload where the medusa_id matches one of the provided product IDs.
Product Deleted Subscriber
Finally, you'll create the subscriber that executes the workflow when the product.deleted event is emitted.
Create the file src/subscribers/product-deleted.ts with the following content:
1import { SubscriberArgs, type SubscriberConfig } from "@medusajs/framework"2import { deletePayloadProductsWorkflow } from "../workflows/delete-payload-products"3 4export default async function productDeletedHandler({5 event: { data },6 container,7}: SubscriberArgs<{8 id: string9}>) {10 await deletePayloadProductsWorkflow(container)11 .run({12 input: {13 product_ids: [data.id],14 },15 })16}17 18export const config: SubscriberConfig = {19 event: "product.deleted",20}
This subscriber listens to the product.deleted event and executes the deletePayloadProductsWorkflow with the deleted product's ID.
Test Product Deletion Handling
To test the product deletion handling, make sure that both the Medusa application and the Next.js Starter Storefront are running.
Then, open the Medusa Admin at localhost:9000/app and go to the products list. Delete a product that exists in Payload.
If you check the Products collection in Payload, you should see that the product has been removed from there as well.
b. Handle Product Variant Creation#
To handle the product-variant.created event, you'll create a workflow that adds the new variant to the corresponding product in Payload.
The workflow will have the following steps:
Workflow hook
Step conditioned by when
View step details
You only need to create the updatePayloadItemsStep step.
updatePayloadItemsStep
The updatePayloadItemsStep will update an item in a Payload collection, such as Products.
To create the step, create the file src/workflows/steps/update-payload-items.ts with the following content:
1import { createStep, StepResponse } from "@medusajs/framework/workflows-sdk"2import { PayloadItemResult, PayloadUpsertData } from "../../modules/payload/types"3import { PAYLOAD_MODULE } from "../../modules/payload"4 5type StepInput = {6 collection: string;7 items: PayloadUpsertData[];8}9 10export const updatePayloadItemsStep = createStep(11 "update-payload-items",12 async ({ items, collection }: StepInput, { container }) => {13 const payloadModuleService = container.resolve(PAYLOAD_MODULE)14 const ids: string[] = items.map((item) => item.id)15 16 const prevData = await payloadModuleService.find(collection, {17 where: {18 id: {19 in: ids.join(","),20 },21 },22 })23 24 const updatedItems: PayloadItemResult[] = []25 26 for (const item of items) {27 const { id, ...data } = item28 updatedItems.push(29 await payloadModuleService.update(30 collection,31 data,32 {33 where: {34 id: {35 equals: id,36 },37 },38 }39 )40 )41 }42 43 return new StepResponse({44 items: updatedItems.map((item) => item.doc),45 }, {46 prevData,47 collection,48 })49 },50 async (data, { container }) => {51 if (!data) {52 return53 }54 const { prevData, collection } = data55 56 const payloadModuleService = container.resolve(PAYLOAD_MODULE)57 58 await Promise.all(59 prevData.docs.map(async ({60 id,61 ...item62 }) => {63 await payloadModuleService.update(64 collection,65 item,66 {67 where: {68 id: {69 equals: id,70 },71 },72 }73 )74 })75 )76 }77)
In the step function, you retrieve the existing data from Payload to pass it to the compensation function. Then, you update the items in Payload.
In the compensation function, you revert the changes made in the step function if an error occurs.
Create Payload Product Variant Workflow
Create the file src/workflows/create-payload-product-variant.ts with the following content:
1import { createWorkflow, transform, when, WorkflowResponse } from "@medusajs/framework/workflows-sdk"2import { useQueryGraphStep } from "@medusajs/medusa/core-flows"3import { PayloadCollectionItem, PayloadUpsertData } from "../modules/payload/types"4import { updatePayloadItemsStep } from "./steps/update-payload-items"5 6type WorkflowInput = {7 variant_ids: string[]; 8}9 10export const createPayloadProductVariantWorkflow = createWorkflow(11 "create-payload-product-variant",12 ({ variant_ids }: WorkflowInput) => {13 const { data: productVariants } = useQueryGraphStep({14 entity: "product_variant",15 fields: [16 "id",17 "title",18 "options.*",19 "options.option.*",20 "product.payload_product.*",21 ],22 filters: {23 id: variant_ids,24 },25 options: {26 throwIfKeyNotFound: true,27 },28 })29 30 const updateData = transform({31 productVariants,32 }, (data) => {33 const items: Record<string, PayloadUpsertData> = {}34 35 data.productVariants.forEach((variant) => {36 // @ts-expect-error37 const payloadProduct = variant.product?.payload_product as PayloadCollectionItem38 if (!payloadProduct) {return}39 if (!items[payloadProduct.id]) {40 items[payloadProduct.id] = {41 variants: payloadProduct.variants || [],42 }43 }44 45 items[payloadProduct.id].variants.push({46 title: variant.title,47 medusa_id: variant.id,48 option_values: variant.options.map((option) => ({49 medusa_id: option.id,50 medusa_option_id: option.option?.id,51 value: option.value,52 })),53 })54 })55 56 return {57 collection: "products",58 items: Object.keys(items).map((id) => ({59 id,60 ...items[id],61 })),62 }63 })64 65 const result = when({ updateData }, (data) => data.updateData.items.length > 0)66 .then(() => {67 return updatePayloadItemsStep(updateData)68 })69 70 const items = transform({ result }, (data) => data.result?.items || [])71 72 return new WorkflowResponse({73 items,74 })75 }76)
This workflow receives the IDs of the product variants to add to Payload.
In the workflow, you:
- Retrieve the product variant details from Medusa using the
useQueryGraphStep, including the linked product data from Payload. - Prepare the data to update the product in Payload by adding the new variant to the existing variants array.
- Update the product in Payload using the
updatePayloadItemsStepif there are any items to update. - Return the updated items from the workflow.
Product Variant Created Subscriber
Finally, you'll create the subscriber that executes the workflow when the product-variant.created event is emitted.
Create the file src/subscribers/variant-created.ts with the following content:
1import { SubscriberArgs, type SubscriberConfig } from "@medusajs/framework"2import { createPayloadProductVariantWorkflow } from "../workflows/create-payload-product-variant"3 4export default async function productVariantCreatedHandler({5 event: { data },6 container,7}: SubscriberArgs<{8 id: string9}>) {10 await createPayloadProductVariantWorkflow(container)11 .run({12 input: {13 variant_ids: [data.id],14 },15 })16}17 18export const config: SubscriberConfig = {19 event: "product-variant.created",20}
This subscriber listens to the product-variant.created event and executes the createPayloadProductVariantWorkflow with the created variant's ID.
Test Product Variant Creation Handling
To test the product variant creation handling, make sure that both the Medusa application and the Next.js Starter Storefront are running.
Then, open the Medusa Admin at localhost:9000/app and open a product's details page. Add a new variant to the product and save the changes.
If you check the product in Payload, you should see that the new variant has been added to the product's variants array.
c. Handle Product Variant Updates#
To handle the product-variant.updated event, you'll create a workflow that updates the variant in the corresponding product in Payload.
The workflow will have the following steps:
Workflow hook
Step conditioned by when
View step details
Update Payload Product Variants Workflow
Since you already have the necessary steps, you only need to create the workflow that uses these steps.
Create the file src/workflows/update-payload-product-variants.ts with the following content:
1import { createWorkflow, transform, when, WorkflowResponse } from "@medusajs/framework/workflows-sdk"2import { useQueryGraphStep } from "@medusajs/medusa/core-flows"3import { PayloadCollectionItem, PayloadUpsertData } from "../modules/payload/types"4import { updatePayloadItemsStep } from "./steps/update-payload-items"5 6type WorkflowInput = {7 variant_ids: string[]; 8}9 10export const updatePayloadProductVariantsWorkflow = createWorkflow(11 "update-payload-product-variants",12 ({ variant_ids }: WorkflowInput) => {13 const { data: productVariants } = useQueryGraphStep({14 entity: "product_variant",15 fields: [16 "id",17 "title",18 "options.*",19 "options.option.*",20 "product.payload_product.*",21 ],22 filters: {23 id: variant_ids,24 },25 options: {26 throwIfKeyNotFound: true,27 },28 })29 30 const updateData = transform({31 productVariants,32 }, (data) => {33 const items: Record<string, PayloadUpsertData> = {}34 35 data.productVariants.forEach((variant) => {36 // @ts-expect-error37 const payloadProduct = variant.product?.payload_product as PayloadCollectionItem38 if (!payloadProduct) {return}39 40 if (!items[payloadProduct.id]) {41 items[payloadProduct.id] = {42 variants: payloadProduct.variants || [],43 }44 }45 46 // Find and update the existing variant in the payload product47 const existingVariantIndex = items[payloadProduct.id].variants.findIndex(48 (v: any) => v.medusa_id === variant.id49 )50 51 if (existingVariantIndex >= 0) {52 // check if option values need to be updated53 const existingVariant = items[payloadProduct.id].variants[existingVariantIndex]54 const updatedOptionValues = variant.options.map((option) => ({55 medusa_id: option.id,56 medusa_option_id: option.option?.id,57 value: existingVariant.option_values.find((ov: any) => ov.medusa_id === option.id)?.value || 58 option.value,59 }))60 61 items[payloadProduct.id].variants[existingVariantIndex] = {62 ...existingVariant,63 option_values: updatedOptionValues,64 }65 } else {66 // Add the new variant to the payload product67 items[payloadProduct.id].variants.push({68 title: variant.title,69 medusa_id: variant.id,70 option_values: variant.options.map((option) => ({71 medusa_id: option.id,72 medusa_option_id: option.option?.id,73 value: option.value,74 })),75 })76 }77 })78 79 return {80 collection: "products",81 items: Object.keys(items).map((id) => ({82 id,83 ...items[id],84 })),85 }86 })87 88 const result = when({ updateData }, (data) => data.updateData.items.length > 0)89 .then(() => {90 return updatePayloadItemsStep(updateData)91 })92 93 const items = transform({ result }, (data) => data.result?.items || [])94 95 return new WorkflowResponse({96 items,97 })98 }99)
This workflow receives the IDs of the product variants to update in Payload.
In the workflow, you:
- Retrieve the product variant details from Medusa using the
useQueryGraphStep, including the linked product data from Payload. - Prepare the data to update the product in Payload by finding and updating the existing variant in the variants array. You only update the variant's option values, in case a new one is added.
- Update the product in Payload using the
updatePayloadItemsStepif there are any items to update. - Return the updated items from the workflow.
Product Variant Updated Subscriber
Finally, you'll create the subscriber that executes the workflow.
Create the file src/subscribers/variant-updated.ts with the following content:
1import { SubscriberArgs, type SubscriberConfig } from "@medusajs/framework"2import { updatePayloadProductVariantsWorkflow } from "../workflows/update-payload-product-variants"3 4export default async function productVariantUpdatedHandler({5 event: { data },6 container,7}: SubscriberArgs<{8 id: string9}>) {10 await updatePayloadProductVariantsWorkflow(container)11 .run({12 input: {13 variant_ids: [data.id],14 },15 })16}17 18export const config: SubscriberConfig = {19 event: "product-variant.updated",20}
This subscriber listens to the product-variant.updated event and executes the updatePayloadProductVariantsWorkflow with the updated variant's ID.
Test Product Variant Update Handling
To test the product variant update handling, make sure that both the Medusa application and the Next.js Starter Storefront are running.
Then, open the Medusa Admin at localhost:9000/app and open a product's details page. Edit an existing variant's title and save the changes.
If you check the product in Payload, you should see that the variant's option values have been updated in the product's variants array.
d. Handle Product Variant Deletions#
To handle the product-variant.deleted event, you'll create a workflow that removes the variant from the corresponding product in Payload.
The workflow will have the following steps:
Workflow hook
Step conditioned by when
View step details
retrievePayloadItemsStep
Since the deletePayloadProductVariantsWorkflow is executed after a product variant is deleted, you can't retrieve the product variant data from Medusa.
Instead, you'll create a step that retrieves the products containing the variants from Payload. You'll then use this data to update the products in Payload.
To create the step, create the file src/workflows/steps/retrieve-payload-items.ts with the following content:
1import { createStep, StepResponse } from "@medusajs/framework/workflows-sdk"2import { PAYLOAD_MODULE } from "../../modules/payload"3 4type StepInput = {5 collection: string;6 where: Record<string, any>;7}8 9export const retrievePayloadItemsStep = createStep(10 "retrieve-payload-items",11 async ({ where, collection }: StepInput, { container }) => {12 const payloadModuleService = container.resolve(PAYLOAD_MODULE)13 14 const items = await payloadModuleService.find(collection, {15 where,16 })17 18 return new StepResponse({19 items: items.docs,20 })21 }22)
This step accepts a collection slug and a where condition to specify which items to retrieve from Payload, then returns the found items.
Delete Payload Product Variants Workflow
To create the workflow, create the file src/workflows/delete-payload-product-variants.ts with the following content:
1import { createWorkflow, transform, when, WorkflowResponse } from "@medusajs/framework/workflows-sdk"2import { updatePayloadItemsStep } from "./steps/update-payload-items"3import { retrievePayloadItemsStep } from "./steps/retrieve-payload-items"4 5type WorkflowInput = {6 variant_ids: string[]7}8 9export const deletePayloadProductVariantsWorkflow = createWorkflow(10 "delete-payload-product-variants",11 ({ variant_ids }: WorkflowInput) => {12 const retrieveData = transform({13 variant_ids,14 }, (data) => {15 return {16 collection: "products",17 where: {18 "variants.medusa_id": {19 in: data.variant_ids.join(","),20 },21 },22 }23 })24 25 const { items: payloadProducts } = retrievePayloadItemsStep(retrieveData)26 27 const updateData = transform({28 payloadProducts,29 variant_ids,30 }, (data) => {31 const items = data.payloadProducts.map((payloadProduct) => ({32 id: payloadProduct.id,33 variants: payloadProduct.variants.filter((v: any) => !data.variant_ids.includes(v.medusa_id)),34 }))35 36 return {37 collection: "products",38 items,39 }40 })41 42 const result = when({ updateData }, (data) => data.updateData.items.length > 0)43 .then(() => {44 // Call the step to update the payload items45 return updatePayloadItemsStep(updateData)46 })47 48 const items = transform({ result }, (data) => data.result?.items || [])49 50 return new WorkflowResponse({51 items,52 })53 }54)
This workflow receives the IDs of the product variants to delete from Payload.
In the workflow, you:
- Retrieve the Payload data of the products that the variants belong to using
retrievePayloadItemsStep. - Prepare the data to update the products in Payload by filtering out the variants that should be deleted.
- Update the products in Payload using the
updatePayloadItemsStepif there are any items to update. - Return the updated items from the workflow.
Product Variant Deleted Subscriber
Finally, you'll create the subscriber that executes the workflow when the product-variant.deleted event is emitted.
Create the file src/subscribers/variant-deleted.ts with the following content:
1import { SubscriberArgs, type SubscriberConfig } from "@medusajs/framework"2import { deletePayloadProductVariantsWorkflow } from "../workflows/delete-payload-product-variants"3 4export default async function productVariantDeletedHandler({5 event: { data },6 container,7}: SubscriberArgs<{8 id: string9}>) {10 await deletePayloadProductVariantsWorkflow(container)11 .run({12 input: {13 variant_ids: [data.id],14 },15 })16}17 18export const config: SubscriberConfig = {19 event: "product-variant.deleted",20}
This subscriber listens to the product-variant.deleted event and executes the deletePayloadProductVariantsWorkflow with the deleted variant's ID.
Test Product Variant Deletion Handling
To test the product variant deletion handling, make sure that both the Medusa application and the Next.js Starter Storefront are running.
Then, open the Medusa Admin at localhost:9000/app and open a product's details page. Delete an existing variant from the product.
If you check the product in Payload, you should see that the variant has been removed from the product's variants array.
e. Handle Product Option Creation#
To handle the product-option.created event, you'll create a workflow that adds the new option to the corresponding product in Payload.
The workflow will have the following steps:
Workflow hook
Step conditioned by when
View step details
Create Payload Product Options Workflow
You already have the necessary steps, so you only need to create the workflow that uses these steps.
Create the file src/workflows/create-payload-product-options.ts with the following content:
1import { createWorkflow, transform, when, WorkflowResponse } from "@medusajs/framework/workflows-sdk"2import { useQueryGraphStep } from "@medusajs/medusa/core-flows"3import { PayloadCollectionItem, PayloadUpsertData } from "../modules/payload/types"4import { updatePayloadItemsStep } from "./steps/update-payload-items"5 6type WorkflowInput = {7 option_ids: string[]; 8}9 10export const createPayloadProductOptionsWorkflow = createWorkflow(11 "create-payload-product-options",12 ({ option_ids }: WorkflowInput) => {13 const { data: productOptions } = useQueryGraphStep({14 entity: "product_option",15 fields: [16 "id",17 "title",18 "product.payload_product.*",19 ],20 filters: {21 id: option_ids,22 },23 options: {24 throwIfKeyNotFound: true,25 },26 })27 28 const updateData = transform({29 productOptions,30 }, (data) => {31 const items: Record<string, PayloadUpsertData> = {}32 33 data.productOptions.forEach((option) => {34 // @ts-expect-error35 const payloadProduct = option.product?.payload_product as PayloadCollectionItem36 if (!payloadProduct) {return}37 38 if (!items[payloadProduct.id]) {39 items[payloadProduct.id] = {40 options: payloadProduct.options || [],41 }42 }43 44 // Add the new option to the payload product45 const newOption = {46 title: option.title,47 medusa_id: option.id,48 }49 50 // Check if option already exists, if not add it51 const existingOptionIndex = items[payloadProduct.id].options.findIndex(52 (o: any) => o.medusa_id === option.id53 )54 55 if (existingOptionIndex === -1) {56 items[payloadProduct.id].options.push(newOption)57 }58 })59 60 return {61 collection: "products",62 items: Object.keys(items).map((id) => ({63 id,64 ...items[id],65 })),66 }67 })68 69 const result = when({ updateData }, (data) => data.updateData.items.length > 0)70 .then(() => {71 return updatePayloadItemsStep(updateData)72 })73 74 const items = transform({ result }, (data) => data.result?.items || [])75 76 return new WorkflowResponse({77 items,78 })79 }80)
This workflow receives the IDs of the product options to add to Payload.
In the workflow, you:
- Retrieve the product option details from Medusa using the
useQueryGraphStep, including the linked product data from Payload. - Prepare the data to update the product in Payload by adding the new option to the existing options array, checking if it doesn't already exist.
- Update the product in Payload using the
updatePayloadItemsStepif there are any items to update. - Return the updated items from the workflow.
Product Option Created Subscriber
Finally, you'll create the subscriber that executes the workflow when the product-option.created event is emitted.
Create the file src/subscribers/option-created.ts with the following content:
1import { SubscriberArgs, type SubscriberConfig } from "@medusajs/framework"2import { createPayloadProductOptionsWorkflow } from "../workflows/create-payload-product-options"3 4export default async function productOptionCreatedHandler({5 event: { data },6 container,7}: SubscriberArgs<{8 id: string9}>) {10 await createPayloadProductOptionsWorkflow(container)11 .run({12 input: {13 option_ids: [data.id],14 },15 })16}17 18export const config: SubscriberConfig = {19 event: "product-option.created",20}
This subscriber listens to the product-option.created event and executes the createPayloadProductOptionsWorkflow with the created option's ID.
Test Product Option Creation Handling
To test the product option creation handling, make sure that both the Medusa application and the Next.js Starter Storefront are running.
Then, open the Medusa Admin at localhost:9000/app and open a product's details page. Add a new option to the product and save the changes.
If you check the product in Payload, you should see that the new option has been added to the product's options array.
f. Handle Product Option Deletions#
To handle the product-option.deleted event, you'll create a workflow that removes the option from the corresponding product in Payload.
The workflow will have the following steps:
Workflow hook
Step conditioned by when
View step details
Delete Payload Product Options Workflow
You already have the necessary steps, so you only need to create the workflow that uses these steps.
Create the file src/workflows/delete-payload-product-options.ts with the following content:
1import { createWorkflow, transform, when, WorkflowResponse } from "@medusajs/framework/workflows-sdk"2import { updatePayloadItemsStep } from "./steps/update-payload-items"3import { retrievePayloadItemsStep } from "./steps/retrieve-payload-items"4 5type WorkflowInput = {6 option_ids: string[]7}8 9export const deletePayloadProductOptionsWorkflow = createWorkflow(10 "delete-payload-product-options",11 ({ option_ids }: WorkflowInput) => {12 const retrieveData = transform({13 option_ids,14 }, (data) => {15 return {16 collection: "products",17 where: {18 "options.medusa_id": {19 in: data.option_ids.join(","),20 },21 },22 }23 })24 25 const { items: payloadProducts } = retrievePayloadItemsStep(retrieveData)26 27 const updateData = transform({28 payloadProducts,29 option_ids,30 }, (data) => {31 const items = data.payloadProducts.map((payloadProducts) => ({32 id: payloadProducts.id,33 options: payloadProducts.options.filter((o: any) => !data.option_ids.includes(o.medusa_id)),34 variants: payloadProducts.variants.map((variant: any) => ({35 ...variant,36 option_values: variant.option_values.filter((ov: any) => !data.option_ids.includes(ov.medusa_option_id)),37 })),38 }))39 40 return {41 collection: "products",42 items,43 }44 })45 46 const result = when({ updateData }, (data) => data.updateData.items.length > 0)47 .then(() => {48 return updatePayloadItemsStep(updateData)49 })50 51 const items = transform({ result }, (data) => data.result?.items || [])52 53 return new WorkflowResponse({54 items,55 })56 }57)
This workflow receives the IDs of the product options to delete from Payload.
In the workflow, you:
- Retrieve the products that contain the options to be deleted using the
retrievePayloadItemsStep. - Prepare the data to update the products in Payload by filtering out the options that should be deleted.
- Update the products in Payload using the
updatePayloadItemsStepif there are any items to update. - Return the updated items from the workflow.
Product Option Deleted Subscriber
Finally, you'll create the subscriber that executes the workflow when the product-option.deleted event is emitted.
Create the file src/subscribers/option-deleted.ts with the following content:
1import { SubscriberArgs, type SubscriberConfig } from "@medusajs/framework"2import { deletePayloadProductOptionsWorkflow } from "../workflows/delete-payload-product-options"3 4export default async function productOptionDeletedHandler({5 event: { data },6 container,7}: SubscriberArgs<{8 id: string9}>) {10 await deletePayloadProductOptionsWorkflow(container)11 .run({12 input: {13 option_ids: [data.id],14 },15 })16}17 18export const config: SubscriberConfig = {19 event: "product-option.deleted",20}
This subscriber listens to the product-option.deleted event and executes the deletePayloadProductOptionsWorkflow with the deleted option's ID.
Test Product Option Deletion Handling
To test the product option deletion handling, make sure that both the Medusa application and the Next.js Starter Storefront are running.
Then, open the Medusa Admin at localhost:9000/app and open a product's details page. Delete an existing option from the product.
If you check the product in Payload, you should see that the option has been removed from the product's options array.
Next Steps#
You've successfully integrated Medusa with Payload to manage content related to products, variants, and options. You can expand on this integration by adding more features, such as:
- Managing the content of other entities, like categories or collections. The process is similar to what you've done for products:
- Create a collection in Payload for the entity.
- Create Medusa workflows and subscribers to handle the creation, update, and deletion of the entity.
- Display the payload data in your Next.js Starter Storefront.
- Enable localization in Payload to support multiple languages.
- You only need to manage the localized content in Payload. Only the default locale will be synced with Medusa.
- You can show the localized content in your Next.js Starter Storefront based on the customer's locale.
- Add custom fields to the Payload collections that are relevant for the storefront, such as SEO metadata or promotional banners.
Learn More about Medusa#
If you're new to Medusa, check out the main documentation, where you'll get a more in-depth understanding of all the concepts you've used in this guide and more.
To learn more about the commerce features that Medusa provides, check out Medusa's Commerce Modules.
Troubleshooting#
If you encounter issues during your development, check out the troubleshooting guides.
Getting Help#
If you encounter issues not covered in the troubleshooting guides:
- Visit the Medusa GitHub repository to report issues or ask questions.
- Join the Medusa Discord community for real-time support from community members.