Authenticate Admin Users with Okta
In this tutorial, you'll learn how to allow admin users to authenticate with Okta.
When you install a Medusa application, you get a fully-fledged commerce platform with a Framework for customization. Medusa also facilitates integrating third-party services that enrich your application with features specific to your unique business use case.
Okta is an enterprise-grade identity management service that provides secure authentication. By integrating Okta with your Medusa application, you allow users in your Okta organization to authenticate and access the Medusa Admin without needing to create separate credentials.
You can follow this tutorial whether you're new to Medusa or an advanced Medusa developer.
Okta Authentication Flow Summary#
Before you implement the Okta integration, this section provides a high-level overview of how the Okta authentication flow works in Medusa.

The authentication flow consists of the following steps:
- An admin user clicks the "Login with Okta" button on the Medusa Admin login page. This action triggers a request to the Medusa server to initiate the authentication process.
- The Medusa server generates an authorization URL with the necessary parameters.
- Medusa Admin redirects the user to the Okta authorization URL.
- The user authenticates with Okta using their Okta credentials.
- After successful authentication, Okta redirects the user back to the Medusa Admin with an authorization code.
- The Medusa Admin validates the callback by sending a request to the Medusa server with the authorization code.
- The Medusa server exchanges the authorization code for tokens and retrieves the user's information from Okta.
- The Medusa server creates or updates the user's auth identity in Medusa and returns the authentication response to the Medusa Admin.
- If this is a new user, the Medusa Admin sends a request to create a new admin user in Medusa.
- The Medusa Admin refreshes the user's token and logs in the user.
Medusa's Auth Module provides the interface to authenticate users. It delegates the actual authentication logic to the underlying Auth Module Provider, which in this case is Okta.
So, to support the above flow, you'll create:
- An Okta Auth Module Provider that implements the logic to authenticate users with Okta and validate the callback.
- An admin user creation flow in the Medusa Admin that creates a new admin user in Medusa after successful authentication with Okta.
- An admin widget that adds the "Login with Okta" button to the Medusa Admin login page and handles the authentication flow from the frontend.
Step 1: Install a Medusa Application#
Start by installing the Medusa application on your machine with the following command:
First, you'll be asked for the project's name. Then, when prompted about installing the Next.js Starter Storefront, choose "Yes."
Afterwards, the installation process will start, which will install the Medusa application as a monorepository in a directory with your project's name. The backend is installed in the apps/backend directory, and the Next.js Starter Storefront is installed in the apps/storefront directory.
Once the installation finishes successfully, the Medusa Admin dashboard will open with a form to create a new user. Enter the user's credentials and submit the form. Afterwards, you can log in with the new user and explore the dashboard.
apps/backend directory of your Medusa project.Step 2: Create Okta Auth Module Provider#
In this step, you'll integrate Okta as an Auth Module Provider. Later, you'll allow admin users to authenticate with Okta.
a. Create Module Directory#
A module is created under the src/modules directory of your Medusa application. So, create the directory src/modules/okta.
b. Create Service#
A module has a service that contains its logic. For Auth Module Providers, the service implements the logic to authenticate users.
To create the service for the Okta Auth Module Provider, create the file src/modules/okta/service.ts with the following content:
1import { AbstractAuthModuleProvider } from "@medusajs/framework/utils"2import {3 Logger,4} from "@medusajs/framework/types"5 6type InjectedDependencies = {7 logger: Logger8}9 10type Options = {11 oktaDomain: string12 clientId: string13 clientSecret: string14 redirectUri: string15}16 17class OktaAuthProviderService extends AbstractAuthModuleProvider {18 static DISPLAY_NAME = "Okta"19 static identifier = "okta"20 21 // Scopes requested from Okta during authentication22 private static readonly SCOPES = ["openid", "profile", "email"]23 24 protected logger_: Logger25 protected options_: Options26 27 constructor(28 { logger }: InjectedDependencies,29 options: Options30 ) {31 // @ts-ignore32 super(...arguments)33 34 this.logger_ = logger35 this.options_ = options36 }37 38 // TODO add methods39}40 41export default OktaAuthProviderService
An Auth Module Provider's service must extend the AbstractAuthModuleProvider class. You'll implement its abstract methods in a bit.
Static Properties
The service must also define the following static properties:
DISPLAY_NAME: The display name of the Auth Module Provider.identifier: The unique identifier of the Auth Module Provider. This identifier is used to form the ID of the Auth Module Provider when registering it in Medusa.
Constructor
The constructor receives the following parameters:
- Dependencies resolved from the module's container that contains Framework resources available to the module.
- Options passed to the Auth Module Provider. You expect the following options:
oktaDomain: The Okta domain of your organization.clientId: The Client ID of your Okta application.clientSecret: The Client Secret of your Okta application.redirectUri: The Redirect URI of your Okta application.
c. Implement Service Methods#
In this section, you'll implement the methods required by the AbstractAuthModuleProvider class. You can refer to the How to Create an Auth Module Provider guide for more details about these methods.
validateOptions
The validateOptions method ensures that the module received the required options. Otherwise, it throws an error.
Add the validateOptions method to the OktaAuthProviderService class:
1import { MedusaError } from "@medusajs/framework/utils"2 3class OktaAuthProviderService extends AbstractAuthModuleProvider {4 // ...5 static validateOptions(options: Record<any, any>): void | never {6 if (!options.oktaDomain) {7 throw new MedusaError(8 MedusaError.Types.INVALID_DATA,9 "Okta auth provider requires oktaDomain option"10 )11 }12 13 if (!options.clientId) {14 throw new MedusaError(15 MedusaError.Types.INVALID_DATA,16 "Okta auth provider requires clientId option"17 )18 }19 20 if (!options.clientSecret) {21 throw new MedusaError(22 MedusaError.Types.INVALID_DATA,23 "Okta auth provider requires clientSecret option"24 )25 }26 27 if (!options.redirectUri) {28 throw new MedusaError(29 MedusaError.Types.INVALID_DATA,30 "Okta auth provider requires redirectUri option"31 )32 }33 }34}
The method receives the options passed to the module as a parameter.
It throws an error if any of the options are missing.
generateState
The generateState method is not required by the AbstractAuthModuleProvider class, but it's necessary to generate a unique state parameter that Okta requires during authentication.
Add the generateState method to the OktaAuthProviderService class:
In the method, you generate a random string that will be used as the state parameter during authentication. You'll use this method in other methods to generate the state parameter.
authenticate
The authenticate method is called when a user tries to authenticate with the Okta Auth Module Provider. It returns the URL to redirect the user to Okta for authentication.
Add the authenticate method to the OktaAuthProviderService class:
1import {2 AuthIdentityProviderService,3 AuthenticationInput,4 AuthenticationResponse,5} from "@medusajs/framework/types"6 7class OktaAuthProviderService extends AbstractAuthModuleProvider {8 // ...9 async authenticate(10 data: AuthenticationInput,11 authIdentityProviderService: AuthIdentityProviderService12 ): Promise<AuthenticationResponse> {13 const { body } = data14 15 // If callback_url is provided, use it; 16 // otherwise use the default redirectUri17 const callbackUrl = body?.callback_url || this.options_.redirectUri18 19 // Generate state parameter for CSRF protection20 const state = this.generateState()21 22 await authIdentityProviderService.setState(state, {23 callback_url: callbackUrl,24 })25 26 const params = new URLSearchParams({27 client_id: this.options_.clientId,28 response_type: "code",29 scope: OktaAuthProviderService.SCOPES.join(" "),30 redirect_uri: callbackUrl,31 state: state,32 })33 34 const authUrl = `${this.options_.oktaDomain}/oauth2/v1/authorize?${35 params.toString()36 }`37 38 // Return the authorization URL for the frontend to redirect to39 return {40 success: true,41 location: authUrl,42 }43 }44}
The method receives the following parameters:
data: The input data for the authentication request, which includes the request body, headers, and other useful information.authIdentityProviderService: The service to manage auth identities.
In the method, you:
- Extract the
callback_urlfrom the input data. If it's not provided, you use theredirectUrioption passed to the module. - Generate a state query parameter using the
generateStatemethod. - Store the state parameter along with the callback URL in the cache using the
setStatemethod of theauthIdentityProviderService. This is useful for validating the state parameter later during the callback. - Create a URL with the required parameters to redirect the user to Okta for authentication.
- Return the authorization URL in the response.
validateCallback
The validateCallback method is called when Okta redirects the user back to your application after authentication. It validates that the user authenticated successfully, creates the user's auth identity, and returns the authentication response.
Add the validateCallback method to the OktaAuthProviderService class:
1class OktaAuthProviderService extends AbstractAuthModuleProvider {2 // ...3 async validateCallback(4 data: AuthenticationInput,5 authIdentityProviderService: AuthIdentityProviderService6 ): Promise<AuthenticationResponse> {7 const { query } = data8 9 const code = query?.code as string10 const stateKey = query?.state as string11 12 if (!code) {13 return {14 success: false,15 error: "Authorization code is missing",16 }17 }18 19 const state = await authIdentityProviderService.getState(stateKey)20 21 if (!state) {22 return {23 success: false,24 error: "No state provided, or session expired",25 }26 }27 28 const callbackUrl = state.callback_url as string29 30 try {31 // Exchange the authorization code for tokens32 const tokenUrl = `${this.options_.oktaDomain}/oauth2/v1/token`33 const params = new URLSearchParams({34 grant_type: "authorization_code",35 code: code,36 redirect_uri: callbackUrl,37 client_id: this.options_.clientId,38 client_secret: this.options_.clientSecret,39 })40 41 const tokenResponse = await fetch(tokenUrl, {42 method: "POST",43 headers: {44 "Content-Type": "application/x-www-form-urlencoded",45 Accept: "application/json",46 },47 body: params.toString(),48 })49 50 if (!tokenResponse.ok) {51 const errorText = await tokenResponse.text()52 throw new MedusaError(53 MedusaError.Types.INVALID_DATA,54 `Failed to exchange code for tokens: ${errorText}`55 )56 }57 58 const tokenData = await tokenResponse.json()59 const accessToken = tokenData.access_token as string60 const refreshToken = tokenData.refresh_token as string | undefined61 const idToken = tokenData.id_token as string | undefined62 const expiresIn = tokenData.expires_in as number63 64 // Get user info from Okta using the access token65 const userInfoUrl = `${this.options_.oktaDomain}/oauth2/v1/userinfo`66 const userInfoResponse = await fetch(userInfoUrl, {67 method: "GET",68 headers: {69 Authorization: `Bearer ${accessToken}`,70 Accept: "application/json",71 },72 })73 74 if (!userInfoResponse.ok) {75 const errorText = await userInfoResponse.text()76 throw new MedusaError(77 MedusaError.Types.INVALID_DATA,78 `Failed to get user info: ${errorText}`79 )80 }81 82 const userInfo = await userInfoResponse.json()83 84 // Extract user identifier (email or sub)85 const entityId = userInfo.email || userInfo.sub86 87 if (!entityId) {88 return {89 success: false,90 error: "Unable to retrieve user identifier from Okta",91 }92 }93 94 // TODO create or update auth identity95 } catch (error) {96 this.logger_.error("Okta authentication error:", error)97 return {98 success: false,99 error: error.message || "Failed to authenticate with Okta",100 }101 }102 }103}
The method receives the following parameters:
data: The input data for the authentication request, which includes the request body, headers, and other useful information.authIdentityProviderService: The service to manage auth identities.
In the method, so far, you:
- Extract the authorization code and state parameter from the input data.
- Retrieve the stored state using the
getStatemethod of theauthIdentityProviderService. If the state is not found, return an error response. - Extract the
callback_urlfrom the retrieved state. - Exchange the authorization code for tokens by making a
POSTrequest to the Okta token endpoint. - If the token exchange is successful, you retrieve the token details from the response, including the access token, refresh token, ID token, and expiration time.
- Use the access token to fetch the user's information from Okta.
Next, you'll create or update the user's auth identity in Medusa.
Replace the // TODO create or update auth identity comment with the following:
1let authIdentity2try {3 // Try to retrieve by entity_id4 authIdentity = await authIdentityProviderService.retrieve({5 entity_id: entityId,6 })7 8 // Update existing auth identity with latest user metadata9 authIdentity = await authIdentityProviderService.update(entityId, {10 user_metadata: {11 email: userInfo.email,12 name: userInfo.name,13 given_name: userInfo.given_name,14 family_name: userInfo.family_name,15 picture: userInfo.picture,16 updated_at: new Date().toISOString(),17 },18 provider_metadata: {19 okta_sub: userInfo.sub,20 access_token: accessToken,21 refresh_token: refreshToken,22 id_token: idToken,23 expires_at: Date.now() + expiresIn * 1000,24 },25 })26} catch (error) {27 if (error.type === MedusaError.Types.NOT_FOUND) {28 // Auth identity doesn't exist, create it29 authIdentity = await authIdentityProviderService.create({30 entity_id: entityId,31 provider_metadata: {32 okta_sub: userInfo.sub,33 access_token: accessToken,34 refresh_token: refreshToken,35 id_token: idToken,36 expires_at: Date.now() + expiresIn * 1000,37 },38 user_metadata: {39 email: userInfo.email,40 name: userInfo.name,41 given_name: userInfo.given_name,42 family_name: userInfo.family_name,43 picture: userInfo.picture,44 },45 })46 } else {47 // Re-throw if it's not a NOT_FOUND error48 throw error49 }50}51 52return {53 success: true,54 authIdentity,55}
In this part of the method, you:
- Try to retrieve the user's auth identity using the
entity_id.- If the user already has an auth identity, it means the user was previously authenticated. You update the existing auth identity with the latest user metadata and provider metadata.
- Otherwise, you create a new auth identity with the user metadata and provider metadata.
- Return a successful response with the auth identity.
d. Export Module Definition#
You've now finished implementing the necessary methods for the Okta Auth Module Provider.
The final piece to a module is its definition, which you export in an index.ts file at the module's root directory. This definition tells Medusa the module's details, including its service.
To create the module's definition, create the file src/modules/okta/index.ts with the following content:
You use ModuleProvider from the Modules SDK to create the module provider's definition. It accepts two parameters:
- The name of the module that this provider belongs to, which is
Modules.AUTHin this case. - An object with a required property
servicesindicating the Module Provider's services.
e. Add Module Provider to Medusa's Configurations#
Once you finish building the module, add it to Medusa's configurations to start using it.
In medusa-config.ts, add a modules property to the configurations:
1import { 2 Modules, 3 ContainerRegistrationKeys,4} from "@medusajs/framework/utils"5 6module.exports = defineConfig({7 // ...8 modules: [9 // ...10 {11 resolve: "@medusajs/medusa/auth",12 dependencies: [13 Modules.CACHE,14 ContainerRegistrationKeys.LOGGER,15 ],16 options: {17 providers: [18 // Default email/password provider19 {20 resolve: "@medusajs/medusa/auth-emailpass",21 id: "emailpass",22 },23 // other providers...24 // Okta auth provider25 {26 resolve: "./src/modules/okta",27 id: "okta",28 options: {29 oktaDomain: process.env.OKTA_DOMAIN!,30 clientId: process.env.OKTA_CLIENT_ID!,31 clientSecret: process.env.OKTA_CLIENT_SECRET!,32 redirectUri: process.env.OKTA_REDIRECT_URI!,33 },34 },35 ],36 },37 },38 ],39})
To pass a Module Provider to the Auth Module, you add the modules property to the Medusa configuration and pass the Auth Module in its value.
The Auth Module accepts a providers option, which is an array of Auth Module Providers to register.
To register the Okta Auth Module Provider, you add an object to the providers array with the following properties:
resolve: The NPM package or path to the module provider. In this case, it's the path to thesrc/modules/oktadirectory.id: The ID of the module provider. The Auth Module Provider is then registered with the IDau_{identifier}_{id}, where:{identifier}: The identifier static property defined in the Module Provider's service, which isoktain this case.{id}: The ID set in this configuration, which is alsooktain this case.
options: The options to pass to the module provider. These are the options you defined in theOptionstype of the module provider's service.
f. Set Up Environment Variables#
Next, you'll set up the environment variables whose values you passed to the Okta Auth Module Provider.
Create Okta Application
To authenticate users with Okta, you need to create an Okta application in your Okta organization.
To create an Okta application:
- Log in to your Okta organization.
- Go to Applications -> Applications.
- Click on "Create App Integration."
- In the pop up, select "OIDC - OpenID Connect" as the Sign-in method and "Web Application" as the Application type. Click "Next."
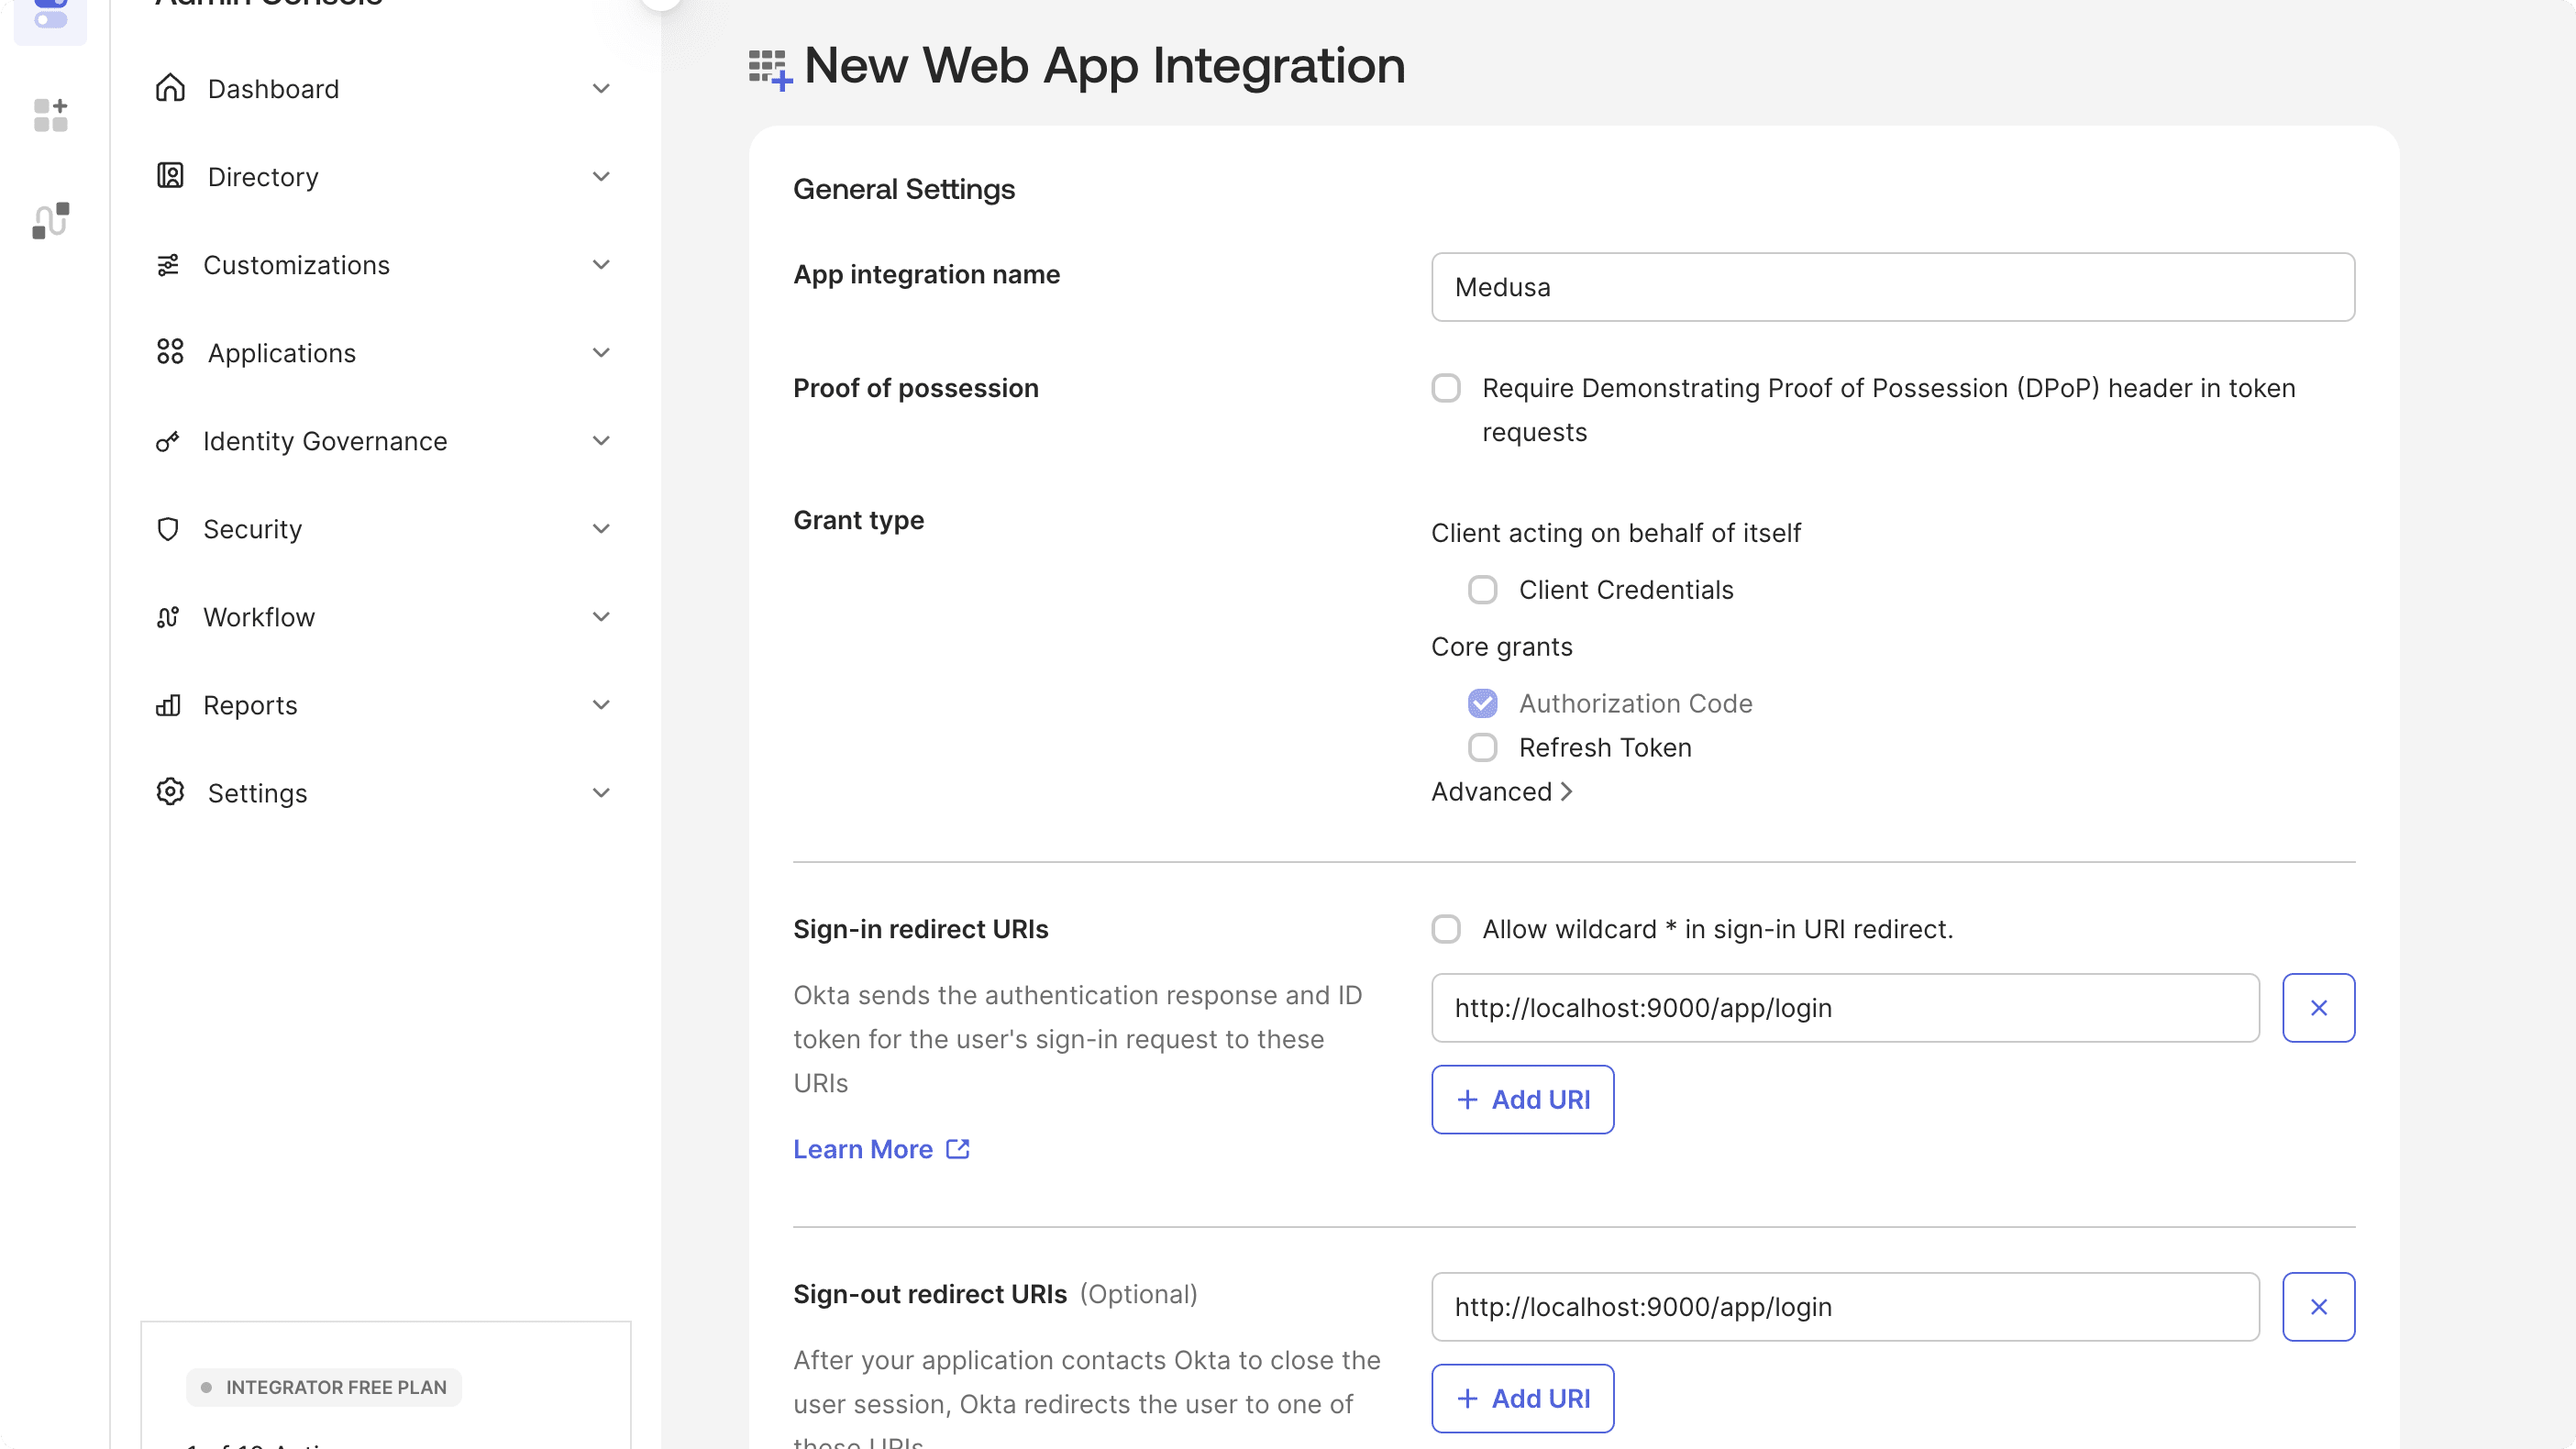
- In the creation form, enter the following details:
- App integration name: A name for your application. For example, "Medusa".
- Sign-in redirect URIs: The redirect URI where Okta will redirect users after authentication. For example, set it to
http://localhost:9000/app/login. You can replace the localhost URL with your Medusa Admin's URL if it's different. - Sign-out redirect URIs: The redirect URI where Okta will redirect users after signing out. For example, set it to
http://localhost:9000/app/login. - Controlled access: Optionally, choose "Allow everyone in your organization to access" to allow all users in your Okta organization to authenticate. You can alternatively restrict access to specific groups.
- Click "Save" to create the application.
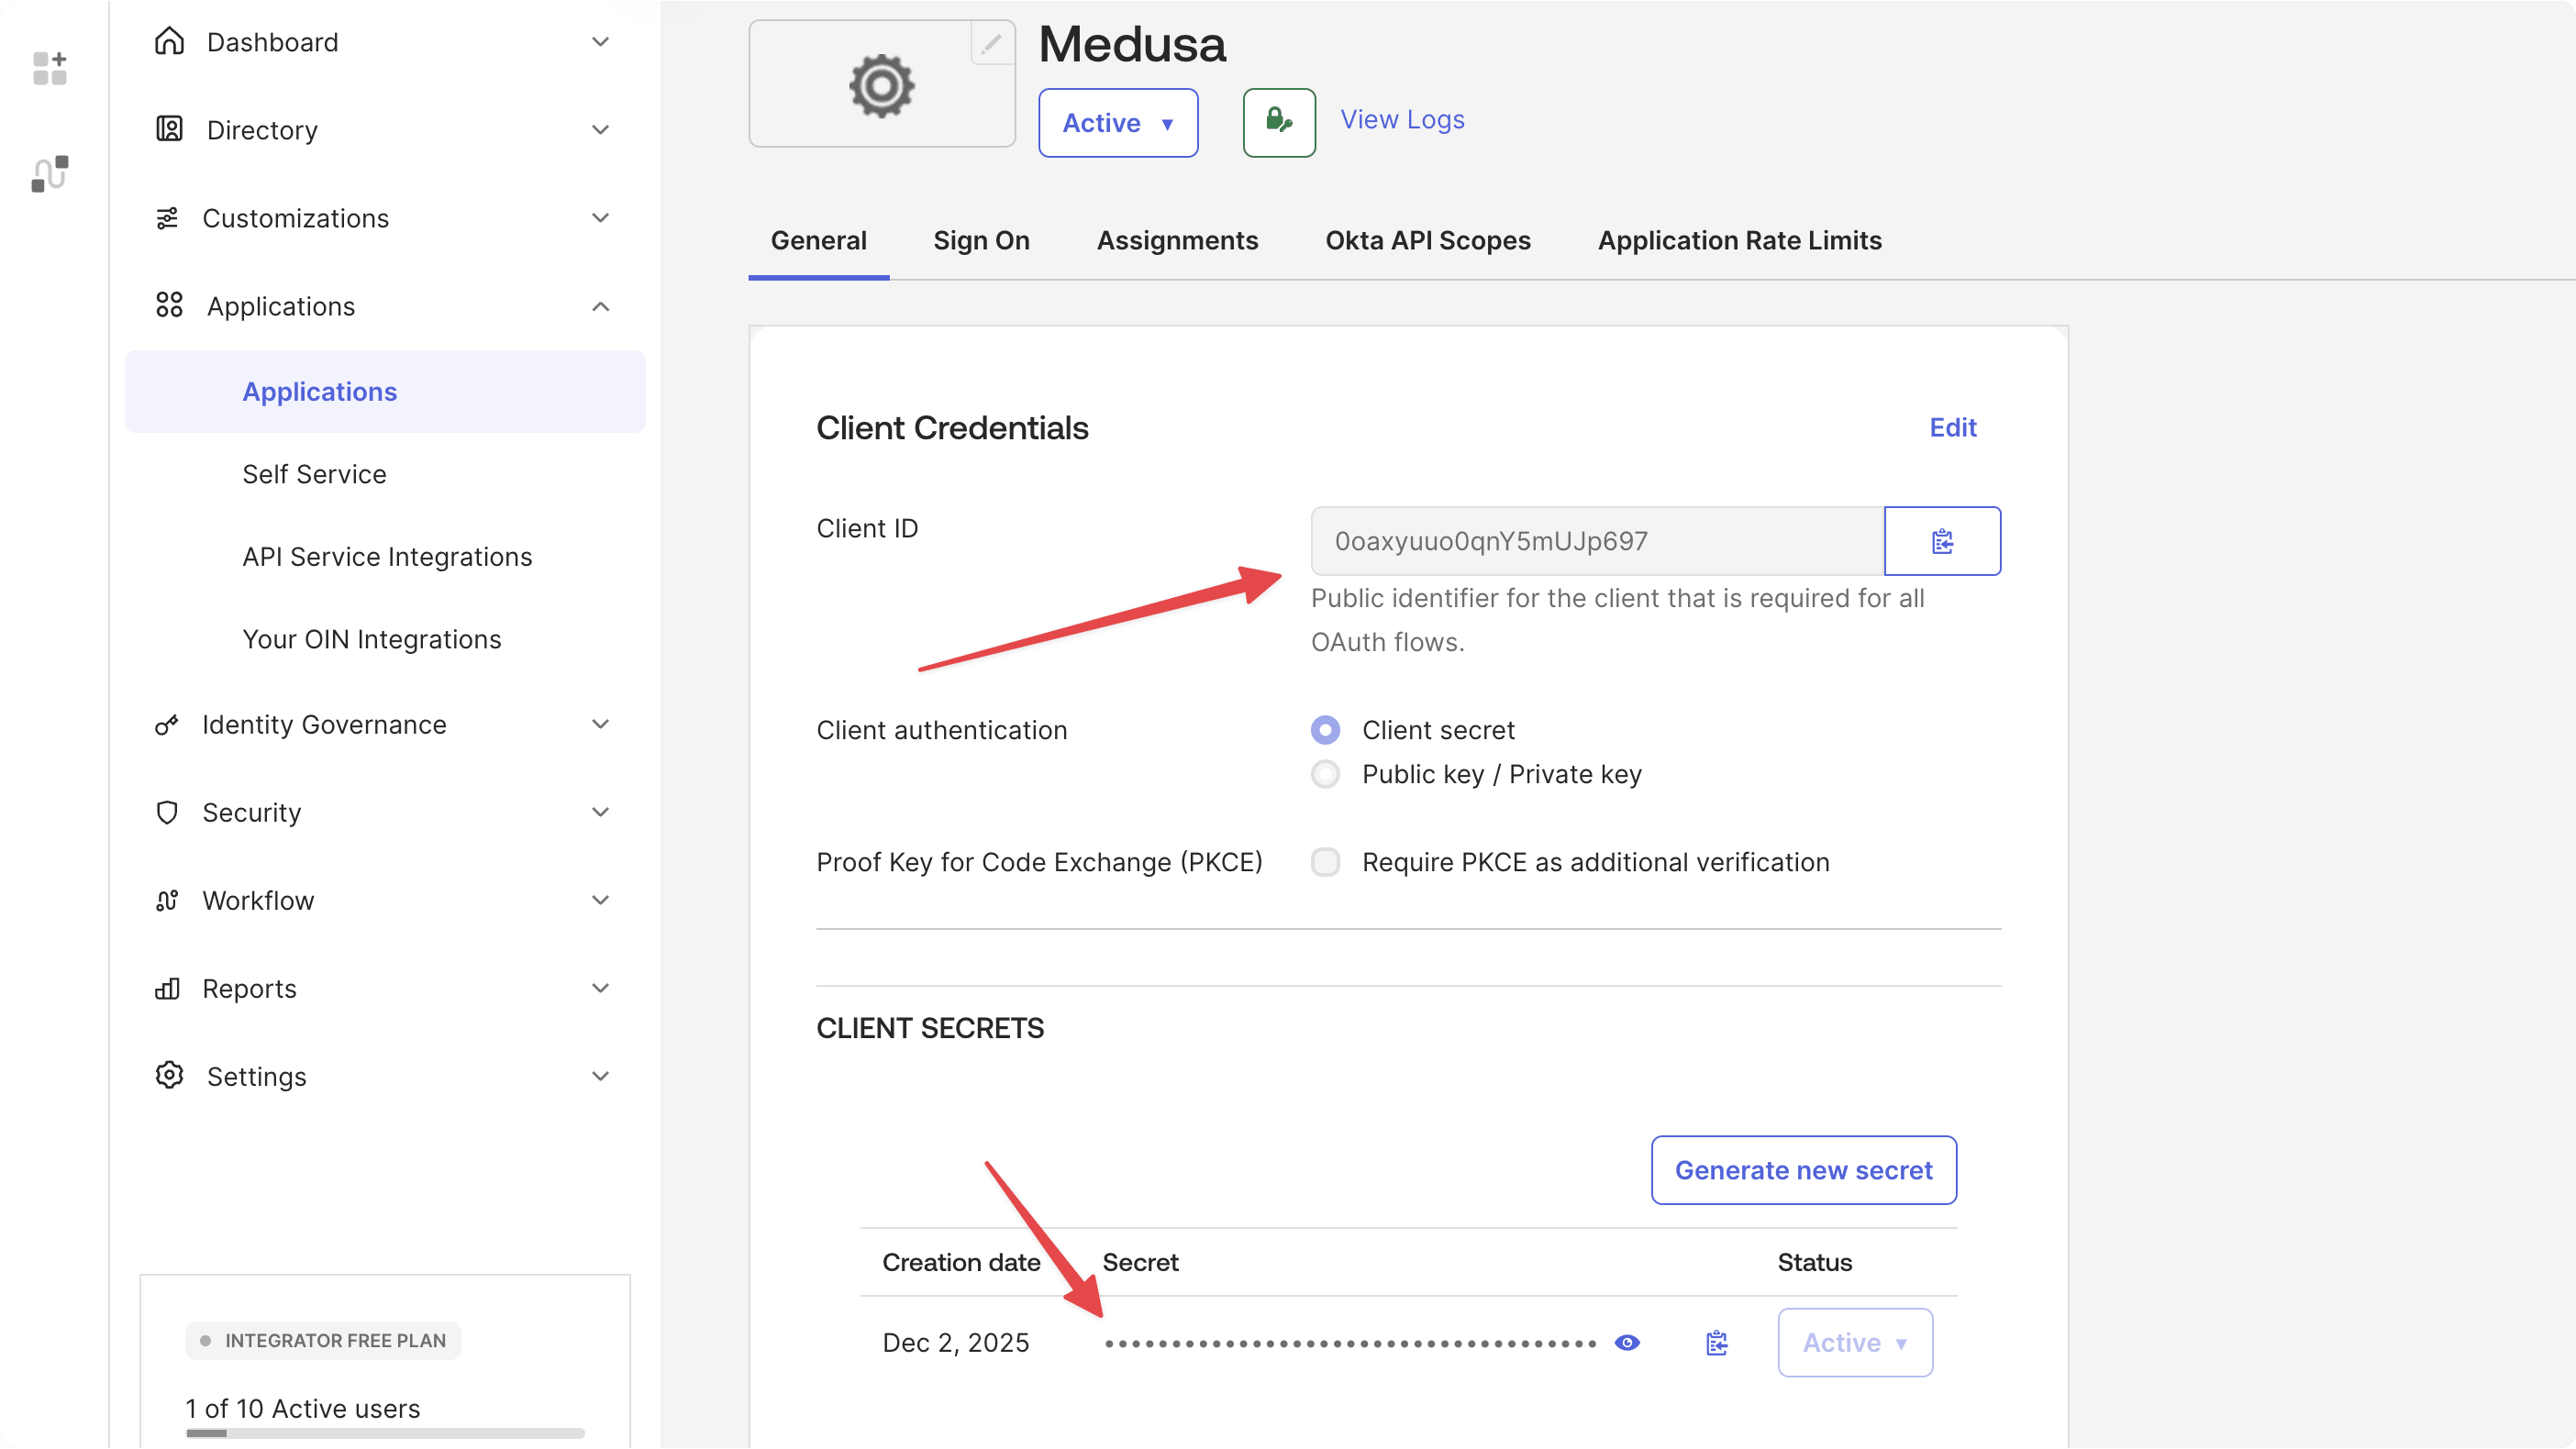
After creating the application, you'll be redirected to the application's settings page. Copy the client ID and client secret from this page, as you'll need them for the environment variables.
Set Environment Variables
Next, set the following environment variables in your Medusa application's .env file:
Where:
OKTA_DOMAIN: The Okta domain of your organization. You can find it by going to Security -> API -> Authorization Servers in your Okta dashboard. It's the URL before/oauth2/default.

OKTA_CLIENT_ID: The Client ID of your Okta application.OKTA_CLIENT_SECRET: The Client Secret of your Okta application.OKTA_REDIRECT_URI: The URL where Okta will redirect users after authentication. It's the same URL you set in the application's Sign-in redirect URIs.
The Okta integration is now ready. You'll test it out once you set up the authentication flow in the Medusa Admin.
Step 3: Create Admin User API Route#
In this step, you'll create an API route that creates an admin user for a newly authenticated Okta user. This also requires creating a workflow that the API route executes to create the user.
a. Create User Workflow#
A workflow is a series of actions, called steps, that complete a task with rollback and retry mechanisms. In Medusa, you build commerce features in workflows, then execute them in other customizations, such as subscribers, scheduled jobs, and API routes.
The workflow to create a user has the following steps:
Loading...Medusa provides the workflow and step out-of-the-box, so you can create the workflow.
Create the file src/workflows/create-user.ts with the following content:
1import { createWorkflow, transform, WorkflowResponse } from "@medusajs/framework/workflows-sdk"2import { createUsersWorkflow, setAuthAppMetadataStep } from "@medusajs/medusa/core-flows"3 4type WorkflowInput = {5 email: string6 auth_identity_id: string7 first_name?: string8 last_name?: string9}10 11export const createUserWorkflow = createWorkflow(12 "create-user",13 (input: WorkflowInput) => {14 const users = createUsersWorkflow.runAsStep({15 input: {16 users: [17 {18 email: input.email,19 first_name: input.first_name,20 last_name: input.last_name,21 },22 ],23 },24 })25 26 const authUserInput = transform({ input, users }, ({ input, users }) => {27 const createdUser = users[0]28 29 return {30 authIdentityId: input.auth_identity_id,31 actorType: "user",32 value: createdUser.id,33 }34 })35 36 setAuthAppMetadataStep(authUserInput)37 38 return new WorkflowResponse({39 user: users[0],40 })41 }42)
You create a workflow using createWorkflow from the Workflows SDK. It accepts the workflow's unique name as a first parameter.
createWorkflow accepts as a second parameter a constructor function, which is the user's details with the ID of the auth identity that Okta created during authentication.
In the workflow's constructor function, you:
- Create the user using the createUsersWorkflow.
- Prepare the input for the
setAuthAppMetadataStepstep using transform. You update the auth identity to associate it with the created user. - Associate the created user with the auth identity (created by Okta) using the setAuthAppMetadataStep.
Finally, you return an instance of WorkflowResponse with the created user.
transform. Refer to the Data Manipulation guide to learn more.b. Create Admin User API Route#
Next, you'll create the API route that executes the createUserWorkflow to create an admin user for a newly authenticated Okta user.
An API route is created in a route.ts file under a sub-directory of the src/api directory. The path of the API route is the file's path relative to src/api.
So, create the file src/api/okta/users/route.ts with the following content:
1import { AuthenticatedMedusaRequest, MedusaResponse } from "@medusajs/framework"2import { z } from "@medusajs/framework/zod"3import { createUserWorkflow } from "../../../workflows/create-user"4 5export const CreateUserSchema = z.object({6 email: z.string(),7 first_name: z.string().optional(),8 last_name: z.string().optional(),9})10 11type CreateUserBody = z.infer<typeof CreateUserSchema>12 13export const POST = async (14 req: AuthenticatedMedusaRequest<CreateUserBody>, 15 res: MedusaResponse16) => {17 const user = await createUserWorkflow(req.scope)18 .run({19 input: {20 email: req.validatedBody.email,21 auth_identity_id: req.auth_context!.auth_identity_id!,22 first_name: req.validatedBody.first_name,23 last_name: req.validatedBody.last_name,24 },25 })26 27 return res.status(200).json({ user })28}
You export a Zod schema that you'll use to validate incoming requests to the API route.
You also export a POST handler function which exposes a POST API route at /okta/users.
In the API route, you execute the createUserWorkflow by invoking it, passing it the Medusa container, then calling its run method with the workflow's input.
Finally, you return the created user in the response.
c. Apply Authentication and Validation Middlewares#
Next, you'll apply middlewares to the API route to ensure that only authenticated users can access it and that the incoming requests are valid.
To apply middlewares to an API route, create the file src/api/middlewares.ts with the following content:
1import { authenticate, defineMiddlewares, validateAndTransformBody } from "@medusajs/framework/http"2import { CreateUserSchema } from "./okta/users/route"3 4export default defineMiddlewares({5 routes: [6 {7 matcher: "/okta/users",8 methods: ["POST"],9 middlewares: [10 authenticate("user", "bearer", {11 allowUnregistered: true,12 }),13 validateAndTransformBody(CreateUserSchema),14 // TODO add Okta validation middleware15 ],16 },17 ],18})
You use defineMiddlewares to apply middlewares to API routes. You apply two middlewares to the /okta/users route:
- authenticate: This middleware ensures only admin users with an authentication token can access the route. You set the
allowUnregisteredoption totrueto allow users who don't have an associated Medusa user yet (new Okta users) to access the route. - validateAndTransformBody: This middleware validates and transforms the request body using the
CreateUserSchemaschema you defined earlier.
You'll add another middleware to validate that the user was authenticated with Okta in the next section.
d. Add Okta Validation Middleware#
To ensure that only authenticated Okta users can access the user creation API route, you'll add a middleware that validates that the user was authenticated with Okta.
To create the middleware, create the file src/api/middlewares/validate-okta-provider.ts with the following content:
1import { 2 AuthenticatedMedusaRequest, 3 MedusaResponse,4 MedusaNextFunction,5} from "@medusajs/framework/http"6import { MedusaError } from "@medusajs/framework/utils"7 8export default async function validateOktaProvider(9 req: AuthenticatedMedusaRequest, 10 res: MedusaResponse, 11 next: MedusaNextFunction12) {13 if (req.auth_context.actor_id) {14 throw new MedusaError(15 MedusaError.Types.INVALID_DATA,16 "User already exists"17 )18 }19 20 const query = req.scope.resolve("query")21 const { data: [authIdentity] } = await query.graph({22 entity: "auth_identity",23 fields: [24 "provider_identities.provider",25 ],26 filters: {27 id: req.auth_context!.auth_identity_id!,28 },29 }, {30 throwIfKeyNotFound: true,31 })32 33 const isOkta = authIdentity.provider_identities.some((identity) => identity?.provider === "okta")34 35 if (!isOkta) {36 throw new MedusaError(37 MedusaError.Types.UNAUTHORIZED,38 "Invalid provider"39 )40 }41 42 next()43}
You create a middleware function that checks if:
- The user already has an associated Medusa user. If so, you throw an error since the user shouldn't access the route.
- The user's auth identity was authenticated by Okta. You use Query to retrieve the user's auth identity with its provider identities, then check whether Okta is one of the providers. If not, you throw an unauthorized error.
If both checks pass, you call the next function to proceed to the next middleware or route handler.
Finally, in src/api/middlewares.ts, add the following import at the top of the file:
Then, replace the // TODO add Okta validation middleware comment with the new middleware:
The validateOktaProvider middleware will now run before the API route handler, ensuring only authenticated Okta users can create an admin user.
You'll test out this API route after you implement the Okta authentication flow in the Medusa Admin.
Step 4: Add Login with Okta in Medusa Admin#
In this step, you'll customize the Medusa Admin login form to add a "Login with Okta" button that initiates the Okta authentication flow.
The Medusa Admin is customizable, allowing you to either inject custom components into existing pages or create new pages.
You'll inject a custom component into the existing login page to add the "Login with Okta" button.
a. Set Admin Authentication Type#
By default, the Medusa Admin uses session-based authentication. However, to support third-party authentication providers like Okta, you need to switch to token-based authentication.
To set the admin authentication type, add the following environment variable to your Medusa application's .env file:
This sets the admin authentication type to JWT (JSON Web Token), which supports third-party authentication providers.
b. Configure JS SDK#
Next, you'll configure Medusa's JS SDK. It allows you to send requests to the Medusa server from any client application, including your Medusa Admin customizations.
The JS SDK is installed by default in your Medusa application. To configure it, create the file src/admin/lib/sdk.ts with the following content:
You create an instance of the JS SDK using the Medusa class from the JS SDK. You pass it an object having the following properties:
baseUrl: The base URL of the Medusa server.debug: A boolean indicating whether to log debug information into the console.auth: An object specifying the authentication type. When using the JS SDK for admin customizations, you use thejwtauthentication type.
c. Add Okta Icon Component#
Next, you'll create a React component that renders the Okta logo. You'll use this component in the "Login with Okta" button.
Create the file src/admin/components/okta-icon.tsx with the following content:
1export default function OktaIcon() {2 return (3 <svg 4 width="15" 5 height="15" 6 viewBox="0 0 15 15" 7 fill="none" 8 xmlns="http://www.w3.org/2000/svg"9 >10 <g clipPath="url(#clip0_16091_86347)">11 <path 12 fillRule="evenodd" 13 clipRule="evenodd" 14 d="M8.23809 0.0952381L7.92857 3.90476C7.78571 3.88095 7.64286 3.88095 7.47619 3.88095C7.28571 3.88095 7.09524 3.90476 6.92857 3.92857L6.7619 2.09524C6.7619 2.04762 6.80952 1.97619 6.85714 1.97619H7.16667L7.02381 0.119048C7.02381 0.0714286 7.07143 0 7.11905 0H8.14286C8.21429 0 8.2619 0.047619 8.23809 0.0952381ZM5.66667 0.285714C5.64286 0.238095 5.59524 0.190476 5.54762 0.214286L4.59524 0.571429C4.52381 0.595238 4.5 0.666667 4.52381 0.714286L5.30952 2.40476L5.02381 2.52381C4.97619 2.54762 4.95238 2.59524 4.97619 2.66667L5.7619 4.33333C6.04762 4.16667 6.35714 4.04762 6.69048 3.97619L5.66667 0.285714ZM3.33333 1.35714L5.54762 4.47619C5.2619 4.66667 5.02381 4.88095 4.80952 5.11905L3.45238 3.80952C3.40476 3.7619 3.40476 3.69048 3.45238 3.66667L3.69048 3.47619L2.38095 2.14286C2.33333 2.09524 2.33333 2.02381 2.38095 2L3.16667 1.35714C3.21429 1.28571 3.28571 1.30952 3.33333 1.35714ZM1.47619 3.14286C1.42857 3.11905 1.35714 3.11905 1.33333 3.16667L0.833333 4.04762C0.809524 4.09524 0.833333 4.16667 0.880952 4.19048L2.57143 5L2.40476 5.2619C2.38095 5.30952 2.40476 5.38095 2.45238 5.40476L4.14286 6.16667C4.2619 5.85714 4.42857 5.57143 4.61905 5.30952L1.47619 3.14286ZM0.214286 5.54762C0.214286 5.5 0.285714 5.45238 0.333333 5.47619L4.02381 6.42857C3.92857 6.7381 3.88095 7.07143 3.85714 7.40476L2 7.2619C1.95238 7.2619 1.90476 7.21429 1.90476 7.14286L1.95238 6.83333L0.142857 6.66667C0.0952381 6.66667 0.047619 6.61905 0.047619 6.54762L0.214286 5.54762ZM0.0952381 8.04762C0.0238095 8.04762 0 8.09524 0 8.16667L0.190476 9.16667C0.190476 9.21429 0.261905 9.2619 0.309524 9.2381L2.11905 8.7619L2.16667 9.07143C2.16667 9.11905 2.2381 9.16667 2.28571 9.14286L4.07143 8.64286C3.97619 8.33333 3.90476 8 3.88095 7.66667L0.0952381 8.04762ZM0.690476 10.6905C0.666667 10.6429 0.690476 10.5714 0.738095 10.5476L4.19048 8.90476C4.30952 9.21429 4.5 9.5 4.71429 9.7619L3.21429 10.8333C3.16667 10.8571 3.09524 10.8571 3.07143 10.8095L2.85714 10.5476L1.30952 11.619C1.2619 11.6429 1.19048 11.6429 1.16667 11.5952L0.690476 10.6905ZM4.85714 9.97619L2.16667 12.6905C2.11905 12.7381 2.11905 12.8095 2.16667 12.8333L2.95238 13.4762C3 13.5238 3.07143 13.5 3.09524 13.4524L4.19048 11.9286L4.42857 12.1429C4.47619 12.1905 4.54762 12.1667 4.57143 12.119L5.61905 10.5952C5.33333 10.4286 5.07143 10.2143 4.85714 9.97619ZM4.33333 14.3095C4.28571 14.2857 4.2619 14.2381 4.28571 14.1667L5.85714 10.7143C6.14286 10.8571 6.47619 10.9762 6.78571 11.0476L6.30952 12.8333C6.28571 12.881 6.2381 12.9286 6.19048 12.9048L5.90476 12.7857L5.40476 14.5952C5.38095 14.6429 5.33333 14.6905 5.28571 14.6667L4.33333 14.3095ZM7.04762 11.0952L6.7381 14.9048C6.7381 14.9524 6.78571 15.0238 6.83333 15.0238H7.85714C7.90476 15.0238 7.95238 14.9762 7.95238 14.9048L7.80952 13.0476H8.11905C8.16667 13.0476 8.21429 13 8.21429 12.9286L8.04762 11.0952C7.85714 11.119 7.69048 11.1429 7.5 11.1429C7.35714 11.119 7.19048 11.119 7.04762 11.0952ZM10.7381 0.809524C10.7619 0.761905 10.7381 0.690476 10.6905 0.666667L9.7381 0.309524C9.69048 0.285714 9.61905 0.333333 9.61905 0.380952L9.11905 2.19048L8.83333 2.07143C8.78571 2.04762 8.71429 2.09524 8.71429 2.14286L8.23809 3.92857C8.57143 4 8.88095 4.11905 9.16667 4.2619L10.7381 0.809524ZM12.8333 2.30952L10.1429 5.02381C9.92857 4.78571 9.66667 4.57143 9.38095 4.40476L10.4286 2.88095C10.4524 2.83333 10.5238 2.83333 10.5714 2.85714L10.8095 3.07143L11.9048 1.54762C11.9286 1.5 12 1.5 12.0476 1.52381L12.8333 2.16667C12.8571 2.21429 12.8571 2.28571 12.8333 2.30952ZM14.2619 4.45238C14.3095 4.42857 14.3333 4.35714 14.3095 4.30952L13.8095 3.42857C13.7857 3.38095 13.7143 3.35714 13.6667 3.40476L12.119 4.47619L11.9524 4.21429C11.9286 4.16667 11.8571 4.14286 11.8095 4.19048L10.3095 5.2381C10.5238 5.5 10.6905 5.78571 10.8333 6.09524L14.2619 4.45238ZM14.8095 5.83333L14.9762 6.83333C14.9762 6.88095 14.9524 6.95238 14.881 6.95238L11.0952 7.30952C11.0714 6.97619 11 6.64286 10.9048 6.33333L12.6905 5.83333C12.7381 5.80952 12.8095 5.85714 12.8095 5.90476L12.8571 6.21429L14.6667 5.7381C14.7381 5.7381 14.7857 5.78571 14.8095 5.83333ZM14.6429 9.52381C14.6905 9.54762 14.7619 9.5 14.7619 9.45238L14.9286 8.45238C14.9286 8.40476 14.9048 8.33333 14.8333 8.33333L12.9762 8.16667L13.0238 7.85714C13.0238 7.80952 13 7.7381 12.9286 7.7381L11.0714 7.59524C11.0714 7.92857 11 8.2619 10.9048 8.57143L14.6429 9.52381ZM13.6667 11.8095C13.6429 11.8571 13.5714 11.881 13.5238 11.8333L10.381 9.66667C10.5714 9.40476 10.7381 9.11905 10.8571 8.80952L12.5476 9.57143C12.5952 9.59524 12.619 9.66667 12.5952 9.71429L12.4286 10L14.119 10.8095C14.1667 10.8333 14.1905 10.9048 14.1667 10.9524L13.6667 11.8095ZM9.45238 10.5238L11.6667 13.6429C11.6905 13.6905 11.7619 13.6905 11.8095 13.6667L12.5952 13.0238C12.6429 12.9762 12.6429 12.9286 12.5952 12.881L11.2857 11.5476L11.5238 11.3571C11.5714 11.3095 11.5714 11.2619 11.5238 11.2143L10.2143 9.90476C10 10.1429 9.7381 10.3571 9.45238 10.5238ZM9.45238 14.7619C9.40476 14.7857 9.33333 14.7381 9.33333 14.6905L8.33333 11.0238C8.66667 10.9524 8.97619 10.8333 9.26191 10.6667L10.0476 12.3333C10.0714 12.381 10.0476 12.4524 10 12.4762L9.71429 12.5952L10.5 14.2857C10.5238 14.3333 10.5 14.4048 10.4524 14.4286L9.45238 14.7619Z"15 fill="currentColor"16 />17 </g>18 <defs>19 <clipPath id="clip0_16091_86347">20 <rect width="15" height="15" fill="white"/>21 </clipPath>22 </defs>23 </svg>24 )25}
d. Create Login with Okta Widget#
A widget is a React component that you can inject into predefined zones in the Medusa Admin.
You'll create a widget that renders the "Login with Okta" button on the login page.
To create the widget, create the file src/admin/widgets/okta-login.tsx with the following content:
1import { defineWidgetConfig } from "@medusajs/admin-sdk"2import { Button, toast } from "@medusajs/ui"3import { decodeToken } from "react-jwt"4import { useSearchParams, useNavigate } from "react-router-dom"5import { useMutation } from "@tanstack/react-query"6import { sdk } from "../lib/sdk"7import { useEffect, useMemo } from "react"8import OktaIcon from "../components/okta-icon"9 10const OKTA_AUTH_PROVIDER = "okta"11 12const LoginWithOkta = () => {13 const [searchParams] = useSearchParams()14 const navigate = useNavigate()15 16 // TODO define auth functions17}18 19export const config = defineWidgetConfig({20 zone: "login.after",21})22 23export default LoginWithOkta
A widget file must export:
- A React component as the default export. This component renders the widget's UI.
- A widget configuration object created using
defineWidgetConfig. This configuration specifies the zone where the widget will be injected, which islogin.afterin this case.
So far, in the component, you:
- Retrieve the URL search parameters. You'll use this to get the authorization code returned by Okta after authentication.
- Get the
navigatefunction which is necessary for navigation after successful login.
Initiate Okta Authentication
Next, you'll start adding the functions necessary for the authentication flow. The first function is the button click handler that initiates the Okta authentication flow.
Replace the // TODO define auth functions comment with the following:
1const oktaLogin = async () => {2 const result = await sdk.auth.login("user", OKTA_AUTH_PROVIDER, {})3 4 if (typeof result === "object" && result.location) {5 // Redirect to okta for authentication6 window.location.href = result.location7 return8 }9 10 if (typeof result !== "string") {11 // Result failed, show an error12 toast.error("Authentication failed")13 return14 }15 16 // User is authenticated17 navigate("/orders")18}19 20// TODO send callback function
The oktaLogin function uses the JS SDK's auth.login method to initiate the Okta authentication flow. This method sends a request to Medusa's /auth/user/okta API route, which executes the authenticate method of the Okta Auth Module Provider's service.
If the result contains a location property, the user is redirected to that location, which is the Okta authentication page.
If the result is not a string (the authentication token), you show an error toast notification.
Otherwise, the user is authenticated and navigated to the orders page.
Handle Okta Callback in Server
Next, you'll add a function that validates the Okta authentication callback in the Medusa server.
Replace the // TODO send callback function comment with the following:
The sendCallback function uses the JS SDK's auth.callback method to send the query parameters returned by Okta to Medusa's /auth/user/okta/callback API route.
This API route executes the validateCallback method of the Okta Auth Module Provider's service to validate the authentication.
Validate Callback and Create User
Next, you'll add a function that validates the callback and creates an admin user if the Okta user is new.
Replace the // TODO validate callback comment with the following:
1const validateCallback = async () => {2 const token = await sendCallback()3 4 const decodedToken = decodeToken(token) as { actor_id: string, user_metadata: Record<string, unknown> }5 6 const userExists = decodedToken.actor_id !== ""7 8 if (!userExists) {9 // Create user10 await sdk.client.fetch("/okta/users", {11 method: "POST",12 body: {13 email: decodedToken.user_metadata?.email as string,14 first_name: decodedToken.user_metadata?.given_name as string,15 last_name: decodedToken.user_metadata?.family_name as string,16 },17 })18 19 const newToken = await sdk.auth.refresh()20 21 if (!newToken) {22 toast.error("Authentication failed")23 return24 }25 }26 27 // User is authenticated28 navigate("/orders")29}30 31const { mutateAsync, isPending } = useMutation({32 mutationFn: async () => {33 if (isPending) {34 return35 }36 return await validateCallback()37 },38 onError: (error) => {39 console.error("Custom authentication error:", error)40 },41})42 43// TODO useEffect to trigger callback validation
In the validateCallback function, you:
- Call the
sendCallbackfunction to validate the Okta authentication in the Medusa server. - Decode the returned authentication token to access the user's details.
- If the
actor_idin the decoded token is an empty string, it means the user is new. So, you:- Send a
POSTrequest to the/okta/usersAPI route you created earlier to create an admin user for the new Okta user. - Refresh the authentication token using the JS SDK's
auth.refreshmethod to get a token associated with the newly created user.
- Send a
- Finally, the user is authenticated, and you navigate them to the orders page.
You also add a mutation using Tanstack Query to handle the asynchronous operation of validating the callback.
Trigger Callback Validation
Next, you'll trigger the callback validation when the search parameters contain an authorization code from Okta.
Replace the // TODO useEffect to trigger callback validation comment with the following:
The useEffect hook runs whenever the search parameters change. If the code parameter is present, it calls the mutateAsync function to validate the callback.
Render Login with Okta Button
Finally, you'll render the "Login with Okta" button in the widget component. You'll also show a loading pop-up when the authentication is in progress.
Replace the // TODO return statement comment with the following:
1const showLoading = useMemo(() => {2 return isPending || !!searchParams.get("code")3}, [isPending, searchParams])4 5return (6 <>7 {showLoading && (8 <div className="fixed inset-0 z-50 flex items-center justify-center bg-black/50 backdrop-blur-sm">9 <div className="flex flex-col items-center gap-4 rounded-lg bg-ui-bg-base p-8 shadow-lg">10 <div className="h-8 w-8 animate-spin rounded-full border-4 border-ui-border-base border-t-ui-fg-interactive" />11 <p className="text-ui-fg-subtle text-sm">Please wait...</p>12 </div>13 </div>14 )}15 <hr className="bg-ui-border-base my-4" />16 <Button 17 variant="secondary" 18 onClick={oktaLogin} 19 className="w-full"20 isLoading={showLoading}21 >22 <OktaIcon />23 Login with Okta24 </Button>25 </>26)
You define a memoized value showLoading that determines whether to show the loading pop-up.
Then, you render a loading pop-up if showLoading is true, and a "Login with Okta" button. The button displays the OktaIcon component and triggers the oktaLogin function when clicked.
Test Okta Authentication Flow#
You can now test out the Okta integration and authentication flow you implemented.
First, run the following command to start the Medusa server:
Then, open the Medusa Admin in your browser at http://localhost:9000/app. You'll see a "Login with Okta" button on the login page.

Click the button to initiate the Okta authentication flow. If you're already logged in to Okta, you'll be redirected back to the Medusa Admin immediately where you'll be logged in. If not, you'll be prompted to log in to Okta first, then redirected back to the Medusa Admin.
Once the authentication is successful, you can access the Medusa Admin dashboard as an authenticated user.
Next Steps#
You've now set up Okta as an authentication provider for admin users in your Medusa application. This allows your Okta organization's users to log in to the Medusa Admin using their Okta credentials without needing to manage separate credentials for Medusa.
You can also manage user access and permissions in Okta. For example, if you deny a user's access to the Medusa application in Okta, that user will no longer be able to log in to the Medusa Admin.
Learn More about Medusa#
If you're new to Medusa, check out the main documentation, where you'll get a more in-depth understanding of all the concepts you've used in this guide and more.
To learn more about the commerce features that Medusa provides, check out Medusa's Commerce Modules.
Troubleshooting#
If you encounter issues during your development, check out the troubleshooting guides.
Getting Help#
If you encounter issues not covered in the troubleshooting guides:
- Visit the Medusa GitHub repository to report issues or ask questions.
- Join the Medusa Discord community for real-time support from community members.