Implement Pre-Orders in Medusa
In this tutorial, you'll learn how to implement pre-orders in Medusa.
When you install a Medusa application, you get a fully-fledged commerce platform with a Framework for customization. The Medusa application's commerce features are built around Commerce Modules that are available out-of-the-box.
The pre-orders feature allows customers to purchase a product before it's available for delivery. Once the product is available, it's automatically shipped to the customer. This is useful when a business is launching and marketing a new product, such as merchandise or books.
This tutorial will help you implement pre-orders in your Medusa application.
Summary#
By following this tutorial, you will learn how to:
- Install and set up Medusa.
- Define the data models necessary for pre-orders and the logic to manage them.
- Customize the Medusa Admin dashboard to allow merchants to:
- Manage pre-order configurations of product variants.
- View pre-orders.
- Automate fulfilling pre-orders when the product becomes available.
- Handle scenarios where a pre-order is canceled or modified.

Step 1: Install a Medusa Application#
Start by installing the Medusa application on your machine with the following command:
You'll first be asked for the project's name. Then, when asked whether you want to install the Next.js Starter Storefront, choose Yes.
Afterward, the installation process will start, which will install the Medusa application as a monorepository in a directory with your project's name. The backend is installed in the apps/backend directory, and the Next.js Starter Storefront is installed in the apps/storefront directory.
Once the installation finishes successfully, the Medusa Admin dashboard will open with a form to create a new user. Enter the user's credentials and submit the form. Afterward, you can log in with the new user and explore the dashboard.
apps/backend directory of your Medusa project.Step 2: Create Preorder Module#
In Medusa, you can build custom features in a module. A module is a reusable package with the data models and functionalities related to a single feature or domain. Medusa integrates the module into your application without implications or side effects on your setup.
In this step, you'll build a Preorder Module that defines the data models and logic to manage pre-orders. Later, you'll build commerce flows related to pre-orders around the module.
a. Create Module Directory#
Create the directory src/modules/preorder that will hold the Preorder Module's code.
b. Create Data Models#
A data model represents a table in the database. You create data models using Medusa's Data Model Language (DML). It simplifies defining a table's columns, relations, and indexes with straightforward methods and configurations.
For the Preorder Module, you'll define a data model to represent pre-order configurations for a product variant, and another to represent a pre-order placed by a customer.
PreorderVariant Data Model
To create the first data model, create the file src/modules/preorder/models/preorder-variant.ts with the following content:
1import { model } from "@medusajs/utils"2import { Preorder } from "./preorder"3 4export enum PreorderVariantStatus {5 ENABLED = "enabled",6 DISABLED = "disabled",7}8 9export const PreorderVariant = model.define(10 "preorder_variant",11 {12 id: model.id().primaryKey(),13 variant_id: model.text().unique(),14 available_date: model.dateTime().index(),15 status: model.enum(Object.values(PreorderVariantStatus))16 .default(PreorderVariantStatus.ENABLED),17 preorders: model.hasMany(() => Preorder, {18 mappedBy: "item",19 }),20 }21)
The PreorderVariant data model has the following properties:
id: The primary key of the table.variant_id: The ID of the product variant that this pre-order variant configurations applies to.- Later, you'll learn how to link this data model to Medusa's
ProductVariantdata model.
- Later, you'll learn how to link this data model to Medusa's
available_date: The date when the product variant will be available for delivery.status: The status of the pre-order variant configuration, which can be eitherenabledordisabled.preorders: A relation to thePreorderdata model, which you'll create next.
ProductVariant data model or its linked records. So, you don't need to duplicate this information in the PreorderVariant data model.Preorder Data Model
Next, you'll create the Preorder data model that represents a customer's purchase of a pre-order product variant.
Create the file src/modules/preorder/models/preorder.ts with the following content:
1import { model } from "@medusajs/utils"2import { PreorderVariant } from "./preorder-variant"3 4export enum PreorderStatus {5 PENDING = "pending",6 FULFILLED = "fulfilled",7 CANCELLED = "cancelled",8}9 10export const Preorder = model.define(11 "preorder",12 {13 id: model.id().primaryKey(),14 order_id: model.text().index(),15 item: model.belongsTo(() => PreorderVariant, {16 mappedBy: "preorders",17 }),18 status: model.enum(Object.values(PreorderStatus))19 .default(PreorderStatus.PENDING),20 }21).indexes([22 {23 on: ["item_id", "status"],24 },25])
The Preorder data model has the following properties:
id: The primary key of the table.order_id: The ID of the Medusa order that this pre-order belongs to.- Later, you'll learn how to link this data model to Medusa's
Orderdata model.
- Later, you'll learn how to link this data model to Medusa's
item: A relation to thePreorderVariantdata model, which represents the item that was pre-ordered.status: The status of the pre-order, which can be eitherpending,fulfilled, orcancelled.
You also define an index on the item_id and status columns to optimize queries that filter by these properties.
c. Create Module's Service#
You can manage your module's data models in a service.
A service is a TypeScript class that the module exports. In the service's methods, you can connect to the database, allowing you to manage your data models, or connect to a third-party service, which is useful if you're integrating with external services.
To create the Preorder Module's service, create the file src/modules/preorder/services/preorder.ts with the following content:
1import { MedusaService } from "@medusajs/framework/utils"2import { PreorderVariant } from "./models/preorder-variant"3import { Preorder } from "./models/preorder"4 5export default class PreorderModuleService extends MedusaService({6 PreorderVariant,7 Preorder,8}) {}
The PreorderModuleService extends MedusaService, which generates a class with data-management methods for your module's data models. This saves you time on implementing Create, Read, Update, and Delete (CRUD) methods.
So, the PreorderModuleService class now has methods like createPreorders and retrievePreorder.
d. Export Module Definition#
The final piece to a module is its definition, which you export in an index.ts file at its root directory. This definition tells Medusa the name of the module and its service.
So, create the file src/modules/preorder/index.ts with the following content:
You use the Module function to create the module's definition. It accepts two parameters:
- The module's name, which is
preorder. - An object with a required property
serviceindicating the module's service.
You also export the module's name as PREORDER_MODULE so you can reference it later.
e. Add Module to Medusa's Configurations#
Once you finish building the module, add it to Medusa's configurations to start using it.
In medusa-config.ts, add a modules property and pass an array with your custom module:
Each object in the modules array has a resolve property, whose value is either a path to the module's directory, or an npm package’s name.
f. Generate Migrations#
Since data models represent tables in the database, you define how they're created in the database with migrations. A migration is a TypeScript class that defines database changes made by a module.
Medusa's CLI tool can generate the migrations for you. To generate a migration for the Preorder Module, run the following command in the apps/backend directory:
The db:generate command of the Medusa CLI accepts the name of the module to generate the migration for. You'll now have a migrations directory under src/modules/preorder that holds the generated migration.
Then, to reflect these migrations on the database, run the following command:
The tables for the PreorderVariant and Preorder data models are now created in the database.
Step 3: Link Preorder and Medusa Data Models#
Since Medusa isolates modules to integrate them into your application without side effects, you can't directly create relationships between data models of different modules.
Instead, Medusa provides a mechanism to define links between data models, and retrieve and manage linked records while maintaining module isolation.
In this step, you'll define a link between the data models in the Preorder Module and the data models in Medusa's Commerce Modules.
a. PreorderVariant <> ProductVariant Link#
To define a link between the PreorderVariant and ProductVariant data models, create the file src/links/preorder-variant.ts with the following content:
You define a link using the defineLink function. It accepts two parameters:
- An object indicating the first data model part of the link. A module has a special
linkableproperty that contains link configurations for its data models. You pass the linkable configurations of the Preorder Module'sPreorderVariantdata model. - An object indicating the second data model part of the link. You pass the linkable configurations of the Product Module's
ProductVariantdata model.
In later steps, you'll learn how this link allows you to retrieve and manage product variants and their pre-order configurations.
b. Preorder <> Order Link#
Next, you'll define a read-only link between the Preorder data model and Medusa's Order data model. Read-only links allow you to retrieve the order that a pre-order belongs to without the need to manage the link in the database.
Create the file src/links/preorder-order.ts with the following content:
1import { defineLink } from "@medusajs/framework/utils"2import PreorderModule from "../modules/preorder"3import OrderModule from "@medusajs/medusa/order"4 5export default defineLink(6 {7 linkable: PreorderModule.linkable.preorder,8 field: "order_id",9 },10 OrderModule.linkable.order,11 {12 readOnly: true,13 }14)
You define the link in a similar way to the previous one, passing three parameters to the defineLink function:
- The first data model part of the link, which is the
Preorderdata model. You also pass afieldproperty that indicates the column in thePreorderdata model that holds the ID of the linkedOrder. - The second data model part of the link, which is the
Orderdata model. - An object that has a
readOnlyproperty, marking this link as read-only.
In later steps, you'll learn how to use this link to retrieve the order that a pre-order belongs to.
c. Sync Links to Database#
After defining links, you need to sync them to the database. This creates the necessary tables to manage the links.
To sync the links to the database, run the migrations command again in the apps/backend directory:
This command will create the necessary table to manage the PreorderVariant <> ProductVariant link.
Step 4: Manage Pre-Order Variant Functionalities#
In this step, you'll implement the logic to manage pre-order configurations of product variants. This includes creating, updating, and disabling pre-order configurations.
When you build commerce features in Medusa that can be consumed by client applications, such as the Medusa Admin dashboard or a storefront, you need to implement:
- A workflow with steps that define the business logic of the feature.
- An API route that exposes the workflow's functionality to client applications.
In this step, you'll implement the workflows and API routes to manage pre-order configurations of product variants.
a. Upsert Pre-Order Variant Workflow#
The first workflow you'll implement allows merchants to create or update pre-order configurations of product variants.
A workflow is a series of queries and actions, called steps, that complete a task. A workflow is similar to a function, but it allows you to track its executions' progress, define roll-back logic, and configure other advanced features.
The workflow you'll build will have the following steps:
Workflow hook
Step conditioned by when
View step details
The useQueryGraphStep and createRemoteLinkStep are available through Medusa's @medusajs/medusa/core-flows package. You'll implement other steps in the workflow.
updatePreorderVariantStep
The updatePreorderVariantStep updates an existing pre-order variant.
To create the step, create the file src/workflows/steps/update-preorder-variant.ts with the following content:
npm run dev or yarn dev command to generate the necessary type definitions, as explained in the Automatically Generated Types guide.1import { createStep, StepResponse } from "@medusajs/framework/workflows-sdk"2import { PREORDER_MODULE } from "../../modules/preorder"3import { 4 PreorderVariantStatus,5} from "../../modules/preorder/models/preorder-variant"6 7type StepInput = {8 id: string9 variant_id?: string10 available_date?: Date11 status?: PreorderVariantStatus12}13 14export const updatePreorderVariantStep = createStep(15 "update-preorder-variant",16 async (input: StepInput, { container }) => {17 const preorderModuleService = container.resolve(18 PREORDER_MODULE19 )20 21 const oldData = await preorderModuleService.retrievePreorderVariant(22 input.id23 )24 25 const preorderVariant = await preorderModuleService.updatePreorderVariants(26 input27 )28 29 return new StepResponse(preorderVariant, oldData)30 },31 async (preorderVariant, { container }) => {32 if (!preorderVariant) {33 return34 }35 36 const preorderModuleService = container.resolve(37 PREORDER_MODULE38 )39 40 await preorderModuleService.updatePreorderVariants({41 id: preorderVariant.id,42 variant_id: preorderVariant.variant_id,43 available_date: preorderVariant.available_date,44 })45 }46)
You create a step with the createStep function. It accepts three parameters:
- The step's unique name.
- An async function that receives two parameters:
- The step's input, which is an object with the pre-order variant's properties.
- An object that has properties including the Medusa container, which is a registry of Framework and commerce tools that you can access in the step.
- An async compensation function that undoes the actions performed by the step function. This function is only executed if an error occurs during the workflow's execution.
In the step function, you resolve the Preorder Module's service from the Medusa container using its resolve method, passing it the module's name as a parameter.
Then, you retrieve the existing configurations to undo the updates if an error occurs during the workflow's execution.
After that, you update the preorder variant using the generated updatePreorderVariants method of the Preorder Module's service.
Finally, a step function must return a StepResponse instance. The StepResponse constructor accepts two parameters:
- The step's output, which is the pre-order variant created.
- Data to pass to the step's compensation function.
In the compensation function, you undo the updates made to the preorder variant if an error occurs in the workflow.
createPreorderVariantStep
The createPreorderVariantStep creates a pre-order variant record.
To create the step, create the file src/workflows/steps/create-preorder-variant.ts with the following content:
1import { createStep, StepResponse } from "@medusajs/framework/workflows-sdk"2import { PREORDER_MODULE } from "../../modules/preorder"3 4type StepInput = {5 variant_id: string6 available_date: Date7}8 9export const createPreorderVariantStep = createStep(10 "create-preorder-variant",11 async (input: StepInput, { container }) => {12 const preorderModuleService = container.resolve(13 PREORDER_MODULE14 )15 16 const preorderVariant = await preorderModuleService.createPreorderVariants(17 input18 )19 20 return new StepResponse(preorderVariant, preorderVariant.id)21 },22 async (preorderVariantId, { container }) => {23 if (!preorderVariantId) {24 return25 }26 27 const preorderModuleService = container.resolve(28 PREORDER_MODULE29 )30 31 await preorderModuleService.deletePreorderVariants(preorderVariantId)32 }33)
In the step, you create a preorder variant record using the data received as input.
In the step's compensation function, you delete the preorder variant if an error occurs in the workflow's execution.
Create Workflow
You now have the necessary steps to build the workflow that upserts a preorder variant's configurations.
To create the workflow, create the file src/workflows/upsert-product-variant-preorder.ts with the following content:
1import { createWorkflow, transform, when, WorkflowResponse } from "@medusajs/framework/workflows-sdk"2import { createRemoteLinkStep, useQueryGraphStep } from "@medusajs/medusa/core-flows"3import { updatePreorderVariantStep } from "./steps/update-preorder-variant"4import { createPreorderVariantStep } from "./steps/create-preorder-variant"5import { PREORDER_MODULE } from "../modules/preorder"6import { Modules } from "@medusajs/framework/utils"7import { PreorderVariantStatus } from "../modules/preorder/models/preorder-variant"8 9type WorkflowInput = {10 variant_id: string;11 available_date: Date;12}13 14export const upsertProductVariantPreorderWorkflow = createWorkflow(15 "upsert-product-variant-preorder",16 (input: WorkflowInput) => {17 // confirm that product variant exists18 useQueryGraphStep({19 entity: "product_variant",20 fields: ["id"],21 filters: {22 id: input.variant_id,23 },24 options: {25 throwIfKeyNotFound: true,26 },27 })28 29 const { data: preorderVariants } = useQueryGraphStep({30 entity: "preorder_variant",31 fields: ["*"],32 filters: {33 variant_id: input.variant_id,34 },35 }).config({ name: "retrieve-preorder-variant" })36 37 const updatedPreorderVariant = when(38 { preorderVariants }, 39 (data) => data.preorderVariants.length > 040 ).then(() => {41 const preorderVariant = updatePreorderVariantStep({42 id: preorderVariants[0].id,43 variant_id: input.variant_id,44 available_date: input.available_date,45 status: PreorderVariantStatus.ENABLED,46 })47 48 return preorderVariant49 })50 51 const createdPreorderVariant = when(52 { preorderVariants }, 53 (data) => data.preorderVariants.length === 054 ).then(() => {55 const preorderVariant = createPreorderVariantStep(input)56 57 createRemoteLinkStep([58 {59 [PREORDER_MODULE]: {60 preorder_variant_id: preorderVariant.id,61 },62 [Modules.PRODUCT]: {63 product_variant_id: preorderVariant.variant_id,64 },65 },66 ])67 68 return preorderVariant69 })70 71 const preorderVariant = transform({72 updatedPreorderVariant,73 createdPreorderVariant,74 }, (data) => 75 data.createdPreorderVariant || data.updatedPreorderVariant76 )77 78 return new WorkflowResponse(preorderVariant)79 }80)
You create a workflow using the createWorkflow function. It accepts the workflow's unique name as a first parameter.
It accepts as a second parameter a constructor function that holds the workflow's implementation. The function accepts an input object holding the variant's ID and its available date.
In the workflow, you:
- Try to retrieve the variant's details to confirm it exists. The useQueryGraphStep uses Query which allows you to retrieve data across modules.
- If it doesn't exist, an error is thrown and the workflow will stop executing.
- Try to retrieve the variant's existing preorder configurations, if any.
- Use when-then to check if there are existing pre-order configurations.
- If so, you update the pre-order variant record.
- Use
when-thento check if there are no existing pre-order configurations.- If so, you create a pre-order variant record and link it to the product variant.
- Use
transformto return either the created or updated preorder variant.
A workflow must return an instance of WorkflowResponse that accepts the data to return to the workflow's executor.
when-then and transform allow you to access the values of data during execution. Learn more in the Data Manipulation and When-Then documentation.b. Upsert Pre-Order Variant API Route#
Next, you'll create the API route that exposes the workflow's functionality to clients.
An API route is created in a route.ts file under a sub-directory of the src/api directory. The path of the API route is the file's path relative to src/api.
Create the file src/api/admin/variants/[id]/preorders/route.ts with the following content:
1import { 2 AuthenticatedMedusaRequest, 3 MedusaResponse,4} from "@medusajs/framework/http"5import { 6 upsertProductVariantPreorderWorkflow, 7} from "../../../../../workflows/upsert-product-variant-preorder"8import { z } from "@medusajs/framework/zod"9 10export const UpsertPreorderVariantSchema = z.object({11 available_date: z.string().datetime(),12})13 14type UpsertPreorderVariantSchema = z.infer<15 typeof UpsertPreorderVariantSchema16>17 18export const POST = async (19 req: AuthenticatedMedusaRequest<UpsertPreorderVariantSchema>,20 res: MedusaResponse21) => {22 const variantId = req.params.id23 24 const { result } = await upsertProductVariantPreorderWorkflow(req.scope)25 .run({26 input: {27 variant_id: variantId,28 available_date: new Date(req.validatedBody.available_date),29 },30 })31 32 res.json({33 preorder_variant: result,34 })35}
You create the UpsertPreorderVariantSchema schema that is used to validate request bodies sent to this API route with Zod.
Then, you export a POST function, which will expose a POST API route at /admin/variants/:id/preorders.
In the API route, you execute the upsertProductVariantPreorderWorkflow, passing it the variant ID from the path parameter and the availability date from the request body.
Finally, you return the created or updated pre-order variant record in the response.
Add Validation Middleware
To validate the body parameters of requests sent to the API route, you need to apply a middleware.
To apply a middleware to a route, create the file src/api/middlewares.ts with the following content:
1import { 2 defineMiddlewares, 3 validateAndTransformBody,4} from "@medusajs/framework/http"5import { 6 UpsertPreorderVariantSchema,7} from "./admin/variants/[id]/preorders/route"8 9export default defineMiddlewares({10 routes: [11 {12 matcher: "/admin/variants/:id/preorders",13 methods: ["POST"],14 middlewares: [15 validateAndTransformBody(UpsertPreorderVariantSchema),16 ],17 },18 ],19})
You apply Medusa's validateAndTransformBody middleware to POST requests sent to the /admin/variants/:id/preorders API route.
The middleware function accepts a Zod schema, which you created in the API route's file.
You'll test this API route later when you customize the Medusa Admin.
c. Disable Pre-Order Variant Workflow#
Next, you'll create a workflow that will disable the pre-order variant configuration. This is useful if the merchant doesn't want the variant to be preorderable anymore.
This workflow has the following steps:
View step details
You only need to implement the disablePreorderVariantStep.
disablePreorderVariantStep
The disablePreorderVariantStep changes the status of a pre-order variant record to disabled.
Create the file src/workflows/steps/disable-preorder-variant.ts with the following content:
1import { createStep, StepResponse } from "@medusajs/framework/workflows-sdk"2import { PREORDER_MODULE } from "../../modules/preorder"3import { 4 PreorderVariantStatus,5} from "../../modules/preorder/models/preorder-variant"6 7type StepInput = {8 id: string9}10 11export const disablePreorderVariantStep = createStep(12 "disable-preorder-variant",13 async ({ id }: StepInput, { container }) => {14 const preorderModuleService = container.resolve(PREORDER_MODULE)15 16 const oldData = await preorderModuleService.retrievePreorderVariant(id)17 18 const preorderVariant = await preorderModuleService.updatePreorderVariants({19 id,20 status: PreorderVariantStatus.DISABLED,21 })22 23 return new StepResponse(preorderVariant, oldData)24 },25 async (preorderVariant, { container }) => {26 if (!preorderVariant) {27 return28 }29 30 const preorderModuleService = container.resolve(PREORDER_MODULE)31 32 await preorderModuleService.updatePreorderVariants({33 id: preorderVariant.id,34 status: preorderVariant.status,35 })36 }37)
The step receives the ID of the pre-order variant, and changes its status to disabled.
In the compensation function, you revert the pre-order variant's status to its previous value.
Create Workflow
To create the workflow that disables the pre-order variant configuration, create the file src/workflows/disable-preorder-variant.ts with the following content:
1import { createWorkflow, WorkflowResponse } from "@medusajs/framework/workflows-sdk"2import { useQueryGraphStep } from "@medusajs/medusa/core-flows"3import { disablePreorderVariantStep } from "./steps/disable-preorder-variant"4 5type WorkflowInput = {6 variant_id: string7}8 9export const disablePreorderVariantWorkflow = createWorkflow(10 "disable-preorder-variant",11 (input: WorkflowInput) => {12 const { data: preorderVariants } = useQueryGraphStep({13 entity: "preorder_variant",14 fields: ["*"],15 filters: {16 variant_id: input.variant_id,17 },18 })19 20 const preorderVariant = disablePreorderVariantStep({21 id: preorderVariants[0].id,22 })23 24 return new WorkflowResponse(preorderVariant)25 }26)
In the workflow, you:
- Retrieve the pre-order variant configuration.
- Disable the pre-order variant configuration.
You return the updated pre-order variant record.
d. Disable Pre-Order Variant API Route#
To expose the functionality to disable a variant's pre-order configurations, you'll create an API route that executes the workflow.
In the file src/api/admin/variants/[id]/preorders/route.ts, add the following import at the top of the file:
Then, add the following function at the end of the file:
1export const DELETE = async (2 req: AuthenticatedMedusaRequest,3 res: MedusaResponse4) => {5 const variantId = req.params.id6 7 const { result } = await disablePreorderVariantWorkflow(req.scope).run({8 input: {9 variant_id: variantId,10 },11 })12 13 res.json({14 preorder_variant: result,15 })16}
You expose a DELETE API route at /admin/variants/:id/preorders.
In the API route, you execute the disablePreorderVariantWorkflow and return the updated preorder variant record.
You'll test out this functionality when you customize the Medusa Admin in the next step.
Step 5: Add Widget in Product Variant Admin Page#
In this step, you'll customize the Medusa Admin to allow admin users to manage pre-order configurations of product variants.
The Medusa Admin dashboard is customizable, allowing you to insert widgets into existing pages, or create new pages.
In this step, you'll insert a widget into the product variant page that allows admin users to manage pre-order configurations.
a. Initialize JS SDK#
To send requests to the Medusa server, you'll use the JS SDK. It's already installed in your Medusa project, but you need to initialize it before using it in your customizations.
Create the file src/admin/lib/sdk.ts with the following content:
Learn more about the initialization options in the JS SDK reference.
b. Define Types#
Next, you'll define types that you'll use in your admin customizations.
Create the file src/admin/lib/types.ts with the following content:
1import { HttpTypes } from "@medusajs/framework/types"2 3export interface PreorderVariant {4 id: string5 variant_id: string6 available_date: string7 status: "enabled" | "disabled"8 created_at: string9 updated_at: string10}11 12export interface Preorder {13 id: string14 order_id: string15 status: "pending" | "fulfilled" | "cancelled"16 created_at: string17 updated_at: string18 item: PreorderVariant & {19 product_variant?: HttpTypes.AdminProductVariant20 }21 order?: HttpTypes.AdminOrder22}23 24export interface PreordersResponse {25 preorders: Preorder[]26}27 28export interface PreorderVariantResponse {29 variant: HttpTypes.AdminProductVariant & {30 preorder_variant?: PreorderVariant31 }32}33 34export interface CreatePreorderVariantData {35 available_date: Date36}
You define types for pre-order variants, pre-orders, and request and response types.
c. Define Pre-order Variant Hook#
To send requests to the Medusa server with support for caching and refetching capabilities, you'll wrap JS SDK methods with Tanstack (React) Query.
So, you'll create a hook that exposes queries and mutations to manage pre-order configurations.
Create the file src/admin/hooks/use-preorder-variant.ts with the following content:
1import { useQuery, useMutation, useQueryClient } from "@tanstack/react-query"2import { toast } from "@medusajs/ui"3import { sdk } from "../lib/sdk"4import { PreorderVariantResponse, CreatePreorderVariantData } from "../lib/types"5import { HttpTypes } from "@medusajs/framework/types"6 7export const usePreorderVariant = (variant: HttpTypes.AdminProductVariant) => {8 const queryClient = useQueryClient()9 10 const { data, isLoading, error } = useQuery<PreorderVariantResponse>({11 queryFn: () => sdk.admin.product.retrieveVariant(12 variant.product_id!,13 variant.id,14 { fields: "*preorder_variant" }15 ),16 queryKey: ["preorder-variant", variant.id],17 })18 19 const upsertMutation = useMutation({20 mutationFn: async (data: CreatePreorderVariantData) => {21 return sdk.client.fetch(`/admin/variants/${variant.id}/preorders`, {22 method: "POST",23 body: data,24 })25 },26 onSuccess: () => {27 queryClient.invalidateQueries({ queryKey: ["preorder-variant", variant.id] })28 toast.success("Preorder configuration saved successfully")29 },30 onError: (error) => {31 toast.error(`Failed to save preorder configuration: ${error.message}`)32 },33 })34 35 const disableMutation = useMutation({36 mutationFn: async () => {37 return sdk.client.fetch(`/admin/variants/${variant.id}/preorders`, {38 method: "DELETE",39 })40 },41 onSuccess: () => {42 queryClient.invalidateQueries({ queryKey: ["preorder-variant", variant.id] })43 toast.success("Preorder configuration removed successfully")44 },45 onError: (error) => {46 toast.error(`Failed to remove preorder configuration: ${error.message}`)47 },48 })49 50 return {51 preorderVariant: data?.variant.preorder_variant?.status === "enabled" ? 52 data.variant.preorder_variant : null,53 isLoading,54 error,55 upsertPreorder: upsertMutation.mutate,56 disablePreorder: disableMutation.mutate,57 isUpserting: upsertMutation.isPending,58 isDisabling: disableMutation.isPending,59 }60}
The usePreorderVariant hook returns an object with the following properties:
preorderVariant: The pre-order variant. It's retrieved from Medusa's Retrieve Variant API route, which allows expanding linked records using thefieldsquery parameter.isLoading: Whether the pre-order variant is being retrieved.error: Errors that occur while retrieving the pre-order variant.upsertPreorder: A mutation to create or update a pre-order variant.disablePreorder: A mutation to disable a pre-order variant.isUpserting: Whether the pre-order variant is being created or updated.isDisabling: Whether the pre-order variant is being disabled.
d. Define Pre-order Variant Widget#
You can now add the widget that allows admin users to manage pre-order configurations of product variants.
Widgets are created in a .tsx file under the src/admin/widgets directory. So, create the file src/admin/widgets/preorder-variant-widget.tsx with the following content:
22import { usePreorderVariant } from "../hooks/use-preorder-variant"23 24const PreorderWidget = ({ 25 data: variant,26}: DetailWidgetProps<AdminProductVariant>) => {27 const [isDrawerOpen, setIsDrawerOpen] = useState(false)28 const [availableDate, setAvailableDate] = useState(29 new Date().toString()30 )31 32 const dialog = usePrompt()33 34 const {35 preorderVariant,36 isLoading,37 upsertPreorder: createPreorder,38 disablePreorder: deletePreorder,39 isUpserting: isCreating,40 isDisabling,41 } = usePreorderVariant(variant)42 43 const handleSubmit = (e: React.FormEvent) => {44 e.preventDefault()45 if (!availableDate) {46 return47 }48 49 createPreorder(50 { available_date: new Date(availableDate) },51 {52 onSuccess: () => {53 setIsDrawerOpen(false)54 setAvailableDate(new Date().toString())55 },56 }57 )58 }59 60 const handleDisable = async () => {61 const confirmed = await dialog({62 title: "Are you sure?",63 description: "This will remove the preorder configuration for this variant. Any existing preorders will not be automatically fulfilled.",64 variant: "danger",65 })66 if (confirmed) {67 deletePreorder()68 }69 }70 71 const formatDate = (dateString: string) => {72 return new Date(dateString).toLocaleDateString("en-US", {73 year: "numeric",74 month: "long",75 day: "numeric",76 })77 }78 79 useEffect(() => {80 if (preorderVariant) {81 setAvailableDate(preorderVariant.available_date)82 } else {83 setAvailableDate(new Date().toString())84 }85 }, [preorderVariant])86 87 // TODO add a return statement88}89 90export const config = defineWidgetConfig({91 zone: "product_variant.details.side.after",92})93 94export default PreorderWidget
A widget file must export:
- A default React component. This component renders the widget's UI.
- A
configobject created withdefineWidgetConfigfrom the Admin SDK. It accepts an object with thezoneproperty that indicates where the widget will be rendered in the Medusa Admin dashboard.
In the widget's component, you retrieve the preorder variant using the usePreorderVariant hook.
You also add a function to handle saving the pre-order configuration, and another to handle disabling the pre-order configuration.
Next, you need to render the widget's UI. Add the following return statement at the end of the widget's component:
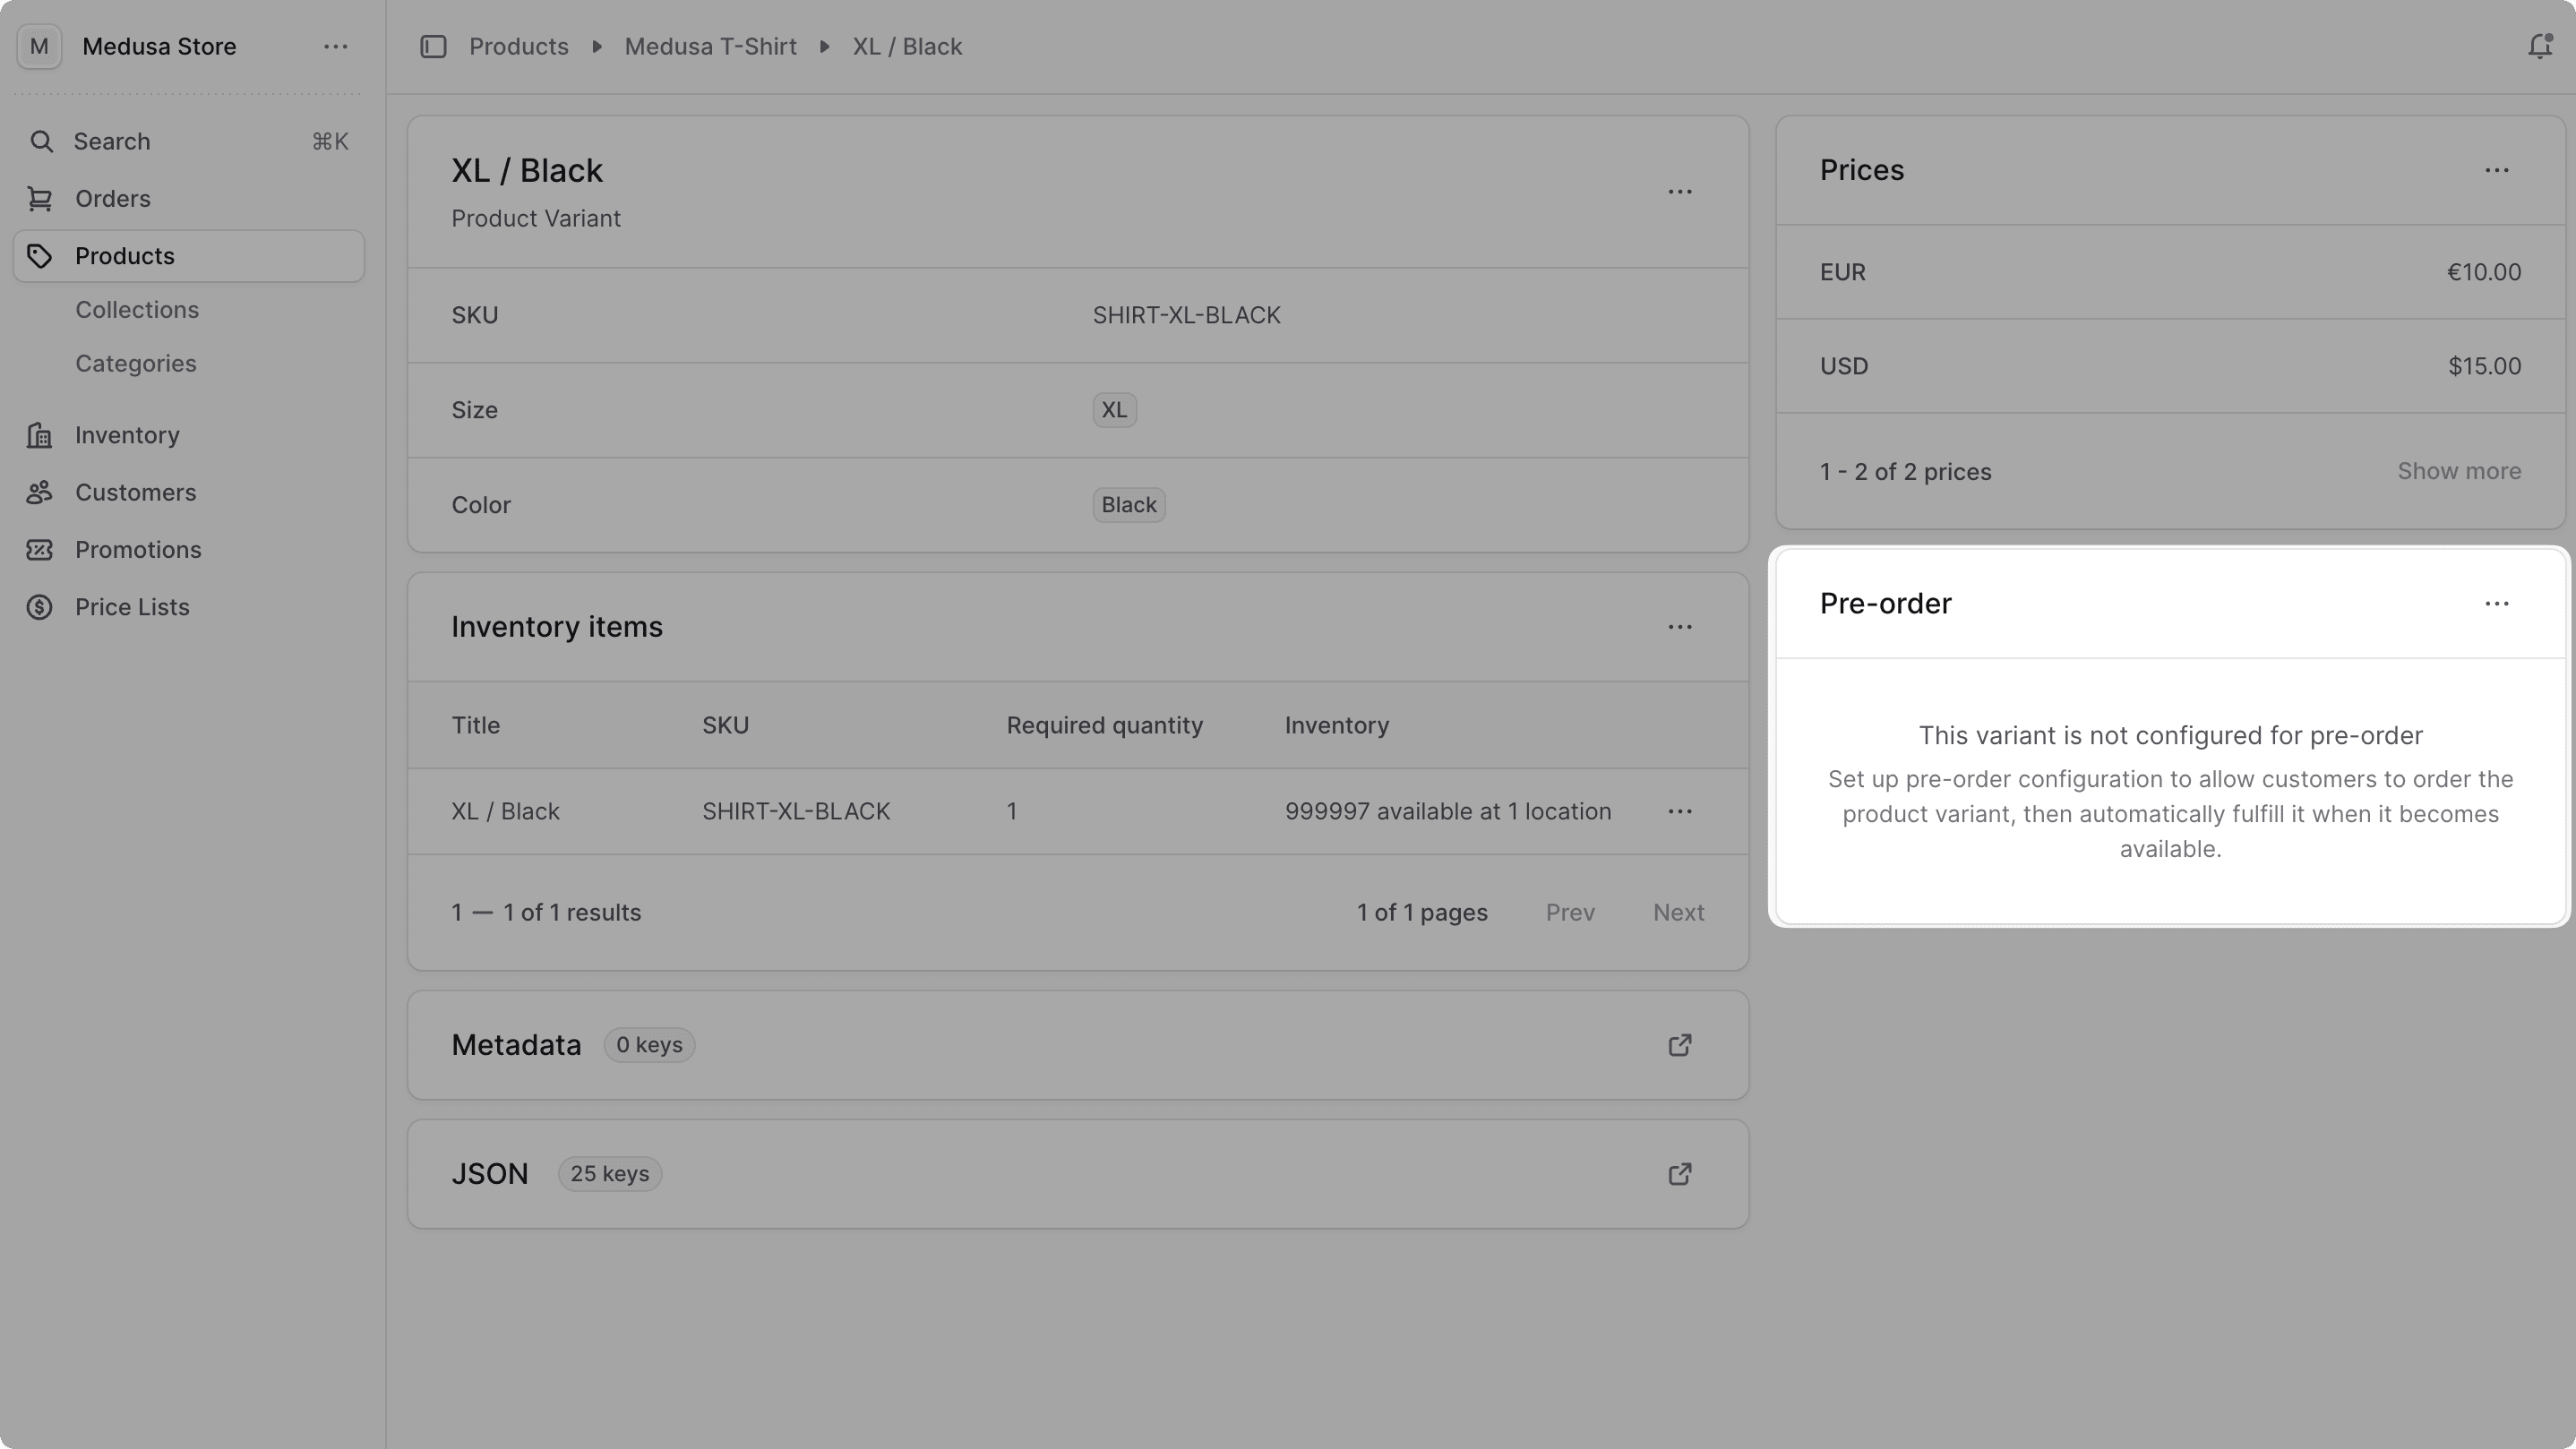
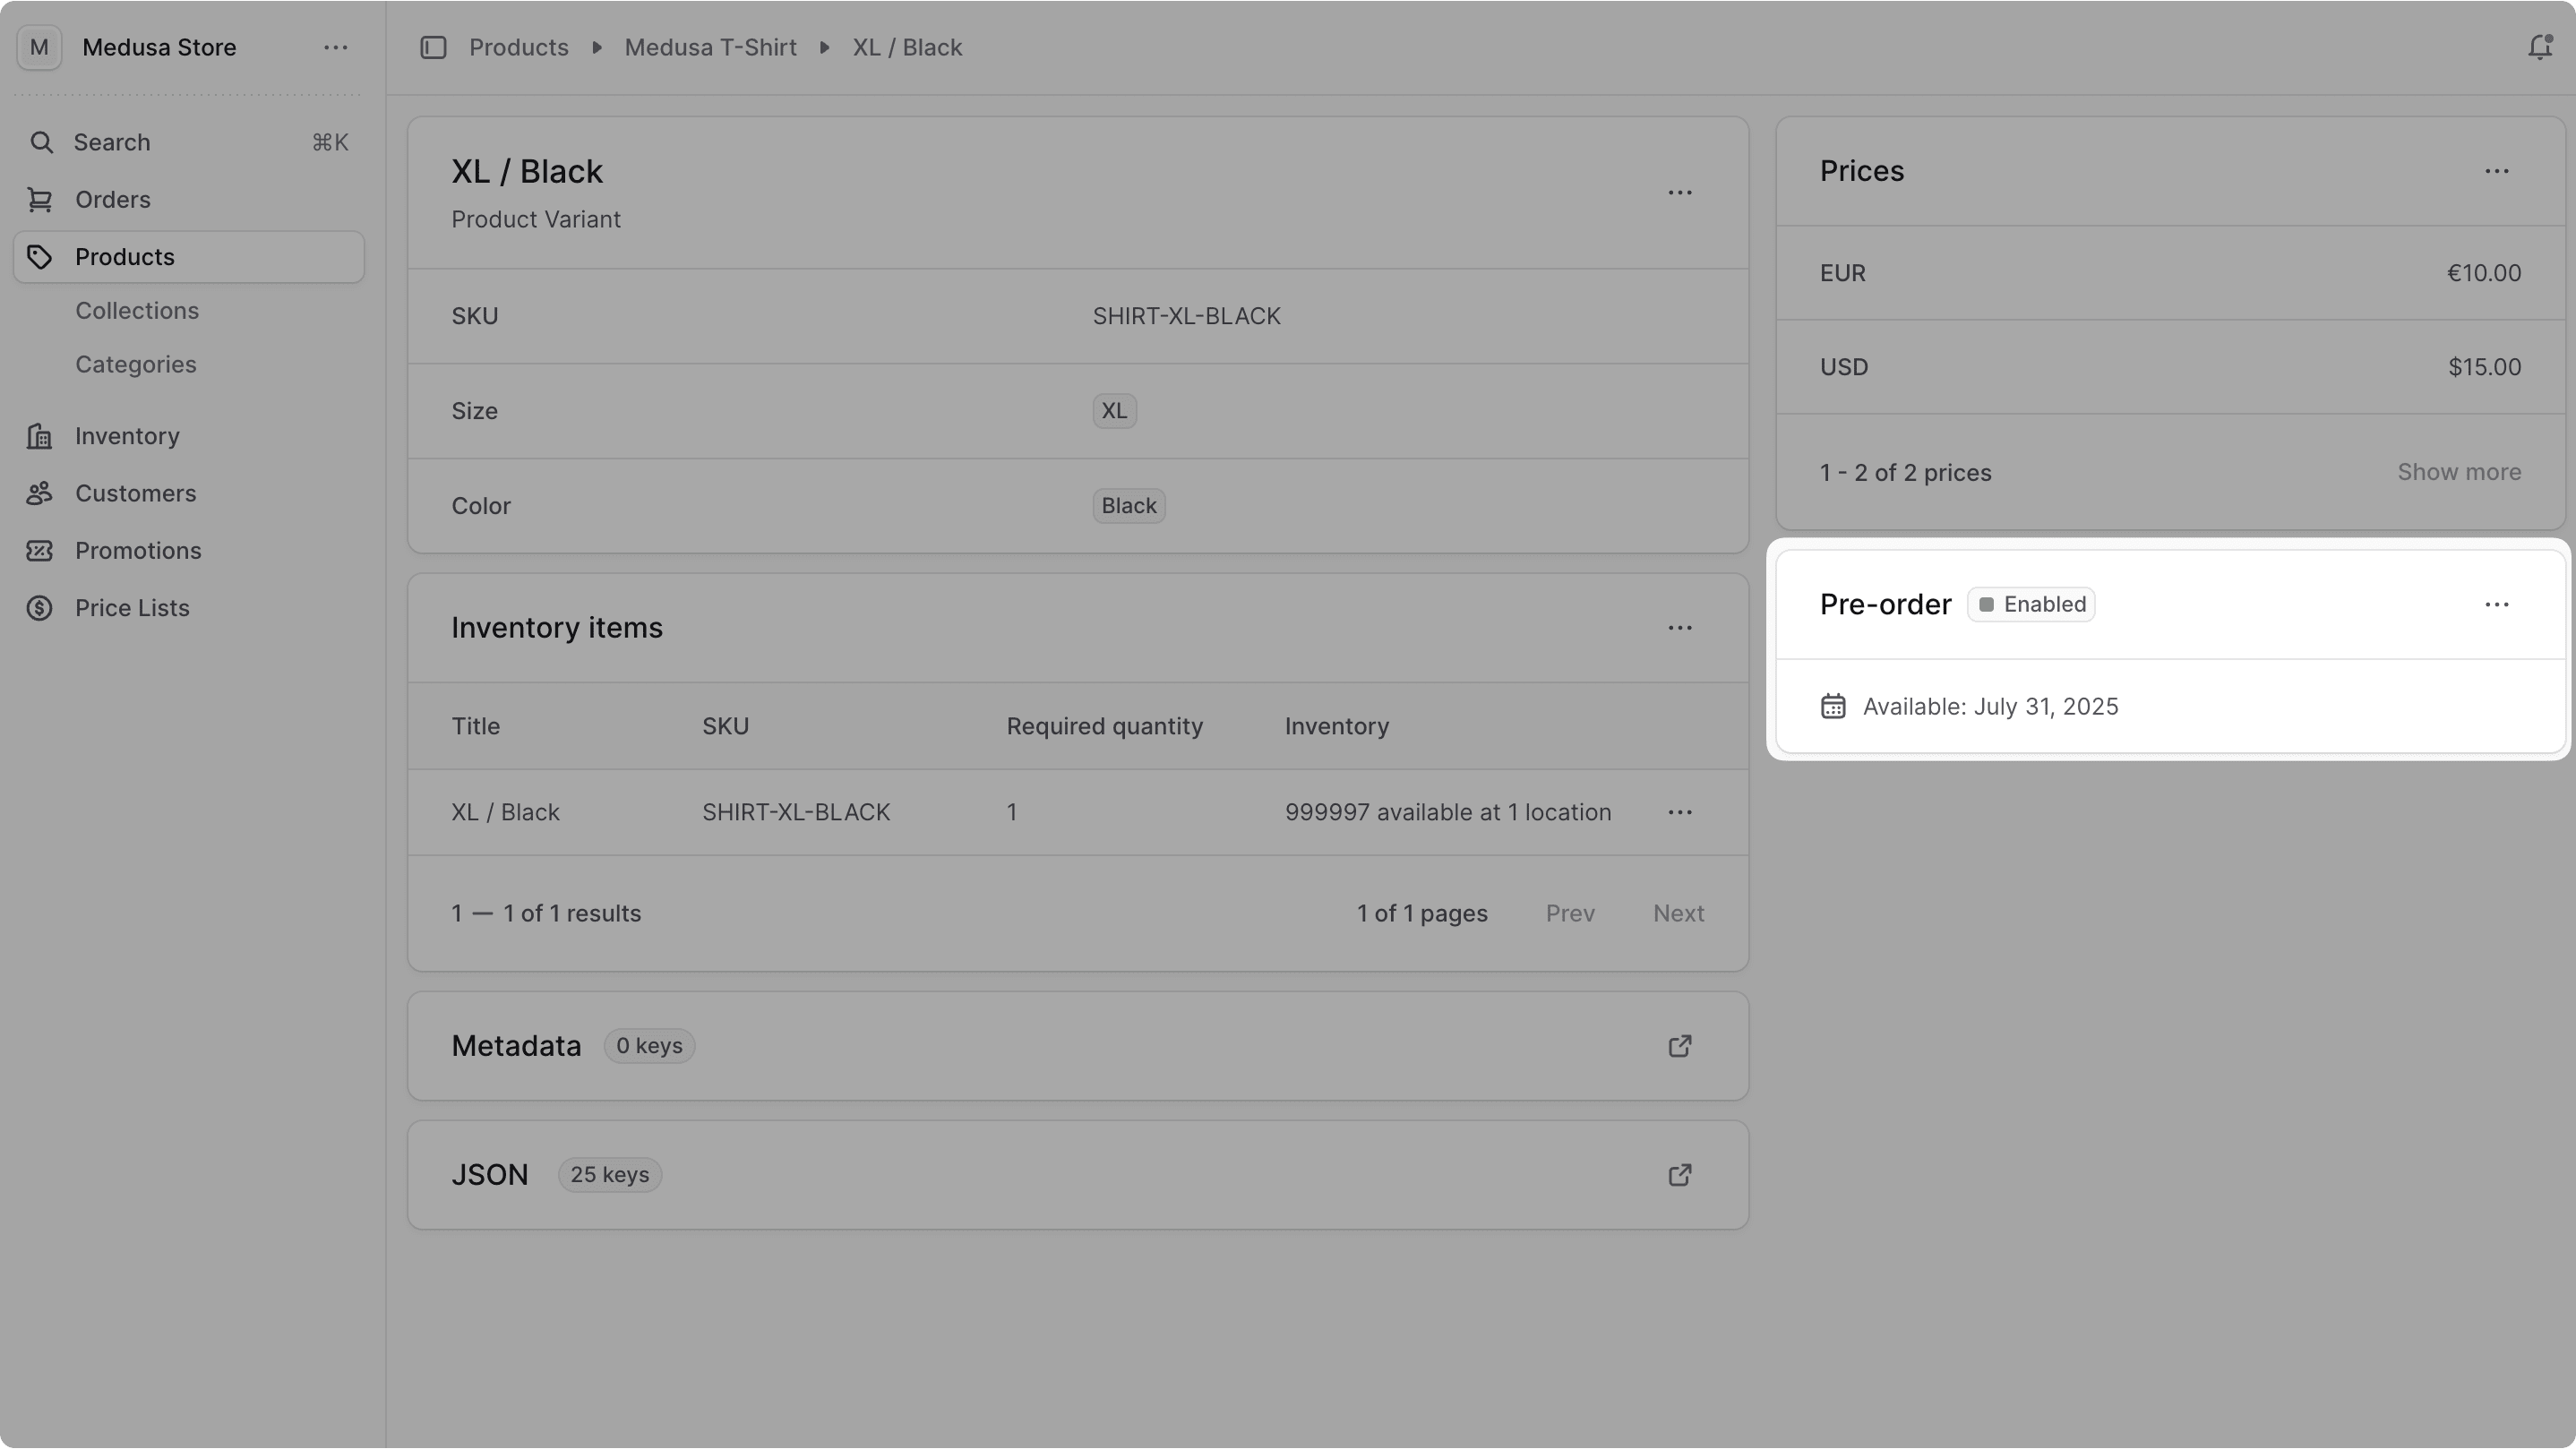
1const PreorderWidget = ({ 2 data: variant,3}: DetailWidgetProps<AdminProductVariant>) => {4 // ...5 return (6 <>7 <Container className="divide-y p-0">8 <div className="flex items-center justify-between px-6 py-4">9 <div className="flex items-center gap-2">10 <Heading level="h2">Pre-order</Heading>11 {preorderVariant?.status === "enabled" && (12 <StatusBadge color={"green"}>13 Enabled14 </StatusBadge>15 )}16 </div>17 <DropdownMenu>18 <DropdownMenu.Trigger asChild>19 <IconButton size="small" variant="transparent">20 <EllipsisHorizontal />21 </IconButton>22 </DropdownMenu.Trigger>23 <DropdownMenu.Content>24 <DropdownMenu.Item25 disabled={isCreating || isDisabling}26 onClick={() => setIsDrawerOpen(true)}27 className={clx(28 "[&_svg]:text-ui-fg-subtle flex items-center gap-x-2",29 {30 "[&_svg]:text-ui-fg-disabled": isCreating || isDisabling,31 }32 )}33 >34 { preorderVariant ? <Pencil /> : <Plus />}35 <span>36 { preorderVariant ? "Edit" : "Add" } Pre-order Configuration37 </span>38 </DropdownMenu.Item>39 <DropdownMenu.Item40 disabled={isCreating || isDisabling || !preorderVariant}41 onClick={handleDisable}42 className={clx(43 "[&_svg]:text-ui-fg-subtle flex items-center gap-x-2",44 {45 "[&_svg]:text-ui-fg-disabled": isCreating || isDisabling || !preorderVariant,46 }47 )}48 >49 <XCircle />50 <span>51 Remove Pre-order Configuration52 </span>53 </DropdownMenu.Item>54 </DropdownMenu.Content>55 56 </DropdownMenu>57 </div>58 59 <div className="px-6 py-4">60 {isLoading ? (61 <Text>Loading pre-order information...</Text>62 ) : preorderVariant ? (63 <div className="space-y-3">64 <div className="flex items-center gap-2 text-ui-fg-subtle">65 <Calendar className="w-4 h-4" />66 <Text size="small">67 Available: {formatDate(preorderVariant.available_date)}68 </Text>69 </div>70 </div>71 ) : (72 <div className="text-center py-4">73 <Text className="text-ui-fg-subtle">74 This variant is not configured for pre-order75 </Text>76 <Text size="small" className="text-ui-fg-muted mt-1">77 Set up pre-order configuration to allow customers to order the product variant, then automatically fulfill it when it becomes available.78 </Text>79 </div>80 )}81 </div>82 </Container>83 84 <Drawer open={isDrawerOpen} onOpenChange={setIsDrawerOpen}>85 <Drawer.Content>86 <Drawer.Header>87 <Drawer.Title>88 {preorderVariant ? "Edit" : "Add"} Pre-order Configuration89 </Drawer.Title>90 </Drawer.Header>91 92 <Drawer.Body>93 <form onSubmit={handleSubmit} className="flex flex-col gap-4">94 <div className="space-y-2">95 <Label htmlFor="available-date">Available Date</Label>96 <DatePicker97 id="available-date"98 value={new Date(availableDate)}99 onChange={(date) => setAvailableDate(date?.toString() || "")}100 minValue={new Date()}101 isRequired={true}102 />103 <Text size="small" className="text-ui-fg-subtle">104 Customers can pre-order this variant until this date, when it becomes available for regular purchase.105 </Text>106 </div>107 </form>108 </Drawer.Body>109 110 <Drawer.Footer>111 <Button 112 variant="secondary" 113 onClick={() => setIsDrawerOpen(false)}114 disabled={isCreating}115 >116 Cancel117 </Button>118 <Button 119 type="submit"120 onClick={handleSubmit}121 isLoading={isCreating}122 >123 Save124 </Button>125 </Drawer.Footer>126 </Drawer.Content>127 </Drawer>128 </>129 )130}
You render the variant's pre-order configurations if available. You also give the admin user the option to add or edit pre-order configurations and remove (disable) them.
To show the pre-order configuration form, you use the Drawer component from Medusa UI.
Test the Customizations#
You can now test the customizations you made in the Medusa server and admin dashboard.
Start the Medusa application with the following command:
Then, open the Medusa Admin dashboard at http://localhost:9000/app and log in.
Go to any product, then click on one of its variants. You'll find a new "Pre-order" section in the side column.
To add pre-order configuration using the widget:
- Click on the icon in the top right corner of the widget.
- Click on "Add Pre-order Configuration".
- In the drawer, select the available date for the pre-order.
- Click the "Save" button.
The widget will be updated to show the pre-order configuration details.
You can also disable the pre-order configuration by clicking on the icon, then choosing "Remove Pre-order Configuration" from the dropdown.
Step 6: Customize Cart Completion#
When customers purchase a pre-order variant, you want to create a Preorder record for every pre-order item in the cart.
In this step, you'll wrap custom logic around Medusa's cart completion logic in a workflow, then execute that workflow in a custom API route.
a. Create Complete Pre-order Cart Workflow#
The workflow that completes a cart with pre-order items has the following steps:
Workflow hook
Step conditioned by when
View step details
You only need to implement the retrievePreorderItemIdsStep and createPreordersStep steps.
retrievePreorderItemIdsStep
The retrievePreorderItemIdsStep receives all cart line items and returns the IDs of the pre-order variants.
Create the file src/workflows/steps/retrieve-preorder-items.ts with the following content:
1import { CartLineItemDTO, ProductVariantDTO } from "@medusajs/framework/types"2import { createStep, StepResponse } from "@medusajs/framework/workflows-sdk"3 4export type RetrievePreorderItemIdsStepInput = {5 line_items: (CartLineItemDTO & {6 variant: ProductVariantDTO & {7 preorder_variant?: {8 id: string9 }10 }11 })[]12}13 14export const retrievePreorderItemIdsStep = createStep(15 "retrieve-preorder-item-ids",16 async ({ line_items }: RetrievePreorderItemIdsStepInput) => {17 const variantIds: string[] = []18 19 line_items.forEach((item) => {20 if (item.variant.preorder_variant) {21 variantIds.push(item.variant.preorder_variant.id)22 }23 })24 25 return new StepResponse(variantIds)26 }27)
In the step, you find the items in the cart whose variants have a linked PreorderVariant record. You return the IDs of those pre-order variants.
createPreordersStep
The createPreordersStep creates a Preorder record for each pre-order variant in the cart.
Create the file src/workflows/steps/create-preorders.ts with the following content:
1import { createStep, StepResponse } from "@medusajs/framework/workflows-sdk"2import { PREORDER_MODULE } from "../../modules/preorder"3 4type StepInput = {5 preorder_variant_ids: string[]6 order_id: string7}8 9export const createPreordersStep = createStep(10 "create-preorders",11 async ({12 preorder_variant_ids,13 order_id,14 }: StepInput, { container }) => {15 const preorderModuleService = container.resolve(PREORDER_MODULE)16 17 const preorders = await preorderModuleService.createPreorders(18 preorder_variant_ids.map((id) => ({19 item_id: id,20 order_id,21 }))22 )23 24 return new StepResponse(preorders, preorders.map((p) => p.id))25 },26 async (preorderIds, { container }) => {27 if (!preorderIds) {28 return29 }30 31 const preorderModuleService = container.resolve(PREORDER_MODULE)32 33 await preorderModuleService.deletePreorders(preorderIds)34 }35)
The step function receives the ID of the Medusa order and the IDs of the pre-order variants in the cart.
In the step function, you create a Preorder record for each pre-order variant. You set the order_id of the Preorder record to the ID of the Medusa order.
In the compensation function, you delete the created Preorder records if an error occurs in the workflow's execution.
Create Workflow
You can now create the workflow that completes a cart with pre-order items.
Create the file src/workflows/complete-cart-preorder.ts with the following content:
16import { createPreordersStep } from "./steps/create-preorders"17 18type WorkflowInput = {19 cart_id: string20}21 22export const completeCartPreorderWorkflow = createWorkflow(23 "complete-cart-preorder",24 (input: WorkflowInput) => {25 acquireLockStep({26 key: input.cart_id,27 timeout: 2,28 ttl: 10,29 })30 const { id } = completeCartWorkflow.runAsStep({31 input: {32 id: input.cart_id,33 },34 })35 36 const { data: preorders } = useQueryGraphStep({37 entity: "preorder",38 fields: [39 "id",40 ],41 filters: {42 order_id: id,43 },44 })45 46 const { data: line_items } = useQueryGraphStep({47 entity: "line_item",48 fields: [49 "variant.*",50 "variant.preorder_variant.*",51 ],52 filters: {53 cart_id: input.cart_id,54 },55 }).config({ name: "retrieve-line-items" })56 57 const preorderItemIds = retrievePreorderItemIdsStep({58 line_items,59 } as unknown as RetrievePreorderItemIdsStepInput)60 61 when({62 preorders,63 preorderItemIds,64 }, (data) => data.preorders.length === 0 && data.preorderItemIds.length > 0)65 .then(() => {66 createPreordersStep({67 preorder_variant_ids: preorderItemIds,68 order_id: id,69 })70 })71 72 const { data: orders } = useQueryGraphStep({73 entity: "order",74 fields: [75 "*",76 "items.*",77 "items.variant.*",78 "items.variant.preorder_variant.*",79 "shipping_address.*",80 "billing_address.*",81 "payment_collections.*",82 "shipping_methods.*",83 ],84 filters: {85 id,86 },87 }).config({ name: "retrieve-order" })88 89 releaseLockStep({90 key: input.cart_id,91 })92 93 return new WorkflowResponse({94 order: orders[0],95 96 })97 }98)
The workflow receives the cart ID as input.
In the workflow, you:
- Acquire a lock on the cart using the acquireLockStep to prevent concurrent modifications.
- Complete the cart using the completeCartWorkflow as a step. This is Medusa's cart completion logic.
- Retrieve existing pre-orders of the created order using the useQueryGraphStep.
- This is essential for idempotency, ensuring that pre-orders are not created multiple times if the workflow is retried.
- Retrieve all line items in the cart using the useQueryGraphStep.
- Retrieve the IDs of the pre-order variants in the cart using the
retrievePreorderItemIdsStep. - Use when-then to check if there are no existing pre-orders and if there are pre-order items in the cart.
- If the condition is met, you create
Preorderrecords for the pre-order items using thecreatePreordersStep.
- If the condition is met, you create
- Retrieve the created order using the useQueryGraphStep.
- Release the lock on the cart using the releaseLockStep.
- Return the created Medusa order.
b. Create Complete Pre-order Cart API Route#
Next, you'll create an API route that executes the completeCartPreorderWorkflow. Storefronts will use this API route to complete carts and place orders.
Create the file src/api/store/carts/[id]/complete-preorder/route.ts with the following content:
1import { MedusaRequest, MedusaResponse } from "@medusajs/framework/http"2import { completeCartPreorderWorkflow } from "../../../../../workflows/complete-cart-preorder"3 4export const POST = async (5 req: MedusaRequest,6 res: MedusaResponse7) => {8 const { id } = req.params9 10 const { result } = await completeCartPreorderWorkflow(req.scope).run({11 input: {12 cart_id: id,13 },14 })15 16 res.json({17 type: "order",18 order: result.order,19 })20}
You expose a POST API route at /store/carts/:id/complete-preorder. In the API route, you execute the completeCartPreorderWorkflow, passing it the cart ID from the path parameter.
Finally, you return the created order in the response.
You'll test this functionality in the next step when you customize the storefront.
Optional: Restrict Cart to Pre-order or Regular Items#
In some use cases, you may want to allow customers to either pre-order products, or order available ones, but not purchase both within the same order.
In those cases, you can perform custom logic within Medusa's add-to-cart logic to validate an item before it's added to the cart.
You do this using workflow hooks. A workflow hook is a point in a workflow where you can inject custom functionality as a step function.
To consume the validate hook of the addToCartWorkflow that holds the add-to-cart logic, create the file src/workflows/hooks/validate-cart.ts with the following content:
1import { MedusaError } from "@medusajs/framework/utils"2import { addToCartWorkflow } from "@medusajs/medusa/core-flows"3import { InferTypeOf } from "@medusajs/framework/types"4import { PreorderVariant } from "../../modules/preorder/models/preorder-variant"5 6function isPreorderVariant(7 preorderVariant: InferTypeOf<typeof PreorderVariant> | undefined8) {9 if (!preorderVariant) {10 return false11 }12 return preorderVariant.status === "enabled" && 13 preorderVariant.available_date > new Date()14}15 16addToCartWorkflow.hooks.validate(17 (async ({ input, cart }, { container }) => {18 const query = container.resolve("query")19 20 const { data: itemsInCart } = await query.graph({21 entity: "line_item",22 fields: ["variant.*", "variant.preorder_variant.*"],23 filters: {24 cart_id: cart.id,25 },26 })27 28 if (!itemsInCart.length) {29 return30 }31 32 const { data: variantsToAdd } = await query.graph({33 entity: "variant",34 fields: ["preorder_variant.*"],35 filters: {36 id: input.items37 .map((item) => item.variant_id)38 .filter(Boolean) as string[],39 },40 })41 42 const cartHasPreorderVariants = itemsInCart.some(43 (item) => isPreorderVariant(44 item.variant?.preorder_variant as InferTypeOf<typeof PreorderVariant>45 )46 )47 48 const newItemsHavePreorderVariants = variantsToAdd.some(49 (variant) => isPreorderVariant(50 variant.preorder_variant as InferTypeOf<typeof PreorderVariant>51 )52 )53 54 if (cartHasPreorderVariants !== newItemsHavePreorderVariants) {55 throw new MedusaError(56 MedusaError.Types.INVALID_DATA,57 "The cart must either contain only preorder variants, or available variants."58 )59 }60 })61)
You consume the hook by calling addToCartWorkflow.hooks.validate, passing it a step function.
In the step function, you check whether the cart's existing items have pre-order variants, and whether the new items have pre-order variants.
If the checks don't match, you throw an error, preventing the new item from being added to the cart.
You can test this out after customizing the storefront in the next section.
Step 7: Customize Storefront for Pre-orders#
In this step, you'll customize the Next.js Starter Storefront to show when products are pre-orderable, use the custom complete pre-order cart API route, and show pre-order information in the order confirmation page.
a. Add Pre-order Types#
You'll start by defining types related to pre-orders that you'll use in the storefront.
In src/types/global.ts, add the following import at the top of the file:
Then, add the following type definitions at the end of the file:
1export type StorePreorderVariant = {2 id: string3 variant_id: string4 available_date: string5 status: "enabled" | "disabled"6}7 8export type StoreProductVariantWithPreorder = HttpTypes.StoreProductVariant & {9 preorder_variant?: StorePreorderVariant10}11 12export type StoreCartLineItemWithPreorder = HttpTypes.StoreCartLineItem & {13 variant: StoreProductVariantWithPreorder14}
You'll use these type definitions in other customizations.
b. Add isPreorder Utility#
In product, cart, and order related pages, you'll need to check if a product variant is a pre-order variant. So, you'll create a utility function that you can reuse in those pages.
Create the file src/lib/util/is-preorder.ts with the following content:
1import { StorePreorderVariant } from "../../types/global"2 3export function isPreorder(4 preorderVariant: StorePreorderVariant | undefined5): boolean {6 return preorderVariant?.status === "enabled" &&7 (preorderVariant.available_date8 ? new Date(preorderVariant.available_date) > new Date()9 : false)10}
The function returns true if the pre-order variant has a status of enabled and an available_date in the future.
c. Show Pre-order Information in Product Page#
In this section, you'll customize the product page to show pre-order information when a customer selects a pre-order variant.
Retrieve Pre-order Variant Information
First, you'll retrieve the pre-order variant information along with the product variant from the Medusa server.
Since the PreorderVariant model is linked to the ProductVariant model, you can retrieve pre-order variants when retrieving product variants using the fields query parameter.
In the file src/lib/data/products.ts, find the listProducts function and update the fields property in the sdk.client.fetch method to include the pre-order variant:
1export const listProducts = async ({2 // ...3}: {4 // ...5}): Promise<{6 // ...7}> => {8 // ...9 return sdk.client10 .fetch<{ products: HttpTypes.StoreProduct[]; count: number }>(11 `/store/products`,12 {13 method: "GET",14 query: {15 // ...16 fields:17 "*variants.calculated_price,+variants.inventory_quantity,+metadata,+tags,*variants.preorder_variant",18 // ...19 },20 // ...21 }22 )23 // ...24}
You add *variants.preorder_variant at the end of the fields query parameter to retrieve the pre-order variant information along with the product variants.
Customize ProductActions Component
Next, you'll customize the ProductActions component to show the pre-order information when a pre-order variant is selected.
In src/modules/products/components/product-actions/index.tsx, add the following imports at the top of the file:
Then, in the ProductActions component, add the following variable before the return statement:
The isSelectedVariantPreorder variable is a boolean that indicates whether the selected product variant is a pre-order variant.
Next, find the Button component in the return statement and update its children to the following:
1return (2 <>3 {/* ... other components ... */}4 <Button5 // ...6 >7 {!selectedVariant && !options8 ? "Select variant"9 : !inStock || !isValidVariant10 ? "Out of stock"11 : isSelectedVariantPreorder ? "Pre-order" : "Add to cart"}12 </Button>13 {/* ... other components ... */}14 </>15)
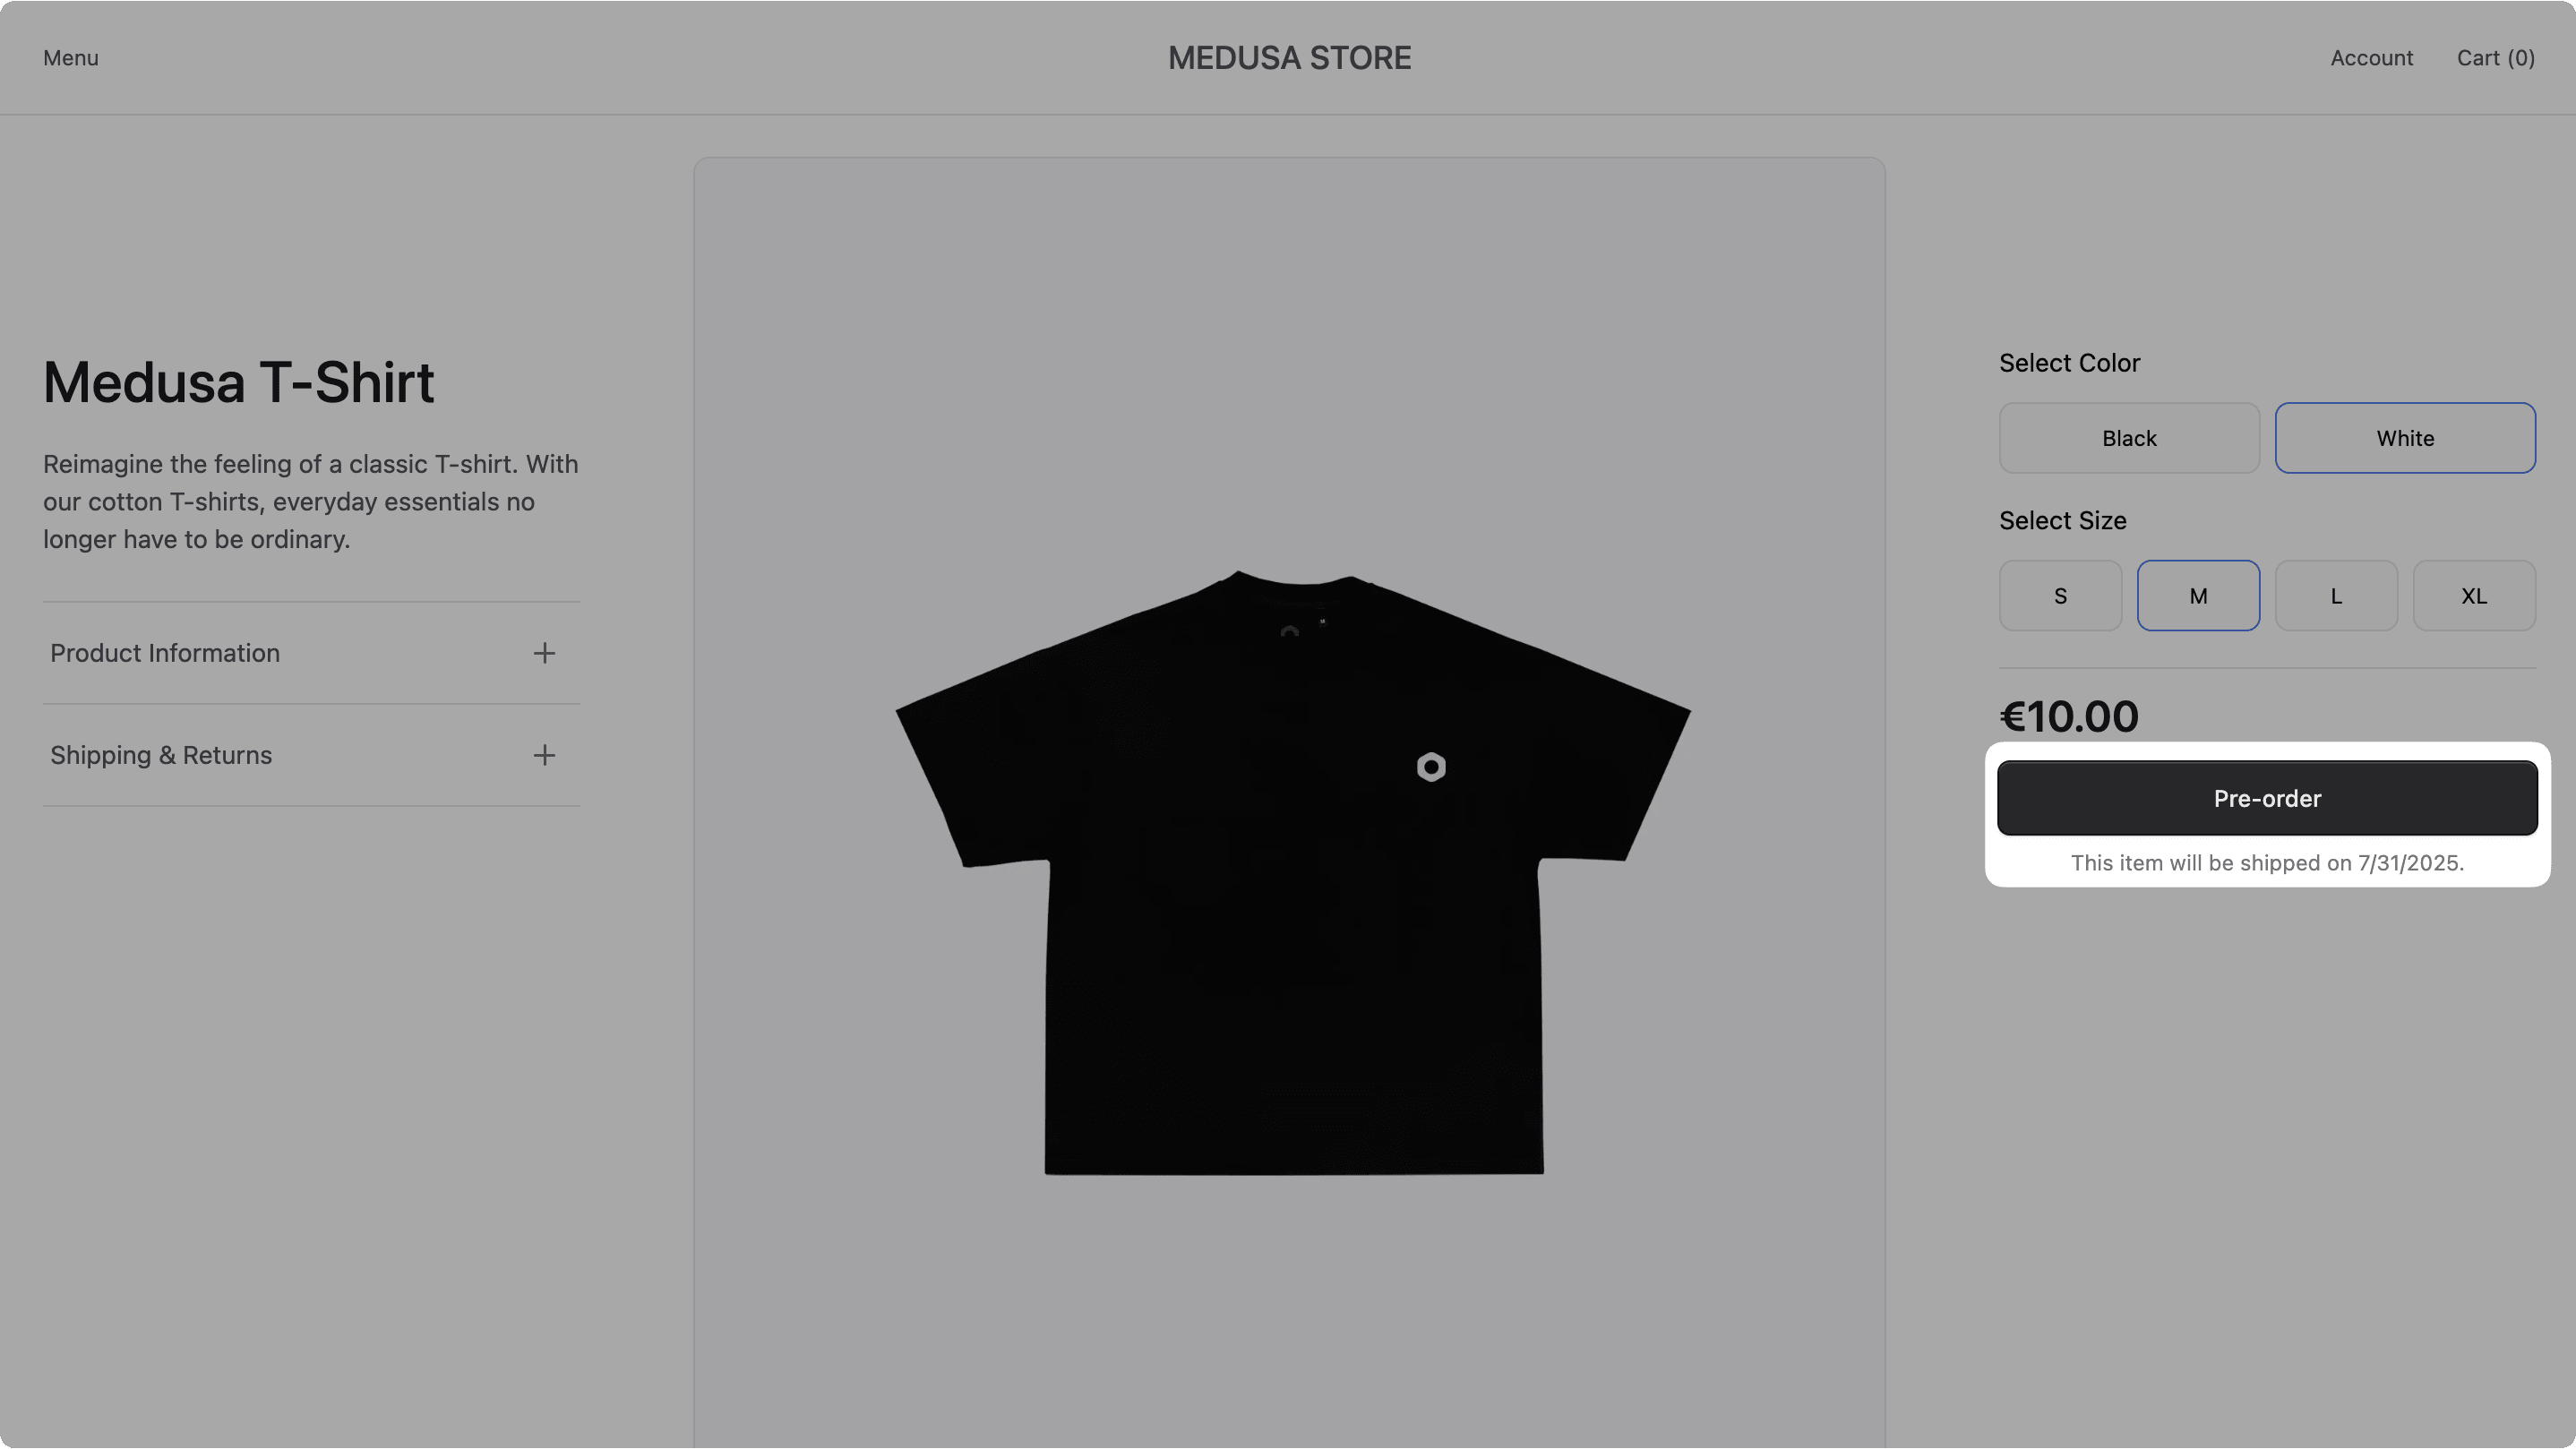
You set the button text to "Pre-order" if the selected variant is a pre-order variant.
Finally, add the following code after the Button component in the return statement:
1return (2 <>3 {/* ... other components ... */}4 <Button5 // ...6 >7 {/* ... */}8 </Button>9 {isSelectedVariantPreorder && (10 <Text className="text-ui-fg-muted text-xs text-center">11 This item will be shipped on{" "}12 {new Date(13 (selectedVariant as StoreProductVariantWithPreorder)!.preorder_variant!.available_date14 ).toLocaleDateString()}.15 </Text>16 )}17 {/* ... other components ... */}18 </>19)
You show a message below the button that indicates when the pre-order item will be shipped.
Test the Product Page Customizations
To test out the changes to the product page, start the Medusa application with the following command:
And in the Next.js Starter Storefront directory, start the Next.js application with the following command:
Open the storefront at http://localhost:8000 and go to Menu -> Store.
Choose a product that has a pre-order variant, then select the pre-order variant's options. The button text will change to "Pre-order" and a message will appear below the button indicating when the item will be shipped.
You can click on the "Pre-order" button to add the item to the cart.
validate hook of the addToCartWorkflow as explained in the optional step, you can test it out now by trying to add a regular item to the cart.d. Show Pre-order Information in Cart Page#
Next, you'll customize the component showing items in the cart and checkout pages to show pre-order information.
Retrieve Pre-order Information in Cart
To show the pre-order information of items in the cart, you need to retrieve the pre-order variant information when retrieving the cart.
In the file src/lib/data/cart.ts, find the retrieveCart function and update the fields property in the sdk.client.fetch method to include the pre-order variant:
1export async function retrieveCart(cartId?: string) {2 // ...3 return await sdk.client4 .fetch<HttpTypes.StoreCartResponse>(`/store/carts/${id}`, {5 method: "GET",6 query: {7 fields:8 "*items, *region, *items.product, *items.variant, *items.thumbnail, *items.metadata, +items.total, *promotions, +shipping_methods.name, *items.variant.preorder_variant",9 },10 // ...11 })12 // ...13}
Notice that you added *items.variant.preorder_variant at the end of the retrieved fields.
Customize Cart Item Component
Next, you'll customize the Item component that shows each item in the cart and checkout pages to show pre-order information.
In src/modules/cart/components/item/index.tsx, add the following imports at the top of the file:
Next, change the type of the item prop in ItemProps:
Then, in the Item component, add the following variable before the return statement:
Finally, in the return statement, add the following after the LineItemOptions component:
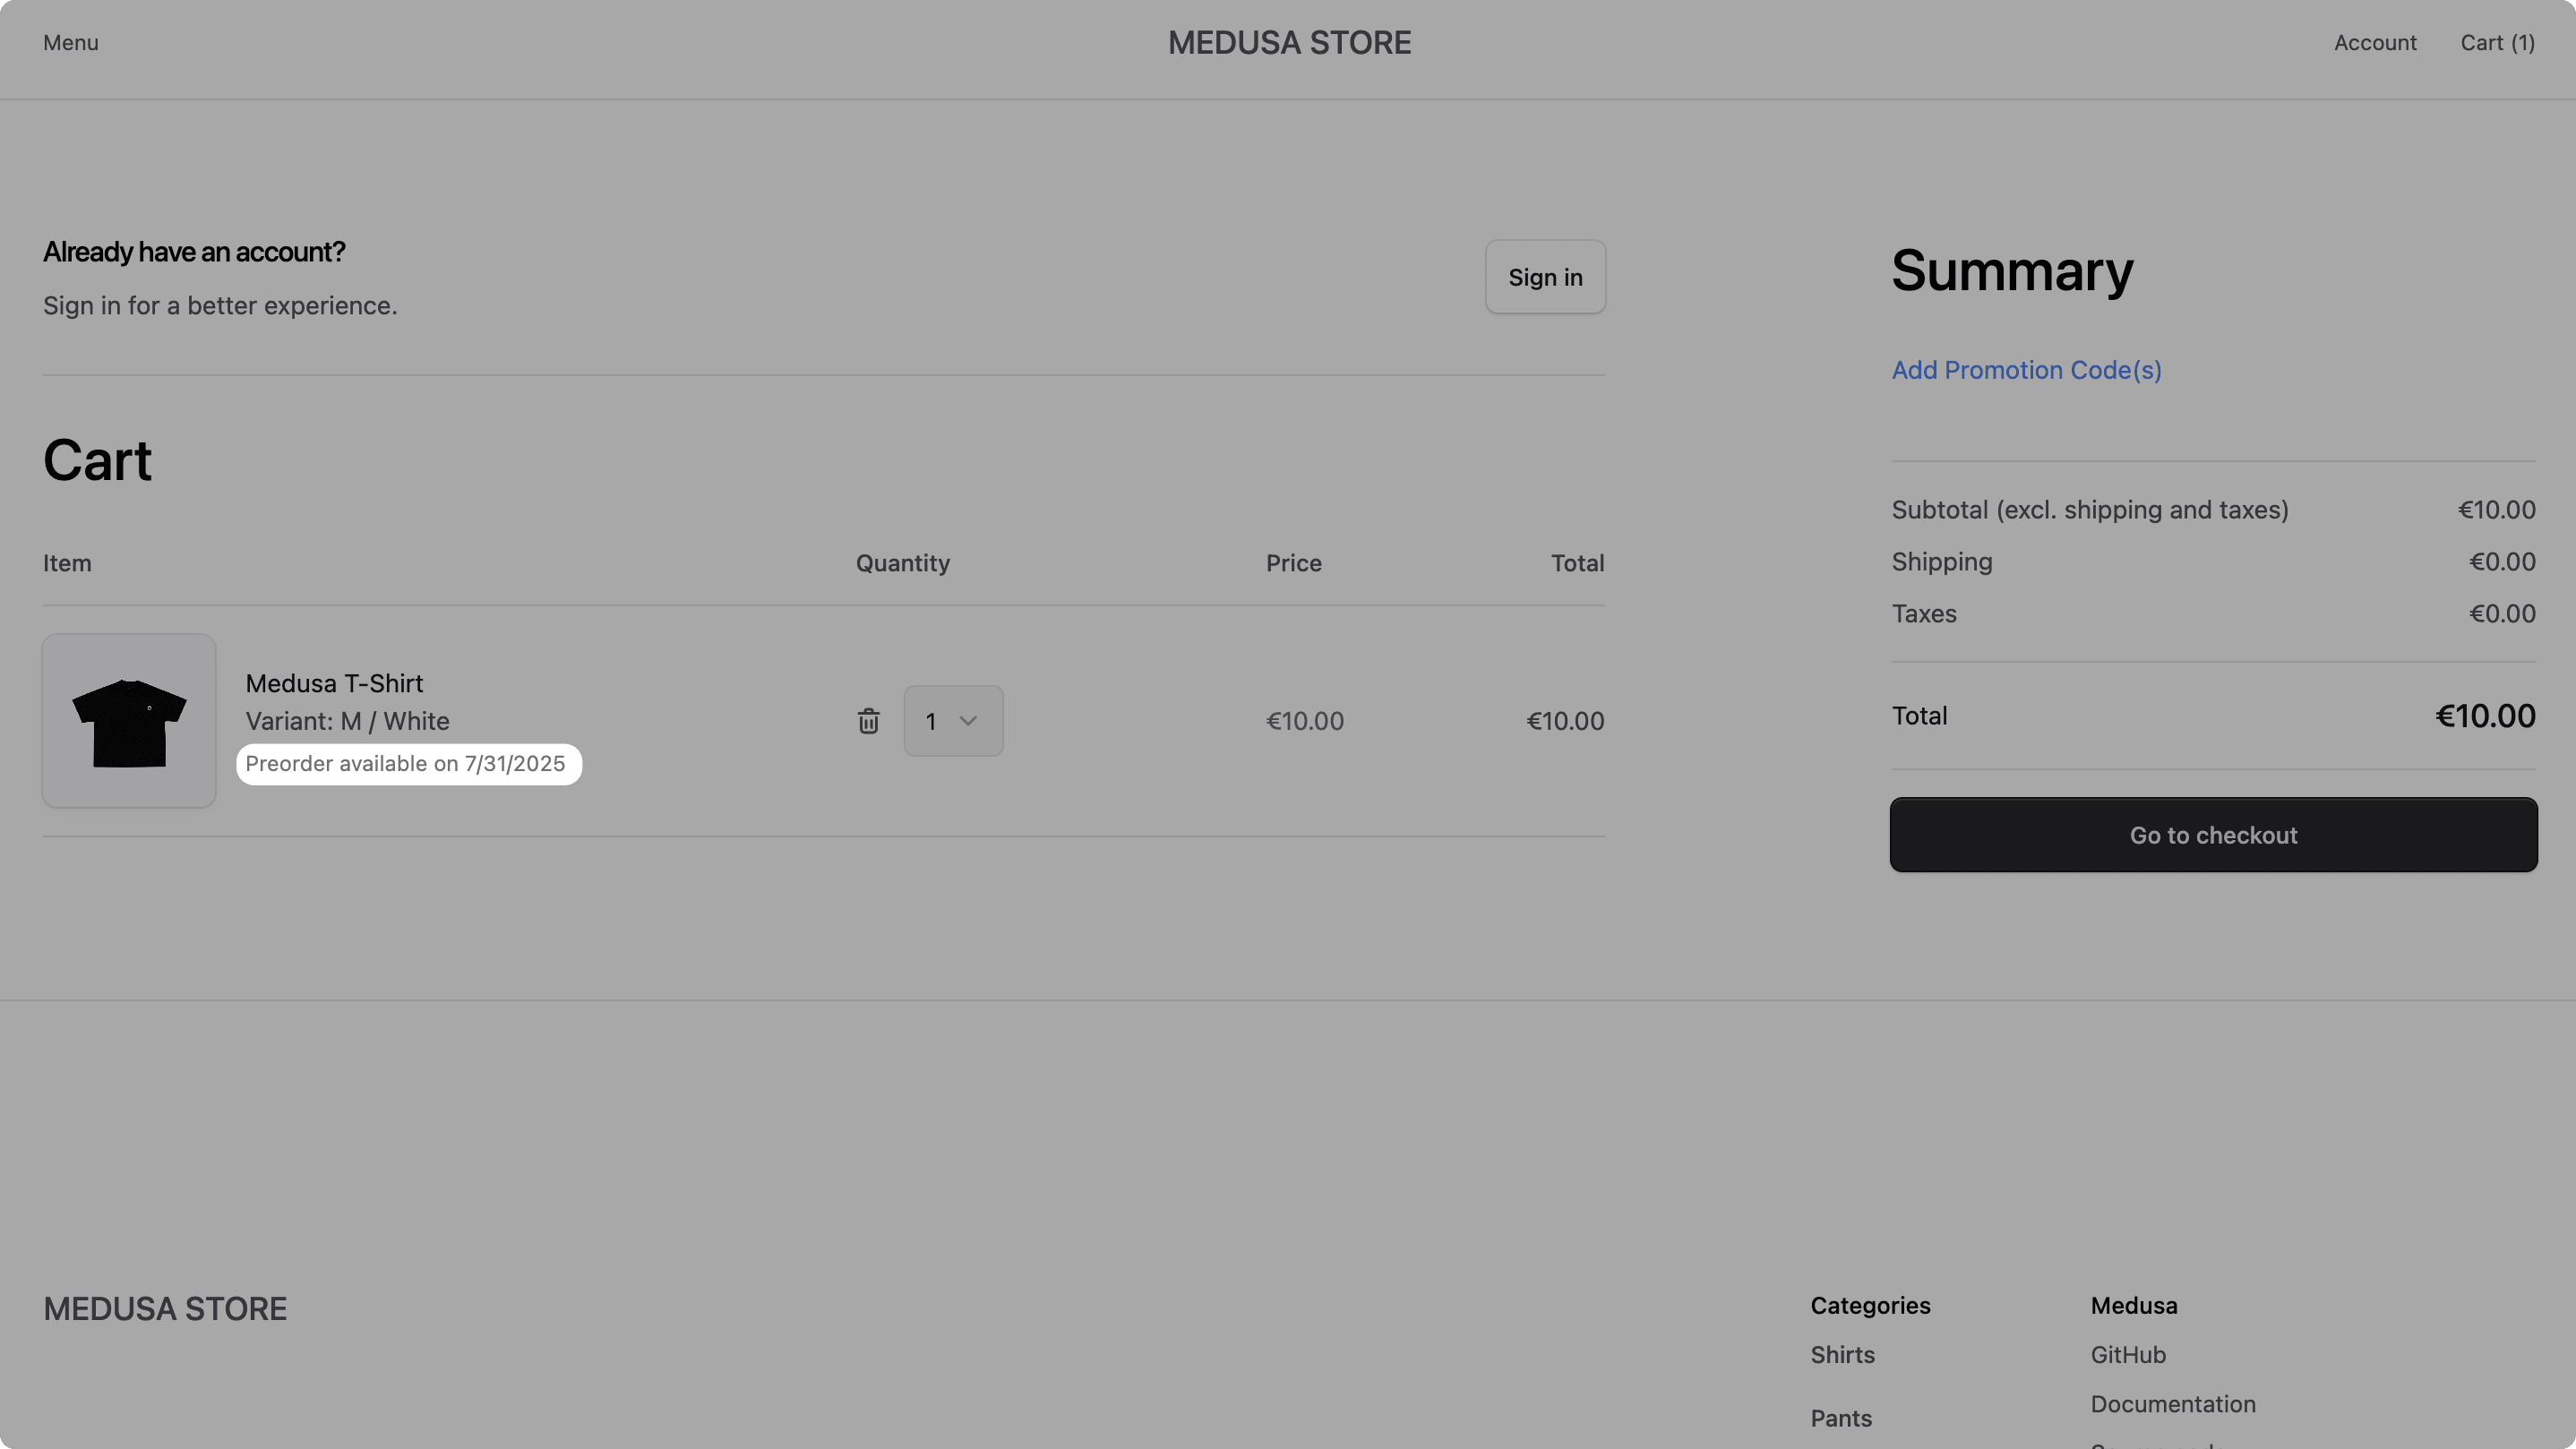
1return (2 <Table.Row className="w-full" data-testid="product-row">3 {/* ... other components ... */}4 <LineItemOptions5 // ...6 />7 {isPreorderItem && (8 <Text className="text-ui-fg-muted text-xs">9 Preorder available on{" "}10 <span>11 {new Date(item.variant!.preorder_variant!.available_date).toLocaleDateString()}12 </span>13 </Text>14 )}15 {/* ... other components ... */}16 </Table.Row>17)
You show a message below the line item options that indicates when the pre-order item will be available.
The change in the ItemProps type will cause a type error in src/modules/cart/templates/items.tsx that uses this type.
To fix it, add in src/modules/cart/templates/items.tsx the following import at the top of the file:
Then, in the return statement of the ItemsTemplate component, find the Item component and change its item prop:
Test the Cart Page Customizations
To test the changes to the cart page, ensure that both the Medusa and Next.js applications are running.
Then, in the storefront, click on the "Cart" link at the top right of the page. You'll find that pre-order items have a message indicating when they're available.
You can also see this message on the checkout page.
e. Use Custom Complete Pre-order Cart API Route#
Next, you'll use the custom API route you created to complete carts. This will allow you to create Preorder records for pre-order items in the cart when the customer places an order.
In src/lib/data/cart.ts, find the following lines in the placeOrder function:
And replace them with the following:
You change the placeOrder function, which is executed when the customer places an order, to use the custom API route you created to complete carts with pre-order items.
Test Cart Completion
To test the cart completion with pre-order items, ensure that both the Medusa and Next.js applications are running.
Then, in the storefront, proceed to checkout with a pre-order item in the cart.
When you place the order, the custom API route will be executed and the order will be placed.
f. Show Pre-order Information in Order Confirmation Page#
Finally, you'll show the pre-order information in the order confirmation and detail pages.
Retrieve Pre-order Information in Order
To show the pre-order information in the order confirmation and detail pages, you need to retrieve the pre-order variant information when retrieving the order.
In the file src/lib/data/orders.ts, find the retrieveOrder function and update the fields property in the sdk.client.fetch method to include the pre-order variant:
1export const retrieveOrder = async (id: string) => {2 // ...3 return sdk.client4 .fetch<HttpTypes.StoreOrderResponse>(`/store/orders/${id}`, {5 method: "GET",6 query: {7 fields:8 "*payment_collections.payments,*items,*items.metadata,*items.variant,*items.product,*items.variant.preorder_variant",9 },10 // ...11 })12 // ...13}
Notice that you added *items.variant.preorder_variant at the end of the retrieved fields.
Customize Order Item Component
Next, you'll customize the Item component that renders each item in the order confirmation and detail pages to show pre-order information.
In src/modules/order/components/item/index.tsx, add the following imports at the top of the file:
Then, change the type of the item prop in ItemProps:
Next, in the Item component, add the following variable:
Finally, in the return statement, add the following after the LineItemOptions component:
1return (2 <Table.Row className="w-full" data-testid="product-row">3 {/* ... other components ... */}4 <LineItemOptions5 // ...6 />7 {isPreorderItem && (8 <Text className="text-ui-fg-muted text-xs">9 Preorder available on{" "}10 <span>11 {new Date(item.variant!.preorder_variant!.available_date).toLocaleDateString()}12 </span>13 </Text>14 )}15 {/* ... other components ... */}16 </Table.Row>17)
Test the Order Confirmation Page Customizations
To test the changes to the order confirmation page, ensure that both the Medusa and Next.js applications are running.
Then, in the storefront, either open the same confirmation page you got earlier after placing the order, or place a new order with a pre-order item in the cart.
You'll find the pre-order information below the product variant options in the order confirmation page.
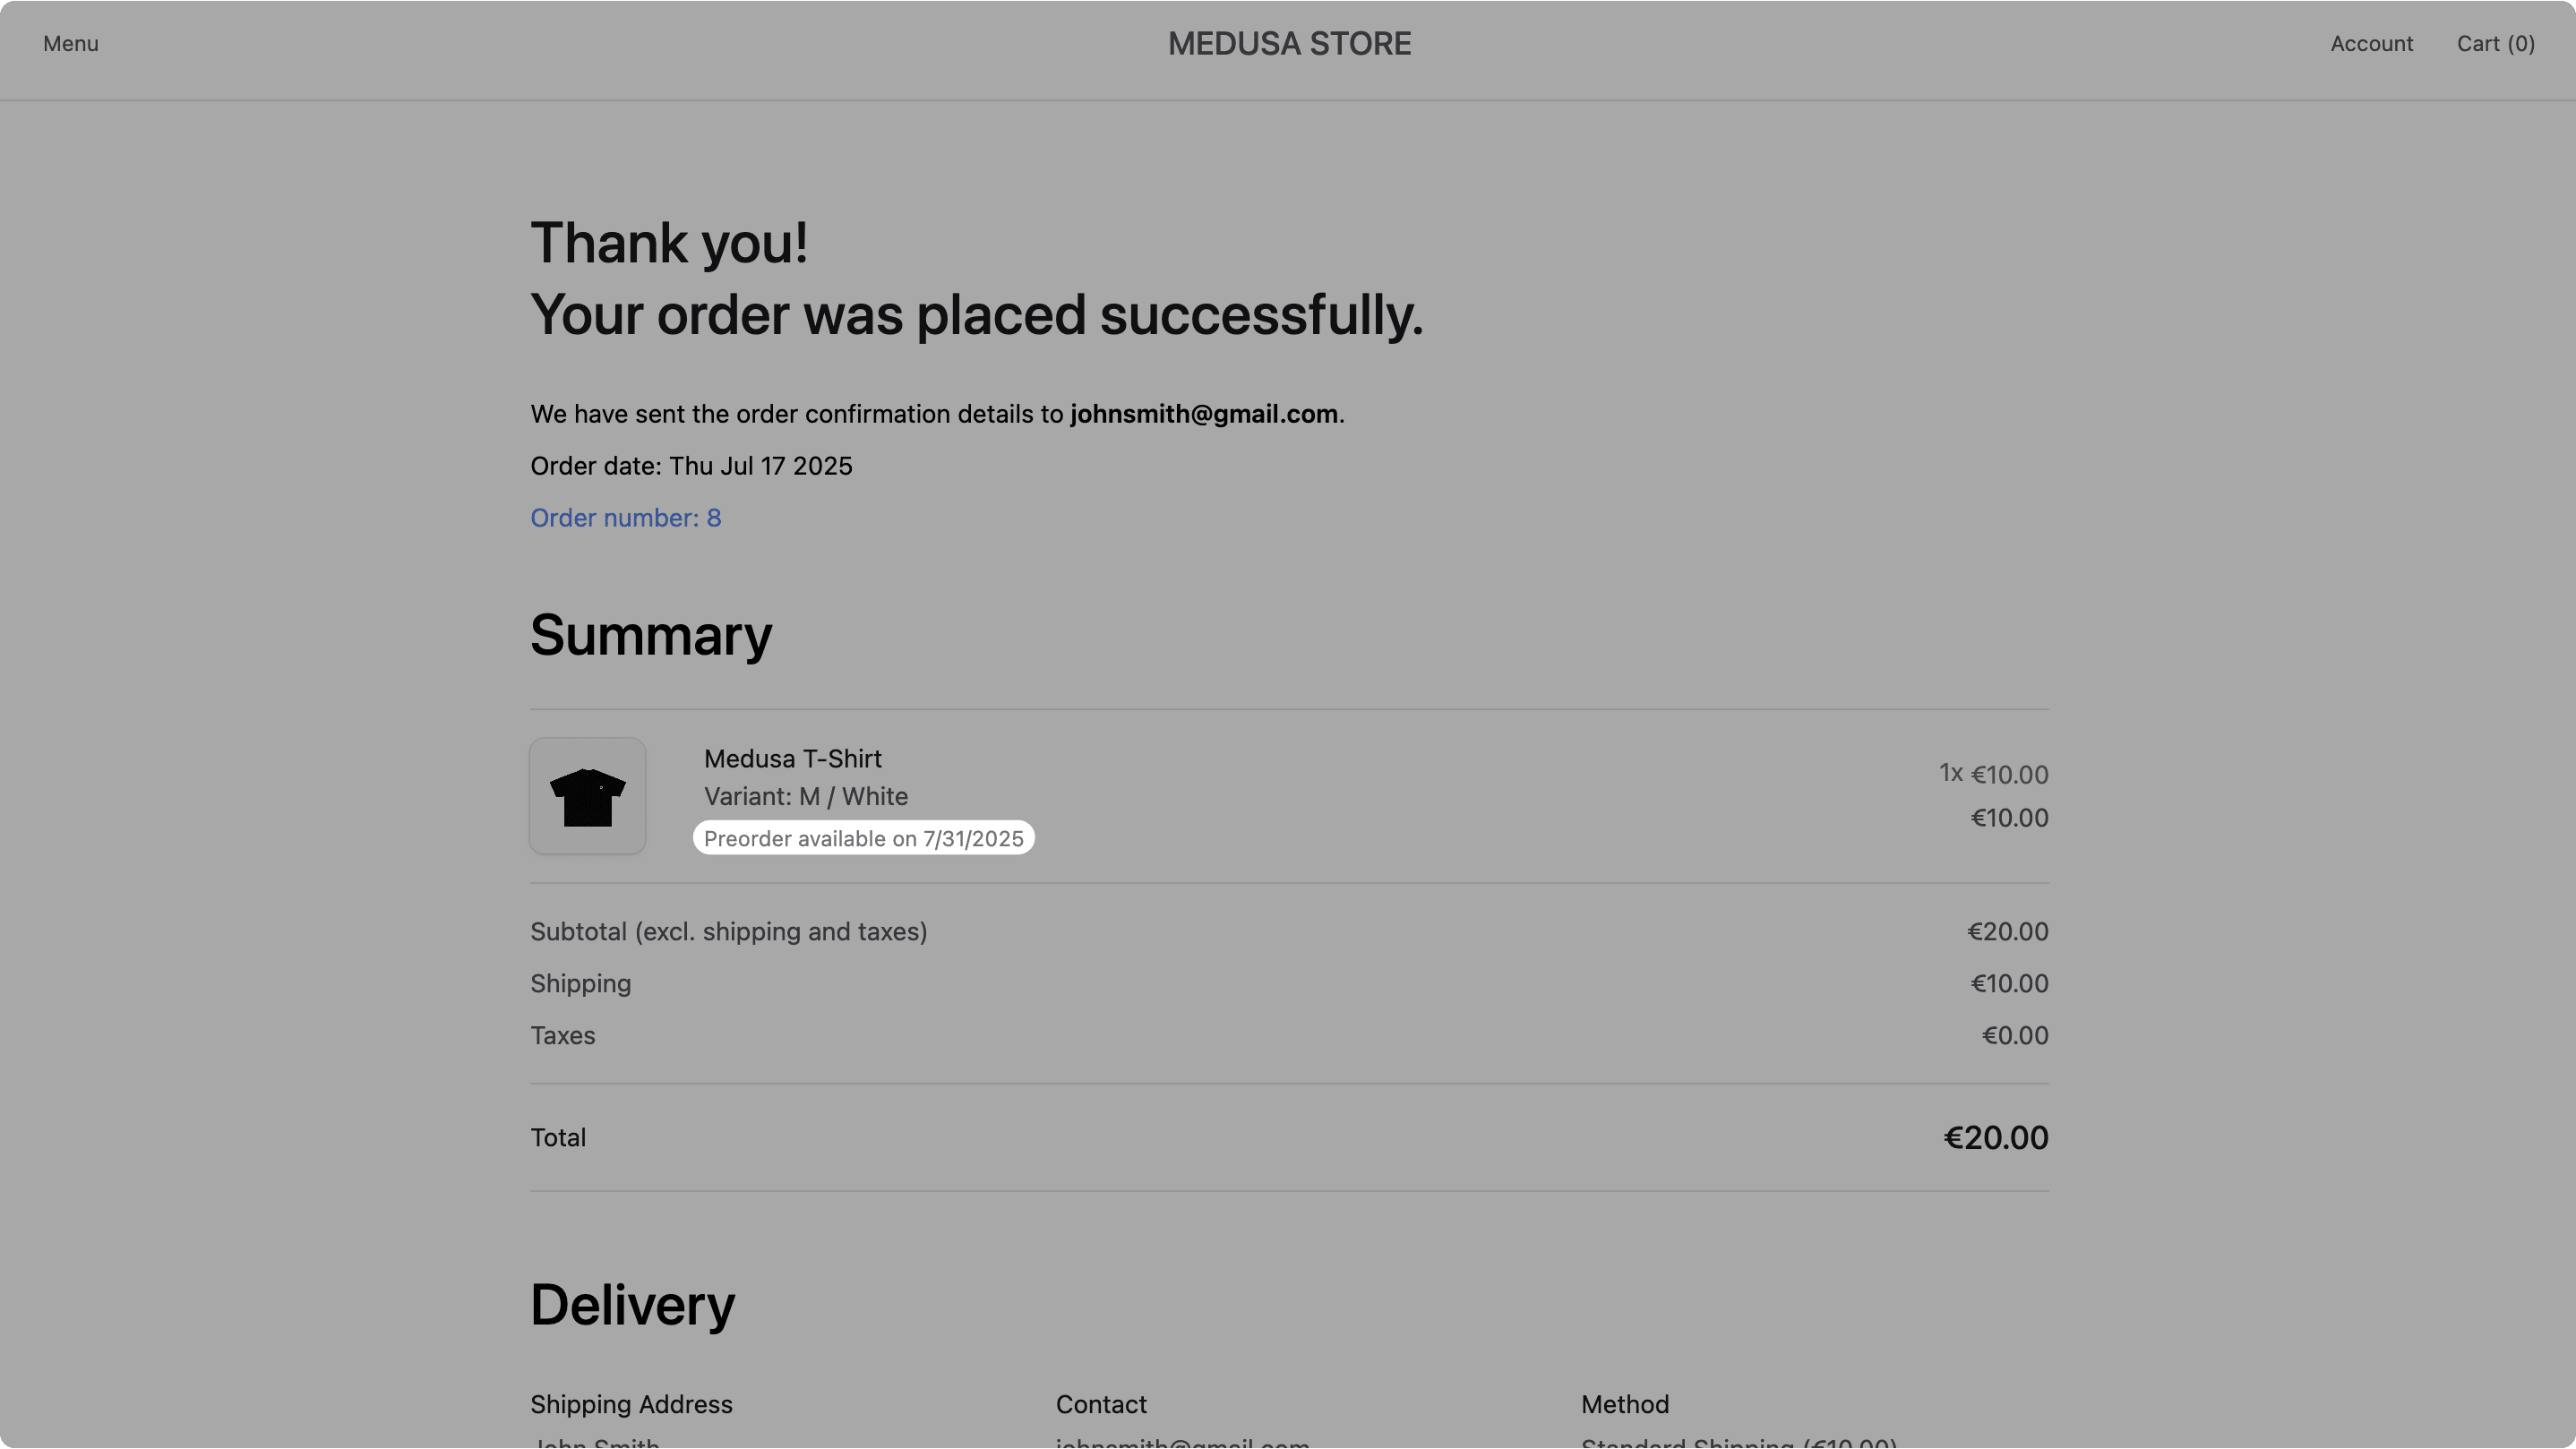
The information will also be shown in the order details page for logged-in customers.
Step 8: Show Pre-Order Information in Order Admin Page#
In this step, you'll customize the Medusa Admin to show pre-order information in the order details page.
a. Retrieve Pre-order Information API Route#
You'll start by creating an API route that retrieves the pre-order information for an order. You'll send requests to this API route in the widget you'll create in the next step.
Create the file src/api/admin/orders/[id]/preorders/route.ts with the following content:
1import { AuthenticatedMedusaRequest, MedusaResponse } from "@medusajs/framework/http"2 3export const GET = async (4 req: AuthenticatedMedusaRequest,5 res: MedusaResponse6) => {7 const query = req.scope.resolve("query")8 const { id: orderId } = req.params9 10 const { data: preorders } = await query.graph({11 entity: "preorder",12 fields: [13 "*", 14 "item.*", 15 "item.product_variant.*", 16 "item.product_variant.product.*",17 ],18 filters: {19 order_id: orderId,20 },21 })22 23 res.json({ preorders })24}
You expose a GET API route at /admin/orders/:id/preorders.
In the API route, you use Query to retrieve the pre-order information for the specified order ID. You return the pre-order information in the response.
b. Add Pre-order React Hook#
Next, you'll add a React hook that retrieves the pre-order information from the API route you created.
Create the file src/admin/hooks/use-preorders.ts with the following content:
1import { useQuery } from "@tanstack/react-query"2import { sdk } from "../lib/sdk"3import { Preorder, PreordersResponse } from "../lib/types"4 5export const usePreorders = (orderId: string) => {6 const { data, isLoading, error } = useQuery<PreordersResponse>({7 queryFn: () => sdk.client.fetch(`/admin/orders/${orderId}/preorders`),8 queryKey: ["orders", orderId],9 retry: 2,10 refetchOnWindowFocus: false,11 })12 13 return {14 preorders: data?.preorders || [],15 isLoading,16 error,17 }18}19 20export type { Preorder }
The usePreorders hook retrieves the pre-order information for the specified order ID using the API route you created.
c. Create Pre-order Widget#
Finally, you'll create a widget that shows the pre-order information in the order details page.
Create the file src/admin/widgets/preorder-widget.tsx with the following content:
1import { defineWidgetConfig } from "@medusajs/admin-sdk"2import { DetailWidgetProps, HttpTypes } from "@medusajs/framework/types"3import { Container, Heading, StatusBadge, Text } from "@medusajs/ui"4import { Link } from "react-router-dom"5import { usePreorders } from "../hooks/use-preorders"6 7const PreordersWidget = ({8 data: order,9}: DetailWidgetProps<HttpTypes.AdminOrder>) => {10 const { preorders, isLoading } = usePreorders(order.id)11 12 if (!preorders.length && !isLoading) {13 return <></>14 }15 16 return (17 <Container className="divide-y p-0">18 <div className="flex flex-col justify-between py-4">19 <div className="flex flex-col gap-2 px-6">20 <Heading level="h2">21 Pre-orders22 </Heading>23 <Text className="text-ui-fg-muted" size="small">24 The following items will be automatically fulfilled on their available date.25 </Text>26 </div>27 {isLoading && <div>Loading...</div>}28 <div className="flex flex-col gap-4 pt-4 px-6">29 {preorders.map((preorder) => (30 <div key={preorder.id} className="flex items-center gap-2">31 {preorder.item.product_variant?.product?.thumbnail && <img 32 src={preorder.item.product_variant.product.thumbnail} 33 alt={preorder.item.product_variant.title || "Product Thumbnail"} 34 className="w-20 h-20 rounded-lg border"35 />}36 <div className="flex flex-col gap-1">37 <div className="flex gap-2">38 <Text>{preorder.item.product_variant?.title || "Unnamed Variant"}</Text>39 <StatusBadge color={getStatusBadgeColor(preorder.status)}>40 {preorder.status.charAt(0).toUpperCase() + preorder.status.slice(1)}41 </StatusBadge>42 </div>43 <Text size="small" className="text-ui-fg-subtle">44 Available on: {new Date(preorder.item.available_date).toLocaleDateString()}45 </Text>46 <Link to={`/products/${preorder.item.product_variant?.product_id}/variants/${preorder.item.variant_id}`}>47 <Text size="small" className="text-ui-fg-interactive">48 View Product Variant49 </Text>50 </Link>51 </div>52 </div>53 ))}54 </div>55 </div>56 </Container>57 )58}59 60const getStatusBadgeColor = (status: string) => {61 switch (status) {62 case "fulfilled":63 return "green"64 case "pending":65 return "orange"66 default:67 return "grey"68 }69}70 71export const config = defineWidgetConfig({72 zone: "order.details.side.after",73})74 75export default PreordersWidget
The PreordersWidget will be injected into the side column of the order details page in the Medusa Admin dashboard.
In the component, you retrieve the pre-order information using the usePreorders hook and display it in a list.
Test the Pre-order Widget#
To test the pre-order widget, ensure that the Medusa application is running.
Then, in the Medusa Admin dashboard, go to any order that has pre-order items. You should see the "Pre-orders" section in the side column with the pre-order information.
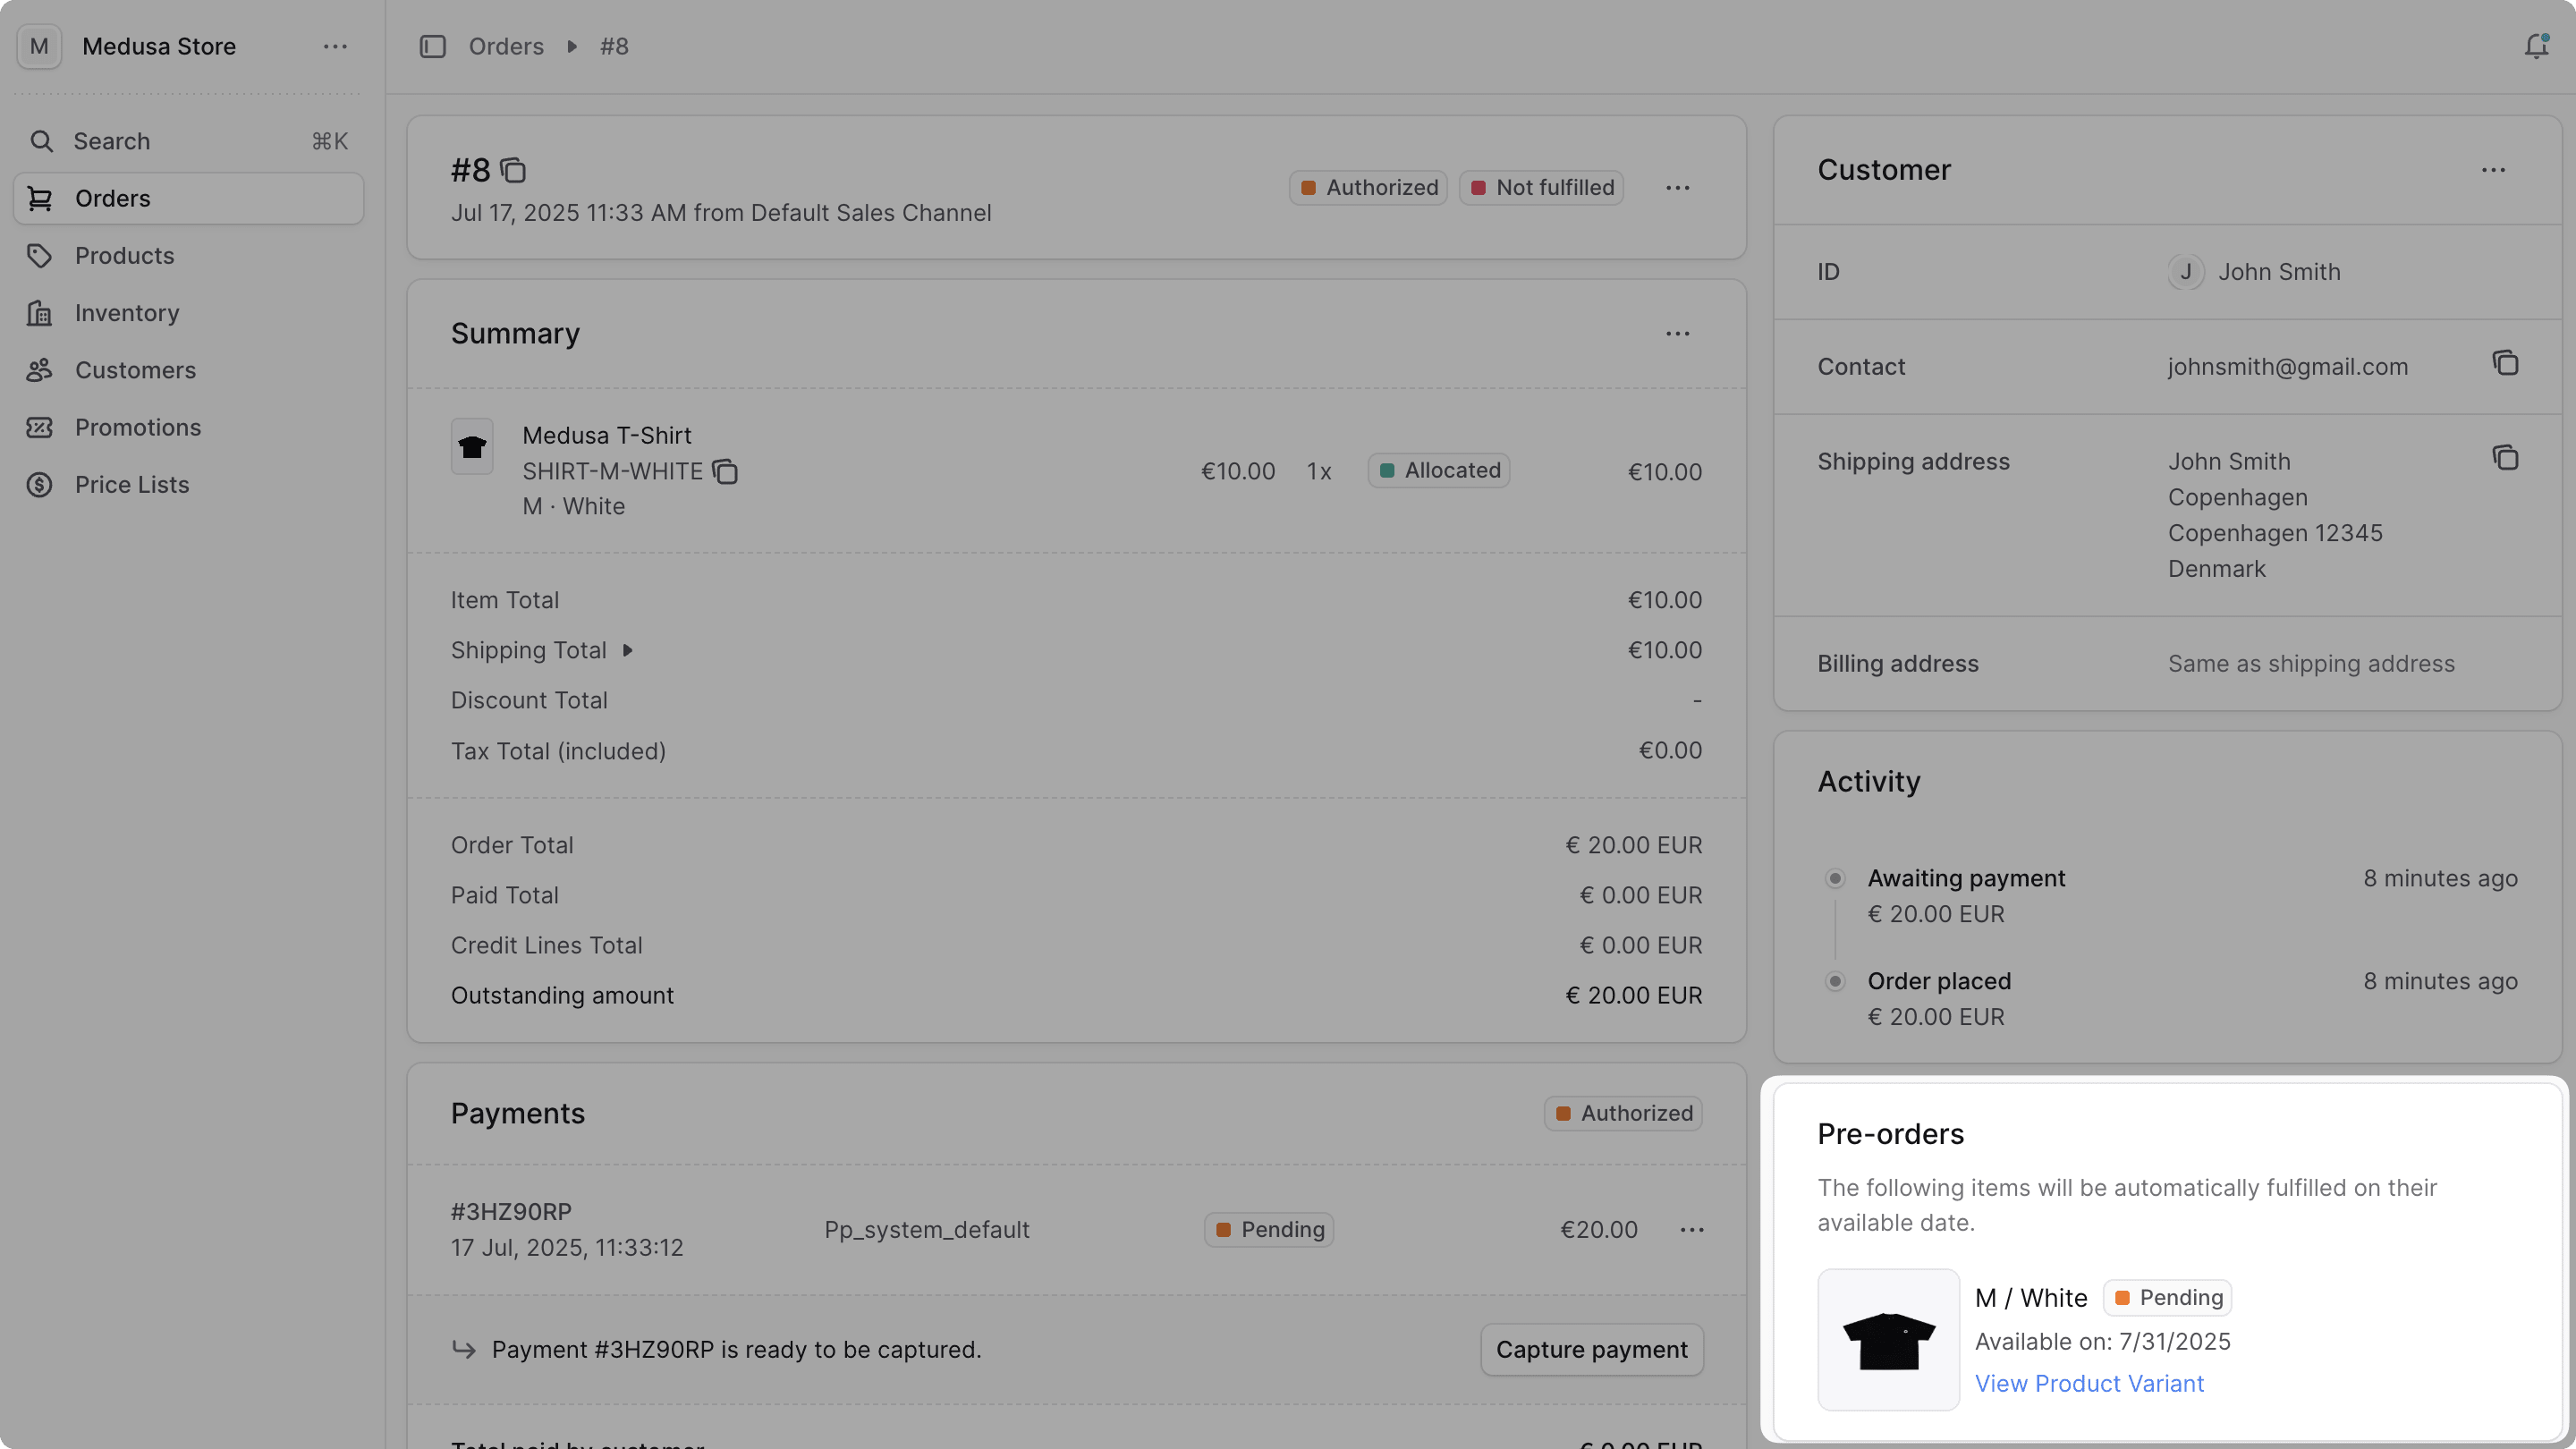
You can see the pre-order variant's title, status, available date, and a link to view the associated product variant.
Step 9: Automatically Fulfill Pre-orders#
When a pre-order variant reaches its available date, you want to automatically fulfill the pre-order items in the order.
In this step, you'll create a workflow that automatically fulfills a pre-order. Then, you'll execute the workflow in a scheduled job that runs every day.
a. Create Auto Fulfill Pre-order Workflow#
The workflow that automatically fulfills a pre-order has the following steps:
View step details
You only need to implement the retrieveItemsToFulfillStep and updatePreordersStep steps.
retrieveItemsToFulfillStep
The retrieveItemsToFulfillStep retrieves the line items to fulfill in an order based on the supplied pre-order variants.
Create the file src/workflows/steps/retrieve-items-to-fulfill.ts with the following content:
1import { InferTypeOf, OrderLineItemDTO } from "@medusajs/framework/types"2import { createStep, StepResponse } from "@medusajs/framework/workflows-sdk"3import { PreorderVariant } from "../../modules/preorder/models/preorder-variant"4 5export type RetrieveItemsToFulfillStepInput = {6 preorder_variant: InferTypeOf<typeof PreorderVariant>7 line_items: OrderLineItemDTO[]8}9 10export const retrieveItemsToFulfillStep = createStep(11 "retrieve-items-to-fulfill",12 async ({13 preorder_variant,14 line_items,15 }: RetrieveItemsToFulfillStepInput) => {16 const itemsToFulfill = line_items.filter((item) =>17 item.variant_id && preorder_variant.variant_id === item.variant_id18 ).map((item) => ({19 id: item.id,20 quantity: item.quantity,21 }))22 23 return new StepResponse({24 items_to_fulfill: itemsToFulfill,25 })26 }27)
The step receives the pre-order variant to be fulfilled as an input, and the line items in the Medusa order.
In the step, you find the items in the Medusa order that are associated with the pre-order variant and return them.
updatePreordersStep
The updatePreordersStep updates the details of pre-order records.
Create the file src/workflows/steps/update-preorders.ts with the following content:
1import { createStep, StepResponse } from "@medusajs/framework/workflows-sdk"2import { PreorderStatus } from "../../modules/preorder/models/preorder"3import { PREORDER_MODULE } from "../../modules/preorder"4 5type StepInput = {6 id: string7 status?: PreorderStatus8 item_id?: string9 order_id?: string10}[]11 12export const updatePreordersStep = createStep(13 "update-preorders",14 async (preorders: StepInput, { container }) => {15 const preorderModuleService = container.resolve(PREORDER_MODULE)16 17 const oldPreorders = await preorderModuleService.listPreorders({18 id: preorders.map((preorder) => preorder.id),19 })20 21 const updatedPreorders = await preorderModuleService.updatePreorders(22 preorders23 )24 25 return new StepResponse(updatedPreorders, oldPreorders)26 },27 async (preorders, { container }) => {28 if (!preorders) {29 return30 }31 32 const preorderModuleService = container.resolve(PREORDER_MODULE)33 34 await preorderModuleService.updatePreorders(35 preorders.map((preorder) => ({36 id: preorder.id,37 status: preorder.status,38 item_id: preorder.item_id,39 order_id: preorder.order_id,40 }))41 )42 }43)
The step receives an array of pre-order records to update.
In the step, you update the pre-order records. In the compensation function, you undo the update if an error occurs during the workflow's execution.
Create Workflow
Finally, you'll create the workflow that automatically fulfills a pre-order.
Create the file src/workflows/fulfill-preorder.ts with the following content:
7import { PreorderStatus } from "../modules/preorder/models/preorder"8 9type WorkflowInput = {10 preorder_id: string11 item: InferTypeOf<typeof PreorderVariant>12 order_id: string13}14 15export const fulfillPreorderWorkflow = createWorkflow(16 "fulfill-preorder",17 (input: WorkflowInput) => {18 const { data: orders } = useQueryGraphStep({19 entity: "order",20 fields: ["items.*"],21 filters: {22 id: input.order_id,23 },24 options: {25 throwIfKeyNotFound: true,26 },27 })28 29 const { items_to_fulfill } = retrieveItemsToFulfillStep({30 preorder_variant: input.item,31 line_items: orders[0].items,32 } as unknown as RetrieveItemsToFulfillStepInput)33 34 const fulfillment = createOrderFulfillmentWorkflow.runAsStep({35 input: {36 order_id: input.order_id,37 items: items_to_fulfill,38 },39 })40 41 updatePreordersStep([{42 id: input.preorder_id,43 status: PreorderStatus.FULFILLED,44 }])45 46 emitEventStep({47 eventName: "preorder.fulfilled",48 data: {49 order_id: input.order_id,50 preorder_variant_id: input.item.id,51 },52 })53 54 return new WorkflowResponse({55 fulfillment,56 })57 }58)
The workflow receives as an input:
preorder_id: The ID of the pre-order to fulfill.item: The pre-order variant to fulfill.order_id: The ID of the Medusa order containing the pre-ordered variant.
In the workflow, you:
- Retrieve the Medusa order using the useQueryGraphStep.
- Retrieve the items to fulfill in the order using the
retrieveItemsToFulfillStep. - Create a fulfillment for the Medusa order using the createOrderFulfillmentWorkflow as a step.
- Update the pre-order status to
FULFILLEDusing theupdatePreordersStep. - Emit an event indicating that a pre-order was fulfilled using the emitEventStep.
- Return the fulfillment in the response.
Optional: Capture Payment
By default, Medusa authorizes an order's payment when it's placed. The admin user can capture the payment later manually.
In some use cases, you may want to capture the payment for the pre-order when fulfilling it.
To do that, you can use Medusa's capturePaymentWorkflow to capture the payment for the order in the workflow.
First, change the retrieveItemsToFulfillStep to return the total of the pre-ordered items:
1import { InferTypeOf, OrderLineItemDTO } from "@medusajs/framework/types"2import { createStep, StepResponse } from "@medusajs/framework/workflows-sdk"3import { PreorderVariant } from "../../modules/preorder/models/preorder-variant"4 5export type RetrieveItemsToFulfillStepInput = {6 preorder_variant: InferTypeOf<typeof PreorderVariant>7 line_items: OrderLineItemDTO[]8}9 10export const retrieveItemsToFulfillStep = createStep(11 "retrieve-items-to-fulfill",12 async ({13 preorder_variant,14 line_items,15 }: RetrieveItemsToFulfillStepInput) => {16 let total = 017 const itemsToFulfill = line_items.filter((item) =>18 item.variant_id && preorder_variant.variant_id === item.variant_id19 ).map((item) => {20 total += item.total as number21 return {22 id: item.id,23 quantity: item.quantity,24 }25 })26 27 return new StepResponse({28 items_to_fulfill: itemsToFulfill,29 items_total: total,30 })31 }32)
Then, update the workflow to the following:
1import { InferTypeOf } from "@medusajs/framework/types"2import { PreorderVariant } from "../modules/preorder/models/preorder-variant"3import { createWorkflow, transform, when, WorkflowResponse } from "@medusajs/framework/workflows-sdk"4import { capturePaymentWorkflow, createOrderFulfillmentWorkflow, emitEventStep, useQueryGraphStep } from "@medusajs/medusa/core-flows"5import { retrieveItemsToFulfillStep, RetrieveItemsToFulfillStepInput } from "./steps/retrieve-items-to-fulfill"6import { updatePreordersStep } from "./steps/update-preorders"7import { PreorderStatus } from "../modules/preorder/models/preorder"8 9type WorkflowInput = {10 preorder_id: string11 item: InferTypeOf<typeof PreorderVariant>12 order_id: string13}14 15export const fulfillPreorderWorkflow = createWorkflow(16 "fulfill-preorder",17 (input: WorkflowInput) => {18 const { data: orders } = useQueryGraphStep({19 entity: "order",20 fields: [21 "items.*", 22 "payment_collections.*", 23 "payment_collections.payments.*", 24 "total", 25 "shipping_methods.*",26 ],27 filters: {28 id: input.order_id,29 },30 options: {31 throwIfKeyNotFound: true,32 },33 })34 35 const { 36 items_to_fulfill, 37 items_total,38 } = retrieveItemsToFulfillStep({39 preorder_variant: input.item,40 line_items: orders[0].items,41 } as unknown as RetrieveItemsToFulfillStepInput)42 43 const fulfillment = createOrderFulfillmentWorkflow.runAsStep({44 input: {45 order_id: input.order_id,46 items: items_to_fulfill,47 },48 })49 50 updatePreordersStep([{51 id: input.preorder_id,52 status: PreorderStatus.FULFILLED,53 }])54 55 const totalCaptureAmount = transform({56 items_total,57 shipping_option_id: fulfillment.shipping_option_id,58 shipping_methods: orders[0].shipping_methods,59 }, (data) => {60 const shippingPrice = data.shipping_methods?.find(61 (sm) => sm?.shipping_option_id === data.shipping_option_id62 )?.amount || 063 return data.items_total + shippingPrice64 })65 66 when({67 payment_collection: orders[0].payment_collections?.[0],68 capture_total: totalCaptureAmount,69 }, (data) => {70 return data.payment_collection?.amount !== undefined && data.payment_collection.captured_amount !== null && 71 (data.payment_collection.amount - data.payment_collection.captured_amount >= data.capture_total)72 }).then(() => {73 capturePaymentWorkflow.runAsStep({74 input: {75 // @ts-ignore76 payment_id: orders[0].payment_collections?.[0]?.payments[0].id,77 amount: totalCaptureAmount,78 },79 })80 })81 82 emitEventStep({83 eventName: "preorder.fulfilled",84 data: {85 order_id: input.order_id,86 preorder_variant_id: input.item.id,87 },88 })89 90 return new WorkflowResponse({91 fulfillment,92 })93 }94)
The changes you made are:
- Retrieved more order fields using
useQueryGraphStep, including the payment collection and its payments. - Retrieved the total of the fulfilled items from
retrieveItemsToFulfillStep. - Calculated the amount to be captured by adding the fulfilled items' total to the shipping method's amount.
- If the total amount to be captured is less than or equal to the amount that can be captured, you capture the amount.
b. Create Scheduled Job to Run Workflow#
Next, you'll create a scheduled job that runs the fulfillPreorderWorkflow every day to automatically fulfill pre-orders.
A scheduled job is an asynchronous function that executes tasks in the background at specified intervals.
To create a scheduled job, create the file src/jobs/fulfill-preorders.ts with the following content:
1import {2 InferTypeOf,3 MedusaContainer,4} from "@medusajs/framework/types"5import { fulfillPreorderWorkflow } from "../workflows/fulfill-preorder"6import { PreorderVariant } from "../modules/preorder/models/preorder-variant"7 8export default async function fulfillPreordersJob(container: MedusaContainer) {9 const query = container.resolve("query")10 const logger = container.resolve("logger")11 12 logger.info("Starting daily fulfill preorders job...")13 14 // TODO add fulfillment logic15}16 17export const config = {18 name: "daily-fulfill-preorders",19 schedule: "0 0 * * *", // Every day at midnight20}
A scheduled job file must export:
- An asynchronous function that is executed at the specified interval in the configuration object.
- A configuration object that specifies when to execute the scheduled job. The schedule is defined as a cron pattern.
So far, you only resolve Query and the Logger utility from the Medusa container passed as input to the scheduled job.
Replace the TODO in the scheduled job with the following:
1const startToday = new Date()2startToday.setHours(0, 0, 0, 0)3 4const endToday = new Date()5endToday.setHours(23, 59, 59, 59)6 7const limit = 10008let preorderVariantsOffset = 09let preorderVariantsCount = 010let totalPreordersCount = 011 12do {13 const { 14 data: preorderVariants,15 metadata,16 } = await query.graph({17 entity: "preorder_variant",18 fields: [19 "*",20 "product_variant.*",21 ],22 filters: {23 status: "enabled",24 available_date: {25 $gte: startToday,26 $lte: endToday,27 },28 },29 pagination: {30 take: limit,31 skip: preorderVariantsOffset,32 },33 })34 35 preorderVariantsCount = metadata?.count || 036 preorderVariantsOffset += limit37 38 let preordersOffset = 039 let preordersCount = 040 41 do {42 const { 43 data: unfulfilledPreorders,44 metadata: preorderMetadata,45 } = await query.graph({46 entity: "preorder",47 fields: ["*"],48 filters: {49 item_id: preorderVariants.map((variant) => variant.id),50 status: "pending",51 },52 pagination: {53 take: limit,54 skip: preordersOffset,55 },56 })57 if (!unfulfilledPreorders.length) {58 continue59 }60 61 preordersCount = preorderMetadata?.count || 062 preordersOffset += limit63 for (const preorder of unfulfilledPreorders) {64 const variant = preorderVariants.find((v) => v.id === preorder.item_id)65 try {66 await fulfillPreorderWorkflow(container)67 .run({68 input: {69 preorder_id: preorder!.id,70 item: variant as unknown as InferTypeOf<typeof PreorderVariant>,71 order_id: preorder!.order_id,72 },73 })74 } catch (e) {75 logger.error(`Failed to fulfill preorder ${preorder.id}: ${e.message}`)76 }77 }78 } while (preordersCount > limit * preordersOffset)79 totalPreordersCount += preordersCount80} while (preorderVariantsCount > limit * preorderVariantsOffset)81 82logger.info(`Fulfilled ${totalPreordersCount} preorders.`)
You retrieve the pre-order variants whose:
statusisenabled.available_dateis within the current day.
Then, you retrieve the pre-orders of those variants whose status is pending, and fulfill each of those pre-orders.
You apply pagination on both the retrieved pre-order variants and pre-orders.
Finally, you log the number of fulfilled pre-orders.
Test Scheduled Job#
To test out the scheduled job, you can change the schedule in the job's configuration to run once a minute:
And comment-out the available_date condition in the first query.graph usage to retrieve all pre-order variants and fulfill their pre-orders:
1const { 2 data: preorderVariants,3 metadata,4} = await query.graph({5 entity: "preorder_variant",6 fields: [7 "*",8 "product_variant.*",9 ],10 filters: {11 status: "enabled",12 // available_date: {13 // $gte: startToday,14 // $lte: endToday15 // }16 },17 pagination: {18 take: limit,19 skip: preorderVariantsOffset,20 },21})
Next, start the Medusa application:
After a minute, you'll see the following messages in the logs:
This indicates that the scheduled job ran successfully and fulfilled one pre-order.
Optional: Send Notification to Customer#
In the fulfillPreorderWorkflow, you emitted the preorder.fulfilled event. This is useful for performing actions when a pre-order is fulfilled separately from the main flow.
For example, you may want to send a notification to the customer when their pre-order is fulfilled. You can do this by creating a subscriber.
A subscriber is an asynchronous function that is executed when its associated event is emitted.
To create a subscriber that sends a notification to the customer when a pre-order is fulfilled, create the file src/subscribers/preorder-notification.ts with the following content:
1import type {2 SubscriberArgs,3 SubscriberConfig,4} from "@medusajs/framework"5 6export default async function productCreateHandler({7 event: { data },8 container,9}: SubscriberArgs<{ 10 order_id: string;11 preorder_variant_id: string;12 }>) {13 const query = container.resolve("query")14 const notificationModuleService = container.resolve(15 "notification"16 )17 18 const { data: preorderVariants } = await query.graph({19 entity: "preorder_variant",20 fields: ["*"],21 filters: {22 id: data.preorder_variant_id,23 },24 })25 26 const { data: [order] } = await query.graph({27 entity: "order",28 fields: ["*"],29 filters: {30 id: data.order_id,31 },32 })33 34 await notificationModuleService.createNotifications([{35 template: "preorder_fulfilled",36 channel: "feed",37 to: order.email!,38 data: {39 preorder_variant: preorderVariants[0],40 order: order,41 },42 }])43}44 45export const config: SubscriberConfig = {46 event: "preorder.fulfilled",47}
A subscriber file must export:
- An asynchronous function that is executed when its associated event is emitted.
- An object that indicates the event that the subscriber is listening to.
The subscriber receives among its parameters the data payload of the emitted event, which includes the IDs of the Medusa order and the pre-order variant.
In the subscriber, you retrieve the details of the order and pre-order variants. Then, you use the Notification Module to send a notification.
Notice that the createNotifications method receives a channel property for a notification. This indicates which Notification Module Provider to send the notification with.
The feed channel is useful for debugging, as it logs the notification in the terminal. To send an email, you can instead set up a provider like SendGrid and change the channel to email.
To test the subscriber, perform the steps to test fulfilling pre-orders. Once a pre-order is fulfilled, you'll see the following message logged in your terminal:
Step 10: Handle Order Cancelation#
Admin users can cancel orders from the dashboard. In those scenarios, you need to also cancel the pre-orders related to that order.
In this step, you'll create a workflow that cancels the pre-orders of an order. Then, you'll execute the workflow in a subscriber that listens to the order cancelation event.
a. Cancel Pre-Orders Workflow#
The workflow that cancels pre-orders of an order has the following steps:
View step details
These steps are already available, so you can implement the workflow.
Create the file src/workflows/cancel-preorders.ts with the following content:
1import { InferTypeOf } from "@medusajs/framework/types"2import { createWorkflow, transform, WorkflowResponse } from "@medusajs/framework/workflows-sdk"3import { emitEventStep } from "@medusajs/medusa/core-flows"4import { updatePreordersStep } from "./steps/update-preorders"5import { Preorder, PreorderStatus } from "../modules/preorder/models/preorder"6 7export type CancelPreordersWorkflowInput = {8 preorders: InferTypeOf<typeof Preorder>[]9 order_id: string10}11 12export const cancelPreordersWorkflow = createWorkflow(13 "cancel-preorders",14 (input: CancelPreordersWorkflowInput) => {15 const updateData = transform({16 preorders: input.preorders,17 }, (data) => {18 return data.preorders.map((preorder) => ({19 id: preorder.id,20 status: PreorderStatus.CANCELLED,21 }))22 })23 24 const updatedPreorders = updatePreordersStep(updateData)25 26 const preordersCancelledEvent = transform({27 preorders: updatedPreorders,28 input,29 }, (data) => {30 return data.preorders.map((preorder) => ({31 id: preorder.id,32 order_id: data.input.order_id,33 }))34 })35 36 emitEventStep({37 eventName: "preorder.cancelled",38 data: preordersCancelledEvent,39 })40 41 return new WorkflowResponse({42 preorders: updatedPreorders,43 })44 }45)
The workflow receives the preorders and the order ID as a parameter.
In the workflow, you:
- Update the pre-orders' status to
cancelled. - Emit the
preorder.cancelledevent.- You can handle the event similar to the preorder.fulfilled event to notify the customer.
b. Cancel Pre-Orders Subscriber#
Next, you'll create the subscriber that listens to the order.canceled event and executes the workflow you created.
Create the file src/subscribers/order-canceled.ts with the following content:
1import { SubscriberArgs, type SubscriberConfig } from "@medusajs/framework"2import { InferTypeOf } from "@medusajs/framework/types"3import { cancelPreordersWorkflow, CancelPreordersWorkflowInput } from "../workflows/cancel-preorders"4import { Preorder } from "../modules/preorder/models/preorder"5 6export default async function orderCanceledHandler({7 event: { data },8 container,9}: SubscriberArgs<{10 id: string11}>) {12 const query = container.resolve("query")13 14 const workflowInput: CancelPreordersWorkflowInput = {15 preorders: [],16 order_id: data.id,17 }18 const limit = 100019 let offset = 020 let count = 021 22 do {23 const { 24 data: preorders,25 metadata,26 } = await query.graph({27 entity: "preorder",28 fields: ["*"],29 filters: {30 order_id: data.id,31 status: "pending",32 },33 pagination: {34 take: limit,35 skip: offset,36 },37 })38 offset += limit39 count = metadata?.count || 040 41 workflowInput.preorders.push(42 ...preorders as InferTypeOf<typeof Preorder>[]43 )44 } while (count > offset + limit)45 46 await cancelPreordersWorkflow(container).run({47 input: workflowInput,48 })49}50 51export const config: SubscriberConfig = {52 event: "order.canceled",53}
The subscriber receives the ID of the canceled order in the event payload.
In the subscriber, you retrieve the preorders of the order with pagination. Then, you execute the cancelPreordersWorkflow, passing it the order ID and pre-orders.
Test Order Cancelation#
To test order cancelation, start the Medusa application.
Then, cancel an order that has a pre-order item. If you refresh the page, the pre-order item's status will be changed to canceled as well.
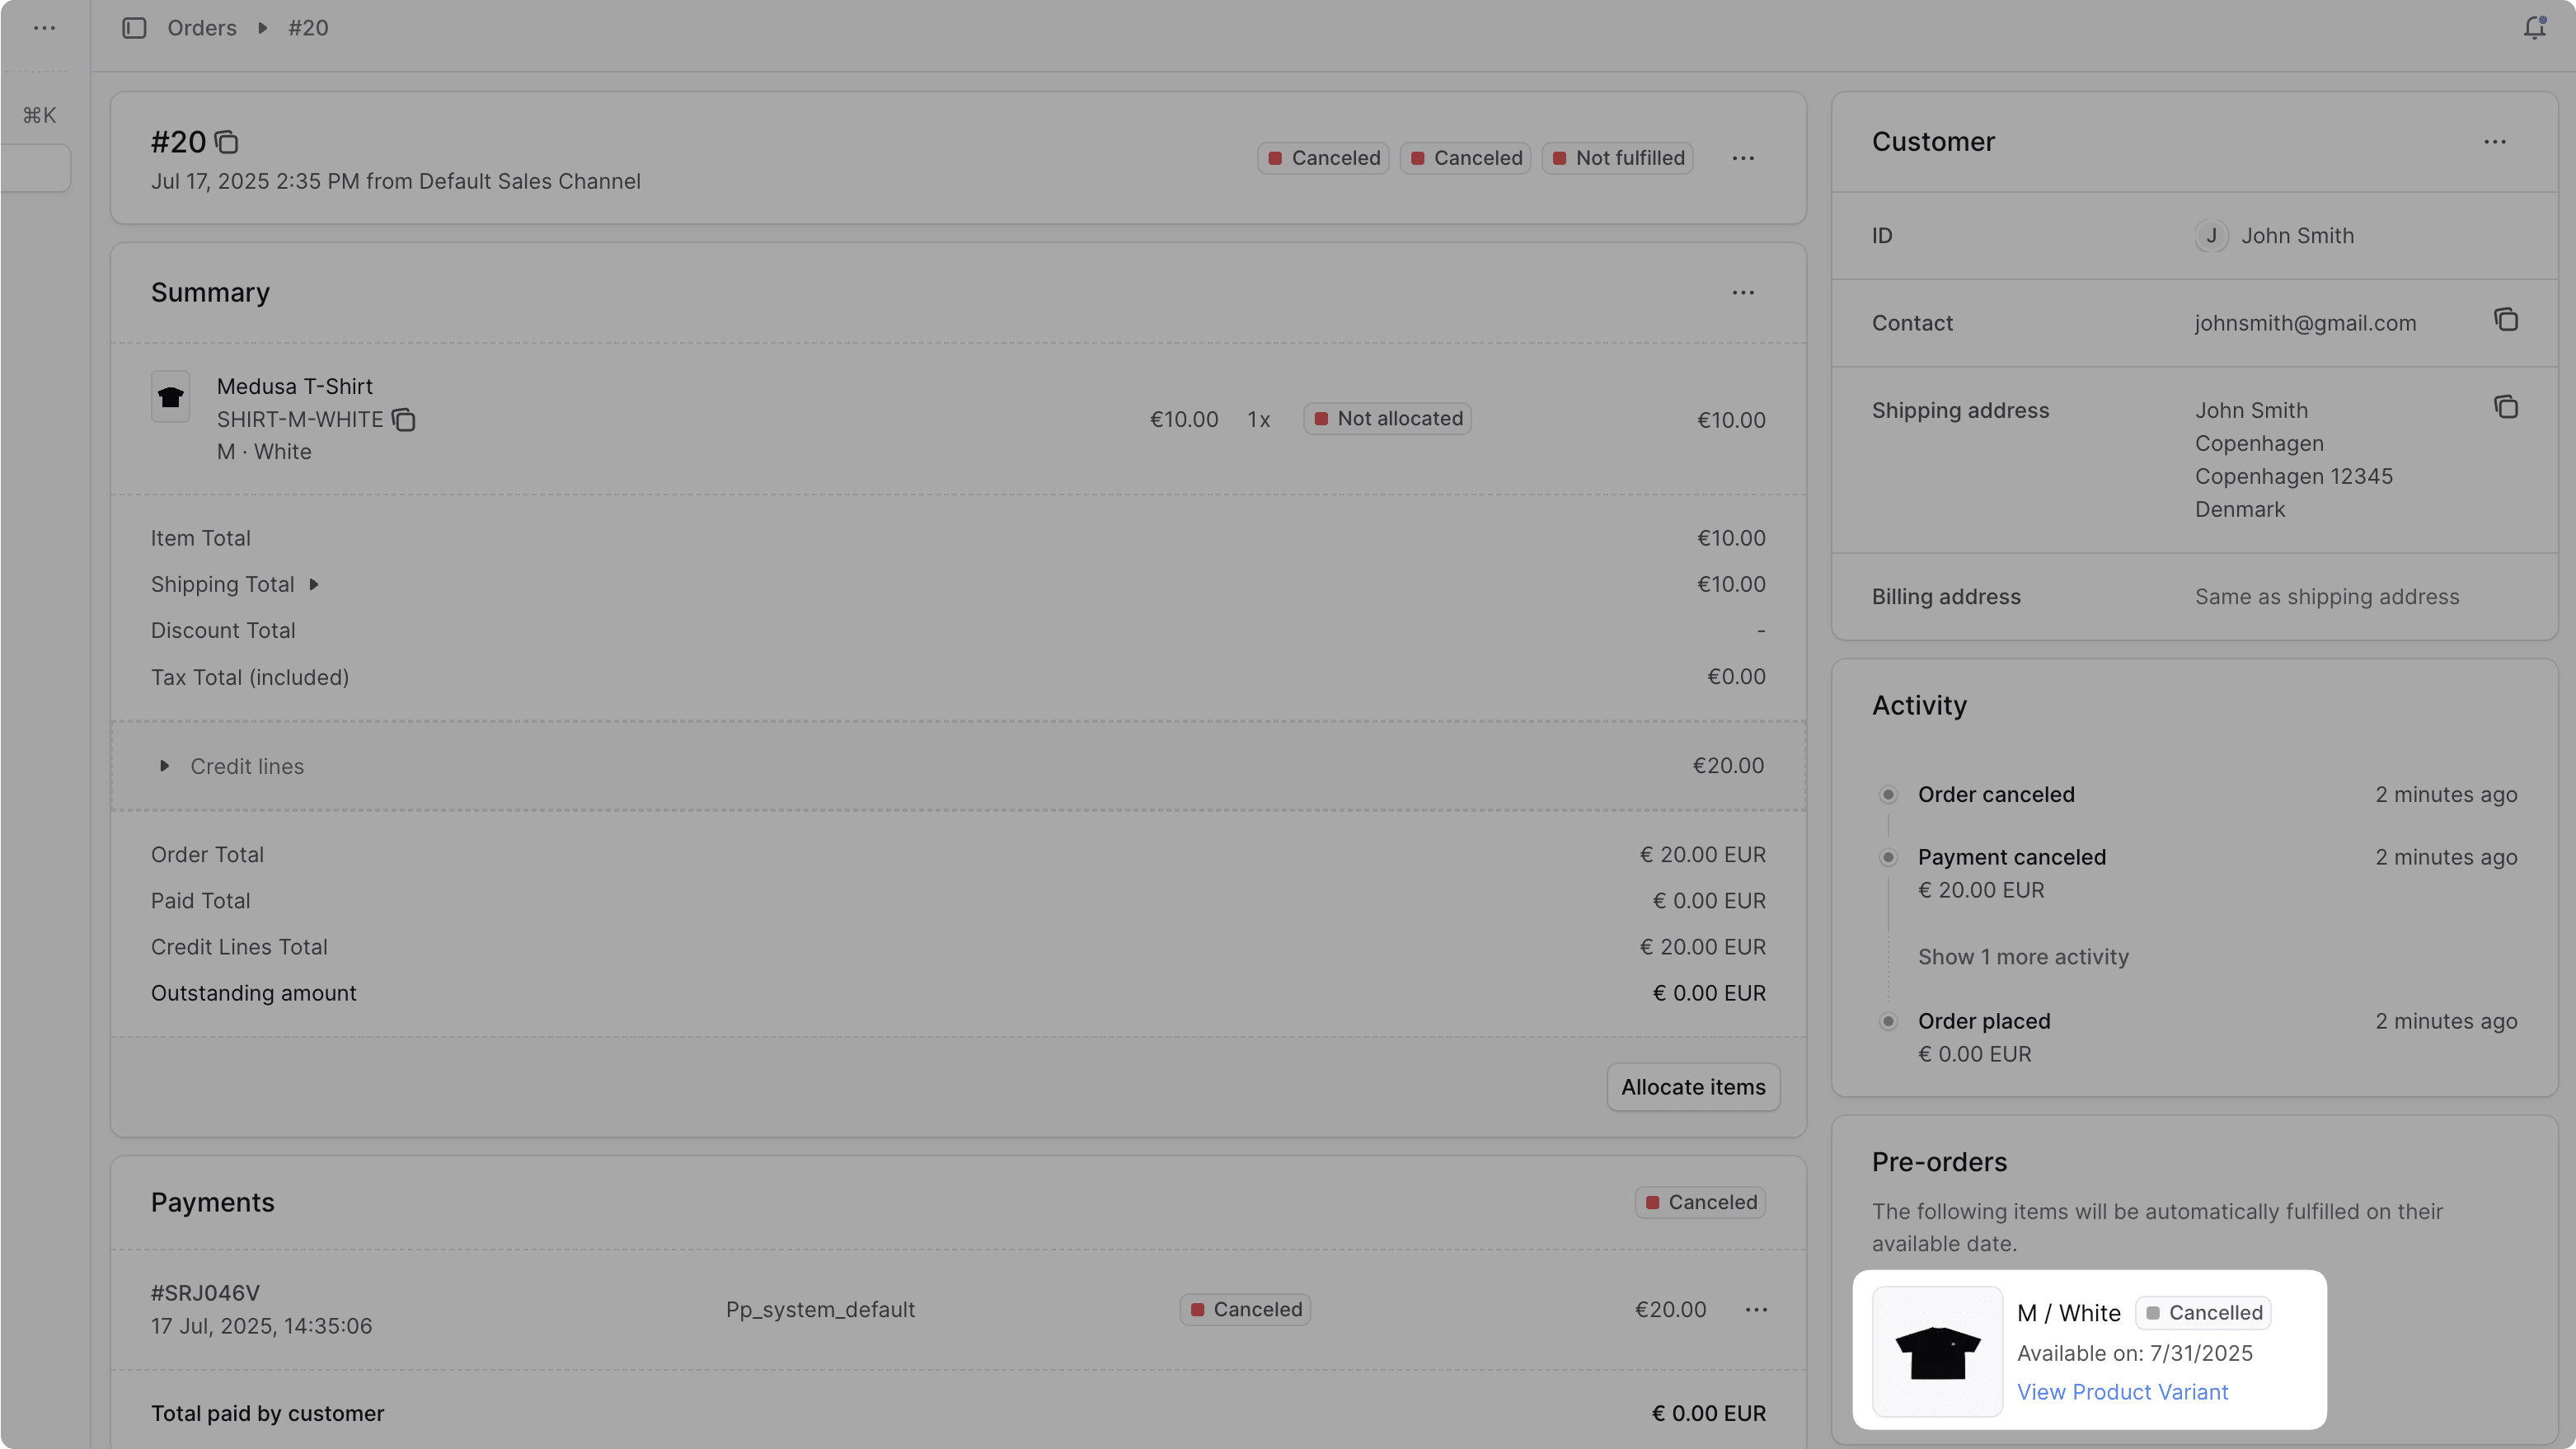
Step 11: Handle Order Edits#
Admin users can edit orders to add or remove items. You should handle those scenarios to:
- Cancel a pre-order if its item is removed from the order.
- Create a pre-order for a new item associated with a pre-order variant.
In this step, you'll create a workflow that cancels or creates pre-orders based on changes in an order. Then, you'll execute the workflow in a subscriber whenever an order edit is confirmed.
a. Handle Order Edit Workflow#
The workflow that will handle order edits has the following steps:
View step details
You only need to implement the retrievePreorderUpdatesStep.
retrievePreorderUpdatesStep
The retrievePreorderUpdatesStep retrieves the pre-orders to be canceled and those to be created.
Create the file src/workflows/steps/retrieve-preorder-updates.ts with the following content:
1import { InferTypeOf, OrderDTO, OrderLineItemDTO, ProductVariantDTO } from "@medusajs/framework/types"2import { PreorderVariant } from "../../modules/preorder/models/preorder-variant"3import { Preorder, PreorderStatus } from "../../modules/preorder/models/preorder"4import { createStep, StepResponse } from "@medusajs/framework/workflows-sdk"5 6export type RetrievePreorderUpdatesStep = {7 order: OrderDTO & {8 items: (OrderLineItemDTO & {9 variant?: ProductVariantDTO & {10 preorder_variant?: InferTypeOf<typeof PreorderVariant>11 }12 })[]13 }14 preorders?: InferTypeOf<typeof Preorder>[]15}16 17export const retrievePreorderUpdatesStep = createStep(18 "retrieve-preorder-updates",19 async ({ order, preorders }: RetrievePreorderUpdatesStep) => {20 const preordersToCancel: {21 id: string22 status: PreorderStatus.CANCELLED23 }[] = []24 const preordersToCreate: {25 preorder_variant_ids: string[]26 order_id: string27 } = {28 preorder_variant_ids: [],29 order_id: order.id,30 }31 32 for (const item of order.items) {33 if (34 !item.variant?.preorder_variant || 35 item.variant.preorder_variant.status === "disabled" || 36 item.variant.preorder_variant.available_date < new Date()37 ) {38 continue39 }40 const preorder = preorders?.find(41 (p) => p.item.variant_id === item.variant_id42 )43 if (!preorder) {44 preordersToCreate.preorder_variant_ids.push(45 item.variant.preorder_variant.id46 )47 }48 }49 50 for (const preorder of (preorders || [])) {51 const item = order.items.find(52 (i) => i.variant_id === preorder.item.variant_id53 )54 if (!item) {55 preordersToCancel.push({56 id: preorder.id,57 status: PreorderStatus.CANCELLED,58 })59 }60 }61 62 return new StepResponse({63 preordersToCancel,64 preordersToCreate,65 })66 }67)
The step receives as input the details of the order, its items, and its pre-orders.
In the step, you loop through the order's items to find pre-order variants that don't have associated pre-orders. You add those to the array of pre-orders to create.
You also loop through the pre-orders to find those that don't have associated items in the order. You add those to the array of pre-orders to cancel.
Create Workflow
You can now create the workflow that handles order edits.
Create the file src/workflows/handle-order-edit.ts with the following content:
5import { createPreordersStep } from "./steps/create-preorders"6 7type WorkflowInput = {8 order_id: string9}10 11export const handleOrderEditWorkflow = createWorkflow(12 "handle-order-edit",13 (input: WorkflowInput) => {14 const { data: orders } = useQueryGraphStep({15 entity: "order",16 fields: [17 "*",18 "items",19 "items.variant.*",20 "items.variant.preorder_variant.*",21 ],22 filters: {23 id: input.order_id,24 },25 options: {26 throwIfKeyNotFound: true,27 },28 })29 30 const { data: preorders } = useQueryGraphStep({31 entity: "preorder",32 fields: ["*", "item.*"],33 filters: {34 order_id: input.order_id,35 status: "pending",36 },37 }).config({ name: "retrieve-preorders" })38 39 const { preordersToCancel, preordersToCreate } = retrievePreorderUpdatesStep({40 order: orders[0],41 preorders,42 } as unknown as RetrievePreorderUpdatesStep)43 44 updatePreordersStep(preordersToCancel)45 46 createPreordersStep(preordersToCreate)47 48 const preordersCancelledEvent = transform({49 preordersToCancel,50 input,51 }, (data) => {52 return data.preordersToCancel.map((preorder) => ({53 id: preorder.id,54 order_id: data.input.order_id,55 }))56 })57 58 emitEventStep({59 eventName: "preorder.cancelled",60 data: preordersCancelledEvent,61 })62 63 return new WorkflowResponse({64 createdPreorders: preordersToCreate,65 cancelledPreorders: preordersToCancel,66 })67 }68)
The workflow receives the order ID as an input.
In the workflow, you:
- Retrieve the order details using the useQueryGraphStep.
- Retrieve the pre-orders of the order using the useQueryGraphStep.
- Retrieve the pre-orders to cancel and create using the
retrievePreorderUpdatesStep. - Update the pre-orders to cancel using the
updatePreordersStep. - Create the pre-orders to create using the
createPreordersStep. - Emit the
preorder.cancelledevent for the pre-orders that were canceled using the emitEventStep.- You can handle the event similar to the preorder.fulfilled event to notify the customer.
- Return the created and canceled pre-orders in the response.
b. Handle Order Edit Subscriber#
Next, you'll create the subscriber that listens to the order-edit.confirmed event and executes the workflow you created.
Create the file src/subscribers/order-edit-confirmed.ts with the following content:
1import { SubscriberArgs, type SubscriberConfig } from "@medusajs/framework"2import { OrderChangeActionDTO } from "@medusajs/framework/types"3import { handleOrderEditWorkflow } from "../workflows/handle-order-edit"4 5export default async function orderEditConfirmedHandler({6 event: { data },7 container,8}: SubscriberArgs<{9 order_id: string,10 actions: OrderChangeActionDTO[]11}>) {12 await handleOrderEditWorkflow(container).run({13 input: {14 order_id: data.order_id,15 },16 })17}18 19export const config: SubscriberConfig = {20 event: "order-edit.confirmed",21}
The subscriber receives the order ID and the actions performed in the order edit in the event payload.
You execute the handleOrderEditWorkflow, passing it the order ID.
Test Order Edit Handler#
To test out the order edit handler, start the Medusa application.
Then, open an order in the Medusa Admin. It can be an order you want to remove a pre-order item from, or an order you want to add a new pre-order item to.
To edit the order:
- Click the icon at the top right of the order details section.
- Choose Edit from the dropdown.
- In the order edit form, you can add or remove items from the order.
- Learn more about the order edit form in the user guide.
- Click the "Confirm Edit" button at the bottom of the form, then click "Continue" in the confirmation modal.
- The order edit request will be shown at the top of the page. Click the "Force confirm" button to confirm the order edit.
If you refresh the page, you'll see that the pre-order items were updated accordingly.

Next Steps#
You've now implemented the pre-order feature in Medusa. You can expand on this feature based on your use case. You can add features like:
- Customize the storefront to show a badge for pre-order items or timers for when a pre-order item will be available.
- Automate partially capturing the payment when the order is placed.
- Add a feature to allow customers to cancel their pre-orders from the storefront.
Learn More about Medusa#
If you're new to Medusa, check out the main documentation, where you'll get a more in-depth understanding of all the concepts you've used in this guide and more.
To learn more about the commerce features that Medusa provides, check out Medusa's Commerce Modules.
Troubleshooting#
If you encounter issues during your development, check out the troubleshooting guides.
Getting Help#
If you encounter issues not covered in the troubleshooting guides:
- Visit the Medusa GitHub repository to report issues or ask questions.
- Join the Medusa Discord community for real-time support from community members.