Implement Agentic Commerce (ChatGPT Instant Checkout) Specifications
In this tutorial, you'll learn how to implement Agentic Commerce specifications in Medusa that allow you to sell through ChatGPT.
When you install a Medusa application, you get a fully-fledged commerce platform with the Framework for customization. The Medusa application's commerce features are built around Commerce Modules, which are available out-of-the-box.
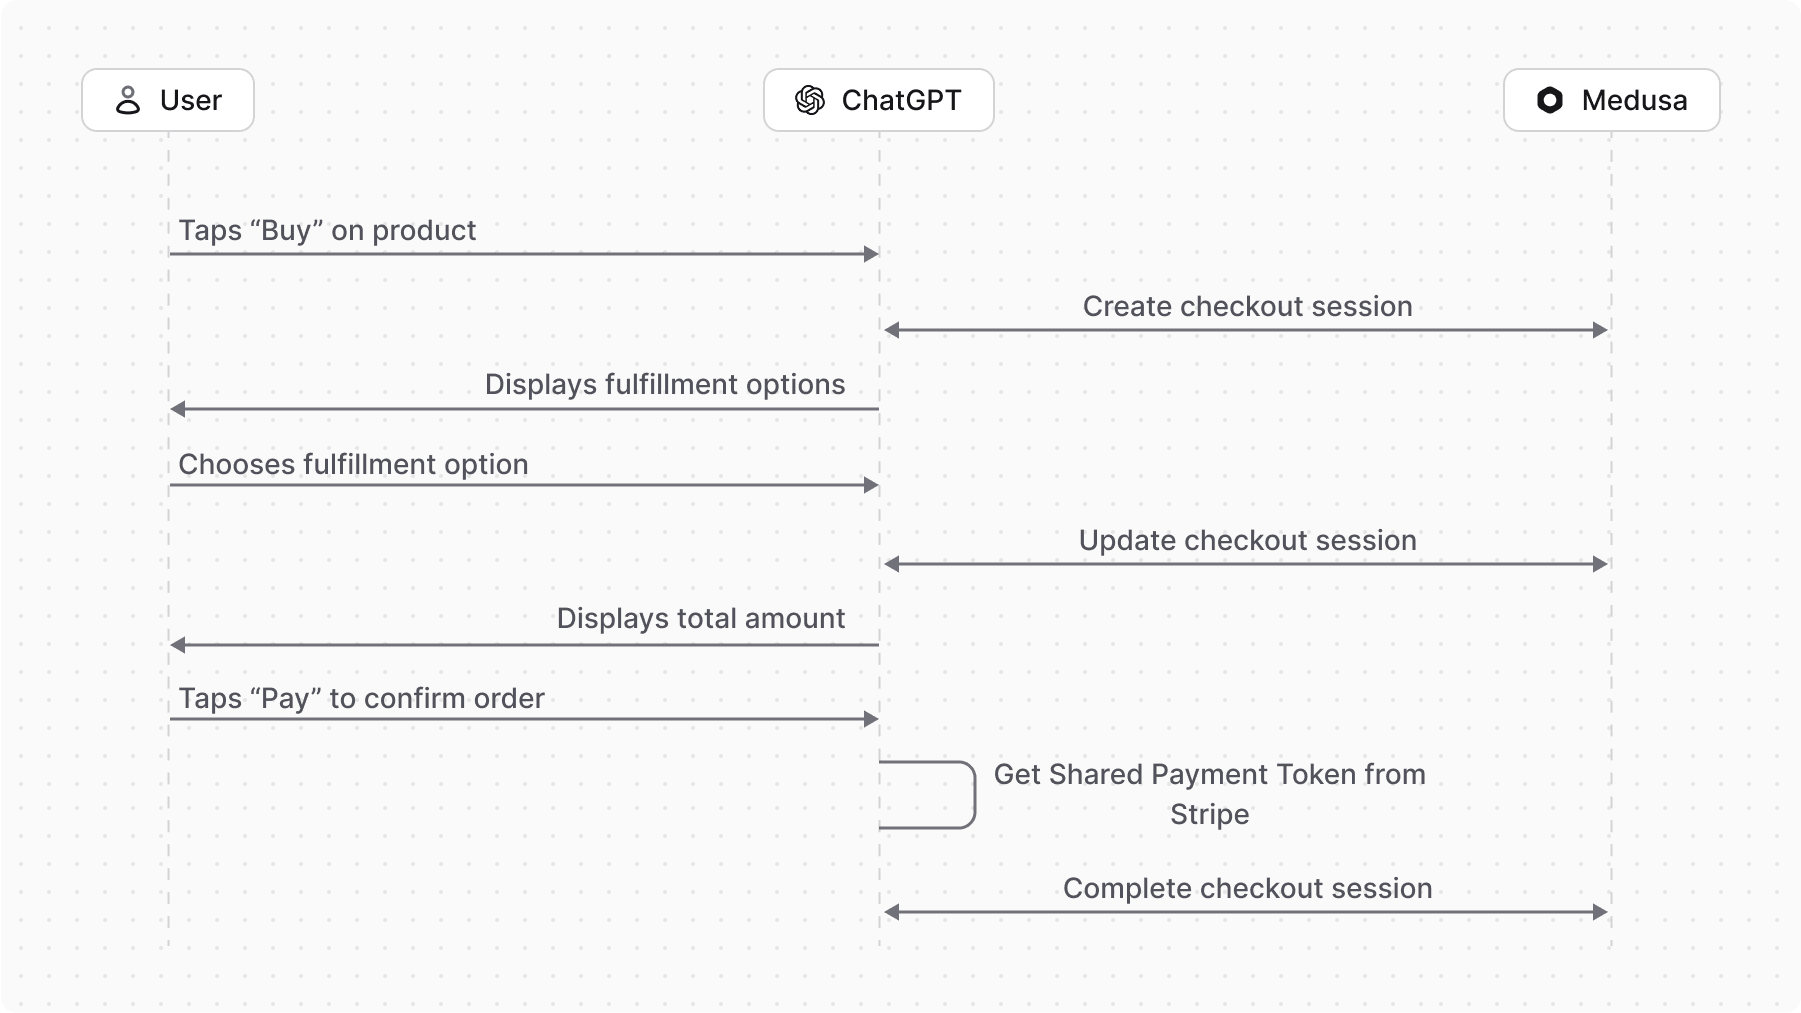
The Agentic Commerce Protocol supports instant checkout experiences within AI agents. By implementing Agentic Commerce specifications in your Medusa application, customers can purchase products through ChatGPT and other AI agents.
Summary#
By following this tutorial, you will learn how to:
- Build a product feed matching the Agentic Commerce specifications.
- Create Agentic Checkout APIs that handle checkout requests from AI agents.
- Send webhook events to AI agents matching the Agentic Commerce specifications.
By the end of this tutorial, you'll have all necessary resources to apply for Instant Checkout and start selling in ChatGPT. You can also sell through other AI agents that support the Agentic Commerce Protocol.
You can follow this tutorial whether you're new to Medusa or an advanced Medusa developer.
Step 1: Install a Medusa Application#
Begin by installing the Medusa application on your machine with the following command:
You'll first be asked for the project's name. You can optionally choose to install the Next.js Starter Storefront as well.
After that, the installation process will begin. This will install the Medusa application as a monorepository in a directory with your project's name. The backend is installed in the apps/backend directory. If you chose to install the Next.js Starter Storefront, it'll be in the apps/storefront directory.
Once the installation finishes successfully, the Medusa Admin dashboard will open with a form to create a new user. Enter the user's credentials and submit the form. Then, you can log in with the new user and explore the dashboard.
apps/backend directory of your Medusa project.Step 2: Create Agentic Commerce Module#
To integrate third-party services into Medusa, you create a custom module. A module is a reusable package with functionalities related to a single feature or domain. Medusa integrates the module into your application without implications or side effects on your setup.
In this step, you'll create a module that integrates with an AI agent through the Agentic Commerce Protocol. This module is useful to send the product feed and webhook events to the AI agent.
a. Create Module Directory#
A module is created under the src/modules directory of your Medusa application. So, create the directory src/modules/agentic-commerce.
b. Create Module Service#
You define a module's functionalities in a service. A service is a TypeScript or JavaScript class that the module exports. In the service's methods, you can connect to the database (useful if your module defines database tables) or connect to third-party services.
In this section, you'll create the Agentic Commerce Module's service and the methods necessary to interact with the Agentic Commerce Protocol.
To create the service, create the file src/modules/agentic-commerce/service.ts with the following content:
1type ModuleOptions = {2 // TODO add module options like API key, etc.3 signatureKey: string4}5 6export default class AgenticCommerceService {7 options: ModuleOptions8 constructor({}, options: ModuleOptions) {9 this.options = options10 // TODO initialize client11 }12}
The service's constructor receives two parameters:
- The Module's container that allows you to resolve Framework tools.
- The module's options that you'll later pass when registering the module in the Medusa application. You can add more options based on your integration.
If you're connecting to AI agents through an SDK or API client, you can initialize it in the constructor.
sendProductFeed Method
Next, you'll add the sendProductFeed method to the service. This method sends the product feed to AI agents, allowing them to search and display your products.
Add the following method to the AgenticCommerceService class:
OpenAI hasn't publicly published the endpoint for sending product feeds. So, in this method, you'll just log the product feed URL to the console.
When you apply for Instant Checkout, you'll get access to the endpoint and can implement the logic to send the product feed in this method.
verifySignature Method
Next, you'll add the verifySignature method to the service. This method verifies signatures of requests sent by AI agents to Agentic Checkout APIs that you'll create later.
Add the following import at the top of the src/modules/agentic-commerce/service.ts file:
Then, add the following method to the AgenticCommerceService class:
1export default class AgenticCommerceService {2 // ...3 async verifySignature({4 signature,5 payload,6 }: {7 // base64 encoded signature8 signature: string9 payload: any10 }) {11 try {12 // Decode the base64 signature13 const receivedSignature = Buffer.from(signature, "base64")14 15 // Create HMAC-SHA256 signature using your signing key16 const expectedSignature = crypto17 .createHmac("sha256", this.options.signatureKey)18 .update(JSON.stringify(payload), "utf8")19 .digest()20 21 // Compare signatures using constant-time comparison to prevent timing attacks22 return crypto.timingSafeEqual(receivedSignature, expectedSignature)23 } catch (error) {24 console.error("Signature verification failed:", error)25 return false26 }27 }28}
This method receives request signatures and payloads, then verifies signatures using HMAC-SHA256 with the module's signatureKey option.
When you apply for Instant Checkout, you'll receive a signature key for verifying request signatures. You can set this key in the module's options.
getSignature Method
Next, you'll add the getSignature method to the service. This method generates signatures for use in request headers when sending webhook events to AI agents.
Add the following method to the AgenticCommerceService class:
This method receives webhook event data and generates signatures using HMAC-SHA256 with the module's signatureKey option.
sendWebhookEvent Method
Finally, you'll add the sendWebhookEvent method to the service. This method sends webhook events to AI agents.
First, add the following type at the top of the src/modules/agentic-commerce/service.ts file:
1export type AgenticCommerceWebhookEvent = {2 type: "order.created" | "order.updated"3 data: {4 type: "order"5 checkout_session_id: string6 permalink_url: string7 status: "created" | "manual_review" | "confirmed" | "canceled" | "shipping" | "fulfilled"8 refunds: {9 type: "store_credit" | "original_payment"10 amount: number11 }[]12 }13}
This type defines the structure of webhook events that you can send to AI agents based on Agentic Commerce specifications.
Then, add the following method to the AgenticCommerceService class:
1export default class AgenticCommerceService {2 // ...3 async sendWebhookEvent({4 type,5 data,6 }: AgenticCommerceWebhookEvent) {7 // Create signature8 const signature = this.getSignature(data)9 // TODO send order webhook event10 console.log(`Sent order webhook event ${type} with signature ${signature} and data ${JSON.stringify(data)}`)11 }12}
This method receives webhook event types and data, generates signatures using the getSignature method, and logs events to the console.
When you apply for Instant Checkout, you'll get access to endpoints for sending webhook events and can implement the logic in this method.
c. Export Module Definition#
The final piece of a module is its definition, which you export in an index.ts file at the root directory. This definition tells Medusa the module name and its service.
So, create the file src/modules/agentic-commerce/index.ts with the following content:
You use the Module function from the Modules SDK to create module definitions. It accepts two parameters:
- The module name, which is
agenticCommerce. - An object with a required
serviceproperty indicating the module's service.
You also export the module name as AGENTIC_COMMERCE_MODULE for later reference.
d. Add Module to Medusa's Configurations#
Once you finish building the module, add it to Medusa's configurations to start using it.
In medusa-config.ts, add a modules property and pass an array with your custom module:
Each object in the modules array has a resolve property, whose value is either a path to the module's directory, or an npm package’s name.
You also pass an options property with module options, including the signature key. Once you receive a signature key from OpenAI, you can set it in the AGENTIC_COMMERCE_SIGNATURE_KEY environment variable.
Your module is now ready for use. You'll build workflows around it in the following steps.
Step 3: Send Product Feed#
In this step, you'll create logic to generate and send product feeds matching Agentic Commerce specifications. These feeds provide AI agents with product information, allowing them to search and display products to customers. Customers can then purchase products through AI agents.
You'll implement:
- A workflow that generates and sends the product feed.
- A scheduled job that executes the workflow every fifteen minutes. This is the maximum frequency OpenAI allows for product feed updates.
a. Send Product Feed Workflow#
A workflow is a series of actions called steps that complete a task. You construct workflows like functions, but they're special functions that allow you to track execution progress, define rollback logic, and configure advanced features.
The workflow for sending product feeds will have the following steps:
Workflow hook
Step conditioned by when
View step details
getProductFeedItemsStep
The getProductFeedItemsStep step retrieves product variants to include in the product feed.
To create the step, create the file src/workflows/steps/get-product-feed-items.ts with the following content:
1import { createStep, StepResponse } from "@medusajs/framework/workflows-sdk"2import { getVariantAvailability, QueryContext } from "@medusajs/framework/utils"3import { CalculatedPriceSet, ShippingOptionDTO } from "@medusajs/framework/types"4 5export type FeedItem = {6 id: string7 title: string8 description: string9 link: string10 image_link?: string11 additional_image_link?: string12 availability: string13 inventory_quantity: number14 price: string15 sale_price?: string16 item_group_id: string17 item_group_title: string18 gtin?: string19 condition?: string20 brand?: string21 product_category?: string22 material?: string23 weight?: string24 color?: string25 size?: string26 seller_name: string27 seller_url: string28 seller_privacy_policy: string29 seller_tos: string30 return_policy: string31 return_window?: number32}33 34type StepInput = {35 currency_code: string36 country_code: string37}38 39const formatPrice = (price: number, currency_code: string) => {40 return `${new Intl.NumberFormat("en-US", {41 currency: currency_code,42 minimumFractionDigits: 2,43 maximumFractionDigits: 2,44 }).format(price)} ${currency_code.toUpperCase()}`45}46 47export const getProductFeedItemsStep = createStep(48 "get-product-feed-items", 49 async (input: StepInput, { container }) => {50 // TODO implement step51 }52)
You define the FeedItem type that matches the structure of an item in the product feed. You also define the StepInput type that includes the input parameters for the step, which are the currency and country codes.
Then, you define the formatPrice utility function that formats a price in a given currency. This is the format required by the Agentic Commerce specifications.
Finally, you create a step with createStep from the Workflows SDK. It accepts two parameters:
- The step's unique name, which is
get-product-feed-items. - An async function that receives two parameters:
- The step's input.
- An object that has properties including the Medusa container, which is a registry of Framework and commerce tools that you can access in the step.
Next, you'll implement the step's logic. Replace the step implementation with the following:
1export const getProductFeedItemsStep = createStep(2 "get-product-feed-items", 3 async (input: StepInput, { container }) => {4 const feedItems: FeedItem[] = []5 const query = container.resolve("query")6 const configModule = container.resolve("configModule")7 const storefrontUrl = configModule.admin.storefrontUrl || 8 process.env.STOREFRONT_URL9 10 const limit = 10011 let offset = 012 let count = 013 const countryCode = input.country_code.toLowerCase()14 const currencyCode = input.currency_code.toLowerCase()15 16 do {17 const {18 data: products,19 metadata,20 } = await query.graph({21 entity: "product",22 fields: [23 "id",24 "title",25 "description",26 "handle",27 "thumbnail",28 "images.*",29 "status",30 "variants.*",31 "variants.calculated_price.*",32 "sales_channels.*",33 "sales_channels.stock_locations.*",34 "sales_channels.stock_locations.address.*",35 "categories.*",36 ],37 filters: {38 status: "published",39 },40 context: {41 variants: {42 calculated_price: QueryContext({43 currency_code: currencyCode,44 }),45 },46 },47 pagination: {48 take: limit,49 skip: offset,50 },51 })52 53 count = metadata?.count ?? 054 offset += limit55 56 for (const product of products) {57 if (!product.variants.length) {continue}58 const salesChannel = product.sales_channels?.find((channel) => {59 return channel?.stock_locations?.some((location) => {60 return location?.address?.country_code.toLowerCase() === countryCode61 })62 })63 64 const availability = salesChannel?.id ? await getVariantAvailability(query, {65 variant_ids: product.variants.map((variant) => variant.id),66 sales_channel_id: salesChannel?.id,67 }) : undefined68 69 const categories = product.categories?.map((cat) => cat?.name)70 .filter((name): name is string => !!name).join(">")71 72 for (const variant of product.variants) {73 // @ts-ignore74 const calculatedPrice = variant.calculated_price as CalculatedPriceSet75 const hasOriginalPrice = 76 calculatedPrice?.original_amount !== calculatedPrice?.calculated_amount77 const originalPrice = hasOriginalPrice ? 78 calculatedPrice.original_amount : calculatedPrice.calculated_amount79 const salePrice = hasOriginalPrice ? 80 calculatedPrice.calculated_amount : undefined81 const stockStatus = !variant.manage_inventory ? "in stock" : 82 !availability?.[variant.id]?.availability ? "out of stock" : "in stock"83 const inventoryQuantity = !variant.manage_inventory ? 84 100000 : availability?.[variant.id]?.availability || 085 const color = variant.options?.find(86 (o) => o.option?.title.toLowerCase() === "color"87 )?.value88 const size = variant.options?.find(89 (o) => o.option?.title.toLowerCase() === "size"90 )?.value91 92 feedItems.push({93 id: variant.id,94 title: product.title,95 description: product.description ?? "",96 link: `${storefrontUrl || ""}/${input.country_code}/${product.handle}`,97 image_link: product.thumbnail ?? "",98 additional_image_link: product.images?.map(99 (image) => image.url100 )?.join(","),101 availability: stockStatus,102 inventory_quantity: inventoryQuantity,103 price: formatPrice(originalPrice as number, currencyCode),104 sale_price: salePrice ? 105 formatPrice(salePrice as number, currencyCode) : undefined,106 item_group_id: product.id,107 item_group_title: product.title,108 gtin: variant.upc || undefined,109 condition: "new", // TODO add condition if supported110 product_category: categories,111 material: variant.material || undefined,112 weight: `${variant.weight || 0} kg`,113 brand: "", // TODO add brands if supported114 color: color || undefined,115 size: size || undefined,116 seller_name: "Medusa", // TODO add seller name if supported117 seller_url: storefrontUrl || "",118 seller_privacy_policy: `${storefrontUrl}/privacy-policy`, // TODO update119 seller_tos: `${storefrontUrl}/terms-of-service`, // TODO update120 return_policy: `${storefrontUrl}/return-policy`, // TODO update121 return_window: 0, // TODO update122 })123 }124 }125 } while (count > offset)126 127 return new StepResponse({ items: feedItems })128})
In the step, you:
- Retrieve products with pagination using Query. Query allows you to retrieve data across modules. You retrieve the fields necessary for the product field.
- For each product, you loop over its variants to add them to the product feed. You add information related to pricing, availability, and other attributes.
- Some of the fields are hardcoded or left empty. You can update them based on your setup.
- For more information on the fields, refer to the Product Feed specifications.
Finally, a step function must return a StepResponse instance. You return the list of feed items in the response.
buildProductFeedXmlStep
Next, you'll create the step that generates the product feed XML from the feed items.
To create the step, create the file src/workflows/steps/build-product-feed-xml.ts with the following content:
1import { createStep, StepResponse } from "@medusajs/framework/workflows-sdk"2import { FeedItem } from "./get-product-feed-items"3 4type StepInput = {5 items: FeedItem[]6}7 8export const buildProductFeedXmlStep = createStep(9 "build-product-feed-xml",10 async (input: StepInput) => {11 const escape = (str: string) =>12 str13 .replace(/&/g, "&")14 .replace(/</g, "<")15 .replace(/>/g, ">")16 .replace(/\"/g, """)17 .replace(/'/g, "'")18 19 const itemsXml = input.items.map((item) => {20 return (21 `<item>` +22 // Flags 23 `<enable_search>true</enable_search>` +24 `<enable_checkout>true</enable_checkout>` +25 // Product Variant Fields26 `<id>${escape(item.id)}</id>` +27 `<title>${escape(item.title)}</title>` +28 `<description>${escape(item.description)}</description>` +29 `<link>${escape(item.link)}</link>` +30 `<gtin>${escape(item.gtin || "")}</gtin>` +31 (item.image_link ? `<image_link>${escape(item.image_link)}</image_link>` : "") +32 (item.additional_image_link ? `<additional_image_link>${escape(item.additional_image_link)}</additional_image_link>` : "") +33 `<availability>${escape(item.availability)}</availability>` +34 `<inventory_quantity>${item.inventory_quantity}</inventory_quantity>` +35 `<price>${escape(item.price)}</price>` +36 (item.sale_price ? `<sale_price>${escape(item.sale_price)}</sale_price>` : "") +37 `<condition>${escape(item.condition || "new")}</condition>` +38 `<product_category>${escape(item.product_category || "")}</product_category>` +39 `<brand>${escape(item.brand || "Medusa")}</brand>` +40 `<material>${escape(item.material || "")}</material>` +41 `<weight>${escape(item.weight || "")}</weight>` +42 `<item_group_id>${escape(item.item_group_id)}</item_group_id>` +43 `<item_group_title>${escape(item.item_group_title)}</item_group_title>` +44 `<size>${escape(item.size || "")}</size>` +45 `<color>${escape(item.color || "")}</color>` +46 `<seller_name>${escape(item.seller_name)}</seller_name>` +47 `<seller_url>${escape(item.seller_url)}</seller_url>` +48 `<seller_privacy_policy>${escape(item.seller_privacy_policy)}</seller_privacy_policy>` +49 `<seller_tos>${escape(item.seller_tos)}</seller_tos>` +50 `<return_policy>${escape(item.return_policy)}</return_policy>` +51 `<return_window>${item.return_window}</return_window>` +52 `</item>`53 )54 }).join("")55 56 const xml =57 `<?xml version="1.0" encoding="UTF-8"?>` +58 `<rss version="2.0" xmlns:g="http://base.google.com/ns/1.0">` +59 `<channel>` +60 `<title>Product Feed</title>` +61 `<description>Product Feed for Agentic Commerce</description>` +62 itemsXml +63 `</channel>` +64 `</rss>`65 66 return new StepResponse(xml)67 }68)
This step receives the list of feed items as input.
In the step, you loop over the feed items and generate an XML string matching the Agentic Commerce specifications. You escape special characters in the fields to ensure the XML is valid.
Finally, you return the XML string in a StepResponse instance.
sendProductFeedStep
The final step is sendProductFeedStep, which sends product feed XML to AI agents.
Create the file src/workflows/steps/send-product-feed.ts with the following content:
npm run dev or yarn dev command to generate the necessary type definitions, as explained in the Automatically Generated Types guide.1import { createStep, StepResponse } from "@medusajs/framework/workflows-sdk"2import { AGENTIC_COMMERCE_MODULE } from "../../modules/agentic-commerce"3 4type StepInput = {5 productFeed: string6}7 8export const sendProductFeedStep = createStep(9 "send-product-feed",10 async (input: StepInput, { container }) => {11 const agenticCommerceModuleService = container.resolve(12 AGENTIC_COMMERCE_MODULE13 )14 15 await agenticCommerceModuleService.sendProductFeed(input.productFeed)16 17 return new StepResponse(void 0)18 }19)
This step receives the product feed XML as input.
In the step, you resolve the Agentic Commerce Module's service from the Medusa container and call its sendProductFeed method to send the product feed to the AI agent.
Create Workflow
You can now create the workflow that uses the steps you created.
Create the file src/workflows/send-product-feed.ts with the following content:
1import { createWorkflow, WorkflowResponse } from "@medusajs/framework/workflows-sdk"2import { getProductFeedItemsStep } from "./steps/get-product-feed-items"3import { buildProductFeedXmlStep } from "./steps/build-product-feed-xml"4import { sendProductFeedStep } from "./steps/send-product-feed"5 6type GenerateProductFeedWorkflowInput = {7 currency_code: string8 country_code: string9}10 11export const sendProductFeedWorkflow = createWorkflow(12 "send-product-feed",13 (input: GenerateProductFeedWorkflowInput) => {14 const { items: feedItems } = getProductFeedItemsStep(input)15 16 const xml = buildProductFeedXmlStep({ 17 items: feedItems,18 })19 20 sendProductFeedStep({21 productFeed: xml,22 })23 24 return new WorkflowResponse({ xml })25 }26)27 28export default sendProductFeedWorkflow
You create a workflow using createWorkflow from the Workflows SDK. It accepts the workflow's unique name as a first parameter.
It accepts as a second parameter a constructor function, which is the workflow's implementation. The function can accept input, which in this case is the currency and country codes.
In the workflow, you:
- Retrieve feed items using
getProductFeedItemsStep. - Generate product feed XML using
buildProductFeedXmlStep. - Send product feed to AI agents using
sendProductFeedStep.
Finally, a workflow function must return a WorkflowResponse instance. You return the product feed XML in the response.
b. Schedule Job to Send Product Feed#
Next, you'll create a scheduled job that executes the sendProductFeedWorkflow every fifteen minutes. A scheduled job is an asynchronous function that the Medusa application runs at the interval you specify during the Medusa application's runtime.
Create the file src/jobs/sync-product-feed.ts with the following content:
1import {2 MedusaContainer,3} from "@medusajs/framework/types"4import sendProductFeedWorkflow from "../workflows/send-product-feed"5 6export default async function syncProductFeed(container: MedusaContainer) {7 const logger = container.resolve("logger")8 const query = container.resolve("query")9 10 const { data: regions } = await query.graph({11 entity: "region",12 fields: ["id", "currency_code", "countries.*"],13 })14 15 for (const region of regions) {16 for (const country of region.countries) {17 await sendProductFeedWorkflow(container).run({18 input: {19 currency_code: region.currency_code,20 country_code: country!.iso_2,21 },22 })23 }24 }25 26 logger.info("Product feed synced for all regions and countries")27}28 29export const config = {30 name: "sync-product-feed",31 schedule: "*/15 * * * *", // Every 15 minutes32}
In a scheduled job file, you must export:
- An asynchronous function that holds the job's logic. The function receives the Medusa container as a parameter.
- A
configobject that specifies the job name and schedule. The schedule is a cron expression that defines the interval at which the job runs.
In the scheduled job function, you use Query to retrieve regions in your Medusa application, including their countries and currency codes.
Then, for each country in each region, you execute sendProductFeedWorkflow, passing the region's currency code and the country's ISO 2 code as input.
Use the Scheduled Job#
To use the scheduled job, start the Medusa application with the following command:
This job runs every fifteen minutes. The current implementation only logs product feeds to the console. Once you apply for Instant Checkout, you can implement logic to send product feeds in the sendProductFeed method of the Agentic Commerce Module's service.
Step 4: Create Checkout Session API#
In this step, you'll start creating Agentic Checkout APIs to handle checkout requests from AI agents.
You'll implement the POST /checkout_sessions API route for creating checkout sessions. AI agents call this endpoint when customers want to purchase products. This is equivalent to creating a new cart in Medusa.
To implement this API route, you'll create:
- A workflow that prepares checkout session responses based on Agentic Commerce specifications. You'll use this workflow in other checkout-related workflows.
- A workflow that creates checkout sessions.
- An API route at
POST /checkout_sessionsthat executes the workflow to create checkout sessions. - A middleware to authenticate AI agent requests to checkout APIs.
- A custom error handler to return errors in the format required by Agentic Commerce specifications.
a. Prepare Checkout Session Response Workflow#
First, you'll create a workflow that prepares checkout session responses. This workflow will be used in other checkout-related workflows to return checkout sessions in the format required by Agentic Commerce specifications.
The workflow has the following steps:
Workflow hook
Step conditioned by when
View step details
These steps and workflows are available in Medusa out-of-the-box. So, you can implement the workflow without creating custom steps.
To create the workflow, create the file src/workflows/prepare-checkout-session-data.ts with the following content:
9} from "@medusajs/medusa/core-flows"10 11export type PrepareCheckoutSessionDataWorkflowInput = {12 buyer?: {13 first_name: string14 email: string15 phone_number?: string16 }17 fulfillment_address?: {18 name: string19 line_one: string20 line_two?: string21 city: string22 state: string23 postal_code: string24 phone_number?: string25 country: string26 }27 cart_id: string28 messages?: {29 type: "error" | "info"30 code: "missing" | "invalid" | "out_of_stock" | "payment_declined" | "required_sign_in" | "requires_3d"31 content_type: "plain" | "markdown"32 content: string33 }[]34}35 36export const prepareCheckoutSessionDataWorkflow = createWorkflow(37 "prepare-checkout-session-data",38 (input: PrepareCheckoutSessionDataWorkflowInput) => {39 // TODO add steps40 }41)
The prepareCheckoutSessionDataWorkflow accepts input with the following properties:
buyer: Buyer information received from AI agents.fulfillment_address: Fulfillment address information received from AI agents.cart_id: Cart ID in Medusa, which is also the checkout session ID.messages: Messages to include in checkout session responses. This is useful for sending error or info messages to AI agents.
Next, you'll implement the workflow's logic. Replace the TODO in the workflow with the following:
1const { data: carts } = useQueryGraphStep({2 entity: "cart",3 fields: [4 "id", 5 "items.*", 6 "shipping_address.*", 7 "shipping_methods.*",8 "region.*",9 "region.payment_providers.*", 10 "currency_code", 11 "email", 12 "phone", 13 "payment_collection.*",14 "total",15 "subtotal",16 "tax_total",17 "discount_total",18 "original_item_total",19 "shipping_total",20 "metadata",21 "order.id",22 ],23 filters: {24 id: input.cart_id,25 },26 options: {27 throwIfKeyNotFound: true,28 },29})30 31// Retrieve shipping options32const shippingOptions = listShippingOptionsForCartWithPricingWorkflow.runAsStep({33 input: {34 cart_id: carts[0].id,35 },36})37 38// TODO prepare response
You first retrieve the cart using useQueryGraphStep, including fields necessary to prepare checkout session responses.
Then, you retrieve shipping options that can be used for the cart using listShippingOptionsForCartWithPricingWorkflow.
Next, you'll prepare checkout session response data. Replace the TODO in the workflow with the following:
1const responseData = transform({2 input,3 carts,4 shippingOptions,5}, (data) => {6 // @ts-ignore7 const hasStripePaymentProvider = data.carts[0].region?.payment_providers?.some((provider) => provider?.id.includes("stripe"))8 const hasPaymentSession = data.carts[0].payment_collection?.payment_sessions?.some((session) => session?.status === "pending")9 return {10 id: data.carts[0].id,11 buyer: data.input.buyer,12 payment_provider: {13 provider: hasStripePaymentProvider ? "stripe" : undefined,14 supported_payment_methods: hasStripePaymentProvider ? ["card"] : undefined,15 },16 status: hasPaymentSession ? "ready_for_payment" : 17 data.carts[0].metadata?.checkout_session_canceled ? "canceled" : 18 data.carts[0].order?.id ? "completed" : "not_ready_for_payment",19 currency: data.carts[0].currency_code,20 line_items: data.carts[0].items.map((item) => ({21 id: item?.id,22 title: item?.title,23 // @ts-ignore24 base_amount: item?.original_total,25 // @ts-ignore26 discount: item?.discount_total,27 // @ts-ignore28 subtotal: item?.subtotal,29 // @ts-ignore30 tax: item?.tax_total,31 // @ts-ignore32 total: item?.total,33 item: {34 id: item?.variant_id,35 quantity: item?.quantity,36 },37 })),38 fulfillment_address: data.input.fulfillment_address,39 fulfillment_options: data.shippingOptions?.map((option) => ({40 type: "shipping",41 id: option?.id,42 title: option?.name,43 subtitle: "",44 carrier_info: option?.provider?.id,45 earliest_delivery_time: option?.type.code === "express" ? 46 new Date(Date.now() + 1 * 24 * 60 * 60 * 1000).toISOString() : // RFC 3339 string - 24 hours47 new Date(Date.now() + 2 * 24 * 60 * 60 * 1000).toISOString(), // RFC 3339 string - 48 hours48 latest_delivery_time: option?.type.code === "express" ? 49 new Date(Date.now() + 1 * 24 * 60 * 60 * 1000).toISOString() : // RFC 3339 string - 24 hours50 new Date(Date.now() + 2 * 24 * 60 * 60 * 1000).toISOString(), // RFC 3339 string - 48 hours51 subtotal: option?.calculated_price.calculated_amount,52 // @ts-ignore53 tax: data.carts[0].shipping_methods?.[0]?.tax_total || 0,54 // @ts-ignore55 total: data.carts[0].shipping_methods?.[0]?.total || option?.calculated_price.calculated_amount,56 })),57 fulfillment_option_id: data.carts[0].shipping_methods?.[0]?.shipping_option_id,58 totals: [59 {60 type: "item_base_amount",61 display_name: "Item Base Amount",62 // @ts-ignore63 amount: data.carts[0].original_item_total,64 },65 {66 type: "subtotal",67 display_name: "Subtotal",68 // @ts-ignore69 amount: data.carts[0].subtotal,70 },71 {72 type: "discount",73 display_name: "Discount",74 // @ts-ignore75 amount: data.carts[0].discount_total,76 },77 {78 type: "fulfillment",79 display_name: "Fulfillment",80 // @ts-ignore81 amount: data.carts[0].shipping_total,82 },83 {84 type: "tax",85 display_name: "Tax",86 // @ts-ignore87 amount: data.carts[0].tax_total,88 },89 {90 type: "total",91 display_name: "Total",92 // @ts-ignore93 amount: data.carts[0].total,94 },95 ],96 messages: data.input.messages || [],97 links: [98 {99 type: "terms_of_use",100 value: "https://www.medusa-commerce.com/terms-of-use", // TODO: replace with actual terms of use101 },102 {103 type: "privacy_policy",104 value: "https://www.medusa-commerce.com/privacy-policy", // TODO: replace with actual privacy policy105 },106 {107 type: "seller_shop_policy",108 value: "https://www.medusa-commerce.com/seller-shop-policy", // TODO: replace with actual seller shop policy109 },110 ],111 }112})113 114return new WorkflowResponse(responseData)
To create variables in workflows, you must use the transform function. This function accepts data to manipulate as the first parameter and a transformation function as the second parameter.
In the transformation function, you prepare checkout session responses matching Agentic Commerce response specifications. You can replace hardcoded values with dynamic values based on your setup.
Finally, you return response data in a WorkflowResponse instance.
b. Create Checkout Session Workflow#
Next, you'll create a workflow that creates carts for checkout sessions. The POST /checkout_sessions API route will execute this workflow.
The workflow has the following steps:
Workflow hook
Step conditioned by when
View step details
These steps and workflows are available in Medusa out-of-the-box. So, you can implement the workflow without creating custom steps.
Create the file src/workflows/create-checkout-session.ts with the following content:
19} from "./prepare-checkout-session-data"20 21type WorkflowInput = {22 items: {23 id: string24 quantity: number25 }[]26 buyer?: {27 first_name: string28 email: string29 phone_number?: string30 }31 fulfillment_address?: {32 name: string33 line_one: string34 line_two?: string35 city: string36 state: string37 postal_code: string38 phone_number?: string39 country: string40 }41}42 43export const createCheckoutSessionWorkflow = createWorkflow(44 "create-checkout-session",45 (input: WorkflowInput) => {46 // TODO add steps47 }48)
The createCheckoutSessionWorkflow accepts an input with the request body of the Create Checkout Session API.
Retrieve and Validate Variants
Next, you'll start implementing the workflow's logic. You'll first validate that the variants in the input exist.
Replace the TODO in the workflow with the following:
1// validate item IDs2const variantIds = transform({3 input,4}, (data) => {5 return data.input.items.map((item) => item.id)6})7 8// Will fail if any variant IDs are not found9useQueryGraphStep({10 entity: "variant",11 fields: ["id"],12 filters: {13 id: variantIds,14 },15 options: {16 throwIfKeyNotFound: true,17 },18})19 20// TODO retrieve region and sales channel
You first create a variable with the variant IDs in the input using the transform function.
Then, you use the useQueryGraphStep to retrieve the variants with the IDs. You set the throwIfKeyNotFound option to true to make the step fail if any of the variant IDs are not found.
Retrieve Region and Sales Channel
Next, you'll retrieve the region and sales channel. These are necessary to associate the cart with the correct region and sales channel. Replace the TODO in the workflow with the following:
1// Find the region ID for US2const { data: regions } = useQueryGraphStep({3 entity: "region",4 fields: ["id"],5 filters: {6 countries: {7 iso_2: "us",8 },9 },10}).config({ name: "find-region" })11 12// get sales channel13const { data: salesChannels } = useQueryGraphStep({14 entity: "sales_channel",15 fields: ["id"],16 // You can filter by name for a specific sales channel17 // filters: {18 // name: "Agentic Commerce"19 // }20}).config({ name: "find-sales-channel" })21 22// TODO retrieve or create customer
You retrieve the region for the US using the useQueryGraphStep step. Instant Checkout in ChatGPT currently only supports the US region.
You also retrieve the sales channels. You can filter the sales channels by name if you want to use a specific sales channel.
Retrieve or Create Customer
Next, if the AI agent provides buyer information, you'll try to retrieve or create the customer. Replace the TODO in the workflow with the following:
1// check if customer already exists2const { data: customers } = useQueryGraphStep({3 entity: "customer",4 fields: ["id"],5 filters: {6 email: input.buyer?.email,7 },8}).config({ name: "find-customer" })9 10// create customer if it does not exist11const createdCustomers = when ({ customers }, ({ customers }) => 12 customers.length === 0 && !!input.buyer?.email13)14.then(() => {15 return createCustomersWorkflow.runAsStep({16 input: {17 customersData: [18 {19 email: input.buyer?.email,20 first_name: input.buyer?.first_name,21 phone: input.buyer?.phone_number,22 has_account: false,23 },24 ],25 },26 })27})28 29// set customer ID based on existing or created customer30const customerId = transform({31 customers,32 createdCustomers,33}, (data) => {34 return data.customers.length > 0 ? 35 data.customers[0].id : data.createdCustomers?.[0].id36})37 38// TODO prepare cart input and create cart
You first try to retrieve the customer using the useQueryGraphStep step, filtering by the buyer's email.
Then, to perform an action based on a condition, you use when-then functions. The when function accepts as a first parameter the data to evaluate, and as a second parameter a function that returns a boolean.
If the when function returns true, the then function is executed, which also accepts a function that performs steps and returns their result.
In this case, if the customer does not exist, you create it using the createCustomersWorkflow workflow.
Finally, you create a variable with the customer ID, which is either the existing customer's ID or the newly created customer's ID.
Prepare Cart Input and Create Cart
Next, you'll prepare the input for the cart creation, then create the cart. Replace the TODO in the workflow with the following:
1const cartInput = transform({2 input,3 regions,4 salesChannels,5 customerId,6}, (data) => {7 const splitAddressName = data.input.fulfillment_address?.name.split(" ") || []8 return {9 items: data.input.items.map((item) => ({10 variant_id: item.id,11 quantity: item.quantity,12 })),13 region_id: data.regions[0]?.id,14 email: data.input.buyer?.email,15 customer_id: data.customerId,16 shipping_address: data.input.fulfillment_address ? {17 first_name: splitAddressName[0],18 last_name: splitAddressName.slice(1).join(" "),19 address_1: data.input.fulfillment_address?.line_one,20 address_2: data.input.fulfillment_address?.line_two,21 city: data.input.fulfillment_address?.city,22 province: data.input.fulfillment_address?.state,23 postal_code: data.input.fulfillment_address?.postal_code,24 country_code: data.input.fulfillment_address?.country,25 } : undefined,26 currency_code: data.regions[0]?.currency_code,27 sales_channel_id: data.salesChannels[0]?.id,28 metadata: {29 is_checkout_session: true,30 },31 } as CreateCartWorkflowInput32})33 34const createdCart = createCartWorkflow.runAsStep({35 input: cartInput,36})37 38// TODO retrieve shipping options
You use the transform function to prepare the input for the createCartWorkflow workflow. You map the input properties to the cart properties.
Then, you create the cart using the createCartWorkflow workflow.
Retrieve Shipping Options and Add Shipping Method
If the AI agent provides a fulfillment address in the request body, you must select the cheapest shipping option and add it to the cart.
Replace the TODO in the workflow with the following:
1// Select the cheapest shipping option if a fulfillment address is provided2when(input, (input) => !!input.fulfillment_address)3.then(() => {4 // Retrieve shipping options5 const shippingOptions = listShippingOptionsForCartWithPricingWorkflow.runAsStep({6 input: {7 cart_id: createdCart.id,8 },9 })10 11 const shippingMethodData = transform({12 createdCart,13 shippingOptions,14 }, (data) => {15 // get the cheapest shipping option16 const cheapestShippingOption = data.shippingOptions.sort(17 (a, b) => a.price - b.price18 )[0]19 return {20 cart_id: data.createdCart.id,21 options: [{22 id: cheapestShippingOption.id,23 }],24 }25 })26 acquireLockStep({27 key: createdCart.id,28 timeout: 2,29 ttl: 10,30 })31 addShippingMethodToCartWorkflow.runAsStep({32 input: shippingMethodData,33 })34 releaseLockStep({35 key: createdCart.id,36 })37})38 39// TODO prepare checkout session response
You use the when function to check if a fulfillment address is provided in the input. If so, you:
- Retrieve the shipping options using the listShippingOptionsForCartWithPricingWorkflow.
- Create a variable with the cheapest shipping option using the
transformfunction. - Acquire a lock on the cart to avoid race conditions.
- Add the cheapest shipping option to the cart using the addShippingMethodToCartWorkflow.
- Release the lock on the cart.
Prepare Checkout Session Response
Finally, you'll prepare and return the checkout session response. Replace the TODO in the workflow with the following:
You prepare the checkout session response using the prepareCheckoutSessionDataWorkflow workflow you created earlier. You return it as the workflow's response.
c. Create Checkout Session API Route#
Next, you'll create the API route at POST /checkout_sessions that executes the createCheckoutSessionWorkflow.
An API route is created in a route.ts file under a sub-directory of the src/api directory. The path of the API route is the file's path relative to src/api.
So, to create an API route, create the file src/api/checkout_sessions/route.ts with the following content:
1import { MedusaRequest, MedusaResponse } from "@medusajs/framework"2import { z } from "@medusajs/framework/zod"3import { createCheckoutSessionWorkflow } from "../../workflows/create-checkout-session"4import { MedusaError } from "@medusajs/framework/utils"5 6export const PostCreateSessionSchema = z.object({7 items: z.array(z.object({8 id: z.string(), // variant ID9 quantity: z.number(),10 })),11 buyer: z.object({12 first_name: z.string(),13 email: z.string(),14 phone_number: z.string().optional(),15 }).optional(),16 fulfillment_address: z.object({17 name: z.string(),18 line_one: z.string(),19 line_two: z.string().optional(),20 city: z.string(),21 state: z.string(),22 country: z.string(),23 postal_code: z.string(),24 phone_number: z.string().optional(),25 }).optional(),26})27 28export const POST = async (29 req: MedusaRequest<30 z.infer<typeof PostCreateSessionSchema>31 >,32 res: MedusaResponse33) => {34 const logger = req.scope.resolve("logger")35 const responseHeaders = {36 "Idempotency-Key": req.headers["idempotency-key"] as string,37 "Request-Id": req.headers["request-id"] as string,38 }39 try {40 const { result } = await createCheckoutSessionWorkflow(req.scope)41 .run({42 input: req.validatedBody,43 context: {44 idempotencyKey: req.headers["idempotency-key"] as string,45 },46 })47 48 res.set(responseHeaders).json(result)49 } catch (error) {50 const medusaError = error as MedusaError51 logger.error(medusaError)52 res.set(responseHeaders).json({53 messages: [54 {55 type: "error",56 code: "invalid",57 content_type: "plain",58 content: medusaError.message,59 },60 ],61 })62 }63}
You first define a validation schema with Zod for the request body. The schema matches the Agentic Commerce request specifications.
Then, you export a POST route handler function, which exposes a POST API route at /checkout_sessions.
In the route handler, you execute the createCheckoutSessionWorkflow, passing the validated request body as input. You return the workflow's response as the API response.
If an error occurs, you catch it and return it in the format required by the Agentic Commerce specifications.
You also return the Idempotency-Key and Request-Id headers in the response if they are provided in the request. These headers are required by the Agentic Commerce specifications.
d. Create Authentication Middleware#
Next, you'll create a middleware to authenticate requests to checkout APIs. The middleware will run before API route handlers and verify that requests contain valid API keys and signatures before allowing access to route handlers.
Create the file src/api/middlewares/validate-agentic-request.ts with the following content:
1import { MedusaNextFunction, MedusaRequest, MedusaResponse } from "@medusajs/framework"2import { AGENTIC_COMMERCE_MODULE } from "../../modules/agentic-commerce"3 4export async function validateAgenticRequest(5 req: MedusaRequest, 6 res: MedusaResponse, 7 next: MedusaNextFunction8) {9 const agenticCommerceModuleService = req.scope.resolve(AGENTIC_COMMERCE_MODULE)10 const apiKeyModuleService = req.scope.resolve("api_key")11 const signature = req.headers["signature"] as string12 const apiKey = req.headers["authorization"]?.replaceAll("Bearer ", "")13 14 const isTokenValid = await apiKeyModuleService.authenticate(apiKey || "")15 const isSignatureValid = !!req.body || await agenticCommerceModuleService.verifySignature({16 signature,17 payload: req.body,18 })19 20 if (!isTokenValid || !isSignatureValid) {21 return res.status(401).json({22 message: "Unauthorized",23 })24 }25 26 next()27}
You create the validateAgenticRequest middleware function that accepts request, response, and next function as parameters.
In this middleware, you:
- Resolve services of the Agentic Commerce and API Key modules.
- Validate that the API key in the
Authorizationheader is valid using the API Key Module's service. - Validate that the signature in the
Signatureheader is valid using the Agentic Commerce Module's service. If the request has no body, you skip signature validation. - If either the API key or signature is invalid, you return a
401 Unauthorizedresponse. - Otherwise, you call the
nextfunction to proceed to the next middleware or route handler.
The headers are expected based on Agentic Commerce specifications. You can create an API key that AI agents can use in the Secret API Key Settings of the Medusa Admin dashboard.
To use this middleware, you need to apply it to checkout API routes.
You apply middlewares in the src/api/middlewares.ts file. Create this file with the following content:
1import { 2 defineMiddlewares, 3 validateAndTransformBody,4} from "@medusajs/framework/http"5import { validateAgenticRequest } from "./middlewares/validate-agentic-request"6import { PostCreateSessionSchema } from "./checkout_sessions/route"7 8export default defineMiddlewares({9 routes: [10 {11 matcher: "/checkout_sessions*",12 middlewares: [13 validateAgenticRequest,14 ],15 },16 {17 matcher: "/checkout_sessions",18 method: ["POST"],19 middlewares: [validateAndTransformBody(PostCreateSessionSchema)],20 },21 ],22})
You apply the validateAgenticRequest middleware to all routes starting with /checkout_sessions.
You also apply the validateAndTransformBody middleware to the POST /checkout_sessions route to ensure request bodies include required fields.
e. Create Custom Error Handler#
Finally, you'll add a custom error handler to return errors in the format required by Agentic Commerce specifications.
To override the default error handler, you can pass the errorHandler property to defineMiddlewares. It accepts an error handler function.
In src/api/middlewares.ts, add the following import at the top of the file:
You import the default error handler and store it in a variable to use in your custom error handler.
Then, add the errorHandler property to the defineMiddlewares function:
1export default defineMiddlewares({2 // ...3 errorHandler: (error, req, res, next) => {4 if (!req.path.startsWith("/checkout_sessions")) {5 return originalErrorHandler(error, req, res, next)6 }7 8 res.json({9 messages: [10 {11 type: "error",12 code: "invalid",13 content_type: "plain",14 content: error.message,15 },16 ],17 })18 },19})
If the request path does not start with /checkout_sessions, you call the original error handler to handle errors.
Otherwise, you return errors in the format required by Agentic Commerce specifications.
Use the Checkout Session API#
To use the POST /checkout_sessions API:
- Apply to ChatGPT's Instant Checkout and access a signature key.
- Create an API key in the Secret API Key Settings of the Medusa Admin dashboard.
- Setup the API key in the Instant Checkout settings.
ChatGPT will then use these to create checkout sessions.
Test the Create Checkout Session API Locally#
To test the POST /checkout_sessions API locally, you'll add an API route to retrieve signatures based on payloads. This allows you to simulate signature generation that ChatGPT performs.
Create the file src/api/signature/route.ts with the following content:
1import { MedusaRequest, MedusaResponse } from "@medusajs/framework/http"2import { AGENTIC_COMMERCE_MODULE } from "../../modules/agentic-commerce"3 4export const POST = async (5 req: MedusaRequest,6 res: MedusaResponse7) => {8 const agenticCommerceModuleService = req.scope.resolve(AGENTIC_COMMERCE_MODULE)9 const signature = await agenticCommerceModuleService.getSignature(req.body)10 res.json({ signature })11}
This API route accepts payloads in request bodies and returns signatures generated using the Agentic Commerce Module's service.
Then, start the Medusa application with the following command:
After that, send a POST request to http://localhost:9000/signature with the JSON body to create checkout sessions. For example:
1curl -X POST 'http://localhost:9000/signature' \2-H 'Content-Type: application/json' \3--data-raw '{4 "items": [5 {6 "id": "variant_01K6CQ43RA0RSWW1BXM8C63YT6",7 "quantity": 18 }9 ],10 "fulfillment_address": {11 "name": "John Smith",12 "line_one": "US",13 "city": "New York",14 "state": "NY",15 "country": "us",16 "postal_code": "12345"17 },18 "buyer": {19 "email": "johnsmith@gmail.com",20 "first_name": "John",21 "phone_number": "123"22 }23}'
Make sure to replace the variant ID with an actual variant ID from your store.
Copy the signature from the response.
Finally, send a POST request to http://localhost:9000/checkout_sessions with the same JSON body and include the Authorization and Signature headers:
1curl -X POST 'http://localhost:9000/checkout_sessions' \2-H 'Signature: {your_signature}' \3-H 'Idempotency-Key: idp_123' \4-H 'Request-Id: req_123' \5-H 'Content-Type: application/json' \6-H 'Authorization: Bearer {your_api_key}' \7--data-raw '{8 "items": [9 {10 "id": "variant_01K6CQ43RA0RSWW1BXM8C63YT6",11 "quantity": 112 }13 ],14 "fulfillment_address": {15 "name": "John Smith",16 "line_one": "US",17 "city": "New York",18 "state": "NY",19 "country": "us",20 "postal_code": "12345"21 },22 "buyer": {23 "email": "johnsmith@gmail.com",24 "first_name": "John",25 "phone_number": "123"26 }27}'
Make sure to replace:
{your_signature}with the signature you copied from the previous request.{your_api_key}with the API key you created in the Medusa Admin dashboard.- The variant ID with an actual variant ID from your store.
You'll receive in the response the checkout session based on the Agentic Commerce specifications.
Step 5: Update Checkout Session API#
Next, you'll implement the POST /checkout_sessions/{id} API to update a checkout session.
This API is called by the AI agent to update the checkout session's details, such as when the buyer changes the fulfillment address. Whenever the checkout session is updated, you must also reset the cart's payment sessions, as instructed in the Agentic Commerce specifications.
Similar to before, you'll create:
- A workflow that updates the checkout session.
- An API route that executes the workflow.
- You'll also apply a validation middleware to the API route.
a. Update Checkout Session Workflow#
First, you'll create the workflow that updates a checkout session. This workflow will be executed by the POST /checkout_sessions/{id} API route.
The workflow has the following steps:
Workflow hook
Step conditioned by when
View step details
These steps and workflows are available in Medusa out-of-the-box. So, you can implement the workflow without creating custom steps.
Create the file src/workflows/update-checkout-session.ts with the following content:
17} from "./prepare-checkout-session-data"18 19type WorkflowInput = {20 cart_id: string21 buyer?: {22 first_name: string23 email: string24 phone_number?: string25 }26 items?: {27 id: string28 quantity: number29 }[]30 fulfillment_address?: {31 name: string32 line_one: string33 line_two?: string34 city: string35 state: string36 postal_code: string37 phone_number?: string38 country: string39 }40 fulfillment_option_id?: string41}42 43export const updateCheckoutSessionWorkflow = createWorkflow(44 "update-checkout-session",45 (input: WorkflowInput) => {46 // Retrieve cart47 const { data: carts } = useQueryGraphStep({48 entity: "cart",49 fields: ["id", "customer.*", "email"],50 filters: {51 id: input.cart_id,52 },53 })54 55 // TODO retrieve or create customer56 }57)
The updateCheckoutSessionWorkflow accepts an input with the request body of the Update Checkout Session API along with the cart ID.
So far, you retrieve the cart using the useQueryGraphStep step.
Retrieve or Create Customer (Update)
Next, you'll retrieve the customer if it exists or create it if it doesn't. Replace the TODO in the workflow with the following:
1// check if customer already exists2const { data: customers } = useQueryGraphStep({3 entity: "customer",4 fields: ["id"],5 filters: {6 email: input.buyer?.email,7 },8}).config({ name: "find-customer" })9 10const createdCustomers = when({ customers }, ({ customers }) => 11 customers.length === 0 && !!input.buyer?.email12)13.then(() => {14 return createCustomersWorkflow.runAsStep({15 input: {16 customersData: [17 {18 email: input.buyer?.email,19 first_name: input.buyer?.first_name,20 phone: input.buyer?.phone_number,21 },22 ],23 },24 })25})26 27const customerId = transform({28 customers,29 createdCustomers,30}, (data) => {31 return data.customers.length > 0 ? 32 data.customers[0].id : data.createdCustomers?.[0].id33})34 35// TODO validate variants if items are provided
You first try to retrieve the customer using the useQueryGraphStep step, filtering by the buyer's email.
Then, if the customer does not exist, you create it using the createCustomersWorkflow workflow.
Finally, you create a variable with the customer ID, which is either the existing customer's ID or the newly created customer's ID.
Validate Variants if Items are Provided
Next, you'll validate that the variants in the input exist if items are provided. Replace the TODO in the workflow with the following:
1// validate items2when(input, (input) => !!input.items)3.then(() => {4 const variantIds = transform(input, (input) => input.items?.map((item) => item.id))5 return useQueryGraphStep({6 entity: "variant",7 fields: ["id"],8 filters: {9 id: variantIds,10 },11 options: {12 throwIfKeyNotFound: true,13 },14 }).config({ name: "find-variant" })15})16 17// TODO update cart
You use the when function to check if items are provided in the input. If so, you retrieve the variants with the IDs using the useQueryGraphStep step. You set the throwIfKeyNotFound option to true to make the step fail if any of the variant IDs are not found.
Update Cart
Next, you'll update the cart based on the input. Replace the TODO in the workflow with the following:
1acquireLockStep({2 key: input.cart_id,3 timeout: 2,4 ttl: 10,5})6// Prepare update data7const updateData = transform({8 input,9 carts,10 customerId,11}, (data) => {12 return {13 id: data.carts[0].id,14 email: data.input.buyer?.email || data.carts[0].email,15 customer_id: data.customerId || data.carts[0].customer?.id,16 items: data.input.items?.map((item) => ({17 variant_id: item.id,18 quantity: item.quantity,19 })),20 shipping_address: data.input.fulfillment_address ? {21 first_name: data.input.fulfillment_address.name.split(" ")[0],22 last_name: data.input.fulfillment_address.name.split(" ")[1],23 address_1: data.input.fulfillment_address.line_one,24 address_2: data.input.fulfillment_address.line_two,25 city: data.input.fulfillment_address.city,26 province: data.input.fulfillment_address.state,27 postal_code: data.input.fulfillment_address.postal_code,28 country_code: data.input.fulfillment_address.country,29 phone: data.input.fulfillment_address.phone_number,30 } : undefined,31 }32})33 34updateCartWorkflow.runAsStep({35 input: updateData,36})37 38// TODO add shipping method if fulfillment option ID is provided
First, you acquire a lock on the cart to avoid concurrent modifications.
Then, you use the transform function to prepare the input for the updateCartWorkflow workflow. You map the input properties to the cart properties.
After that, you update the cart using the updateCartWorkflow. This workflow will also clear the cart's payment sessions.
Add Shipping Method if Fulfillment Option ID is Provided
Finally, you'll add the shipping method to the cart if a fulfillment option ID is provided, and prepare and return the checkout session response. Replace the TODO in the workflow with the following:
1// try to update shipping method2when(input, (input) => !!input.fulfillment_option_id)3.then(() => {4 addShippingMethodToCartWorkflow.runAsStep({5 input: {6 cart_id: updateData.id,7 options: [{8 id: input.fulfillment_option_id!,9 }],10 },11 })12})13 14const responseData = prepareCheckoutSessionDataWorkflow.runAsStep({15 input: {16 cart_id: updateData.id,17 buyer: input.buyer,18 fulfillment_address: input.fulfillment_address,19 },20})21 22releaseLockStep({23 key: input.cart_id,24})25 26return new WorkflowResponse(responseData)
You use the when function to check if a fulfillment option ID is provided in the input. If it is, you add it to the cart using the addShippingMethodToCartWorkflow workflow.
Then, you prepare the checkout session response using the prepareCheckoutSessionDataWorkflow workflow you created earlier.
Finally, you release the lock on the cart and return the prepared response as the workflow's response.
b. Update Checkout Session API Route#
Next, you'll create an API route that executes the updateCheckoutSessionWorkflow.
Create the file src/api/checkout_sessions/[id]/route.ts with the following content:
6import { refreshPaymentCollectionForCartWorkflow } from "@medusajs/medusa/core-flows"7 8export const PostUpdateSessionSchema = z.object({9 buyer: z.object({10 first_name: z.string(),11 email: z.string(),12 phone_number: z.string().optional(),13 }).optional(),14 items: z.array(z.object({15 id: z.string(),16 quantity: z.number(),17 })).optional(),18 fulfillment_address: z.object({19 name: z.string(),20 line_one: z.string(),21 line_two: z.string().optional(),22 city: z.string(),23 state: z.string(),24 country: z.string(),25 postal_code: z.string(),26 phone_number: z.string().optional(),27 }).optional(),28 fulfillment_option_id: z.string().optional(),29})30 31export const POST = async (32 req: MedusaRequest<33 z.infer<typeof PostUpdateSessionSchema>34 >,35 res: MedusaResponse36) => {37 const responseHeaders = {38 "Idempotency-Key": req.headers["idempotency-key"] as string,39 "Request-Id": req.headers["request-id"] as string,40 }41 try {42 const { result } = await updateCheckoutSessionWorkflow(req.scope)43 .run({44 input: {45 cart_id: req.params.id,46 ...req.validatedBody,47 },48 context: {49 idempotencyKey: req.headers["idempotency-key"] as string,50 },51 })52 53 res.set(responseHeaders).json(result)54 } catch (error) {55 const medusaError = error as MedusaError56 57 await refreshPaymentCollectionForCartWorkflow(req.scope).run({58 input: {59 cart_id: req.params.id,60 },61 })62 63 const { result } = await prepareCheckoutSessionDataWorkflow(req.scope)64 .run({65 input: {66 cart_id: req.params.id,67 ...req.validatedBody,68 messages: [69 {70 type: "error",71 code: medusaError.type === MedusaError.Types.PAYMENT_AUTHORIZATION_ERROR ? 72 "payment_declined" : "invalid",73 content_type: "plain",74 content: medusaError.message,75 },76 ],77 },78 })79 80 res.set(responseHeaders).json(result)81 }82}
You first define a validation schema with Zod for the request body. The schema matches the Agentic Commerce request specifications.
Then, you export a POST route handler function, which exposes a POST API route at /checkout_sessions/{id}.
In the route handler, you execute the updateCheckoutSessionWorkflow, passing the cart ID from the URL parameters and the validated request body as input. You return the workflow's response as the API response.
If an error occurs, you refresh the cart's payment sessions using the refreshPaymentCollectionForCartWorkflow, and prepare the checkout session response with an error message using the prepareCheckoutSessionDataWorkflow workflow. You return this response.
c. Apply Validation Middleware#
Finally, you'll apply the validation middleware to the POST /checkout_sessions/{id} API route.
In src/api/middlewares.ts, add the following import at the top of the file:
Then, add a new route configuration in defineMiddlewares:
You apply the validateAndTransformBody middleware to the POST /checkout_sessions/{id} route to ensure the request body includes the required fields.
Use the Update Checkout Session API#
To use the POST /checkout_sessions/:id API, you need to:
- Apply to ChatGPT's Instant Checkout and access a signature key.
- Create an API key in the Secret API Key Settings of the Medusa Admin dashboard.
- Setup the API key in the Instant Checkout settings.
ChatGPT will then use it to update a checkout session.
Test the Update Checkout Session API Locally#
To test out the POST /checkout_sessions/:id API locally, you need to use the same signature generation API route you created earlier.
First, assuming you already created a checkout session and have the cart ID, send a POST request to http://localhost:9000/signature with the JSON body to update the checkout session. For example:
Make sure to replace the fulfillment option ID with an actual shipping option ID from your store.
Then, send a POST request to http://localhost:9000/checkout_sessions/{cart_id} with the same JSON body, and include the Authorization and Signature headers:
1curl -X POST 'http://localhost:9000/checkout_sessions/{cart_id}' \2-H 'Signature: {signature}' \3-H 'Idempotency-Key: idp_123' \4-H 'Request-Id: req_123' \5-H 'Content-Type: application/json' \6-H 'Authorization: Bearer {api_key}' \7--data '{8 "fulfillment_option_id": "so_01K6FCGVFMNNC5H43SB9NNNAJ3"9}'
Make sure to replace:
{cart_id}with the cart ID of the checkout session you created earlier.{signature}with the signature you copied from the previous request.{api_key}with the API key you created in the Medusa Admin dashboard.- The fulfillment option ID with an actual shipping option ID from your store.
You'll receive in the response the updated checkout session based on the Agentic Commerce specifications.
Step 6: Get Checkout Session API#
Next, you'll implement the GET /checkout_sessions/{id} API to retrieve a checkout session. This API is called by the AI agent to get the current state of the checkout session.
This API route will use the prepareCheckoutSessionDataWorkflow workflow you created earlier to prepare the checkout session response.
To create the API route, add the following function to src/api/checkout_sessions/[id]/route.ts:
1export const GET = async (2 req: MedusaRequest,3 res: MedusaResponse4) => {5 const responseHeaders = {6 "Idempotency-Key": req.headers["idempotency-key"] as string,7 "Request-Id": req.headers["request-id"] as string,8 }9 try {10 const { result } = await prepareCheckoutSessionDataWorkflow(req.scope)11 .run({12 input: {13 cart_id: req.params.id,14 },15 context: {16 idempotencyKey: req.headers["idempotency-key"] as string,17 },18 })19 20 res.set(responseHeaders).status(200).json(result)21 } catch (error) {22 const medusaError = error as MedusaError23 const statusCode = medusaError.type === MedusaError.Types.NOT_FOUND ? 404 : 50024 res.set(responseHeaders).status(statusCode).json({25 type: "invalid_request",26 code: "request_not_idempotent",27 message: statusCode === 404 ? "Checkout session not found" : "Internal server error",28 })29 }30}
You export a GET route handler function, which exposes a GET API route at /checkout_sessions/{id}.
In the route handler, you execute the prepareCheckoutSessionDataWorkflow, passing the cart ID from the URL parameters as input. You return the workflow's response as the API response.
Use the Get Checkout Session API#
To use the GET /checkout_sessions/:id API, you need to:
- Apply to ChatGPT's Instant Checkout and access a signature key.
- Create an API key in the Secret API Key Settings of the Medusa Admin dashboard.
- Setup the API key in the Instant Checkout settings.
ChatGPT will then use it to get a checkout session.
Test the Get Checkout Session API Locally#
To test out the GET /checkout_sessions/:id API locally, send a GET request to /checkout_sessions/{cart_id}:
Make sure to replace:
{cart_id}with the cart ID of the checkout session you created earlier.{api_key}with the API key you created in the Medusa Admin dashboard.
You'll receive in the response the checkout session based on the Agentic Commerce specifications.
Step 7: Complete Checkout Session API#
Next, you'll implement the POST /checkout_sessions/{id}/complete API to complete a checkout session.
The AI agent calls this API route to finalize the checkout process and create an order. This API route will complete the cart, process the payment, and return the final checkout session details. If an error occurs, it resets the cart's payment sessions and returns the checkout session with an error message.
To implement this API route, you'll create:
- A workflow that completes the checkout session.
- An API route that executes the workflow.
- You'll also apply a validation middleware to the API route.
You'll also set up the Stripe Payment Module Provider. ChatGPT currently supports only Stripe as a payment provider.
a. Complete Checkout Session Workflow#
The workflow that completes a checkout session has the following steps:
Workflow hook
Step conditioned by when
View step details
These steps and workflows are available in Medusa out-of-the-box. So, you can implement the workflow without creating custom steps.
To create the workflow, create the file src/workflows/complete-checkout-session.ts with the following content:
20} from "./prepare-checkout-session-data"21 22type WorkflowInput = {23 cart_id: string24 buyer?: {25 first_name: string26 email: string27 phone_number?: string28 }29 payment_data: {30 token: string31 provider: string32 billing_address?: {33 name: string34 line_one: string35 line_two?: string36 city: string37 state: string38 postal_code: string39 country: string40 phone_number?: string41 }42 }43}44 45export const completeCheckoutSessionWorkflow = createWorkflow(46 "complete-checkout-session",47 (input: WorkflowInput) => {48 // Retrieve cart details49 const { data: carts } = useQueryGraphStep({50 entity: "cart",51 fields: [52 "id", 53 "region.*", 54 "region.payment_providers.*", 55 "shipping_address.*",56 ],57 filters: {58 id: input.cart_id,59 },60 options: {61 throwIfKeyNotFound: true,62 },63 })64 acquireLockStep({65 key: input.cart_id,66 timeout: 2,67 ttl: 10,68 })69 70 // TODO update cart with billing address if provided71 }72)
The completeCheckoutSessionWorkflow accepts an input with the properties received from the AI agent to complete the checkout session.
So far, you retrieve the cart using the useQueryGraphStep, and you acquire a lock on the cart using the acquireLockStep to prevent concurrent modifications.
Update Cart with Billing Address
Next, you'll update the cart with the billing address if it's provided. Replace the TODO in the workflow with the following:
1when(input, (input) => !!input.payment_data.billing_address)2.then(() => {3 const updateData = transform({4 input,5 carts,6 }, (data) => {7 return {8 id: data.carts[0].id,9 billing_address: {10 first_name: data.input.payment_data.billing_address!.name.split(" ")[0],11 last_name: data.input.payment_data.billing_address!.name.split(" ")[1],12 address_1: data.input.payment_data.billing_address!.line_one,13 address_2: data.input.payment_data.billing_address!.line_two,14 city: data.input.payment_data.billing_address!.city,15 province: data.input.payment_data.billing_address!.state,16 postal_code: data.input.payment_data.billing_address!.postal_code,17 country_code: data.input.payment_data.billing_address!.country,18 phone: data.input.payment_data.billing_address!.phone_number,19 },20 }21 })22 return updateCartWorkflow.runAsStep({23 input: updateData,24 })25})26 27// TODO complete cart if payment provider is valid
You use the when function to check if a billing address is provided in the input. If it is, you prepare the input for the updateCartWorkflow workflow using the transform function, and then you update the cart using the updateCartWorkflow workflow.
Complete Cart if Payment Provider is Valid
Next, you'll complete the cart if the payment provider is valid. Replace the TODO in the workflow with the following:
1const preparationInput = transform({2 carts,3 input,4}, (data) => {5 return {6 cart_id: data.carts[0].id,7 buyer: data.input.buyer,8 fulfillment_address: data.carts[0].shipping_address ? {9 name: data.carts[0].shipping_address.first_name + " " + data.carts[0].shipping_address.last_name,10 line_one: data.carts[0].shipping_address.address_1 || "",11 line_two: data.carts[0].shipping_address.address_2 || "",12 city: data.carts[0].shipping_address.city || "",13 state: data.carts[0].shipping_address.province || "",14 postal_code: data.carts[0].shipping_address.postal_code || "",15 country: data.carts[0].shipping_address.country_code || "",16 phone_number: data.carts[0].shipping_address.phone || "",17 } : undefined,18 }19})20 21const paymentProviderId = transform({22 input,23}, (data) => {24 switch (data.input.payment_data.provider) {25 case "stripe":26 return "pp_stripe_stripe"27 default:28 return data.input.payment_data.provider29 }30})31 32const completeCartResponse = when({33 carts,34 paymentProviderId, 35}, (data) => {36 // @ts-ignore37 return !!data.carts[0].region?.payment_providers?.find((provider) => provider?.id === data.paymentProviderId)38})39.then(() => {40 const paymentCollection = createPaymentCollectionForCartWorkflow.runAsStep({41 input: {42 cart_id: carts[0].id,43 },44 })45 46 createPaymentSessionsWorkflow.runAsStep({47 input: {48 payment_collection_id: paymentCollection.id,49 provider_id: paymentProviderId,50 data: {51 shared_payment_token: input.payment_data.token,52 },53 },54 })55 56 completeCartWorkflow.runAsStep({57 input: {58 id: carts[0].id,59 },60 })61 62 return prepareCheckoutSessionDataWorkflow.runAsStep({63 input: preparationInput,64 })65})66 67// TODO handle invalid payment provider
You use transform to prepare the input for the prepareCheckoutSessionDataWorkflow workflow and to map the payment provider from the input to the payment provider ID used in your Medusa store.
Then, you use the when function to check if the payment provider is valid for the cart's region. If so, you:
- Create a payment collection for the cart using the createPaymentCollectionForCartWorkflow.
- Create payment sessions in the payment collection using the createPaymentSessionsWorkflow.
- Complete the cart using the completeCartWorkflow.
Finally, you prepare the checkout session response using the prepareCheckoutSessionDataWorkflow.
Handle Invalid Payment Provider
Next, you'll handle the case where the payment provider is invalid. You'll prepare an error response to return to the AI agent.
Replace the TODO in the workflow with the following:
1const invalidPaymentResponse = when({2 carts,3 paymentProviderId,4}, (data) => {5 return !data.carts[0].region?.payment_providers?.find((provider) => provider?.id === data.paymentProviderId)6})7.then(() => {8 refreshPaymentCollectionForCartWorkflow.runAsStep({9 input: {10 cart_id: carts[0].id,11 },12 })13 const prepareDataWithMessages = transform({14 prepareData: preparationInput,15 }, (data) => {16 return {17 ...data.prepareData,18 messages: [19 {20 type: "error",21 code: "invalid",22 content_type: "plain",23 content: "Invalid payment provider",24 },25 ],26 } as PrepareCheckoutSessionDataWorkflowInput27 })28 return prepareCheckoutSessionDataWorkflow.runAsStep({29 input: prepareDataWithMessages,30 }).config({ name: "prepare-checkout-session-data-with-messages" })31})32 33// Return response
You use the when function to check if the payment provider is invalid for the cart's region.
If so, you refresh the cart's payment sessions using the refreshPaymentCollectionForCartWorkflow, then you prepare the input for the prepareCheckoutSessionDataWorkflow workflow. You add an error message indicating that the payment provider is invalid.
Return Response
Finally, you'll return the appropriate response based on whether the cart was completed or if there was an error. Replace the TODO in the workflow with the following:
You use transform to pick either the response from completing the cart or the error response for an invalid payment provider.
Then, you release the lock on the cart using the releaseLockStep step, and return the response as the workflow's response.
b. Complete Checkout Session API Route#
Next, you'll create an API route at POST /checkout_sessions/{id}/complete that executes the completeCheckoutSessionWorkflow.
Create the file src/api/checkout_sessions/[id]/complete/route.ts with the following content:
6import { prepareCheckoutSessionDataWorkflow } from "../../../../workflows/prepare-checkout-session-data"7 8export const PostCompleteSessionSchema = z.object({9 buyer: z.object({10 first_name: z.string(),11 email: z.string(),12 phone_number: z.string().optional(),13 }).optional(),14 payment_data: z.object({15 token: z.string(),16 provider: z.string(),17 billing_address: z.object({18 name: z.string(),19 line_one: z.string(),20 line_two: z.string().optional(),21 city: z.string(),22 state: z.string(),23 postal_code: z.string(),24 country: z.string(),25 phone_number: z.string().optional(),26 }).optional(),27 }),28})29 30export const POST = async (31 req: MedusaRequest<32 z.infer<typeof PostCompleteSessionSchema>33 >,34 res: MedusaResponse35) => {36 const responseHeaders = {37 "Idempotency-Key": req.headers["idempotency-key"] as string,38 "Request-Id": req.headers["request-id"] as string,39 }40 try {41 const { result } = await completeCheckoutSessionWorkflow(req.scope)42 .run({43 input: {44 cart_id: req.params.id,45 ...req.validatedBody,46 },47 context: {48 idempotencyKey: req.headers["idempotency-key"] as string,49 },50 })51 52 res.set(responseHeaders).json(result)53 } catch (error) {54 const medusaError = error as MedusaError55 56 await refreshPaymentCollectionForCartWorkflow(req.scope).run({57 input: {58 cart_id: req.params.id,59 },60 }) 61 const { result } = await prepareCheckoutSessionDataWorkflow(req.scope)62 .run({63 input: {64 cart_id: req.params.id,65 ...req.validatedBody,66 messages: [67 {68 type: "error",69 code: medusaError.type === MedusaError.Types.PAYMENT_AUTHORIZATION_ERROR ? 70 "payment_declined" : "invalid",71 content_type: "plain",72 content: medusaError.message,73 },74 ],75 },76 })77 78 res.set(responseHeaders).json(result)79 }80}
You first define a validation schema with Zod for the request body. The schema matches the Agentic Commerce request specifications.
Then, you export a POST route handler function, which exposes a POST API route at /checkout_sessions/{id}/complete.
In the route handler, you execute the completeCheckoutSessionWorkflow, passing the cart ID from the URL parameters and the validated request body as input. You return the workflow's response as the API response.
If an error occurs, you refresh the cart's payment sessions using the refreshPaymentCollectionForCartWorkflow, and prepare the checkout session response with an error message using the prepareCheckoutSessionDataWorkflow. You return this response.
c. Apply Validation Middleware#
Finally, you'll apply the validation middleware to the POST /checkout_sessions/{id}/complete API route.
In src/api/middlewares.ts, add the following import at the top of the file:
Then, add a new route configuration in defineMiddlewares:
You apply the validateAndTransformBody middleware to the POST /checkout_sessions/{id}/complete route to ensure the request body includes the required fields.
d. Setup Stripe Payment Module Provider#
To support payments with Stripe, you'll need to set up the Stripe Payment Module Provider in your Medusa store.
In medusa-config.ts, add a new entry to the modules array:
1module.exports = defineConfig({2 // ...3 modules: [4 // ...5 {6 resolve: "@medusajs/medusa/payment",7 options: {8 providers: [9 {10 resolve: "@medusajs/medusa/payment-stripe",11 id: "stripe",12 options: {13 apiKey: process.env.STRIPE_API_KEY,14 // other options...15 },16 },17 ],18 },19 },20 ],21})
This will add Stripe as a payment provider in your Medusa store.
Make sure to set the STRIPE_API_KEY environment variable with your Stripe secret key, which you can retrieve from the Stripe Dashboard:
Finally, you must enable Stripe as a payment provider in the US region. Learn how to do that in the Regions user guide.
Use the Complete Checkout Session API#
To use the POST /checkout_sessions/:id/complete API, you need to:
- Apply to ChatGPT's Instant Checkout and access a signature key.
- Create an API key in the Secret API Key Settings of the Medusa Admin dashboard.
- Setup the API key in the Instant Checkout settings.
ChatGPT will then use it to complete a checkout session.
Test the Complete Checkout Session API Locally#
To test out the POST /checkout_sessions/:id/complete API locally, you need to generate a shared payment token with Stripe.
Then, send a POST request to http://localhost:9000/signature with the JSON body to complete the checkout session. For example:
Make sure to replace {token} with the shared payment token you generated with Stripe.
Then, send a POST request to http://localhost:9000/checkout_sessions/{cart_id}/complete with the same JSON body, and include the Authorization and Signature headers:
1curl -X POST 'http://localhost:9000/checkout_sessions/{cart_id}/complete' \2-H 'Signature: {signature}' \3-H 'Idempotency-Key: idp_123' \4-H 'Request-Id: req_123' \5-H 'Content-Type: application/json' \6-H 'Authorization: Bearer {api_key}' \7--data-raw '{8 "buyer": {9 "first_name": "John",10 "email": "johnsmith@gmail.com",11 "phone_number": "123"12 },13 "payment_data": {14 "provider": "stripe",15 "token": "{token}"16 }17}'
Make sure to replace:
{cart_id}with the cart ID of the checkout session you created earlier.{signature}with the signature you copied from the previous request.{token}with the shared payment token you generated with Stripe.{api_key}with the API key you created in the Medusa Admin dashboard.
You'll receive in the response the completed checkout session based on the Agentic Commerce specifications.
Step 8: Cancel Checkout Session API#
The last Checkout Session API you'll implement is the POST /checkout_sessions/{id}/cancel API to cancel a checkout session.
The AI agent calls this API route to cancel the checkout process. This API route will cancel any authorized payment sessions associated with the cart, update the cart status to canceled, and return the updated checkout session details.
To implement this API route, you'll create:
- A workflow that cancels the checkout session.
- An API route that executes the workflow.
a. Cancel Checkout Session Workflow#
The workflow that cancels a checkout session has the following steps:
Workflow hook
Step conditioned by when
View step details
You only need to implement the validateCartCancelationStep and cancelPaymentSessionsStep steps. The other steps and workflows are available in Medusa out-of-the-box.
validateCartCancelationStep
The validateCartCancelationStep step throws an error if the cart cannot be canceled.
To create the step, create the file src/workflows/steps/validate-cart-cancelation.ts with the following content:
1import { CartDTO, OrderDTO, PaymentCollectionDTO } from "@medusajs/framework/types"2import { MedusaError } from "@medusajs/framework/utils"3import { createStep } from "@medusajs/framework/workflows-sdk"4 5export type ValidateCartCancelationStepInput = {6 cart: CartDTO & {7 payment_collection?: PaymentCollectionDTO8 order?: OrderDTO9 }10}11 12export const validateCartCancelationStep = createStep(13 "validate-cart-cancelation",14 async ({ cart }: ValidateCartCancelationStepInput) => {15 if (cart.metadata?.checkout_session_canceled) {16 throw new MedusaError(17 MedusaError.Types.INVALID_DATA,18 "Cart is already canceled"19 )20 }21 if (!!cart.order) {22 throw new MedusaError(23 MedusaError.Types.INVALID_DATA,24 "Cart is already associated with an order"25 )26 }27 const invalidPaymentSessions = cart.payment_collection?.payment_sessions28 ?.some((session) => session.status === "authorized" || session.status === "canceled")29 30 if (!!cart.completed_at || !!invalidPaymentSessions) {31 throw new MedusaError(32 MedusaError.Types.INVALID_DATA,33 "Cart cannot be canceled"34 )35 }36 }37)
The validateCartCancelationStep accepts a cart as input.
In the step, you throw an error if:
- The cart has a
checkout_session_canceledmetadata field set totrue, indicating it was already canceled. - The cart is already associated with an order.
- The cart has a
completed_atdate, indicating it was already completed. - The cart has any payment sessions with a status of
authorizedorcanceled.
cancelPaymentSessionsStep
The cancelPaymentSessionsStep step cancels payment sessions associated with the cart.
To create the step, create the file src/workflows/steps/cancel-payment-sessions.ts with the following content:
1import { promiseAll } from "@medusajs/framework/utils"2import { createStep, StepResponse } from "@medusajs/framework/workflows-sdk"3 4type StepInput = {5 payment_session_ids: string[]6}7 8export const cancelPaymentSessionsStep = createStep(9 "cancel-payment-session",10 async ({ payment_session_ids }: StepInput, { container }) => {11 const paymentModuleService = container.resolve("payment")12 13 const paymentSessions = await paymentModuleService.listPaymentSessions({14 id: payment_session_ids,15 })16 17 const updatedPaymentSessions = await promiseAll(18 paymentSessions.map((session) => {19 return paymentModuleService.updatePaymentSession({20 id: session.id,21 status: "canceled",22 currency_code: session.currency_code,23 amount: session.amount,24 data: session.data,25 })26 })27 )28 29 return new StepResponse(updatedPaymentSessions, paymentSessions)30 },31 async (paymentSessions, { container }) => {32 if (!paymentSessions) {33 return34 }35 const paymentModuleService = container.resolve("payment")36 37 await promiseAll(38 paymentSessions.map((session) => {39 return paymentModuleService.updatePaymentSession({40 id: session.id,41 status: session.status,42 currency_code: session.currency_code,43 amount: session.amount,44 data: session.data,45 })46 })47 )48 }49)
The cancelPaymentSessionsStep accepts an array of payment session IDs as input.
In the step, you retrieve the payment sessions using the listPaymentSessions method of the Payment Module's service. Then, you update their status to canceled using the updatePaymentSession method.
You also pass a third argument to the createStep function, which is the compensation function. This function is executed if the workflow execution fails, allowing you to revert any changes made by the step. In this case, you revert the payment sessions to their original status.
Cancel Checkout Session Workflow
You can now implement the cancelCheckoutSessionWorkflow.
Create the file src/workflows/cancel-checkout-session.ts with the following content:
5import { prepareCheckoutSessionDataWorkflow } from "./prepare-checkout-session-data"6 7type WorkflowInput = {8 cart_id: string9}10 11export const cancelCheckoutSessionWorkflow = createWorkflow(12 "cancel-checkout-session",13 (input: WorkflowInput) => {14 const { data: carts } = useQueryGraphStep({15 entity: "cart",16 fields: [17 "id", 18 "payment_collection.*", 19 "payment_collection.payment_sessions.*",20 "order.id",21 ],22 filters: {23 id: input.cart_id,24 },25 options: {26 throwIfKeyNotFound: true,27 },28 })29 30 validateCartCancelationStep({31 cart: carts[0],32 } as unknown as ValidateCartCancelationStepInput)33 34 acquireLockStep({35 key: input.cart_id,36 timeout: 2,37 ttl: 10,38 })39 40 // TODO cancel payment sessions if any41 }42)
The cancelCheckoutSessionWorkflow accepts an input with the cart ID of the checkout session to cancel.
So far, you:
- Retrieve the cart using the
useQueryGraphStepstep. - Validate that the cart can be canceled using the
validateCartCancelationStep. - Acquire a lock on the cart using the
acquireLockStepto prevent concurrent modifications.
Next, you'll cancel the payment sessions if there are any. Replace the TODO in the workflow with the following:
1when({2 carts,3}, (data) => !!data.carts[0].payment_collection?.payment_sessions?.length)4.then(() => {5 const paymentSessionIds = transform({6 carts,7 }, (data) => {8 return data.carts[0].payment_collection?.payment_sessions?.map((session) => session!.id)9 })10 cancelPaymentSessionsStep({11 payment_session_ids: paymentSessionIds,12 })13})14 15updateCartWorkflow.runAsStep({16 input: {17 id: carts[0].id,18 metadata: {19 checkout_session_canceled: true,20 },21 },22})23 24// TODO prepare and return response
You use the when function to check if the cart has any payment sessions. If so, you prepare an array with the payment session IDs using the transform function and then you cancel the payment sessions using the cancelPaymentSessionsStep.
You also update the cart using the updateCartWorkflow workflow to add a checkout_session_canceled metadata field to the cart. This is useful to detect canceled checkout sessions in the future.
Finally, you'll prepare the checkout session response, release the lock, and return the response. Replace the TODO in the workflow with the following:
You prepare the checkout session response using the prepareCheckoutSessionDataWorkflow workflow, then you release the lock on the cart using the releaseLockStep. Finally, you return the response.
b. Cancel Checkout Session API Route#
Next, you'll create a POST API route at /checkout_sessions/{id}/cancel that executes the cancelCheckoutSessionWorkflow.
Create the file src/api/checkout_sessions/[id]/cancel/route.ts with the following content:
1import { MedusaRequest, MedusaResponse } from "@medusajs/framework/http"2import { cancelCheckoutSessionWorkflow } from "../../../../workflows/cancel-checkout-session"3import { MedusaError } from "@medusajs/framework/utils"4 5export const POST = async (6 req: MedusaRequest,7 res: MedusaResponse8) => {9 const responseHeaders = {10 "Idempotency-Key": req.headers["idempotency-key"] as string,11 "Request-Id": req.headers["request-id"] as string,12 }13 try {14 const { result } = await cancelCheckoutSessionWorkflow(req.scope)15 .run({16 input: {17 cart_id: req.params.id,18 },19 context: {20 idempotencyKey: req.headers["idempotency-key"] as string,21 },22 })23 24 res.set(responseHeaders).json(result)25 } catch (error) {26 const medusaError = error as MedusaError27 res.set(responseHeaders).status(405).json({28 messages: [29 {30 type: "error",31 code: "invalid",32 content_type: "plain",33 content: medusaError.message,34 },35 ],36 })37 }38}
You export a POST route handler function, which exposes a POST API route at /checkout_sessions/{id}/cancel.
In the route handler, you execute the cancelCheckoutSessionWorkflow, passing the cart ID from the URL parameters as input. You return the workflow's response as the API response.
Use the Cancel Checkout Session API#
To use the POST /checkout_sessions/:id/cancel API, you need to:
- Apply to ChatGPT's Instant Checkout and access a signature key.
- Create an API key in the Secret API Key Settings of the Medusa Admin dashboard.
- Setup the API key in the Instant Checkout settings.
ChatGPT will then use it to cancel a checkout session.
Test the Cancel Checkout Session API Locally#
To test out the POST /checkout_sessions/:id/cancel API locally, send a POST request to /checkout_sessions/{cart_id}/cancel:
Make sure to replace:
{cart_id}with the cart ID of the checkout session you created earlier.{api_key}with the API key you created in the Medusa Admin dashboard.
You'll receive in the response the canceled checkout session based on the Agentic Commerce specifications.
Step 9: Send Webhook Events to AI Agent#
In the last step, you'll send webhook events to AI agents when orders are placed or updated. This informs AI agents about order updates, as specified in Agentic Commerce specifications.
To send webhook events to AI agents on order updates, you'll create a subscriber. A subscriber is an asynchronous function that listens to events to perform tasks.
In this case, you'll create a subscriber that listens to order.placed and order.updated events to send webhook events to AI agents.
Create the file src/subscribers/order-webhooks.ts with the following content:
1import type {2 SubscriberArgs,3 SubscriberConfig,4} from "@medusajs/framework"5import { AGENTIC_COMMERCE_MODULE } from "../modules/agentic-commerce"6import { AgenticCommerceWebhookEvent } from "../modules/agentic-commerce/service"7 8export default async function orderWebhookHandler({9 event: { data, name },10 container,11}: SubscriberArgs<{ id: string }>) {12 const orderId = data.id13 const query = container.resolve("query")14 const agenticCommerceModuleService = container.resolve(AGENTIC_COMMERCE_MODULE)15 const configModule = container.resolve("configModule")16 const storefrontUrl = configModule.admin.storefrontUrl || process.env.STOREFRONT_URL17 18 // retrieve order19 const { data: [order] } = await query.graph({20 entity: "order",21 fields: [22 "id",23 "cart.id",24 "cart.metadata",25 "status",26 "fulfillments.*",27 "transactions.*",28 ],29 filters: {30 id: orderId,31 },32 })33 34 // only send webhook if order is associated with a checkout session35 if (!order || !order.cart?.metadata?.is_checkout_session) {36 return37 }38 39 // prepare webhook event40 const webhookEvent: AgenticCommerceWebhookEvent = {41 type: name === "order.placed" ? "order.created" : "order.updated",42 data: {43 type: "order",44 checkout_session_id: order.cart.id,45 permalink_url: `${storefrontUrl}/orders/${order.id}`,46 status: "confirmed",47 refunds: order.transactions?.filter(48 (transaction) => transaction?.reference === "refund"49 ).map((transaction) => ({50 type: "original_payment",51 amount: transaction!.amount * -1,52 })) || [],53 },54 }55 56 // set status based on order, fulfillments and transactions57 if (order.status === "canceled") {58 webhookEvent.data.status = "canceled"59 } else {60 const allFulfillmentsShipped = order.fulfillments?.every((fulfillment) => !!fulfillment?.shipped_at)61 const allFulfillmentsDelivered = order.fulfillments?.every((fulfillment) => !!fulfillment?.delivered_at)62 if (allFulfillmentsShipped) {63 webhookEvent.data.status = "shipping"64 } else if (allFulfillmentsDelivered) {65 webhookEvent.data.status = "fulfilled"66 }67 }68 69 // send webhook event70 await agenticCommerceModuleService.sendWebhookEvent(webhookEvent)71}72 73export const config: SubscriberConfig = {74 event: ["order.placed", "order.updated"],75}
A subscriber file must export:
- An asynchronous function, which is the subscriber that executes when events are emitted.
- A configuration object that holds names of events the subscriber listens to, which are
order.placedandorder.updatedin this case.
The subscriber function receives an object as a parameter that has a container property, which is the Medusa container.
In the subscriber function, you:
- Retrieve orders using Query. You filter by order IDs received in event data.
- If orders don't exist or if order carts don't have the
is_checkout_sessionmetadata field, you return early since orders are not associated with checkout sessions. - Prepare webhook event payloads based on order data, following Agentic Commerce webhook specifications.
- Send webhook events to AI agents using the
sendWebhookEventmethod of the Agentic Commerce Module's service.
Use Order Webhook Events in ChatGPT#
To use order webhook events in ChatGPT:
- Apply to ChatGPT's Instant Checkout and access a signature key.
- Set up webhook URLs in Instant Checkout settings and update
sendWebhookEventto use webhook URLs from the settings.
ChatGPT will then receive webhook events when orders are placed or updated.
Test Order Webhook Events Locally#
To test order webhook events locally and ensure they're being sent correctly:
- Start the Medusa server.
- Create a checkout session.
- Complete the checkout session.
- Check the logs of your Medusa server to see that
order.placedevents were emitted and webhook events were sent to AI agents.
Next Steps#
You've now built Agentic Commerce integration in your Medusa store. You can use it once you apply to ChatGPT's Instant Checkout and set up the integration in Instant Checkout settings.
If you're new to Medusa, check out the main documentation, where you'll get more in-depth understanding of all concepts used in this guide and more.
To learn more about commerce features that Medusa provides, check out Medusa's Commerce Modules.
Troubleshooting#
If you encounter issues during development, check out the troubleshooting guides.
Getting Help#
If you encounter issues not covered in troubleshooting guides:
- Visit the Medusa GitHub repository to report issues or ask questions.
- Join the Medusa Discord community for real-time support from community members.