Implement Personalized Products in Medusa
In this tutorial, you will learn how to implement personalized products in Medusa.
When you install a Medusa application, you get a fully-fledged commerce platform with a Framework for customization. You can benefit from existing features and extend them to implement your business requirements.
Personalized products allow customers to enter custom values for product attributes, such as text or images, before adding them to the cart. This is useful for businesses that offer customizable products, such as furniture, clothing, or gifts.
Summary#
By following this tutorial, you will learn how to:
- Install and set up a Medusa application.
- Store personalized product data.
- Calculate custom pricing based on personalized attributes.
- Validate personalized product data before adding to the cart.
- Add personalized products to the cart.
- Extend the Medusa Admin dashboard to show personalized product data in an order.
You can follow this tutorial whether you're new to Medusa or an advanced Medusa developer.
Step 1: Install a Medusa Application#
Start by installing the Medusa application on your machine with the following command:
You'll first be asked for the project's name. Then, when asked whether you want to install the Next.js Starter Storefront, choose Yes.
the installation process will start, which will install the Medusa application as a monorepository in a directory with your project's name. The backend is installed in the apps/backend directory, and the Next.js Starter Storefront is installed in the apps/storefront directory.
Once the installation finishes successfully, the Medusa Admin dashboard will open with a form to create a new user. Enter the user's credentials and submit the form. Afterward, you can log in with the new user and explore the dashboard.
apps/backend directory of your Medusa project.Step 2: Create a Personalized Product#
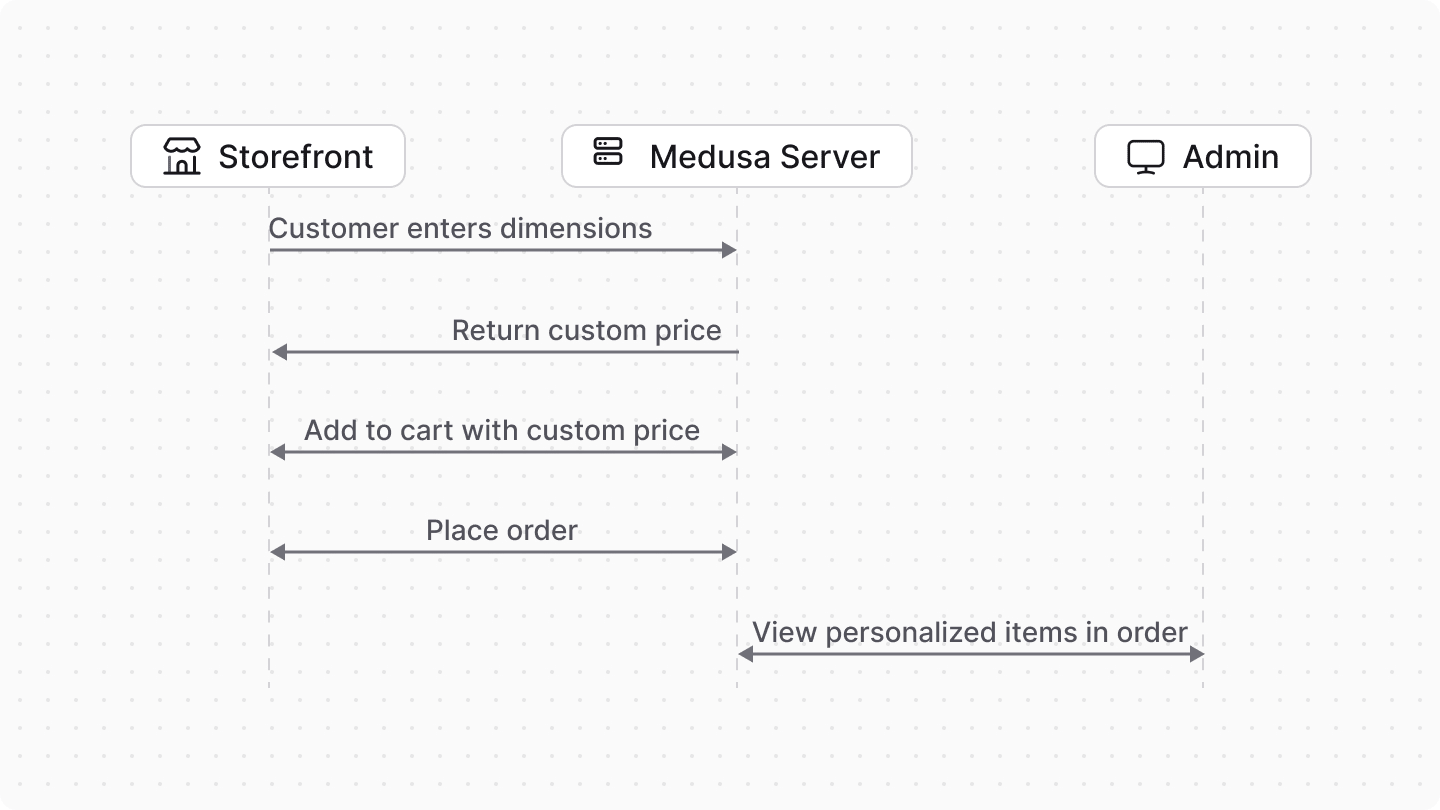
In this tutorial, you'll use the example of selling fabric of custom height and width. The customer can enter the height and width of the fabric they want to buy, and the price will be calculated based on these values.
When the customer adds the product variant to the cart, you'll store the personalized data in the line item's metadata property. Note that the same product variant added with different metadata to the cart is treated as a separate line item.
When the customer places the order, the line items' metadata property are copied to the order's line items, allowing you to access the personalized data later.
So, to create a personalized product, you can just create a regular product using the Medusa Admin.
Differentiate Personalized Products#
If you want to support both personalized and non-personalized products, you can set an is_personalized flag in the personalized product's metadata property to differentiate them from regular products.
To do that from the Medusa Admin dashboard:
- Go to Products from the sidebar and click on the product you want to edit.
- Click on the icon in the "Metadata" section.
- In the side window, enter
is_personalizedas the key andtrueas the value. - Once you're done, click on the "Save" button.

The rest of this tutorial will always check for this is_personalized flag to determine whether the product is personalized or not.
Step 3: Get Personalization Price#
When the customer enters the fabric's height and width, you'll calculate a custom price based on the entered dimensions and the product variant's price. You'll show that price to the customer and, later, use it when adding the product to the cart.
In this step, you'll implement the logic to calculate the custom price, then expose that logic to client applications. To do that, you will:
- Create a workflow that calculates the price based on the height, width, and product variant's price.
- Create an API route that executes the workflow and returns the price.
a. Create a Workflow#
A workflow is a series of queries and actions, called steps, that complete a task. A workflow is similar to a function, but it allows you to track its executions' progress, define roll-back logic, and configure other advanced features.
In Medusa, you implement your custom commerce flows in workflows. Then, you execute those workflows from other customizations, such as API routes.
The workflow that calculates the personalized product variant's price will have the following steps:
Loading...Medusa provides the useQueryGraphStep, so you only need to implement the getCustomPriceStep step.
getCustomPriceStep
The getCustomPriceStep will calculate a variant's custom price based on its original price, and the height and width values entered by the customer.
To create the step, create the file src/workflows/steps/get-custom-price.ts with the following content:
1import { ProductVariantDTO } from "@medusajs/framework/types"2import { MedusaError } from "@medusajs/framework/utils"3import { createStep, StepResponse } from "@medusajs/framework/workflows-sdk"4 5export type GetCustomPriceStepInput = {6 variant: ProductVariantDTO & {7 calculated_price?: {8 calculated_amount: number9 }10 }11 metadata?: Record<string, unknown>12}13 14const DIMENSION_PRICE_FACTOR = 0.0115 16export const getCustomPriceStep = createStep(17 "get-custom-price",18 async ({19 variant, metadata = {},20 }: GetCustomPriceStepInput) => {21 if (!variant.product?.metadata?.is_personalized) {22 return new StepResponse(variant.calculated_price?.calculated_amount || 0)23 }24 if (!metadata.height || !metadata.width) {25 throw new MedusaError(26 MedusaError.Types.INVALID_DATA,27 "Custom price requires width and height metadata to be set."28 )29 }30 const height = metadata.height as number31 const width = metadata.width as number32 33 const originalPrice = variant.calculated_price?.calculated_amount || 034 const customPrice = originalPrice + (height * width * DIMENSION_PRICE_FACTOR)35 36 return new StepResponse(customPrice)37 }38)
You create a step with the createStep function. It accepts two parameters:
- The step's unique name.
- An async function that receives two parameters:
- The step's input, which is an object with the variant's data and the
metadataobject containing the height and width values. - An object that has properties including the Medusa container, which is a registry of Framework and commerce tools that you can access in the step.
- The step's input, which is an object with the variant's data and the
In the step function, you first check if the product is personalized by checking the is_personalized flag in the product's metadata. If it is not personalized, you return the original price.
Then, you calculate the custom price by multiplying the height and width to a 0.01 factor, which means that for every square unit of height and width, the price increases by 0.01 units. You add the variant's original price to the result.
Finally, a step function must return a StepResponse instance that accepts the step's output as a parameter, which is the calculated price.
Create the Workflow
Next, you'll create the workflow that calculates a personalized product variant's price.
Create the file src/workflows/get-custom-price.ts with the following content:
1import { QueryContext } from "@medusajs/framework/utils"2import { createWorkflow, WorkflowResponse } from "@medusajs/framework/workflows-sdk"3import { useQueryGraphStep } from "@medusajs/medusa/core-flows"4import { getCustomPriceStep, GetCustomPriceStepInput } from "./steps/get-custom-price"5 6type WorkflowInput = {7 variant_id: string8 region_id: string9 metadata?: Record<string, unknown>10}11 12export const getCustomPriceWorkflow = createWorkflow(13 "get-custom-price-workflow",14 (input: WorkflowInput) => {15 const { data: regions } = useQueryGraphStep({16 entity: "region",17 fields: ["currency_code"],18 filters: {19 id: input.region_id,20 },21 options: {22 throwIfKeyNotFound: true,23 },24 })25 const { data: variants } = useQueryGraphStep({26 entity: "variant",27 fields: [28 "*",29 "calculated_price.*",30 "product.*",31 ],32 filters: {33 id: input.variant_id,34 },35 options: {36 throwIfKeyNotFound: true,37 },38 context: {39 calculated_price: QueryContext({40 currency_code: regions[0].currency_code,41 }),42 },43 }).config({ name: "get-custom-price-variant" })44 45 const price = getCustomPriceStep({46 variant: variants[0],47 metadata: input.metadata,48 } as unknown as GetCustomPriceStepInput)49 50 return new WorkflowResponse(price)51 }52)
You create a workflow using the createWorkflow function. It accepts the workflow's unique name as a first parameter.
It accepts as a second parameter a constructor function that holds the workflow's implementation. The function accepts an input object holding the variant's ID, the ID of the customer's region, and the metadata object containing the height and width values.
In the workflow, you:
- Retrieve the region's currency code using the
useQueryGraphStepstep. This is necessary to calculate the variant's price in the correct currency.- The
useQueryGraphStepuses Query to retrieve data across modules.
- The
- Retrieve the product variant with its calculated price using the
useQueryGraphStep. - Calculate the custom price using the
getCustomPriceStep, passing the variant and metadata as input.
A workflow must return an instance of WorkflowResponse that accepts the data to return to the workflow's executor.
b. Create an API Route#
Now that you have the workflow that calculates the custom price, you can create an API route that executes this workflow and returns the price.
An API route is created in a route.ts file under a sub-directory of the src/api directory. The path of the API route is the file's path relative to src/api.
Create the file src/api/store/variants/[id]/price/route.ts with the following content:
1import { MedusaRequest, MedusaResponse } from "@medusajs/framework/http"2import { getCustomPriceWorkflow } from "../../../../../workflows/get-custom-price"3import { z } from "@medusajs/framework/zod"4 5export const PostCustomPriceSchema = z.object({6 region_id: z.string(),7 metadata: z.object({8 height: z.number(),9 width: z.number(),10 }),11})12 13type PostCustomPriceSchemaType = z.infer<typeof PostCustomPriceSchema>14 15export async function POST(16 req: MedusaRequest<PostCustomPriceSchemaType>,17 res: MedusaResponse18) {19 const { id: variantId } = req.params20 const { 21 region_id,22 metadata,23 } = req.validatedBody24 25 const { result: price } = await getCustomPriceWorkflow(req.scope).run({26 input: {27 variant_id: variantId,28 region_id,29 metadata,30 },31 })32 33 res.json({34 price,35 })36}
You create the PostCustomPriceSchema schema that is used to validate request bodies sent to this API route with Zod.
Then, you export a POST route handler function, which will expose a POST API route at /store/variants/:id/price.
In the route handler, you execute the getCustomPriceWorkflow workflow by invoking it, passing the Medusa container (stored in req.scope), then executing its run method.
Finally, you return the price in the response.
c. Add Validation Middleware#
To ensure that the API route receives the correct request body parameters, you can apply a middleware on the API route that validates incoming requests.
To apply middlewares, create the file src/api/middlewares.ts with the following content:
1import { defineMiddlewares, validateAndTransformBody } from "@medusajs/framework/http"2import { PostCustomPriceSchema } from "./store/variants/[id]/price/route"3 4export default defineMiddlewares({5 routes: [6 {7 matcher: "/store/variants/:id/price",8 methods: ["POST"],9 middlewares: [10 validateAndTransformBody(PostCustomPriceSchema),11 ],12 },13 ],14})
You apply Medusa's validateAndTransformBody middleware to POST requests sent to the /store/variants/:id/price route.
The middleware function accepts a Zod schema used for validation. This is the schema you created in the API route's file.
You'll test out the API route when you customize the storefront in the next step.
Step 4: Show Calculated Price in the Storefront#
In this step, you'll customize the Next.js Starter Storefront to show a personalized product's custom price when the customer enters the height and width values.
a. Add Server Function#
The first step is to add a server function that retrieves the custom price from the API route you created.
In src/lib/data/products.ts, add the following function:
1export const getCustomVariantPrice = async ({2 variant_id,3 region_id,4 metadata,5}: {6 variant_id: string7 region_id: string8 metadata?: Record<string, any>9}) => {10 const headers = {11 ...(await getAuthHeaders()),12 }13 14 return sdk.client15 .fetch<{ price: number }>(16 `/store/variants/${variant_id}/price`,17 {18 method: "POST",19 body: {20 region_id,21 metadata,22 },23 headers,24 cache: "no-cache",25 }26 )27 .then(({ price }) => price)28}
You create a getCustomVariantPrice function that accepts the variant's ID, the region's ID, and the metadata object containing the height and width values.
In the function, you use the JS SDK to send a POST request to the /store/variants/:id/price API route you created in the previous step. The function returns the price from the response.
b. Customize the Product Price Component#
Next, you'll customize the product price component to show the custom price when the product is personalized.
The ProductPrice component is located in src/modules/products/components/product-price/index.tsx. It shows either the product's cheapest variant price, or the selected variant's price.
Replace the content of the file with the following:
1import { clx } from "@medusajs/ui"2import { HttpTypes } from "@medusajs/types"3import { useEffect, useMemo, useState } from "react"4import { getCustomVariantPrice } from "../../../../lib/data/products"5import { convertToLocale } from "../../../../lib/util/money"6 7export default function ProductPrice({8 product,9 variant,10 metadata,11 region,12}: {13 product: HttpTypes.StoreProduct14 variant?: HttpTypes.StoreProductVariant15 metadata?: Record<string, any>16 region: HttpTypes.StoreRegion17}) {18 const [price, setPrice] = useState(0)19 20 useEffect(() => {21 if (22 !variant ||23 (product.metadata?.is_personalized && (24 !metadata?.height || !metadata?.width25 ))26 ) {27 return28 }29 30 getCustomVariantPrice({31 variant_id: variant.id,32 region_id: region.id,33 metadata,34 })35 .then((price) => {36 setPrice(price)37 })38 .catch((error) => {39 console.error("Error fetching custom variant price:", error)40 })41 }, [metadata, variant])42 43 const displayPrice = useMemo(() => {44 return convertToLocale({45 amount: price,46 currency_code: region.currency_code,47 })48 }, [price])49 50 return (51 <div className="flex flex-col text-ui-fg-base">52 <span53 className={clx("text-xl-semi")}54 >55 {price > 0 && <span56 data-testid="product-price"57 data-value={displayPrice}58 >59 {displayPrice}60 </span>}61 </span>62 </div>63 )64}
You make the following main changes:
- Add the
metadataandregionprops to the component, since you need them to retrieve the custom price. - Define a
pricestate variable to hold the custom price. - Use the
useEffecthook to call thegetCustomVariantPricefunction whenever thevariant,metadata, orregionchanges. - Use the
useMemohook to convert the price to the locale format using theconvertToLocalefunction. - Display the custom price in the component.
c. Add Height and Width Inputs#
Next, you'll customize the parent component of the ProductPrice component to pass the new props to it, and to show the height and width inputs.
In src/modules/products/components/product-actions/index.tsx, add the following import at the top of the file:
Next, pass the region prop to the ProductActions component. The props' type already defines it but it's not included in the destructured props:
Then, add new state variables in the ProductActions component for the height and width values:
After that, find the ProductPrice component in the return statement and replace it with the following:
1return (2 <>3 {/* ... */}4 <div className="flex flex-col gap-y-2">5 {!!product.metadata?.is_personalized && (6 <div className="flex flex-col gap-y-3">7 <span className="text-sm">Enter Dimensions</span>8 <div className="flex gap-3">9 <Input10 name="width"11 value={width}12 onChange={(e) => setWidth(Number(e.target.value))}13 label="Width (cm)"14 type="number"15 min={0}16 />17 <Input18 name="height"19 value={height}20 onChange={(e) => setHeight(Number(e.target.value))}21 label="Height (cm)"22 type="number"23 min={0}24 />25 </div>26 </div>27 )}28 </div>29 30 <ProductPrice 31 product={product} 32 variant={selectedVariant}33 region={region}34 metadata={{ width, height }}35 />36 {/* ... */}37 </>38)
You add a new section that shows the height and width inputs when the product is personalized. The inputs update the height and width state variables.
Then, you pass the new metadata and region props to the ProductPrice component.
Finally, update the add-to-cart button's disabled prop to check if the product is personalized and if the height and width values are set:
1return (2 <>3 {/* ... */}4 <Button5 disabled={6 !inStock ||7 !selectedVariant ||8 !!disabled ||9 isAdding ||10 !isValidVariant ||11 (!!product.metadata?.is_personalized && (!width || !height))12 }13 // ...14 >15 {/* ... */}16 </Button>17 {/* ... */}18 </>19)
Test Price Customization#
You can now test the price customization in the storefront.
First, start the Medusa application with the following command:
Then, start the Next.js Starter Storefront with the following command:
Open the storefront in your browser at http://localhost:8000. Go to Menu -> Store and click on the personalized product you created.
You should see the height and width inputs below other product variant options. Once you enter the height and width values, the price will be shown and updated based on the values you entered.

Step 5: Implement Custom Add-to-Cart Logic#
In this step, you'll implement custom logic to add personalized products to the cart.
When the customer adds a personalized product to the cart, you need to add the item to the cart with the calculated price.
So, you'll create a workflow that wraps around Medusa's existing add-to-cart logic to add the personalized product to the cart with the custom price. Then, you'll create an API route that executes this workflow.
a. Create the Add-to-Cart Workflow#
The custom add-to-cart workflow will have the following steps:
Loading...You already have all the necessary steps within the workflow, so you create it right away.
Create the file src/workflows/custom-add-to-cart.ts with the following content:
1import { createWorkflow, transform, WorkflowResponse } from "@medusajs/framework/workflows-sdk"2import { 3 addToCartWorkflow, 4 acquireLockStep, 5 releaseLockStep, 6 useQueryGraphStep,7} from "@medusajs/medusa/core-flows"8import { getCustomPriceWorkflow } from "./get-custom-price"9 10type CustomAddToCartWorkflowInput = {11 item: {12 variant_id: string;13 quantity?: number;14 metadata?: Record<string, unknown>;15 }16 cart_id: string;17}18 19export const customAddToCartWorkflow = createWorkflow(20 "custom-add-to-cart",21 (input: CustomAddToCartWorkflowInput) => {22 const { data: carts } = useQueryGraphStep({23 entity: "cart",24 fields: ["region_id"],25 filters: {26 id: input.cart_id,27 },28 options: {29 throwIfKeyNotFound: true,30 },31 })32 const price = getCustomPriceWorkflow.runAsStep({33 input: {34 variant_id: input.item.variant_id,35 region_id: carts[0].region_id!,36 metadata: input.item.metadata,37 },38 })39 40 acquireLockStep({41 key: input.cart_id,42 timeout: 2,43 ttl: 10,44 })45 46 const itemData = transform({47 item: input.item,48 price,49 }, (data) => {50 return {51 variant_id: data.item.variant_id,52 quantity: data.item.quantity || 1,53 metadata: data.item.metadata,54 unit_price: data.price,55 }56 })57 58 addToCartWorkflow.runAsStep({59 input: {60 cart_id: input.cart_id,61 items: [itemData],62 },63 })64 65 // refetch the updated cart66 const { data: updatedCart } = useQueryGraphStep({67 entity: "cart",68 fields: ["*", "items.*"],69 filters: {70 id: input.cart_id,71 },72 }).config({ name: "refetch-cart" })73 74 releaseLockStep({75 key: input.cart_id,76 })77 78 return new WorkflowResponse({79 cart: updatedCart[0],80 })81 }82)
The workflow accepts the item to add to the cart, which includes the variant's ID, quantity, and metadata, as well as the cart's ID.
In the workflow, you:
- Retrieve the cart's region using the
useQueryGraphStep. - Calculate the custom price using the
getCustomPriceWorkflowthat you created earlier. - Acquire a lock on the cart using the
acquireLockStepto prevent concurrent modifications. - Prepare the data of the item to add to the cart.
- You use the
transformfunction because direct data manipulation isn't allowed in workflows. Refer to the Data Manipulation guide to learn more.
- You use the
- Add the item to the cart using the
addToCartWorkflow. - Refetch the updated cart using the
useQueryGraphStepto return the cart data in the workflow's response. - Release the lock on the cart using the
releaseLockStep.
b. Create the Add-to-Cart API Route#
Next, you'll create an API route that executes the custom add-to-cart workflow.
Create the file src/api/store/carts/[id]/line-items-custom/route.ts with the following content:
1import { MedusaRequest, MedusaResponse } from "@medusajs/framework/http"2import { z } from "@medusajs/framework/zod"3import { 4 customAddToCartWorkflow,5} from "../../../../../workflows/custom-add-to-cart"6 7export const PostAddCustomLineItemSchema = z.object({8 variant_id: z.string(),9 quantity: z.number().optional(),10 metadata: z.record(z.string(), z.unknown()).optional(),11})12 13type PostAddCustomLineItemSchemaType = z.infer<14 typeof PostAddCustomLineItemSchema15>;16 17export async function POST(18 req: MedusaRequest<PostAddCustomLineItemSchemaType>,19 res: MedusaResponse20) {21 const { id: cartId } = req.params22 const { result: cart } = await customAddToCartWorkflow(req.scope).run({23 input: {24 item: {25 variant_id: req.validatedBody.variant_id,26 quantity: req.validatedBody.quantity,27 metadata: req.validatedBody.metadata,28 },29 cart_id: cartId,30 },31 })32 33 res.json({34 cart,35 })36}
You create a PostAddCustomLineItemSchema schema to validate the request body sent to this API route.
Then, you export a POST route handler function which will expose a POST API route at /store/carts/:id/line-items-custom.
In the route handler, you execute the customAddToCartWorkflow workflow passing it the item's details and cart ID as input.
Finally, you return the updated cart in the response.
c. Add Validation Middleware#
Similar to the previous API route, you'll apply a validation middleware to the API route to ensure that the request body is valid.
In src/api/middlewares.ts, add a new middleware for the custom add-to-cart API route:
1// other imports...2import { 3 PostAddCustomLineItemSchema,4} from "./store/carts/[id]/line-items-custom/route"5 6export default defineMiddlewares({7 routes: [8 // ...9 {10 matcher: "/store/carts/:id/line-items-custom",11 methods: ["POST"],12 middlewares: [13 validateAndTransformBody(PostAddCustomLineItemSchema),14 ],15 },16 ],17})
This applies the validateAndTransformBody middleware to POST requests sent to the /store/carts/:id/line-items-custom route, validating the request body against the schema you created.
You'll test out this API route when you customize the storefront in the next steps.
Step 6: Validate Personalized Products Added to Cart#
In this step, you'll ensure that the personalized products added to the cart include the height and width values in their metadata property.
Medusa's addToCartWorkflow workflow supports performing custom validation on the items being added to the cart using workflow hooks. A workflow hook is a point in a workflow where you can inject custom functionality as a step function.
To consume the validate hook that runs before an item is added to the cart, create the file src/workflows/hooks/validate-personalized-product.ts with the following content:
1import { MedusaError } from "@medusajs/framework/utils"2import { addToCartWorkflow } from "@medusajs/medusa/core-flows"3 4addToCartWorkflow.hooks.validate(5 async ({ input }, { container }) => {6 const query = container.resolve("query")7 const { data: variants } = await query.graph({8 entity: "variant",9 fields: ["product.*"],10 filters: {11 id: input.items.map((item) => item.variant_id).filter(Boolean) as string[],12 },13 })14 for (const item of input.items) {15 const variant = variants.find((v) => v.id === item.variant_id)16 if (!variant?.product?.metadata?.is_personalized) {17 continue18 }19 if (20 !item.metadata?.height || !item.metadata.width ||21 isNaN(Number(item.metadata.height)) || isNaN(Number(item.metadata.width))22 ) {23 throw new MedusaError(24 MedusaError.Types.INVALID_DATA,25 "Please set height and width metadata for each item."26 )27 }28 }29 }30)
You consume the hook by calling addToCartWorkflow.hooks.validate, passing it a step function.
In the step function, you:
- Resolve Query from the Medusa container to retrieve data across modules.
- Retrieve the product variants being added to the cart.
- Loop through the items being added to the cart.
- If an item's product is personalized, you validate that the
metadataobject contains theheightandwidthvalues, and that they are valid numbers. Otherwise, you throw an error.
If the hook throws an error, the addToCartWorkflow will not proceed with adding the item to the cart, and the error will be returned in the API response.
You can test this out after customizing the storefront in the next section.
Step 7: Use the Custom Add-to-Cart API Route in Storefront#
In this step, you'll customize the Next.js Starter Storefront to use the custom add-to-cart API route when a customer adds a product to the cart.
You'll also customize components showing items in the cart and order confirmation to display the personalized product's height and width values.
a. Customize Add-to-Cart Server Function#
The addToCart function defined in src/lib/data/cart.ts is used to add items to the cart. You'll customize it to use the custom add-to-cart API route.
First, find the addToCart function and change its parameters to accept the metadata object:
Then, find the following lines in the function:
And replace them with the following:
You send a request to the API route you created in the previous step, passing the variant ID, quantity, and metadata in the request body.
Next, you'll need to pass the metadata object when calling the addToCart function.
In src/modules/products/components/product-actions/index.tsx, find the addToCart function call in the handleAddToCart function and pass it the metadata object:
Now, when the customer adds a personalized product to the cart, the height and width values will be sent to the API route.
b. Customize Cart Item Component#
Next, you'll customize the cart item component to show the height and width values for personalized products.
In src/modules/cart/components/item/index.tsx, add the following in the Item component's return statement, right after the LineItemOptions component:
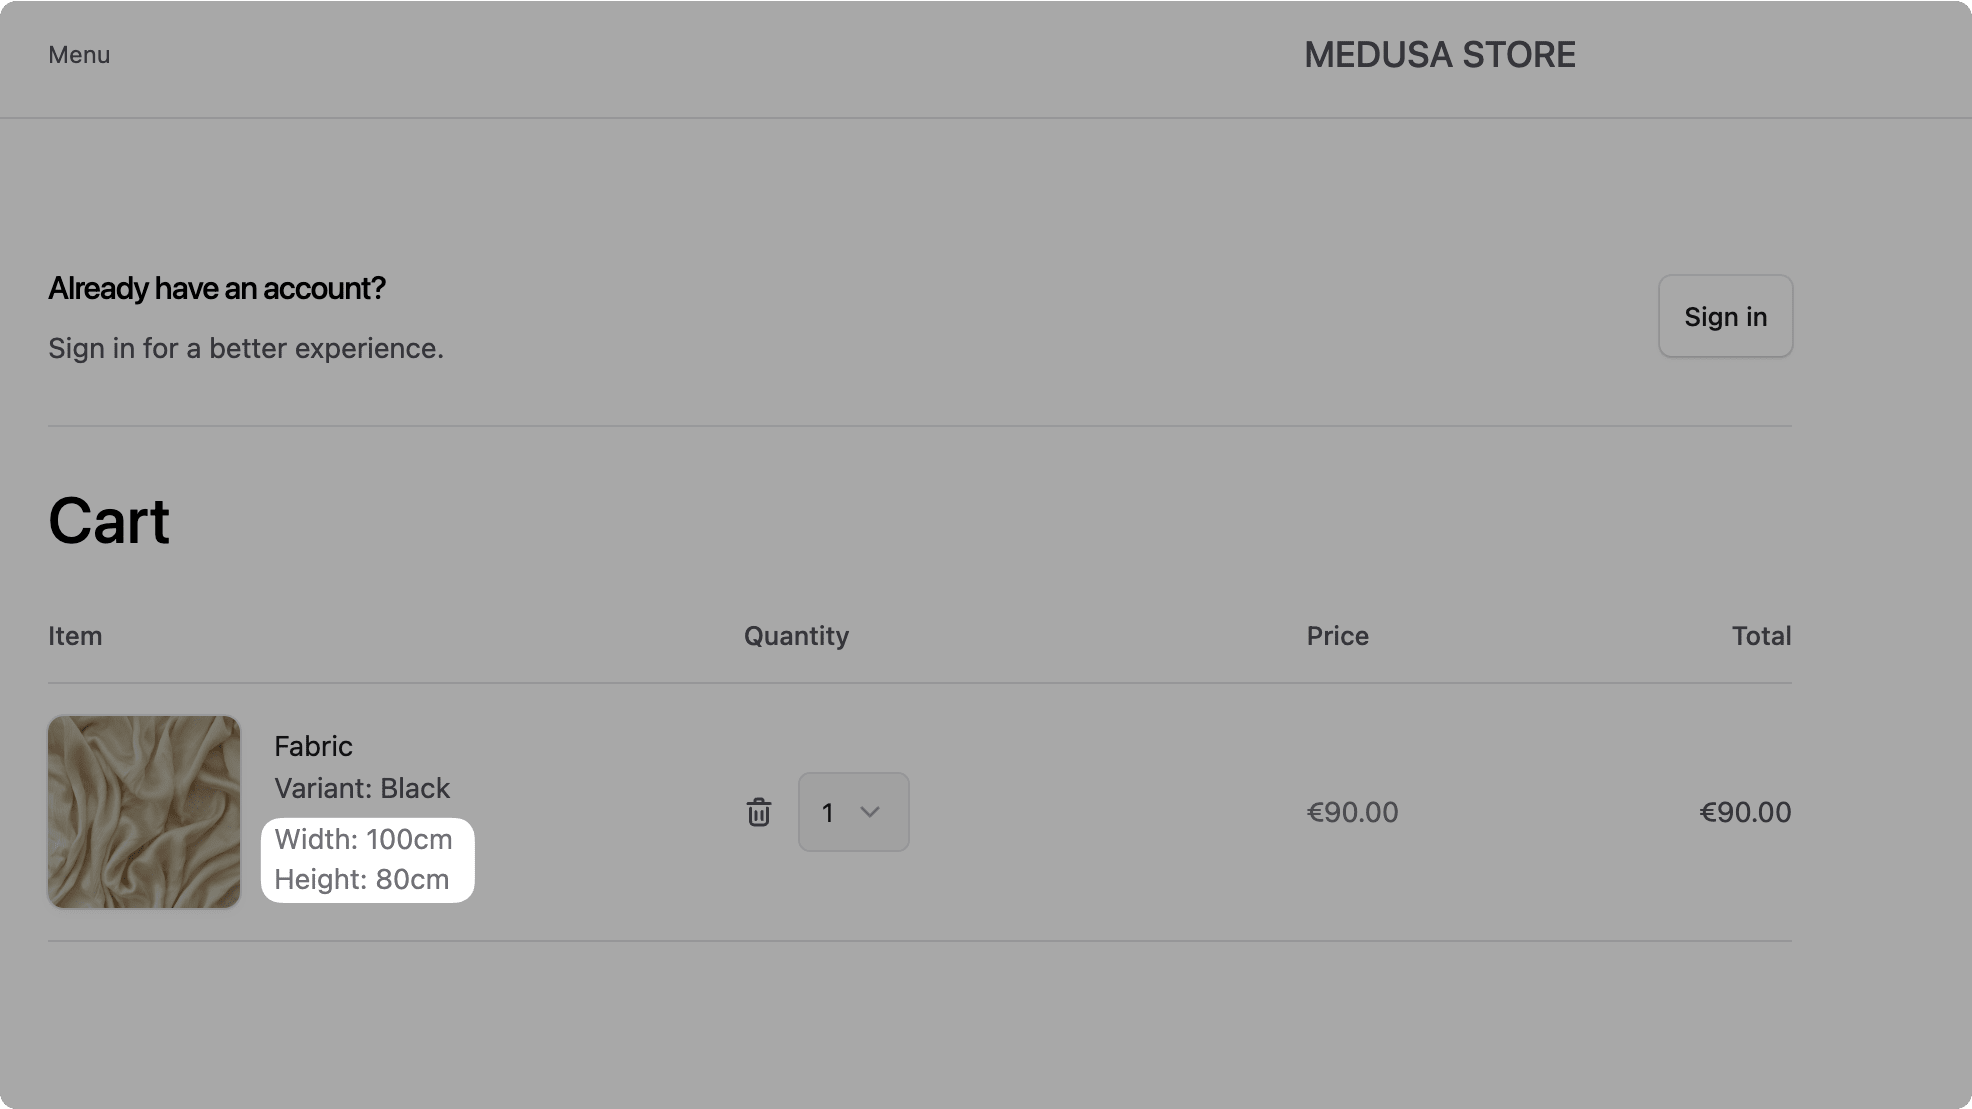
1return (2 <Table.Row className="w-full" data-testid="product-row">3 {/* ... */}4 <LineItemOptions variant={item.variant} data-testid="product-variant" />5 <div className="text-sm text-ui-fg-muted">6 {!!item.metadata?.width && <div>Width: {item.metadata.width as number}cm</div>}7 {!!item.metadata?.height && <div>Height: {item.metadata.height as number}cm</div>}8 </div>9 {/* ... */}10 </Table.Row>11)
You show the height and width values from the item's metadata object if they exist. This will display the dimensions of personalized products in the cart.
c. Customize Order Confirmation Page#
Finally, you'll customize the order item component in the order confirmation page to show the height and width values for personalized products.
In src/modules/orders/components/order-item/index.tsx, add the following in the Item component's return statement, right after the LineItemOptions component:
1return (2 <Table.Row className="w-full" data-testid="product-row">3 {/* ... */}4 <LineItemOptions variant={item.variant} data-testid="product-variant" />5 <div className="text-sm text-ui-fg-muted">6 {!!item.metadata?.width && <div>Width: {item.metadata.width as number}cm</div>}7 {!!item.metadata?.height && <div>Height: {item.metadata.height as number}cm</div>}8 </div>9 {/* ... */}10 </Table.Row>11)
Similarly, you show the height and width values from the item's metadata object if they exist. This will display the dimensions of personalized products in the order confirmation page.
Test the Custom Add-to-Cart Logic#
To test out the custom add-to-cart logic, ensure that both the Medusa application and the Next.js Starter Storefront are running.
Then, add a personalized product to the cart after choosing any necessary product options and entering the height and width values. You should see the product added to the cart with the correct price based on the dimensions you entered.
If you open the cart page by clicking on "Cart" at the top right, you can see the personalized product's height and width values displayed after the product variant options.
Place Order with Personalized Product
You can also proceed to the checkout page and complete the order. The order confirmation page will show the personalized product with its height and width values.
Step 8: Show an Order's Personalized Items in Medusa Admin#
In this step, you'll customize the Medusa Admin to show the personalized item's height and width values in an order's details page.
The Medusa Admin dashboard is extensible, allowing you to either inject custom components into existing pages, or create new pages.
In this case, you'll inject a custom component, called a widget, into the order details page.
Widgets are created in a .tsx file under the src/admin/widgets directory. So, create the file src/admin/widgets/order-personalized.tsx with the following content:
1import { defineWidgetConfig } from "@medusajs/admin-sdk"2import { Container, Heading, Text } from "@medusajs/ui"3import { AdminOrder, DetailWidgetProps } from "@medusajs/framework/types"4 5const PersonalizedOrderItemsWidget = ({ 6 data: order,7}: DetailWidgetProps<AdminOrder>) => {8 const items = order.items.filter((item) => {9 return item.variant?.product?.metadata?.is_personalized10 })11 12 if (!items.length) {13 return <></>14 }15 16 return (17 <Container className="divide-y p-0">18 <div className="flex items-center justify-between px-6 py-4">19 <Heading level="h2">Personalized Order Items</Heading>20 </div>21 <div className="divide-y">22 {items.map((item) => (23 <div key={item.id} className="flex gap-4 px-6 py-4">24 {item.variant?.product?.thumbnail && <img25 src={item.variant.product.thumbnail}26 alt={item.variant.title || "Personalized Product"}27 className="h-8 w-6 object-cover rounded border border-ui-border"28 />}29 <div className="flex flex-col">30 <Text size="small" weight="plus">31 {item.variant?.product?.title}: {item.variant?.title}32 </Text>33 <Text size="small" className="text-ui-fg-subtle">34 Width (cm): {item.metadata?.width as number || "N/A"}35 </Text>36 <Text size="small" className="text-ui-fg-subtle">37 Height (cm): {item.metadata?.height as number || "N/A"}38 </Text>39 </div>40 </div>41 ))}42 </div>43 </Container>44 )45}46 47export const config = defineWidgetConfig({48 zone: "order.details.after",49})50 51export default PersonalizedOrderItemsWidget
A widget file must export:
- A default React component. This component renders the widget's UI.
- A
configobject created with thedefineWidgetConfigfunction. It accepts an object with thezoneproperty that indicates where the widget will be rendered in the Medusa Admin dashboard.
The widget component accepts a data prop that contains the order data.
In the component, you retrieve the items whose product is personalized. Then, you display those items with their height and width values. Remember, the metadata property is copied from the cart's line items to the order's line items.
If there are no personalized items in the order, you don't show the widget.
Test the Personalized Order Items Widget#
To test out the personalized order items widget, start the Medusa application and open the Medusa Admin dashboard in your browser at http://localhost:9000/app.
Go to Orders and click on an order that contains a personalized product. You should see the "Personalized Order Items" widget displaying the personalized items with their dimensions.

Next Steps#
You've now implemented personalized products in Medusa, allowing customers to customize product dimensions and see the calculated price in the storefront. You can expand on this feature to:
- Add more personalization options, such as text engraving.
- Implement more complex pricing calculations based on additional metadata.
- Create a custom fulfillment provider to handle personalized products differently during fulfillment.
Learn More about Medusa#
If you're new to Medusa, check out the main documentation, where you'll get a more in-depth understanding of all the concepts you've used in this guide and more.
To learn more about the commerce features that Medusa provides, check out Medusa's Commerce Modules.
Troubleshooting#
If you encounter issues during your development, check out the troubleshooting guides.
Getting Help#
If you encounter issues not covered in the troubleshooting guides:
- Visit the Medusa GitHub repository to report issues or ask questions.
- Join the Medusa Discord community for real-time support from community members.