Integrate Odoo with Medusa
In this guide, you will learn how to implement the integration layer between Odoo and Medusa.
When you install a Medusa application, you get a fully-fledged commerce platform that supports customizations. However, your business might already be using other systems such as an ERP to centralize data and processes. The Medusa Framework facilitates integrating the ERP system and using its data to enrich your commerce platform.
Odoo is a suite of open-source business apps that covers all your business needs, including an ERP system. You can use Odoo to store products and their prices, manage orders, and more.
This guide will teach you how to implement the general integration between Medusa and Odoo. You will learn how to connect to Odoo's APIs and fetch data such as products. You can then expand on this integration to implement your business requirements. You can also refer to this recipe to find general examples of ERP integration use cases and how to implement them.
Step 1: Install a Medusa Application#
Start by installing the Medusa application on your machine with the following command:
You will first be asked for the project's name. You can also optionally choose to install the Next.js Starter Storefront.
the installation process will start, which will install the Medusa application as a monorepository in a directory with your project's name. The backend is installed in the apps/backend directory. If you chose to install the Next.js Starter Storefront, it'll be in the apps/storefront directory.
Once the installation finishes successfully, the Medusa Admin dashboard will open with a form to create a new user. Enter the user's credential and submit the form. Afterwards, you can login with the new user and explore the dashboard.
apps/backend directory of your Medusa project.Step 2: Install JSONRPC Package#
Odoo's APIs are based on the XML-RPC and JSON-RPC protocols. So, to connect to Odoo's APIs, you need a JSON-RPC client library.
Run the following command in the Medusa application to install the json-rpc-2.0 package:
You will use this package in the next steps to connect to Odoo's APIs.
Step 3: Create Odoo Module#
To integrate third-party systems into Medusa, you create a custom module. A module is a re-usable package with functionalities related to a single feature or domain. Medusa integrates the module into your application without implications or side effects on your setup.
In this step, you'll create an Odoo Module that provides the interface to connect to and interact with Odoo. You will later use this module when implementing the product syncing logic.
Create Module Directory#
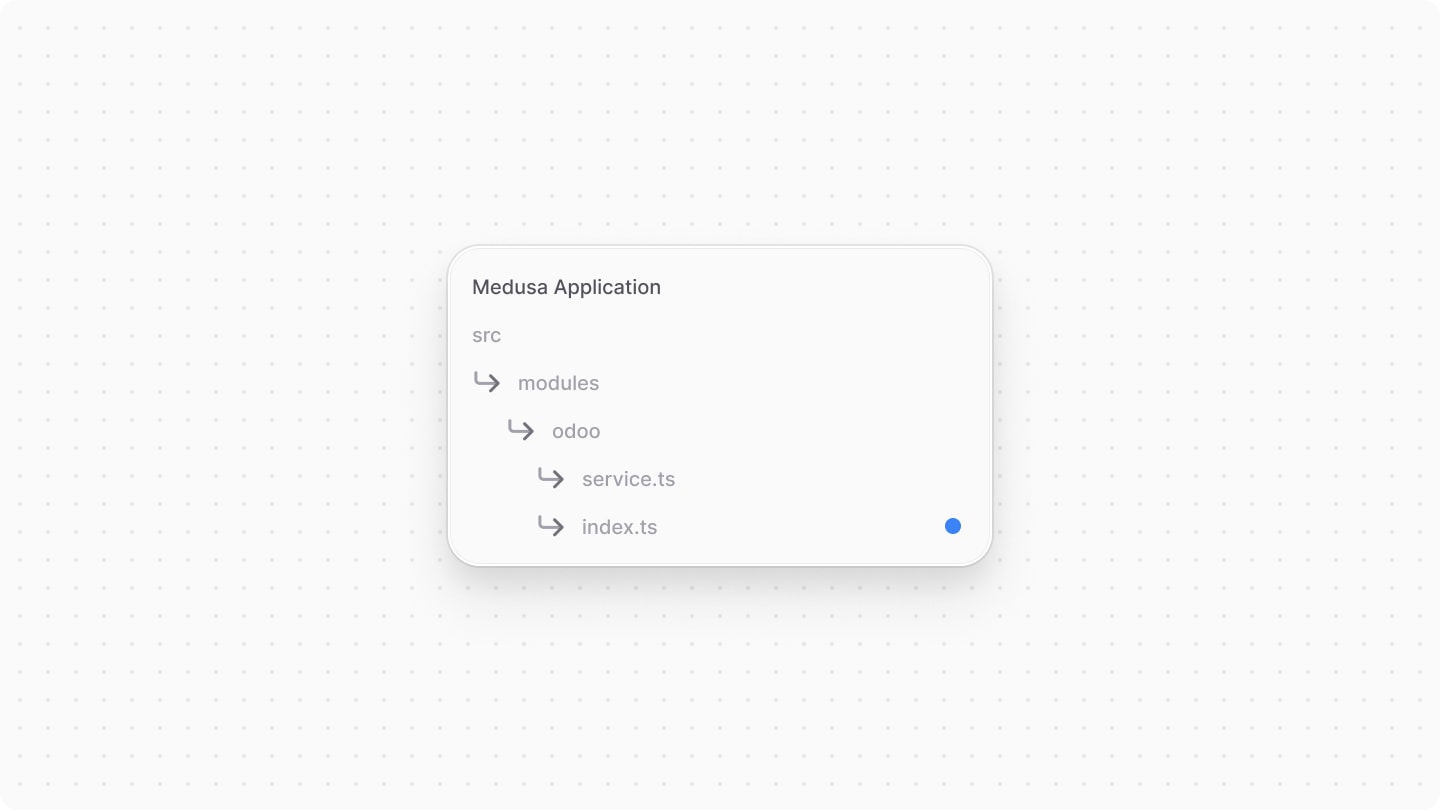
A module is created under the src/modules directory of your Medusa application. So, create the directory src/modules/odoo.

Create Service#
You define a module's functionalities in a service. A service is a TypeScript or JavaScript class that the module exports. In the service's methods, you can connect to the database, which is useful if your module defines tables in the database, or connect to a third-party service.
Medusa registers the module's service in the Medusa container, allowing you to easily resolve the service from other customizations and use its methods.
In this section, you'll create the Odoo Module's service and the methods necessary to connect to Odoo.
To create the service, create the file src/modules/odoo/service.ts with the following content:

1import { JSONRPCClient } from "json-rpc-2.0"2 3type Options = {4 url: string5 dbName: string6 username: string7 apiKey: string8}9 10export default class OdooModuleService {11 private options: Options12 private client: JSONRPCClient13 14 constructor({}, options: Options) {15 this.options = options16 17 this.client = new JSONRPCClient((jsonRPCRequest) => {18 fetch(`${options.url}/jsonrpc`, {19 method: "POST",20 headers: {21 "content-type": "application/json",22 },23 body: JSON.stringify(jsonRPCRequest),24 }).then((response) => {25 if (response.status === 200) {26 // Use client.receive when you received a JSON-RPC response.27 return response28 .json()29 .then((jsonRPCResponse) => this.client.receive(jsonRPCResponse))30 } else if (jsonRPCRequest.id !== undefined) {31 return Promise.reject(new Error(response.statusText))32 }33 })34 })35 }36}
You create an OdooModuleService class that has two class properties:
options: An object that holds the Odoo Module's options. Those include the API key, URL, database name, and username. You'll learn how to pass those to the module later.client: An instance of theJSONRPCClientclass from thejson-rpc-2.0package. You'll use this client to connect to Odoo's APIs.
The service's constructor accepts as a second parameter the module's options. So, you use those to initialize the options property and create the client property. The client property is initialized with a function that sends a JSON-RPC request to Odoo's API and receives the response.
Next, you will add the methods to log in and fetch data from Odoo.
Login Method#
Before sending any request to Odoo's APIs, you need to have an authenticated UID of the user. So, you'll implement a method to retrieve that UID when it's not set.
Start by adding a uid property to the OdooModuleService class:
Then, add the following login method:
The login method sends a JSON-RPC request to Odoo's API to authenticate the user. It uses the client property to send a request with the service, method, and args properties.
If the authentication was successful, Odoo returns a UID, which you store in the uid property.
Fetch Products Method#
You can fetch many data from Odoo based on your business requirements, or create data in Odoo. For this guide, you'll only learn how to fetch products. You will use this method later to sync products from Odoo to Medusa.
First, add the following types to src/modules/odoo/service.ts:
1export type Pagination = {2 offset?: number3 limit?: number4}5 6export type OdooProduct = {7 id: number8 display_name: string9 is_published: boolean10 website_url: string11 name: string12 list_price: number13 description: string | false14 description_sale: string | false15 product_variant_ids: OdooProductVariant[]16 qty_available: number17 location_id: number | false18 taxes_id: number[]19 hs_code: string | false20 allow_out_of_stock_order: boolean21 is_kits: boolean22 image_1920: string23 image_1024: string24 image_512: string25 image_256: string26 image_128: string27 attribute_line_ids: {28 attribute_id: {29 display_name: string30 }31 value_ids: {32 display_name: string33 }[]34 }[]35 currency_id: {36 id: number37 display_name: string38 }39}40 41export type OdooProductVariant = Omit<42 OdooProduct, 43 "product_variant_ids" | "attribute_line_ids"44> & {45 product_template_variant_value_ids: {46 id: number47 name: string48 attribute_id: {49 display_name: string50 }51 }[]52 code: string53}
You define the following types:
Pagination: An object that holds the pagination options for fetching products.OdooProduct: An object that represents an Odoo product. You define the properties that you'll fetch from Odoo's API. You can add more properties based on your business requirements.OdooProductVariant: An object that represents an Odoo product variant. You define the properties that you'll fetch from Odoo's API. You can add more properties based on your business requirements.
Then, add the following listProducts method to the OdooModuleService class:
1export default class OdooModuleService {2 // ...3 async listProducts(filters?: any, pagination?: Pagination) {4 if (!this.uid) {5 await this.login()6 }7 8 const { offset, limit } = pagination || { offset: 0, limit: 10 }9 10 const ids = await this.client.request("call", {11 service: "object",12 method: "execute_kw",13 args: [14 this.options.dbName, 15 this.uid, 16 this.options.apiKey, 17 "product.template", 18 "search", 19 filters || [[20 ["is_product_variant", "=", false],21 ]], {22 offset,23 limit,24 },25 ],26 })27 28 // TODO retrieve product details based on ids29 }30}
In the listProducts method, you first check if the user is authenticated, and call the login method otherwise. Then, you send a JSON-RPC request to retrieve product IDs from Odoo with pagination and filter options. Odoo's APIs require you to first retrieve the IDs of the products and then fetch the details of each product.
To retrieve the products, replace the TODO with the following:
1// product fields to retrieve2const productSpecifications = {3 id: {},4 display_name: {},5 is_published: {},6 website_url: {},7 name: {},8 list_price: {},9 description: {},10 description_sale: {},11 qty_available: {},12 location_id: {},13 taxes_id: {},14 hs_code: {},15 allow_out_of_stock_order: {},16 is_kits: {},17 image_1920: {},18 image_1024: {},19 image_512: {},20 image_256: {},21 currency_id: {22 fields: {23 display_name: {},24 },25 },26}27 28// retrieve products29const products: OdooProduct[] = await this.client.request("call", {30 service: "object",31 method: "execute_kw",32 args: [33 this.options.dbName, 34 this.uid, 35 this.options.apiKey, 36 type, 37 "web_read", 38 [ids], 39 {40 specification: {41 ...productSpecifications,42 product_variant_ids: {43 fields: {44 ...productSpecifications,45 product_template_variant_value_ids: {46 fields: {47 name: {},48 attribute_id: {49 fields: {50 display_name: {},51 },52 },53 },54 context: {55 show_attribute: false,56 },57 },58 code: {},59 },60 context: {61 show_code: false,62 },63 },64 attribute_line_ids: {65 fields: {66 attribute_id: {67 fields: {68 display_name: {},69 },70 },71 value_ids: {72 fields: {73 display_name: {},74 },75 context: {76 show_attribute: false,77 },78 },79 },80 },81 },82 },83 ],84})85 86return products
You first define the productSpecifications object that holds the fields you want to fetch for each product and its variants. So, if you want to add more fields, you can add them in this object.
Then, you send a request to Odoo to fetch the products' details based on the IDs you retrieved earlier. You use the productSpecifications object to define the fields you want to fetch for each product and its variants. Finally, you return the fetched products.
You will use the listProducts method to sync products from Odoo to Medusa in the next steps.
Export Module Definition#
The final piece to a module is its definition, which you export in an index.ts file at its root directory. This definition tells Medusa the name of the module and its service.
So, create the file src/modules/odoo/index.ts with the following content:
You use the Module function from the Modules SDK to create the module's definition. It accepts two parameters:
- The module's name, which is
odoo. - An object with a required property
serviceindicating the module's service.
Add Module to Medusa's Configurations#
Once you finish building the module, add it to Medusa's configurations to start using it.
In medusa-config.ts, add a modules property and pass an array with your custom module:
Each object in the modules array has a resolve property, whose value is either a path to the module's directory, or an npm package’s name. Modules that accept options also have an options property. You pass the options you defined in the OdooModuleService class to the module.
Then, set the environment variables in the .env file or system environment variables:
Where:
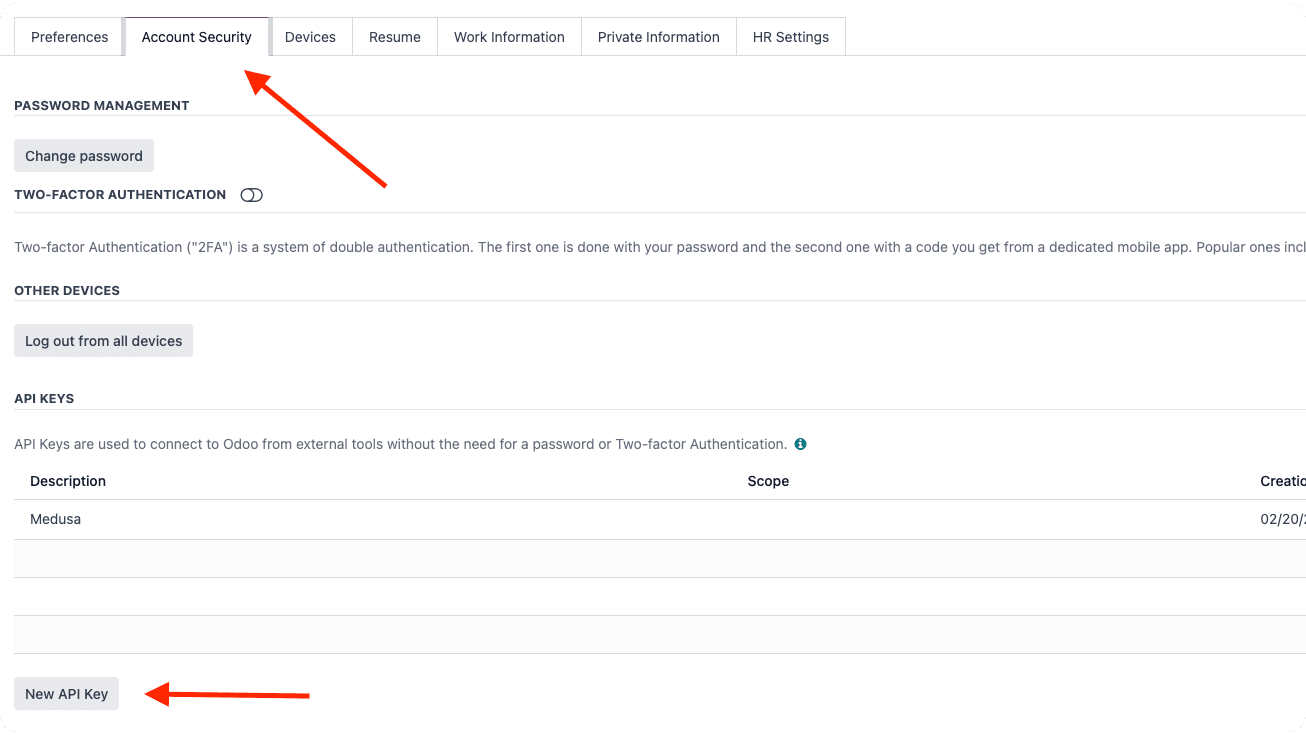
ODOO_URL: The URL of your Odoo instance, which is of the formathttps://<domain>.odoo.com.ODOO_DB_NAME: The name of the database in your Odoo instance, which is the same as the domain in the URL.ODOO_USERNAME: The username or email of an Odoo user.ODOO_API_KEY: The API key of an Odoo user, or the user's password. To retrieve an API Key:- On your Odoo dashboard, click on the user's avatar at the top right and choose "My Profile" from the dropdown.

- On your profile's page, click the "Account Security" tab, then the "New API Key" button.
- In the pop-up that opens, enter your password.
- Enter the API Key's name, and set the expiration to "Persistent Key", then click the "Generate Key" button.
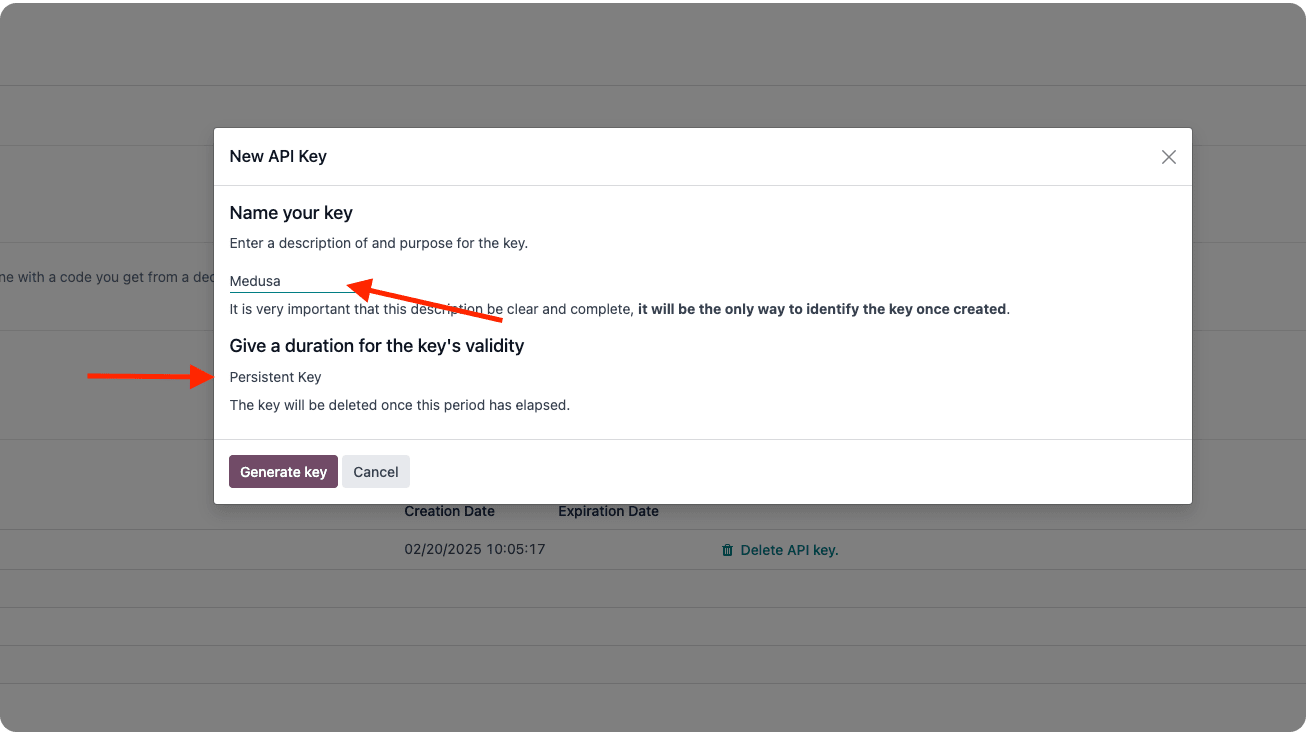
- Copy the generated API Key and use it as the
ODOO_API_KEYenvironment variable's value.
You will test that the Odoo Module works as expected in the next steps.
Step 4: Sync Products from Odoo to Medusa#
There are different use cases you can implement when integrating an ERP like Odoo. One of them is syncing products from the ERP to Medusa. This way, you can manage products in Odoo and have them reflected in your commerce platform.
To implement the syncing functionality, you need to create a workflow. A workflow is a series of queries and actions, called steps, that complete a task. You construct a workflow similar to how you create a JavaScript function, but with additional features like defining rollback logic for each step, performing long actions asynchronously, and tracking the progress of the steps.
After defining the workflow, you can execute it in other customizations, such as periodically or when an event occurs.
In this section, you'll create a workflow that syncs products from Odoo to Medusa. Then, you'll execute that workflow once a day using a scheduled job. The workflow has the following steps:
View step details
The only step you'll need to implement is the getProductsFromErp step. The other steps are available through Medusa's @medusajs/medusa/core-flows package.
getProductsFromErp#
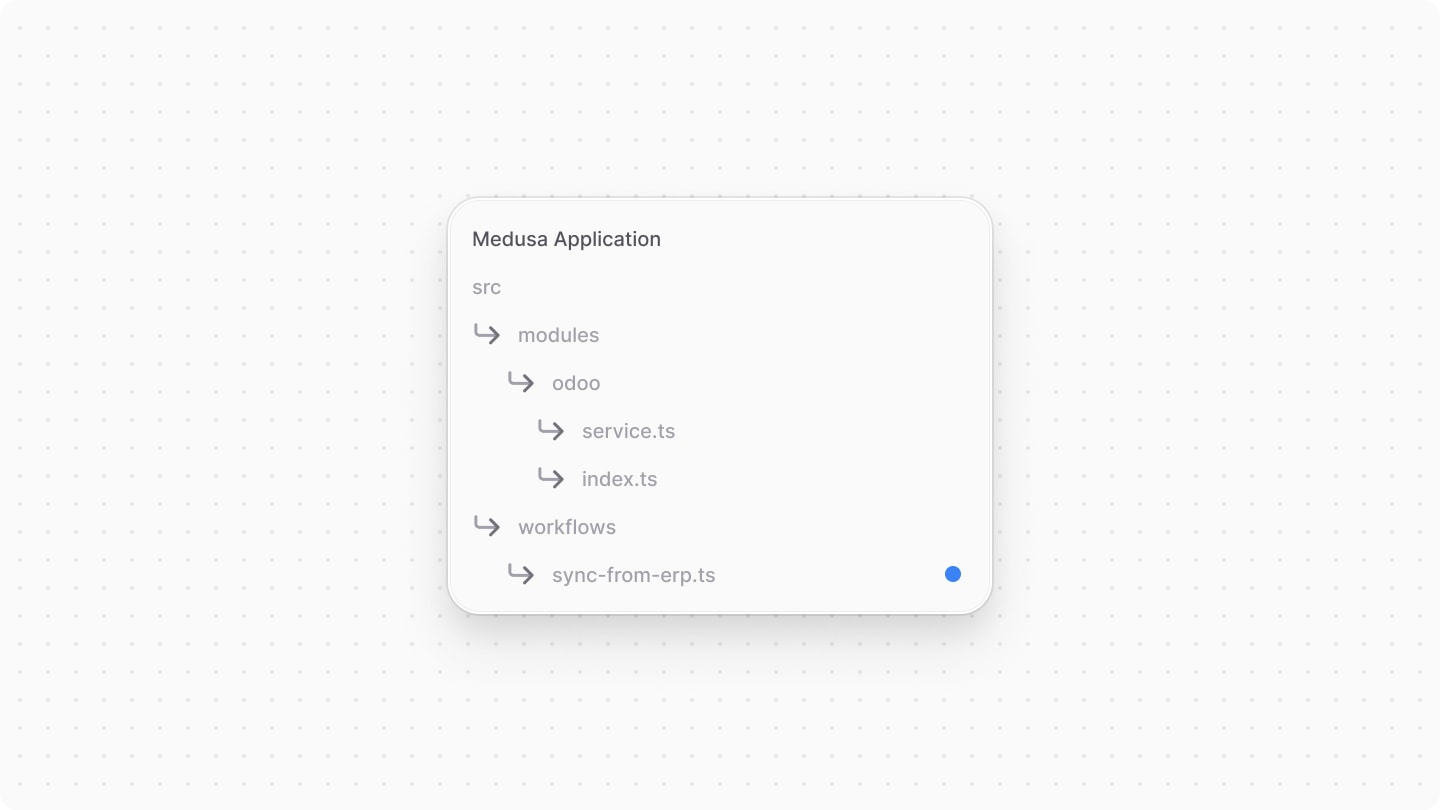
The first step of the workflow is to retrieve the products from the ERP. So, create the file src/workflows/sync-from-erp.ts with the following content:
1import { createStep, StepResponse } from "@medusajs/framework/workflows-sdk"2 3type Input = {4 offset: number5 limit: number6}7 8const getProductsFromErp = createStep(9 "get-products-from-erp",10 async (input: Input, { container }) => {11 const odooModuleService = container.resolve("odoo")12 13 const products = await odooModuleService.listProducts(undefined, input)14 15 return new StepResponse(products)16 }17)
You create a step using createStep from the Workflows SDK. It accepts two parameters:
- The step's name, which is
get-products-from-erp. - An async function that executes the step's logic. The function receives two parameters:
- The input data for the step, which are the pagination fields
offsetandlimit. - An object holding the workflow's context, including the Medusa Container that allows you to resolve Framework and commerce tools.
- The input data for the step, which are the pagination fields
In this step, you resolve the Odoo Module's service from the container and use its listProducts method to fetch products from Odoo. You pass the pagination options from the input data to the method.
A step must return an instance of StepResponse which accepts as a parameter the data to return, which is in this case the products.
Create Workflow#
You can now create the workflow that syncs the products from Odoo to Medusa.
In the same src/workflows/sync-from-erp.ts file, add the following imports:
1import { 2 createWorkflow, transform, WorkflowResponse,3} from "@medusajs/framework/workflows-sdk"4import { 5 createProductsWorkflow, updateProductsWorkflow, useQueryGraphStep,6} from "@medusajs/medusa/core-flows"7import { 8 CreateProductWorkflowInputDTO, UpdateProductWorkflowInputDTO,9} from "@medusajs/framework/types"
Then, add the workflow after the step:
1export const syncFromErpWorkflow = createWorkflow(2 "sync-from-erp",3 (input: Input) => {4 const odooProducts = getProductsFromErp(input)5 6 // @ts-ignore7 const { data: stores } = useQueryGraphStep({8 entity: "store",9 fields: [10 "default_sales_channel_id",11 ],12 })13 14 // @ts-ignore15 const { data: shippingProfiles } = useQueryGraphStep({16 entity: "shipping_profile",17 fields: ["id"],18 pagination: {19 take: 1,20 },21 }).config({ name: "shipping-profile" })22 23 const externalIdsFilters = transform({24 odooProducts,25 }, (data) => {26 return data.odooProducts.map((product) => `${product.id}`)27 })28 29 // @ts-ignore30 const { data: existingProducts } = useQueryGraphStep({31 entity: "product",32 fields: ["id", "external_id", "variants.*"],33 filters: {34 // @ts-ignore35 external_id: externalIdsFilters,36 },37 }).config({ name: "existing-products" })38 39 // TODO prepare products to create and update40 }41)
You create a workflow using createWorkflow from the Workflows SDK. It accepts the workflow's unique name as a first parameter.
It accepts as a second parameter a constructor function, which is the workflow's implementation. The function receives the pagination options as a parameter. In the workflow, you:
- Call the
getProductsFromErpstep to fetch products from Odoo. - Use the useQueryGraphStep to fetch the Medusa store configurations, sales channels, and shipping profiles. You'll use this data when creating the products in a later step.
- The
useQueryGraphStepuses Query, which is a tool that retrieves data across modules.
- The
- To figure out which products need to be updated, you retrieve products filtered by their
external_idfield, which you'll set to the Odoo product's ID when you create the products next.- Notice that you use
transformfrom the Workflows SDK to create the external IDs filters. That's because data manipulation is not allowed in a workflow. You can learn more about this and other restrictions in this documentation.
- Notice that you use
Next, you need to prepare the products that should be created or updated. To do that, replace the TODO with the following:
1const {2 productsToCreate,3 productsToUpdate,4} = transform({5 existingProducts,6 odooProducts,7 shippingProfiles,8 stores,9}, (data) => {10 const productsToCreate: CreateProductWorkflowInputDTO[] = []11 const productsToUpdate: UpdateProductWorkflowInputDTO[] = []12 13 data.odooProducts.forEach((odooProduct) => {14 const product: CreateProductWorkflowInputDTO | UpdateProductWorkflowInputDTO = {15 external_id: `${odooProduct.id}`,16 title: odooProduct.display_name,17 description: odooProduct.description || odooProduct.description_sale || "",18 status: odooProduct.is_published ? "published" : "draft",19 options: odooProduct.attribute_line_ids.length ? odooProduct.attribute_line_ids.map((attribute) => {20 return {21 title: attribute.attribute_id.display_name,22 values: attribute.value_ids.map((value) => value.display_name),23 }24 }) : [25 {26 title: "Default",27 values: ["Default"],28 },29 ],30 hs_code: odooProduct.hs_code || "",31 handle: odooProduct.website_url.replace("/shop/", ""),32 variants: [],33 shipping_profile_id: data.shippingProfiles[0].id,34 sales_channels: [35 {36 id: data.stores[0].default_sales_channel_id || "",37 },38 ],39 }40 41 const existingProduct = data.existingProducts.find((p) => p.external_id === product.external_id)42 if (existingProduct) {43 product.id = existingProduct.id44 }45 46 if (odooProduct.product_variant_ids?.length) {47 product.variants = odooProduct.product_variant_ids.map((variant) => {48 const options = {}49 if (variant.product_template_variant_value_ids.length) {50 variant.product_template_variant_value_ids.forEach((value) => {51 options[value.attribute_id.display_name] = value.name52 })53 } else {54 product.options?.forEach((option) => {55 options[option.title] = option.values[0]56 })57 }58 return {59 id: existingProduct ? existingProduct.variants.find((v) => v.sku === variant.code)?.id : undefined,60 title: variant.display_name.replace(`[${variant.code}] `, ""),61 sku: variant.code || undefined,62 options,63 prices: [64 {65 amount: variant.list_price,66 currency_code: variant.currency_id.display_name.toLowerCase(),67 },68 ],69 manage_inventory: false, // change to true if syncing inventory from Odoo70 metadata: {71 external_id: `${variant.id}`,72 },73 }74 })75 } else {76 product.variants?.push({77 id: existingProduct ? existingProduct.variants[0].id : undefined,78 title: "Default",79 options: {80 Default: "Default",81 },82 // @ts-ignore83 prices: [84 {85 amount: odooProduct.list_price,86 currency_code: odooProduct.currency_id.display_name.toLowerCase(),87 },88 ],89 metadata: {90 external_id: `${odooProduct.id}`,91 },92 manage_inventory: false, // change to true if syncing inventory from Odoo93 })94 }95 96 if (existingProduct) {97 productsToUpdate.push(product as UpdateProductWorkflowInputDTO)98 } else {99 productsToCreate.push(product as CreateProductWorkflowInputDTO)100 }101 })102 103 return {104 productsToCreate,105 productsToUpdate,106 }107})108 109// TODO create and update the products
You use transform again to prepare the products to create and update. It receives two parameters:
- An object with the data you'll use in the transform function.
- The transform function, which receives the object from the first parameter, and returns the data that can be used in the rest of the workflow.
In the transform function, you:
- Create the
productsToCreateandproductsToUpdatearrays to hold the products that should be created and updated, respectively. - Iterate over the products fetched from Odoo and create a product object for each. You set the product's properties based on the Odoo product's properties. If you want to add more properties, you can do so at this point.
- Most importantly, you set the
external_idto the Odoo product's ID, which allows you later to identify the product later when updating it or for other operations. - You also set the product's variants either to Odoo's variants or to a default variant. You set the product variant's Odoo ID in the
metadata.external_idfield, which allows you to identify the variant later when updating it or for other operations.
- Most importantly, you set the
- To determine if a product already exists, you check if the product's
external_idmatches an existing product'sexternal_id. You add it to the products to be updated. You apply a similar logic for the variants. - Finally, you return an object with the
productsToCreateandproductsToUpdatearrays.
You can now create and update the products in the workflow. Replace the TODO with the following:
You use the createProductsWorkflow and updateProductsWorkflow to create and update the products returned from the transform function. Since both of these are workflows, you use the runAsStep method to run them as steps in the current workflow.
Finally, a workflow must return a instance of WorkflowResponse passing it as a parameter the data to return, which in this case is the products fetched from Odoo.
You can now execute this workflow in other customizations, such as a scheduled job.
Create Scheduled Job#
In Medusa, you can run a task at a specified interval using a scheduled job. A scheduled job is an asynchronous function that runs at a regular interval during the Medusa application's runtime to perform tasks such as syncing products from Odoo to Medusa.
To create a scheduled job, create the file src/jobs/sync-products-from-erp.ts with the following content:
1import {2 MedusaContainer,3} from "@medusajs/framework/types"4import { syncFromErpWorkflow } from "../workflows/sync-from-erp"5import { OdooProduct } from "../modules/odoo/service"6 7export default async function syncProductsJob(container: MedusaContainer) {8 const limit = 109 let offset = 010 let total = 011 let odooProducts: OdooProduct[] = []12 13 console.log("Syncing products...")14 15 do {16 odooProducts = (await syncFromErpWorkflow(container).run({17 input: {18 limit,19 offset,20 },21 })).result.odooProducts22 23 offset += limit24 total += odooProducts.length25 } while (odooProducts.length > 0)26 27 console.log(`Synced ${total} products`)28}29 30export const config = {31 name: "daily-product-sync",32 schedule: "0 0 * * *", // Every day at midnight33}
In this file, you export:
- An asynchronous function, which is the task to execute at the specified schedule.
- A configuration object having the following properties:
name: A unique name for the scheduled job.schedule: A cron expression string indicating the schedule to run the job at. The specified schedule indicates that this job should run every day at midnight.
The scheduled job function accepts the Medusa container as a parameter. In the function, you define the pagination options for the products to fetch from Odoo. You then run the syncFromErpWorkflow workflow with the pagination options. You increment the offset by the limit each time you run the workflow until you fetch all the products.
Test it Out#
To test out syncing the products from Odoo to Medusa, first, change the schedule of the job in src/jobs/sync-products-from-erp.ts to run every minute:
Then, start the Medusa application with the following command:
A minute later, you should find the message Syncing products... in the console. Once the job finishes, you should see the message Synced <number> products, indicating the number of products synced.
You can also confirm that the products were synced by checking the products in the Medusa Admin dashboard.
If you encounter any issues, make sure the module options are set correctly as explained in this section.
Next Steps#
You now have the foundation for integrating Odoo with Medusa. You can expand on this integration to implement more use cases, such as syncing orders, restricting purchases of products based on custom rules, and checking inventory in Odoo before adding to the cart. You can find the approach to implement these use cases in this recipe.
If you're new to Medusa, check out the main documentation, where you'll get a more in-depth learning of all the concepts you've used in this guide and more.
To learn more about the commerce features that Medusa provides, check out Medusa's Commerce Modules.