Create Order Returns in the Storefront
In this tutorial, you'll learn how to let customers create order returns directly from your storefront.
Medusa supports automated Return Merchandise Authorization (RMA) flows for orders. Customers can create return requests for their orders, and merchants can manage these requests through the Medusa Admin dashboard. Medusa provides the necessary API routes and workflows to handle returns efficiently.
Summary#
In this tutorial, you'll customize the Next.js Starter Storefront to let customers create return requests for their orders directly from the storefront.
You can follow this tutorial whether you're new to Medusa or an advanced Medusa developer.

Step 1: Install a Medusa Application#
Start by installing the Medusa application on your machine with the following command:
You'll first be asked for the project's name. Then, when asked whether you want to install the Next.js Starter Storefront, choose Yes.
Afterward, the installation process will start, which will install the Medusa application as a monorepository in a directory with your project's name. The backend is installed in the apps/backend directory, and the Next.js Starter Storefront is installed in the apps/storefront directory.
Once the installation finishes successfully, the Medusa Admin dashboard will open with a form to create a new user. Enter the user's credentials and submit the form. Afterward, you can log in with the new user and explore the dashboard.
Step 2: Add Return Server Functions#
In this step, you'll add server functions to the Next.js Starter Storefront that let you send requests to the Medusa application for order returns. You'll use these functions later in the storefront pages.
apps/storefront directory of your project:cd apps/storefront List Return Reasons Function#
The first function sends a request to the List Return Reasons API route. It fetches the available return reasons, which customers can select from when creating a return request.
Create the file src/lib/data/returns.ts with the following content:
1"use server"2 3import { sdk } from "@lib/config"4import { getAuthHeaders, getCacheOptions } from "@lib/data/cookies"5import medusaError from "@lib/util/medusa-error"6import { HttpTypes } from "@medusajs/types"7 8export const listReturnReasons = async () => {9 const headers = {10 ...(await getAuthHeaders()),11 }12 13 const next = {14 ...(await getCacheOptions("return-reasons")),15 }16 17 return sdk.client18 .fetch<HttpTypes.StoreReturnReasonListResponse>(`/store/return-reasons`, {19 method: "GET",20 headers,21 next,22 cache: "force-cache",23 })24 .then(({ return_reasons }) => return_reasons)25 .catch((err) => medusaError(err))26}
You add the listReturnReasons function. It sends a GET request to the /store/return-reasons API route. The function returns the list of return reasons.
List Return Shipping Options Function#
Next, you'll add a function that sends a request to the List Shipping Options API route. It fetches the available shipping options for returns, which customers can select from when creating a return request.
In the same src/lib/data/returns.ts file, add the following function:
1export const listReturnShippingOptions = async (cartId: string) => {2 const headers = {3 ...(await getAuthHeaders()),4 }5 6 const next = {7 ...(await getCacheOptions("shipping-options")),8 }9 10 return sdk.client11 .fetch<HttpTypes.StoreShippingOptionListResponse>(`/store/shipping-options`, {12 method: "GET",13 query: {14 cart_id: cartId,15 is_return: true,16 },17 headers,18 next,19 cache: "force-cache",20 })21 .then(({ shipping_options }) => shipping_options)22 .catch((err) => medusaError(err))23}
You add the listReturnShippingOptions function. It sends a GET request to the /store/shipping-options API route and returns the shipping options.
The API route accepts the following query parameters:
cart_id: The ID of the cart associated with the order being returned.is_return: A boolean value set totrueto retrieve only shipping options for returns.
Create Return Function#
Finally, you'll add a function that sends a request to the Create Return API route. This creates a return request for an order.
In the same src/lib/data/returns.ts file, add the following function:
1export const createReturnRequest = async (2 state: {3 success: boolean4 error: string | null5 return: any | null6 },7 formData: FormData8): Promise<{9 success: boolean10 error: string | null11 return: any | null12}> => {13 const orderId = formData.get("order_id") as string14 const items = JSON.parse(formData.get("items") as string)15 const returnShippingOptionId = formData.get("return_shipping_option_id") as string16 const locationId = formData.get("location_id") as string17 18 if (!orderId || !items || !returnShippingOptionId) {19 return { 20 success: false, 21 error: "Order ID, items, and return shipping option are required", 22 return: null, 23 }24 }25 26 const headers = await getAuthHeaders()27 28 return await sdk.client29 .fetch<HttpTypes.StoreReturnResponse>(`/store/returns`, {30 method: "POST",31 body: {32 order_id: orderId,33 items,34 return_shipping: {35 option_id: returnShippingOptionId,36 },37 location_id: locationId,38 },39 headers,40 })41 .then(({ return: returnData }) => ({ 42 success: true, 43 error: null, 44 return: returnData, 45 }))46 .catch((err) => ({ 47 success: false, 48 error: err.message, 49 return: null, 50 }))51}
You add the createReturnRequest function. It sends a POST request to the /store/returns API route. The function accepts a FormData object containing the order ID, the items to be returned, the selected return shipping option ID, and the stock location ID to which the returned items will be sent.
The function returns an object with the following properties:
success: Whether the return request was created successfully.error: The error message if the request failed, ornullif it succeeded.return: The created return object if the request succeeded, ornullif it failed.
Step 3: Add Return Utilities#
In this step, you'll add a file with utility functions that will mainly help you determine whether an order and its items are eligible for return.
An item is eligible for return if it has been delivered and not yet returned. An order is eligible for return if it has at least one item that's eligible for return.
Create the file src/lib/util/returns.ts with the following content:
1import { HttpTypes } from "@medusajs/types"2 3export type ItemWithDeliveryStatus = HttpTypes.StoreOrderLineItem & {4 deliveredQuantity: number5 returnableQuantity: number6 isDelivered: boolean7 isReturnable: boolean8}9 10export const calculateReturnableQuantity = (item: HttpTypes.StoreOrderLineItem): number => {11 const deliveredQuantity = item.detail?.delivered_quantity || 012 const returnRequestedQuantity = item.detail?.return_requested_quantity || 013 const returnReceivedQuantity = item.detail?.return_received_quantity || 014 const writtenOffQuantity = item.detail?.written_off_quantity || 015 16 return Math.max(17 0, 18 deliveredQuantity - returnRequestedQuantity - returnReceivedQuantity - writtenOffQuantity19 )20}21 22export const isItemReturnable = (item: HttpTypes.StoreOrderLineItem): boolean => {23 return calculateReturnableQuantity(item) > 024}25 26export const hasReturnableItems = (order: HttpTypes.StoreOrder): boolean => {27 return order.items?.some(isItemReturnable) || false28}29 30export const enhanceItemsWithReturnStatus = (items: HttpTypes.StoreOrderLineItem[]): ItemWithDeliveryStatus[] => {31 return items.map((item) => {32 const deliveredQuantity = item.detail?.delivered_quantity || 033 const returnableQuantity = calculateReturnableQuantity(item)34 35 return {36 ...item,37 deliveredQuantity,38 returnableQuantity,39 isDelivered: deliveredQuantity > 0,40 isReturnable: returnableQuantity > 0,41 }42 })43}
You add the following utility functions:
calculateReturnableQuantity: Calculates the returnable quantity for a given item. It subtracts quantities that have been returned, requested for return, or written off from the delivered quantity.isItemReturnable: Determines if a given item is returnable by checking if its returnable quantity is greater than zero.hasReturnableItems: Checks if an order has at least one item that is returnable.enhanceItemsWithReturnStatus: Adds return status information to each item in the order. It adds the following properties:deliveredQuantity: The quantity of the item that has been delivered.returnableQuantity: The quantity of the item that is returnable.isDelivered: A boolean indicating whether any quantity of the item has been delivered.isReturnable: A boolean indicating whether any quantity of the item is returnable.
You'll use these utility functions later in the storefront pages. They help determine whether to allow customers to create a return request for their order. They also help determine which items can be returned.
Step 4: Add Return Item Selector#
In this step, you'll add a component that lets customers select the quantity to return of items from their order. Later, you'll use this component in the return request page.

The component displays each item's details. It lets customers specify the quantity to return based on the returnable quantity of the item. It also lets customers select a return reason for the item and provide an optional note.
To create the component, create the file src/modules/account/components/return-item-selector/index.tsx with the following content:
8import { ItemWithDeliveryStatus } from "../../../../lib/util/returns"9 10export type ReturnItemSelection = {11 id: string12 quantity: number13 return_reason_id?: string14 note?: string15}16 17type ReturnItemSelectorProps = {18 items: ItemWithDeliveryStatus[]19 returnReasons: HttpTypes.StoreReturnReason[]20 onItemSelectionChange: (item: ReturnItemSelection) => void21 selectedItems: ReturnItemSelection[]22}23 24const ReturnItemSelector: React.FC<ReturnItemSelectorProps> = ({25 items,26 returnReasons,27 onItemSelectionChange,28 selectedItems,29}) => {30 const handleQuantityChange = ({31 item_id,32 quantity,33 selected_item,34 }: {35 item_id: string36 quantity: number37 selected_item?: ReturnItemSelection38 }) => {39 const item = items.find((i) => i.id === item_id)40 if (!item || !item.isReturnable) {return}41 42 const maxQuantity = item.returnableQuantity43 const newQuantity = Math.max(0, Math.min(quantity, maxQuantity))44 45 onItemSelectionChange({46 id: item_id,47 quantity: newQuantity,48 return_reason_id: selected_item?.return_reason_id || "",49 note: selected_item?.note || "",50 })51 }52 53 const handleReturnReasonChange = ({54 item_id,55 return_reason_id,56 selected_item,57 }: {58 item_id: string59 return_reason_id: string60 selected_item?: ReturnItemSelection61 }) => {62 onItemSelectionChange({63 id: item_id,64 quantity: selected_item?.quantity || 0,65 return_reason_id,66 note: selected_item?.note || "",67 })68 }69 70 const handleNoteChange = ({71 item_id,72 note,73 selected_item,74 }: {75 item_id: string76 note: string77 selected_item?: ReturnItemSelection78 }) => {79 onItemSelectionChange({80 id: item_id,81 quantity: selected_item?.quantity || 0,82 return_reason_id: selected_item?.return_reason_id || "",83 note,84 })85 }86 87 // TODO render component88}89 90export default ReturnItemSelector
You create the ReturnItemSelector component that accepts the following props:
items: The list of items in the order, enhanced with their delivery and return status.returnReasons: The list of available return reasons.onItemSelectionChange: A callback function that is called when the customer selects or updates an item to return.selectedItems: The list of items that the customer has selected to return.
In the component, you define three functions:
handleQuantityChange: Called when the customer changes the quantity to return for an item.handleReturnReasonChange: Called when the customer selects a return reason for an item.handleNoteChange: Called when the customer adds or updates a note for an item.
Next, you'll add a return statement that renders the item selector. Replace the TODO in the ReturnItemSelector component with the following:
1return (2 <div className="space-y-4">3 {items.map((item) => {4 const itemSelection = selectedItems.find((si) => si.id === item.id)5 const currentQuantity = itemSelection?.quantity || 06 const currentReturnReason = itemSelection?.return_reason_id || ""7 const currentNote = itemSelection?.note || ""8 9 return (10 <div11 key={item.id}12 className={`p-4 border rounded-lg ${13 !item.isReturnable ? "opacity-60 bg-gray-50" : ""14 }`}15 >16 <div className="flex items-start gap-4">17 <div className="flex-shrink-0">18 <div className="flex w-16">19 <Thumbnail thumbnail={item.thumbnail} images={[]} size="square" />20 </div>21 </div>22 23 <div className="flex-1 min-w-0">24 <div className="flex items-center gap-2 mb-1">25 <h4 className="txt-medium truncate">26 {item.title}27 </h4>28 {!item.isReturnable && (29 // @ts-ignore30 <Badge color="grey" size="small">31 {!item.isDelivered ? "Not delivered" : "Not returnable"}32 </Badge>33 )}34 </div>35 {item.variant && (36 <p className="txt-small text-ui-fg-subtle">37 {item.variant.title}38 </p>39 )}40 <p className="txt-small text-ui-fg-subtle">41 {item.isReturnable ? (42 <>Available to return: {item.returnableQuantity} {item.returnableQuantity === 1 ? "item" : "items"}</>43 ) : item.isDelivered ? (44 <>Delivered: {item.deliveredQuantity} of {item.quantity} {item.quantity === 1 ? "item" : "items"} (already processed)</>45 ) : (46 <>Delivered: 0 of {item.quantity} {item.quantity === 1 ? "item" : "items"}</>47 )}48 </p>49 </div>50 51 <div className="flex items-center gap-2">52 <span className="txt-small">53 {convertToLocale({54 amount: item.unit_price,55 currency_code: "USD", // Default currency, should be passed from parent56 })}57 </span>58 59 {item.isReturnable ? (60 <div className="flex items-center gap-2">61 {/* @ts-ignore */}62 <IconButton63 size="small"64 onClick={() => handleQuantityChange({65 item_id: item.id,66 quantity: currentQuantity - 1,67 selected_item: itemSelection,68 })}69 disabled={currentQuantity <= 0}70 >71 <Minus />72 </IconButton>73 74 <span className="w-8 text-center txt-small">75 {currentQuantity}76 </span>77 78 {/* @ts-ignore */}79 <IconButton80 size="small"81 onClick={() => handleQuantityChange({82 item_id: item.id,83 quantity: currentQuantity + 1,84 selected_item: itemSelection,85 })}86 disabled={currentQuantity >= item.returnableQuantity}87 >88 <Plus />89 </IconButton>90 </div>91 ) : (92 <div className="txt-small text-ui-fg-subtle">93 Not available94 </div>95 )}96 </div>97 </div>98 99 {item.isReturnable && currentQuantity > 0 && (100 <div className="mt-4 pt-4 border-t border-ui-border-base space-y-3">101 <div>102 <label className="block txt-small-plus mb-2">103 Return Reason (Optional)104 </label>105 <Select106 value={currentReturnReason}107 onValueChange={(value) => handleReturnReasonChange({108 item_id: item.id,109 return_reason_id: value,110 selected_item: itemSelection,111 })}112 >113 <Select.Trigger>114 <Select.Value placeholder="Select a reason..." />115 </Select.Trigger>116 <Select.Content>117 {returnReasons.map((reason) => (118 <Select.Item key={reason.id} value={reason.id}>119 {reason.label}120 </Select.Item>121 ))}122 </Select.Content>123 </Select>124 </div>125 126 <div>127 <label className="block txt-small-plus mb-2">128 Additional Note (Optional)129 </label>130 <Textarea131 value={currentNote}132 onChange={(e) => handleNoteChange({133 item_id: item.id,134 note: e.target.value,135 selected_item: itemSelection,136 })}137 placeholder="Please provide any additional information about this return..."138 rows={2}139 maxLength={500}140 />141 <p className="txt-xsmall text-ui-fg-subtle mt-1">142 {currentNote.length}/500 characters143 </p>144 </div>145 </div>146 )}147 </div>148 )149 })}150 151 {selectedItems.length > 0 && (152 <div className="mt-4 p-4 bg-gray-50 rounded-lg">153 <h4 className="txt-medium-plus mb-2">Selected Items Summary</h4>154 <div className="space-y-3">155 {selectedItems.map((selectedItem) => {156 const item = items.find((i) => i.id === selectedItem.id)157 if (!item) {return null}158 159 const returnReason = returnReasons.find((r) => r.id === selectedItem.return_reason_id)160 161 return (162 <div key={selectedItem.id} className="border-b border-gray-200 pb-2 last:border-b-0">163 <div className="flex justify-between txt-small mb-1">164 <span>{item.title} x {selectedItem.quantity}</span>165 <span>166 {convertToLocale({167 amount: item.unit_price * selectedItem.quantity,168 currency_code: "USD", // Default currency, should be passed from parent169 })}170 </span>171 </div>172 {returnReason && (173 <p className="txt-xsmall text-ui-fg-subtle">174 Reason: {returnReason.label}175 </p>176 )}177 {selectedItem.note && (178 <p className="txt-xsmall text-ui-fg-subtle">179 Note: {selectedItem.note}180 </p>181 )}182 </div>183 )184 })}185 </div>186 </div>187 )}188 </div>189)
You render the list of items in the order. For each item, you display its details, including its title, variant, price, and returnable status.
If the item is returnable, you display controls that let customers select the quantity to return, choose a return reason from a dropdown, and provide an optional note.
You also display a summary of the selected items to return at the bottom of the component.
Step 5: Add Return Shipping Selector#
In this step, you'll add a component that lets customers select a shipping option for their return request. Later, you'll use this component in the return request page.

The component will display the available shipping options for returns, along with their name and price. For shipping options whose price type is calculated by the associated fulfillment provider, the component will retrieve its calculated price from the Medusa application.
To create the component, create the file src/modules/account/components/return-shipping-selector/index.tsx with the following content:
10import { convertToLocale } from "@lib/util/money"11import { calculatePriceForShippingOption } from "@lib/data/fulfillment"12import { Loader } from "@medusajs/icons"13import Radio from "@modules/common/components/radio"14 15type ReturnShippingSelectorProps = {16 shippingOptions: HttpTypes.StoreCartShippingOption[]17 selectedOption: string18 onOptionSelect: (optionId: string) => void19 cartId: string20 currencyCode: string21}22 23const ReturnShippingSelector: React.FC<ReturnShippingSelectorProps> = ({24 shippingOptions,25 selectedOption,26 onOptionSelect,27 cartId,28 currencyCode,29}) => {30 const [isLoadingPrices, setIsLoadingPrices] = useState(true)31 const [calculatedPricesMap, setCalculatedPricesMap] = useState<32 Record<string, number>33 >({})34 35 useEffect(() => {36 setIsLoadingPrices(true)37 38 if (shippingOptions?.length) {39 const promises = shippingOptions40 .filter((sm) => sm.price_type === "calculated")41 .map((sm) => calculatePriceForShippingOption(sm.id, cartId))42 43 if (promises.length) {44 Promise.allSettled(promises).then((res) => {45 const pricesMap: Record<string, number> = {}46 res47 .filter((r) => r.status === "fulfilled")48 .forEach((p) => (pricesMap[p.value?.id || ""] = p.value?.amount!))49 50 setCalculatedPricesMap(pricesMap)51 setIsLoadingPrices(false)52 })53 } else {54 setIsLoadingPrices(false)55 }56 } else {57 setIsLoadingPrices(false)58 }59 }, [shippingOptions, cartId])60 61 if (shippingOptions.length === 0) {62 return (63 <div className="p-4 border border-yellow-200 bg-yellow-50 rounded-lg">64 <p className="text-yellow-800 text-sm">65 No return shipping options are currently available. Please contact customer service for assistance.66 </p>67 </div>68 )69 }70 71 // TODO render component72}73 74export default ReturnShippingSelector
You create the ReturnShippingSelector component that accepts the following props:
shippingOptions: The list of available shipping options for returns.selectedOption: The ID of the currently selected shipping option.onOptionSelect: A callback function that is called when the customer selects a shipping option.cartId: The ID of the cart associated with the order being returned.currencyCode: The currency code to use for displaying prices.
In the component, you define a useEffect hook that retrieves the calculated prices for shipping options with price type calculated. The hook updates the component's state with the retrieved prices.
Next, you'll add a return statement that renders the shipping selector. Replace the TODO in the ReturnShippingSelector component with the following:
1return (2 <RadioGroup3 value={selectedOption}4 onChange={onOptionSelect}5 >6 <div className="space-y-3">7 {shippingOptions.map((option) => (8 <RadioGroup.Option9 key={option.id}10 value={option.id}11 className={clx(12 "p-4 border rounded-lg cursor-pointer transition-colors",13 {14 "border-ui-fg-interactive bg-ui-bg-interactive/5":15 selectedOption === option.id,16 "border-gray-200 hover:border-gray-300":17 selectedOption !== option.id,18 }19 )}20 >21 <div className="flex items-center gap-3">22 <Radio23 checked={selectedOption === option.id}24 data-testid={`shipping-option-${option.id}`}25 />26 27 <div className="flex-1">28 <div className="flex items-center justify-between">29 <h4 className="txt-medium">30 {option.name}31 </h4>32 <span className="txt-medium">33 {option.price_type === "flat" ? (34 convertToLocale({35 amount: option.amount!,36 currency_code: currencyCode,37 })38 ) : calculatedPricesMap[option.id] ? (39 convertToLocale({40 amount: calculatedPricesMap[option.id],41 currency_code: currencyCode,42 })43 ) : isLoadingPrices ? (44 <Loader />45 ) : (46 "-"47 )}48 </span>49 </div>50 51 {option.data && typeof option.data === "object" && option.data !== null && "description" in option.data && (52 <p className="txt-small mt-1">53 {String(option.data.description)}54 </p>55 )}56 </div>57 </div>58 </RadioGroup.Option>59 ))}60 </div>61 </RadioGroup>62)
You render the list of available shipping options for returns. For each option, you display its name and price.
If a shipping option's price type is calculated, you display the calculated price retrieved from the Medusa application.
Step 6: Add Request Return Page#
In this step, you'll add the page that lets customers create a return request for their order. You'll add a template component that contains the main logic of the page, and a page component that fetches the necessary data and renders the template.
Request Return Template#
First, you'll add the template component. Create the file src/modules/account/templates/return-request-template.tsx with the following content:
12import { Button } from "@medusajs/ui"13 14type ReturnRequestTemplateProps = {15 order: HttpTypes.StoreOrder16 shippingOptions: HttpTypes.StoreCartShippingOption[]17 returnReasons: HttpTypes.StoreReturnReason[]18}19 20const ReturnRequestTemplate: React.FC<ReturnRequestTemplateProps> = ({21 order,22 shippingOptions,23 returnReasons,24}) => {25 const [selectedItems, setSelectedItems] = useState<ReturnItemSelection[]>([])26 const [selectedShippingOption, setSelectedShippingOption] = useState("")27 const [state, formAction] = useActionState(createReturnRequest, {28 success: false,29 error: null,30 return: null,31 })32 33 // Get all items and categorize them based on delivered quantity and returnable quantity34 const itemsWithDeliveryStatus = enhanceItemsWithReturnStatus(order.items || [])35 36 const handleItemSelection = ({37 id,38 quantity,39 return_reason_id,40 note,41 }: ReturnItemSelection) => {42 setSelectedItems((prev) => {43 const existing = prev.find((item) => item.id === id)44 if (existing) {45 if (quantity === 0) {46 return prev.filter((item) => item.id !== id)47 }48 return prev.map((item) => {49 return item.id === id ? 50 { ...item, quantity, return_reason_id, note } : 51 item52 })53 } else if (quantity > 0) {54 return [...prev, { id, quantity, return_reason_id, note }]55 }56 return prev57 })58 }59 60 const handleSubmit = (formData: FormData) => {61 formData.append("order_id", order.id)62 formData.append("items", JSON.stringify(selectedItems))63 formData.append("return_shipping_option_id", selectedShippingOption)64 // @ts-expect-error issue in HTTP types65 const locationId = shippingOptions.find((opt) => opt.id === selectedShippingOption)?.service_zone.fulfillment_set.location.id66 formData.append("location_id", locationId)67 formAction(formData)68 }69 70 // TODO render component71 72}73 74export default ReturnRequestTemplate
You create the ReturnRequestTemplate component that accepts the following props:
order: The order for which the return request is being created.shippingOptions: The list of available shipping options for returns.returnReasons: The list of available return reasons.
In the component, you define the following variables and functions:
selectedItems: A state variable that holds the list of items customers have selected to return.selectedShippingOption: A state variable that holds the ID of the selected shipping option for the return.stateandformAction: Variables returned by React'suseActionStatehook that manage the state of the return request creation action.itemsWithDeliveryStatus: A variable that holds the list of items in the order, enhanced with their delivery and return status using theenhanceItemsWithReturnStatusutility function.handleItemSelection: A function that updates theselectedItemsstate when customers select or update an item to return.handleSubmit: A function that handles the form submission to create the return request. It appends the necessary data to aFormDataobject and calls theformActionfunction.
Next, you'll add a return statement that shows a success message after the return request is created successfully. Replace the TODO in the ReturnRequestTemplate component with the following:
1if (state.success && state.return) {2 return (3 <div className="flex flex-col justify-center gap-y-4">4 <div className="flex gap-2 justify-between items-center">5 <h1 className="text-2xl-semi">Return Request Submitted</h1>6 <LocalizedClientLink7 href="/account/orders"8 className="flex gap-2 items-center text-ui-fg-subtle hover:text-ui-fg-base"9 >10 <XMark /> Back to orders11 </LocalizedClientLink>12 </div>13 <div className="bg-white p-6 rounded-lg border">14 <div className="text-center">15 <h2 className="text-xl-semi mb-4">Return Request Created Successfully</h2>16 <p className="text-base-regular mb-4">17 Your return request has been submitted. Return ID: <strong>{state.return.id}</strong>18 </p>19 <p className="text-small-regular text-ui-fg-subtle">20 Our support team may contact you for further information regarding your return.21 </p>22 </div>23 </div>24 </div>25 )26}27 28// TODO render component
If the return request was created successfully, you display a success message with the return ID and a link to go back to the orders page.
Finally, you'll add a return statement that renders the main content of the return request page. Replace the TODO in the ReturnRequestTemplate component with the following:
1return (2 <div className="flex flex-col justify-center gap-y-4">3 <div className="flex gap-2 justify-between items-center">4 <h1 className="text-2xl-semi">Request Return</h1>5 <LocalizedClientLink6 href={`/account/orders/details/${order.id}`}7 className="flex gap-2 items-center text-ui-fg-subtle hover:text-ui-fg-base"8 >9 <XMark /> Back to order details10 </LocalizedClientLink>11 </div>12 13 <div>14 <div className="mb-6">15 <h2 className="text-xl-semi mb-2">Order #{order.display_id}</h2>16 <div className="flex items-center gap-4 text-small-regular text-ui-fg-subtle mb-4">17 <span>Ordered: {new Date(order.created_at).toDateString()}</span>18 <span>Total: {convertToLocale({19 amount: order.total,20 currency_code: order.currency_code,21 })}</span>22 </div>23 <p className="text-base-regular text-ui-fg-subtle">24 You can request a return for items that have been delivered. Select the items you'd like to return and choose a return shipping option.25 </p>26 </div>27 28 {itemsWithDeliveryStatus.length === 0 ? (29 <div className="text-center py-8">30 <p className="text-base-regular text-ui-fg-subtle">31 No items available in this order.32 </p>33 </div>34 ) : (35 <form action={handleSubmit} className="space-y-6">36 <div>37 <h3 className="txt-medium-plus mb-4">Items to Return</h3>38 <ReturnItemSelector39 items={itemsWithDeliveryStatus}40 returnReasons={returnReasons}41 onItemSelectionChange={handleItemSelection}42 selectedItems={selectedItems}43 />44 </div>45 46 <div>47 <h3 className="txt-medium-plus mb-4">Choose Return Shipping</h3>48 <ReturnShippingSelector49 shippingOptions={shippingOptions}50 selectedOption={selectedShippingOption}51 onOptionSelect={setSelectedShippingOption}52 cartId={(order as any).cart.id}53 currencyCode={order.currency_code}54 />55 </div>56 57 58 {state.error && (59 <div className="bg-red-50 border border-red-200 rounded-md p-4">60 <p className="text-red-800 text-sm">{state.error}</p>61 </div>62 )}63 64 <div className="flex justify-end">65 <Button 66 type="submit" 67 variant="primary"68 disabled={selectedItems.length === 0 || selectedShippingOption === ""}69 >70 Request Return71 </Button>72 </div>73 </form>74 )}75 </div>76 </div>77)
You render the main content of the return request page. You display the order details, including the order ID, order date, and total amount.
You also display the item and shipping selector components that you created earlier.
Finally, you show a submit button that lets customers submit the return request.
Request Return Page#
Next, you'll add the page component that fetches the necessary data and renders the ReturnRequestTemplate component.
Create the file src/app/[countryCode]/(main)/account/@dashboard/orders/return/[id]/page.tsx with the following content:
5import { notFound } from "next/navigation"6 7type Props = {8 params: Promise<{ id: string }>9}10 11export async function generateMetadata(props: Props): Promise<Metadata> {12 const params = await props.params13 const order = await retrieveOrder(params.id).catch(() => null)14 15 if (!order) {16 notFound()17 }18 19 return {20 title: `Return Request - Order #${order.display_id}`,21 description: `Request a return for your order`,22 }23}24 25export default async function ReturnRequestPage(props: Props) {26 const params = await props.params27 28 const order = await retrieveOrder(params.id).catch(() => null)29 30 if (!order) {31 return notFound()32 }33 34 // Get shipping options and return reasons35 const [shippingOptions, returnReasons] = await Promise.all([36 listReturnShippingOptions((order as any).cart.id),37 listReturnReasons(),38 ])39 40 return <ReturnRequestTemplate order={order} shippingOptions={shippingOptions} returnReasons={returnReasons} />41}
You create the ReturnRequestPage component that fetches the order details, available return shipping options, and return reasons.
If the order is not found, you return a 404 page. Otherwise, you render the ReturnRequestTemplate component with the fetched data.
Retrieve Cart with Order Data#
Since you need the cart ID to retrieve data like return shipping options, you need to retrieve the cart along with the order data. You can do this by adding +cart.id to the fields query parameter when retrieving the order.
In src/lib/data/orders.ts, update the retrieveOrder function to include the cart in the fields parameter:
1export const retrieveOrder = async (id: string) => {2 // ...3 4 return sdk.client5 .fetch<HttpTypes.StoreOrderResponse>(`/store/orders/${id}`, {6 query: {7 fields:8 "*payment_collections.payments,*items,*items.metadata,*items.variant,*items.product,+cart.id",9 },10 // ...11 })12 // ...13}
You add +cart.id to the fields parameter to ensure that the cart ID is included in the order data.
Step 7: Add Link to Request Return Page#
Before you test the return request page, you'll add a link to the page from the order details page.
In src/modules/order/templates/order-details-template.tsx, add the following imports at the top of the file:
Then, in the OrderDetailsTemplate component, add the following variable:
You add a variable to check whether the order has any returnable items using the hasReturnableItems utility function.
Finally, in the return statement, find the following lines that display a button to go back to the orders page:
And replace them with the following:
1<div className="flex gap-2 items-center">2 {hasReturnableItemsInOrder && (3 <LocalizedClientLink href={`/account/orders/return/${order.id}`}>4 {/* @ts-ignore */}5 <Button variant="secondary" size="small">6 Request Return7 </Button>8 </LocalizedClientLink>9 )}10 <LocalizedClientLink11 href="/account/orders"12 className="flex gap-2 items-center text-ui-fg-subtle hover:text-ui-fg-base"13 data-testid="back-to-overview-button"14 >15 <XMark /> Back to overview16 </LocalizedClientLink>17</div>
You add a button that links to the return request page next to the "Back to overview" link. The button is displayed only if the order has returnable items.
Test the Return Request Page#
Now that you've added the return request page and the necessary components, you can test the functionality.
First, run the following command from the apps/backend directory to start the development server:
And run the following command from the storefront directory to start the storefront development server:
Prerequisites#
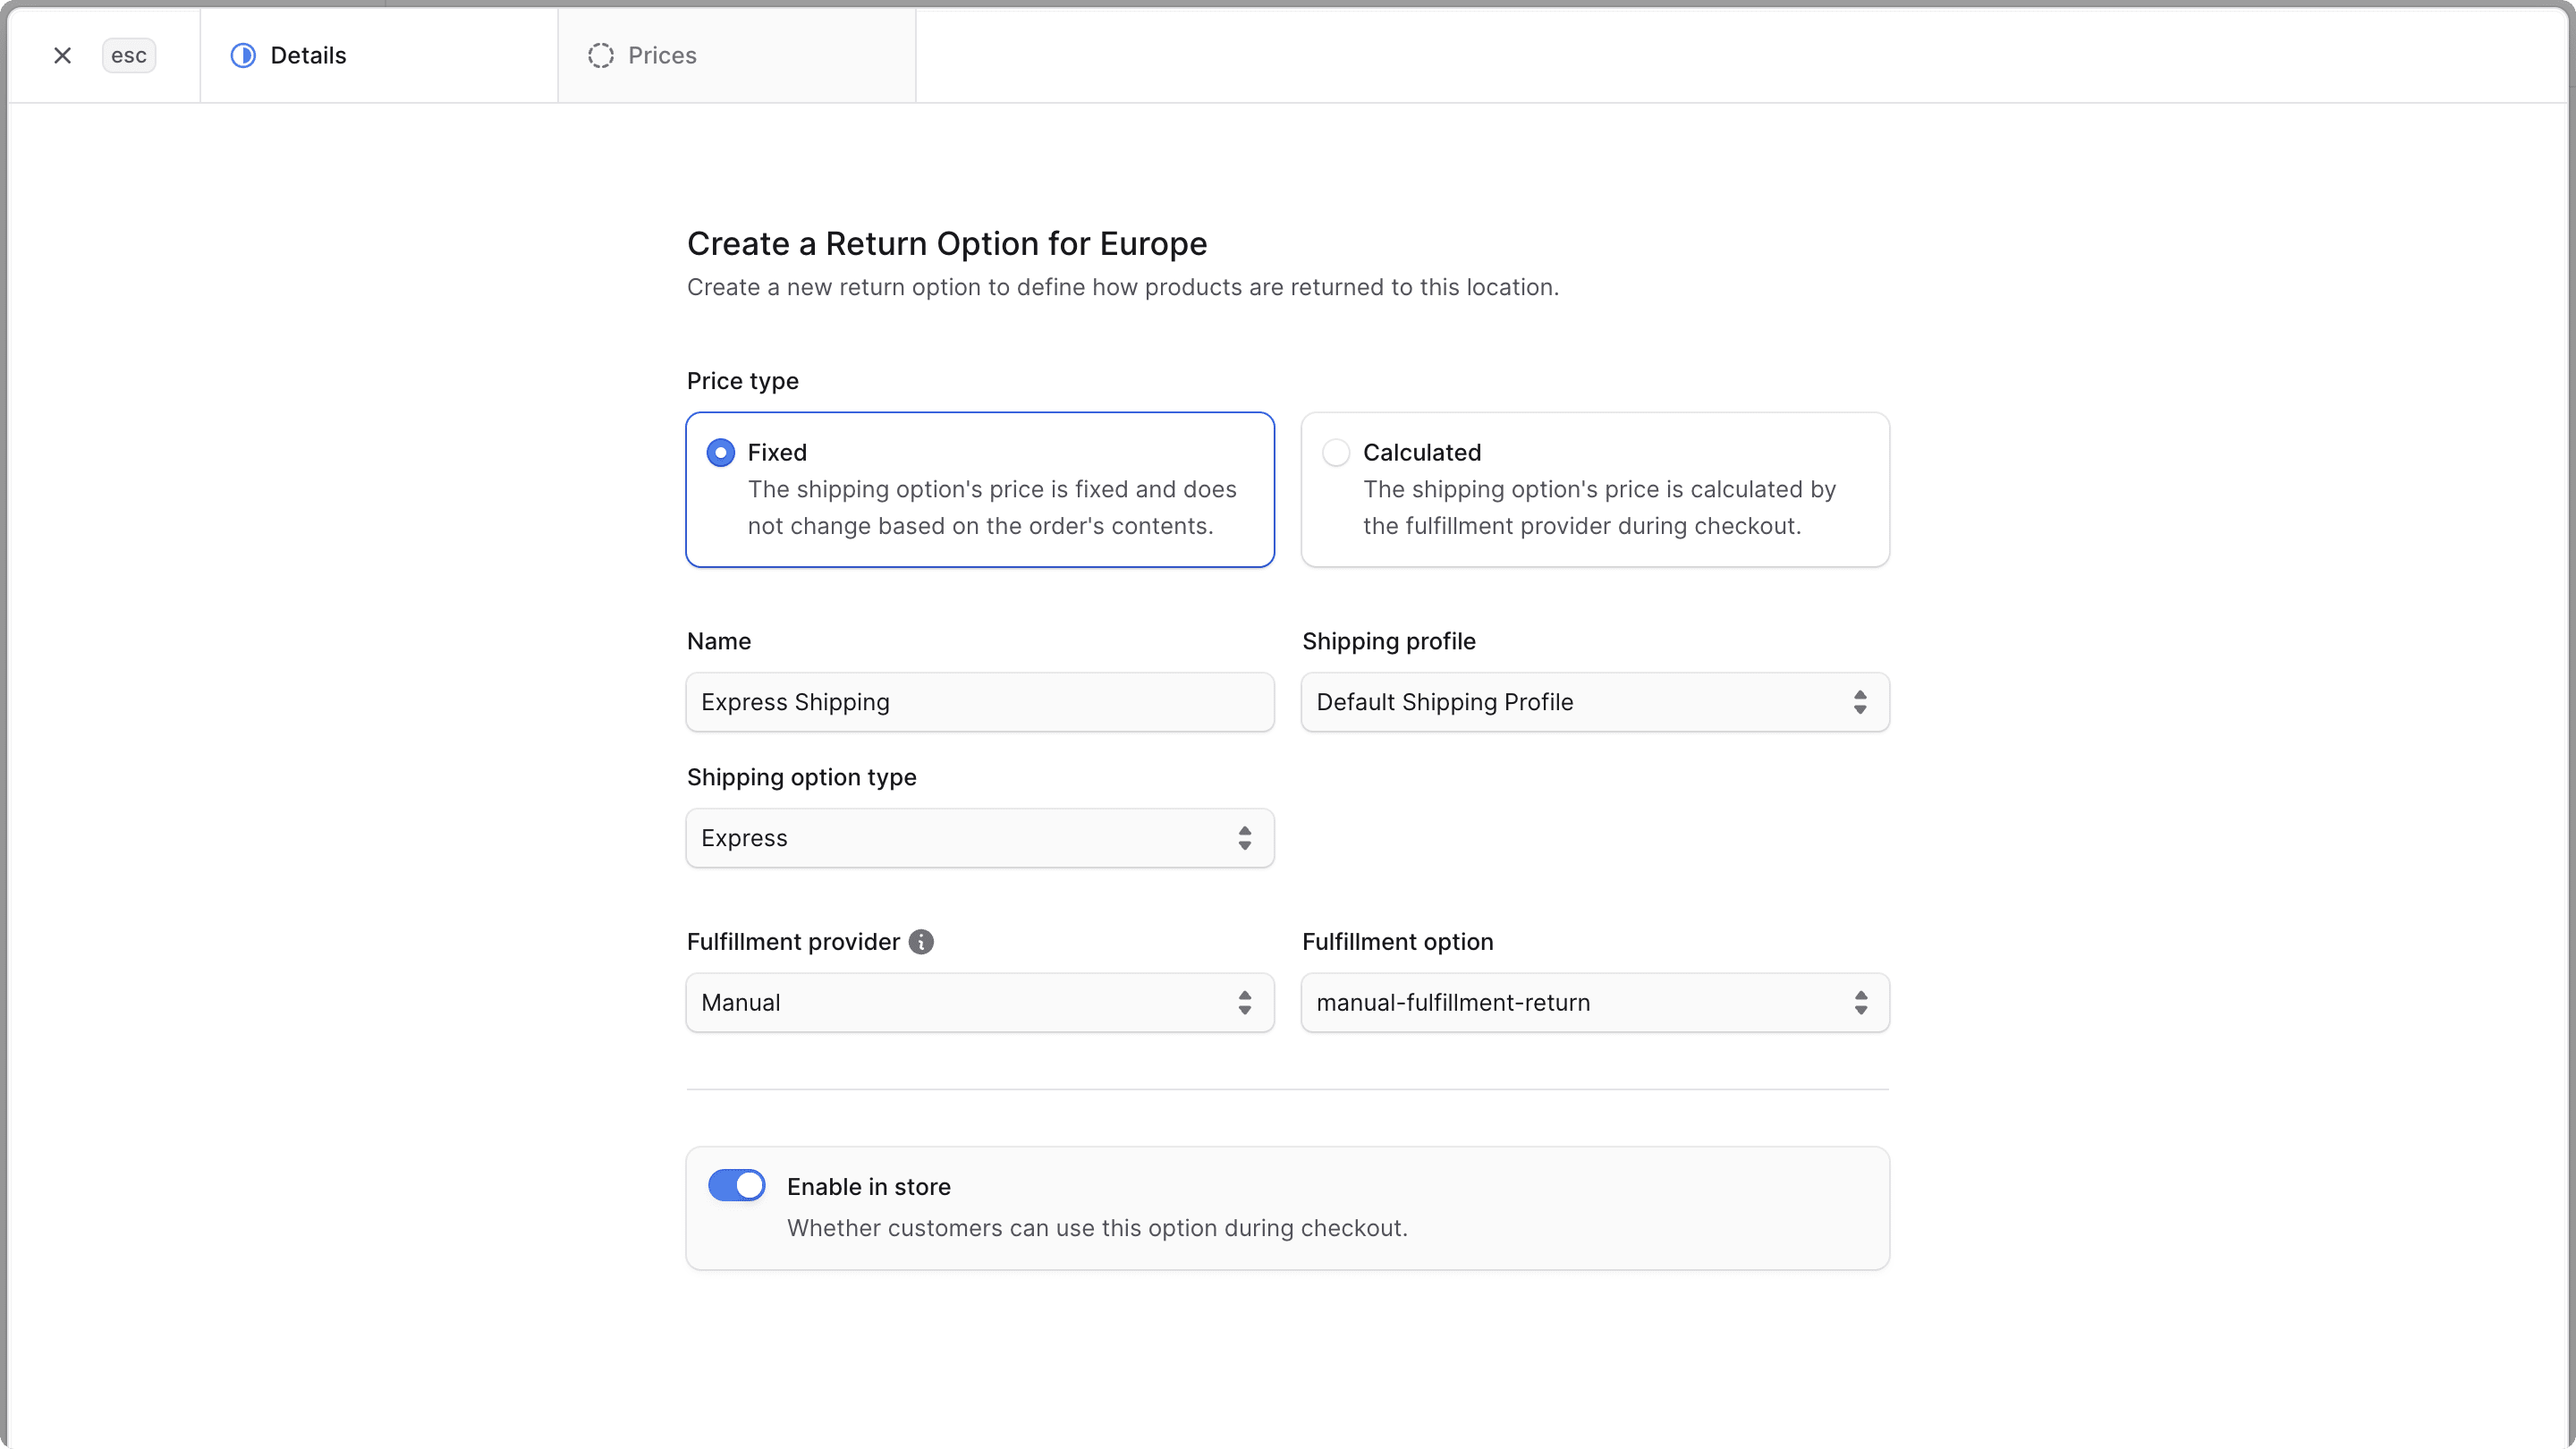
Create Return Shipping Options
Before you can test the return request page, you need to create return shipping options in the Medusa Admin. To do that:
- Open the Medusa Admin in your browser at
localhost:9000/appand log in. - Go to Settings -> Locations & Shipping.
- Click on "View details" of a location to add the shipping options to.
- In the Shipping Options section, find the "Return options" subsection and click "Create option".
- In the form, enter the shipping option's details and price.
- Click "Save" to create the return shipping option.
You can learn more about creating a shipping option in the Manage Locations user guide.
Create Return Reasons
Next, you need to create return reasons in the Medusa Admin. To do that:
- In the Medusa Admin, go to Settings -> Return Reasons.
- Click "Create" to add a new return reason.
- In the form, enter the return reason's label and value.
- Click "Save" to create the return reason.
You can learn more about creating return reasons in the Manage Return Reasons user guide.

Create Customer Account
Next, you need to create a customer account from the Next.js Starter Storefront. To do that:
- Go to Account.
- Click the
Join uslink. - Enter the customer's details like email and password.
- Click "Join" to create the account.

Place an Order
As a logged-in customer, place an order from the Next.js Starter Storefront. You can add an item to the cart, proceed to checkout, and complete the order. You'll see an order confirmation page afterward.

Deliver Items in the Order
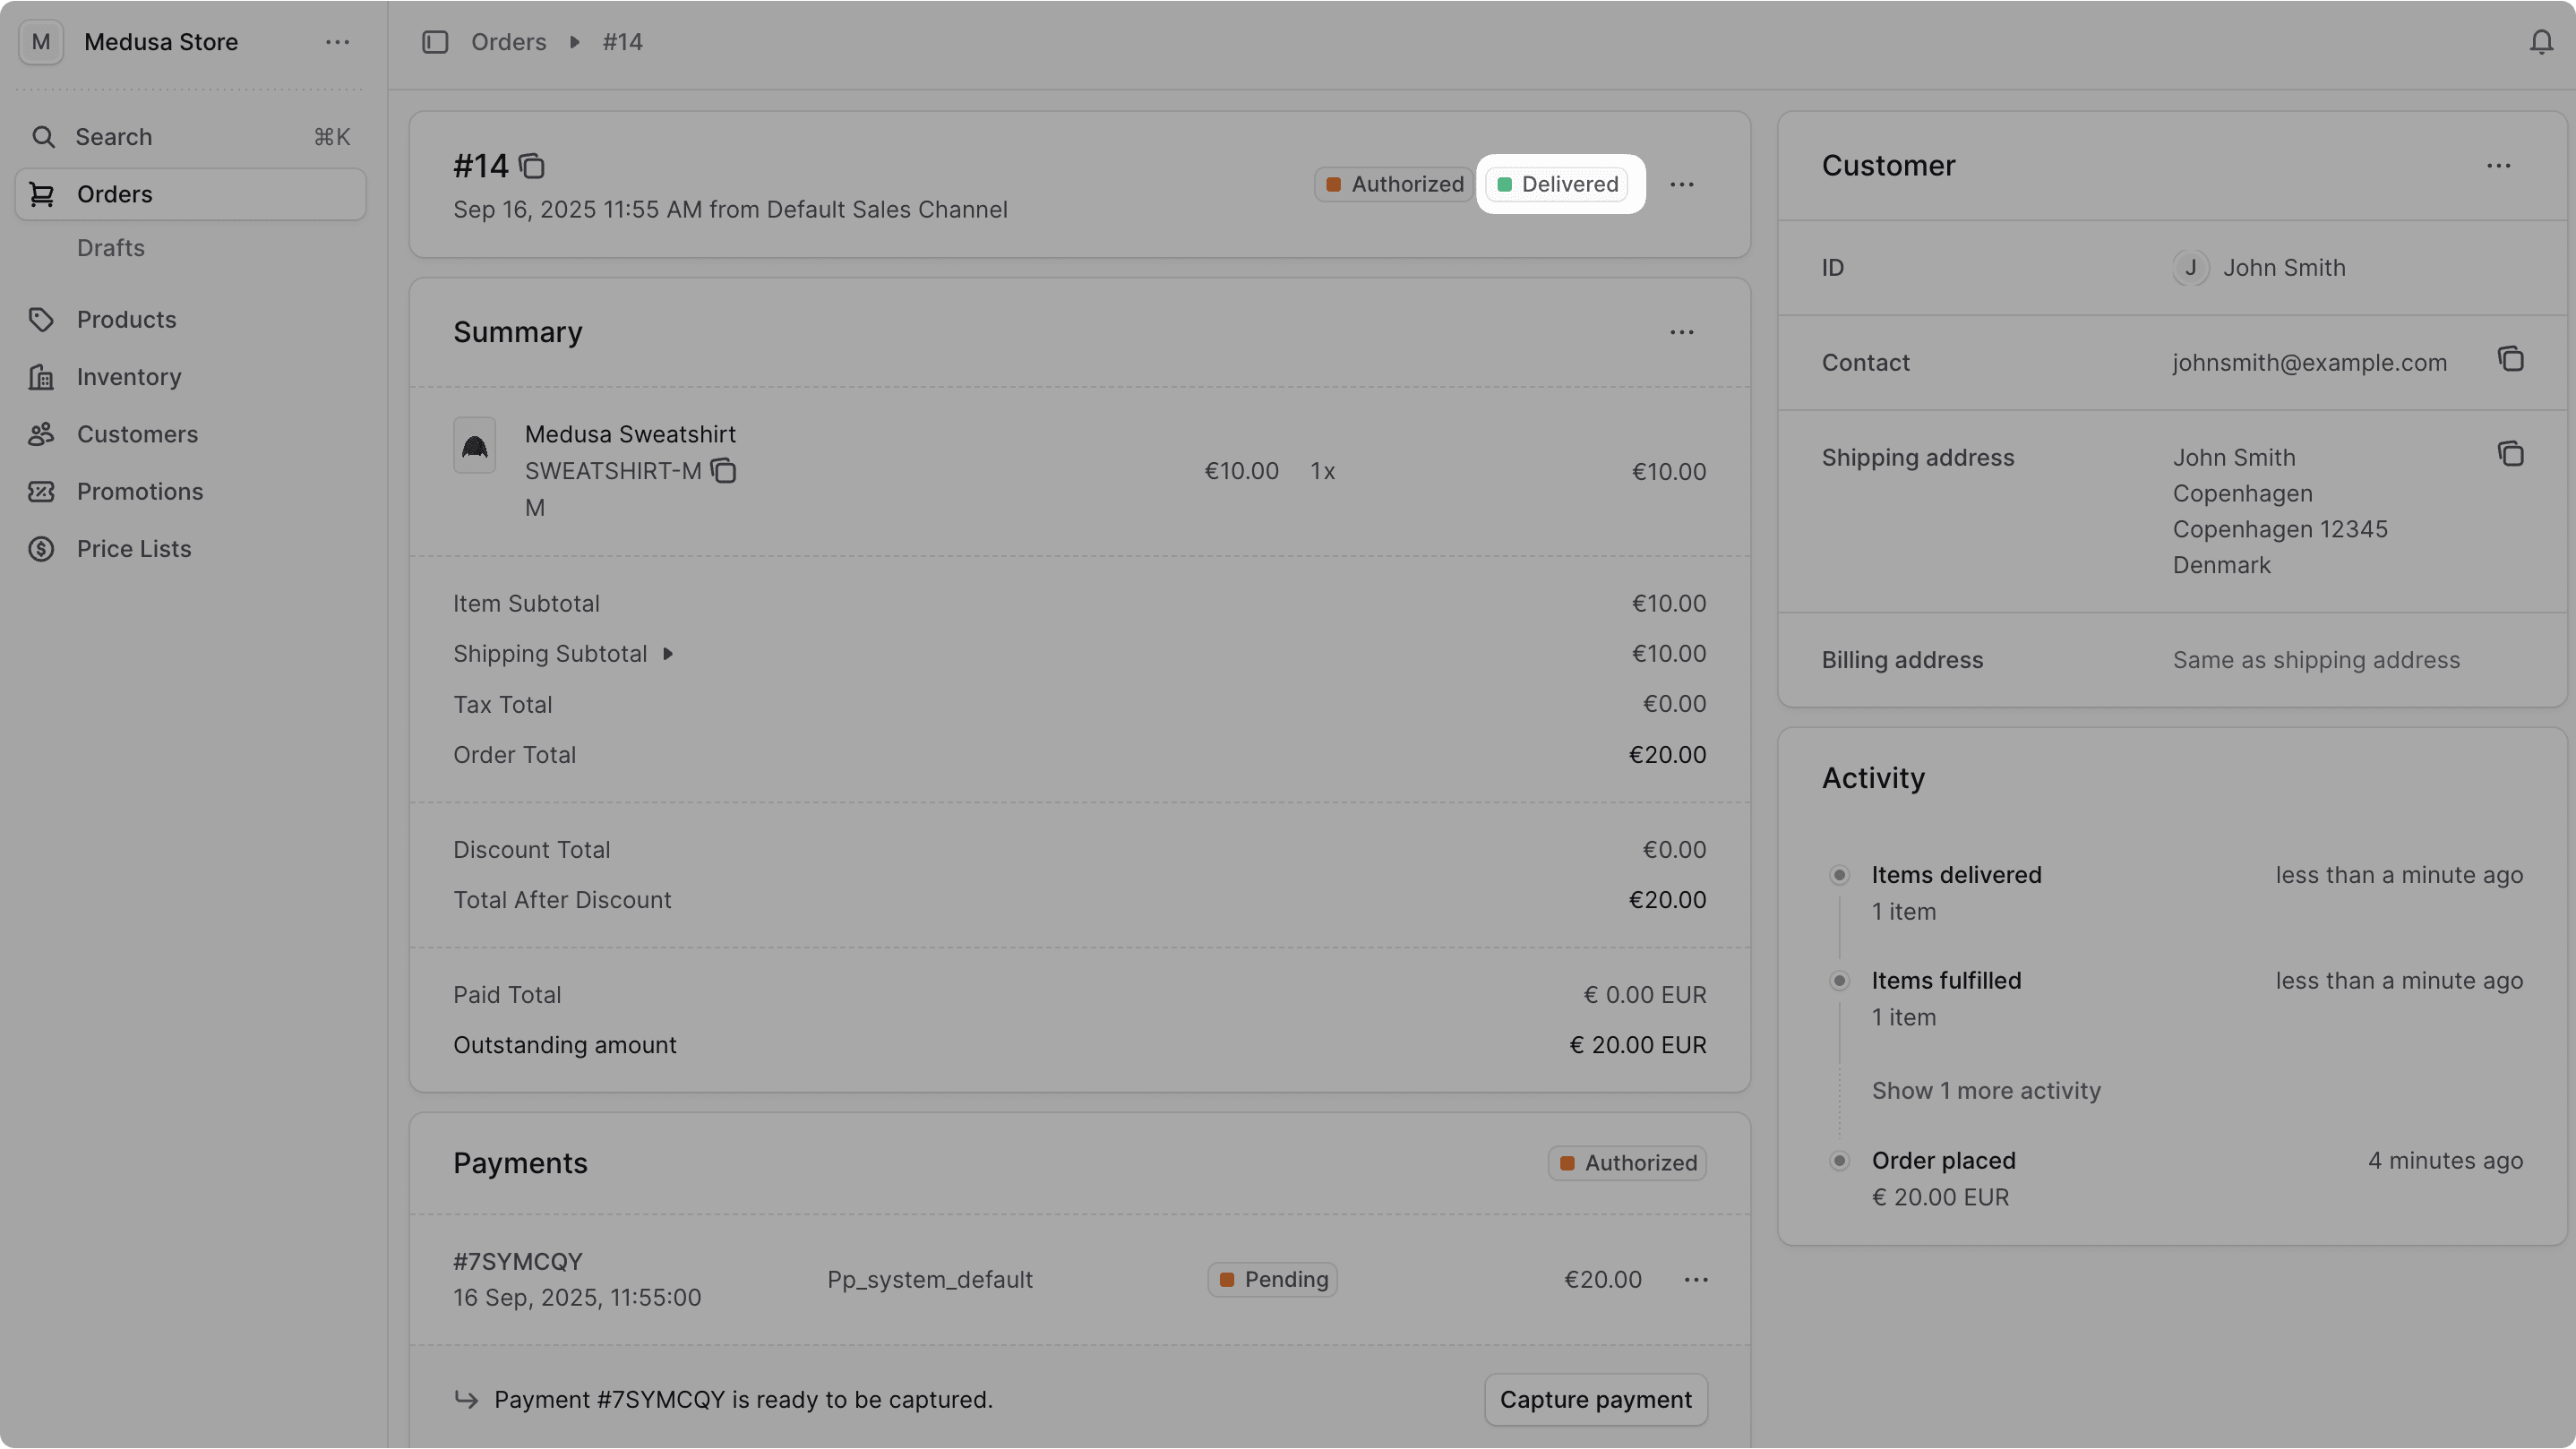
Finally, you need to deliver the items in the order from the Medusa Admin to make them returnable. To do that:
- In the Medusa Admin, go to Orders.
- Click on the order you just placed from the storefront.
- Under the "Unfulfilled Items" section, click the icon and choose "Fulfill Items" from the dropdown.
- In the form, choose a location, a shipping method, and the quantity to fulfill.
- Click "Create Fulfillment" to create the fulfillment.
- In the "Fulfillment #1" section, click the "Mark as delivered" button to mark the fulfillment as delivered.
The order's fulfillment status will change to "Delivered", and the items will become returnable.
Learn more about creating fulfillments and marking them as delivered in the Manage Order Fulfillments user guide.
Test the Return Request Flow#
You can now request a return from the storefront as the logged-in customer. To do that:
- In the storefront, go to Account -> Orders.
- Click the "See details" button of the order.
- Click the "Request Return" button to go to the return request page.

- In the Request Return page, increment the quantity of an item to return, select a return reason, and provide an optional note.
- Choose a return shipping option.
- Click the "Request Return" button to submit the return request.
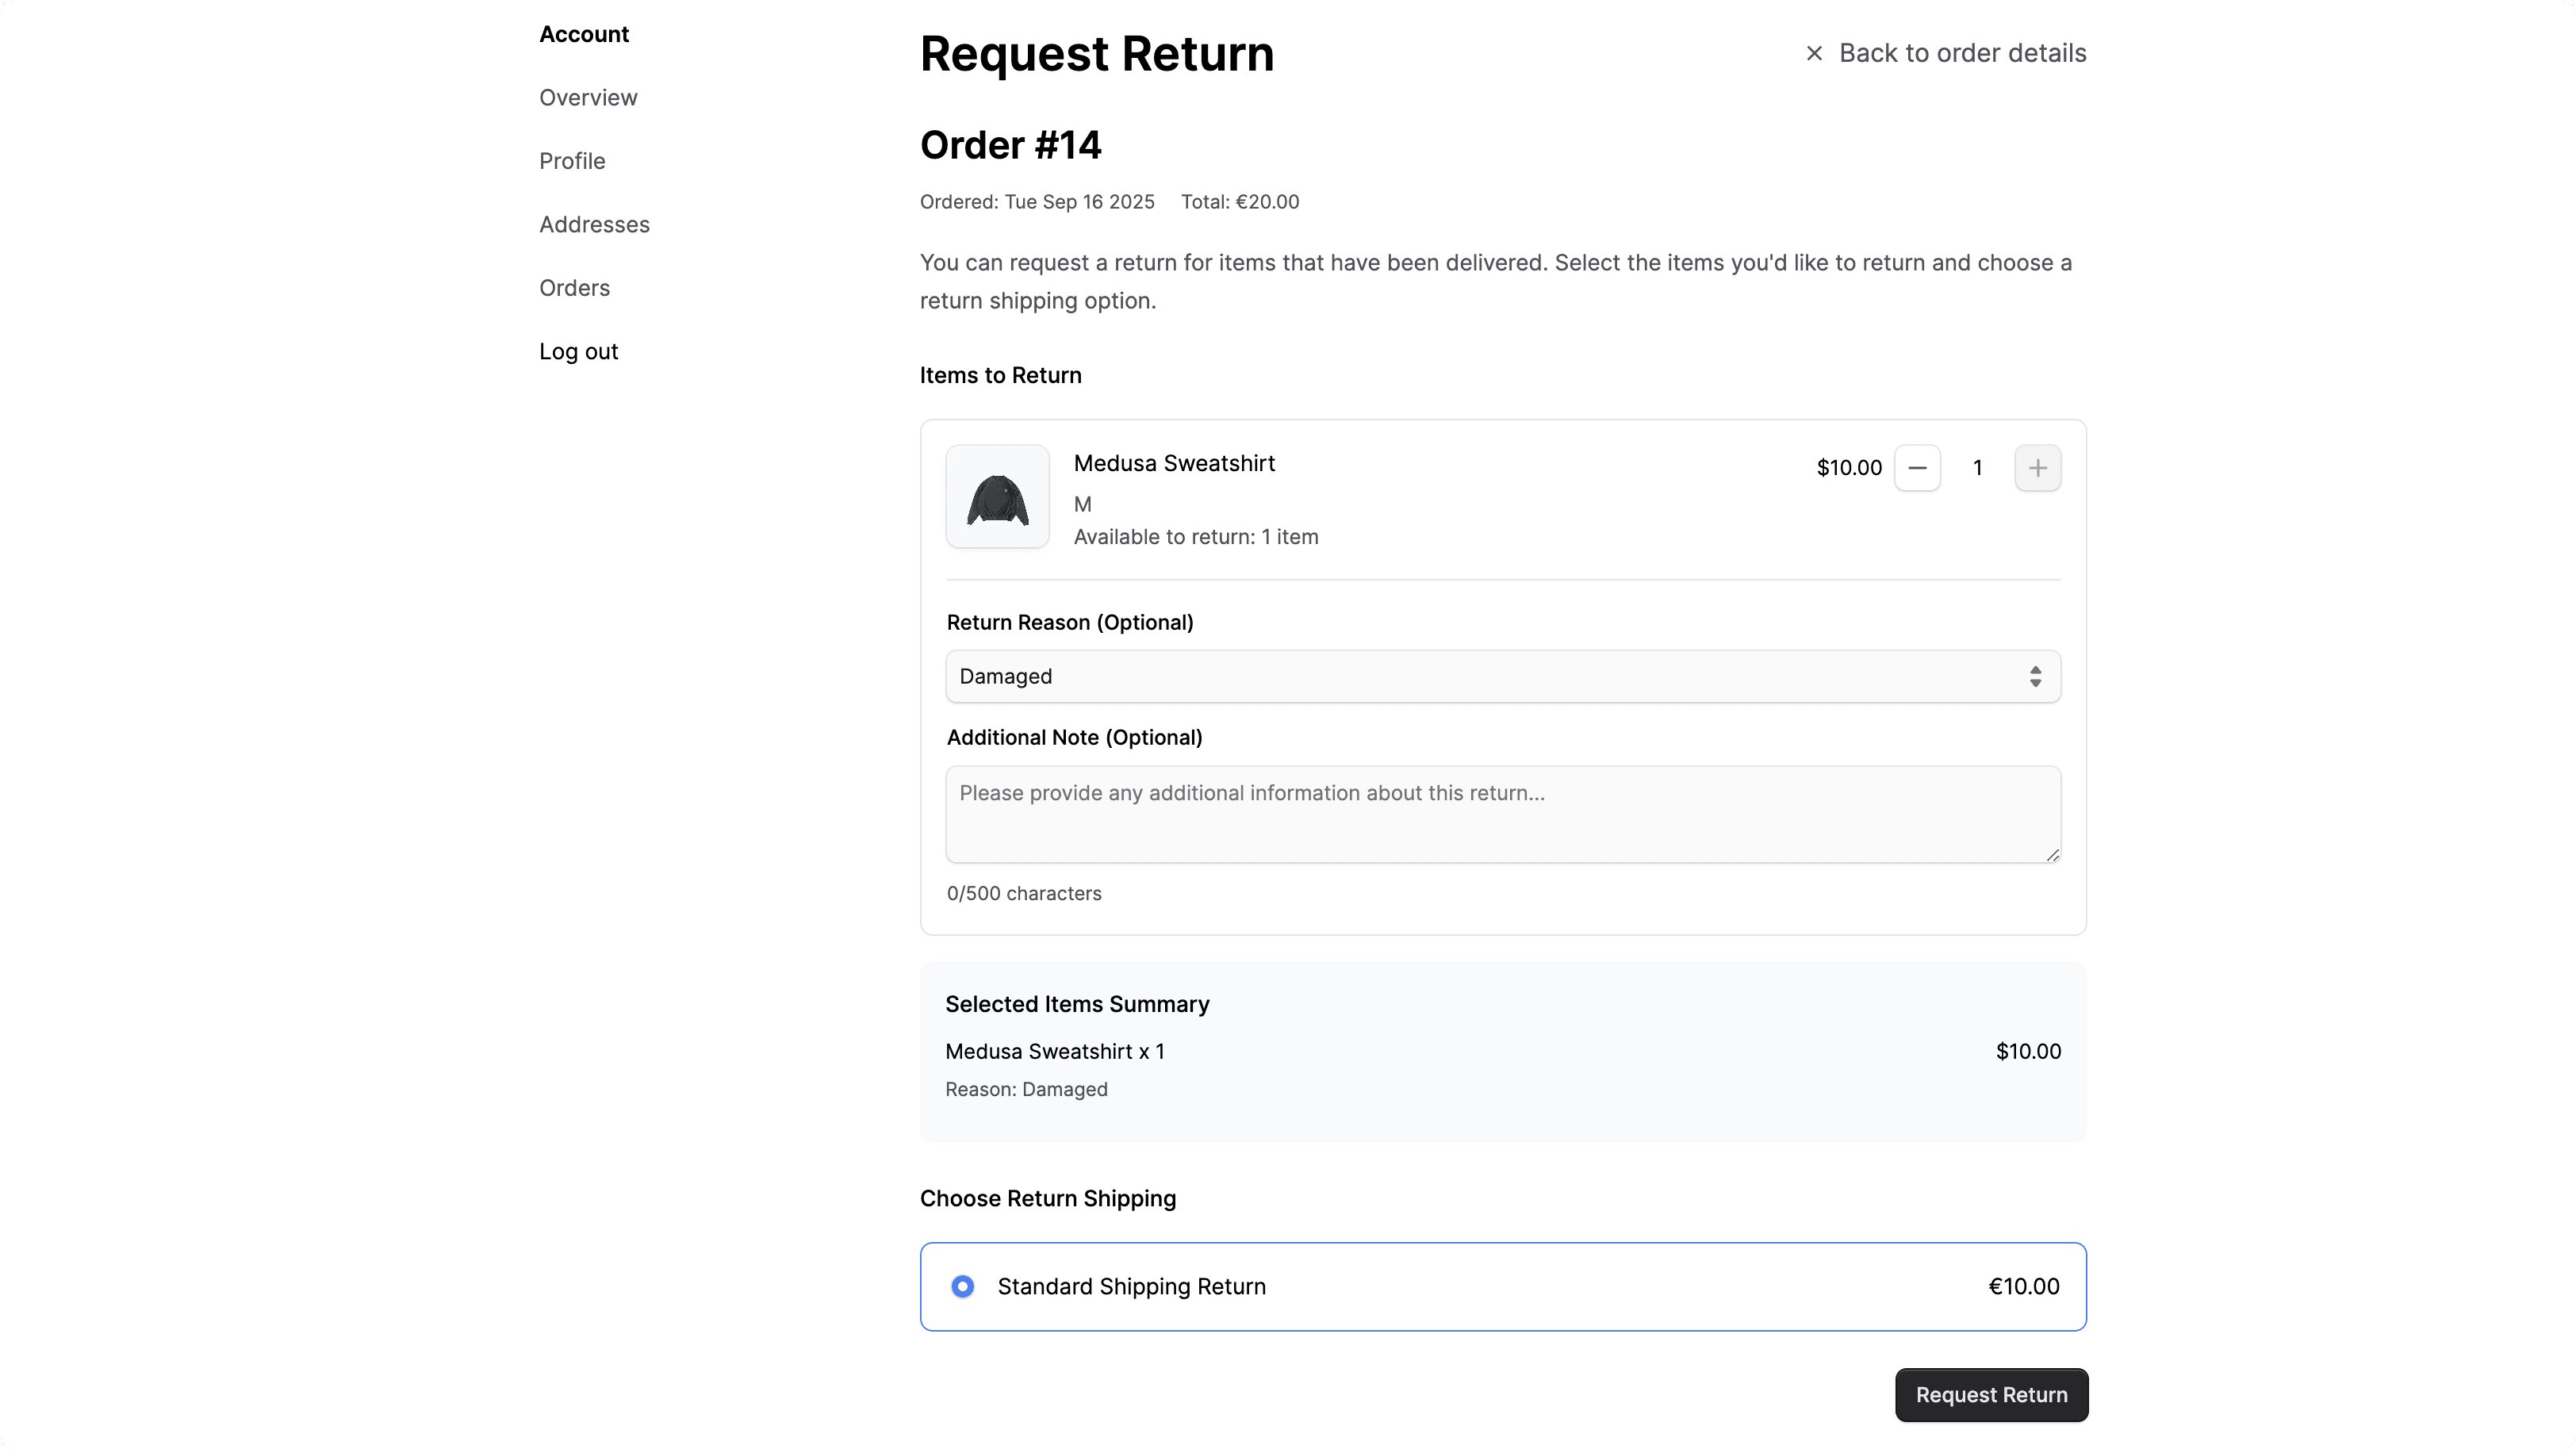
You should see a success message after submitting the return request.
If you open the order's details page in the Medusa Admin, you'll see the requested return in the Activity section. You'll also see a note below the order's items that were requested for return.

Next Steps#
Handle Return Requests in the Medusa Admin#
As a merchant, you can now handle return requests from the Medusa Admin. You can:
- Mark Return Items as Received. This is equivalent to approving the return request. This sets the return's status to "received" and restocks the returned items.

- If you've previously captured the order's payment and there's an outstanding amount, you can refund the outstanding amount.
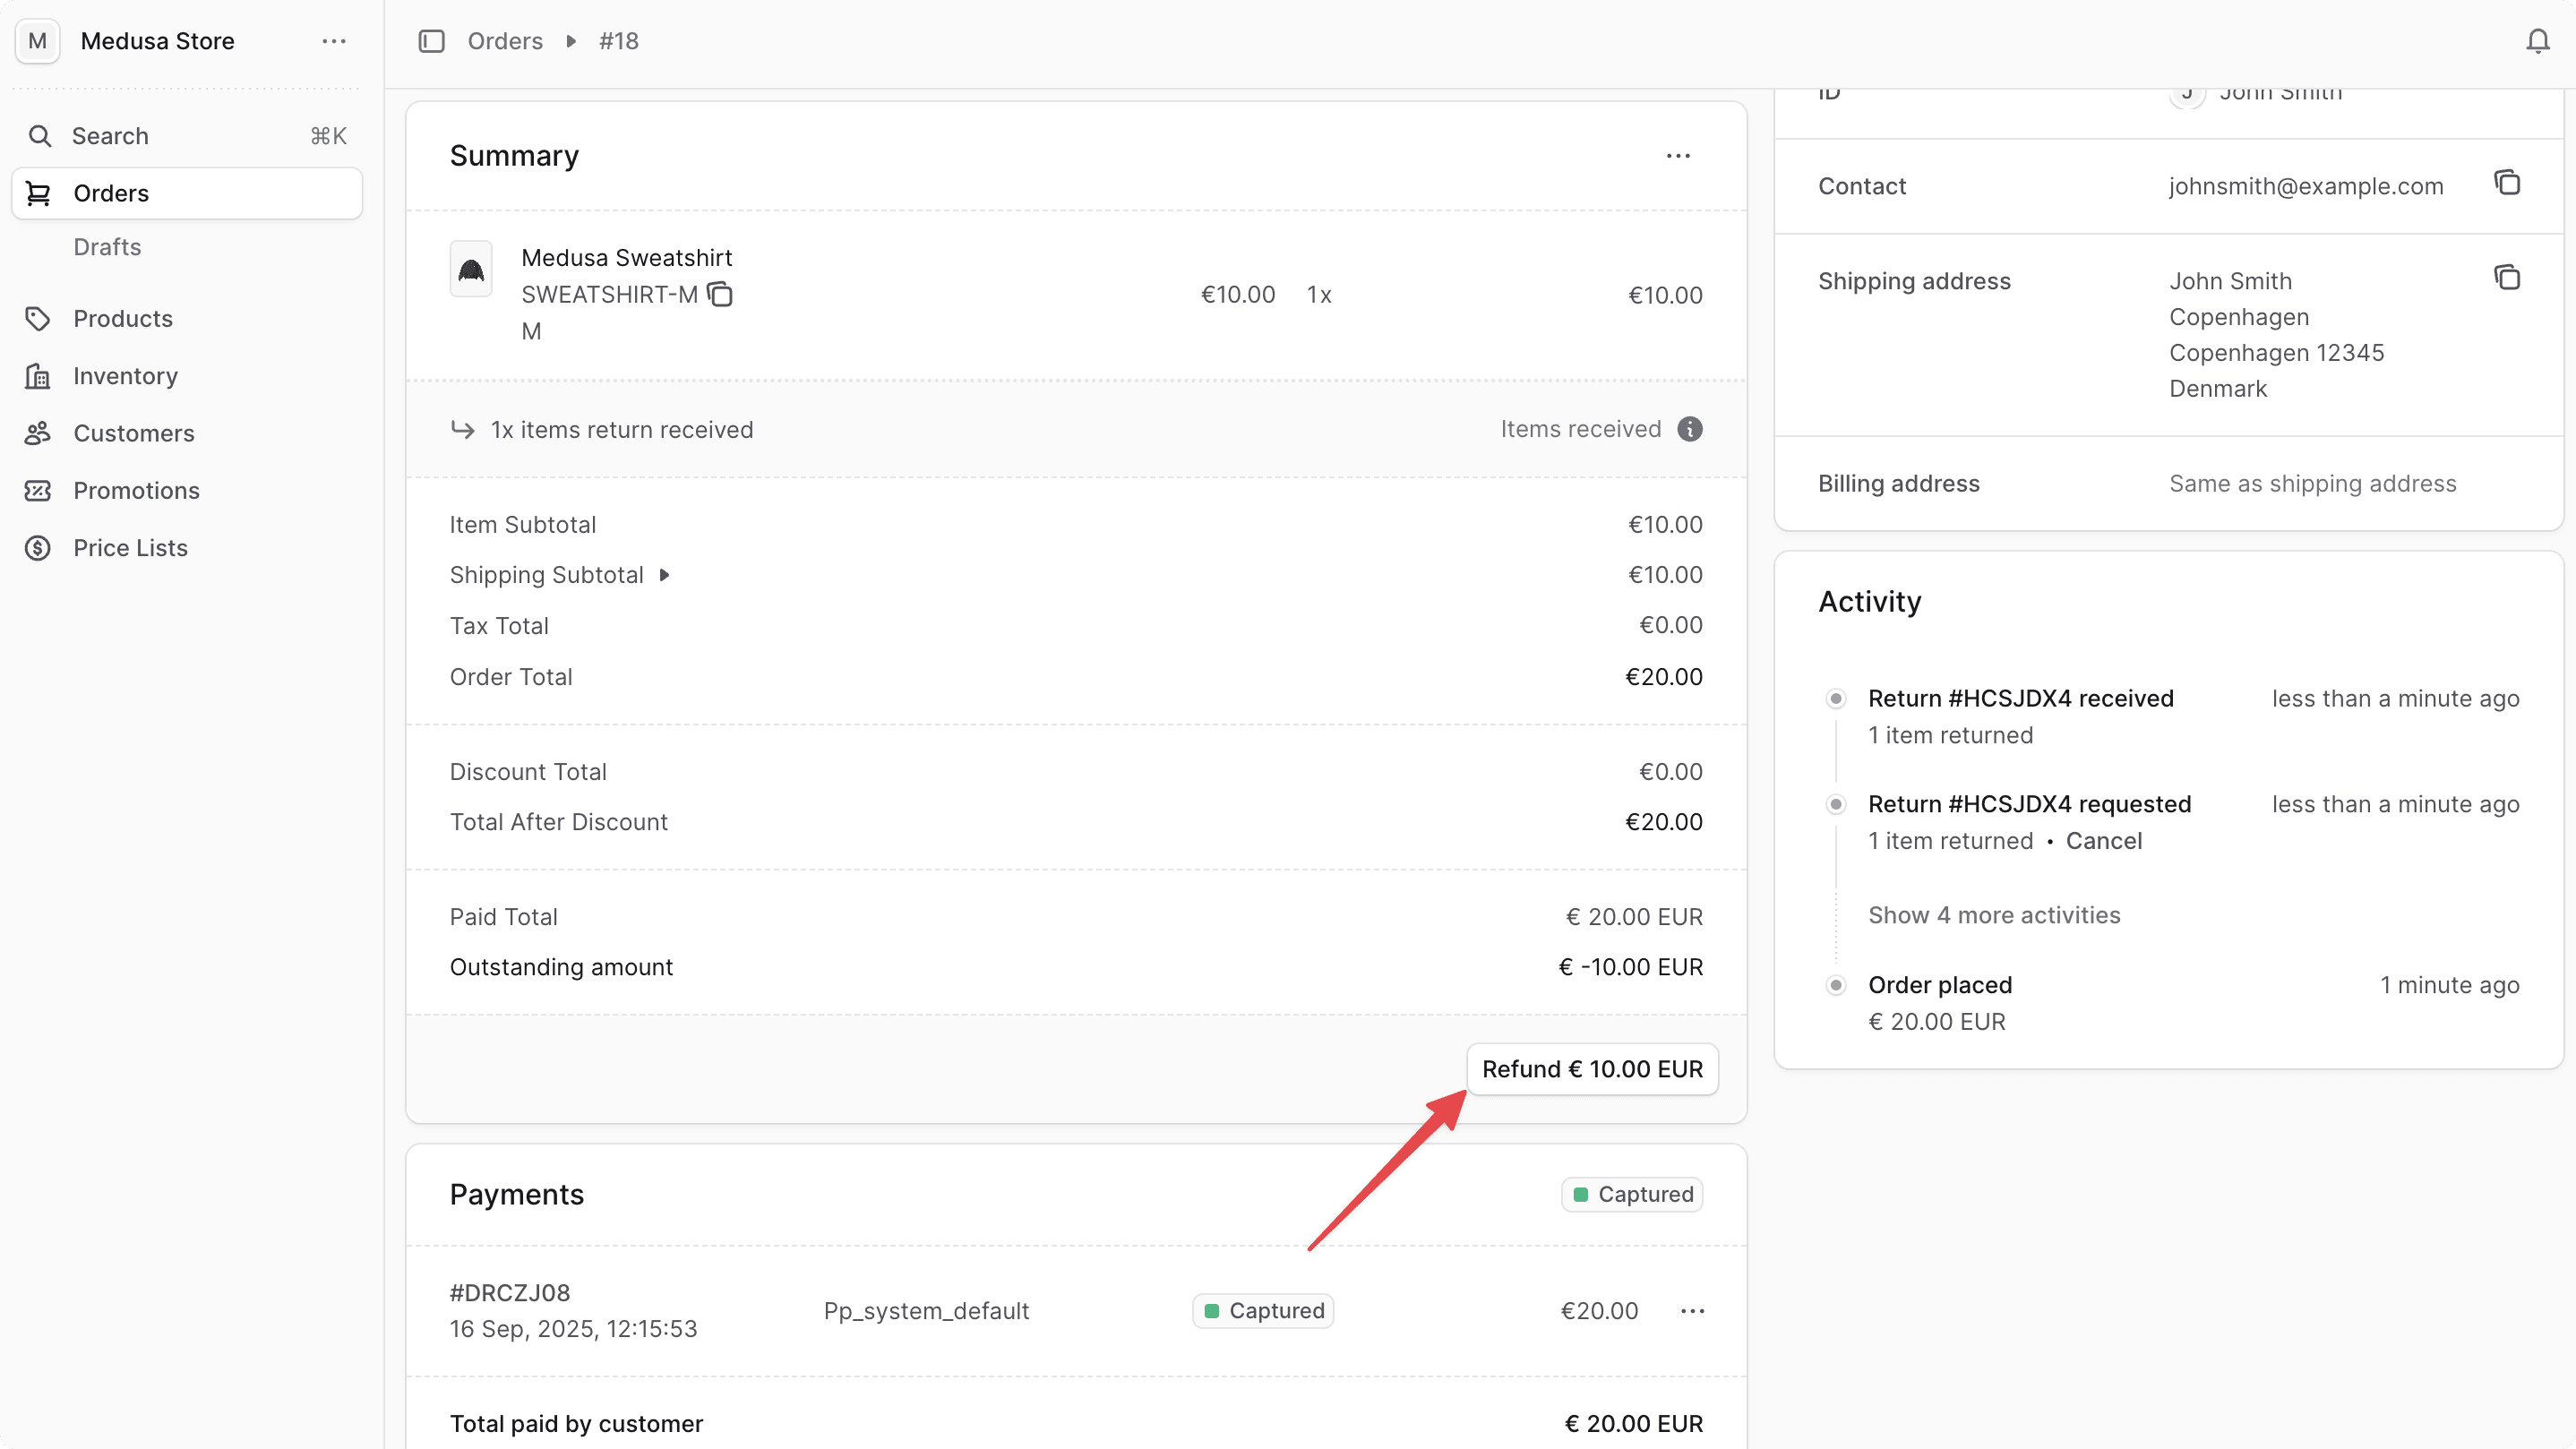
- Cancel a return request. This sets the return's status to "canceled". The customer can request a new return if needed.

Customize the Return Request Page#
You can customize the return request page to fit your storefront's design and requirements. You can also change how returns are created. For example, you can let guest customers request returns, set custom prices for return shipping options, or specify a stock location to return the items to.
Refer to the Create Return API reference to see the available parameters when creating a return request.
Learn More about Medusa#
If you're new to Medusa, check out the main documentation, where you'll get a more in-depth understanding of all the concepts you've used in this guide and more.
To learn more about the commerce features that Medusa provides, check out Medusa's Commerce Modules.
Troubleshooting#
If you encounter issues during your development, check out the troubleshooting guides.
Getting Help#
If you encounter issues not covered in the troubleshooting guides:
- Visit the Medusa GitHub repository to report issues or ask questions.
- Join the Medusa Discord community for real-time support from community members.