Integrate Avalara (AvaTax) for Tax Calculation
In this tutorial, you'll learn how to integrate Avalara with Medusa to handle tax calculations.
When you install a Medusa application, you get a fully-fledged commerce platform with a Framework for customization. Medusa's architecture supports integrating third-party services, such as tax providers, allowing you to build custom features around core commerce flows.
Avalara is a leading provider of tax compliance solutions, including sales tax calculation, filing, and remittance. By integrating Avalara with Medusa, you can calculate taxes during checkout with accurate rates based on customer location.
Summary#
By following this tutorial, you'll learn how to:
- Install and set up Medusa.
- Create the Avalara Tax Module Provider that calculates taxes using Avalara.
- Create transactions in Avalara when an order is placed.
- Sync products to Avalara to manage their tax codes and classifications.
You can follow this tutorial whether you're new to Medusa or an advanced Medusa developer.

Step 1: Install a Medusa Application#
Start by installing the Medusa application on your machine with the following command:
You'll first be asked for the project's name. Then, when asked whether you want to install the Next.js Starter Storefront, choose "Yes."
Afterwards, the installation process will start, which will install the Medusa application as a monorepository in a directory with your project's name. The backend is installed in the apps/backend directory, and the Next.js Starter Storefront is installed in the apps/storefront directory.
Once the installation finishes successfully, the Medusa Admin dashboard will open with a form to create a new user. Enter the user's credentials and submit the form. Afterwards, you can log in with the new user and explore the dashboard.
apps/backend directory of your Medusa project.Step 2: Create Avalara Tax Module Provider#
To integrate third-party services into Medusa, you create a custom module. A module is a reusable package with functionalities related to a single feature or domain.
Medusa's Tax Module implements concepts and functionalities related to taxes, but delegates tax calculations to external services through Tax Module Providers.
In this step, you'll integrate Avalara as a Tax Module Provider. Later, you'll use it to calculate taxes in your Medusa application.
a. Install AvaTax SDK#
First, install the AvaTax SDK package to interact with Avalara's API. Run the following command in your apps/backend directory:
b. Create Module Directory#
A module is created under the src/modules directory of your Medusa application. So, create the directory src/modules/avalara.
c. Define Module Options#
Next, define a TypeScript type for the Avalara Module options. These options configure the module when it's registered in the Medusa application.
Create the file src/modules/avalara/types.ts with the following content:
The module options include:
username: The Avalara account ID or username.password: The Avalara license key or password.appName: The name of your application. Defaults tomedusa.appVersion: The version of your application. Defaults to1.0.0.appEnvironment: The environment of your application, eitherproductionorsandbox. Defaults tosandbox.machineName: The name of the machine where your application is running. Defaults tomedusa.timeout: The timeout for API requests in milliseconds. Defaults to3000.companyCode: The Avalara company code to use for tax calculations. If not provided, the default company in Avalara is used.companyId: The Avalara company ID, which is necessary later when creating items in Avalara.
You'll learn how to set these options when you register the module.
d. Create Avalara Service#
A module has a service that contains its logic. For Tax Module Providers, the service implements the logic to calculate taxes using the third-party service.
To create the service for the Avalara Tax Module Provider, create the file src/modules/avalara/service.ts with the following content:
1import { ITaxProvider } from "@medusajs/framework/types"2import Avatax from "avatax"3import { MedusaError } from "@medusajs/framework/utils"4import { ModuleOptions } from "./types"5 6type InjectedDependencies = {7 // Add any dependencies you want to inject via the module container8}9 10class AvalaraTaxModuleProvider implements ITaxProvider {11 static identifier = "avalara"12 private readonly avatax: Avatax13 private readonly options: ModuleOptions14 15 constructor({}: InjectedDependencies, options: ModuleOptions) {16 this.options = options17 if (!options?.username || !options?.password || !options?.companyId) {18 throw new MedusaError(19 MedusaError.Types.INVALID_DATA,20 "Avalara module options are required: username, password and companyId"21 )22 }23 this.avatax = new Avatax({24 appName: options.appName || "medusa",25 appVersion: options.appVersion || "1.0.0",26 machineName: options.machineName || "medusa",27 environment: options.appEnvironment === "production" ? "production" : "sandbox",28 timeout: options.timeout || 3000,29 }).withSecurity({30 username: options.username,31 password: options.password,32 })33 }34 getIdentifier(): string {35 return AvalaraTaxModuleProvider.identifier36 }37}38 39export default AvalaraTaxModuleProvider
A Tax Module Provider's service must implement the ITaxProvider interface. It must also have an identifier static property with the unique identifier of the provider.
The constructor of a module's service receives the following parameters:
- An object with the dependencies to resolve from the Module's container.
- An object with the module options passed to the provider when it's registered.
In the constructor, you validate that the required options are provided. Then, you create an instance of the Avatax client using the provided options.
You also define the getIdentifier method required by the ITaxProvider interface, which returns the provider's identifier.
getTaxLines Method
Next, you'll implement the getTaxLines method required by the ITaxProvider interface. This method calculates the tax lines for line items and shipping methods. Medusa uses this method during checkout to calculate taxes.
Before creating the method, you'll create a createTransaction method that creates a transaction in Avalara to calculate taxes.
First, add the following import at the top of the file:
Then, add the following in the AvalaraTaxModuleProvider class:
1class AvalaraTaxModuleProvider implements ITaxProvider {2 // ...3 async createTransaction(model: CreateTransactionModel) {4 try {5 const response = await this.avatax.createTransaction({6 model,7 include: "Details",8 })9 10 return response11 } catch (error) {12 throw new MedusaError(13 MedusaError.Types.UNEXPECTED_STATE,14 `An error occurred while creating transaction for Avalara: ${error}`15 )16 }17 }18}
This method receives the details of the transaction to create in Avalara. It calls the avatax.createTransaction method to create the transaction. If the transaction's type ends with Order, Avalara will calculate and return the tax details only. If it ends with Invoice, Avalara will save the transaction.
You return the response from Avalara, which contains the tax details.
You'll now add the getTaxLines method to calculate tax lines using Avalara.
First, add the following imports at the top of the file:
Then, add the method to the AvalaraTaxModuleProvider class:
1class AvalaraTaxModuleProvider implements ITaxProvider {2 // ...3 4 async getTaxLines(5 itemLines: ItemTaxCalculationLine[], 6 shippingLines: ShippingTaxCalculationLine[],7 context: TaxCalculationContext8 ): Promise<(ItemTaxLineDTO | ShippingTaxLineDTO)[]> {9 try {10 const currencyCode = (11 itemLines[0]?.line_item.currency_code || shippingLines[0]?.shipping_line.currency_code12 )?.toUpperCase()13 const response = await this.createTransaction({14 lines: [15 ...(itemLines.length ? itemLines.map((line) => {16 const quantity = Number(line.line_item.quantity) ?? 017 return {18 number: line.line_item.id,19 quantity,20 amount: quantity * (Number(line.line_item.unit_price) ?? 0),21 taxCode: line.rates.find((rate) => rate.is_default)?.code ?? "",22 itemCode: line.line_item.product_id,23 }24 }) : []),25 ...(shippingLines.length ? shippingLines.map((line) => {26 return {27 number: line.shipping_line.id,28 quantity: 1,29 amount: Number(line.shipping_line.unit_price) ?? 0,30 taxCode: line.rates.find((rate) => rate.is_default)?.code ?? "",31 }32 }) : []),33 ],34 date: new Date(),35 customerCode: context.customer?.id ?? "",36 addresses: {37 "singleLocation": {38 line1: context.address.address_1 ?? "",39 line2: context.address.address_2 ?? "",40 city: context.address.city ?? "",41 region: context.address.province_code ?? "",42 postalCode: context.address.postal_code ?? "",43 country: context.address.country_code.toUpperCase() ?? "",44 },45 },46 currencyCode,47 type: DocumentType.SalesOrder,48 })49 50 // TODO return tax lines51 } catch (error) {52 throw new MedusaError(53 MedusaError.Types.UNEXPECTED_STATE,54 `An error occurred while getting tax lines from Avalara: ${error}`55 )56 }57 }58}
The getTaxLines method receives the following parameters:
itemLines: An array of line items to calculate taxes for.shippingLines: An array of shipping methods to calculate taxes for.context: Additional context for tax calculation, such as customer and address information.
In the method, you create a transaction in Avalara for both line items and shipping methods using the avatax.createTransaction method. Since you set the type to DocumentType.SalesOrder, Avalara will calculate and return the tax details for the provided items and shipping methods without saving the transaction.
Next, you'll extract the tax lines from the response and return them in the expected format. Replace the // TODO return tax lines comment with the following:
1const taxLines: (ItemTaxLineDTO | ShippingTaxLineDTO)[] = []2response?.lines?.forEach((line) => {3 line.details?.forEach((detail) => {4 const isShippingLine = shippingLines.find(5 (sLine) => sLine.shipping_line.id === line.lineNumber6 ) !== undefined7 const commonData = {8 rate: (detail.rate ?? 0) * 100,9 name: detail.taxName ?? "",10 code: line.taxCode || detail.rateTypeCode || detail.signatureCode || "",11 provider_id: this.getIdentifier(),12 }13 if (!isShippingLine) {14 taxLines.push({15 ...commonData,16 line_item_id: line.lineNumber ?? "",17 })18 } else {19 taxLines.push({20 ...commonData,21 shipping_line_id: line.lineNumber ?? "",22 })23 }24 })25})26 27return taxLines
This code extracts the tax details from the Avalara response and constructs an array of tax lines in the expected format. Finally, it returns the array of tax lines.
e. Export Module Definition#
You've finished implementing the Avalara Tax Module Provider's service and its required method.
The final piece of a module is its definition, which you export in an index.ts file at the module's root directory. This definition tells Medusa the module's details, including its service.
To create the module's definition, create the file src/modules/avalara/index.ts with the following content:
You use ModuleProvider from the Modules SDK to create the module provider's definition. It accepts two parameters:
- The name of the module that this provider belongs to, which is
Modules.TAXin this case. - An object with a required
servicesproperty indicating the Module Provider's services.
f. Add Module Provider to Medusa's Configuration#
After finishing the module, add it to Medusa's configuration to start using it.
In medusa-config.ts, add a modules property:
1module.exports = defineConfig({2 // ...3 modules: [4 {5 resolve: "@medusajs/medusa/tax",6 options: {7 providers: [8 {9 resolve: "./src/modules/avalara",10 id: "avalara",11 options: {12 username: process.env.AVALARA_USERNAME,13 password: process.env.AVALARA_PASSWORD,14 appName: process.env.AVALARA_APP_NAME,15 appVersion: process.env.AVALARA_APP_VERSION,16 appEnvironment: process.env.AVALARA_APP_ENVIRONMENT,17 machineName: process.env.AVALARA_MACHINE_NAME,18 timeout: process.env.AVALARA_TIMEOUT,19 companyCode: process.env.AVALARA_COMPANY_CODE,20 companyId: process.env.AVALARA_COMPANY_ID,21 },22 },23 ],24 },25 },26 ],27})
To pass a Tax Module Provider to the Tax Module, add the modules property to the Medusa configuration and pass the Tax Module in its value.
The Tax Module accepts a providers option, which is an array of Tax Module Providers to register.
You register the Avalara Tax Module Provider and pass it the expected options.
g. Set Environment Variables#
Finally, set the required environment variables in your .env file:
You set the following variables:
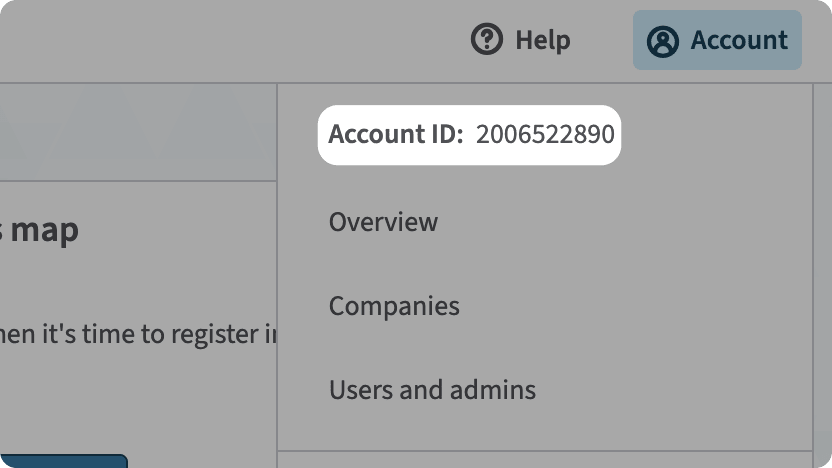
AVALARA_USERNAME: Your Avalara account ID. You can retrieve it from the Avalara dashboard by clicking on "Account" at the top right. It's at the top of the dropdown.
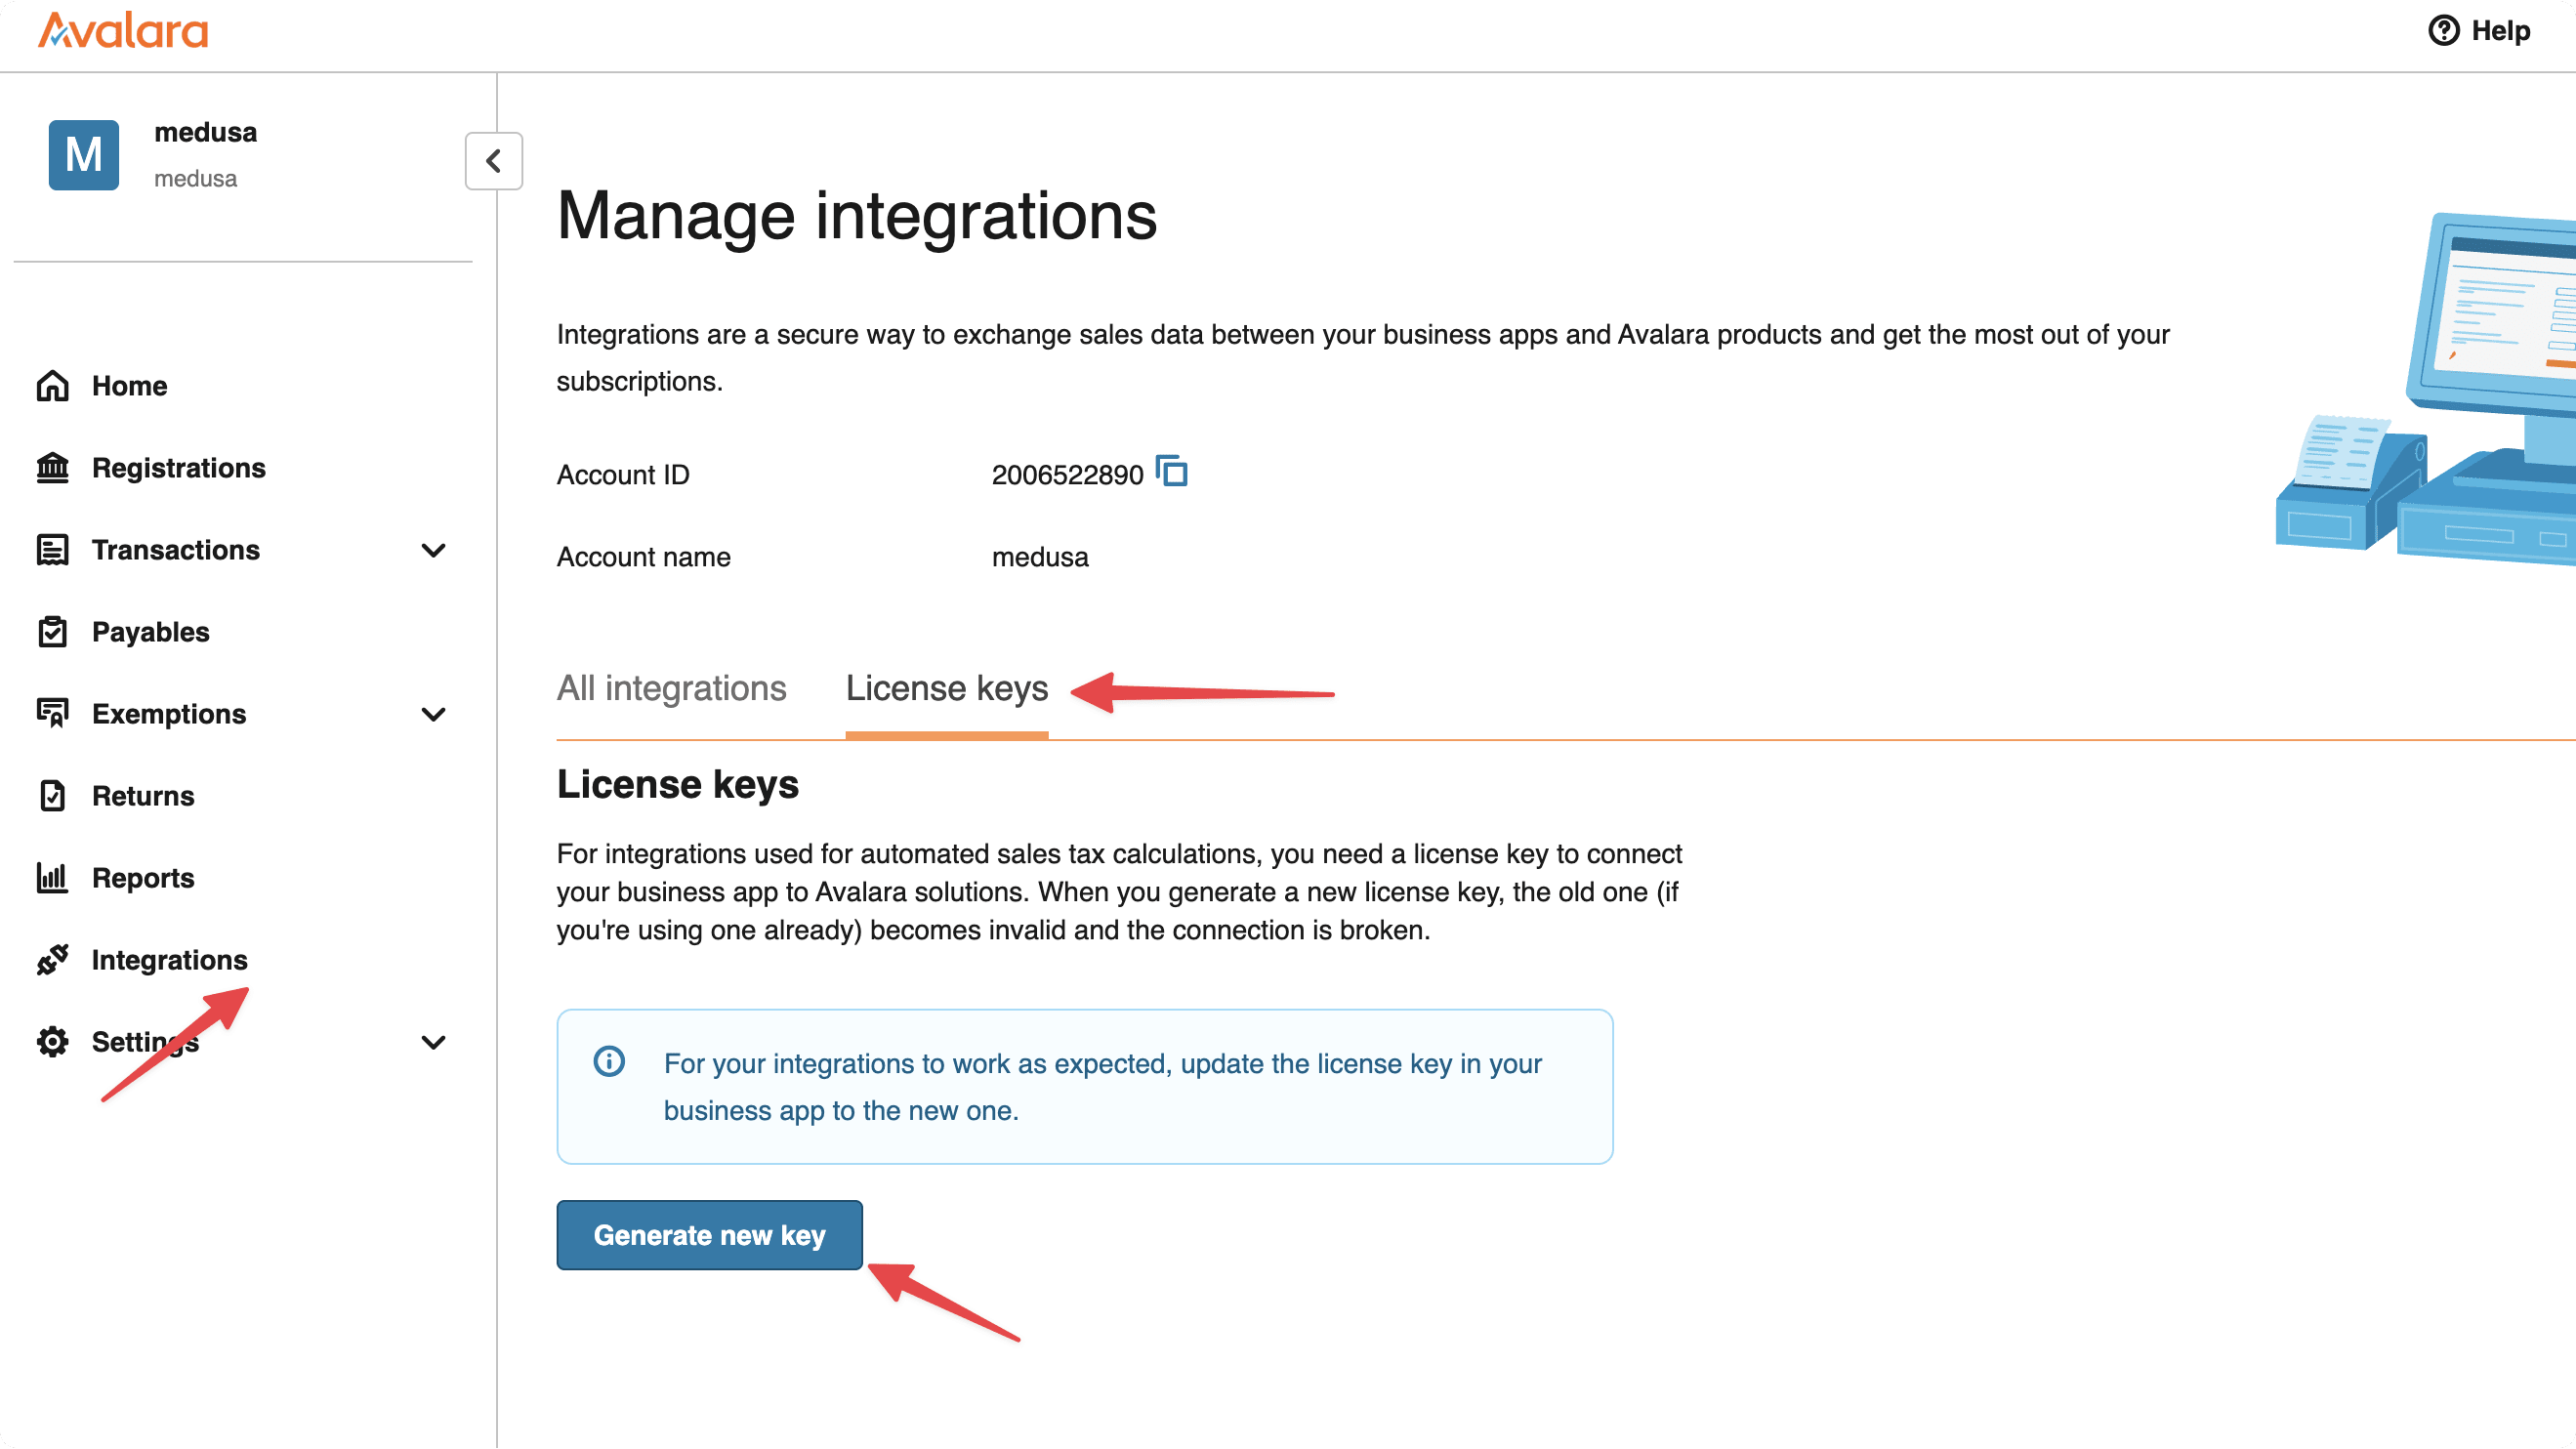
AVALARA_PASSWORD: Your Avalara license key. To retrieve it from the Avalara dashboard:- From the sidebar, click on "Integrations."
- Choose the "License Keys" tab.
- Click on the "Generate new key" button.
- Confirm generating the key.
- Copy the generated key.
AVALARA_APP_ENVIRONMENT: The environment of your application, which can be eitherproductionorsandbox. Set it based on your Avalara account type. Note that Avalara provides separate accounts for production and sandbox environments.AVALARA_COMPANY_ID: The company ID in Avalara for creating products for tax code management. To retrieve it from the Avalara dashboard:- From the sidebar, click on "Settings" → "All settings."
- Find the "Companies" card and click on "Manage."
- Click on the company you want to use.
- Copy the company ID from the URL. It's the number at the end of the URL, after
/companies/.
You can also set other optional environment variables for further configuration. Refer to Avalara's documentation for more details about these options.
Step 3: Test Tax Calculation with Avalara#
You'll test the Avalara integration using the Next.js Starter Storefront that you installed earlier. You'll proceed through checkout and verify that taxes are calculated using Avalara.
Prerequisite: Set Region's Provider to Avalara#
Before testing the integration, configure the regions you want to use Avalara for tax calculations.
First, run the following command in your apps/backend directory to start the server:
Then:
- Go to
http://localhost:9000/adminand log in to the Medusa Admin dashboard. - Go to "Settings" → "Tax Regions."
- Select the country you want to configure Avalara for. You can repeat these steps for multiple countries.
- In the first section, click on the icon at the top right and choose "Edit."
- In the "Tax Provider" dropdown, select "Avalara (AVALARA)."
- Click on "Save."

Test Checkout with Avalara#
Now you can test the checkout process in the Next.js Starter Storefront.
While the Medusa server is running, open another terminal window in the storefront's directory and run the following command to start the storefront:
Then:
- Go to
http://localhost:8000to open the storefront. - Go to "Menu" → "Store" and click on a product.
- Select the product's options if any, then click on "Add to cart."
- Click on the cart icon at the top right to open the cart.
- Click on "Go to checkout."
- Enter the shipping information and click on "Continue to delivery." The tax amount will update in the right section.

- In the Delivery step, select a shipping method. This will update the tax amount based on the shipping method's price.
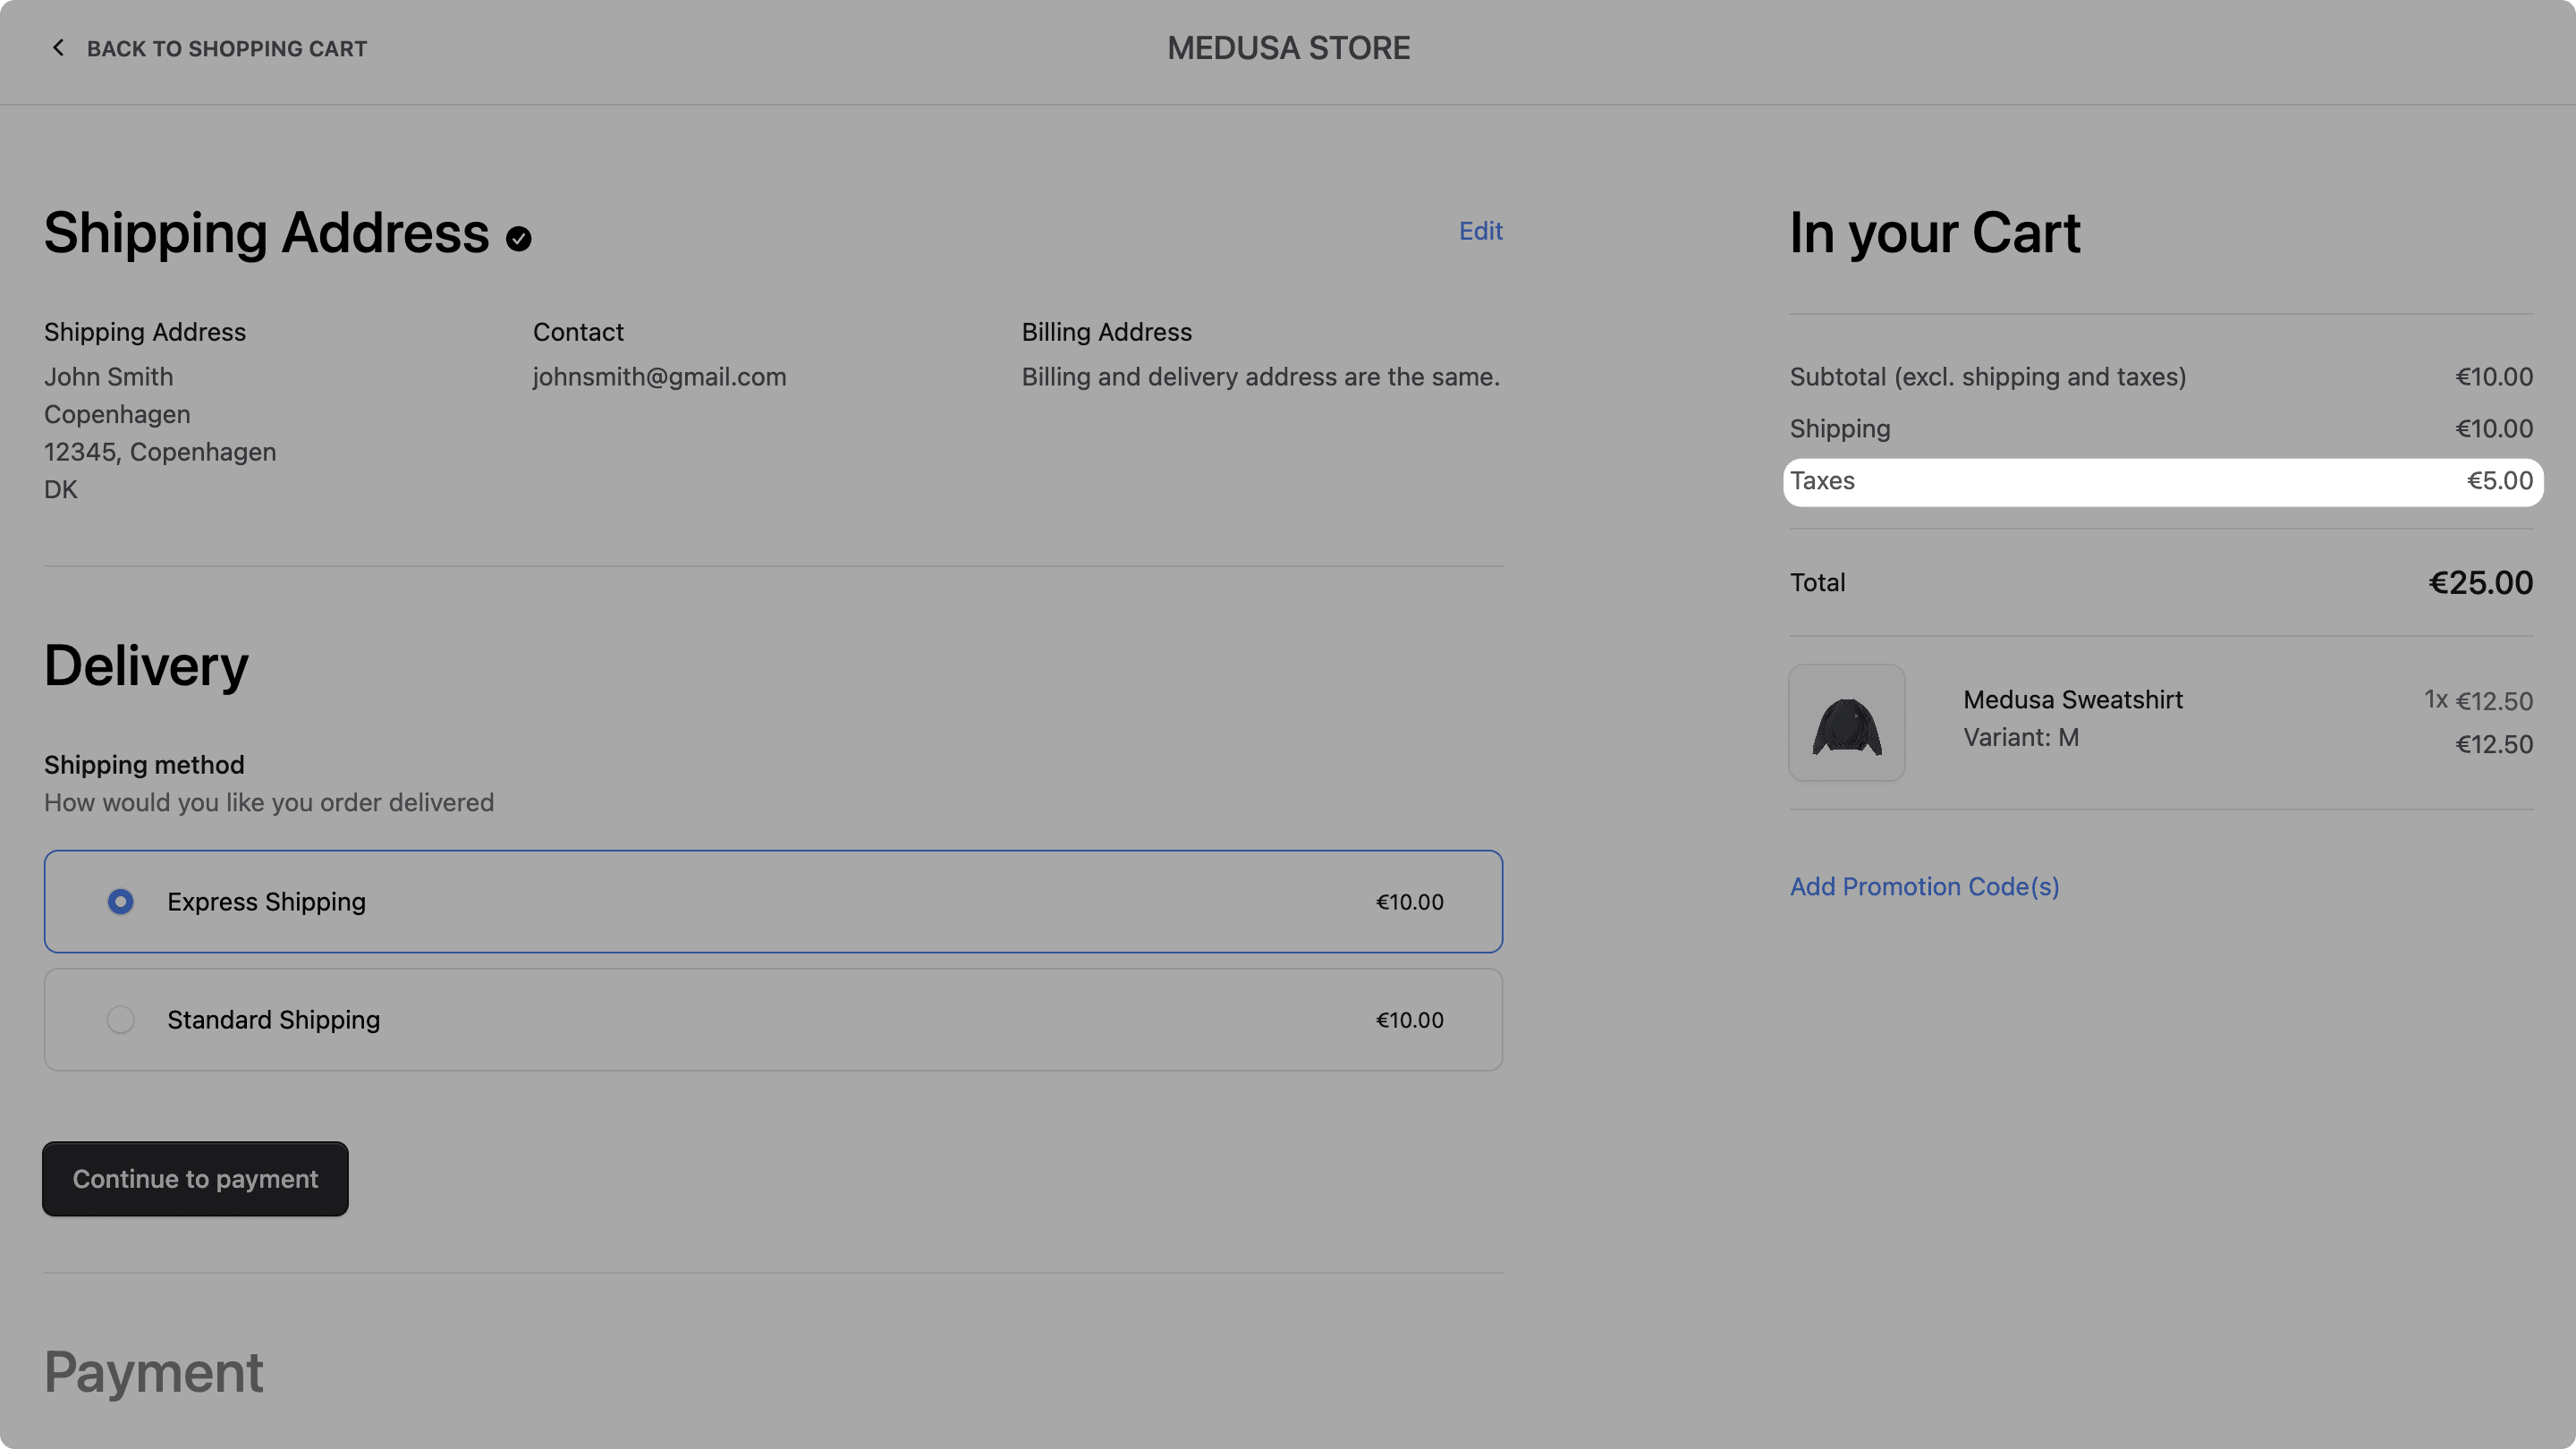
You can now complete the checkout with the taxes calculated by Avalara.
Step 4: Create Transactions in Avalara on Order Placement#
Avalara allows you to create transactions when an order is placed. This helps you keep track of sales and tax liabilities in Avalara.
In this step, you'll implement the logic to create an Avalara transaction when an order is placed in Medusa. You will:
- Add a method in the Avalara Tax Module Provider's service to uncommit a transaction. This is useful for rolling back the transaction if an error occurs or the order is canceled.
- Create a workflow that creates a transaction in Avalara for an order.
- Create a subscriber that listens to the
order.placedevent and triggers the workflow.
a. Add Uncommit Transaction Method#
First, you'll add a method in the Avalara Tax Module Provider's service to uncommit a transaction.
In src/modules/avalara/service.ts, add the following method to the AvalaraTaxModuleProvider class:
1class AvalaraTaxModuleProvider implements ITaxProvider {2 // ...3 async uncommitTransaction(transactionCode: string) {4 try {5 const response = await this.avatax.uncommitTransaction({6 companyCode: this.options.companyCode!,7 transactionCode: transactionCode,8 })9 10 return response11 }12 catch (error) {13 throw new MedusaError(14 MedusaError.Types.UNEXPECTED_STATE,15 `An error occurred while uncommitting transaction for Avalara: ${error}`16 )17 }18 }19}
This method receives the code of the transaction to uncommit. It calls the avatax.uncommitTransaction method to uncommit the transaction in Avalara.
b. Create Order Transaction Workflow#
Next, you'll create a workflow that creates an order transaction. A workflow is a series of actions, called steps, that complete a task. You construct a workflow like you construct a function, but it's a special function that allows you to track execution progress, define roll-back logic, and configure other advanced features.
The workflow to create an Avalara transaction has the following steps:
Workflow hook
Step conditioned by when
View step details
Medusa provides the first and last step out of the box. You only need to create the createTransactionStep.
createTransactionStep
The createTransactionStep creates a transaction in Avalara.
To create the step, create the file src/workflows/steps/create-transaction.ts with the following content:
1import { createStep, StepResponse } from "@medusajs/framework/workflows-sdk"2import AvalaraTaxModuleProvider from "../../modules/avalara/service"3import { DocumentType } from "avatax/lib/enums/DocumentType"4 5type StepInput = {6 lines: {7 number: string8 quantity: number9 amount: number10 taxCode: string11 itemCode?: string12 }[]13 date: Date14 customerCode: string15 addresses: {16 singleLocation: {17 line1: string18 line2: string19 city: string20 region: string21 postalCode: string22 country: string23 }24 }25 currencyCode: string26 type: DocumentType27}28 29export const createTransactionStep = createStep(30 "create-transaction",31 async (input: StepInput, { container }) => {32 const taxModuleService = container.resolve("tax")33 const avalaraProviderService = taxModuleService.getProvider(34 `tp_${AvalaraTaxModuleProvider.identifier}_avalara`35 ) as AvalaraTaxModuleProvider36 37 const response = await avalaraProviderService.createTransaction(input)38 39 return new StepResponse(response, response)40 },41 async (data, { container }) => {42 if (!data?.code) {43 return44 }45 const taxModuleService = container.resolve("tax")46 const avalaraProviderService = taxModuleService.getProvider(47 `tp_${AvalaraTaxModuleProvider.identifier}_avalara`48 ) as AvalaraTaxModuleProvider49 50 await avalaraProviderService.uncommitTransaction(data.code)51 }52)
You create a step with createStep from the Workflows SDK. It accepts three parameters:
- The step's unique name, which is
create-transaction. - An async function that receives two parameters:
- The step's input, which is an object containing the transaction's details.
- An object that has properties including the Medusa container, which is a registry of Framework and commerce tools that you can access in the step.
- An async compensation function that runs if an error occurs during the workflow's execution. It rolls back changes made in the step.
In the step function, you retrieve the Avalara Tax Module Provider's service from the Tax Module. Then, you call its createTransaction method to create a transaction in Avalara.
A step function must return a StepResponse instance. The StepResponse constructor accepts two parameters:
- The step's output, which is the created transaction.
- Data to pass to the step's compensation function.
In the compensation function, you uncommit the created transaction if an error occurs during the workflow's execution.
Create Transaction Workflow
You'll now create the workflow. Create the file src/workflows/create-order-transaction.ts with the following content:
1import { createWorkflow, transform, WorkflowResponse } from "@medusajs/framework/workflows-sdk"2import { updateOrderWorkflow, useQueryGraphStep } from "@medusajs/medusa/core-flows"3import { createTransactionStep } from "./steps/create-transaction"4import AvalaraTaxModuleProvider from "../modules/avalara/service"5import { DocumentType } from "avatax/lib/enums/DocumentType"6 7type WorkflowInput = {8 order_id: string9}10 11export const createOrderTransactionWorkflow = createWorkflow(12 "create-order-transaction-workflow",13 (input: WorkflowInput) => {14 const { data: orders } = useQueryGraphStep({15 entity: "order",16 fields: [17 "id",18 "currency_code",19 "items.quantity",20 "items.id",21 "items.unit_price",22 "items.product_id",23 "items.tax_lines.id",24 "items.tax_lines.description",25 "items.tax_lines.code",26 "items.tax_lines.rate",27 "items.tax_lines.provider_id",28 "items.variant.sku",29 "shipping_methods.id",30 "shipping_methods.amount",31 "shipping_methods.tax_lines.id",32 "shipping_methods.tax_lines.description",33 "shipping_methods.tax_lines.code",34 "shipping_methods.tax_lines.rate",35 "shipping_methods.tax_lines.provider_id",36 "shipping_methods.shipping_option_id",37 "customer.id",38 "customer.email",39 "customer.metadata",40 "customer.groups.id",41 "shipping_address.id",42 "shipping_address.address_1",43 "shipping_address.address_2",44 "shipping_address.city",45 "shipping_address.postal_code",46 "shipping_address.country_code",47 "shipping_address.region_code",48 "shipping_address.province",49 "shipping_address.metadata",50 ],51 filters: {52 id: input.order_id,53 },54 })55 56 // TODO create transaction57 }58)
You create a workflow using createWorkflow from the Workflows SDK. It accepts the workflow's unique name as a first parameter.
As a second parameter, it accepts a constructor function, which is the workflow's implementation. The function can accept input, which in this case is the order ID.
So far, you retrieve the order's details using the useQueryGraphStep. It uses Query under the hood to retrieve data across modules.
Next, you'll prepare the transaction input, create the transaction, and update the order with the transaction code. Replace the // TODO create transaction comment with the following:
1const transactionInput = transform({ orders }, ({ orders }) => {2 const providerId = `tp_${AvalaraTaxModuleProvider.identifier}_avalara`3 return {4 lines: [5 ...(orders[0]?.items?.map((item) => {6 return {7 number: item?.id ?? "",8 quantity: item?.quantity ?? 0,9 amount: item?.unit_price ?? 0,10 taxCode: item?.tax_lines?.find(11 (taxLine) => taxLine?.provider_id === providerId12 )?.code ?? "",13 itemCode: item?.product_id ?? "",14 }15 }) ?? []),16 ...(orders[0]?.shipping_methods?.map((shippingMethod) => {17 return {18 number: shippingMethod?.id ?? "",19 quantity: 1,20 amount: shippingMethod?.amount ?? 0,21 taxCode: shippingMethod?.tax_lines?.find(22 (taxLine) => taxLine?.provider_id === providerId23 )?.code ?? "",24 }25 }) ?? []),26 ],27 date: new Date(),28 customerCode: orders[0]?.customer?.id ?? "",29 addresses: {30 singleLocation: {31 line1: orders[0]?.shipping_address?.address_1 ?? "",32 line2: orders[0]?.shipping_address?.address_2 ?? "",33 city: orders[0]?.shipping_address?.city ?? "",34 region: orders[0]?.shipping_address?.province ?? "",35 postalCode: orders[0]?.shipping_address?.postal_code ?? "",36 country: orders[0]?.shipping_address?.country_code?.toUpperCase() ?? "",37 },38 },39 currencyCode: orders[0]?.currency_code.toUpperCase() ?? "",40 type: DocumentType.SalesInvoice,41 }42})43 44const response = createTransactionStep(transactionInput)45 46const order = updateOrderWorkflow.runAsStep({47 input: {48 id: input.order_id,49 user_id: "",50 metadata: {51 avalara_transaction_code: response.code,52 },53 },54})55 56return new WorkflowResponse(order)
You prepare the transaction input using the transform function. You include in the input the line items and shipping methods from the order, along with the customer and address details.
Notice that you set the type to DocumentType.SalesInvoice to save the transaction in Avalara.
Then, you call the createTransactionStep to create the transaction in Avalara.
Finally, you use the updateOrderWorkflow to save the created transaction's code in the order's metadata.
A workflow must return an instance of WorkflowResponse. The WorkflowResponse constructor accepts the workflow's output as a parameter, which is the updated order in this case.
transform allows you to access the values of data during execution. Learn more in the Data Manipulation documentation.c. Create Order Placed Subscriber#
Next, you'll create a subscriber that listens to the order.placed event and executes the createOrderTransactionWorkflow when the event is emitted.
A subscriber is an asynchronous function that is executed when its associated event is emitted.
To create the subscriber, create the file src/subscribers/order-placed.ts with the following content:
1import { SubscriberArgs, type SubscriberConfig } from "@medusajs/framework"2import { createOrderTransactionWorkflow } from "../workflows/create-order-transaction"3 4export default async function orderPlacedHandler({5 event: { data },6 container,7}: SubscriberArgs<{ id: string }>) {8 await createOrderTransactionWorkflow(container).run({9 input: {10 order_id: data.id,11 },12 })13}14 15export const config: SubscriberConfig = {16 event: `order.placed`,17}
A subscriber file must export:
- An asynchronous function that is executed when its associated event is emitted.
- An object that indicates the event that the subscriber is listening to.
The subscriber receives among its parameters the data payload of the emitted event, which includes the order ID.
In the subscriber, you call the createOrderTransactionWorkflow with the order ID to create the transaction in Avalara.
Test Order Placement with Avalara Transaction#
To test the order placement with Avalara transaction creation, make sure both the Medusa server and the Next.js Starter Storefront are running.
Then, go to the storefront at http://localhost:8000 and complete the checkout process you started in the previous step.
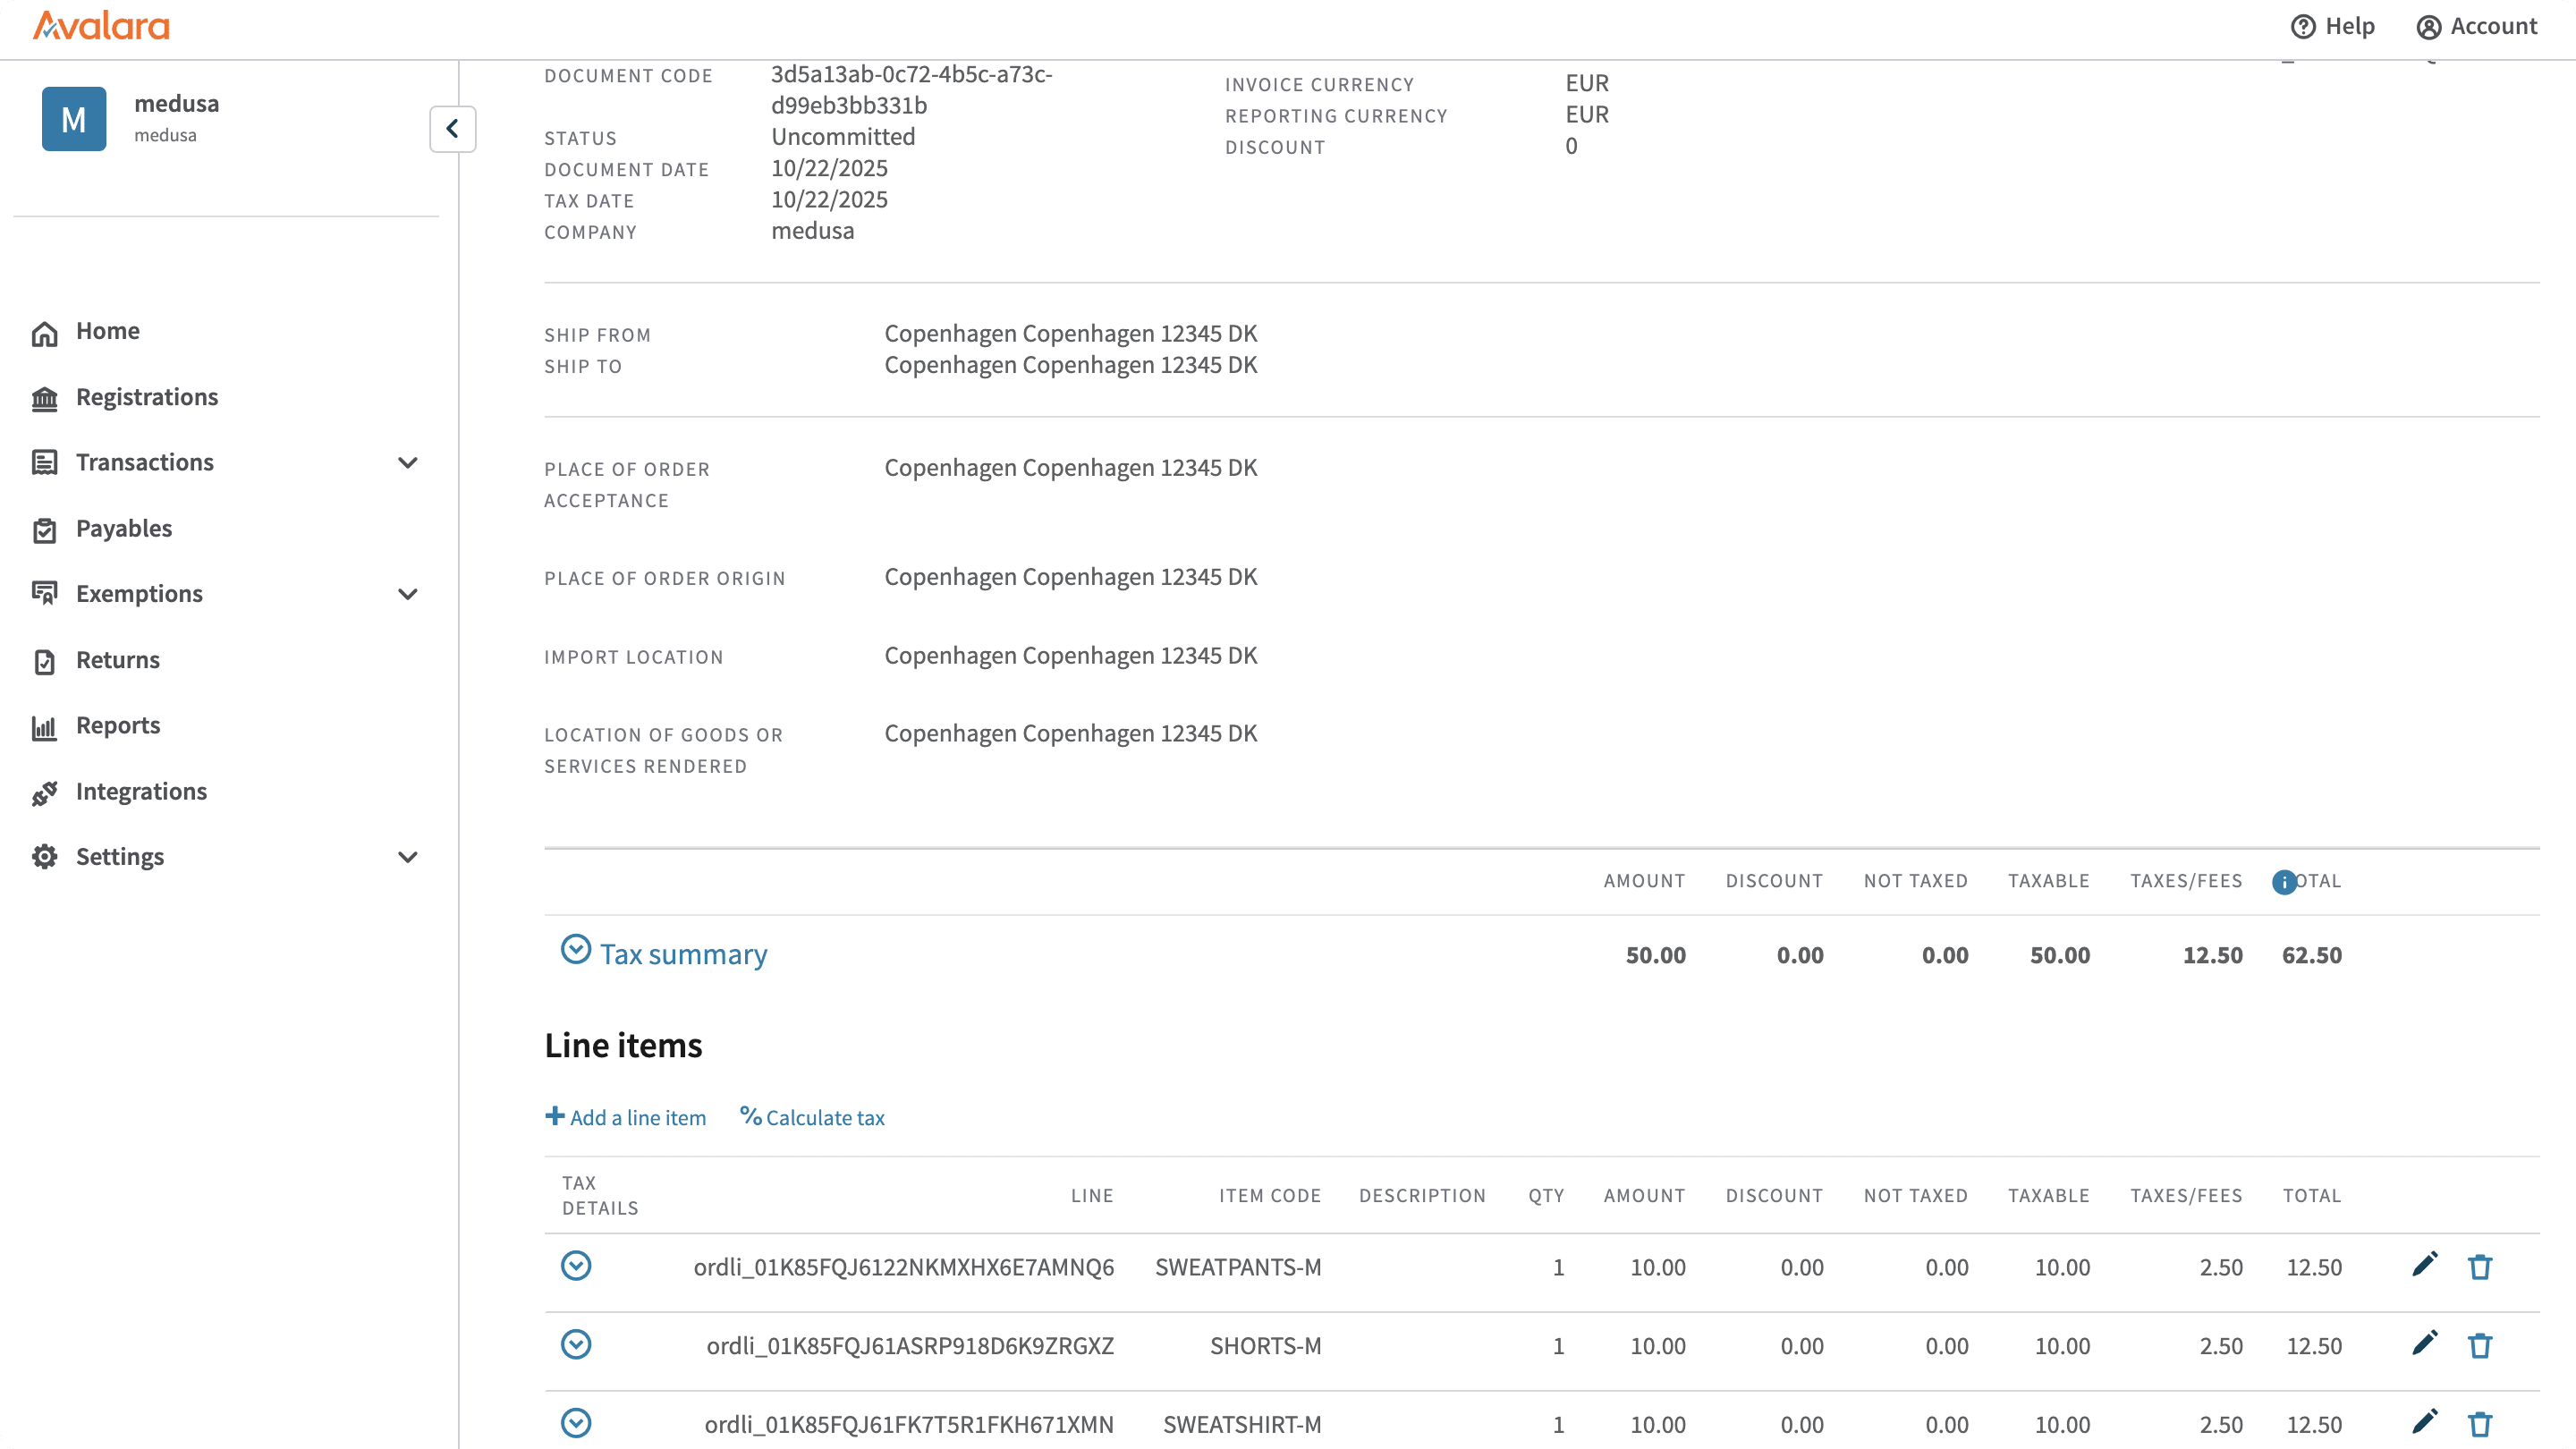
You can verify that the transaction was created in Avalara by going to your Avalara dashboard:
- From the sidebar, click on "Transactions" → "Transactions."
- In the filter at the top, select "This month to date."
- In the list, the first transaction should correspond to the order you just placed. Click on it to view its details.
You can view the tax details calculated by Avalara for the order, with the line items and shipping method included in the transaction.
Step 5: Sync Products with Avalara#
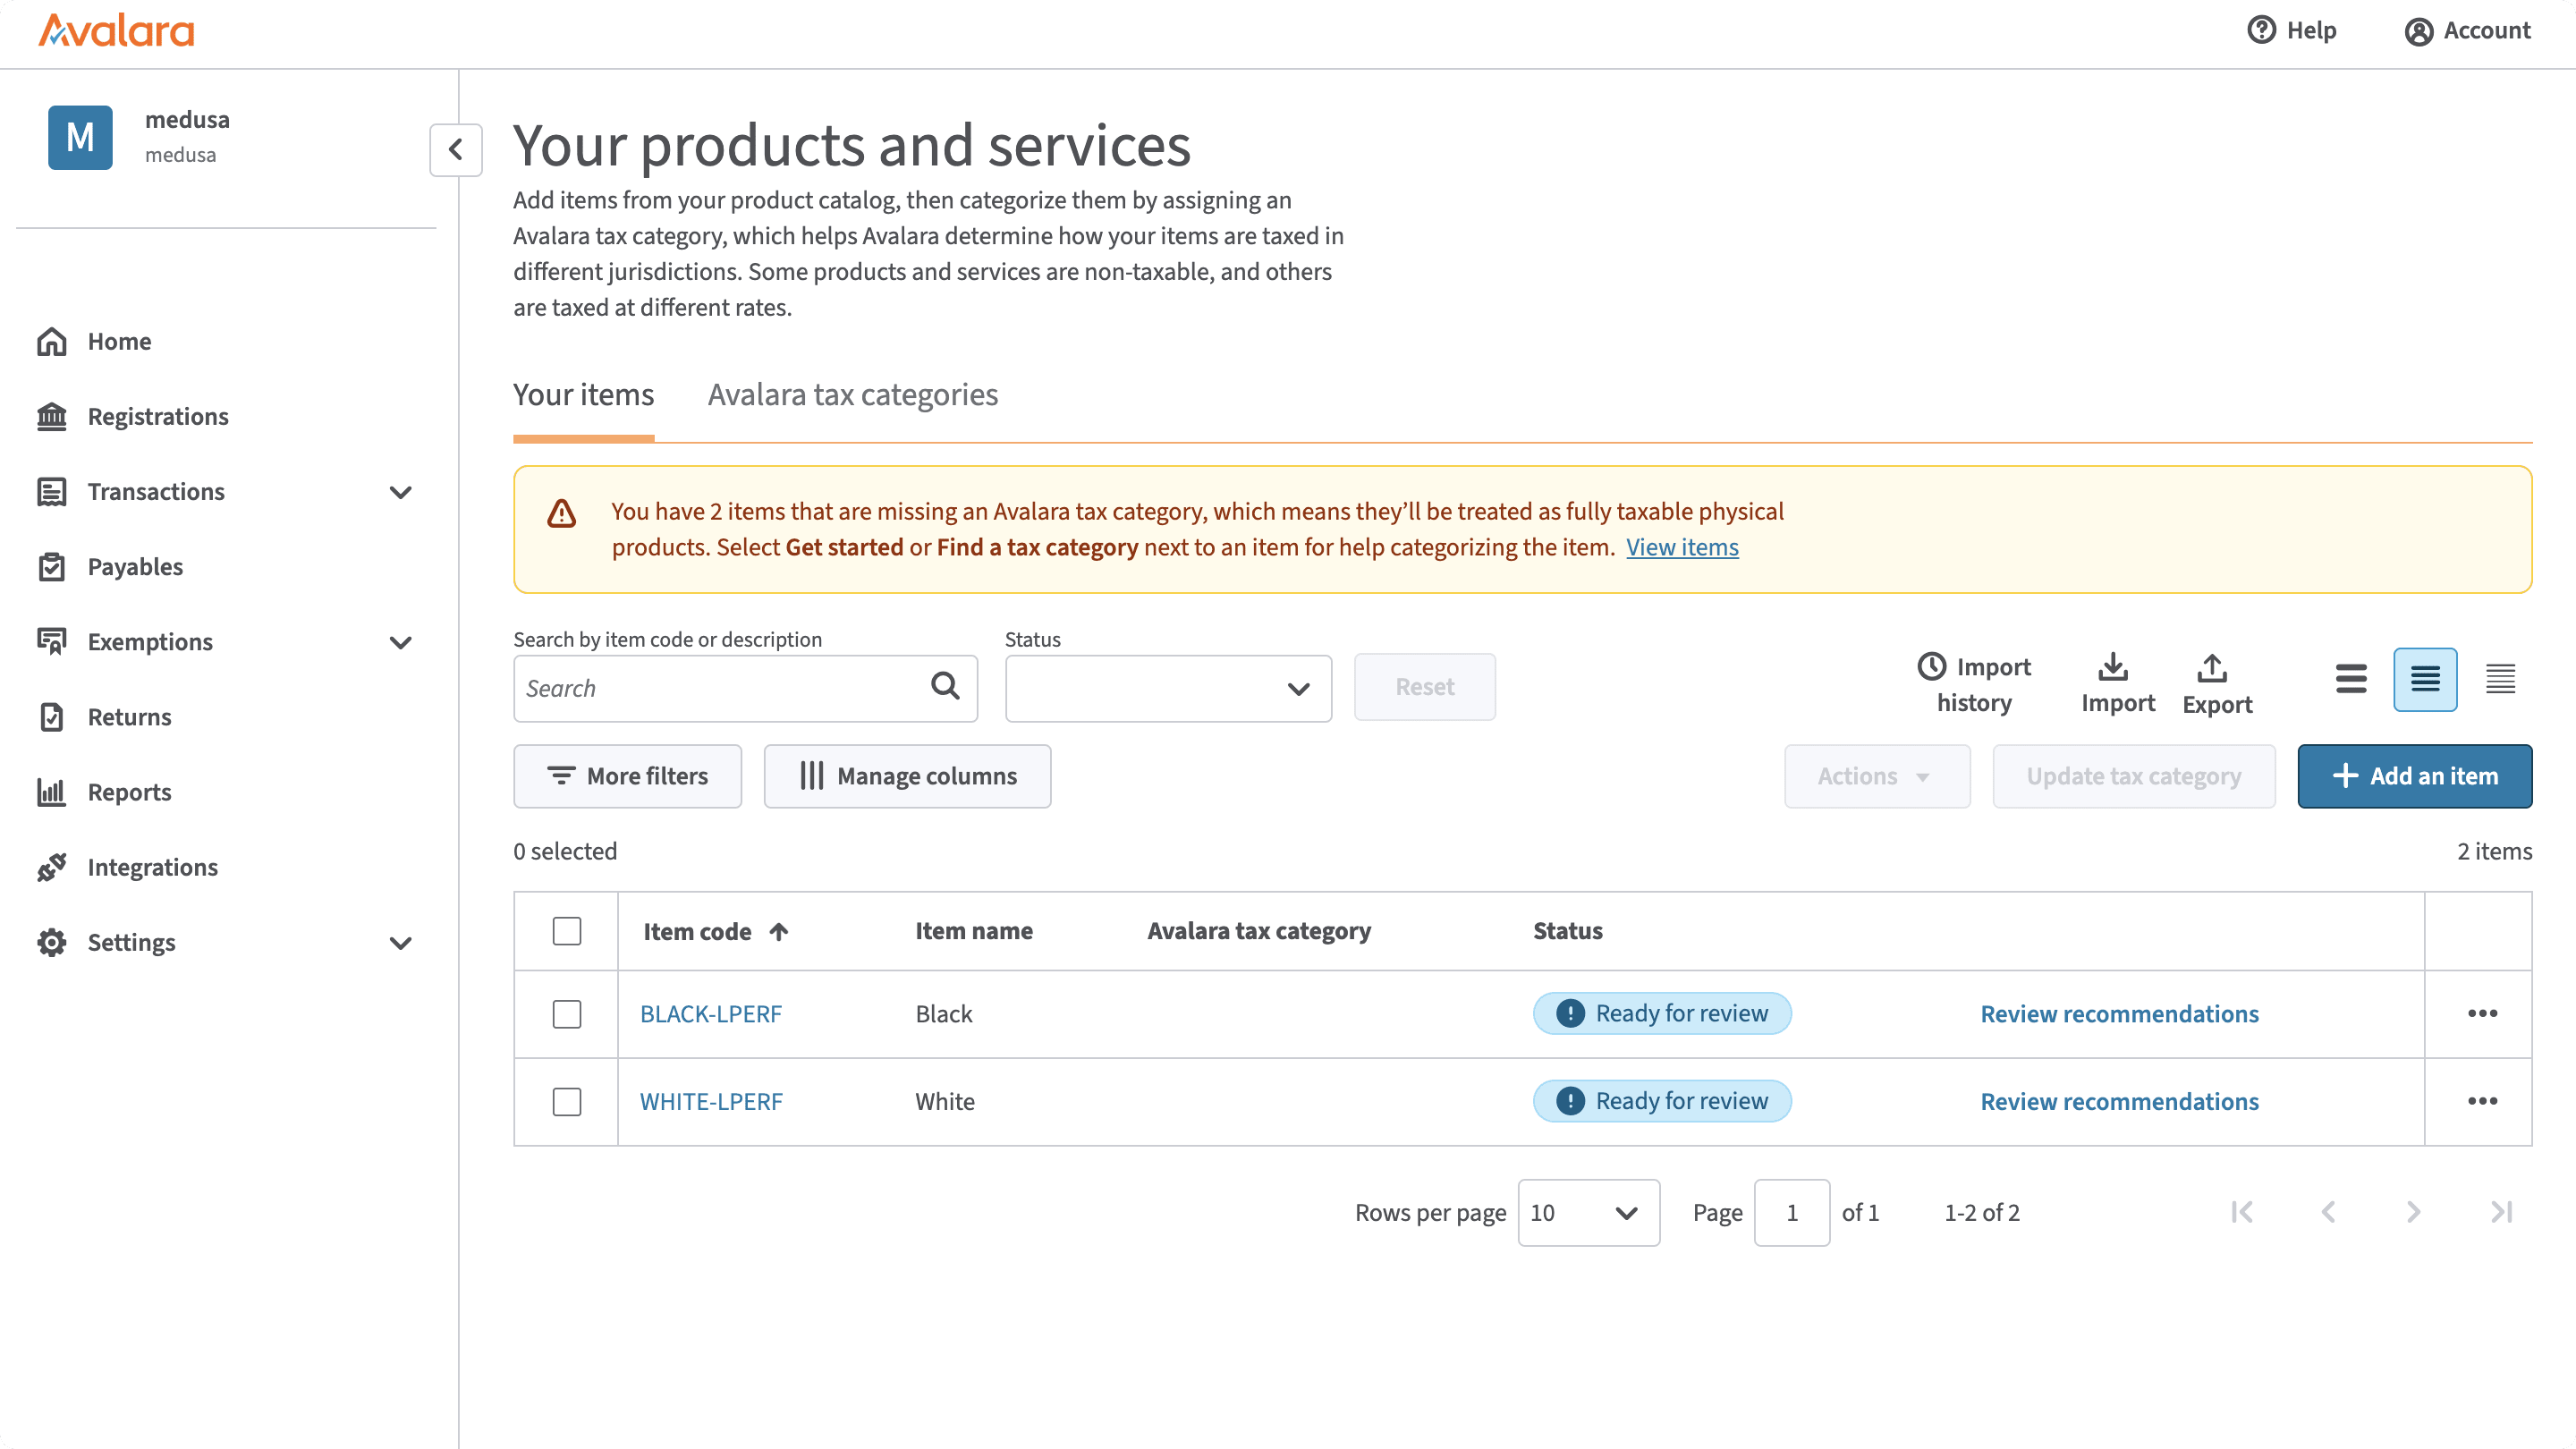
In Avalara, you can manage the items you sell to set classifications, tax codes, exemptions, and other tax-related settings.
In this step, you'll sync Medusa's products with Avalara items. This way, you can manage tax codes and other settings for your products directly from Avalara.
To do this, you will:
- Add methods to the Avalara Tax Module Provider's service to manage Avalara items.
- Build workflows to create, update, and delete Avalara items.
- Create subscribers that listen to product events and trigger the workflows.
a. Add Methods to Avalara Tax Module Provider#
To manage Avalara items, you'll add methods to the Avalara Tax Module Provider's service that uses the AvaTax API to create, update, and delete items.
In src/modules/avalara/service.ts, add the following methods to the AvalaraTaxModuleProvider class:
1class AvalaraTaxModuleProvider implements ITaxProvider {2 // ...3 async createItems(items: {4 medusaId: string5 itemCode: string6 description: string7 [key: string]: unknown8 }[]) {9 try {10 const response = await this.avatax.createItems({11 companyId: this.options.companyId!,12 model: await Promise.all(13 items.map(async (item) => {14 return {15 ...item,16 id: 0, // Avalara will generate an ID for the item17 itemCode: item.itemCode,18 description: item.description,19 source: "medusa",20 sourceEntityId: item.medusaId,21 }22 })23 ),24 })25 26 return response27 } catch (error) {28 throw new MedusaError(29 MedusaError.Types.UNEXPECTED_STATE,30 `An error occurred while creating item classifications for Avalara: ${error}`31 )32 }33 }34 35 async getItem(id: number) {36 try {37 const response = await this.avatax.getItem({38 companyId: this.options.companyId!,39 id,40 })41 42 return response43 } catch (error) {44 throw new MedusaError(45 MedusaError.Types.UNEXPECTED_STATE,46 `An error occurred while retrieving item classification from Avalara: ${error}`47 )48 }49 }50 51 async updateItem(item: {52 id: number53 itemCode: string54 description: string55 [key: string]: unknown56 }) {57 try {58 const response = await this.avatax.updateItem({59 companyId: this.options.companyId!,60 id: item.id,61 model: {62 ...item,63 id: item.id,64 itemCode: item.itemCode,65 description: item.description,66 source: "medusa",67 },68 })69 70 return response71 } catch (error) {72 throw new MedusaError(73 MedusaError.Types.UNEXPECTED_STATE,74 `An error occurred while updating item classifications for Avalara: ${error}`75 )76 }77 }78 79 async deleteItem(id: number) {80 try {81 const response = await this.avatax.deleteItem({82 companyId: this.options.companyId!,83 id,84 })85 86 return response87 } catch (error) {88 throw new MedusaError(89 MedusaError.Types.UNEXPECTED_STATE,90 `An error occurred while deleting item classifications for Avalara: ${error}`91 )92 }93 }94}
You add the following methods:
createItems: Creates multiple items in Avalara using their Create Items API.getItem: Retrieves an item from Avalara using their Get Item API.updateItem: Updates an item in Avalara using their Update Item API.deleteItem: Deletes an item in Avalara using their Delete Item API.
You'll use these methods in the next sections to build workflows that sync products with Avalara items.
b. Create Avalara Item Workflow#
The first workflow you'll build creates an item for a product in Avalara. It has the following steps:
Workflow hook
Step conditioned by when
View step details
Medusa provides the first and last step out of the box. You only need to create the createItemStep.
createItemStep
The createItemStep creates an item in Avalara.
To create the step, create the file src/workflows/steps/create-item.ts with the following content:
1import { createStep, StepResponse } from "@medusajs/framework/workflows-sdk"2import AvalaraTaxModuleProvider from "../../modules/avalara/service"3 4type StepInput = {5 item: {6 medusaId: string7 itemCode: string8 description: string9 [key: string]: unknown10 }11}12 13export const createItemStep = createStep(14 "create-item",15 async ({ item }: StepInput, { container }) => {16 const taxModuleService = container.resolve("tax")17 const avalaraProviderService = taxModuleService.getProvider(18 `tp_${AvalaraTaxModuleProvider.identifier}_avalara`19 ) as AvalaraTaxModuleProvider20 21 const response = await avalaraProviderService.createItems(22 [item]23 )24 25 return new StepResponse(response[0], response[0].id)26 },27 async (data, { container }) => {28 if (!data) {29 return30 }31 const taxModuleService = container.resolve("tax")32 const avalaraProviderService = taxModuleService.getProvider(33 `tp_${AvalaraTaxModuleProvider.identifier}_avalara`34 ) as AvalaraTaxModuleProvider35 36 avalaraProviderService.deleteItem(data)37 }38)
The step receives the details of the item to create as input.
In the step, you retrieve the Avalara Tax Module Provider's service from the Tax Module. Then, you call its createItems method to create the item in Avalara.
You return the created item, and you pass its ID to the compensation function to delete the item if an error occurs during the workflow's execution.
Create Product Item Workflow
You can now create the workflow. Create the file src/workflows/create-product-item.ts with the following content:
1import { createWorkflow, WorkflowResponse } from "@medusajs/framework/workflows-sdk"2import { updateProductsWorkflow, useQueryGraphStep } from "@medusajs/medusa/core-flows"3import { createItemStep } from "./steps/create-item"4 5type WorkflowInput = {6 product_id: string7}8 9export const createProductItemWorkflow = createWorkflow(10 "create-product-item",11 (input: WorkflowInput) => {12 const { data: products } = useQueryGraphStep({13 entity: "product",14 fields: [15 "id",16 "title",17 ],18 filters: {19 id: input.product_id,20 },21 options: {22 throwIfKeyNotFound: true,23 },24 })25 26 const response = createItemStep({27 item: {28 medusaId: products[0].id,29 itemCode: products[0].id,30 description: products[0].title,31 },32 })33 34 updateProductsWorkflow.runAsStep({35 input: {36 products: [37 {38 id: input.product_id,39 metadata: {40 avalara_item_id: response.id,41 },42 },43 ],44 },45 })46 47 return new WorkflowResponse(response)48 }49)
The workflow receives the product ID as input.
In the workflow, you:
- Retrieve the product's details using the
useQueryGraphStep. - Create the item in Avalara using the
createItemStep. - Save the created item's ID in the product's metadata using the
updateProductsWorkflow. This ID is useful when you want to update or delete the item later.
You return the created item as the workflow's output.
c. Create Product Created Subscriber#
Next, you'll create a subscriber that listens to the product.created event and executes the createProductItemWorkflow.
Create the file src/subscribers/product-created.ts with the following content:
1import { SubscriberArgs, type SubscriberConfig } from "@medusajs/framework"2import { createProductItemWorkflow } from "../workflows/create-product-item"3 4export default async function productCreatedHandler({5 event: { data },6 container,7}: SubscriberArgs<{ id: string }>) {8 await createProductItemWorkflow(container).run({9 input: {10 product_id: data.id,11 },12 })13}14 15export const config: SubscriberConfig = {16 event: `product.created`,17}
You create a subscriber similar to the one you created for the order.placed event. This time, it listens to the product.created event and triggers the createProductItemWorkflow with the product ID.
d. Test Product Creation with Avalara Item#
To test the product creation with Avalara item creation, make sure the Medusa server is running.
Then:
- Open the Medusa Admin dashboard at
http://localhost:9000/admin. - Go to "Products," and create a new product.
- After creating the product, go to your Avalara dashboard.
- From the sidebar, click on "Settings" → "What you sell and buy."
This will open the Items page, where you can see the product you created as items in Avalara. You can click on an item to view it, add a classification, and more.
e. Update Avalara Item Workflow#
Next, you'll create a workflow that updates a product's item in Avalara. The workflow has the following steps:
Workflow hook
Step conditioned by when
View step details
Medusa provides the first step out of the box, and you have already created the createProductItemWorkflow. You only need to create the updateItemStep.
updateItemStep
The updateItemStep updates an item in Avalara.
To create the step, create the file src/workflows/steps/update-item.ts with the following content:
1import { createStep, StepResponse } from "@medusajs/framework/workflows-sdk"2import AvalaraTaxModuleProvider from "../../modules/avalara/service"3 4type StepInput = {5 item: {6 id: number7 medusaId: string8 itemCode: string9 description: string10 [key: string]: unknown11 }12}13 14export const updateItemStep = createStep(15 "update-item",16 async ({ item }: StepInput, { container }) => {17 const taxModuleService = container.resolve("tax")18 const avalaraProviderService = taxModuleService.getProvider(19 `tp_${AvalaraTaxModuleProvider.identifier}_avalara`20 ) as AvalaraTaxModuleProvider21 22 // Retrieve original item before updating23 const originalItem = await avalaraProviderService.getItem(item.id)24 25 // Update the item26 const response = await avalaraProviderService.updateItem(item)27 28 return new StepResponse(response, {29 originalItem,30 })31 },32 async (data, { container }) => {33 if (!data) {34 return35 }36 37 const taxModuleService = container.resolve("tax")38 const avalaraProviderService = taxModuleService.getProvider(39 `tp_${AvalaraTaxModuleProvider.identifier}_avalara`40 ) as AvalaraTaxModuleProvider41 42 // Revert the updates by restoring original values43 await avalaraProviderService.updateItem({44 id: data.originalItem.id,45 itemCode: data.originalItem.itemCode,46 description: data.originalItem.description,47 })48 }49)
The step receives the details of the item to update as input.
In the step, you:
- Retrieve the Avalara Tax Module Provider's service from the Tax Module.
- Retrieve the original item from Avalara before updating it.
- Call the
updateItemmethod to update the item in Avalara. - Return the updated item and pass the original item to the compensation function.
In the compensation function, you revert the updates by restoring the original values if an error occurs during the workflow's execution.
Update Product Item Workflow
You can now create the workflow. Create the file src/workflows/update-product-item.ts with the following content:
1import { createWorkflow, WorkflowResponse, transform, when } from "@medusajs/framework/workflows-sdk"2import { useQueryGraphStep } from "@medusajs/medusa/core-flows"3import { updateItemStep } from "./steps/update-item"4import { createProductItemWorkflow } from "./create-product-item"5 6type WorkflowInput = {7 product_id: string8}9 10export const updateProductItemWorkflow = createWorkflow(11 "update-product-item",12 (input: WorkflowInput) => {13 const { data: products } = useQueryGraphStep({14 entity: "product",15 fields: [16 "id",17 "title",18 "metadata",19 ],20 filters: {21 id: input.product_id,22 },23 options: {24 throwIfKeyNotFound: true,25 },26 })27 28 const createResponse = when({ products }, ({ products }) => 29 products.length > 0 && !products[0].metadata?.avalara_item_id30 )31 .then(() => {32 return createProductItemWorkflow.runAsStep({33 input: {34 product_id: input.product_id,35 },36 })37 })38 39 const updateResponse = when({ products }, ({ products }) => 40 products.length > 0 && !!products[0].metadata?.avalara_item_id41 )42 .then(() => {43 return updateItemStep({44 item: {45 id: products[0].metadata?.avalara_item_id as number,46 medusaId: products[0].id,47 itemCode: products[0].id,48 description: products[0].title,49 },50 })51 })52 53 const response = transform({54 createResponse,55 updateResponse,56 }, (data) => {57 return data.createResponse || data.updateResponse58 })59 60 return new WorkflowResponse(response)61 }62)
The workflow receives the product ID as input.
In the workflow, you:
- Retrieve the product's details using the
useQueryGraphStep. - Use a
whencondition to check whether the product has an Avalara item ID in its metadata.- If it doesn't, you call the
createProductItemWorkflowto create the item in Avalara. - If it does, you prepare the input and call the
updateItemStepto update the item in Avalara.
- If it doesn't, you call the
- Use
transformto return either the created or updated item as the workflow's output.
when-then allows you to run steps based on conditions during execution. Learn more in the Conditions in Workflows documentation.f. Create Product Updated Subscriber#
Next, you'll create a subscriber that listens to the product.updated event and executes the updateProductItemWorkflow.
Create the file src/subscribers/product-updated.ts with the following content:
1import { SubscriberArgs, type SubscriberConfig } from "@medusajs/framework"2import { updateProductItemWorkflow } from "../workflows/update-product-item"3 4export default async function productUpdatedHandler({5 event: { data },6 container,7}: SubscriberArgs<{ id: string }>) {8 await updateProductItemWorkflow(container).run({9 input: {10 product_id: data.id,11 },12 })13}14 15export const config: SubscriberConfig = {16 event: `product.updated`,17}
You create a subscriber similar to the one you created for the product.created event. This time, it listens to the product.updated event and triggers the updateProductItemWorkflow with the product ID.
g. Test Product Update with Avalara Item#
To test the product update with Avalara item update, make sure the Medusa server is running.
Then:
- Open the Medusa Admin dashboard at
http://localhost:9000/admin. - Go to "Products," and edit an existing product. For example, you can edit its title.
- After updating the product, go to your Avalara dashboard.
- From the sidebar, click on "Settings" → "What you sell and buy."
- If the product already had an item in Avalara, click on it to view its details and confirm that the changes were applied.
- If the product didn't have an item in Avalara, you should see a new item created for it.
h. Delete Avalara Item Workflow#
The last workflow you'll build deletes a product's item from Avalara. The workflow has the following steps:
Workflow hook
Step conditioned by when
View step details
Medusa provides the first step out of the box. You only need to create the deleteItemStep.
deleteItemStep
The deleteItemStep deletes an item from Avalara.
To create the step, create the file src/workflows/steps/delete-item.ts with the following content:
1import { createStep, StepResponse } from "@medusajs/framework/workflows-sdk"2import AvalaraTaxModuleProvider from "../../modules/avalara/service"3 4type StepInput = {5 item_id: number6}7 8export const deleteItemStep = createStep(9 "delete-item",10 async ({ item_id }: StepInput, { container }) => {11 const taxModuleService = container.resolve("tax")12 const avalaraProviderService = taxModuleService.getProvider(13 `tp_${AvalaraTaxModuleProvider.identifier}_avalara`14 ) as AvalaraTaxModuleProvider15 16 try {17 // Retrieve original item before deleting18 const original = await avalaraProviderService.getItem(item_id)19 // Delete the item20 const response = await avalaraProviderService.deleteItem(original.id)21 22 return new StepResponse(response, {23 originalItem: original,24 })25 } catch (error) {26 console.error(error)27 // Item does not exist in Avalara, so we can skip deletion28 return new StepResponse(void 0)29 }30 },31 async (data, { container }) => {32 if (!data) {33 return34 }35 36 const taxModuleService = container.resolve("tax")37 const avalaraProviderService = taxModuleService.getProvider(38 `tp_${AvalaraTaxModuleProvider.identifier}_avalara`39 ) as AvalaraTaxModuleProvider40 41 await avalaraProviderService.createItems(42 [{43 medusaId: data.originalItem.sourceEntityId ?? "",44 description: data.originalItem.description,45 itemCode: data.originalItem.itemCode,46 }]47 )48 }49)
The step receives the ID of the item to delete as input.
In the step, you:
- Retrieve the Avalara Tax Module Provider's service from the Tax Module.
- Retrieve the original item before deleting it.
- Call the
deleteItemmethod to delete the item in Avalara. - Return the deletion response and pass the original item to the compensation function.
In the compensation function, you recreate the item using the original values if an error occurs during the workflow's execution.
Delete Product Item Workflow
You can now create the workflow. Create the file src/workflows/delete-product-item.ts with the following content:
1import { createWorkflow, when, WorkflowResponse } from "@medusajs/framework/workflows-sdk"2import { deleteItemStep } from "./steps/delete-item"3import { useQueryGraphStep } from "@medusajs/medusa/core-flows"4 5type WorkflowInput = {6 product_id: string7}8 9export const deleteProductItemWorkflow = createWorkflow(10 "delete-product-item",11 (input: WorkflowInput) => {12 const { data: products } = useQueryGraphStep({13 entity: "product",14 fields: [15 "id",16 "metadata",17 ],18 filters: {19 id: input.product_id,20 },21 withDeleted: true,22 options: {23 throwIfKeyNotFound: true,24 },25 })26 27 when({ products }, ({ products }) =>28 products.length > 0 && !!products[0].metadata?.avalara_item_id29 )30 .then(() => {31 deleteItemStep({ item_id: products[0].metadata!.avalara_item_id as number })32 })33 34 return new WorkflowResponse(void 0)35 }36)
The workflow receives the product ID as input.
In the workflow, you:
- Retrieve the product's details using the
useQueryGraphStep, including deleted products. - Use a
whencondition to check whether the product has an Avalara item ID in its metadata.- If it does, you call the
deleteItemStepto delete the item in Avalara.
- If it does, you call the
i. Create Product Deleted Subscriber#
Finally, you'll create a subscriber to delete the Avalara item when a product is deleted.
Create the file src/subscribers/product-deleted.ts with the following content:
1import { SubscriberArgs, type SubscriberConfig } from "@medusajs/framework"2import { deleteProductItemWorkflow } from "../workflows/delete-product-item"3 4export default async function productDeletedHandler({5 event: { data },6 container,7}: SubscriberArgs<{ id: string }>) {8 await deleteProductItemWorkflow(container).run({9 input: {10 product_id: data.id,11 },12 throwOnError: false,13 })14}15 16export const config: SubscriberConfig = {17 event: `product.deleted`,18}
You create a subscriber similar to the previous ones. This time, the subscriber listens to the product.deleted event and triggers the deleteProductItemWorkflow with the product ID.
j. Test Product Deletion with Avalara Item#
To test the product deletion with Avalara item deletion, make sure the Medusa server is running.
Then:
- Open the Medusa Admin dashboard at
http://localhost:9000/admin. - Go to "Products," and delete a product.
- After deleting the product, go to your Avalara dashboard.
- From the sidebar, click on "Settings" → "What you sell and buy." The product's item should no longer be listed.
Next Steps#
You've successfully integrated Avalara with Medusa to handle tax calculations during checkout, create transactions when orders are placed, and sync products with Avalara items.
You can expand on this integration by managing tax features in Avalara, such as exemptions. You can also handle order events like order.canceled to void transactions in Avalara when orders are canceled.
Learn More About Medusa#
If you're new to Medusa, check out the main documentation for a more in-depth understanding of the concepts used in this guide.
To learn more about the commerce features that Medusa provides, check out Medusa's Commerce Modules.
Troubleshooting#
If you encounter issues during your development, check out the troubleshooting guides.
Getting Help#
If you encounter issues not covered in the troubleshooting guides:
- Visit the Medusa GitHub repository to report issues or ask questions.
- Join the Medusa Discord community for real-time support from community members.