Implement Product Rentals in Medusa
In this tutorial, you'll learn how to implement product rentals in Medusa.
When you install a Medusa application, you get a fully-fledged commerce platform with a Framework for customization. The Medusa application's commerce features are built around Commerce Modules that are available out-of-the-box.
Product rentals allow customers to rent products for a specified period. This feature is particularly useful for businesses that offer items like equipment, vehicles, or formal wear.
Summary#
By following this tutorial, you'll learn how to:
- Install and set up Medusa with the Next.js Starter Storefront.
- Define and manage data models useful for product rentals.
- Allow admin users to manage rental configurations of products.
- Allow customers to rent products for specified periods through the storefront.
- Allow admin users to manage rented items in orders.
- Handle events like order cancellation and fulfillment for rented products.
You can follow this tutorial whether you're new to Medusa or an advanced Medusa developer.

Step 1: Install a Medusa Application#
Start by installing the Medusa application on your machine with the following command:
You'll first be asked for the project's name. Then, when asked whether you want to install the Next.js Starter Storefront, choose Yes.
Afterward, the installation process will start, which will install the Medusa application as a monorepository in a directory with your project's name. The backend is installed in the apps/backend directory, and the Next.js Starter Storefront is installed in the apps/storefront directory.
Once the installation finishes successfully, the Medusa Admin dashboard will open with a form to create a new user. Enter the user's credentials and submit the form. Afterward, you can log in with the new user and explore the dashboard.
apps/backend directory of your Medusa project.Step 2: Create Rental Module#
In Medusa, you can build custom features in a module. A module is a reusable package with the data models and functionalities related to a single feature or domain. Medusa integrates the module into your application without implications or side effects on your setup.
In this step, you'll build a Rental Module that defines the data models and logic to manage rentals and rental configurations in the database.
a. Create Module Directory#
Create the directory src/modules/rental that will hold the Rental Module's code.
b. Create Data Models#
A data model represents a table in the database. You create data models using Medusa's Data Model Language (DML). It simplifies defining a table's columns, relations, and indexes with straightforward methods and configurations.
For the Rental Module, you'll create a data model to represent rental configurations for products, and another to represent individual rentals.
RentalConfiguration Data Model
The RentalConfiguration data model holds rental configurations for products. Products with a rental configuration can be rented.
To create the data model, create the file src/modules/rental/models/rental-configuration.ts with the following content:
1import { model } from "@medusajs/framework/utils"2import { Rental } from "./rental"3 4export const RentalConfiguration = model.define("rental_configuration", {5 id: model.id().primaryKey(),6 product_id: model.text(),7 min_rental_days: model.number().default(1),8 max_rental_days: model.number().nullable(),9 status: model.enum(["active", "inactive"]).default("active"),10 rentals: model.hasMany(() => Rental, {11 mappedBy: "rental_configuration",12 }),13})
The RentalConfiguration data model has the following properties:
id: The primary key of the table.product_id: The ID of the Medusa product associated with the rental configuration.min_rental_days: The minimum number of days a product can be rented.max_rental_days: The maximum number of days a product can be rented.status: The status of the rental configuration, which can be either "active" or "inactive".rentals: A one-to-many relation to theRentaldata model, which you'll create next.
Notice that you'll handle pricing and inventory through Medusa's existing Product and Inventory modules.
Rental Data Model
The Rental data model holds individual rentals. They will be created for each rented product variant in an order.
To create the data model, create the file src/modules/rental/models/rental.ts with the following content:
1import { model } from "@medusajs/framework/utils"2import { RentalConfiguration } from "./rental-configuration"3 4export const Rental = model.define("rental", {5 id: model.id().primaryKey(),6 variant_id: model.text(),7 customer_id: model.text(),8 order_id: model.text().nullable(),9 line_item_id: model.text().nullable(),10 rental_start_date: model.dateTime(),11 rental_end_date: model.dateTime(),12 actual_return_date: model.dateTime().nullable(),13 rental_days: model.number(),14 status: model.enum(["pending", "active", "returned", "cancelled"]).default("pending"),15 rental_configuration: model.belongsTo(() => RentalConfiguration, {16 mappedBy: "rentals",17 }),18})
The Rental data model has the following properties:
id: The primary key of the table.variant_id: The ID of the Medusa product variant being rented.customer_id: The ID of the customer renting the product.order_id: The ID of the Medusa order associated with the rental.line_item_id: The ID of the Medusa line item associated with the rental.rental_start_date: The start date of the rental period.rental_end_date: The end date of the rental period.actual_return_date: The actual return date of the rented product.rental_days: The number of days the product is rented.status: The status of the rental, which can be "pending", "active", "returned", or "cancelled".rental_configuration: A many-to-one relation to theRentalConfigurationdata model.
c. Create Module's Service#
You can manage your module's data models in a service.
A service is a TypeScript class that the module exports. In the service's methods, you can connect to the database, allowing you to manage your data models, or connect to a third-party service, which is useful if you're integrating with external services.
To create the Rental Module's service, create the file src/modules/rental/service.ts with the following content:
1import { MedusaService } from "@medusajs/framework/utils"2import { Rental } from "./models/rental"3import { RentalConfiguration } from "./models/rental-configuration"4 5class RentalModuleService extends MedusaService({6 Rental,7 RentalConfiguration,8}) {9 10}11 12export default RentalModuleService
The RentalModuleService extends MedusaService, which generates a class with data-management methods for your module's data models. This saves you time on implementing Create, Read, Update, and Delete (CRUD) methods.
So, the RentalModuleService class now has methods like createRentals and retrieveRentalConfiguration.
d. Create the Module Definition#
The final piece to a module is its definition, which you export in an index.ts file at its root directory. This definition tells Medusa the name of the module and its service.
So, create the file src/modules/rental/index.ts with the following content:
You use the Module function to create the module's definition. It accepts two parameters:
- The module's name, which is
rental. - An object with a required
serviceproperty indicating the module's service.
You also export the module's name as RENTAL_MODULE so you can reference it later.
e. Add Module to Medusa's Configurations#
Once you finish building the module, add it to Medusa's configurations to start using it.
In medusa-config.ts, add a modules property and pass it an array with your custom module:
Each object in the modules array has a resolve property, whose value is either a path to the module's directory, or an npm package’s name.
f. Generate Migrations#
Since data models represent tables in the database, you define how they're created in the database with migrations. A migration is a TypeScript class that defines database changes made by a module.
Medusa's CLI tool can generate the migrations for you. To generate a migration for the Rental Module, run the following command in the apps/backend directory:
The db:generate command of the Medusa CLI accepts the name of the module to generate the migration for. You'll now have a migrations directory under src/modules/rental that holds the generated migration.
Then, to reflect these migrations on the database, run the following command:
The tables for the data models are now created in the database.
Step 3: Define Links between Data Models#
Since Medusa isolates modules to integrate them into your application without side effects, you can't directly create relationships between data models of different modules.
Instead, Medusa provides a mechanism to define links between data models and retrieve and manage linked records while maintaining module isolation.
In this step, you'll define links between the data models in the Rental Module and the data models in Medusa's modules:
RentalConfiguration↔Product: The rental configuration of a product.Rental->Order: The order that the rental belongs to.Rental->OrderLineItem: The associated order line item for the rental.Customer->Rental: The customer who made the rental.Rental->ProductVariant: The product variant being rented.
a. RentalConfiguration ↔ Product Link#
To define the link between RentalConfiguration and Product, create the file src/links/product-rental-config.ts with the following content:
You define a link using the defineLink function. It accepts two parameters:
- An object indicating the first data model part of the link. A module has a special
linkableproperty that contains link configurations for its data models. You pass the linkable configurations of the Product Module'sProductdata model. - An object indicating the second data model part of the link. You pass the linkable configurations of the Rental Module's
RentalConfigurationdata model.
b. Rental -> Order Link#
To define the link from a Rental to an Order, create the file src/links/rental-order.ts with the following content:
1import { defineLink } from "@medusajs/framework/utils"2import RentalModule from "../modules/rental"3import OrderModule from "@medusajs/medusa/order"4 5export default defineLink(6 {7 linkable: RentalModule.linkable.rental,8 field: "order_id",9 },10 OrderModule.linkable.order,11 {12 readOnly: true,13 }14)
You define a link similar to the previous one, but with an additional configuration object as the third parameter. You enable the readOnly property to indicate that this link is not saved in the database. It's only used to query the order of a rental.
c. Rental -> OrderLineItem Link#
To define the link from a Rental to an OrderLineItem, create the file src/links/rental-line-item.ts with the following content:
1import { defineLink } from "@medusajs/framework/utils"2import RentalModule from "../modules/rental"3import OrderModule from "@medusajs/medusa/order"4 5export default defineLink(6 {7 linkable: RentalModule.linkable.rental,8 field: "line_item_id",9 },10 OrderModule.linkable.orderLineItem,11 {12 readOnly: true,13 }14)
You define the link similarly to the previous one, enabling the readOnly property to indicate that this link is not saved in the database. It's only used to query the line item of a rental.
d. Customer -> Rental Link#
To define the link from a Customer to a Rental, create the file src/links/rental-customer.ts with the following content:
1import { defineLink } from "@medusajs/framework/utils"2import RentalModule from "../modules/rental"3import CustomerModule from "@medusajs/medusa/customer"4 5export default defineLink(6 {7 linkable: CustomerModule.linkable.customer,8 field: "id",9 },10 {11 ...RentalModule.linkable.rental.id,12 primaryKey: "customer_id",13 },14 {15 readOnly: true,16 }17)
You define the link similarly to the previous ones, enabling the readOnly property to indicate that this link is not saved in the database. It's only used to query the customer of a rental.
e. Rental -> ProductVariant Link#
To define the link from a Rental to a ProductVariant, create the file src/links/rental-variant.ts with the following content:
1import { defineLink } from "@medusajs/framework/utils"2import RentalModule from "../modules/rental"3import ProductModule from "@medusajs/medusa/product"4 5export default defineLink(6 {7 linkable: RentalModule.linkable.rental,8 field: "variant_id",9 },10 ProductModule.linkable.productVariant,11 {12 readOnly: true,13 }14)
You define the link similarly to the previous ones, enabling the readOnly property to indicate that this link is not saved in the database. It's only used to query the product variant of a rental.
f. Sync Links to Database#
After defining links, you need to sync them to the database. This creates the necessary tables to store the link between the RentalConfiguration and Product data models.
To sync the links to the database, run the migrations command again in the apps/backend directory:
This command will create the necessary table to store the link. The other links are read-only and don't require database changes.
Step 4: Manage Rental Configurations Workflow#
In this step, you'll implement the logic to create or update a rental configuration for a product. Later, you'll execute this logic from an API route, and allow admin users to manage rental configurations from the Medusa Admin dashboard.
You create custom functionalities in workflows. A workflow is a series of queries and actions, called steps, that complete a task. A workflow is similar to a function, but it allows you to track its executions' progress, define roll-back logic, and configure other advanced features.
The workflow to manage rental configurations will have the following steps:
Workflow hook
Step conditioned by when
View step details
Medusa provides the useQueryGraphStep and createRemoteLinkStep out-of-the-box. So, you only need to implement the other steps.
createRentalConfigurationStep#
The createRentalConfigurationStep creates a rental configuration.
To create the step, create the file src/workflows/steps/create-rental-configuration.ts with the following content:
1import { createStep, StepResponse } from "@medusajs/framework/workflows-sdk"2import { RENTAL_MODULE } from "../../modules/rental"3import RentalModuleService from "../../modules/rental/service"4 5type CreateRentalConfigurationInput = {6 product_id: string7 min_rental_days?: number8 max_rental_days?: number | null9 status?: "active" | "inactive"10}11 12export const createRentalConfigurationStep = createStep(13 "create-rental-configuration",14 async (15 input: CreateRentalConfigurationInput,16 { container }17 ) => {18 const rentalModuleService: RentalModuleService = container.resolve(19 RENTAL_MODULE20 )21 22 const rentalConfig = await rentalModuleService.createRentalConfigurations(23 input24 )25 26 return new StepResponse(rentalConfig, rentalConfig.id)27 },28 async (rentalConfigId, { container }) => {29 if (!rentalConfigId) {return}30 31 const rentalModuleService: RentalModuleService = container.resolve(32 RENTAL_MODULE33 )34 35 // Delete the created configuration on rollback36 await rentalModuleService.deleteRentalConfigurations(rentalConfigId)37 }38)
You create a step with the createStep function. It accepts three parameters:
- The step's unique name.
- An async function that receives two parameters:
- The step's input, which is an object with the rental configuration's details.
- An object that has properties including the Medusa container, which is a registry of Framework and commerce tools that you can access in the step.
- An async compensation function that undoes the actions performed by the step function. This function is only executed if an error occurs during the workflow's execution.
In the step function, you resolve the Rental Module's service from the Medusa container, and use it to create a rental configuration.
A step function must return a StepResponse instance with the step's output as a first parameter, and the data to pass to the compensation function as a second parameter.
In the compensation function, you delete the created rental configuration if an error occurs during the workflow's execution.
updateRentalConfigurationStep#
The updateRentalConfigurationStep updates a rental configuration.
To create the step, create the file src/workflows/steps/update-rental-configuration.ts with the following content:
1import { createStep, StepResponse } from "@medusajs/framework/workflows-sdk"2import { RENTAL_MODULE } from "../../modules/rental"3import RentalModuleService from "../../modules/rental/service"4 5type UpdateRentalConfigurationInput = {6 id: string7 min_rental_days?: number8 max_rental_days?: number | null9 status?: "active" | "inactive"10}11 12export const updateRentalConfigurationStep = createStep(13 "update-rental-configuration",14 async (15 input: UpdateRentalConfigurationInput,16 { container }17 ) => {18 const rentalModuleService: RentalModuleService = container.resolve(19 RENTAL_MODULE20 )21 22 // retrieve existing rental configuration23 const existingRentalConfig = await rentalModuleService.retrieveRentalConfiguration(24 input.id25 )26 27 const updatedRentalConfig = await rentalModuleService.updateRentalConfigurations(28 input29 )30 31 return new StepResponse(updatedRentalConfig, existingRentalConfig)32 },33 async (existingRentalConfig, { container }) => {34 if (!existingRentalConfig) {return}35 36 const rentalModuleService: RentalModuleService = container.resolve(37 RENTAL_MODULE38 )39 40 await rentalModuleService.updateRentalConfigurations({41 id: existingRentalConfig.id,42 min_rental_days: existingRentalConfig.min_rental_days,43 max_rental_days: existingRentalConfig.max_rental_days,44 status: existingRentalConfig.status,45 })46 }47)
This step receives the rental configuration's ID and the details to update.
In the step, you retrieve the existing rental configuration before updating it. Then, you update the rental configuration using the Rental Module's service.
You return a StepResponse instance with the updated rental configuration as the output, and you pass the existing rental configuration to the compensation function.
In the compensation function, you revert the rental configuration to its previous state if an error occurs during the workflow's execution.
Manage Rental Configuration Workflow#
You can now create the workflow to manage rental configurations using the steps you created.
To create the workflow, create the file src/workflows/upsert-rental-config.ts with the following content:
1import {2 createWorkflow,3 WorkflowResponse,4 transform,5 when,6} from "@medusajs/framework/workflows-sdk"7import { 8 useQueryGraphStep, 9 createRemoteLinkStep,10} from "@medusajs/medusa/core-flows"11import { Modules } from "@medusajs/framework/utils"12import { 13 createRentalConfigurationStep,14} from "./steps/create-rental-configuration"15import { 16 updateRentalConfigurationStep,17} from "./steps/update-rental-configuration"18import { 19 RENTAL_MODULE,20} from "../modules/rental"21 22type UpsertRentalConfigWorkflowInput = {23 product_id: string24 min_rental_days?: number25 max_rental_days?: number | null26 status?: "active" | "inactive"27}28 29export const upsertRentalConfigWorkflow = createWorkflow(30 "upsert-rental-config",31 (input: UpsertRentalConfigWorkflowInput) => {32 // Retrieve product with its rental configuration33 const { data: products } = useQueryGraphStep({34 entity: "product",35 fields: ["id", "rental_configuration.*"],36 filters: { id: input.product_id },37 options: {38 throwIfKeyNotFound: true,39 },40 })41 42 // If rental config doesn't exist, create it and link43 const createdConfig = when({ products }, (data) => {44 return !data.products[0]?.rental_configuration45 }).then(() => {46 const newConfig = createRentalConfigurationStep({47 product_id: input.product_id,48 min_rental_days: input.min_rental_days,49 max_rental_days: input.max_rental_days,50 status: input.status,51 })52 53 // Create link between product and rental configuration54 const linkData = transform({ 55 newConfig, 56 product_id: input.product_id,57 }, (data) => {58 return [59 {60 [Modules.PRODUCT]: {61 product_id: data.product_id,62 },63 [RENTAL_MODULE]: {64 rental_configuration_id: data.newConfig.id,65 },66 },67 ]68 })69 70 createRemoteLinkStep(linkData)71 72 return newConfig73 })74 75 // If rental config exists, update it76 // @ts-ignore77 const updatedConfig = when({ products }, (data) => {78 return !!data.products[0]?.rental_configuration79 }).then(() => {80 return updateRentalConfigurationStep({81 id: products[0].rental_configuration!.id,82 min_rental_days: input.min_rental_days,83 max_rental_days: input.max_rental_days,84 status: input.status,85 })86 })87 88 // Return whichever config was created or updated89 const rentalConfig = transform({ updatedConfig, createdConfig }, (data) => {90 return data.updatedConfig || data.createdConfig91 })92 93 return new WorkflowResponse(rentalConfig)94 }95)
You create a workflow using the createWorkflow function. It accepts the workflow's unique name as a first parameter.
It accepts as a second parameter a constructor function that holds the workflow's implementation.
The function accepts an input object holding the rental configuration's details.
In the workflow, you:
- Retrieve the product's details with its rental configuration using the
useQueryGraphStep. This step uses Query under the hood, which retrieves data across modules.- You enable the
throwIfKeyNotFoundoption to throw an error if the product doesn't exist.
- You enable the
- Use when-then to check if the product doesn't have a rental configuration. If true, you:
- Create a rental configuration using the
createRentalConfigurationStep. - Create a link between the product and the created rental configuration using the
createRemoteLinkStep.
- Create a rental configuration using the
- Use when-then to check if the product has a rental configuration. If true, you update the rental configuration using the
updateRentalConfigurationStep. - Prepare the data to return using transform to return either the created or updated rental configuration.
A workflow must return a WorkflowResponse instance with the workflow's output. You return the created or updated rental configuration.
You'll execute this workflow from an API route in the next step.
transform and when-then to perform operations or check conditions based on execution values. Learn more in the Conditions and Data Manipulation workflow documentation.Step 5: Manage Rental Configurations API Route#
In this step, you'll create API routes that allow you to retrieve and manage rental configurations. Later, you'll use these API routes in the Medusa Admin dashboard to allow admin users to manage rental configurations.
a. Manage Rental Configurations API Route#
An API route is created in a route.ts file under a sub-directory of the src/api directory. The path of the API route is the file's path relative to src/api.
To create an API route that upserts rental configurations of a product, create the file src/api/admin/products/[id]/rental-config/route.ts with the following content:
1import type { 2 MedusaRequest, 3 MedusaResponse,4} from "@medusajs/framework/http"5import { 6 upsertRentalConfigWorkflow,7} from "../../../../../workflows/upsert-rental-config"8import { z } from "@medusajs/framework/zod"9 10export const PostRentalConfigBodySchema = z.object({11 min_rental_days: z.number().optional(),12 max_rental_days: z.number().nullable().optional(),13 status: z.enum(["active", "inactive"]).optional(),14})15 16export const POST = async (17 req: MedusaRequest<z.infer<typeof PostRentalConfigBodySchema>>,18 res: MedusaResponse19) => {20 const { id } = req.params21 22 const { result } = await upsertRentalConfigWorkflow(req.scope).run({23 input: {24 product_id: id,25 min_rental_days: req.validatedBody.min_rental_days,26 max_rental_days: req.validatedBody.max_rental_days,27 status: req.validatedBody.status,28 },29 })30 31 res.json({ rental_config: result })32}
You first define a Zod schema to validate the request body.
Then, since you export a POST function, you expose a POST API route at /admin/products/:id/rental-config.
In the API route handler, you execute the upsertRentalConfigWorkflow by invoking it, passing it the Medusa container from the request's scope. Then, you call its run method, passing the workflow's input from the request's parameters and validated body.
Finally, you return the created or updated rental configuration in the response.
b. Add Validation Middleware#
To validate the body parameters of requests sent to the API route, you need to apply a middleware.
To apply a middleware, create the file src/api/middlewares.ts with the following content:
1import { 2 defineMiddlewares, 3 validateAndTransformBody,4} from "@medusajs/framework/http"5import { 6 PostRentalConfigBodySchema,7} from "./admin/products/[id]/rental-config/route"8 9export default defineMiddlewares({10 routes: [11 {12 matcher: "/admin/products/:id/rental-config",13 methods: ["POST"],14 middlewares: [15 validateAndTransformBody(PostRentalConfigBodySchema),16 ],17 },18 ],19})
You apply the validateAndTransformBody middleware to the POST route of the /admin/products/:id/rental-config path, passing it the Zod schema you created in the route file.
Any request that doesn't conform to the schema will receive a 400 Bad Request response.
c. Retrieve Rental Configuration API Route#
Next, you'll add an API route at the same path to retrieve a product's rental configuration.
In src/api/admin/products/[id]/rental-config/route.ts, add the following at the end of the file:
1export const GET = async (req: MedusaRequest, res: MedusaResponse) => {2 const { id } = req.params3 const query = req.scope.resolve("query")4 5 // Query rental configuration for the product6 const { data: rentalConfigs } = await query.graph({7 entity: "rental_configuration",8 fields: ["*"],9 filters: { product_id: id },10 })11 12 res.json({ rental_config: rentalConfigs[0] })13}
You expose a GET API route at /admin/products/:id/rental-config. In the route handler, you resolve Query from the Medusa container and use it to query the rental configuration for the product.
Then, you return the rental configuration in the response.
In the next step, you'll consume these API routes in the Medusa Admin dashboard.
Step 6: Manage Rental Configurations in Medusa Admin#
In this step, you'll customize the Medusa Admin dashboard to allow admin users to manage rental configurations for products.
The Medusa Admin dashboard is customizable, allowing you to insert widgets into existing pages, or create new pages.
In this step, you'll insert a widget into the Product Details page to allow admin users to manage rental configurations for products.
a. Initialize JS SDK#
To send requests to the Medusa server, you'll use the JS SDK. It's already installed in your Medusa project, but you need to initialize it before using it in your customizations.
Create the file src/admin/lib/sdk.ts with the following content:
Learn more about the initialization options in the JS SDK reference.
b. Create Rental Configuration Widget#
Next, you'll create the widget to manage rental configurations on the Product Details page.
To create the widget, create the file src/admin/widgets/product-rental-config.tsx with the following content:
17import { useEffect, useState } from "react"18 19type RentalConfig = {20 id: string21 product_id: string22 min_rental_days: number23 max_rental_days: number | null24 status: "active" | "inactive"25}26 27type RentalConfigResponse = {28 rental_config: RentalConfig | null29}30 31const ProductRentalConfigWidget = ({32 data: product,33}: DetailWidgetProps<AdminProduct>) => {34 // TODO implement component35}36 37export const config = defineWidgetConfig({38 zone: "product.details.after",39})40 41export default ProductRentalConfigWidget
A widget file must export:
- A default React component. This component renders the widget's UI.
- A
configobject created withdefineWidgetConfigfrom the Admin SDK. It accepts an object with thezoneproperty that indicates where the widget will be rendered in the Medusa Admin dashboard.
Next, you'll add the implementation of the ProductRentalConfigWidget component.
Replace the // TODO implement component comment with the following code inside the ProductRentalConfigWidget component:
1const [drawerOpen, setDrawerOpen] = useState(false)2const [minRentalDays, setMinRentalDays] = useState(1)3const [maxRentalDays, setMaxRentalDays] = useState<number | null>(null)4const confirm = usePrompt()5 6const { data, isLoading, refetch } = useQuery<RentalConfigResponse>({7 queryFn: () =>8 sdk.client.fetch(`/admin/products/${product.id}/rental-config`),9 queryKey: [["products", product.id, "rental-config"]],10})11 12const upsertMutation = useMutation({13 mutationFn: async (config: {14 min_rental_days: number15 max_rental_days: number | null16 status?: "active" | "inactive"17 }) => {18 return sdk.client.fetch(`/admin/products/${product.id}/rental-config`, {19 method: "POST",20 body: config,21 })22 },23 onSuccess: () => {24 toast.success("Rental configuration updated successfully")25 refetch()26 setDrawerOpen(false)27 },28 onError: () => {29 toast.error("Failed to update rental configuration")30 },31})32 33// TODO add useEffect + handle state changes
You define the following state variables and hooks:
drawerOpen,minRentalDays, andmaxRentalDaysstate variables to manage the drawer visibility and form inputs.confirmto show confirmation prompts using Medusa's UI package.data,isLoading, andrefetchfrom auseQueryhook to fetch the product's rental configuration using theGETAPI route you created earlier.upsertMutationfrom auseMutationhook to upsert the rental configuration using thePOSTAPI route you created earlier.
Next, you need to handle data and state changes. Replace the // TODO add useEffect + handle state changes comment with the following code:
1useEffect(() => {2 if (data?.rental_config) {3 setMinRentalDays(data.rental_config.min_rental_days)4 setMaxRentalDays(data.rental_config.max_rental_days)5 }6}, [data?.rental_config])7 8const handleOpenDrawer = () => {9 setDrawerOpen(true)10}11 12const handleSubmit = () => {13 upsertMutation.mutate({14 min_rental_days: minRentalDays,15 max_rental_days: maxRentalDays,16 })17}18 19const handleToggleStatus = async () => {20 if (!data?.rental_config) {return}21 22 const newStatus = 23 data.rental_config.status === "active" ? 24 "inactive" : "active"25 const action = 26 newStatus === "inactive" ? "Deactivate" : "Activate"27 28 if (await confirm({29 title: `${action} rental configuration?`,30 description: `Are you sure you want to ${action.toLowerCase()} this rental configuration?`,31 variant: newStatus === "inactive" ? "danger" : "confirmation",32 })) {33 upsertMutation.mutate({34 status: newStatus,35 })36 }37}38 39// TODO render component
You add a useEffect hook to set the form inputs when the rental configuration data is fetched.
You also define the following functions:
handleOpenDrawer: Opens the drawer that shows the rental configuration form.handleSubmit: Submits the form to upsert the rental configuration.handleToggleStatus: Toggles the rental configuration's status betweenactiveandinactive, showing a confirmation prompt before proceeding.
Finally, you'll implement the component's UI. Replace the // TODO render component comment with the following code:
1return (2 <>3 <Container className="divide-y p-0">4 <div className="flex items-center justify-between px-6 py-4">5 <Heading level="h2">Rental Configuration</Heading>6 {!isLoading && data?.rental_config && (7 <Badge color={data.rental_config.status === "active" ? "green" : "grey"} size="2xsmall">8 {data.rental_config.status === "active" ? "Active" : "Inactive"}9 </Badge>10 )}11 </div>12 13 {isLoading && (14 <div className="px-6 py-4">15 <Text className="text-ui-fg-subtle">Loading...</Text>16 </div>17 )}18 19 {!isLoading && !data?.rental_config && (20 <>21 <div className="px-6 py-4">22 <Text className="text-ui-fg-subtle">This product is not currently available for rental.</Text>23 </div>24 <div className="flex justify-end border-t px-6 py-4">25 <Button size="small" onClick={handleOpenDrawer} variant="secondary">26 Make Rentable27 </Button>28 </div>29 </>30 )}31 32 {!isLoading && data?.rental_config && (33 <div className="divide-y">34 <div className="grid grid-cols-2 items-center px-6 py-4">35 <Text size="small" weight="plus" className="mb-1">36 Min Rental Days37 </Text>38 <Text className="text-ui-fg-subtle text-right">{data.rental_config.min_rental_days}</Text>39 </div>40 <div className="grid grid-cols-2 items-center px-6 py-4">41 <Text size="small" weight="plus" className="mb-1">42 Max Rental Days43 </Text>44 <Text className="text-ui-fg-subtle text-right">45 {data.rental_config.max_rental_days ?? "Unlimited"}46 </Text>47 </div>48 <div className="flex gap-2 px-6 py-4 justify-end">49 <Button size="small" variant="secondary" onClick={handleOpenDrawer}>50 Edit51 </Button>52 <Button53 size="small"54 variant={"primary"}55 onClick={handleToggleStatus}56 disabled={upsertMutation.isPending}57 isLoading={upsertMutation.isPending}58 >59 {data.rental_config.status === "active" 60 ? "Deactivate" 61 : "Activate"62 }63 </Button>64 </div>65 </div>66 )}67 </Container>68 69 <Drawer open={drawerOpen} onOpenChange={setDrawerOpen}>70 <Drawer.Content>71 <Drawer.Header>72 <Drawer.Title>73 {data?.rental_config ? "Edit" : "Add"} Rental Configuration74 </Drawer.Title>75 </Drawer.Header>76 <Drawer.Body className="space-y-4">77 <div>78 <Label htmlFor="min_rental_days">Minimum Rental Days</Label>79 <Input80 id="min_rental_days"81 type="number"82 min="1"83 value={minRentalDays}84 onChange={(e) => setMinRentalDays(Number(e.target.value))}85 />86 </div>87 <div>88 <Label htmlFor="max_rental_days">89 Maximum Rental Days (leave empty for unlimited)90 </Label>91 <Input92 id="max_rental_days"93 type="number"94 min={minRentalDays}95 value={maxRentalDays ?? ""}96 onChange={(e) =>97 setMaxRentalDays(98 e.target.value ? Number(e.target.value) : null99 )100 }101 />102 </div>103 </Drawer.Body>104 <Drawer.Footer>105 <div className="flex gap-2">106 <Button107 variant="secondary"108 onClick={() => setDrawerOpen(false)}109 >110 Cancel111 </Button>112 <Button113 onClick={handleSubmit}114 disabled={upsertMutation.isPending}115 isLoading={upsertMutation.isPending}116 >117 Save118 </Button>119 </div>120 </Drawer.Footer>121 </Drawer.Content>122 </Drawer>123 </>124)
You show a section with the rental configuration details if they exist. You also show a drawer with a form to create or update the rental configuration.
If the product has a rental configuration, you show a button to toggle its status between active and inactive.
Test Rental Configuration Widget#
You can now test the rental configuration widget in the Medusa Admin dashboard.
Run the following command in the apps/backend directory to start the Medusa server:
Then, open the Medusa Admin dashboard in your browser at http://localhost:9000/app and login with the user you created in the first step.
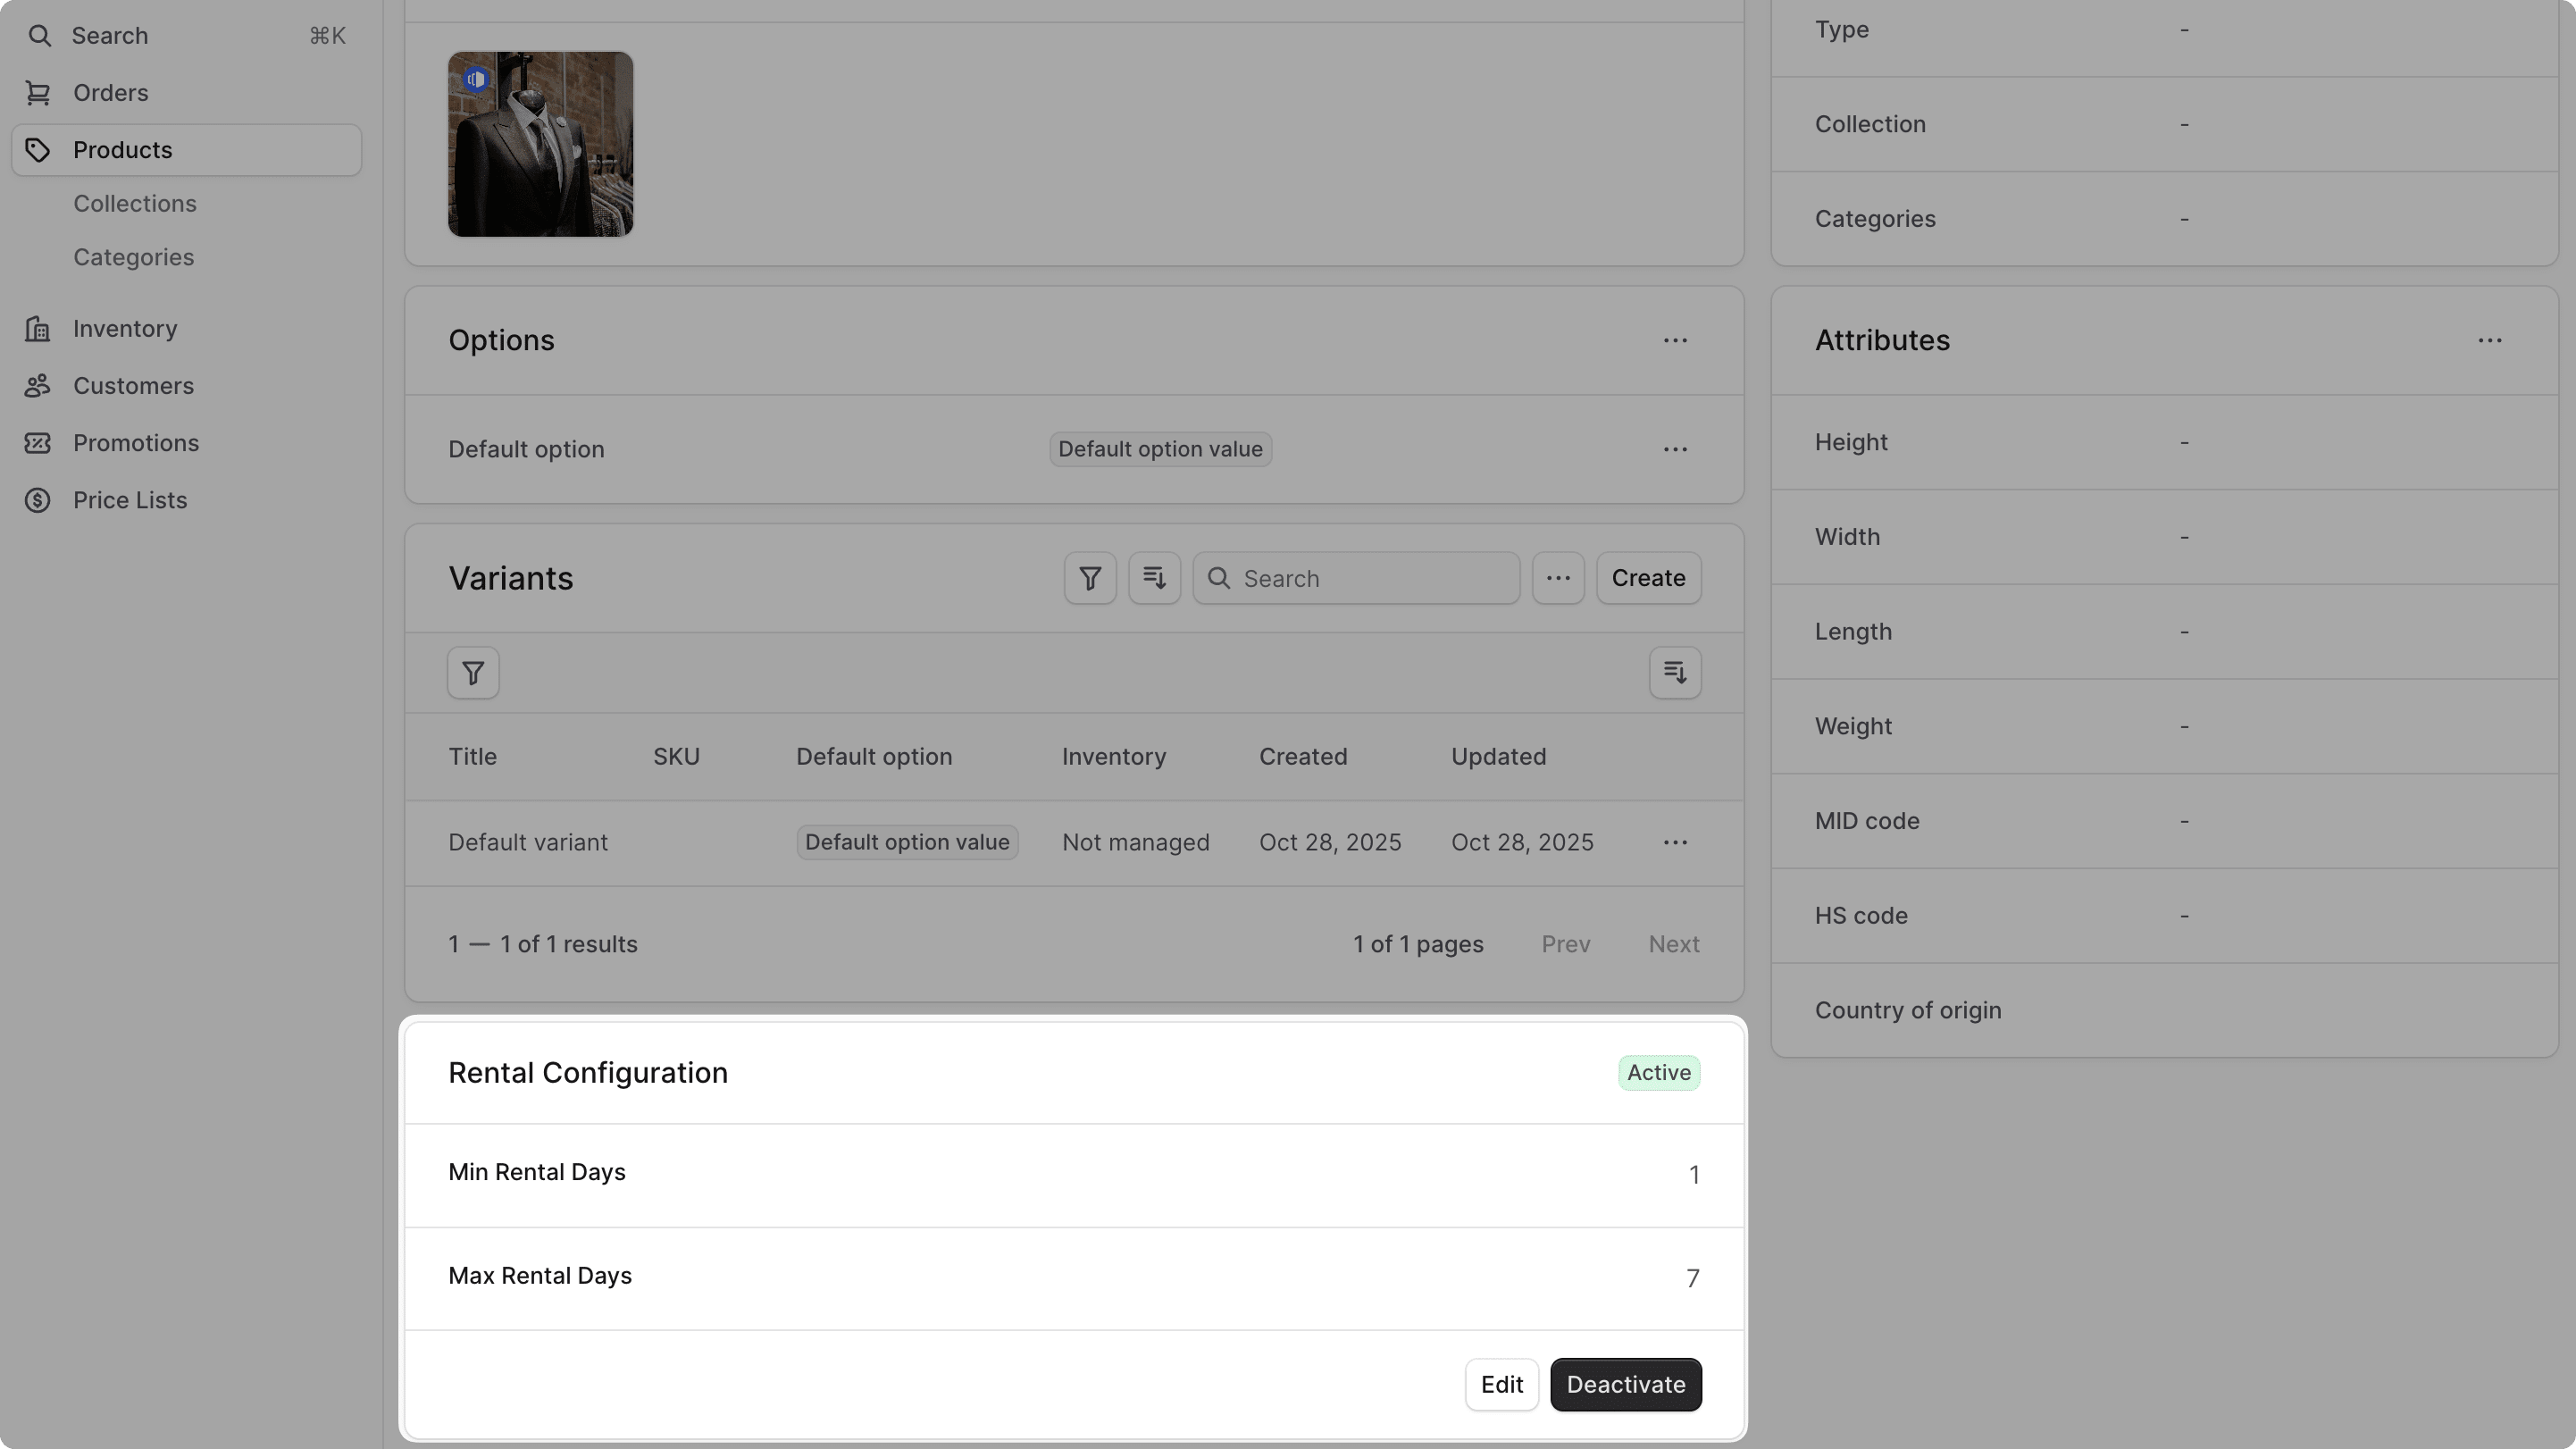
Navigate to the Products page, open any product's page, and scroll down to the Rental Configuration section. Click the "Make Rentable" button to set up the product's rental configuration.

In the rental configuration form, you can set the minimum and maximum rental days. Click the "Save" button to create the rental configuration.

After saving, you should see the rental configuration details in the widget. You can edit the configuration or toggle its status.
Step 7: Retrieve Rental Availability API Route#
In this step, you'll add an API route that allows customers to check the availability of a product for rental between two dates, and retrieve the total rental price.
a. Define hasRentalOverlap Method#
Before you implement the API route, you'll add a method to the Rental Module's service that checks if a rental overlaps with a given date range.
In src/modules/rental/service.ts, add the following method to the RentalModuleService class:
1class RentalModuleService extends MedusaService({2 Rental,3 RentalConfiguration,4}) {5 async hasRentalOverlap(variant_id: string, start_date: Date, end_date: Date) {6 const [, count] = await this.listAndCountRentals({7 variant_id,8 status: ["active", "pending"],9 $or: [10 { 11 rental_start_date: { 12 $lte: end_date,13 },14 rental_end_date: {15 $gte: start_date,16 },17 },18 ],19 })20 21 return count > 022 }23}
The method accepts a product variant ID, a rental start date, and a rental end date.
In the method, you use the listAndCountRentals method of the service to count the number of rentals for the given variant that overlap with the provided date range.
If the count is greater than zero, it means there is an overlapping rental, and the method returns true. Otherwise, it returns false.
b. Define validateRentalDates Utility#
Next, you'll create a utility function to validate rental dates.
Create the file src/utils/validate-rental-dates.ts with the following content:
1import { MedusaError } from "@medusajs/framework/utils"2 3export default function validateRentalDates(4 rentalStartDate: string | Date,5 rentalEndDate: string | Date,6 rentalConfiguration: {7 min_rental_days: number8 max_rental_days: number | null9 },10 rentalDays: number | string11) {12 const startDate = rentalStartDate instanceof Date ? rentalStartDate : new Date(rentalStartDate)13 const endDate = rentalEndDate instanceof Date ? rentalEndDate : new Date(rentalEndDate)14 const days = typeof rentalDays === "number" ? rentalDays : Number(rentalDays)15 16 // Validate rental period meets configuration requirements17 if (days < rentalConfiguration.min_rental_days) {18 throw new MedusaError(19 MedusaError.Types.INVALID_DATA,20 `Rental period of ${days} days is less than the minimum of ${rentalConfiguration.min_rental_days} days`21 )22 }23 24 if (25 rentalConfiguration.max_rental_days !== null &&26 days > rentalConfiguration.max_rental_days27 ) {28 throw new MedusaError(29 MedusaError.Types.INVALID_DATA,30 `Rental period of ${days} days exceeds the maximum of ${rentalConfiguration.max_rental_days} days`31 )32 }33 34 // validate that the dates aren't in the past35 const now = new Date()36 now.setHours(0, 0, 0, 0) // Reset to start of day37 if (startDate < now || endDate < now) {38 throw new MedusaError(39 MedusaError.Types.INVALID_DATA,40 `Rental dates cannot be in the past. Received start date: ${startDate.toISOString()}, end date: ${endDate.toISOString()}`41 )42 }43 44 if (endDate <= startDate) {45 throw new MedusaError(46 MedusaError.Types.INVALID_DATA,47 `rentalEndDate must be after rentalStartDate`48 )49 }50}
The function accepts the rental start and end dates, the rental configuration, and the number of rental days.
In the function, you validate:
- That the rental period meets the minimum and maximum rental days defined in the configuration.
- That the rental dates are not in the past.
- That the end date is after the start date.
If any validation fails, you throw a MedusaError with the INVALID_DATA type.
You'll use this utility function in your customizations.
c. Rental Availability API Route#
Next, you'll create the API route to retrieve the rental availability of a product.
To create the API route, create the file src/api/store/products/[id]/rental-availability/route.ts with the following content:
5import RentalModuleService from "../../../../../modules/rental/service"6import validateRentalDates from "../../../../../utils/validate-rental-dates"7 8export const GetRentalAvailabilitySchema = z.object({9 variant_id: z.string(),10 start_date: z.string().refine((val) => !isNaN(Date.parse(val)), {11 message: "start_date must be a valid date string (YYYY-MM-DD)",12 }),13 end_date: z14 .string()15 .optional()16 .refine((val) => val === undefined || !isNaN(Date.parse(val)), {17 message: "end_date must be a valid date string (YYYY-MM-DD)",18 }),19 currency_code: z.string().optional(),20})21 22export const GET = async (23 req: MedusaRequest<{}, z.infer<typeof GetRentalAvailabilitySchema>>, 24 res: MedusaResponse25) => {26 const { id: productId } = req.params27 28 const { 29 variant_id, 30 start_date, 31 end_date,32 currency_code,33 } = req.validatedQuery34 35 const query = req.scope.resolve("query")36 const rentalModuleService: RentalModuleService = req.scope.resolve(37 RENTAL_MODULE38 )39 40 // Parse dates41 const rentalStartDate = new Date(start_date)42 const rentalEndDate = end_date ? new Date(end_date) : new Date(rentalStartDate)43 44 // If no end_date provided, assume single day rental (same day)45 if (!end_date) {46 rentalEndDate.setHours(23, 59, 59, 999)47 }48 49 // TODO retrieve and validate rental configuration50}
You define a Zod schema to validate the query parameters of the request. You also expose a GET API route at /store/products/:id/rental-availability.
In the route handler, you parse the start and end dates.
Next, you'll implement the logic to retrieve and validate the rental configuration. Replace the // TODO retrieve and validate rental configuration comment with the following code:
1const { data: [rentalConfig] } = await query.graph({2 entity: "rental_configuration",3 fields: ["*"],4 filters: { 5 product_id: productId,6 status: "active",7 },8})9 10if (!rentalConfig) {11 throw new MedusaError(12 MedusaError.Types.NOT_FOUND,13 "product is not rentable"14 )15}16 17const rentalDays = Math.ceil(18 (rentalEndDate.getTime() - rentalStartDate.getTime()) / 19 (1000 * 60 * 60 * 24)20) + 1 // +1 to include both start and end date21 22validateRentalDates(23 rentalStartDate, 24 rentalEndDate, 25 {26 min_rental_days: rentalConfig.min_rental_days,27 max_rental_days: rentalConfig.max_rental_days,28 }, 29 rentalDays30)31 32// TODO check for overlapping rentals and calculate price
You retrieve the active rental configuration for the product using Query. Then, you calculate the rental period in days, and you validate the rental dates using the validateRentalDates utility you created earlier.
Next, you'll implement the logic to check for overlapping rentals and calculate the rental price. Replace the // TODO check for overlapping rentals and calculate price comment with the following code:
1// Check if variant is already rented during the requested period2const isAvailable = !await rentalModuleService.hasRentalOverlap(3 variant_id, 4 rentalStartDate, 5 rentalEndDate6)7let price = 08if (isAvailable && currency_code) {9 const { data: [variant] } = await query.graph({10 entity: "product_variant",11 fields: ["calculated_price.*"],12 filters: {13 id: variant_id,14 },15 context: {16 calculated_price: QueryContext({17 currency_code: currency_code,18 }),19 },20 })21 price = ((variant as any).calculated_price?.calculated_amount || 0) *22 rentalDays23}24 25res.json({26 available: isAvailable,27 price: {28 amount: price,29 currency_code: currency_code,30 },31})
You use the hasRentalOverlap method you defined earlier to check if there are any overlapping rentals for the specified variant and date range.
If the variant is available and a currency code is provided, you retrieve the variant's calculated price using Query and calculate the total rental price based on the number of rental days.
Finally, you return the availability status and the total rental price in the response.
c. Add Query Validation Middleware#
To validate the query parameters of requests sent to the Rental Availability API route, you'll apply a middleware.
In src/api/middlewares.ts, add the following imports at the top of the file:
Then, pass a new object to the routes array in defineMiddlewares:
You apply the validateAndTransformQuery middleware to the GET route of the /store/products/:id/rental-availability path, passing it the Zod schema you created in the route file.
You'll use this API route in the next step to check the rental availability of products.
Step 8: Show Rental Options in Storefront#
In this step, you'll customize the Next.js Starter Storefront to show rental options on the product details page, allowing customers to choose rental dates when the product is rentable.
a. Define Types#
First, you'll define types for the rental configuration and rental availability response.
Create the file src/types/rental.ts in the storefront directory with the following content:
1export interface RentalConfiguration {2 min_rental_days: number3 max_rental_days: number | null4 status: "active" | "inactive"5}6 7export interface RentalAvailabilityResponse {8 available: boolean9 message?: string10 price?: {11 amount: number12 currency_code: string | null13 }14}
You'll use these types in the next sections.
b. Fetch Rental Configuration with Product Details#
Next, you'll ensure that the rental configuration is fetched when retrieving the product details. You can retrieve linked data models by passing its name in the fields query parameter when fetching the product.
In src/lib/data/products.ts, find the listProducts function and update the fields parameter passed to the JS SDK function call to include the *rental_configuration field:
1export const listProducts = async ({2 // ...3}: {4 // ...5}): Promise<{6 // ...7}> => {8 // ...9 return sdk.client10 .fetch<{ products: HttpTypes.StoreProduct[]; count: number }>(11 `/store/products`,12 {13 query: {14 // ...15 fields:16 "*variants.calculated_price,+variants.inventory_quantity,+metadata,+tags,*rental_configuration",17 },18 // ...19 }20 )21 // ...22}
You pass *rental_configuration at the end of the fields parameter. This will attach a rental_configuration object to each product returned by the API if it has one.
c. Add Rental Availability Function#
Next, you'll add a server function that retrieves the rental availability of a product by calling the Rental Availability API route you created earlier.
Create the file src/lib/data/rentals.ts with the following content:
1"use server"2 3import { sdk } from "@lib/config"4import { getAuthHeaders, getCacheOptions } from "./cookies"5import { RentalAvailabilityResponse } from "../../types/rental"6 7export const getRentalAvailability = async ({8 productId,9 variantId,10 startDate,11 endDate,12 currencyCode,13}: {14 productId: string15 variantId: string16 startDate: string17 endDate?: string18 currencyCode?: string19}): Promise<RentalAvailabilityResponse> => {20 const headers = {21 ...(await getAuthHeaders()),22 }23 24 const next = {25 ...(await getCacheOptions("rental-availability")),26 }27 28 const queryParams: Record<string, any> = {29 variant_id: variantId,30 start_date: startDate,31 }32 33 if (endDate) {34 queryParams.end_date = endDate35 }36 37 if (currencyCode) {38 queryParams.currency_code = currencyCode39 }40 41 return sdk.client42 .fetch<RentalAvailabilityResponse>(43 `/store/products/${productId}/rental-availability`,44 {45 method: "GET",46 query: queryParams,47 headers,48 next,49 cache: "no-store", // Always fetch fresh data for availability50 }51 )52 .then((data) => data)53}
The getRentalAvailability function accepts the product ID, variant ID, rental start date, optional rental end date, and optional currency code.
In the function, you send a GET request to the Rental Availability API route, passing the parameters as query parameters.
The function returns the rental availability response.
d. Create Rental Date Picker Component#
Next, you'll create the component that shows start and end date pickers for selecting rental dates. You'll show this component for rentable products only.
Create the file src/modules/products/components/rental-date-picker/index.tsx with the following content:
7import { RentalConfiguration } from "../../../../types/rental"8 9type RentalDatePickerProps = {10 product: HttpTypes.StoreProduct11 selectedVariant?: HttpTypes.StoreProductVariant12 region: HttpTypes.StoreRegion13 onDatesSelected: (data: {14 startDate: string15 endDate: string16 days: number17 price?: { amount: number; currency_code: string | null }18 }) => void19 disabled?: boolean20}21 22export default function RentalDatePicker({23 product,24 selectedVariant,25 region,26 onDatesSelected,27 disabled = false,28}: RentalDatePickerProps) {29 const [startDate, setStartDate] = useState<Date | null>(null)30 const [endDate, setEndDate] = useState<Date | null>(null)31 const [isLoading, setIsLoading] = useState(false)32 const [error, setError] = useState<string | null>(null)33 const rentalConfig = useMemo(() => {34 return "rental_configuration" in product35 ? (product.rental_configuration as RentalConfiguration | undefined)36 : undefined37 }, [product])38 39 // TODO define functions40}
You define the RentalDatePicker component that accepts the following props:
product: The product object.selectedVariant: The product variant that the customer has selected.region: The region that the customer is viewing the product in.onDatesSelected: A callback function that is called when the customer selects valid rental dates.disabled: An optional boolean to disable the date picker.
In the component, you define state variables to manage the selected start and end dates, loading state, and error messages. You also create a memoized variable for the rental configuration.
Next, you'll add the functions to handle date selection and availability checking. Replace the // TODO define functions comment with the following code:
1// Memoized rental days calculation for display2const rentalDays = useCallback((start: Date, end: Date) => {3 if (!start || !end) {return 0}4 return Math.ceil(5 (end.getTime() - start.getTime()) / (1000 * 3600 * 24)6 ) + 1 // +1 to include both start and end dates7}, [])8 9// Helper function to check if date is in the past10const isDateInPast = (date: Date) => {11 const today = new Date()12 today.setHours(0, 0, 0, 0)13 return date < today ? "Date cannot be in the past" : true14}15 16// Helper function to format date to YYYY-MM-DD string17const formatDateToString = (date: Date): string => {18 const year = date.getFullYear()19 const month = String(date.getMonth() + 1).padStart(2, "0")20 const day = String(date.getDate()).padStart(2, "0")21 return `${year}-${month}-${day}`22}23 24// Memoized comprehensive validation and availability checking25const validateAndCheckAvailability = useCallback(async (start: Date, end: Date) => {26 if (!selectedVariant?.id || !rentalConfig) {27 return28 }29 setError(null)30 31 try {32 const startDateString = formatDateToString(start)33 const endDateString = formatDateToString(end)34 35 // 1. Validate date order (allow same day for single day rental)36 if (end < start) {37 setError("End date cannot be before start date")38 return39 }40 41 const days = rentalDays(start, end)42 43 if (rentalConfig.min_rental_days && days < rentalConfig.min_rental_days) {44 setError(`Minimum rental period is ${rentalConfig.min_rental_days} days`)45 return46 }47 48 if (rentalConfig.max_rental_days && days > rentalConfig.max_rental_days) {49 setError(`Maximum rental period is ${rentalConfig.max_rental_days} days`)50 return51 }52 53 setIsLoading(true)54 55 // 3. Check availability with backend56 const availability = await getRentalAvailability({57 productId: product.id,58 variantId: selectedVariant.id,59 startDate: startDateString,60 endDate: endDateString,61 currencyCode: region.currency_code,62 })63 64 if (!availability.available) {65 setError(availability.message || "Selected rental period is not available")66 return67 }68 69 // 4. If everything is valid, call the callback with price information70 setError(null)71 onDatesSelected({72 startDate: startDateString,73 endDate: endDateString,74 days: days,75 price: availability.price,76 })77 78 } catch (err) {79 setError("Failed to check rental availability")80 console.error("Rental availability error:", err)81 } finally {82 setIsLoading(false)83 }84}, [selectedVariant?.id, rentalConfig, product.id, onDatesSelected, rentalDays])85 86// Memoized date change handlers to prevent recreation on every render87const handleStartDateChange = useCallback((date: Date | null) => {88 setStartDate(date)89 setError(null)90 // Trigger comprehensive validation if both dates are now selected91 if (date && endDate) {92 validateAndCheckAvailability(date, endDate)93 }94}, [endDate, validateAndCheckAvailability])95 96const handleEndDateChange = useCallback((date: Date | null) => {97 setEndDate(date)98 setError(null)99 // Trigger comprehensive validation if both dates are now selected100 if (date && startDate) {101 validateAndCheckAvailability(startDate, date)102 }103}, [startDate, validateAndCheckAvailability])104 105// TODO render component
You define the following functions:
rentalDays: Calculates the number of rental days between two dates.isDateInPast: Checks if a given date is in the past.formatDateToString: Formats a date to aYYYY-MM-DDstring.validateAndCheckAvailability: A comprehensive function that validates the selected dates against the rental configuration and checks availability with the backend.handleStartDateChangeandhandleEndDateChange: Handlers for when the start and end dates are changed. They call thevalidateAndCheckAvailabilityfunction if both dates are selected.
Finally, you'll add the return statement to render the component's UI. Replace the // TODO render component comment with the following code:
1if (rentalConfig?.status !== "active") {2 return null3}4 5return (6 <div className="space-y-4">7 <div className="text-sm font-medium">Rental Period</div>8 9 <div className="flex flex-col gap-4">10 <div>11 <label className="block text-sm font-medium mb-2">From</label>12 <DatePicker13 value={startDate}14 onChange={handleStartDateChange}15 isDisabled={disabled || isLoading}16 minValue={new Date()}17 validate={(date) => {18 return isDateInPast(new Date(date.toString()))19 }}20 />21 </div>22 23 <div>24 <label className="block text-sm font-medium mb-2">Until</label>25 <DatePicker26 value={endDate}27 onChange={handleEndDateChange}28 isDisabled={disabled || isLoading || !startDate}29 minValue={startDate || new Date()}30 validate={(date) => {31 return isDateInPast(new Date(date.toString()))32 }}33 />34 </div>35 </div>36 37 {error && (38 <div className="text-sm text-red-600">39 {error}40 </div>41 )}42 43 {isLoading && (44 <div className="text-sm text-gray-500">45 Checking availability...46 </div>47 )}48 49 {startDate && endDate && !error && !isLoading && (50 <div className="text-sm text-ui-fg-subtle">51 Rental period: {rentalDays(startDate, endDate)} days52 </div>53 )}54 </div>55)
If the product does not have an active rental configuration, you return null to avoid rendering anything.
Otherwise, you render two date pickers for selecting the rental start and end dates. You also show error messages, loading indicators, and the calculated rental period.
e. Customize Product Price Component#
Next, you'll customize the product price component to show the rental price for rental products.
Replace the file content in src/modules/products/components/product-price/index.tsx with the following code:
1import { clx } from "@medusajs/ui"2 3import { getProductPrice } from "@lib/util/get-product-price"4import { HttpTypes } from "@medusajs/types"5import { convertToLocale } from "../../../../lib/util/money"6import { RentalAvailabilityResponse } from "../../../../types/rental"7 8export default function ProductPrice({9 product,10 variant,11 rentalPrice,12 is_rental = false,13}: {14 product: HttpTypes.StoreProduct15 variant?: HttpTypes.StoreProductVariant16 rentalPrice?: RentalAvailabilityResponse["price"] | null17 is_rental?: boolean18}) {19 const { cheapestPrice, variantPrice } = getProductPrice({20 product,21 variantId: variant?.id,22 })23 24 const selectedPrice = variant ? variantPrice : cheapestPrice25 26 // Use rental price if available, otherwise use regular price27 const displayPrice = rentalPrice ? {28 calculated_price: convertToLocale({29 amount: rentalPrice.amount,30 currency_code: rentalPrice.currency_code!,31 }),32 calculated_price_number: rentalPrice.amount,33 price_type: "default" as const,34 original_price: "",35 original_price_number: 0,36 percentage_diff: "",37 } : selectedPrice38 39 if (!displayPrice) {40 return <div className="block w-32 h-9 bg-gray-100 animate-pulse" />41 }42 43 return (44 <div className="flex flex-col text-ui-fg-base">45 <span46 className={clx("text-xl-semi", {47 "text-ui-fg-interactive": displayPrice.price_type === "sale",48 })}49 >50 {!variant && !rentalPrice && "From "}51 <span52 data-testid="product-price"53 data-value={displayPrice.calculated_price_number}54 >55 {displayPrice.calculated_price}56 </span>57 {!rentalPrice && is_rental && <span className="text-xs text-ui-fg-muted ml-1">per day</span>}58 </span>59 {displayPrice.price_type === "sale" && (60 <>61 <p>62 <span className="text-ui-fg-subtle">Original: </span>63 <span64 className="line-through"65 data-testid="original-product-price"66 data-value={displayPrice.original_price_number}67 >68 {displayPrice.original_price}69 </span>70 </p>71 <span className="text-ui-fg-interactive">72 -{displayPrice.percentage_diff}%73 </span>74 </>75 )}76 </div>77 )78}
You make the following key changes:
- Add a new optional prop
rentalPriceto accept the rental price information. - Add a new optional prop
is_rentalthat indicates if the product is a rentable product. - Add a
displayPricevariable that uses the rental price if available; otherwise, it falls back to the regular product price. - Update the price display to show "per day" if the product is rentable and no rental price is provided.
For non-rentable products, the price is shown as usual.
f. Show Rental Options on Product Details Page#
Finally, you'll customize the product actions component shown on the product details page to display the rental date picker and pass the rental price to the product price component.
In src/modules/products/components/product-actions/index.tsx, add the following imports at the top of the file:
Then, in the ProductActions component, destructure the region prop:
Next, add the state variables in the ProductActions component:
1const [rentalStartDate, setRentalStartDate] = useState<string | null>(null)2const [rentalEndDate, setRentalEndDate] = useState<string | null>(null)3const [rentalDays, setRentalDays] = useState<number | null>(null)4const [rentalPrice, setRentalPrice] = useState<RentalAvailabilityResponse["price"] | null>(null)5 6const rentalConfig = "rental_configuration" in product ?7 product.rental_configuration as RentalConfiguration | undefined : undefined8const isRentable = rentalConfig?.status === "active"9 10// Check if rental dates are required and selected11const rentalDatesValid = useMemo(() => {12 return !isRentable || (!!rentalStartDate && !!rentalEndDate && !!rentalDays)13}, [isRentable, rentalStartDate, rentalEndDate, rentalDays])
You define the following variables:
rentalStartDateandrentalEndDate: To store the selected rental dates.rentalDays: To store the number of rental days.rentalPrice: To store the rental price information.rentalConfig: Holds the rental configuration of the product.isRentable: A boolean indicating if the product is rentable.rentalDatesValid: A memoized value that checks if rental dates are required and have been selected.
Next, add to the component a function that handles when rental dates are selected:
1const handleRentalDatesSelected = (data: {2 startDate: string3 endDate: string4 days: number5 price?: { amount: number; currency_code: string | null }6}) => {7 setRentalStartDate(data.startDate)8 setRentalEndDate(data.endDate)9 setRentalDays(data.days)10 setRentalPrice(data.price || null)11}
This function sets the state variables when rental dates are selected.
Then, in the return statement of the ProductActions component, add the following before the ProductPrice component:
1{isRentable && (2 <>3 <RentalDatePicker4 product={product}5 selectedVariant={selectedVariant}6 region={region}7 onDatesSelected={handleRentalDatesSelected}8 disabled={!!disabled || isAdding}9 />10 11 <Divider className="my-4" />12 </>13)}
And update the ProductPrice component to pass the rentalPrice and is_rental props:
Finally, update the "Add to Cart" button to be disabled if rental dates are required but not selected:
1<Button2 onClick={handleAddToCart}3 disabled={4 !inStock ||5 !selectedVariant ||6 !!disabled ||7 isAdding ||8 !isValidVariant ||9 !rentalDatesValid10 }11 variant="primary"12 className="w-full h-10"13 isLoading={isAdding}14 data-testid="add-product-button"15>16 {!selectedVariant && !options17 ? "Select variant"18 : !inStock || !isValidVariant19 ? "Out of stock"20 : !rentalDatesValid21 ? "Select rental dates"22 : "Add to cart"}23</Button>
g. Test Rental Options in Storefront#
You can now view and select the rental options in the Next.js Starter Storefront.
First, run the following command in the apps/backend directory to start the Medusa server:
Then, in a separate terminal, navigate to the Next.js Starter Storefront directory and run the following command to start the storefront:
Open the storefront in http://localhost:8000 and go to Menu -> Store. Click on a rentable product to view its details.
On the right side, you'll find the rental date picker component where you can select the rental start and end dates. This will update the rental price shown above the "Add to Cart" button.
You haven't implemented the add-to-cart functionality for rentable products yet. You'll do that in the next step.

Step 9: Add Rental Products to Cart#
In this step, you'll implement the logic to add rentable products to the cart in the Medusa application. You'll wrap Medusa's existing add-to-cart logic to include rental-specific data and validation.
You'll create a workflow with the logic to add rental products to the cart, and an API route that uses this workflow.
a. Add Products with Rental to Cart Workflow#
First, you'll create a workflow that contains the logic to add products to the cart, with support for rental products.
The workflow will have the following steps:
Workflow hook
Step conditioned by when
View step details
Medusa provides all the steps and workflows out-of-the-box, except for the validateRentalCartItemStep step, which you'll implement.
hasCartOverlap Utility
Before you implement the workflow and its steps, you'll create a utility function that checks if an item overlaps with existing rental items in the cart.
Create the file src/utils/has-cart-overlap.ts with the following content:
1export default function hasCartOverlap(2 item: {3 variant_id: string4 rental_start_date: Date5 rental_end_date: Date6 rental_days: number7 },8 cart_items: {9 id: string10 variant_id: string11 metadata?: Record<string, unknown>12 }[]13): boolean {14 for (const cartItem of cart_items) {15 if (cartItem.variant_id !== item.variant_id) {16 continue17 }18 19 // Check if this cart item is also a rental with metadata20 const cartItemMetadata = cartItem.metadata || {}21 const existingStartStr = cartItemMetadata.rental_start_date22 const existingEndStr = cartItemMetadata.rental_end_date23 const existingDays = cartItemMetadata.rental_days24 25 if (!existingStartStr || !existingEndStr || !existingDays) {26 continue27 }28 29 // Both are rental items, check for date overlap30 const existingStartDate = new Date(existingStartStr as string)31 const existingEndDate = new Date(existingEndStr as string)32 33 // Check if dates overlap34 const hasOverlap = item.rental_start_date <= existingEndDate && item.rental_end_date >= existingStartDate35 36 if (hasOverlap) {return true}37 }38 39 return false40}
The hasCartOverlap function accepts a rental item and a list of existing cart items.
In the function, you loop through the existing cart items and check if any of them are rental items for the same variant with an overlapping rental period.
The function returns true if an overlap is found, otherwise it returns false.
validateRentalCartItemStep
The validateRentalCartItemStep validates the rental data provided and retrieves the rental days and price.
To create the step, create the file src/workflows/steps/validate-rental-cart-item.ts with the following content:
7import hasCartOverlap from "../../utils/has-cart-overlap"8import validateRentalDates from "../../utils/validate-rental-dates"9 10export type ValidateRentalCartItemInput = {11 variant: ProductVariantDTO12 quantity: number13 metadata?: Record<string, unknown>14 rental_configuration: InferTypeOf<typeof RentalConfiguration> | null15 existing_cart_items: {16 id: string17 variant_id: string18 metadata?: Record<string, unknown>19 }[]20}21 22export const validateRentalCartItemStep = createStep(23 "validate-rental-cart-item",24 async ({ 25 variant, 26 quantity, 27 metadata, 28 rental_configuration, 29 existing_cart_items,30 }: ValidateRentalCartItemInput, { container }) => {31 const rentalModuleService: RentalModuleService = container.resolve(RENTAL_MODULE)32 33 // Skip validation if not a rental product or if rental config is not active34 if (rental_configuration?.status !== "active") {35 return new StepResponse({ is_rental: false, rental_days: 0, price: 0 })36 }37 38 // This is a rental product - validate quantity39 if (quantity !== 1) {40 throw new MedusaError(41 MedusaError.Types.INVALID_DATA,42 `Rental items must have a quantity of 1. Cannot add ${quantity} of variant ${variant.id}`43 )44 }45 46 // TODO validate metadata47 }48)
The validateRentalCartItemStep accepts the following props:
variant: The product variant to add to the cart.quantity: The quantity of the variant to add.metadata: Optional metadata associated with the cart item. This metadata should include rental options like start and end dates.rental_configuration: The rental configuration of the product variant.existing_cart_items: The existing items in the cart.
In the step, you first return early if the product is not a rental product or if the rental configuration is not active. You also validate that the quantity is 1, as rental items must have a quantity of one.
Next, you'll validate that the necessary rental options are provided in the item's metadata. Replace the // TODO validate metadata comment with the following code:
1// Validate metadata2const rentalStartDate = metadata?.rental_start_date3const rentalEndDate = metadata?.rental_end_date4const rentalDays = metadata?.rental_days5 6if (!rentalStartDate || !rentalEndDate || !rentalDays) {7 throw new MedusaError(8 MedusaError.Types.INVALID_DATA,9 `Rental product variant ${variant.id} requires rental_start_date, rental_end_date and rental_days in metadata`10 )11}12 13const startDate = new Date(rentalStartDate as string)14const endDate = new Date(rentalEndDate as string)15const days = typeof rentalDays === "number" ? rentalDays : Number(rentalDays)16 17validateRentalDates(18 startDate, 19 endDate, 20 {21 min_rental_days: rental_configuration.min_rental_days,22 max_rental_days: rental_configuration.max_rental_days,23 }, 24 days25)26 27// TODO validate that there's no overlap with cart items or existing rentals
You validate that the rental_start_date, rental_end_date, and rental_days are provided in the metadata. These are necessary to process the rental and will be stored in the line item's metadata property.
You also validate the rental dates using the validateRentalDates utility function you created earlier.
Next, you'll validate that the rental period does not overlap with existing rentals in the cart or existing rentals for the same variant. Replace the // TODO validate that there's no overlap with cart items or existing rentals comment with the following code:
1// Check if this rental variant is already in the cart with overlapping dates2const hasCartOverlapResult = hasCartOverlap(3 {4 variant_id: variant.id,5 rental_start_date: startDate,6 rental_end_date: endDate,7 rental_days: days,8 },9 existing_cart_items10)11 12if (hasCartOverlapResult) {13 throw new MedusaError(14 MedusaError.Types.INVALID_DATA,15 `Rental variant ${variant.id} is already in the cart with overlapping dates (${startDate.toISOString().split("T")[0]} to ${endDate.toISOString().split("T")[0]})`16 )17}18 19// Check availability for the requested period20const hasOverlap = await rentalModuleService.hasRentalOverlap(variant.id, startDate, endDate)21 22if (hasOverlap) {23 throw new MedusaError(24 MedusaError.Types.NOT_ALLOWED,25 `Variant ${variant.id} is already rented during the requested period (${startDate.toISOString()} to ${endDate.toISOString()})`26 )27}28 29return new StepResponse({ 30 is_rental: true,31 rental_days: days,32 price: ((variant as any).calculated_price?.calculated_amount || 0) * days,33})
You first check if the rental start and end dates are in the past, and if the end date is after the start date.
Then, you check for overlaps with existing cart items using the hasCartOverlap utility you created earlier. If there are overlaps, you throw an error.
Next, you use the hasRentalOverlap method from the Rental Module's service to check if there are any overlapping rentals for the specified variant and date range. If there are overlaps, you throw an error.
Finally, you return a StepResponse indicating that the item is a rental, along with the number of rental days and the total price for the rental period.
Add Products with Rental to Cart Workflow
You can now create the addToCartWithRentalWorkflow that uses the validateRentalCartItemStep step.
Create the file src/workflows/add-to-cart-with-rental.ts with the following content:
17} from "./steps/validate-rental-cart-item"18 19type AddToCartWorkflowInput = {20 cart_id: string21 variant_id: string22 quantity: number23 metadata?: Record<string, unknown>24}25 26export const addToCartWithRentalWorkflow = createWorkflow(27 "add-to-cart-with-rental",28 (input: AddToCartWorkflowInput) => {29 const { data: carts } = useQueryGraphStep({30 entity: "cart",31 fields: ["id", "currency_code", "region_id", "items.*"],32 filters: { id: input.cart_id },33 options: {34 throwIfKeyNotFound: true,35 },36 })37 38 const { data: variants } = useQueryGraphStep({39 entity: "product_variant",40 fields: [41 "id",42 "product.id",43 "product.rental_configuration.*",44 "calculated_price.*",45 ],46 filters: {47 id: input.variant_id,48 },49 options: {50 throwIfKeyNotFound: true,51 },52 context: {53 calculated_price: QueryContext({54 currency_code: carts[0].currency_code,55 region_id: carts[0].region_id,56 }),57 },58 }).config({ name: "retrieve-variant" })59 60 const rentalData = when({ variants }, (data) => {61 return data.variants[0].product?.rental_configuration?.status === "active"62 }).then(() => {63 return validateRentalCartItemStep({64 variant: variants[0],65 quantity: input.quantity,66 metadata: input.metadata,67 rental_configuration: variants[0].product?.rental_configuration || null,68 existing_cart_items: carts[0].items,69 } as unknown as ValidateRentalCartItemInput)70 })71 72 acquireLockStep({73 key: input.cart_id,74 timeout: 2,75 ttl: 10,76 })77 78 const itemToAdd = transform({79 input,80 rentalData,81 variants,82 }, (data) => {83 const baseItem = {84 variant_id: data.input.variant_id,85 quantity: data.input.quantity,86 metadata: data.input.metadata,87 }88 89 // If it's a rental product, use the calculated rental price90 if (data.rentalData?.is_rental && data.rentalData.price) {91 return [{92 ...baseItem,93 unit_price: data.rentalData.price,94 }]95 }96 97 // For non-rental products, don't specify unit_price (let Medusa calculate it)98 return [baseItem]99 })100 101 addToCartWorkflow.runAsStep({102 input: {103 cart_id: input.cart_id,104 items: itemToAdd as any,105 },106 })107 108 const { data: updatedCart } = useQueryGraphStep({109 entity: "cart",110 fields: ["*", "items.*"],111 filters: {112 id: input.cart_id,113 },114 }).config({ name: "refetch-cart" })115 116 releaseLockStep({117 key: input.cart_id,118 })119 120 return new WorkflowResponse({121 cart: updatedCart[0],122 })123 }124)
You create the addToCartWithRentalWorkflow workflow that accepts the cart ID, variant ID, quantity, and optional metadata.
In the workflow, you:
- Retrieve the cart details using the
useQueryGraphStep. - Retrieve the product variant details using the
useQueryGraphStep. - If the product is rentable, call the
validateRentalCartItemStepto validate and retrieve rental data. - Acquire a lock on the cart using the
acquireLockStep. - Prepare the item to add to the cart.
- If it's a rentable product, you set the
unit_priceto the calculated rental price. - For non-rentable products, you don't specify the
unit_price; Medusa will use the variant's price.
- If it's a rentable product, you set the
- Add the item to the cart using the existing
addToCartWorkflow. - Retrieve the updated cart details.
- Release the lock on the cart using the
releaseLockStep.
Finally, you return the updated cart in the workflow response.
b. Add to Cart with Rental API Route#
Next, you'll create an API route that uses the addToCartWithRentalWorkflow to add products to the cart, including rental products.
Create the file src/api/store/carts/[id]/line-items/rentals/route.ts with the following content:
8import { z } from "@medusajs/framework/zod"9 10export const PostCartItemsRentalsBody = z.object({11 variant_id: z.string(),12 quantity: z.number(),13 metadata: z.record(z.string(), z.unknown()).optional(),14})15 16export const POST = async (17 req: MedusaRequest<z.infer<typeof PostCartItemsRentalsBody>>,18 res: MedusaResponse19) => {20 const { id: cart_id } = req.params21 const { variant_id, quantity, metadata } = req.validatedBody22 23 const { result } = await addToCartWithRentalWorkflow(req.scope).run({24 input: {25 cart_id,26 variant_id,27 quantity,28 metadata,29 },30 })31 32 res.json({ cart: result.cart })33}
You create a Zod schema to validate the request body, which includes the variant_id, quantity, and optional metadata.
You expose a POST API route at /store/carts/{id}/line-items/rentals. In the route handler, you execute the addToCartWithRentalWorkflow passing it the necessary input.
You return the updated cart in the response.
c. Add Validation Middleware#
Next, you'll add validation middleware to ensure that the request body for adding rental items to the cart is valid.
In src/api/middlewares.ts, add the following import at the top of the file:
Then, pass a new object to the routes array in defineMiddlewares:
You apply the validateAndTransformBody middleware to the rental add-to-cart route, using the PostCartItemsRentalsBody schema to validate incoming requests.
In the next step, you'll customize the storefront to use this new API route when adding rental products to the cart.
Step 10: Add Rental Products to Cart in Storefront#
In this step, you'll customize the Next.js Starter Storefront to use the new rental add-to-cart API route when adding products to the cart.
a. Update Add to Cart Function#
First, you'll update the addToCart function to use the rental add-to-cart API route when adding rental products to the cart.
In src/lib/data/cart.ts, find the addToCart function and add a metadata property to its object parameter:
Then, in the function, change the JS SDK call to the following:
You send a POST request to /store/carts/{id}/line-items/rentals, passing the variant_id, quantity, and metadata in the request body.
b. Pass Rental Metadata when Adding to Cart#
Next, you'll update the product actions component to pass the rental metadata when adding rentable products to the cart.
In src/modules/products/components/product-actions/index.tsx, find the handleAddToCart function in the ProductActions component and update it to the following:
1const handleAddToCart = async () => {2 if (!selectedVariant?.id) {return null}3 4 setIsAdding(true)5 6 await addToCart({7 variantId: selectedVariant.id,8 quantity: 1,9 countryCode,10 metadata: isRentable ? {11 rental_start_date: rentalStartDate,12 rental_end_date: rentalEndDate,13 rental_days: rentalDays,14 } : undefined,15 })16 17 setIsAdding(false)18}
If the product is rentable, you pass the rental_start_date, rental_end_date, and rental_days in the metadata property when adding the product to the cart.
c. Show Rental Info in Cart#
Finally, you'll customize the cart item component to show rental information for rentable products in the cart.
In src/modules/cart/components/item/index.tsx, add the following below the LineItemOptions component in the return statement of the Item component:
1{!!item.metadata?.rental_start_date && !!item.metadata?.rental_end_date && (2 <Text className="txt-small text-ui-fg-muted">3 Rental: {new Date(item.metadata.rental_start_date as string).toLocaleDateString("en-US", { 4 month: "short", 5 day: "numeric", 6 year: "numeric", 7 })}8 {item.metadata.rental_days !== 1 && ` - ${new Date(item.metadata.rental_end_date as string).toLocaleDateString("en-US", { 9 month: "short", 10 day: "numeric", 11 year: "numeric", 12 })}`}13 </Text>14)}
You show the rental start and end dates if they're available in the line item's metadata.
Test Adding Rental Products to Cart#
You can now test adding rentable products to the cart in the Next.js Starter Storefront.
First, run both the Medusa server and the Next.js Starter Storefront.
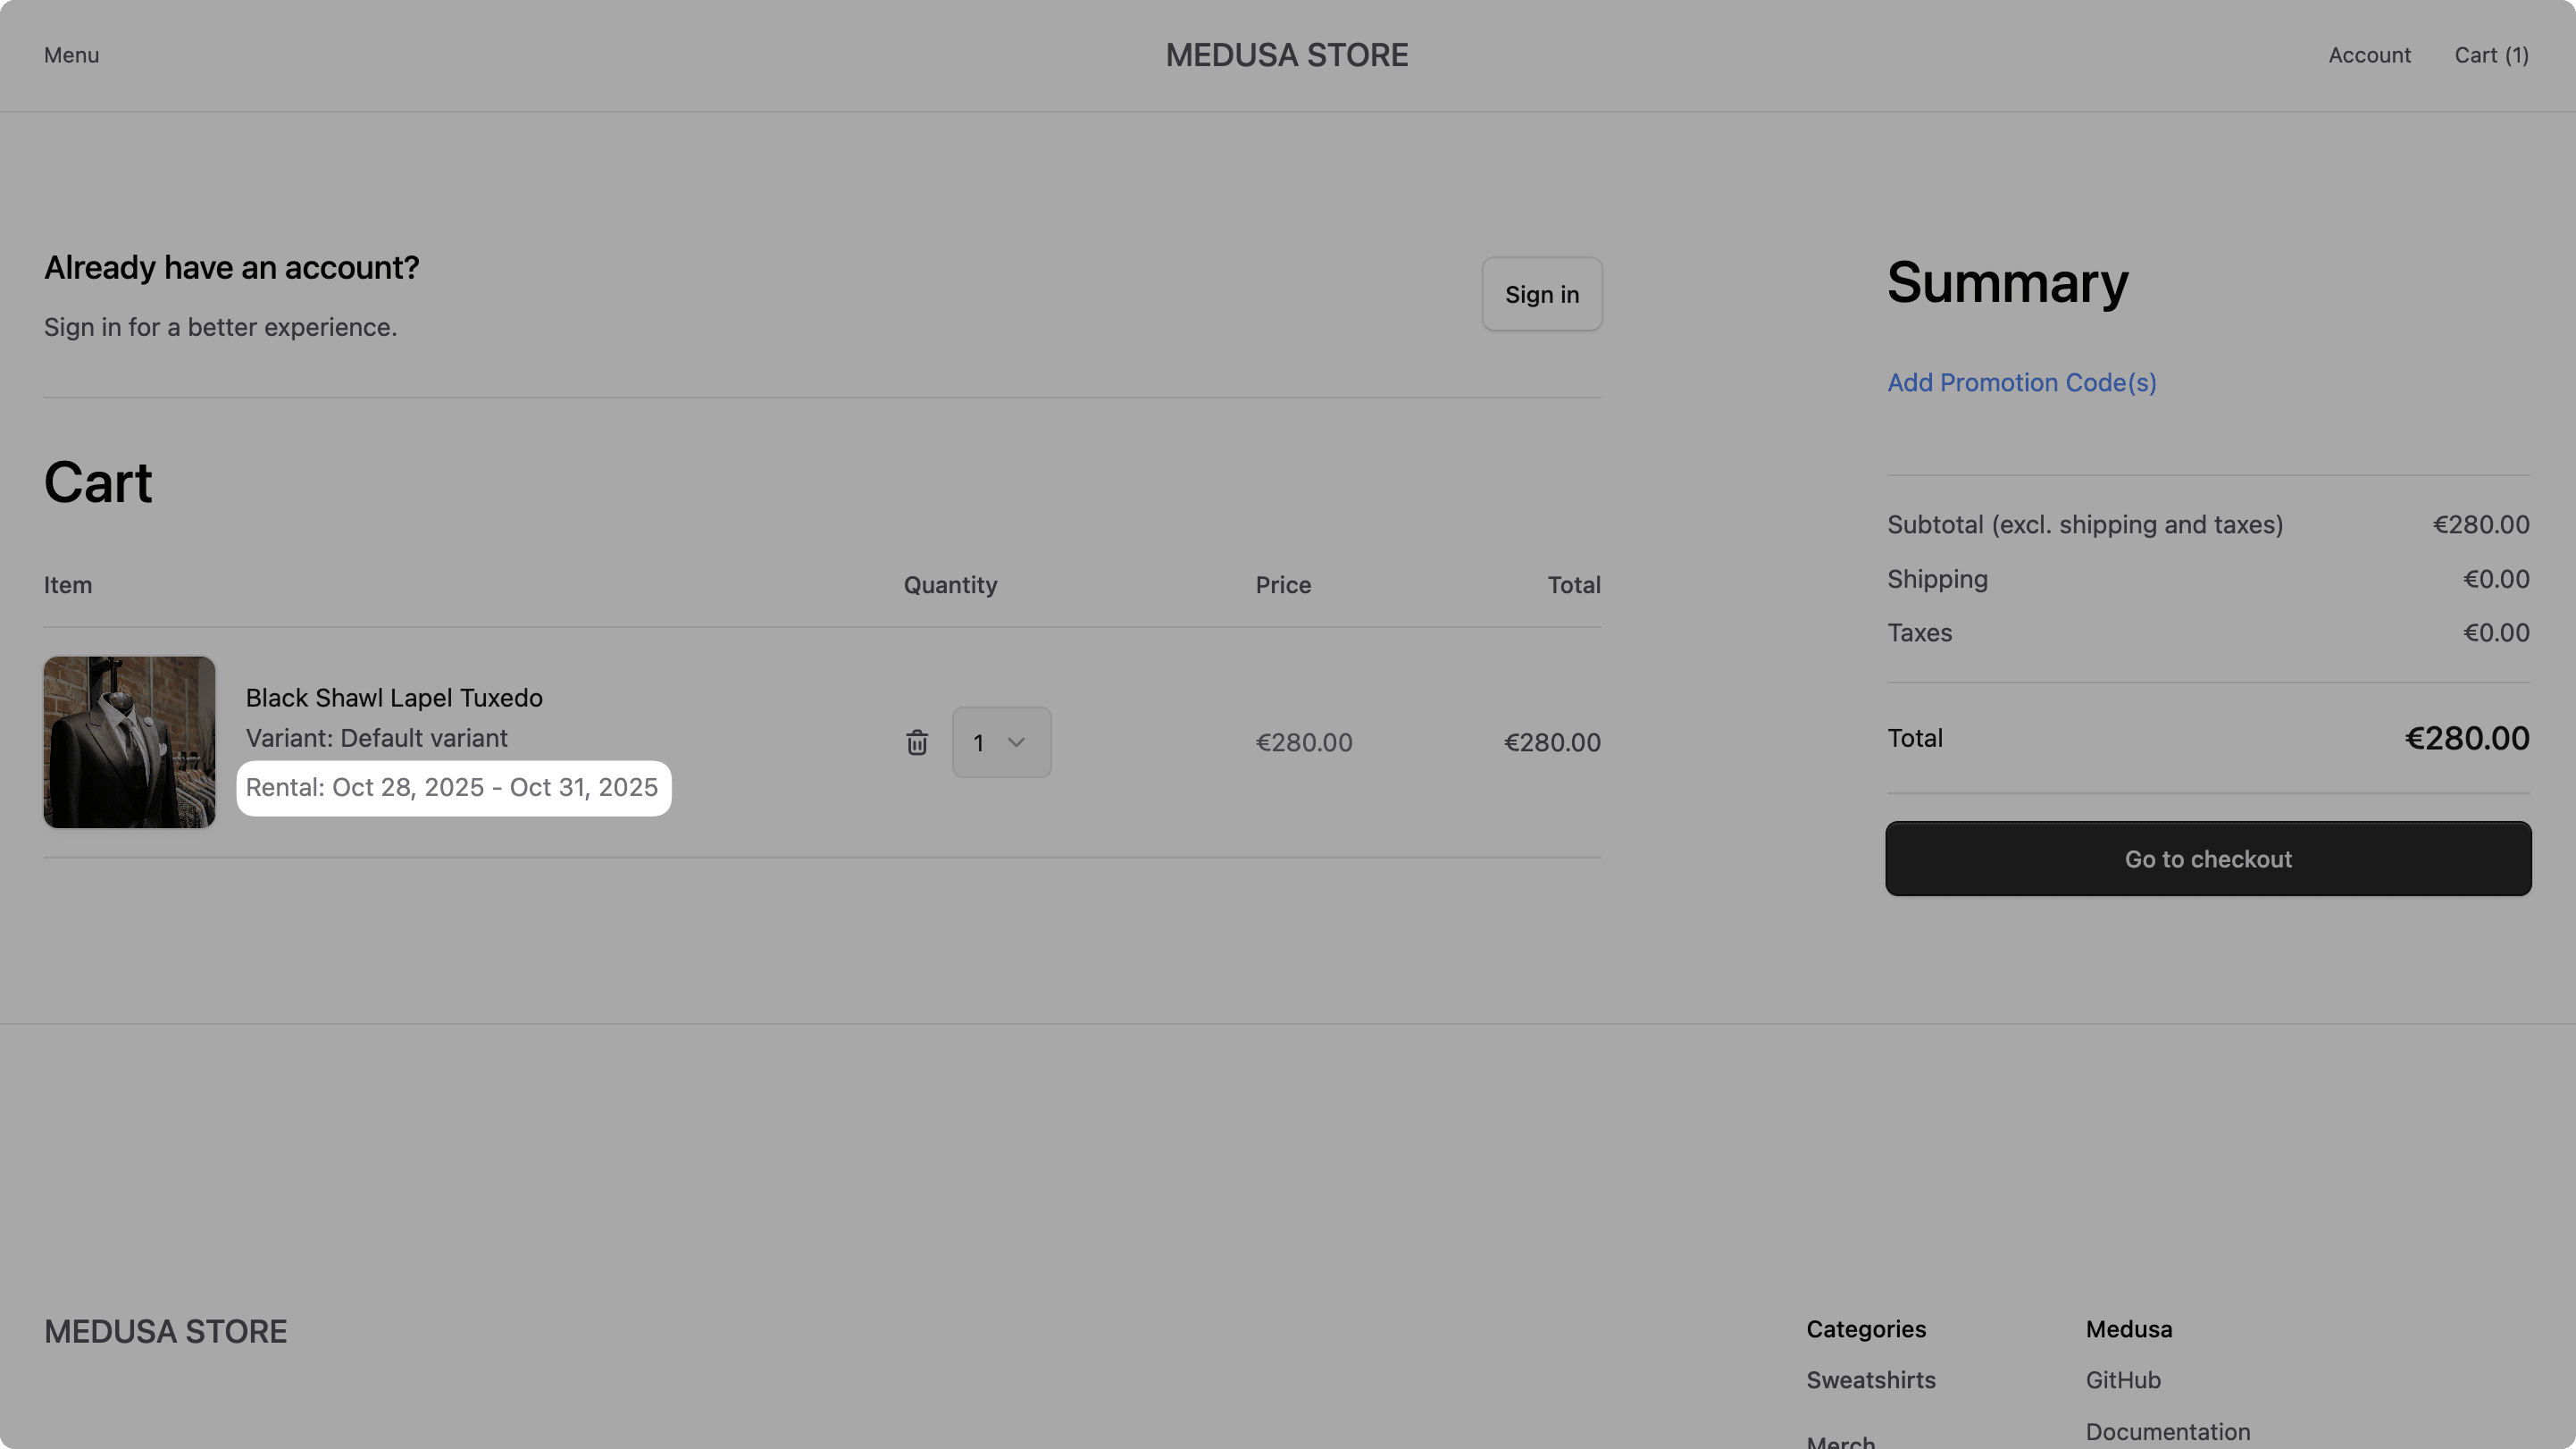
Then, in the storefront, open the product details page for a rentable product. Select the rental start and end dates, then click the "Add to cart" button.
The product will be added to the cart with the rental options. You can click the cart icon at the top right to view the cart, where you'll see the rental dates displayed under the product name.
Step 11: Create Rental Orders#
In this step, you'll implement the logic to create rental orders in the Medusa application. You'll wrap Medusa's existing order creation logic to handle rental-specific data and validation.
You'll create a workflow with the logic to create rental orders and an API route that uses this workflow.
a. Create Rental Orders Workflow#
First, you'll create a workflow that contains the logic to create rental orders, with support for rental products.
The workflow will have the following steps:
Workflow hook
Step conditioned by when
View step details
You'll implement the validateRentalStep and createRentalsStep steps used in the workflow. The rest are provided by Medusa out-of-the-box.
validateRentalStep
The validateRentalStep validates the rental items in the cart before creating the order. The validation logic is similar to the validateRentalCartItemStep.
To create the step, create the file src/workflows/steps/validate-rental.ts with the following content:
1import { createStep, StepResponse } from "@medusajs/framework/workflows-sdk"2import { MedusaError } from "@medusajs/framework/utils"3import { RENTAL_MODULE } from "../../modules/rental"4import RentalModuleService from "../../modules/rental/service"5import { InferTypeOf } from "@medusajs/framework/types"6import { RentalConfiguration } from "../../modules/rental/models/rental-configuration"7import hasCartOverlap from "../../utils/has-cart-overlap"8import validateRentalDates from "../../utils/validate-rental-dates"9import { cancelOrderWorkflow } from "@medusajs/medusa/core-flows"10 11export type ValidateRentalInput = {12 rental_items: {13 line_item_id: string14 variant_id: string15 quantity: number16 rental_configuration: InferTypeOf<typeof RentalConfiguration>17 rental_start_date: Date18 rental_end_date: Date19 rental_days: number20 order_id: string21 }[]22}23 24export const validateRentalStep = createStep(25 "validate-rental",26 async ({ rental_items, order_id }: ValidateRentalInput, { container }) => {27 const rentalModuleService: RentalModuleService = container.resolve(RENTAL_MODULE)28 29 for (let i = 0; i < rental_items.length; i++) {30 const rentalItem = rental_items[i]31 const { 32 line_item_id, 33 variant_id, 34 quantity, 35 rental_configuration, 36 rental_start_date, 37 rental_end_date, 38 rental_days,39 } = rentalItem40 41 if (rental_configuration.status !== "active") {42 throw new MedusaError(43 MedusaError.Types.INVALID_DATA,44 `Rental configuration for variant ${variant_id} is not active`45 )46 }47 48 // Validate quantity is 1 for rental items49 if (quantity !== 1) {50 throw new MedusaError(51 MedusaError.Types.INVALID_DATA,52 `Rental items must have a quantity of 1. Line item ${line_item_id} has quantity ${quantity}`53 )54 }55 56 // Validate metadata presence57 if (!rental_start_date || !rental_end_date || !rental_days) {58 throw new MedusaError(59 MedusaError.Types.INVALID_DATA,60 `Line item ${line_item_id} is for a rentable product but is missing required metadata: rental_start_date, rental_end_date, and/or rental_days`61 )62 }63 64 // Convert to Date if needed65 const startDate = rental_start_date instanceof Date ? rental_start_date : new Date(rental_start_date)66 const endDate = rental_end_date instanceof Date ? rental_end_date : new Date(rental_end_date)67 68 validateRentalDates(69 startDate, 70 endDate, 71 {72 min_rental_days: rental_configuration.min_rental_days,73 max_rental_days: rental_configuration.max_rental_days,74 }, 75 rental_days76 )77 78 const hasCartOverlapResult = hasCartOverlap(79 {80 variant_id,81 rental_start_date,82 rental_end_date,83 rental_days,84 },85 rental_items.slice(i + 1).map((item) => ({86 id: item.line_item_id,87 variant_id: item.variant_id,88 metadata: {89 rental_start_date: item.rental_start_date.toISOString(),90 rental_end_date: item.rental_end_date.toISOString(),91 rental_days: item.rental_days,92 },93 }))94 )95 96 if (hasCartOverlapResult) {97 throw new MedusaError(98 MedusaError.Types.INVALID_DATA,99 `Cannot have multiple rental items for variant ${variant_id} with overlapping dates in the cart`100 )101 }102 103 if (await rentalModuleService.hasRentalOverlap(variant_id, startDate, endDate)) {104 throw new MedusaError(105 MedusaError.Types.NOT_ALLOWED,106 `Variant ${variant_id} is already rented during the requested period (${startDate.toISOString()} to ${endDate.toISOString()})`107 )108 }109 }110 111 return new StepResponse({ validated: true, order_id })112 },113 async (order_id, { container, context }) => {114 if (!order_id) {return}115 116 cancelOrderWorkflow(container).run({117 input: {118 order_id,119 },120 context,121 container,122 })123 }124)
The validateRentalStep accepts an array of rental items in the cart.
In the step, you perform similar validations as in the validateRentalCartItemStep, but this time for all rental items in the cart.
You validate that the rental configuration is active, the quantity is 1, and the necessary rental metadata is present.
You also check for overlaps between rental items in the cart and existing rentals for the same variant.
If any validation fails, you throw an appropriate error. If all validations pass, you return a StepResponse indicating success.
You also provide a compensation function that cancels the order if the validation fails after the order has been created.
createRentalsForOrderStep
The createRentalsForOrderStep creates rental records for rental items in the order after it has been created.
To create the step, create the file src/workflows/steps/create-rentals-for-order.ts with the following content:
1import { createStep, StepResponse } from "@medusajs/framework/workflows-sdk"2import { RENTAL_MODULE } from "../../modules/rental"3import RentalModuleService from "../../modules/rental/service"4import { OrderDTO } from "@medusajs/framework/types"5 6export type CreateRentalsForOrderInput = {7 order: OrderDTO8}9 10export const createRentalsForOrderStep = createStep(11 "create-rentals-for-order",12 async ({ order }: CreateRentalsForOrderInput, { container }) => {13 const rentalModuleService: RentalModuleService = container.resolve(RENTAL_MODULE)14 15 const rentalItems = (order.items || []).filter((item) => {16 return item.metadata?.rental_start_date && 17 item.metadata?.rental_end_date && item.metadata?.rental_days18 })19 20 if (rentalItems.length === 0) {21 return new StepResponse([])22 }23 24 const rentals = await rentalModuleService.createRentals(25 rentalItems.map((item) => {26 const { 27 variant_id,28 metadata,29 } = item30 const rentalConfiguration = (item as any).variant?.product?.rental_configuration31 32 return {33 variant_id: variant_id!,34 customer_id: order.customer_id,35 order_id: order.id,36 line_item_id: item.id,37 rental_start_date: new Date(metadata?.rental_start_date as string),38 rental_end_date: new Date(metadata?.rental_end_date as string),39 rental_days: Number(metadata?.rental_days),40 rental_configuration_id: rentalConfiguration?.id as string,41 }42 })43 )44 45 return new StepResponse(46 rentals,47 rentals.map((rental) => rental.id)48 )49 },50 async (rentalIds, { container }) => {51 if (!rentalIds) {return}52 53 const rentalModuleService: RentalModuleService = container.resolve(RENTAL_MODULE)54 55 // Delete all created rentals on rollback56 await rentalModuleService.deleteRentals(rentalIds)57 }58)
The createRentalsForOrderStep accepts the order as input.
In the step, you filter the order items to find rental items based on the presence of rental metadata.
For each rental item, you create a rental record using the createRentals method from the Rental Module's service.
In the compensation function, you delete the created rentals if an error occurs during the workflow's execution.
Create Rentals Workflow
You can now create the createRentalsWorkflow that uses the above steps.
Create the file src/workflows/create-rentals.ts with the following content:
20} from "./steps/create-rentals-for-order"21 22type CreateRentalsWorkflowInput = {23 cart_id: string24}25 26export const createRentalsWorkflow = createWorkflow(27 "create-rentals",28 ({ cart_id }: CreateRentalsWorkflowInput) => {29 const { data: carts } = useQueryGraphStep({30 entity: "cart",31 fields: [32 "id",33 "customer_id",34 "items.*",35 "items.variant_id",36 "items.metadata",37 "items.variant.product.rental_configuration.*",38 ],39 filters: { id: cart_id },40 options: { throwIfKeyNotFound: true },41 })42 43 const rentalItems = transform({ carts }, ({ carts }) => {44 const cart = carts[0]45 const rentalItemsList: Record<string, unknown>[] = []46 47 for (const item of cart.items || []) {48 if (!item || !item.variant) {49 continue50 }51 52 const rentalConfig = (item.variant as any)?.product?.rental_configuration53 54 // Only include items that have an active rental configuration55 if (rentalConfig && rentalConfig.status === "active") {56 const metadata = item.metadata || {}57 58 rentalItemsList.push({59 line_item_id: item.id,60 variant_id: item.variant_id,61 quantity: item.quantity,62 rental_configuration: rentalConfig,63 rental_start_date: metadata.rental_start_date,64 rental_end_date: metadata.rental_end_date,65 rental_days: metadata.rental_days,66 })67 }68 }69 70 return rentalItemsList71 })72 73 acquireLockStep({74 key: cart_id,75 timeout: 2,76 ttl: 10,77 })78 79 const order = completeCartWorkflow.runAsStep({80 input: { id: cart_id },81 })82 83 const { data: orders } = useQueryGraphStep({84 entity: "order",85 fields: [86 "id", 87 "items.*", 88 "customer_id", 89 "shipping_address.*", 90 "billing_address.*",91 "items.variant.product.rental_configuration.*",92 ],93 filters: { id: order.id },94 options: { throwIfKeyNotFound: true },95 }).config({ name: "retrieve-order" })96 97 const { data: rentals } = useQueryGraphStep({98 entity: "rental",99 fields: [100 "id",101 ],102 filters: { order_id: order.id },103 }).config({ name: "retrieve-rentals" })104 105 when(106 { rentals, rentalItems }, 107 (data) => data.rentals.length === 0 && data.rentalItems.length > 0108 )109 .then(() => {110 validateRentalStep({ 111 rental_items: rentalItems,112 order_id: order.id,113 } as unknown as ValidateRentalInput)114 createRentalsForOrderStep({115 order: orders[0],116 } as unknown as CreateRentalsForOrderInput)117 })118 119 releaseLockStep({120 key: cart_id,121 })122 123 // @ts-ignore124 return new WorkflowResponse({125 order: orders[0],126 })127 }128)
You create the createRentalsWorkflow workflow that accepts the cart ID as input.
In the workflow, you:
- Retrieve the cart details using the
useQueryGraphStep. - Extract the rental items from the cart.
- Acquire a lock on the cart to prevent race conditions.
- Complete the cart and create the order using the existing
completeCartWorkflow. - Retrieve the created order details using the
useQueryGraphStep. - Retrieve existing rentals for the order to ensure idempotency.
- This is essential to avoid creating duplicate rentals if the workflow is retried.
- Perform a condition with
whento check that there are no existing rentals for the order and there are rental items in the cart. If the condition is met, you:- Validate the rental items in the cart using the
validateRentalStep. - Create rental records for the rental items in the order using the
createRentalsForOrderStep.
- Validate the rental items in the cart using the
- Release the lock on the cart.
- Return the created order in the workflow response.
b. Create Rental Orders API Route#
Next, you'll create an API route that uses the createRentalsWorkflow to create rental orders.
Create the file src/api/store/rentals/[cart_id]/route.ts with the following content:
1import type { MedusaRequest, MedusaResponse } from "@medusajs/framework/http"2import { createRentalsWorkflow } from "../../../../workflows/create-rentals"3 4export const POST = async (5 req: MedusaRequest,6 res: MedusaResponse7) => {8 const { cart_id } = req.params9 10 const { result } = await createRentalsWorkflow(req.scope).run({11 input: {12 cart_id,13 },14 })15 16 res.json({17 type: "order",18 order: result.order,19 })20}
You expose a POST API route at /store/rentals/{cart_id}. In the route handler, you execute the createRentalsWorkflow, passing it the cart ID from the request parameters.
You return the created order in the response.
You'll use this API route in the storefront to create rental orders.
Step 12: Create Rental Orders in Storefront#
In this step, you'll customize the Next.js Starter Storefront to use the new rental order creation API route when placing an order.
a. Update Place Order Function#
First, you'll update the placeOrder function to use the rental order creation API route when placing an order.
In src/lib/data/cart.ts, find the placeOrder function and update the JS SDK call to the following:
You send a POST request to /store/rentals/{cart_id} to create the rental order.
Also, in the same function, remove the return statement that returns cartRes.cart to avoid TypeScript errors:
b. Show Rental Info in Order Confirmation#
Next, you'll customize the order confirmation component to show rental information for rentable items in the order.
In src/modules/order/components/item/index.tsx, add the following below the LineItemOptions component in the return statement of the Item component:
1{!!item.metadata?.rental_start_date && !!item.metadata?.rental_end_date && (2 <Text className="txt-small text-ui-fg-muted">3 Rental: {new Date(item.metadata.rental_start_date as string).toLocaleDateString("en-US", { 4 month: "short", 5 day: "numeric", 6 year: "numeric", 7 })}8 {item.metadata.rental_days !== 1 && ` - ${new Date(item.metadata.rental_end_date as string).toLocaleDateString("en-US", { 9 month: "short", 10 day: "numeric", 11 year: "numeric", 12 })}`}13 </Text>14)}
You show the rental start and end dates if they're available in the line item's metadata.
Test Creating Rental Orders#
You can now test creating rental orders in the Next.js Starter Storefront.
First, run both the Medusa server and the Next.js Starter Storefront.
Then, in the storefront, open the cart that contains rental products. Proceed to checkout and complete the order.
After placing the order, you'll be redirected to the order confirmation page, where you'll see the rental dates displayed under the product name and options.

Step 13: Manage Rentals in Admin#
In this step, you'll allow admin users to manage rentals in the Medusa Admin Dashboard. You will:
- Create an API route to retrieve rentals of an order.
- Create a workflow to update a rental's status.
- Create an API route to update a rental's status.
- Inject an admin widget to view and manage rentals of an order.
a. Retrieve Order Rentals API Route#
First, you'll create an API route to retrieve the rentals associated with a specific order.
Create the file src/api/admin/orders/[id]/rentals/route.ts with the following content:
1import type { MedusaRequest, MedusaResponse } from "@medusajs/framework/http"2 3export const GET = async (req: MedusaRequest, res: MedusaResponse) => {4 const { id } = req.params5 const query = req.scope.resolve("query")6 7 const { data: rentals } = await query.graph({8 entity: "rental",9 fields: [10 "*",11 "product_variant.id",12 "product_variant.title",13 "product_variant.product.id",14 "product_variant.product.title",15 "product_variant.product.thumbnail",16 ],17 filters: {18 order_id: id,19 },20 })21 22 res.json({ rentals })23}
You expose a GET API route at /admin/orders/{id}/rentals. In the route handler, you use Query to retrieve the rentals associated with the specified order ID.
b. Update Rental Workflow#
Next, you'll create a workflow to update a rental's status.
The workflow has a single step that updates the rental's status.
updateRentalStep
The updateRentalStep updates the rental's status with validation.
To create the step, create the file src/workflows/steps/update-rental.ts with the following content:
1import { createStep, StepResponse } from "@medusajs/framework/workflows-sdk"2import { RENTAL_MODULE } from "../../modules/rental"3import RentalModuleService from "../../modules/rental/service"4import { MedusaError } from "@medusajs/framework/utils"5 6type UpdateRentalInput = {7 rental_id: string8 status: "active" | "returned" | "cancelled"9}10 11export const updateRentalStep = createStep(12 "update-rental",13 async ({ rental_id, status }: UpdateRentalInput, { container }) => {14 const rentalModuleService: RentalModuleService = container.resolve(RENTAL_MODULE)15 16 const existingRental = await rentalModuleService.retrieveRental(rental_id)17 const actualReturnDate = status === "returned" ? new Date() : null18 19 if (status === "active" && existingRental.status !== "pending") {20 throw new MedusaError(21 MedusaError.Types.INVALID_DATA, 22 "Can't activate a rental that is not in a pending state."23 )24 }25 26 if (status === "returned" && existingRental.status !== "active") {27 throw new MedusaError(28 MedusaError.Types.INVALID_DATA,29 "Can't return a rental that is not in an active state."30 )31 }32 33 if (status === "cancelled" && !["active", "pending"].includes(existingRental.status)) {34 throw new MedusaError(35 MedusaError.Types.INVALID_DATA,36 "Can't cancel a rental that is not in an active or pending state."37 )38 }39 40 const updatedRental = await rentalModuleService.updateRentals({41 id: rental_id,42 status,43 actual_return_date: actualReturnDate,44 })45 46 return new StepResponse(updatedRental, existingRental)47 },48 async (existingRental, { container }) => {49 if (!existingRental) {return}50 51 const rentalModuleService: RentalModuleService = container.resolve(RENTAL_MODULE)52 53 await rentalModuleService.updateRentals({54 id: existingRental.id,55 status: existingRental.status,56 actual_return_date: existingRental.actual_return_date,57 })58 }59)
The updateRentalStep accepts the rental ID and the new status as input.
In the step, you retrieve the existing rental and validate that the status change is allowed based on the current status.
You then update the rental's status using the updateRentals method from the Rental Module's service.
In the compensation function, you revert the rental to its previous status if an error occurs during the workflow's execution.
Update Rental Workflow
Next, you'll create the updateRentalWorkflow that uses the above step.
Create the file src/workflows/update-rental.ts with the following content:
1import { createWorkflow, WorkflowResponse } from "@medusajs/framework/workflows-sdk"2import { updateRentalStep } from "./steps/update-rental"3 4type UpdateRentalWorkflowInput = {5 rental_id: string6 status: "active" | "returned" | "cancelled"7}8 9export const updateRentalWorkflow = createWorkflow(10 "update-rental",11 ({ rental_id, status }: UpdateRentalWorkflowInput) => {12 // Update rental status13 const updatedRental = updateRentalStep({14 rental_id,15 status,16 })17 18 return new WorkflowResponse(updatedRental)19 }20)
You create the updateRentalWorkflow workflow that accepts the rental ID and the new status as input.
In the workflow, you update the rental's status using the updateRentalStep and return the updated rental in the workflow response.
c. Update Rental API Route#
Next, you'll create an API route that uses the updateRentalWorkflow to update a rental's status.
Create the file src/api/admin/rentals/[id]/route.ts with the following content:
1import type { MedusaRequest, MedusaResponse } from "@medusajs/framework/http"2import { updateRentalWorkflow } from "../../../../workflows/update-rental"3import { z } from "@medusajs/framework/zod"4 5export const PostRentalStatusBodySchema = z.object({6 status: z.enum(["active", "returned", "cancelled"]),7})8 9export const POST = async (10 req: MedusaRequest<z.infer<typeof PostRentalStatusBodySchema>>,11 res: MedusaResponse12) => {13 const { id } = req.params14 const { status } = req.validatedBody15 16 const { result } = await updateRentalWorkflow(req.scope).run({17 input: {18 rental_id: id,19 status,20 },21 })22 23 res.json({ rental: result })24}
You create a Zod schema to validate the request body, which includes the new rental status.
You also expose a POST API route at /admin/rentals/{id}. In the route handler, you execute the updateRentalWorkflow, and return the updated rental in the response.
d. Apply Validation Middleware#
Next, you'll add validation middleware to ensure that the request body for updating a rental's status is valid.
In src/api/middlewares.ts, add the following import at the top of the file:
Then, pass a new object to the routes array in defineMiddlewares:
You apply the validateAndTransformBody middleware to the rental update route, using the PostRentalStatusBodySchema schema to validate incoming requests.
e. Inject Admin Widget#
Finally, you'll inject an admin widget into the order details page to view and manage rentals associated with the order.
Create the file src/admin/widgets/order-rental-items.tsx with the following content:
17import { useEffect, useState } from "react"18 19type Rental = {20 id: string21 variant_id: string22 customer_id: string23 order_id: string24 line_item_id: string25 rental_start_date: string26 rental_end_date: string27 actual_return_date: string | null28 rental_days: number29 status: "pending" | "active" | "returned" | "cancelled"30 product_variant?: {31 id: string32 title: string33 product?: {34 id: string35 title: string36 thumbnail: string37 }38 }39}40 41type RentalsResponse = {42 rentals: Rental[]43}44 45const OrderRentalItemsWidget = ({46 data: order,47}: DetailWidgetProps<AdminOrder>) => {48 const [drawerOpen, setDrawerOpen] = useState(false)49 const [selectedRental, setSelectedRental] = useState<Rental | null>(null)50 const [newStatus, setNewStatus] = useState("")51 52 const { data, refetch } = useQuery<RentalsResponse>({53 queryFn: () =>54 sdk.client.fetch(55 `/admin/orders/${order.id}/rentals`56 ),57 queryKey: [["orders", order.id, "rentals"]],58 })59 60 useEffect(() => {61 if (data?.rentals.length) {62 setSelectedRental(data.rentals[0])63 setNewStatus(data.rentals[0].status)64 }65 }, [data?.rentals])66 67 // TODO add mutation68}69 70export const config = defineWidgetConfig({71 zone: "order.details.after",72})73 74export default OrderRentalItemsWidget
You create the OrderRentalItemsWidget component that will be injected into the order details page in the admin dashboard.
In the component, you define the following state variables:
drawerOpen: Controls the visibility of the rental management drawer.selectedRental: Holds the currently selected rental for management.newStatus: Holds the new status selected for the rental being managed.
You also retrieve the rentals associated with the order, and set the initial selected rental and status when the data is loaded.
Next, you'll add a mutation for updating a rental's status. Replace the // TODO add mutation comment with the following code:
1const updateMutation = useMutation({2 mutationFn: async (params: { rentalId: string; status: string }) => {3 return sdk.client.fetch(`/admin/rentals/${params.rentalId}`, {4 method: "POST",5 body: { status: params.status },6 })7 },8 onSuccess: () => {9 toast.success("Rental status updated successfully")10 refetch()11 setDrawerOpen(false)12 setSelectedRental(null)13 },14 onError: (error) => {15 toast.error(`Failed to update rental status: ${error.message}`)16 },17})18 19// TODO add helper functions
The mutation sends a POST request to the rental update API route with the new status.
Next, you'll add helper functions to handle events and formatting. Replace the // TODO add helper functions comment with the following code:
1const handleOpenDrawer = (rental: Rental) => {2 setSelectedRental(rental)3 setNewStatus(rental.status)4 setDrawerOpen(true)5}6 7const handleSubmit = () => {8 if (!selectedRental) {9 return10 }11 12 updateMutation.mutate({13 rentalId: selectedRental.id,14 status: newStatus,15 })16}17 18const getStatusBadgeColor = (status: string) => {19 switch (status) {20 case "active":21 return "green"22 case "returned":23 return "blue"24 case "cancelled":25 return "red"26 case "pending":27 return "orange"28 default:29 return "grey"30 }31}32 33const formatStatus = (status: string) => {34 return status.charAt(0).toUpperCase() + status.slice(1)35}36 37const formatDate = (dateString: string) => {38 return new Date(dateString).toLocaleDateString()39}40 41// TODO add return statement
You define the following functions:
handleOpenDrawer: Opens the rental management drawer for the selected rental.handleSubmit: Submits the rental status update.getStatusBadgeColor: Returns the badge color based on the rental status.formatStatus: Formats the rental status string.formatDate: Formats a date string into a readable format.
Finally, you'll add the return statement to render the component UI. Replace the // TODO add return statement comment with the following code:
1if (!data?.rentals.length) {2 return null3}4 5return (6 <>7 <Container className="divide-y p-0">8 <div className="flex items-center justify-between px-6 py-4">9 <Heading level="h2">Rental Items</Heading>10 </div>11 <Table>12 <Table.Header>13 <Table.Row>14 <Table.HeaderCell>Product</Table.HeaderCell>15 <Table.HeaderCell>Start Date</Table.HeaderCell>16 <Table.HeaderCell>End Date</Table.HeaderCell>17 <Table.HeaderCell>Status</Table.HeaderCell>18 <Table.HeaderCell>Actions</Table.HeaderCell>19 </Table.Row>20 </Table.Header>21 <Table.Body>22 {data.rentals.map((rental) => (23 <Table.Row key={rental.id}>24 <Table.Cell className="py-4">25 <div className="flex items-start gap-4">26 {rental.product_variant?.product?.thumbnail && (27 <img28 src={rental.product_variant?.product?.thumbnail || ""}29 alt={rental.product_variant?.product?.title || ""}30 className="w-6 h-8 object-cover rounded border border-ui-border-base"31 />32 )}33 <div>34 <Text weight="plus" size="small" className="text-ui-fg-base">35 {rental.product_variant?.product?.title || "N/A"}36 </Text>37 <Text size="xsmall" className="text-ui-fg-subtle">38 {rental.product_variant?.title || "N/A"}39 </Text>40 </div>41 </div>42 </Table.Cell>43 <Table.Cell>44 {formatDate(rental.rental_start_date)}45 </Table.Cell>46 <Table.Cell>47 {formatDate(rental.rental_end_date)}48 </Table.Cell>49 <Table.Cell>50 <Badge color={getStatusBadgeColor(rental.status)} size="2xsmall">51 {formatStatus(rental.status)}52 </Badge>53 </Table.Cell>54 <Table.Cell>55 <Button56 size="small"57 variant="transparent"58 onClick={() => handleOpenDrawer(rental)}59 className="p-0 text-ui-fg-subtle"60 >61 Update Status62 </Button>63 </Table.Cell>64 </Table.Row>65 ))}66 </Table.Body>67 </Table>68 </Container>69 70 <Drawer open={drawerOpen} onOpenChange={setDrawerOpen}>71 <Drawer.Content>72 <Drawer.Header>73 <Drawer.Title>Update Rental Status</Drawer.Title>74 </Drawer.Header>75 <Drawer.Body className="space-y-4">76 {selectedRental && (77 <>78 <div>79 <Text weight="plus" className="mb-2">80 Rental Details81 </Text>82 <div className="space-y-1">83 <Text size="small">84 Product:{" "}85 {selectedRental.product_variant?.product?.title || "N/A"}86 </Text>87 <Text size="small">88 Variant: {selectedRental.product_variant?.title || "N/A"}89 </Text>90 <Text size="small">91 Rental Period: {formatDate(selectedRental.rental_start_date)} to{" "}92 {formatDate(selectedRental.rental_end_date)} ({selectedRental.rental_days}{" "}93 days)94 </Text>95 </div>96 </div>97 <hr />98 <div className="space-y-1">99 <Label htmlFor="status" className="txt-compact-small font-medium">Status</Label>100 <Select value={newStatus} onValueChange={setNewStatus}>101 <Select.Trigger id="status">102 <Select.Value />103 </Select.Trigger>104 <Select.Content>105 <Select.Item value="pending" disabled className="text-ui-fg-disabled">Pending</Select.Item>106 <Select.Item value="active">Active</Select.Item>107 <Select.Item value="returned">Returned</Select.Item>108 <Select.Item value="cancelled">Cancelled</Select.Item>109 </Select.Content>110 </Select>111 </div>112 </>113 )}114 </Drawer.Body>115 <Drawer.Footer>116 <div className="flex gap-2">117 <Button118 variant="secondary"119 onClick={() => setDrawerOpen(false)}120 >121 Cancel122 </Button>123 <Button124 onClick={handleSubmit}125 disabled={updateMutation.isPending || newStatus === selectedRental?.status}126 isLoading={updateMutation.isPending}127 >128 Save129 </Button>130 </div>131 </Drawer.Footer>132 </Drawer.Content>133 </Drawer>134 </>135)
If there are no rentals, you return null to avoid rendering the widget.
Otherwise, you show a table of rental items associated with the order, along with a button to update the status of each rental.
When the "Update Status" button is clicked, a drawer opens, allowing the admin user to change the rental's status.
Test Managing Rentals in Admin#
You can now test managing rentals in the Medusa Admin Dashboard.
First, start the Medusa application and log in.
Then, go to Orders and click on an order that contains rental items.
In the order details page, you'll see a new "Rental Items" section with a table listing the rental items associated with the order.

You can click the "Update Status" button for a rental item to open the drawer and edit its status.

You can change the rental status and save the changes. The rental status will be updated accordingly.
Step 14: Handle Order Cancellation#
Medusa Admin users can cancel orders. So, in this step, you'll customize the order cancellation flow to validate that rental items in the order can be cancelled based on their rental status. You'll also update the rental statuses when an order is cancelled.
a. Validate Rental Items on Order Cancellation#
To add custom validation when cancelling an order, you'll consume the orderCanceled hook of the cancelOrderWorkflow. A workflow hook allows you to run custom steps at specific points in a workflow.
To consume the orderCanceled hook, create the file src/workflows/hooks/validate-order-cancel.ts with the following content:
1import { cancelOrderWorkflow } from "@medusajs/medusa/core-flows"2import { MedusaError, ContainerRegistrationKeys } from "@medusajs/framework/utils"3 4cancelOrderWorkflow.hooks.orderCanceled(5 async ({ order }, { container }) => {6 const query = container.resolve(ContainerRegistrationKeys.QUERY)7 8 // Retrieve all rentals associated with this order9 const { data: rentals } = await query.graph({10 entity: "rental",11 fields: ["id", "status", "variant_id"],12 filters: {13 order_id: order.id,14 },15 })16 17 // Validate that all rentals are in a cancelable state18 // Only pending, active, or already cancelled rentals can be part of a canceled order19 const nonCancelableRentals = rentals.filter(20 (rental: any) => !["pending", "active", "cancelled"].includes(rental.status)21 )22 23 if (nonCancelableRentals.length > 0) {24 const problematicRentals = nonCancelableRentals25 .map((r: any) => `${r.id} (${r.status})`)26 .join(", ")27 throw new MedusaError(28 MedusaError.Types.NOT_ALLOWED,29 `Cannot cancel order. Some rentals cannot be canceled: ${problematicRentals}. Only rentals with status "pending", "active", or "cancelled" can be canceled with the order.`30 )31 }32 }33)
You consume the orderCanceled hook of the cancelOrderWorkflow, passing it a step function.
In the subscriber function, you retrieve all rentals associated with the order being cancelled. If a rental's status is returned, you throw an error. This will roll back the changes made by the cancelOrderWorkflow, preventing the order from being cancelled.
Test Order Cancellation Validation
To test the order cancellation validation, try to cancel an order from the Medusa Admin that has rental items with returned status. The order cancellation should fail.
b. Update Rental Statuses on Order Cancellation#
Next, you'll update the rental statuses when an order is cancelled.
When an order is cancelled, Medusa emits an order.canceled event. You can handle this event in a subscriber.
A subscriber is an asynchronous function that executes actions in the background when specific events are emitted.
To create the subscriber, create the file src/subscribers/order-canceled.ts with the following content:
1import { SubscriberArgs, type SubscriberConfig } from "@medusajs/framework"2import { updateRentalWorkflow } from "../workflows/update-rental"3 4export default async function orderCanceledHandler({5 event: { data },6 container,7}: SubscriberArgs<{ id: string }>) {8 const logger = container.resolve("logger")9 const query = container.resolve("query")10 11 logger.info(`Processing rental cancellations for order ${data.id}`)12 13 try {14 // Retrieve all rentals associated with the canceled order15 const { data: rentals } = await query.graph({16 entity: "rental",17 fields: ["id", "status"],18 filters: {19 order_id: data.id,20 status: {21 $ne: "cancelled",22 },23 },24 })25 26 if (!rentals || rentals.length === 0) {27 logger.info(`No rentals found for order ${data.id}`)28 return29 }30 31 logger.info(`Found ${rentals.length} rental(s) to cancel for order ${data.id}`)32 33 // Update each rental's status to cancelled34 let successCount = 035 let errorCount = 036 37 for (const rental of rentals) {38 try {39 await updateRentalWorkflow(container).run({40 input: {41 rental_id: (rental as any).id,42 status: "cancelled",43 },44 })45 successCount++46 logger.info(`Cancelled rental ${(rental as any).id}`)47 } catch (error) {48 errorCount++49 logger.error(50 `Failed to cancel rental ${(rental as any).id}: ${error.message}`51 )52 }53 }54 55 logger.info(56 `Rental cancellation complete for order ${data.id}: ${successCount} succeeded, ${errorCount} failed`57 )58 } catch (error) {59 logger.error(`Error in orderCanceledHandler: ${error.message}`)60 }61}62 63export const config: SubscriberConfig = {64 event: "order.canceled",65}
A subscriber file must export:
- An asynchronous function that is executed when its associated event is emitted.
- An object that indicates the event that the subscriber is listening to.
In the subscriber function, you retrieve all rentals associated with the cancelled order that are not already cancelled.
Then, you iterate over the rentals and update their status to cancelled using the updateRentalWorkflow.
Test Rental Status Update on Order Cancellation
To test the rental status update on order cancellation, cancel an order from the Medusa Admin that has rental items with pending or active status.
Then, refresh the page. You'll see that the rental items' statuses have been updated to cancelled.
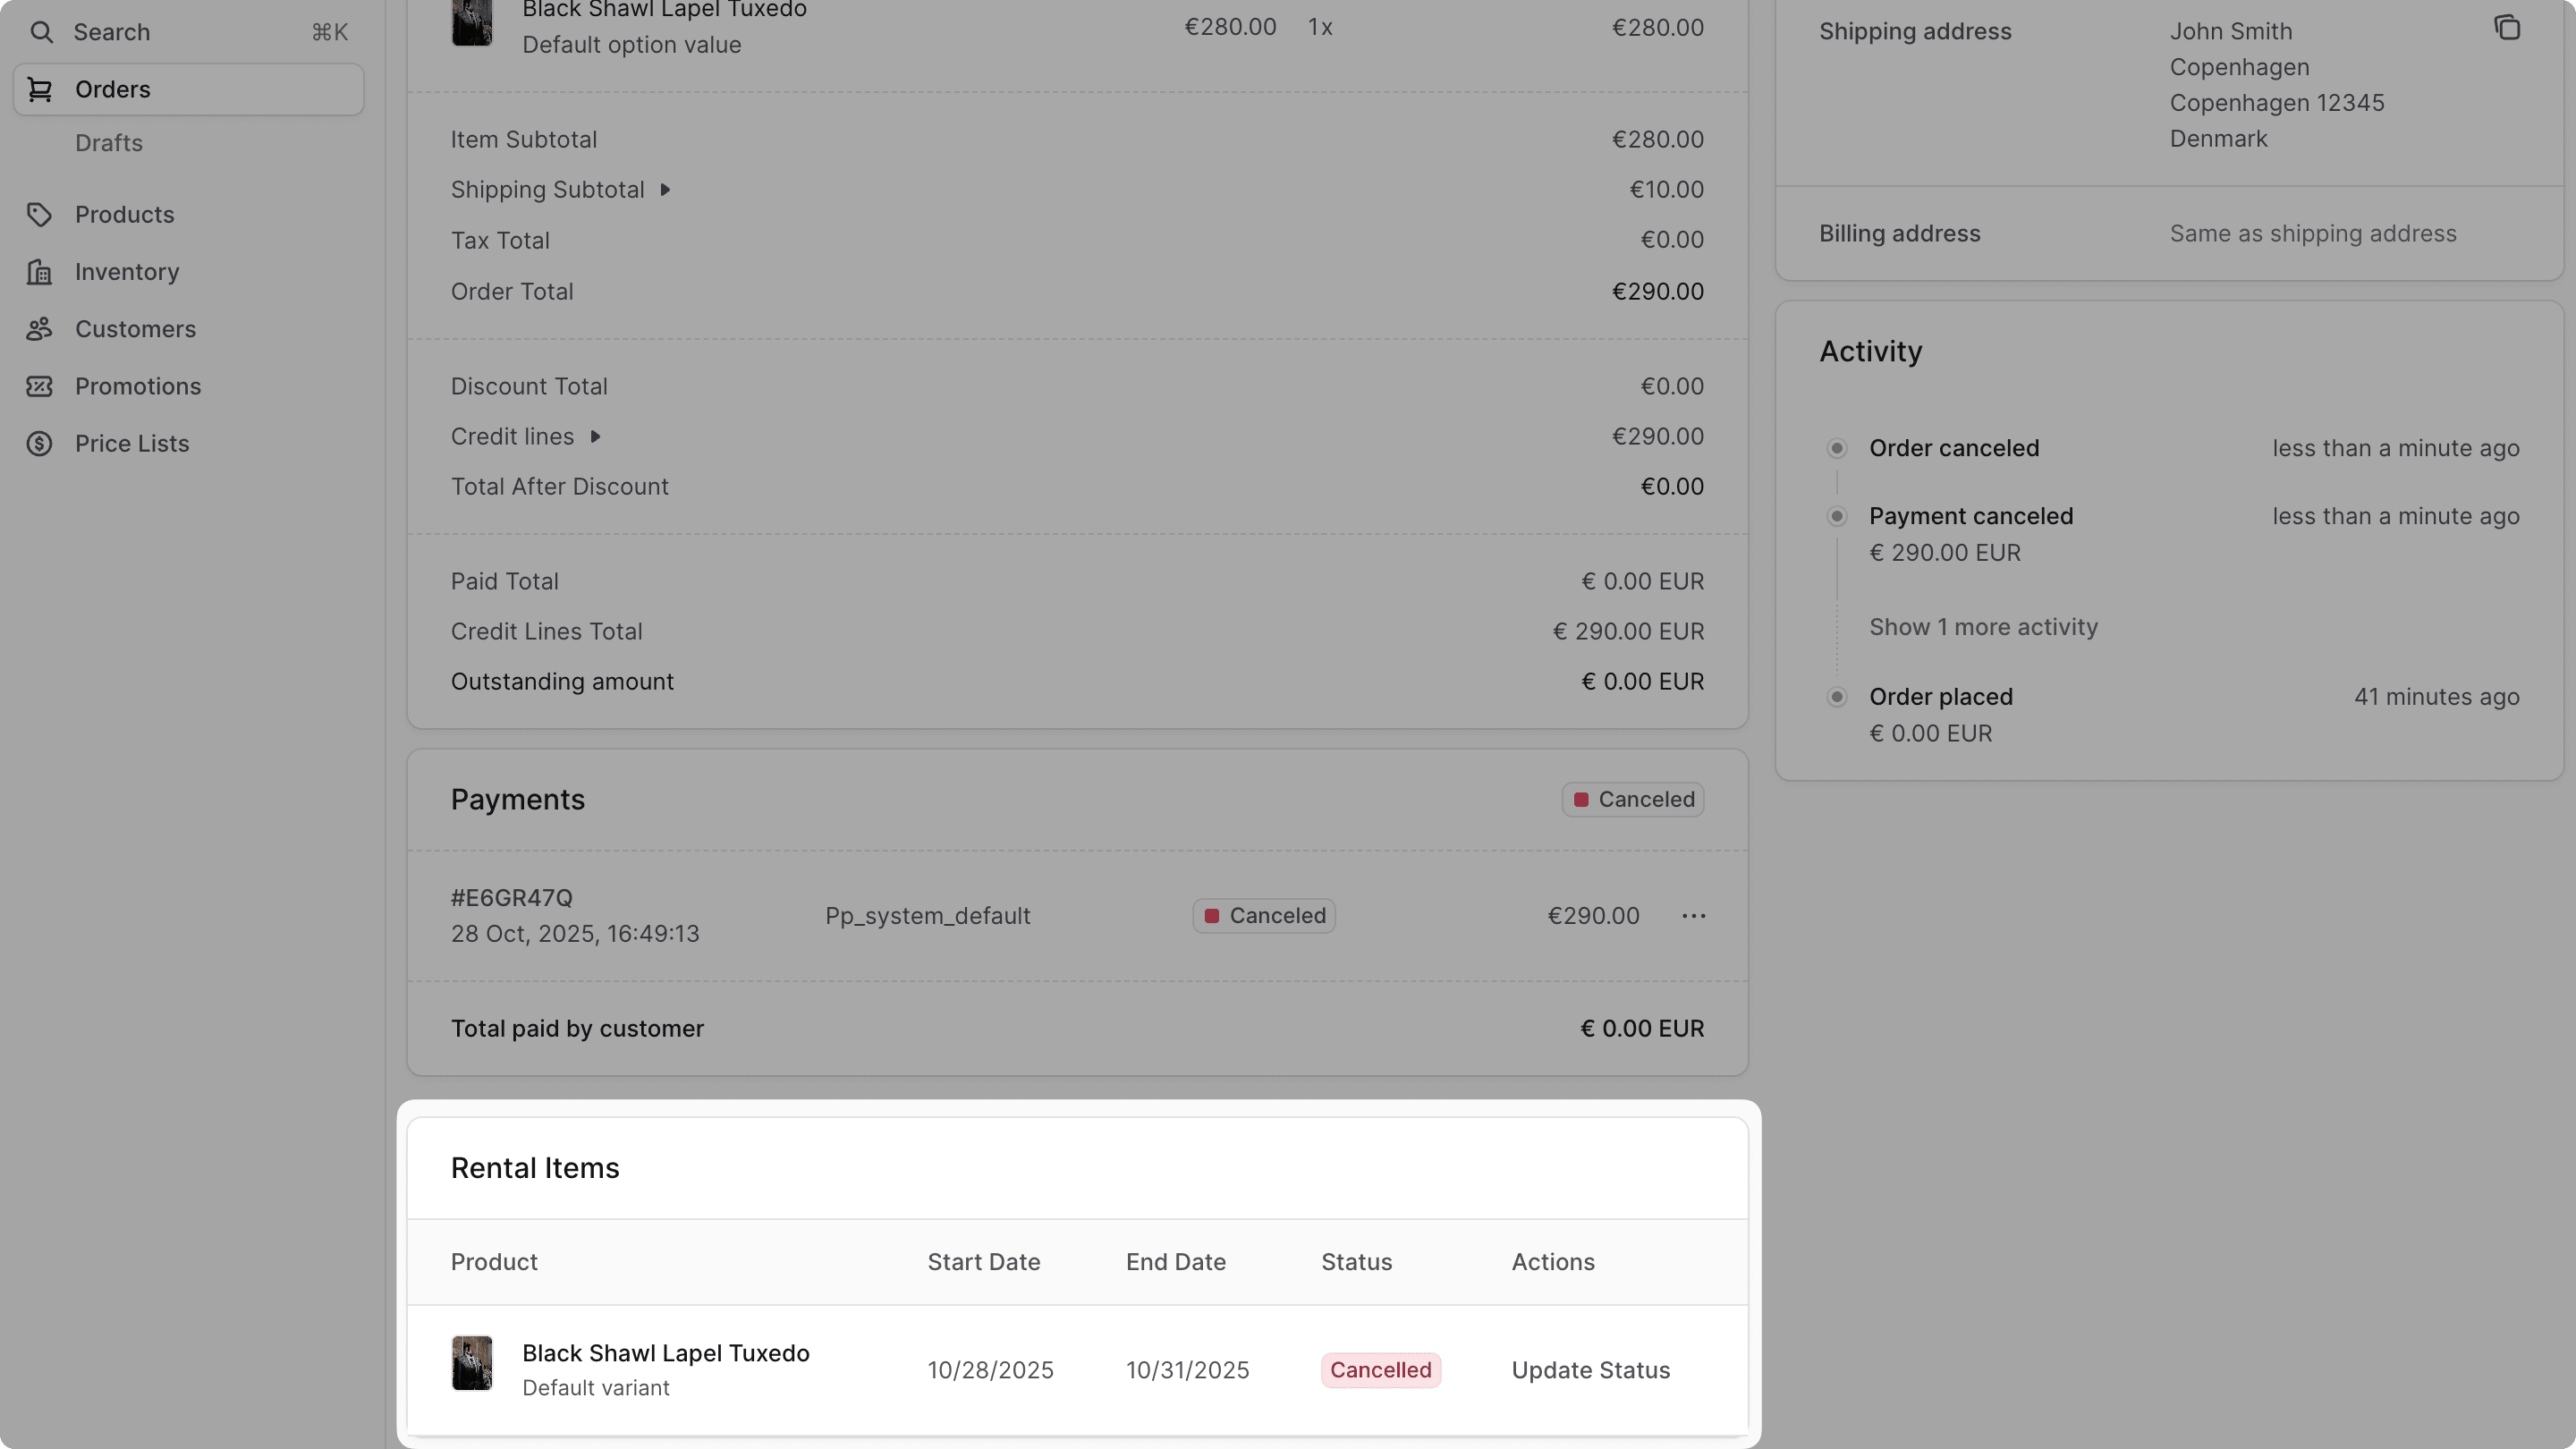
Optional: Automate Rental Status Updates#
In realistic scenarios, you might want to automate rental status updates based on specific events, rental periods, or external triggers.
In this optional step, you'll explore two approaches to automate rental status updates:
- Using a scheduled job to periodically check and update rental statuses.
- Handling events like
shipment.createdto update rental statuses when shipments are created.
You can also implement other approaches based on your use case.
a. Scheduled Job for Rental Status Updates#
A scheduled job is an asynchronous function that runs tasks at specific intervals while the Medusa application is running. You can use scheduled jobs to change a rental's status based on the rental period.
For example, to automatically mark rentals as active when their rental start date is reached, create a scheduled job at src/jobs/activate-rentals.ts with the following content:
1import { MedusaContainer } from "@medusajs/framework/types"2import { ContainerRegistrationKeys } from "@medusajs/framework/utils"3import { updateRentalWorkflow } from "../workflows/update-rental"4 5export default async function activateRentalsJob(container: MedusaContainer) {6 const logger = container.resolve("logger")7 const query = container.resolve(ContainerRegistrationKeys.QUERY)8 9 // Get current date at start of day for comparison10 const today = new Date()11 today.setHours(0, 0, 0, 0)12 13 // Get tomorrow at start of day14 const tomorrow = new Date(today)15 tomorrow.setDate(tomorrow.getDate() + 1)16 17 try {18 // Find all pending rentals whose start date is today19 const { data: rentalsToActivate } = await query.graph({20 entity: "rental",21 fields: ["id", "rental_start_date", "status"],22 filters: {23 status: ["pending"],24 rental_start_date: {25 $gte: today,26 $lt: tomorrow,27 },28 },29 })30 31 if (rentalsToActivate.length === 0) {32 logger.info("No pending rentals to activate today")33 return34 }35 36 logger.info(`Found ${rentalsToActivate.length} rentals to activate today`)37 38 // Activate each rental using the workflow39 let successCount = 040 let errorCount = 041 42 for (const rental of rentalsToActivate) {43 try {44 await updateRentalWorkflow(container).run({45 input: {46 rental_id: rental.id,47 status: "active",48 },49 })50 successCount++51 logger.info(`Activated rental ${rental.id}`)52 } catch (error) {53 errorCount++54 logger.error(`Failed to activate rental ${rental.id}: ${error.message}`)55 }56 }57 58 logger.info(59 `Rental activation complete: ${successCount} succeeded, ${errorCount} failed`60 )61 } catch (error) {62 logger.error(`Error in rental activation job: ${error.message}`)63 }64}65 66export const config = {67 name: "activate-rentals",68 schedule: "0 0 * * *", // Every day at midnight69}
A scheduled job file must export:
- An asynchronous function that is executed at the specified interval in the configuration object.
- A configuration object that specifies when to execute the scheduled job. The schedule is defined as a cron pattern.
This scheduled job runs every day at midnight. In the job function, you retrieve all rentals with pending status whose rental start date is the current date.
Then, you update their status to active using the updateRentalWorkflow.
Test Scheduled Job
To test the scheduled job, you can change its schedule property to run every minute:
Then, start the Medusa application and wait for a minute. You should see log messages indicating that the job is running and has activated any pending rentals whose start date is today.
b. Event-Driven Rental Status Updates#
You can also update rental statuses based on specific events in Medusa.
For example, you might want to mark rentals as active when their associated shipments are created. You can do this by creating a subscriber that listens to the shipment.created event:
1import { SubscriberArgs, type SubscriberConfig } from "@medusajs/framework"2import { ContainerRegistrationKeys } from "@medusajs/framework/utils"3import { updateRentalWorkflow } from "../workflows/update-rental"4 5export default async function shipmentCreatedHandler({6 event: { data },7 container,8}: SubscriberArgs<{ id: string; no_notification?: boolean }>) {9 const logger = container.resolve("logger")10 const query = container.resolve(ContainerRegistrationKeys.QUERY)11 12 logger.info(`Processing rental activations for shipment ${data.id}`)13 14 try {15 // Retrieve the fulfillment with its items16 const { data: fulfillments } = await query.graph({17 entity: "fulfillment",18 fields: ["id", "items.*", "items.line_item_id"],19 filters: {20 id: data.id,21 },22 })23 24 if (!fulfillments || fulfillments.length === 0) {25 logger.warn(`Fulfillment ${data.id} not found`)26 return27 }28 29 const fulfillment = fulfillments[0]30 const lineItemIds = (fulfillment as any).items?.map((item: any) => item.line_item_id) || []31 32 if (lineItemIds.length === 0) {33 logger.info(`No items found in fulfillment ${data.id}`)34 return35 }36 37 logger.info(`Found ${lineItemIds.length} item(s) in fulfillment ${data.id}`)38 39 // Retrieve all rentals associated with these line items40 const { data: rentals } = await query.graph({41 entity: "rental",42 fields: ["id", "status", "line_item_id", "variant_id"],43 filters: {44 line_item_id: lineItemIds,45 status: "pending",46 },47 })48 49 if (!rentals || rentals.length === 0) {50 logger.info(`No rentals found for fulfillment ${data.id}`)51 return52 }53 54 logger.info(`Found ${rentals.length} rental(s) to activate for fulfillment ${data.id}`)55 56 // Update each rental's status to active57 let successCount = 058 let errorCount = 059 60 for (const rental of rentals) { 61 try {62 await updateRentalWorkflow(container).run({63 input: {64 rental_id: rental.id,65 status: "active",66 },67 })68 successCount++69 logger.info(`Activated rental ${rental.id} (variant: ${rental.variant_id})`)70 } catch (error) {71 errorCount++72 logger.error(73 `Failed to activate rental ${rental.id}: ${error.message}`74 )75 }76 }77 78 logger.info(79 `Rental activation complete for shipment ${data.id}: ${successCount} activated, ${errorCount} failed`80 )81 } catch (error) {82 logger.error(`Error in shipmentCreatedHandler: ${error.message}`)83 }84}85 86export const config: SubscriberConfig = {87 event: "shipment.created",88}
You create a subscriber that listens to the shipment.created event. In the subscriber function, you:
- Retrieve the fulfillment associated with the shipment.
- Extract the line item IDs from the fulfillment.
- Retrieve all rentals associated with those line items that are in
pendingstatus. - Update their status to
activeusing theupdateRentalWorkflow.
Test Event-Driven Rental Status Update
To test the event-driven rental status update, create a fulfillment for an order that has rental items with pending status from the Medusa Admin. Then, mark the fulfillment as shipped.
If you refresh the order details page, you should see that the rental items' statuses have been updated to active.

Optional: Remove Shipping for Rental Items#
In some scenarios, a rentable item might not require shipping. For example, if the rental item is digital.
You can remove the shipping requirement for rentable items by:
- Removing the associated shipping profile of the product. You can do this from the Medusa Admin.
- Customizing the checkout flow in the storefront to remove the delivery step for orders that only contain rentable items.
Learn more about customizing shipping requirements for products in the Selling Products guide.
Optional: Handling Inventory for Rental Items#
Medusa provides optional inventory management for product variants. If enabled, Medusa will increment and decrement inventory levels for product variants when orders are placed, fulfilled, or returned.
Handling inventory for rental products depends on your specific use case:
- No inventory management: If inventory of rental products is not a concern, you can disable inventory management for rental product variants. The product variants will always be considered in-stock, and only the rental logic will govern their availability.
- Standard inventory management: If you want to manage inventory for rental products, you can enable inventory management for rental product variants. In this case, you'll need to ensure that inventory levels are adjusted appropriately based on rental status changes.
For example, in the updateRentalWorkflow, you might want to increment inventory when the rental is marked as returned:
1import { createWorkflow, transform, when, WorkflowResponse } from "@medusajs/framework/workflows-sdk"2import { updateRentalStep } from "./steps/update-rental"3import { adjustInventoryLevelsStep, useQueryGraphStep } from "@medusajs/medusa/core-flows"4 5type UpdateRentalWorkflowInput = {6 rental_id: string7 status: "active" | "returned" | "cancelled"8}9 10export const updateRentalWorkflow = createWorkflow(11 "update-rental",12 ({ rental_id, status }: UpdateRentalWorkflowInput) => {13 // Update rental status14 const updatedRental = updateRentalStep({15 rental_id,16 status,17 })18 19 when({ updatedRental }, (data) => data.updatedRental.status === "returned" )20 .then(() => {21 // Retrieve variant inventory details22 const { data: variants } = useQueryGraphStep({23 entity: "variant",24 fields: [25 "inventory.*",26 "inventory.location_levels.*",27 ],28 filters: {29 id: updatedRental.variant_id,30 },31 })32 33 // Prepare inventory adjustment34 const stockUpdate = transform({35 variants,36 }, (data) => {37 const inventoryUpdates: {38 inventory_item_id: string39 location_id: string40 adjustment: number41 }[] = []42 43 data.variants[0].inventory?.map((inv) => {44 inv?.location_levels?.map((locLevel) => {45 inventoryUpdates.push({46 inventory_item_id: inv!.id,47 location_id: locLevel!.location_id,48 adjustment: 1,49 })50 })51 })52 53 return inventoryUpdates54 })55 56 // Adjust inventory levels57 adjustInventoryLevelsStep(stockUpdate)58 })59 60 return new WorkflowResponse(updatedRental)61 }62)
Next Steps#
You have now implemented product rentals in your Medusa application. You can expand on this foundation by adding more features, such as allowing customers to view and manage their rentals from the storefront.
Learn More about Medusa#
If you're new to Medusa, check out the main documentation, where you'll get a more in-depth understanding of all the concepts you've used in this guide and more.
To learn more about the commerce features that Medusa provides, check out Medusa's Commerce Modules.
Troubleshooting#
If you encounter issues during your development, check out the troubleshooting guides.
Getting Help#
If you encounter issues not covered in the troubleshooting guides:
- Visit the Medusa GitHub repository to report issues or ask questions.
- Join the Medusa Discord community for real-time support from community members.