Implement Product Feed for Meta and Google
In this tutorial, you'll learn how to create a product feed in Medusa that can be used for Meta and Google.
When you install a Medusa application, you get a fully-fledged commerce platform with a Framework for customization. The Medusa application's commerce features are built around Commerce Modules that are available out-of-the-box.
Businesses that are selling on social media platforms like Meta (Instagram and Facebook) and Google need to upload their product catalog to those platforms and keep them in sync with their Medusa store. Creating a product feed allows you to automate this process.
Summary#
By following this tutorial, you will learn how to:
- Install and set up Medusa with the Next.js Starter Storefront.
- Create a workflow that builds a product feed XML.
- Expose an API route to serve the product feed.
- Use the API route on social platforms like Meta and Google.
You can follow this tutorial whether you're new to Medusa or an advanced Medusa developer.
Step 1: Install a Medusa Application#
Start by installing the Medusa application on your machine with the following command:
You'll first be asked for the project's name. Then, when asked whether you want to install the Next.js Starter Storefront, choose Yes.
Afterward, the installation process will start, which will install the Medusa application as a monorepository in a directory with your project's name. The backend is installed in the apps/backend directory, and the Next.js Starter Storefront is installed in the apps/storefront directory.
Once the installation finishes successfully, the Medusa Admin dashboard will open with a form to create a new user. Enter the user's credentials and submit the form. Afterward, you can log in with the new user and explore the dashboard.
apps/backend directory of your Medusa project.Step 2: Create Product Feed Workflow#
In this step, you'll create the logic to build an XML string for a product feed.
In Medusa, you implement commerce logic within a workflow. A workflow is a series of queries and actions, called steps, that complete a task. A workflow is similar to a function, but it allows you to track its executions' progress, define roll-back logic, and configure other advanced features.
You'll create a workflow that builds a product feed. Later, you'll execute the workflow from an API route, allowing third-party services to retrieve the product feed.
The workflow you'll create will have the following steps:
Workflow hook
Step conditioned by when
View step details
getProductFeedItemsStep#
The getProductFeedItemsStep will retrieve the Medusa products with pagination, and format their product variants as items to be added to the feed.
To create the step, create the file src/workflows/steps/get-product-feed-items.ts with the following content:
1import { createStep, StepResponse } from "@medusajs/framework/workflows-sdk"2import { getVariantAvailability, QueryContext } from "@medusajs/framework/utils"3import { CalculatedPriceSet } from "@medusajs/framework/types"4 5export type FeedItem = {6 id: string7 title: string8 description: string9 link: string10 image_link?: string11 additional_image_link?: string12 availability: string13 price: string14 sale_price?: string15 item_group_id: string16 condition?: string17 brand?: string18}19 20const formatPrice = (price: number, currency_code: string) => {21 return `${new Intl.NumberFormat("en-US", {22 currency: currency_code,23 minimumFractionDigits: 2,24 maximumFractionDigits: 2,25 }).format(price)} ${currency_code.toUpperCase()}`26}27 28type StepInput = {29 currency_code: string30 country_code: string31}32 33export const getProductFeedItemsStep = createStep(34 "get-product-feed-items", 35 async (input: StepInput, { container }) => {36 // ...37 }38)
You first define a FeedItem type that represents each product in the feed. It has properties matching Meta and Google's specification. You can add other optional specification fields to this type, if necessary.
You also define a formatPrice function that will format a price with a currency code based on the format requested by Meta and Google. Meta and Google request that a price is formatted as "X.XX USD", where X.XX is the price with two decimal places, and USD is the currency code in uppercase.
After that, you create a step with the createStep function. It accepts two parameters:
- The step's unique name.
- An async function that receives two parameters:
- The step's input, which is an object holding the requested currency and country codes.
- An object that has properties including the Medusa container, which is a registry of Framework and commerce tools that you can access in the step.
Next, you'll implement the step's logic. Add the following in the step function:
1const feedItems: FeedItem[] = []2const query = container.resolve("query")3const configModule = container.resolve("configModule")4const storefrontUrl = configModule.admin.storefrontUrl || 5 process.env.STOREFRONT_URL6 7const limit = 1008let offset = 09let count = 010const countryCode = input.country_code.toLowerCase()11const currencyCode = input.currency_code.toLowerCase()12 13do {14 const {15 data: products,16 metadata,17 } = await query.graph({18 entity: "product",19 fields: [20 "id",21 "title",22 "description",23 "handle",24 "thumbnail",25 "images.*",26 "status",27 "variants.*",28 "variants.calculated_price.*",29 "sales_channels.*",30 "sales_channels.stock_locations.*",31 "sales_channels.stock_locations.address.*",32 ],33 filters: {34 status: "published",35 },36 context: {37 variants: {38 calculated_price: QueryContext({39 currency_code: currencyCode,40 }),41 },42 },43 pagination: {44 take: limit,45 skip: offset,46 },47 })48 49 count = metadata?.count ?? 050 offset += limit51 52 // TODO prepare feed data53} while (count > offset)54 55return new StepResponse({ items: feedItems })
You first initialize an empty array of FeedItem objects that you'll populate later.
Then, you resolve the following resources from the Medusa container:
- Query that allows you to retrieve data across modules.
- Medusa Configurations that are defined in
medusa-config.ts.
You use the Medusa configurations to retrieve the storefront URL, which you'll use to build the product links in the feed. If the storefront URL is not set in the configurations, you fall back to the STOREFRONT_URL environment variable.
After that, you use Query to retrieve product data with pagination. For each product, you retrieve fields and relations useful for the feed. You still need to add the logic for populating the feed items.
Finally, a step function must return a StepResponse instance with the step's output, which is the list of feed items.
Populate Feed Items
To populate the product data as feed items, replace the TODO in the step with the following:
1for (const product of products) {2 if (!product.variants.length) {continue}3 const salesChannel = product.sales_channels?.find((channel) => {4 return channel?.stock_locations?.some((location) => {5 return location?.address?.country_code.toLowerCase() === countryCode6 })7 })8 9 const availability = salesChannel?.id ? await getVariantAvailability(query, {10 variant_ids: product.variants.map((variant) => variant.id),11 sales_channel_id: salesChannel?.id,12 }) : undefined13 14 for (const variant of product.variants) {15 // @ts-ignore16 const calculatedPrice = variant.calculated_price as CalculatedPriceSet17 const hasOriginalPrice = calculatedPrice?.original_amount && 18 calculatedPrice.original_amount !== calculatedPrice.calculated_amount19 const originalPrice = hasOriginalPrice ? calculatedPrice.original_amount : 20 calculatedPrice.calculated_amount21 const salePrice = hasOriginalPrice ? calculatedPrice.calculated_amount : 22 undefined23 const stockStatus = !variant.manage_inventory ? "in stock" : 24 !availability?.[variant.id]?.availability ? "out of stock" : "in stock"25 26 feedItems.push({27 id: variant.id,28 title: product.title,29 description: product.description ?? "",30 link: `${storefrontUrl || ""}/${input.country_code}/${product.handle}`,31 image_link: product.thumbnail ?? "",32 additional_image_link: product.images?.map(33 (image) => image.url34 )?.join(","),35 availability: stockStatus,36 price: formatPrice(originalPrice as number, currencyCode),37 sale_price: salePrice ? formatPrice(salePrice as number, currencyCode) : 38 undefined,39 item_group_id: product.id,40 condition: "new", // TODO add condition if supported41 brand: "", // TODO add brand if supported42 })43 }44}
For each product, you:
- Skip the product if it doesn't have variants.
- In Medusa, customers purchase variants of a product.
- Try to retrieve the sales channel of a product that has stock locations in the requested country code.
- In Medusa, a product variant's inventory is tracked by stock locations that are associated with sales channels. So, you must retrieve the product's sales channel that matches the requested country code to check the availability of each variant. Learn more in the Product Variant Inventory guide.
- For each variant, you:
- Retrieve the variant's price and sale price.
- If the
calculated_price.original_amountis different thancalculated_price.calculated_amount, the variant is on sale and thecalculated_price.calculated_amountis the sale price. - Otherwise, the
calculated_price.calculated_amountis the regular price.
- If the
- Check the variant's availability.
- If the variant's
manage_inventoryproperty is disabled, the variant is always in stock. - If the variant's
manage_inventoryproperty is enabled, check the availability retrieved from thegetVariantAvailabilityfunction.
- If the variant's
- Populate the feed item with the variant's data.
- Retrieve the variant's price and sale price.
The feedItems array will contain feed data for every product variant.
buildProductFeedXmlStep#
In the buildProductFeedXmlStep, you will construct the XML string for the product feed.
To create the step, create the file src/workflows/steps/build-product-feed-xml.ts with the following content:
1import { createStep, StepResponse } from "@medusajs/framework/workflows-sdk"2import { FeedItem } from "./get-product-feed-items"3 4type StepInput = {5 items: FeedItem[]6}7 8export const buildProductFeedXmlStep = createStep(9 "build-product-feed-xml",10 async (input: StepInput) => {11 const escape = (str: string) =>12 str13 .replace(/&/g, "&")14 .replace(/</g, "<")15 .replace(/>/g, ">")16 .replace(/\"/g, """)17 .replace(/'/g, "'")18 19 const itemsXml = input.items.map((item) => {20 return (21 `<item>` +22 `<g:id>${escape(item.id)}</g:id>` +23 `<title>${escape(item.title)}</title>` +24 `<description>${escape(item.description)}</description>` +25 `<link>${escape(item.link)}</link>` +26 (item.image_link ? `<g:image_link>${escape(item.image_link)}</g:image_link>` : "") +27 (item.additional_image_link ? `<g:additional_image_link>${escape(item.additional_image_link)}</g:additional_image_link>` : "") +28 `<g:availability>${escape(item.availability)}</g:availability>` +29 `<g:price>${escape(item.price)}</g:price>` +30 (item.sale_price ? `<g:sale_price>${escape(item.sale_price)}</g:sale_price>` : "") +31 `<g:condition>${escape(item.condition || "new")}</g:condition>` +32 (item.brand ? `<g:brand>${escape(item.brand)}</g:brand>` : "") +33 `<g:item_group_id>${escape(item.item_group_id)}</g:item_group_id>` +34 `</item>`35 )36 }).join("")37 38 const xml =39 `<?xml version="1.0" encoding="UTF-8"?>` +40 `<rss version="2.0" xmlns:g="http://base.google.com/ns/1.0">` +41 `<channel>` +42 `<title>Product Feed</title>` +43 `<description>Product Feed for Social Platforms</description>` +44 itemsXml +45 `</channel>` +46 `</rss>`47 48 return new StepResponse(xml)49 }50)
This step accepts the feed items as an input.
In the step, you format the XML string based on the specifications accepted by Meta and Google. You also escape special characters in the feed data to ensure the XML is valid.
Finally, the step returns the XML string.
Create the Workflow#
Now that you have the steps, you can create the workflow to build a product feed.
Create the file src/workflows/generate-product-feed.ts with the following content:
1import { createWorkflow, WorkflowResponse } from "@medusajs/framework/workflows-sdk"2import { getProductFeedItemsStep } from "./steps/get-product-feed-items"3import { buildProductFeedXmlStep } from "./steps/build-product-feed-xml"4 5type GenerateProductFeedWorkflowInput = {6 currency_code: string7 country_code: string8}9 10export const generateProductFeedWorkflow = createWorkflow(11 "generate-product-feed",12 (input: GenerateProductFeedWorkflowInput) => {13 const { items: feedItems } = getProductFeedItemsStep(input)14 15 const xml = buildProductFeedXmlStep({ 16 items: feedItems,17 })18 19 return new WorkflowResponse({ xml })20 }21)22 23export default generateProductFeedWorkflow
You create a workflow using the createWorkflow function. It accepts the workflow's unique name as a first parameter.
It accepts as a second parameter a constructor function that holds the workflow's implementation.
The constructor function accepts an object holding the currency code and country code.
In the function, you:
- Get the product feed items using the
getProductFeedItemsStep. - Build the product feed XML using the
buildProductFeedXmlStep.
A workflow must return an instance of WorkflowResponse. It receives as a parameter the data returned by the workflow, which is the XML string.
In the next step, you'll create an API route that executes this workflow.
Step 3: Create Product Feed API Route#
In this step, you'll expose the product feed XML by creating an API route.
An API route is an endpoint that exposes commerce features to external applications and clients, such as third-party services.
An API route is created in a route.ts file under a sub-directory of the src/api directory. The path of the API route is the file's path relative to src/api.
So, to create the API route, create the file src/api/product-feed/route.ts with the following content:
1import type { MedusaRequest, MedusaResponse } from "@medusajs/framework/http"2import generateProductFeedWorkflow from "../../workflows/generate-product-feed"3 4export async function GET(5 req: MedusaRequest, 6 res: MedusaResponse7) {8 const { 9 currency_code,10 country_code,11 } = req.validatedQuery12 13 const { result } = await generateProductFeedWorkflow(req.scope).run({14 input: {15 currency_code: currency_code as string,16 country_code: country_code as string,17 },18 })19 20 res.setHeader("Content-Type", "application/rss+xml; charset=utf-8")21 res.status(200).send(result.xml)22}
By exporting a GET route handler function, you expose a GET API route at the /product-feed path.
In the route handler, you retrieve the country and currency codes from the request's query parameters.
Then, you execute the generateProductFeedWorkflow by invoking it, passing it the Medusa container (which is req.scope), and calling its run method. You pass the workflow's input to the run method.
Finally, you set the response headers to indicate that the content is XML and send the XML string in the response.
Add Query Validation Middleware#
To ensure that the country and currency codes are passed as query parameters, you need to apply a middleware.
A middleware is a function that runs when a request is sent before running the route handler. It's useful to validate request query and body parameters.
To apply a middleware on the API route, create the file src/api/middlewares.ts with the following content:
1import { defineMiddlewares, validateAndTransformQuery } from "@medusajs/framework/http"2import { z } from "@medusajs/framework/zod"3 4export default defineMiddlewares({5 routes: [6 {7 matcher: "/product-feed",8 methods: ["GET"],9 middlewares: [10 validateAndTransformQuery(z.object({11 currency_code: z.string(),12 country_code: z.string(),13 }), {}),14 ],15 },16 ],17})
You apply the validateAndTransformQuery middleware on the /product-feed API route. The middleware accepts as a first parameter a Zod schema that defines the expected query parameters.
The request will now fail before reaching the route handler if the query parameters are invalid.
Test it Out#
To test out the product feed API route, start the Medusa server with the following command:
Then, in your browser, go to http://localhost:9000/product-feed?currency_code=eur&country_code=dk. You can replace the currency and country codes based on the ones you use in your store.
You'll receive an XML in the response similar to the following:
1<?xml version="1.0" encoding="UTF-8"?>2<rss version="2.0" xmlns:g="http://base.google.com/ns/1.0">3 <channel>4 <title>Product Feed</title>5 <description>Product Feed for Social Platforms</description>6 <item>7 <g:id>variant_123</g:id>8 <g:title>Product Title</g:title>9 <g:description>Product Description</g:description>10 <g:link>https://example.com/dk/product-handle</g:link>11 <g:image_link>https://example.com/product/image.jpg</g:image_link>12 <g:price>19.99 EUR</g:price>13 <g:availability>in stock</g:availability>14 <g:item_group_id>product_123</g:item_group_id>15 </item>16 </channel>17</rss>
Step 4: Use the Product Feed#
If your Medusa application is deployed, you can now use the product feed API route on social platforms like Meta and Google.
STOREFRONT_URL environment variable before using the product feed API route.For example, to add your product feed as a data source in Meta:
- Go to your Meta Business Portfolio.
- Select your business portfolio.
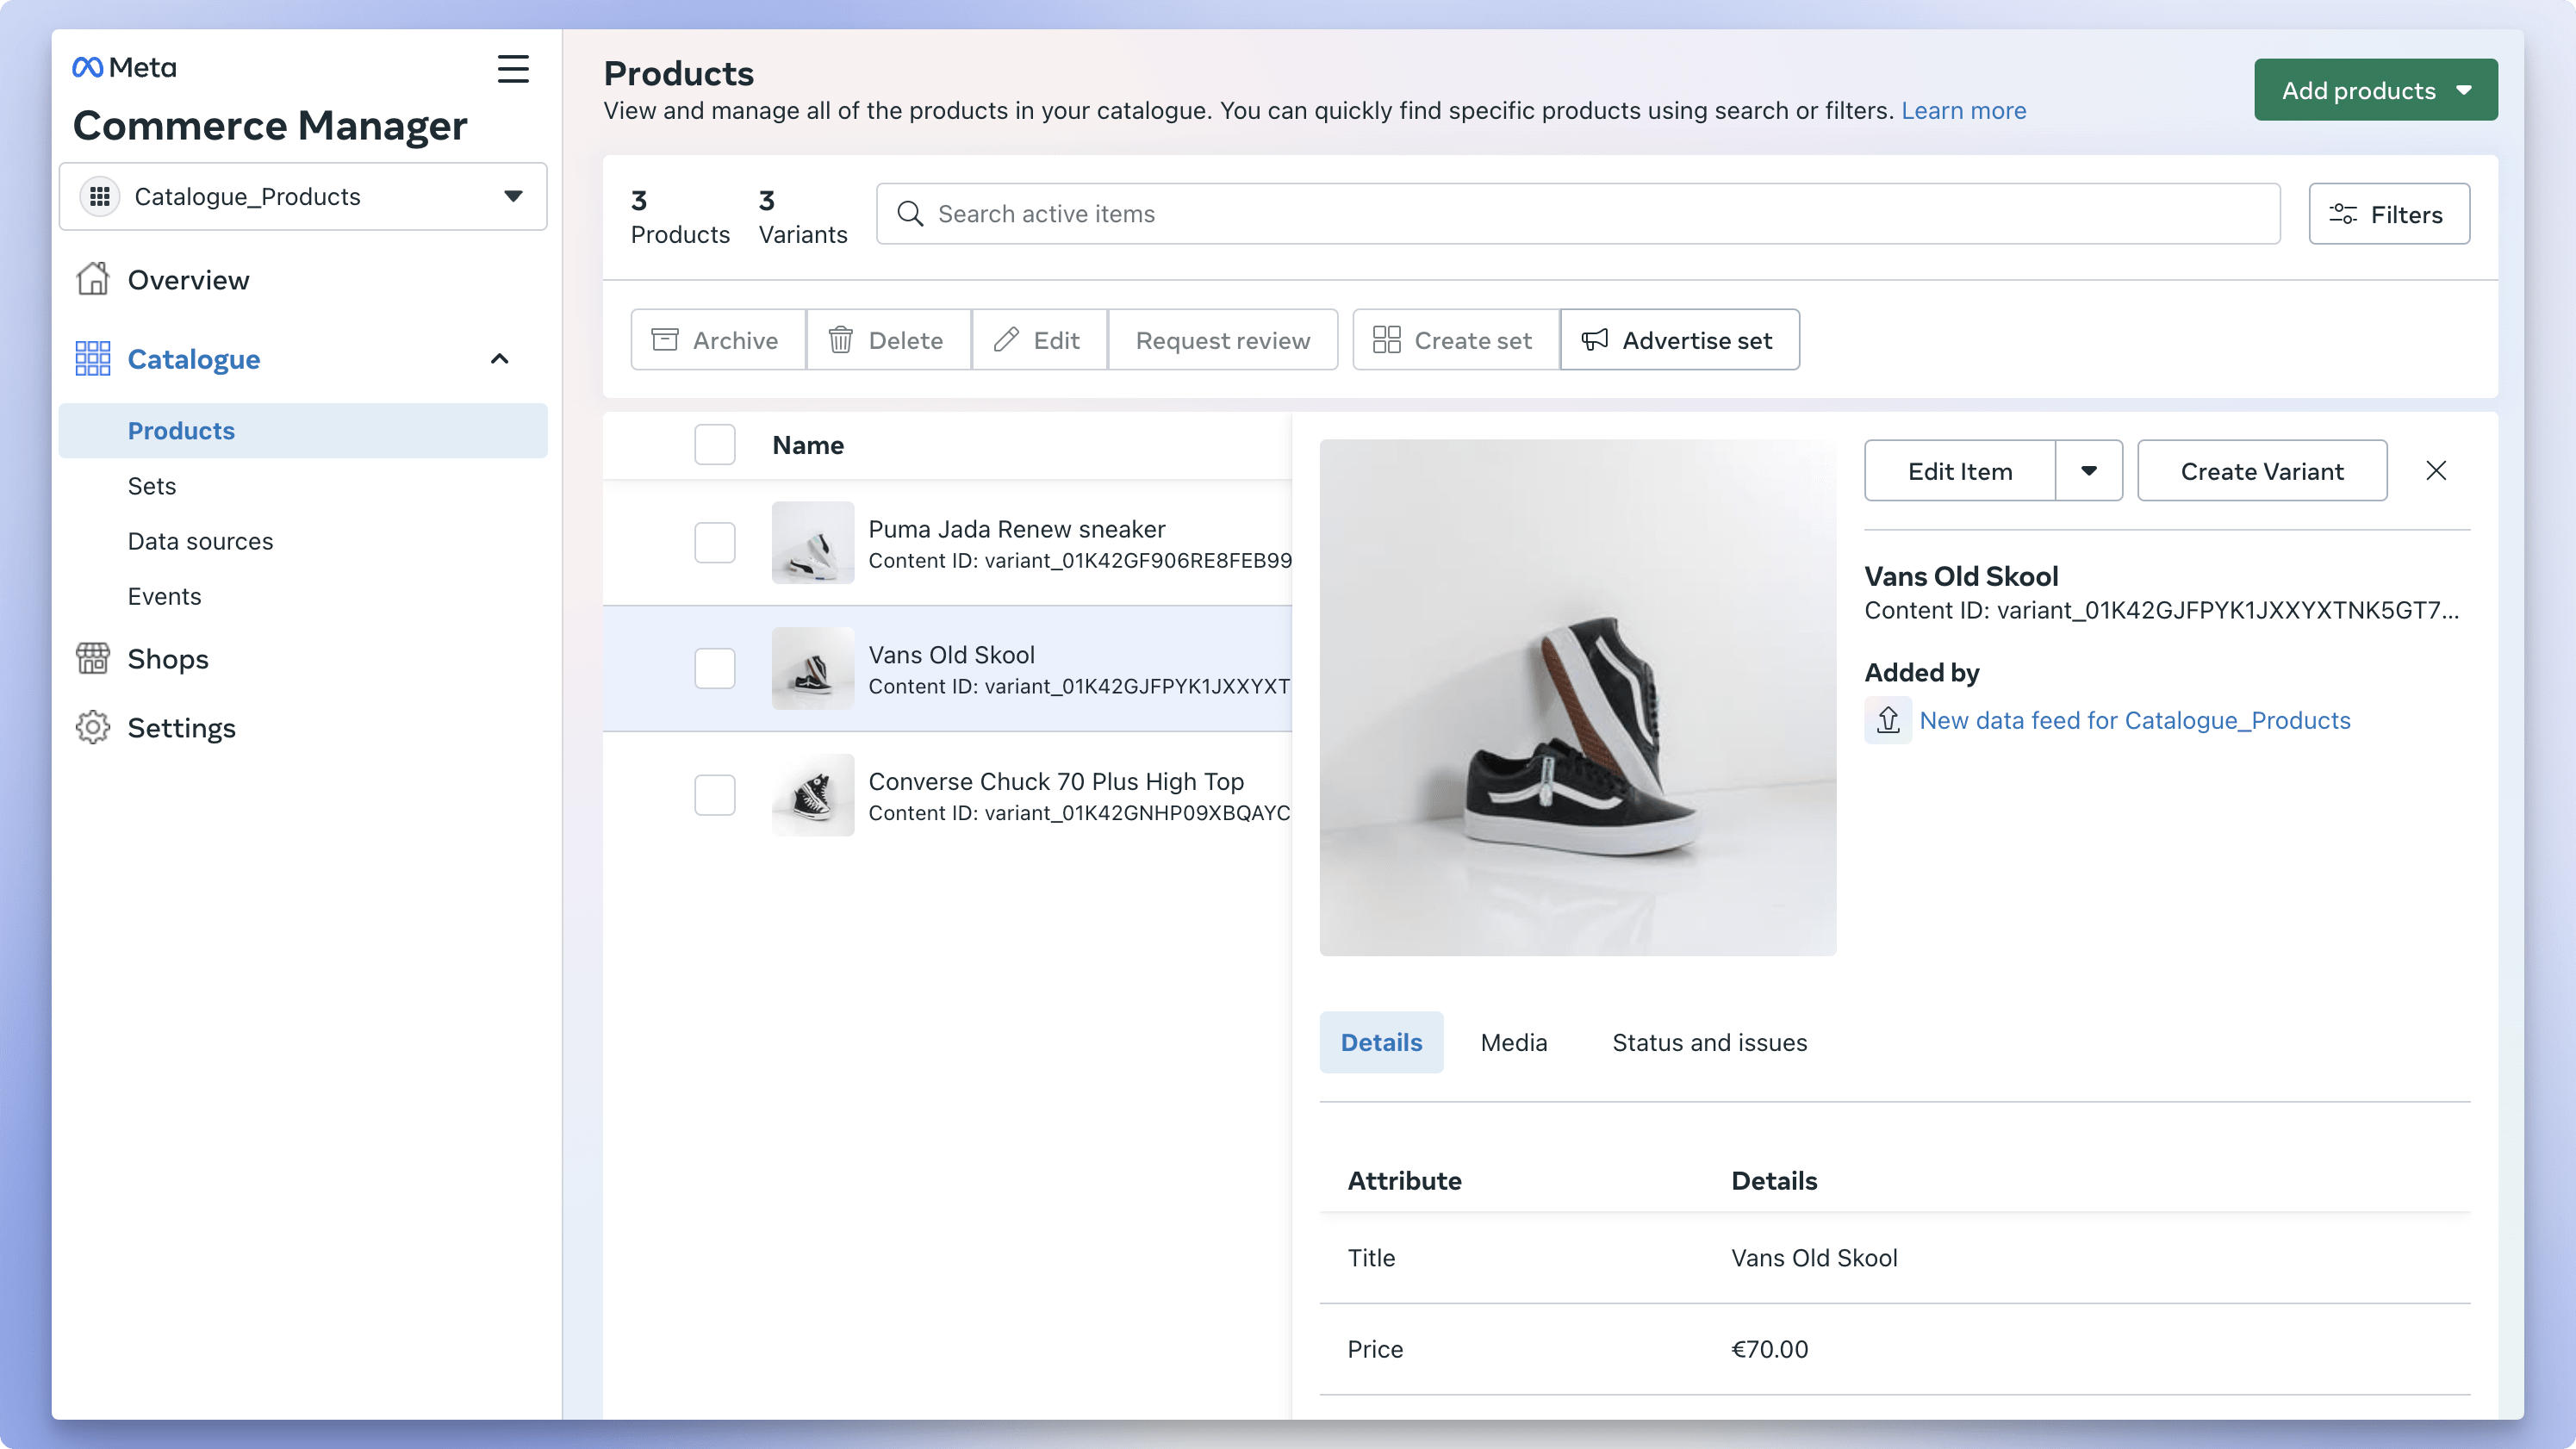
- Go to Catalogue -> Data sources.
- Choose the "Data feed" option, and click Next.

- Choose the "Use a URL or Google Sheets" option, and enter the URL to the product feed API route. For example,
https://your-medusa-store.com/product-feed?currency_code=eur&country_code=dk. - Click the Next button.
- In the pop-up that opens, choose "EUR" as the default currency, or the currency you want to use.
- Click the Upload button.
Then, wait until Meta finishes processing and uploading your products. Once it's done, you can view the products in Catalogue -> Products.

Next Steps#
You've now set up the product feed API route for your Medusa application. Meta and Google will pull products from this feed periodically, ensuring your product listings are always up to date.
You can add more fields to the product feed based on your use case. Refer to Meta and Google's product feed specifications for more details on available fields and their formats.
Learn More about Medusa#
If you're new to Medusa, check out the main documentation, where you'll get a more in-depth understanding of all the concepts you've used in this guide and more.
To learn more about the commerce features that Medusa provides, check out Medusa's Commerce Modules.
Troubleshooting#
If you encounter issues during your development, check out the troubleshooting guides.
Getting Help#
If you encounter issues not covered in the troubleshooting guides:
- Visit the Medusa GitHub repository to report issues or ask questions.
- Join the Medusa Discord community for real-time support from community members.