Add Gift Message to Line Items in Medusa
In this tutorial, you will learn how to add a gift message to items in carts and orders in Medusa.
When you install a Medusa application, you get a fully-fledged commerce platform with a Framework for customization. The Medusa application's commerce features are built around Commerce Modules, which are available out-of-the-box. These features include cart and order management capabilities.
You can customize the Medusa application and storefront to add a gift message to items in the cart. This feature allows customers to add a personalized message to their gifts, enhancing the shopping experience.
Summary#
By following this tutorial, you will learn how to:
- Install and set up Medusa and the Next.js Starter Storefront.
- Customize the storefront to support gift messages on cart items during checkout.
- Customize the Medusa Admin to show gift items with messages in an order.
You can follow this tutorial whether you're new to Medusa or an advanced Medusa developer.
Step 1: Install a Medusa Application#
Start by installing the Medusa application on your machine with the following command:
First, you'll be asked for the project's name. Then, when prompted about installing the Next.js Starter Storefront, choose "Yes."
Afterward, the installation process will start, which will install the Medusa application as a monorepository in a directory with your project's name. The backend is installed in the apps/backend directory, and the Next.js Starter Storefront is installed in the apps/storefront directory.
Once the installation finishes successfully, the Medusa Admin dashboard will open with a form to create a new user. Enter the user's credentials and submit the form. Afterward, you can log in with the new user and explore the dashboard.
apps/backend directory of your Medusa project.Step 2: Add Gift Inputs to Cart Item#
In this step, you'll customize the Next.js Starter Storefront to allow customers to specify that an item is a gift and add a gift message to it.
You'll store the gift option and message in the cart item's metadata property, which is a key-value jsonb object that can hold any additional information about the item. When the customer places the order, the metadata is copied to the metadata of the order's line items.
So, you only need to customize the storefront to add the gift message input and update the cart item metadata.
a. Changes to Update Item Function#
The Next.js Starter Storefront has an updateLineItem function that sends a request to the Medusa server to update the cart item. However, it doesn't support updating the metadata property.
So, in src/lib/data/cart.ts, find the updateLineItem function and add a metadata property to its object parameter:
Next, change the usage of await sdk.store.cart.updateLineItem in the function to pass the metadata property:
You pass the metadata property to the Medusa server, which will update the cart item with the new metadata.
b. Add Gift Inputs#
Next, you'll modify the cart item component that's shown in the cart and checkout pages to show two inputs: one to specify that the item is a gift and another to add a gift message.
In src/modules/cart/components/item/index.tsx, add the following imports at the top of the file:
You import components from the Medusa UI library that will be useful for the gift inputs.
Next, in the Item component, add the following variables before the changeQuantity function:
1const [giftUpdating, setGiftUpdating] = useState(false)2const [newGiftMessage, setNewGiftMessage] = useState(3 item.metadata?.gift_message as string || ""4)5const [isEditingGiftMessage, setIsEditingGiftMessage] = useState(false)6 7const isGift = item.metadata?.is_gift === "true"8const giftMessage = item.metadata?.gift_message as string
You define the following variables:
giftUpdating: A state variable to track whether the gift message is being updated. This will be useful to handle loading and disabled states.newGiftMessage: A state variable to hold the new gift message input value.isEditingGiftMessage: A state variable to track whether the gift message input is being edited. This will be useful to show or hide the input field.isGift: A boolean indicating whether the item is a gift based on themetadata.is_giftproperty.giftMessage: The current gift message from the item'smetadata.gift_messageproperty.
Next, add the following functions before the return statement to handle updates to the gift inputs:
1const handleGiftToggle = async (checked: boolean) => {2 setGiftUpdating(true)3 4 try {5 const newMetadata = {6 is_gift: checked.toString(),7 gift_message: checked ? newGiftMessage : "",8 }9 10 await updateLineItem({11 lineId: item.id,12 quantity: item.quantity,13 metadata: newMetadata,14 })15 } catch (error) {16 console.error("Error updating gift status:", error)17 } finally {18 setGiftUpdating(false)19 }20}21 22const handleSaveGiftMessage = async () => {23 setGiftUpdating(true)24 25 try {26 const newMetadata = {27 is_gift: "true",28 gift_message: newGiftMessage,29 }30 31 await updateLineItem({32 lineId: item.id,33 quantity: item.quantity,34 metadata: newMetadata,35 })36 setIsEditingGiftMessage(false)37 } catch (error) {38 console.error("Error updating gift message:", error)39 } finally {40 setGiftUpdating(false)41 }42}43 44const handleStartEdit = () => {45 setIsEditingGiftMessage(true)46}47 48const handleCancelEdit = () => {49 setNewGiftMessage(giftMessage || "")50 setIsEditingGiftMessage(false)51}
You define the following functions:
handleGiftToggle: Used when the gift checkbox is toggled. It updates the cart item's metadata to set theis_giftandgift_messageproperties based on the checkbox state.handleSaveGiftMessage: Used to save the gift message when the customer clicks the "Save" button. It updates the cart item's metadata with the new gift message.handleStartEdit: Used to start editing the gift message input by setting theisEditingGiftMessagestate totrue.handleCancelEdit: Used to cancel the gift message editing and reset the input value to the current gift message.
Finally, you'll change the return statement to include the gift inputs. Replace the existing return statement with the following:
1return (2 <div className="bg-white border border-gray-200 rounded-lg p-4">3 <div className="flex gap-4">4 {/* Product Image */}5 <div className="flex-shrink-0">6 <LocalizedClientLink7 href={`/products/${item.product_handle}`}8 className={clx("flex", {9 "w-16": type === "preview",10 "w-20": type === "full",11 })}12 >13 <Thumbnail14 thumbnail={item.thumbnail}15 images={item.variant?.product?.images}16 size="square"17 />18 </LocalizedClientLink>19 </div>20 21 {/* Product Details */}22 <div className="flex-1 min-w-0">23 <div className="flex justify-between items-start mb-2">24 <div className="flex-1 min-w-0">25 <Text26 className="txt-medium-plus text-ui-fg-base truncate"27 data-testid="product-title"28 >29 {item.product_title}30 </Text>31 <LineItemOptions variant={item.variant} data-testid="product-variant" />32 </div>33 </div>34 35 {/* Gift Options */}36 <div className="mb-3">37 <div38 className="inline-flex items-center gap-2 px-3 py-1.5 bg-gray-50 rounded-full border hover:bg-gray-100 transition-colors disabled:opacity-50 disabled:cursor-not-allowed"39 >40 <Checkbox41 checked={isGift}42 onCheckedChange={handleGiftToggle}43 disabled={giftUpdating}44 className="w-4 h-4"45 id="is-gift"46 />47 <Label htmlFor="is-gift">48 This is a gift49 </Label>50 </div>51 52 {isGift && (53 <div className="mt-3">54 {isEditingGiftMessage ? (55 <div className="space-y-2">56 <div className="flex items-center gap-2">57 <Text className="text-sm font-medium text-ui-fg-base">58 Gift Message:59 </Text>60 <Text className="text-xs text-ui-fg-subtle">(optional)</Text>61 </div>62 <Textarea63 placeholder="Add a personal message..."64 value={newGiftMessage}65 onChange={(e) => setNewGiftMessage(e.target.value)}66 disabled={giftUpdating}67 className="w-full"68 rows={2}69 />70 <div className="flex justify-end gap-2">71 <Button72 size="small"73 variant="secondary"74 onClick={handleCancelEdit}75 disabled={giftUpdating}76 className="text-xs px-3 py-1"77 >78 Cancel79 </Button>80 <Button81 size="small"82 variant="primary"83 onClick={handleSaveGiftMessage}84 disabled={giftUpdating || newGiftMessage === giftMessage}85 className="text-xs px-3 py-1"86 >87 {giftUpdating ? <Spinner /> : "Save"}88 </Button>89 </div>90 </div>91 ) : (92 <div className="flex items-center justify-between">93 <div className="flex items-center gap-2">94 <Text className="text-sm font-medium text-ui-fg-base">95 Gift Message:96 </Text>97 {giftMessage ? (98 <Text className="text-sm text-ui-fg-subtle">99 {giftMessage}100 </Text>101 ) : (102 <Text className="text-sm text-ui-fg-subtle italic">103 No message added104 </Text>105 )}106 </div>107 <Button108 size="small"109 variant="secondary"110 onClick={handleStartEdit}111 className="text-xs px-2 py-1"112 >113 {giftMessage ? "Edit" : "Add"}114 </Button>115 </div>116 )}117 </div>118 )}119 </div>120 121 {/* Quantity and Actions */}122 {type === "full" && (123 <div className="flex items-center justify-between">124 <div className="flex items-center gap-2">125 <DeleteButton id={item.id} data-testid="product-delete-button" />126 <CartItemSelect127 value={item.quantity}128 onChange={(value) => changeQuantity(parseInt(value.target.value))}129 className="w-16 h-8 p-2"130 data-testid="product-select-button"131 >132 {/* TODO: Update this with the v2 way of managing inventory */}133 {Array.from(134 {135 length: Math.min(maxQuantity, 10),136 },137 (_, i) => (138 <option value={i + 1} key={i}>139 {i + 1}140 </option>141 )142 )}143 </CartItemSelect>144 {updating && <Spinner />}145 </div>146 </div>147 )}148 149 {/* Preview Mode */}150 {type === "preview" && (151 <div className="flex items-center justify-between">152 <Text className="text-sm text-ui-fg-subtle">153 Qty: {item.quantity}154 </Text>155 <LineItemUnitPrice156 item={item}157 style="tight"158 currencyCode={currencyCode}159 />160 </div>161 )}162 163 <ErrorMessage error={error} data-testid="product-error-message" />164 </div>165 </div>166 </div>167)
You replace the previous table row design with a card. In the card, you show the item's image, title, variant options, quantity, and price.
You also show a checkbox to toggle the gift status of the item. If the item is a gift, you show a text area to add or edit the gift message. You only show the gift message input if the user clicks an "Add" or "Edit" button.
The gift message input has a "Save" button to save the message and a "Cancel" button to cancel the editing.
c. Update Cart and Checkout Templates#
The items are previously shown on the cart and checkout pages in a table. However, since you've changed the item component to a card, you'll need to update the cart and checkout templates to replace the table with a list of items.
In src/modules/cart/templates/items.tsx, which shows the items on the cart page, change the return statement to the following:
1return (2 <div>3 <div className="pb-3 flex items-center">4 <Heading className="text-[2rem] leading-[2.75rem]">Cart</Heading>5 </div>6 <div className="space-y-4">7 {items8 ? items9 .sort((a, b) => {10 return (a.created_at ?? "") > (b.created_at ?? "") ? -1 : 111 })12 .map((item) => {13 return (14 <Item15 key={item.id}16 item={item}17 currencyCode={cart?.currency_code}18 />19 )20 })21 : repeat(5).map((i) => {22 return <SkeletonLineItem key={i} />23 })}24 </div>25 </div>26)
You replace the table that was wrapping the items with a div that contains a list of Item components.
Next, in src/modules/cart/templates/preview.tsx that shows the items in the checkout summary, change the return statement to the following:
1return (2 <div3 className={clx("space-y-3 mt-4", {4 "pl-[1px] overflow-y-scroll overflow-x-hidden no-scrollbar max-h-[420px]":5 hasOverflow,6 })}7 >8 {items9 ? items10 .sort((a, b) => {11 return (a.created_at ?? "") > (b.created_at ?? "") ? -1 : 112 })13 .map((item) => {14 return (15 <Item16 key={item.id}17 item={item}18 type="preview"19 currencyCode={cart.currency_code}20 />21 )22 })23 : repeat(5).map((i) => {24 return <SkeletonLineItem key={i} />25 })}26 </div>27)
Similarly, you replace the table that was wrapping the items with a div that contains a list of Item components.
Test the Changes#
You can now test the gift inputs during checkout.
First, start the Medusa application by running the following command in the Medusa application directory:
Then, start the Next.js Starter Storefront by running the following command in the storefront directory:
Open the storefront in your browser at http://localhost:8000. Add a product to the cart, and proceed to the checkout page. You'll find a checkbox to mark the item as a gift for each item.
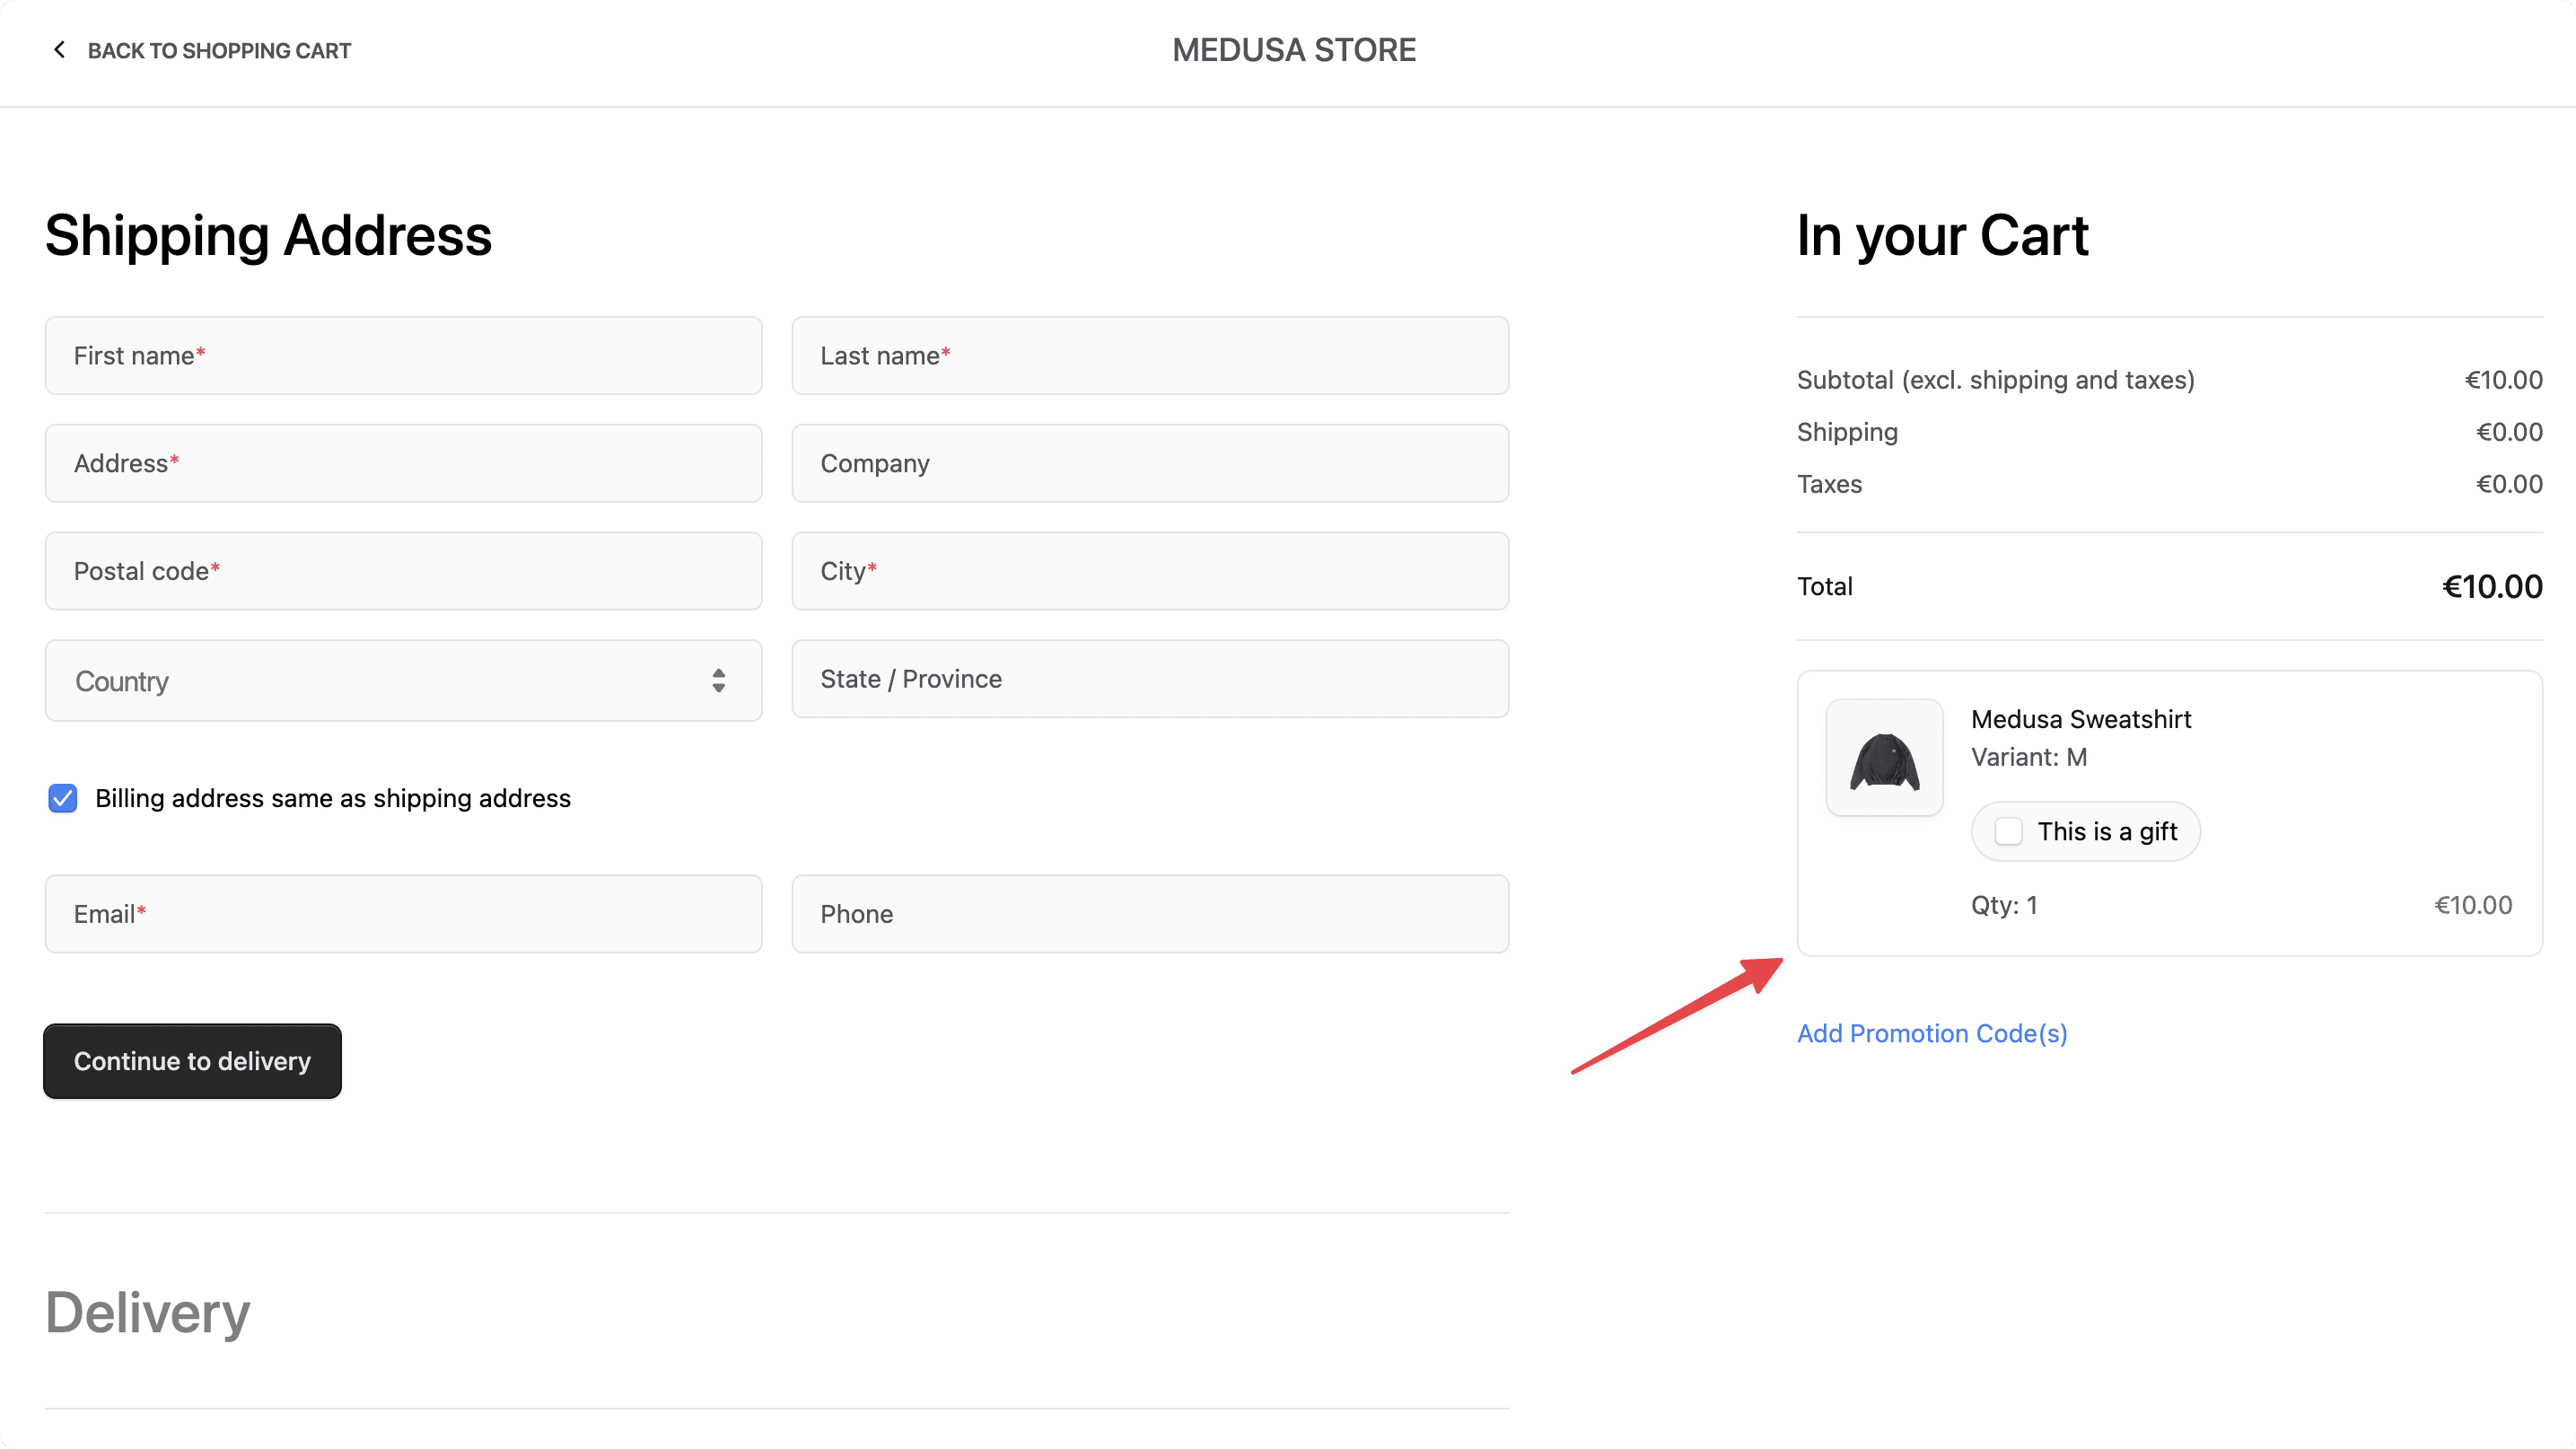
If you check the box, you can also add and edit the gift message. The gift message will be saved in the cart item's metadata.

Step 3: Show Gift Options in Order Confirmation Page#
Next, you'll customize the storefront to show the gift message of items in the order confirmation page.
In src/modules/order/components/item/index.tsx, add in the Item component the following variables:
You define the following variables:
isGift: A boolean indicating whether the item is a gift based on themetadata.is_giftproperty.giftMessage: The item's gift message from themetadata.gift_messageproperty.
Next, in the return statement, add the following below the LineItemOptions component:
If the item is a gift, you show the gift message below the variant options. If no gift message is provided, you show "No gift message provided."
Test the Changes#
To test this change, place an order with a gift item. On the order confirmation page, you should see the gift message displayed below the variant options.

Step 4: Show Gift Options in Admin Dashboard#
In this step, you'll customize the Medusa Admin dashboard to show the gift items with their messages in an order.
What is a Widget?#
The Medusa Admin dashboard's pages are customizable to insert widgets of custom content in predefined injection zones. You create these widgets as React components that allow admin users to perform custom actions.
So, to show the gift items with their messages in an order, you'll create a custom widget that shows the gift items in the order details page.
Create the Widget#
You create a widget in a .tsx file under the src/admin/widgets directory. So, in the Medusa application directory, create the file src/admin/widgets/order-gift-items-widget.tsx with the following content:
1import { defineWidgetConfig } from "@medusajs/admin-sdk"2import { Container, Text } from "@medusajs/ui"3import { DetailWidgetProps, AdminOrder } from "@medusajs/framework/types"4 5const OrderGiftItemsWidget = ({ data }: DetailWidgetProps<AdminOrder>) => {6 const giftItems = data.items?.filter(7 (item: any) => item.metadata?.is_gift === "true"8 )9 10 if (!giftItems?.length) {11 return null12 }13 14 return (15 <Container className="mb-4">16 <Text className="font-medium h2-core mb-2">Gift Items & Messages</Text>17 <div className="flex flex-col gap-4">18 {giftItems.map((item: any) => (19 <div key={item.id} className="border-b last:border-b-0 pb-2">20 <Text className="font-medium">{item.title} (x{item.quantity})</Text>21 <Text className="text-sm text-gray-600">22 Gift Message: {item.metadata?.gift_message || "(No message)"}23 </Text>24 </div>25 ))}26 </div>27 </Container>28 )29}30 31export const config = defineWidgetConfig({32 zone: "order.details.side.after",33})34 35export default OrderGiftItemsWidget
A widget file must export:
- A React component that renders the widget content.
- A configuration object created with
defineWidgetConfigthat defines the widget's injection zone.
You define the OrderGiftItemsWidget component that is injected in the order.details.side.after zone. Because it's injected in the order details page, it receives the order details as a data prop.
In the component, you filter the order items to get only the gift items by checking if the metadata.is_gift property is set to "true". Then, you render the gift items with their messages in a new "Gift Items & Messages" section.
Test Medusa Admin Changes#
To test out the Medusa Admin widget, start the Medusa application by running the following command in the Medusa application directory:
Then, open the Medusa Admin at http://localhost:9000/app and log in with the user you created earlier.
Go to the Orders page and click on an order that has gift items. You'll find a new section called "Gift Items & Messages" that shows the gift items with their messages.

Optional: Handle Gift Items in Fulfillment Provider#
If you have a custom fulfillment provider and you want to handle gift items in it, you can do so in the createFulfillment method of the Fulfillment Module Provider's service.
For example:
1class ManualFulfillmentService extends utils_1.AbstractFulfillmentProviderService {2 // ...3 async createFulfillment(4 data: Record<string, unknown>,5 items: Partial<Omit<FulfillmentItemDTO, "fulfillment">>[],6 order: Partial<FulfillmentOrderDTO> | undefined,7 fulfillment: Partial<Omit<FulfillmentDTO, "provider_id" | "data" | "items">>8 ): Promise<CreateFulfillmentResult> {9 const itemsWithGiftMessage = order.items?.filter((lineItem) => {10 const isInFulfillment = items.find(11 (item) => item.line_item_id === lineItem.id12 )13 if (!isInFulfillment) {14 return false15 }16 return lineItem.metadata?.is_gift === "true"17 })18 19 // TODO pass gift items to third-party provider20 }21}
You filter the order items to find the items that are part of the fulfillment and are gift items. You can then process or pass them differently to your third-party provider.
Next Steps#
You've now added gift messages to items in carts and orders in Medusa.
If you're new to Medusa, check out the main documentation, where you'll get a more in-depth understanding of all the concepts you've used in this guide and more.
To learn more about the commerce features that Medusa provides, check out Medusa's Commerce Modules.
Troubleshooting#
If you encounter issues during your development, check out the troubleshooting guides.
Getting Help#
If you encounter issues not covered in the troubleshooting guides:
- Visit the Medusa GitHub repository to report issues or ask questions.
- Join the Medusa Discord community for real-time support from community members.