Add Images to Product Categories
In this tutorial, you'll learn how to add images to product categories in Medusa.
When you install a Medusa application, you get a fully-fledged commerce platform with the Framework for customization. The Medusa application's commerce features are built around Commerce Modules, which are available out of the box.
Medusa doesn't natively support adding images to product categories. However, it provides the customization capabilities you need to implement this feature.
Summary#
By following this tutorial, you'll learn how to:
- Install and set up Medusa with the Next.js Starter Storefront.
- Define data models for product category images and the logic to manage them.
- Customize the Medusa Admin dashboard to manage category images.
- Customize the Next.js Starter Storefront to add a megamenu that shows category thumbnails, and show a banner image on category pages.

Step 1: Install a Medusa Application#
Start by installing the Medusa application on your machine with the following command:
You'll first be asked for the project's name. Then, when asked whether you want to install the Next.js Starter Storefront, choose Yes.
Afterward, the installation process will start, which will install the Medusa application as a monorepository in a directory with your project's name. The backend is installed in the apps/backend directory, and the Next.js Starter Storefront is installed in the apps/storefront directory.
Once the installation finishes successfully, the Medusa Admin dashboard will open with a form to create a new user. Enter the user's credentials and submit the form. Afterward, you can log in with the new user and explore the dashboard.
apps/backend directory of your Medusa project.Step 2: Create Product Media Module#
In Medusa, you can build custom features in a module. A module is a reusable package with the data models and functionalities related to a single feature or domain. Medusa integrates the module into your application without implications or side effects on your setup.
In this step, you'll build a Product Media module that manages images for product categories. You can also extend it to manage images for other product-related entities, such as product collections.
a. Create Module Directory#
Create the directory src/modules/product-media that will hold the Product Media Module's code.
b. Create Data Models#
A data model represents a table in the database. You create data models using Medusa's Data Model Language (DML). It simplifies defining a table's columns, relations, and indexes with straightforward methods and configurations.
For the Product Media module, you only need the ProductCategoryImage data model to represent an image associated with a product category.
To create the data model, create the file src/modules/product-media/models/product-category-image.ts with the following content:
1import { model } from "@medusajs/framework/utils"2 3const ProductCategoryImage = model.define("product_category_image", {4 id: model.id().primaryKey(),5 url: model.text(),6 file_id: model.text(),7 type: model.enum(["thumbnail", "image"]),8 category_id: model.text(),9})10 .indexes([11 {12 on: ["category_id", "type"],13 where: "type = 'thumbnail'",14 unique: true,15 name: "unique_thumbnail_per_category",16 },17 ])18 19export default ProductCategoryImage
The ProductCategoryImage data model has the following properties:
id: A unique identifier for the image.url: The URL of the image.file_id: The ID of the file in the external storage service. This is useful when deleting the file from storage.type: The type of image, which can be eitherthumbnailorimage.category_id: The ID of the product category associated with this image.
You also define a unique index on the category_id and type columns to ensure each product category has only one thumbnail image.
c. Create Module's Service#
You manage your module's data models in a service.
A service is a TypeScript class that the module exports. In the service's methods, you can connect to the database to manage your data models, or connect to third-party services when integrating with external platforms.
To create the Product Media module's service, create the file src/modules/product-media/service.ts with the following content:
The ProductMediaModuleService extends MedusaService, which generates a class with data-management methods for your module's data models. This saves you time implementing Create, Read, Update, and Delete (CRUD) methods.
The ProductMediaModuleService class now has methods like createProductCategoryImages and retrieveProductCategoryImages.
d. Create the Module Definition#
The final piece of a module is its definition, which you export in an index.ts file at the module's root directory. This definition tells Medusa the module's name and its service.
So, create the file src/modules/product-media/index.ts with the following content:
You use the Module function to create the module's definition. It accepts two parameters:
- The module's name, which is
productMedia. - An object with a required property
serviceindicating the module's service.
You also export the module's name as PRODUCT_MEDIA_MODULE so you can reference it later.
Add Module to Medusa's Configurations#
After building the module, add it to Medusa's configurations to start using it.
In medusa-config.ts, add a modules property with an array containing your custom module:
Each object in the modules array has a resolve property, whose value is either a path to the module's directory, or an npm package’s name.
Generate Migrations#
Since data models represent tables in the database, you define how they're created in the database with migrations. A migration is a TypeScript class that defines database changes made by a module.
Medusa's CLI tool can generate migrations for you. To generate a migration for the Product Media Module, run the following command in the apps/backend directory:
The db:generate command of the Medusa CLI accepts the name of the module to generate the migration for. You'll now have a migrations directory under src/modules/product-media that holds the generated migration.
Then, to reflect these migrations on the database, run the following command:
The tables for the data models are now created in the database.
Step 3: Create Product Category Images#
In this step, you'll implement the logic to create product category images using the Product Media module.
When building commerce features in Medusa that client applications consume, such as the Medusa Admin dashboard or a storefront, you need to implement:
- A workflow with steps that define the feature's business logic.
- An API route that exposes the workflow's functionality to client applications.
In this step, you'll create a workflow and an API route to create product category images.
a. Create Product Category Image Workflow#
In this section, you'll implement the workflow that creates product category images.
A workflow is a series of queries and actions, called steps, that complete a task. A workflow is similar to a function, but it allows you to track execution progress, define rollback logic, and configure other advanced features.
The workflow you'll build has the following steps:
Workflow hook
Step conditioned by when
View step details
convertCategoryThumbnailsStep#
The convertCategoryThumbnailsStep converts existing thumbnails of a category to regular images if a new thumbnail is being added for that category. This ensures that each category has only one thumbnail image.
To create the step, create the file src/workflows/steps/convert-category-thumbnails.ts with the following content:
1import { createStep, StepResponse } from "@medusajs/framework/workflows-sdk"2import { PRODUCT_MEDIA_MODULE } from "../../modules/product-media"3import ProductMediaModuleService from "../../modules/product-media/service"4 5export type ConvertCategoryThumbnailsStepInput = {6 category_ids: string[]7}8 9export const convertCategoryThumbnailsStep = createStep(10 "convert-category-thumbnails-step",11 async (input: ConvertCategoryThumbnailsStepInput, { container }) => {12 // TODO: implement step logic13 },14 async (compensationData, { container }) => {15 // TODO: implement compensation logic16 }17)
You create a step with the createStep function. It accepts three parameters:
- The step's unique name.
- An async function that receives two parameters:
- The step's input, which is an object containing the categories whose thumbnails to convert.
- An object with properties including the Medusa container, which is a registry of Framework and commerce tools accessible in the step.
- An async compensation function that undoes the actions performed by the step function. This function executes only if an error occurs during workflow execution.
Next, define the step's logic that converts existing thumbnails of a category to regular images. Replace the // TODO: implement step logic comment in the step function with the following:
1const productMediaService: ProductMediaModuleService =2 container.resolve(PRODUCT_MEDIA_MODULE)3 4// Find existing thumbnails in the specified categories5const existingThumbnails = await productMediaService.listProductCategoryImages({6 type: "thumbnail",7 category_id: input.category_ids,8})9 10if (existingThumbnails.length === 0) {11 return new StepResponse([], [])12}13 14// Store previous states for compensation15const compensationData: string[] = existingThumbnails.map((t) => t.id)16 17// Convert existing thumbnails to "image" type18await productMediaService.updateProductCategoryImages(19 existingThumbnails.map((t) => ({20 id: t.id,21 type: "image" as const,22 }))23)24 25return new StepResponse(existingThumbnails, compensationData)
In the step function, you:
- Resolve the
ProductMediaModuleServicefrom the Medusa container to manage product category images. - Retrieve existing thumbnail images for the categories in the input.
- If there are no existing thumbnails, return an empty
StepResponse. - Otherwise, update the existing thumbnails to regular images.
A step function must return a StepResponse instance. The StepResponse constructor accepts two parameters:
- The step's output, which is the updated category images.
- Data to pass to the step's compensation function.
The compensation function should undo the actions performed by the step function. Replace the // TODO: implement compensation logic comment in the compensation function with the following:
1if (!compensationData?.length) {2 return3}4 5const productMediaService: ProductMediaModuleService =6 container.resolve(PRODUCT_MEDIA_MODULE)7 8// Revert thumbnails back to "thumbnail" type9await productMediaService.updateProductCategoryImages(10 compensationData.map((id) => ({11 id,12 type: "thumbnail" as const,13 }))14)
In the compensation function, you revert the images back to thumbnails in case an error occurs in the workflow execution.
createCategoryImagesStep
The createCategoryImagesStep creates the category images.
To create the step, create the file src/workflows/steps/create-category-images.ts with the following content:
1import { createStep, StepResponse } from "@medusajs/framework/workflows-sdk"2import { PRODUCT_MEDIA_MODULE } from "../../modules/product-media"3import ProductMediaModuleService from "../../modules/product-media/service"4import { MedusaError } from "@medusajs/framework/utils"5 6export type CreateCategoryImagesStepInput = {7 category_images: {8 category_id: string9 type: "thumbnail" | "image"10 url: string11 file_id: string12 }[]13}14 15export const createCategoryImagesStep = createStep(16 "create-category-images-step",17 async (input: CreateCategoryImagesStepInput, { container }) => {18 const productMediaService: ProductMediaModuleService =19 container.resolve(PRODUCT_MEDIA_MODULE)20 21 // Group images by category to handle thumbnails efficiently22 const imagesByCategory = input.category_images.reduce((acc, img) => {23 if (!acc[img.category_id]) {24 acc[img.category_id] = []25 }26 acc[img.category_id].push(img)27 return acc28 }, {} as Record<string, typeof input.category_images>)29 30 // Process each category31 for (const [_, images] of Object.entries(imagesByCategory)) {32 const thumbnailImages = images.filter((img) => img.type === "thumbnail")33 34 // If there are new thumbnails for this category, convert existing ones to "image"35 if (thumbnailImages.length > 1) {36 throw new MedusaError(37 MedusaError.Types.INVALID_DATA,38 "Only one thumbnail is allowed per category"39 )40 }41 }42 43 // Create all category images44 const createdImages = await productMediaService.createProductCategoryImages(45 Object.values(imagesByCategory).flat()46 )47 48 return new StepResponse(createdImages, createdImages)49 },50 async (compensationData, { container }) => {51 if (!compensationData?.length) {52 return53 }54 55 const productMediaService: ProductMediaModuleService =56 container.resolve(PRODUCT_MEDIA_MODULE)57 58 await productMediaService.deleteProductCategoryImages(59 compensationData60 )61 }62)
This step accepts the category images to create as input.
In the step function, you throw an error if more than one thumbnail image is being added for a category. Otherwise, you create the category images.
In the compensation function, you delete the created category images in case an error occurs in the workflow execution.
Create Workflow
You can now create the workflow that uses the createCategoryImagesStep step.
To create the workflow, create the file src/workflows/create-category-images.ts with the following content:
8import { convertCategoryThumbnailsStep } from "./steps/convert-category-thumbnails"9 10export type CreateCategoryImagesInput = {11 category_images: {12 category_id: string13 type: "thumbnail" | "image"14 url: string15 file_id: string16 }[]17}18 19export const createCategoryImagesWorkflow = createWorkflow(20 "create-category-images",21 (input: CreateCategoryImagesInput) => {22 23 when(input, (data) => data.category_images.some((img) => img.type === "thumbnail"))24 .then(25 () => {26 const categoryIds = transform({27 input,28 }, (data) => {29 return data.input.category_images.filter(30 (img) => img.type === "thumbnail"31 ).map((img) => img.category_id)32 })33 34 convertCategoryThumbnailsStep({35 category_ids: categoryIds,36 })37 }38 )39 40 const categoryImages = createCategoryImagesStep({41 category_images: input.category_images,42 })43 44 return new WorkflowResponse(categoryImages)45 }46)
You create a workflow using the createWorkflow function. It accepts the workflow's unique name as a first parameter.
It accepts as a second parameter a constructor function that holds the workflow's implementation. The function accepts an input object with the category images to create.
In the workflow, you:
- Check if any of the images to create is a thumbnail using when-then.
- If so, you execute the
convertCategoryThumbnailsStepstep to convert existing thumbnails of the categories to regular images.
- If so, you execute the
- Create the category images using the
createCategoryImagesStep.
A workflow must return an instance of WorkflowResponse that accepts the data to return to the workflow's executor. You return the created images.
b. Create API Route#
Next, you'll create an API route that exposes the workflow's functionality to client applications.
An API route is created in a route.ts file under a sub-directory of the src/api directory. The path of the API route is the file's path relative to src/api.
Create the file src/api/admin/categories/[category_id]/images/route.ts with the following content:
1import { MedusaRequest, MedusaResponse } from "@medusajs/framework/http"2import { createCategoryImagesWorkflow } from "../../../../../workflows/create-category-images"3import { z } from "@medusajs/framework/zod"4 5export const CreateCategoryImagesSchema = z.object({6 images: z.array(7 z.object({8 type: z.enum(["thumbnail", "image"]),9 url: z.string(),10 file_id: z.string(),11 })12 ).min(1, "At least one image is required"),13})14 15type CreateCategoryImagesInput = z.infer<typeof CreateCategoryImagesSchema>16 17export async function POST(18 req: MedusaRequest<CreateCategoryImagesInput>,19 res: MedusaResponse20): Promise<void> {21 const { category_id } = req.params22 const { images } = req.validatedBody23 24 // Add category_id to each image25 const category_images = images.map((image) => ({26 ...image,27 category_id,28 }))29 30 const { result } = await createCategoryImagesWorkflow(req.scope).run({31 input: {32 category_images,33 },34 })35 36 res.status(200).json({ category_images: result })37}
You create the CreateCategoryImagesSchema schema to validate request bodies sent to this API route using Zod.
Then, you export a POST function, which exposes a POST API route at /admin/categories/:category_id/images.
In the API route, you execute the createCategoryImagesWorkflow workflow with the category images to create. You set each image's category_id to the category_id parameter from the request URL.
Finally, you return the created category images in the response.
c. Add Validation Middleware#
To validate the body parameters of requests sent to the API route, apply a middleware.
To apply middleware to a route, create the file src/api/middlewares.ts with the following content:
1import { 2 defineMiddlewares, 3 validateAndTransformBody,4} from "@medusajs/framework/http"5import { 6 CreateCategoryImagesSchema,7} from "./admin/categories/[category_id]/images/route"8 9export default defineMiddlewares({10 routes: [11 {12 matcher: "/admin/categories/:category_id/images",13 method: ["POST"],14 middlewares: [15 validateAndTransformBody(CreateCategoryImagesSchema),16 ],17 },18 ],19})
You apply Medusa's validateAndTransformBody middleware to POST requests sent to the /admin/categories/:category_id/images route. The middleware function accepts a Zod schema that you created in the API route's file.
You'll test this API route later when you customize the Medusa Admin.
Step 4: List Product Category Images API#
In this step, you'll add an API route that retrieves a category's images.
In src/api/admin/categories/[category_id]/images/route.ts, add the following at the end of the file:
1export async function GET(2 req: MedusaRequest,3 res: MedusaResponse4): Promise<void> {5 const { category_id } = req.params6 const query = req.scope.resolve("query")7 8 const { data: categoryImages } = await query.graph({9 entity: "product_category_image",10 fields: ["*"],11 filters: {12 category_id,13 },14 })15 16 res.status(200).json({ category_images: categoryImages })17}
You export a GET function that exposes a GET API route at /admin/categories/:category_id/images.
In the API route, you resolve Query, which retrieves data across modules.
You use Query to retrieve the images for the category whose ID is specified in the request's URL parameters.
Finally, you return the retrieved category images in the response.
You'll test this API route next when you customize the Medusa Admin.
Step 5: Create Product Category Images in Medusa Admin#
In this step, you'll customize the Medusa Admin dashboard to manage a product category's images.
The Medusa Admin dashboard is customizable, allowing you to insert widgets into existing pages or create new pages.
In this step, you'll insert a widget into the product category details page to display its images and allow uploading new ones. Later, you'll expand the widget to support deleting images and updating their types.
a. Initialize JS SDK#
To send requests to the Medusa server, you'll use the JS SDK. It's already installed in your Medusa project, but you need to initialize it before using it in your customizations.
Create the file src/admin/lib/sdk.ts with the following content:
Learn more about the initialization options in the JS SDK reference.
b. Define Types#
Next, you'll define TypeScript types that you'll use in your admin customizations.
Create the file src/admin/types.ts with the following content:
You define types for a product category image and an uploaded file (before it is created as a category image).
c. Add Media Widget#
Next, you'll add a widget to the product category details page to show its images.
Widgets are created in a .tsx file under the src/admin/widgets directory. So, create the file src/admin/widgets/category-media-widget.tsx with the following content:
1import { defineWidgetConfig } from "@medusajs/admin-sdk"2import { Container, Heading } from "@medusajs/ui"3import { DetailWidgetProps, AdminProductCategory } from "@medusajs/framework/types"4import { useQuery } from "@tanstack/react-query"5import { sdk } from "../lib/sdk"6import { CategoryImage } from "../types"7import { ThumbnailBadge } from "@medusajs/icons"8 9type CategoryImagesResponse = {10 category_images: CategoryImage[]11}12 13const CategoryMediaWidget = ({ data }: DetailWidgetProps<AdminProductCategory>) => {14 const { data: response, isLoading } = useQuery({15 queryKey: ["category-images", data.id],16 queryFn: async () => {17 const result = await sdk.client.fetch<CategoryImagesResponse>(18 `/admin/categories/${data.id}/images`19 )20 return result21 },22 })23 24 const images = response?.category_images || []25 26 return (27 <Container className="divide-y p-0">28 <div className="flex items-center justify-between px-6 py-4">29 <Heading level="h2">Media</Heading>30 {/* TODO show edit modal */}31 </div>32 <div className="px-6 py-4">33 <div className="grid grid-cols-[repeat(auto-fill,96px)] gap-4">34 {isLoading && (35 <div className="col-span-full">36 <p className="text-ui-fg-subtle text-sm">Loading...</p>37 </div>38 )}39 {!isLoading && images.length === 0 && (40 <div className="col-span-full">41 <p className="text-ui-fg-subtle text-sm">No images added yet</p>42 </div>43 )}44 {images.map((image: CategoryImage) => (45 <div46 key={image.id}47 className="relative aspect-square overflow-hidden rounded-lg border border-ui-border-base bg-ui-bg-subtle"48 >49 <img50 src={image.url}51 alt={`Category ${image.type}`}52 className="h-full w-full object-cover"53 />54 {image.type === "thumbnail" && (55 <div className="absolute top-2 left-2">56 <ThumbnailBadge />57 </div>58 )}59 </div>60 ))}61 </div>62 </div>63 </Container>64 )65}66 67export const config = defineWidgetConfig({68 zone: "product_category.details.after",69})70 71export default CategoryMediaWidget
A widget file must export:
- A default React component. This component renders the widget's UI.
- A
configobject created withdefineWidgetConfigfrom the Admin SDK. It accepts an object with thezoneproperty that indicates where the widget will be rendered in the Medusa Admin dashboard.
In the widget's component, you use Tanstack (React) Query to fetch the category images with the JS SDK. You display the images in a grid.
If an image is a thumbnail, you show a ThumbnailBadge icon at the top-left corner of the image.
d. Category Media Modal#
Next, you'll create a modal that displays the category images with a form to upload new images. Later, you'll expand on the modal to allow deleting images or updating their types.
Category Image Item Component
First, you'll create a component that represents a category image in the modal.
Create the file src/admin/components/category-media/category-image-item.tsx with the following content:
1import { ThumbnailBadge } from "@medusajs/icons"2 3type CategoryImageItemProps = {4 id: string5 url: string6 alt: string7 isThumbnail: boolean8}9 10export const CategoryImageItem = ({11 id,12 url,13 alt,14 isThumbnail,15}: CategoryImageItemProps) => {16 return (17 <div18 key={id}19 className="shadow-elevation-card-rest hover:shadow-elevation-card-hover focus-visible:shadow-borders-focus bg-ui-bg-subtle-hover group relative aspect-square h-auto max-w-full overflow-hidden rounded-lg outline-none"20 >21 {isThumbnail && (22 <div className="absolute left-2 top-2">23 <ThumbnailBadge />24 </div>25 )}26 {/* TODO add selection checkbox */}27 <img28 src={url}29 alt={alt}30 className="size-full object-cover object-center"31 />32 </div>33 )34}
The CategoryImageItem component accepts the image's ID, URL, alt text, and whether it's a thumbnail. It displays the image and a ThumbnailBadge icon if it's a thumbnail.
Category Image Gallery Component
Next, you'll create a component that displays a gallery of category images, including existing and newly uploaded images.
Create the file src/admin/components/category-media/category-image-gallery.tsx with the following content:
1import { Text } from "@medusajs/ui"2import { CategoryImage, UploadedFile } from "../../types"3import { CategoryImageItem } from "./category-image-item"4 5type CategoryImageGalleryProps = {6 existingImages: CategoryImage[]7 uploadedFiles: UploadedFile[]8 currentThumbnailId: string | null9}10 11export const CategoryImageGallery = ({12 existingImages,13 uploadedFiles,14 currentThumbnailId,15}: CategoryImageGalleryProps) => {16 // TODO filter deleted images17 const visibleExistingImages = existingImages18 19 const hasNoImages = visibleExistingImages.length === 0 && uploadedFiles.length === 020 21 return (22 <div className="bg-ui-bg-subtle size-full overflow-auto">23 <div className="grid h-fit auto-rows-auto grid-cols-4 gap-6 p-6">24 {/* Existing images */}25 {visibleExistingImages.map((image) => {26 if (!image.id) {return null}27 28 const imageId = image.id29 const isThumbnail = currentThumbnailId === imageId30 31 return (32 <CategoryImageItem33 key={imageId}34 id={imageId}35 url={image.url}36 alt={`Category ${image.type}`}37 isThumbnail={isThumbnail}38 />39 )40 })}41 42 {/* Newly uploaded files */}43 {uploadedFiles.map((file) => {44 const uploadedId = `uploaded:${file.id}`45 const isThumbnail = currentThumbnailId === uploadedId46 47 return (48 <CategoryImageItem49 key={file.id}50 id={file.id}51 url={file.url}52 alt="Uploaded"53 isThumbnail={isThumbnail}54 />55 )56 })}57 58 {/* Empty state */}59 {hasNoImages && (60 <div className="col-span-4 flex items-center justify-center p-8">61 <Text className="text-ui-fg-subtle text-center">62 No images yet. Upload images to get started.63 </Text>64 </div>65 )}66 </div>67 </div>68 )69}
The CategoryImageGallery component accepts the following props:
existingImages: The existing category images.uploadedFiles: The newly uploaded files that are not yet created as category images.currentThumbnailId: The ID of the current thumbnail image.
The component displays the existing images and the newly uploaded files using the CategoryImageItem component. It also shows an empty state message if there are no images.
Category Image Upload Component
Next, you'll create a component that allows uploading new images.
Create the file src/admin/components/category-media/category-image-upload.tsx with the following content:
1import { RefObject } from "react"2import { ArrowDownTray } from "@medusajs/icons"3 4type CategoryImageUploadProps = {5 fileInputRef: RefObject<HTMLInputElement>6 isUploading: boolean7 onFileSelect: (files: FileList | null) => void8}9 10export const CategoryImageUpload = ({11 fileInputRef,12 isUploading,13 onFileSelect,14}: CategoryImageUploadProps) => {15 return (16 <div className="bg-ui-bg-base overflow-auto border-b px-6 py-4 lg:border-b-0 lg:border-l">17 <div className="flex flex-col space-y-2">18 <div className="flex flex-col gap-y-2">19 <div className="flex flex-col gap-y-1">20 <div className="flex items-center gap-x-1">21 <label className="font-sans txt-compact-small font-medium">22 Media23 </label>24 <p className="font-normal font-sans txt-compact-small text-ui-fg-muted">25 (Optional)26 </p>27 </div>28 <span className="txt-small text-ui-fg-subtle">29 Add media to the product to showcase it in your storefront.30 </span>31 </div>32 33 <div>34 <input35 ref={fileInputRef}36 type="file"37 multiple38 accept="image/jpeg,image/png,image/gif,image/webp,image/heic,image/svg+xml"39 onChange={(e) => onFileSelect(e.target.files)}40 hidden41 />42 43 <button44 type="button"45 onClick={() => fileInputRef.current?.click()}46 disabled={isUploading}47 className="bg-ui-bg-component border-ui-border-strong transition-fg group flex w-full flex-col items-center gap-y-2 rounded-lg border border-dashed p-8 hover:border-ui-border-interactive focus:border-ui-border-interactive focus:shadow-borders-focus outline-none focus:border-solid disabled:opacity-50 disabled:cursor-not-allowed"48 onDragOver={(e) => {49 e.preventDefault()50 e.stopPropagation()51 }}52 onDrop={(e) => {53 e.preventDefault()54 e.stopPropagation()55 if (!isUploading) {56 onFileSelect(e.dataTransfer.files)57 }58 }}59 >60 <div className="text-ui-fg-subtle group-disabled:text-ui-fg-disabled flex items-center gap-x-2">61 <ArrowDownTray />62 <p className="font-normal font-sans txt-medium">63 {isUploading ? "Uploading..." : "Upload images"}64 </p>65 </div>66 <p className="font-normal font-sans txt-compact-small text-ui-fg-muted group-disabled:text-ui-fg-disabled">67 Drag and drop images here or click to upload.68 </p>69 </button>70 </div>71 </div>72 </div>73 </div>74 )75}
The CategoryImageUpload component accepts the following props:
fileInputRef: A reference to the hidden file input element.isUploading: A boolean indicating whether files are being uploaded.onFileSelect: A callback function that is called when files are selected or dropped.
The component renders a button that opens the file picker when clicked. It also supports drag-and-drop uploads.
When files are selected or dropped, the component calls the onFileSelect callback with the selected files.
Category Image Hooks
Next, you'll create custom hooks for uploading images and creating category images. You'll use these hooks in the modal to upload images then create category images.
Create the file src/admin/hooks/use-category-image.ts with the following content:
1import { useMutation, useQueryClient } from "@tanstack/react-query"2import { sdk } from "../lib/sdk"3import { CategoryImage } from "../types"4 5type UseCategoryImageMutationsProps = {6 categoryId: string7 onCreateSuccess?: () => void8}9 10export const useCategoryImageMutations = ({11 categoryId,12 onCreateSuccess,13}: UseCategoryImageMutationsProps) => {14 const queryClient = useQueryClient()15 16 const uploadFilesMutation = useMutation({17 mutationFn: async (files: File[]) => {18 const response = await sdk.admin.upload.create({ files })19 return response20 },21 onError: (error) => {22 console.error("Failed to upload files:", error)23 },24 })25 26 const createImagesMutation = useMutation({27 mutationFn: async (images: Omit<CategoryImage, "id" | "category_id">[]) => {28 const response = await sdk.client.fetch(29 `/admin/categories/${categoryId}/images`,30 {31 method: "POST",32 headers: {33 "Content-Type": "application/json",34 },35 body: {36 images,37 },38 }39 )40 return response41 },42 onSuccess: () => {43 queryClient.invalidateQueries({ queryKey: ["category-images", categoryId] })44 onCreateSuccess?.()45 },46 })47 48 // TODO add update and delete mutations49 50 return {51 uploadFilesMutation,52 createImagesMutation,53 }54}
The useCategoryImageMutations hook accepts the following parameters:
categoryId: The ID of the category to manage images for.onCreateSuccess: An optional callback function called after successfully creating images.
The hook returns two mutations:
uploadFilesMutation: A mutation that uploads files using Medusa's existing API route for uploads. This will upload the images to the configured File Module Provider.createImagesMutation: A mutation that creates category images by sending aPOSTrequest to the API route you created earlier.
You'll later add mutations to update and delete category images.
Category Media Modal Component
Finally, you'll create the modal component that uses the components and hook you created earlier.
Create the file src/admin/components/category-media/category-media-modal.tsx with the following content:
7import { useCategoryImageMutations } from "../../hooks/use-category-image"8 9type CategoryMediaModalProps = {10 categoryId: string11 existingImages: CategoryImage[]12}13 14export const CategoryMediaModal = ({15 categoryId,16 existingImages,17}: CategoryMediaModalProps) => {18 const [open, setOpen] = useState(false)19 const [uploadedFiles, setUploadedFiles] = useState<UploadedFile[]>([])20 const [currentThumbnailId, setCurrentThumbnailId] = useState<string | null>(21 null22 )23 const fileInputRef = useRef<HTMLInputElement>(null)24 const queryClient = useQueryClient()25 26 const {27 uploadFilesMutation,28 createImagesMutation,29 } = useCategoryImageMutations({30 categoryId,31 onCreateSuccess: () => {32 setOpen(false)33 resetModalState()34 },35 })36 37 const isSaving = 38 createImagesMutation.isPending39 40 // TODO add functions41}
The CategoryMediaModal component accepts the following props:
categoryId: The ID of the category to manage images for.existingImages: The existing category images.
In the component, you define the following variables:
open: A boolean indicating whether the modal is open.uploadedFiles: An array of newly uploaded files not yet created as category images.currentThumbnailId: The ID of the current thumbnail image.fileInputRef: A reference to the hidden file input element.queryClient: The Tanstack Query client for managing query caching and invalidation.uploadFilesMutationandcreateImagesMutation: The mutations returned by theuseCategoryImageMutationshook.isSaving: A boolean indicating whether an operation, such as creating images, is in progress.
Next, you'll add functions to handle modal state changes. Replace the // TODO add functions comment with the following:
1const resetModalState = () => {2 setUploadedFiles([])3 setCurrentThumbnailId(null)4}5 6const initializeThumbnail = () => {7 const thumbnailImage = existingImages.find((img) => img.type === "thumbnail")8 if (thumbnailImage?.id) {9 setCurrentThumbnailId(thumbnailImage.id)10 }11}12 13const handleOpenChange = (isOpen: boolean) => {14 setOpen(isOpen)15 if (isOpen) {16 initializeThumbnail()17 } else {18 resetModalState()19 }20}21 22// TODO handle upload file
You add three functions:
resetModalState: Resets the modal's state by clearing uploaded files and the current thumbnail ID.initializeThumbnail: Initializes the current thumbnail ID based on existing images when the modal opens.handleOpenChange: Handles changes to the modal's open state, initializing or resetting the state as needed.
Next, you'll add a function to handle file uploads. Replace the // TODO handle upload file comment with the following:
1const handleUploadFile = (files: FileList | null) => {2 if (!files || files.length === 0) {return}3 const filesArray = Array.from(files)4 5 uploadFilesMutation.mutate(filesArray, {6 onSuccess: (data) => {7 setUploadedFiles((prev) => [...prev, ...data.files])8 },9 })10 11 if (fileInputRef.current) {12 fileInputRef.current.value = ""13 }14}15 16// TODO handle save
You add the handleUploadFile function, which is called when files are selected or dropped. It uploads the files using uploadFilesMutation and updates the uploadedFiles state with the uploaded files.
Next, you'll add a function to handle saving the uploaded files as category images. Replace the // TODO handle save comment with the following:
1const handleSave = async () => {2 const hasNewImages = uploadedFiles.length > 03 4 try {5 const operations: Array<Promise<unknown>> = []6 if (hasNewImages) {7 const imagesToCreate = uploadedFiles.map((file) => ({8 url: file.url,9 file_id: file.id,10 type: file.type || (currentThumbnailId === `uploaded:${file.id}` ? 11 "thumbnail" : "image"12 ),13 }))14 operations.push(createImagesMutation.mutateAsync(imagesToCreate))15 }16 17 // TODO add update and delete operations18 19 await Promise.all(operations)20 21 queryClient.invalidateQueries({ queryKey: ["category-images", categoryId] })22 setOpen(false)23 resetModalState()24 toast.success("Category media saved successfully")25 } catch (error) {26 toast.error("Failed to save changes")27 }28}29 30// TODO render modal
You add the handleSave function, which is called when the user clicks the "Save" button in the modal. It creates category images for the uploaded files using createImagesMutation.
You'll revisit this function later to add update and delete operations.
Finally, you'll render the modal. Replace the // TODO render modal comment with the following:
1return (2 <FocusModal open={open} onOpenChange={handleOpenChange}>3 <FocusModal.Trigger asChild>4 <Button size="small" variant="secondary">5 Edit6 </Button>7 </FocusModal.Trigger>8 9 <FocusModal.Content>10 <FocusModal.Header>11 <Heading>Edit Media</Heading>12 </FocusModal.Header>13 14 <FocusModal.Body className="flex h-full overflow-hidden">15 <div className="flex w-full h-full flex-col-reverse lg:grid lg:grid-cols-[1fr_560px]">16 <CategoryImageGallery17 existingImages={existingImages}18 uploadedFiles={uploadedFiles}19 currentThumbnailId={currentThumbnailId}20 />21 <CategoryImageUpload22 fileInputRef={fileInputRef}23 isUploading={uploadFilesMutation.isPending}24 onFileSelect={handleUploadFile}25 />26 </div>27 {/* TODO show command bar */}28 </FocusModal.Body>29 <FocusModal.Footer>30 <div className="flex items-center justify-end gap-x-2">31 <FocusModal.Close asChild>32 <Button size="small" variant="secondary">33 Cancel34 </Button>35 </FocusModal.Close>36 <Button37 size="small"38 onClick={handleSave}39 isLoading={isSaving}40 >41 Save42 </Button>43 </div>44 </FocusModal.Footer>45 </FocusModal.Content>46 </FocusModal>47)
You render a modal using the FocusModal component from Medusa UI. The modal displays the CategoryImageGallery component on the left and the CategoryImageUpload component on the right.
You also render an "Edit" button that opens the modal when clicked.
e. Add Modal to Widget#
Finally, add the CategoryMediaModal component to the CategoryMediaWidget component.
In src/admin/widgets/category-media-widget.tsx, add the following import at the top:
Then, in the CategoryMediaWidget's return statement, replace the /* TODO show edit modal */ comment with the following:
You add the CategoryMediaModal component, passing the category ID and existing images as props.
Test the Media Widget#
You can now test the media widget in the Medusa Admin dashboard.
Run the following command in the Medusa project directory to start the Medusa server:
Then, go to localhost:9000/app in your browser and:
- Log in with the admin user you created earlier.
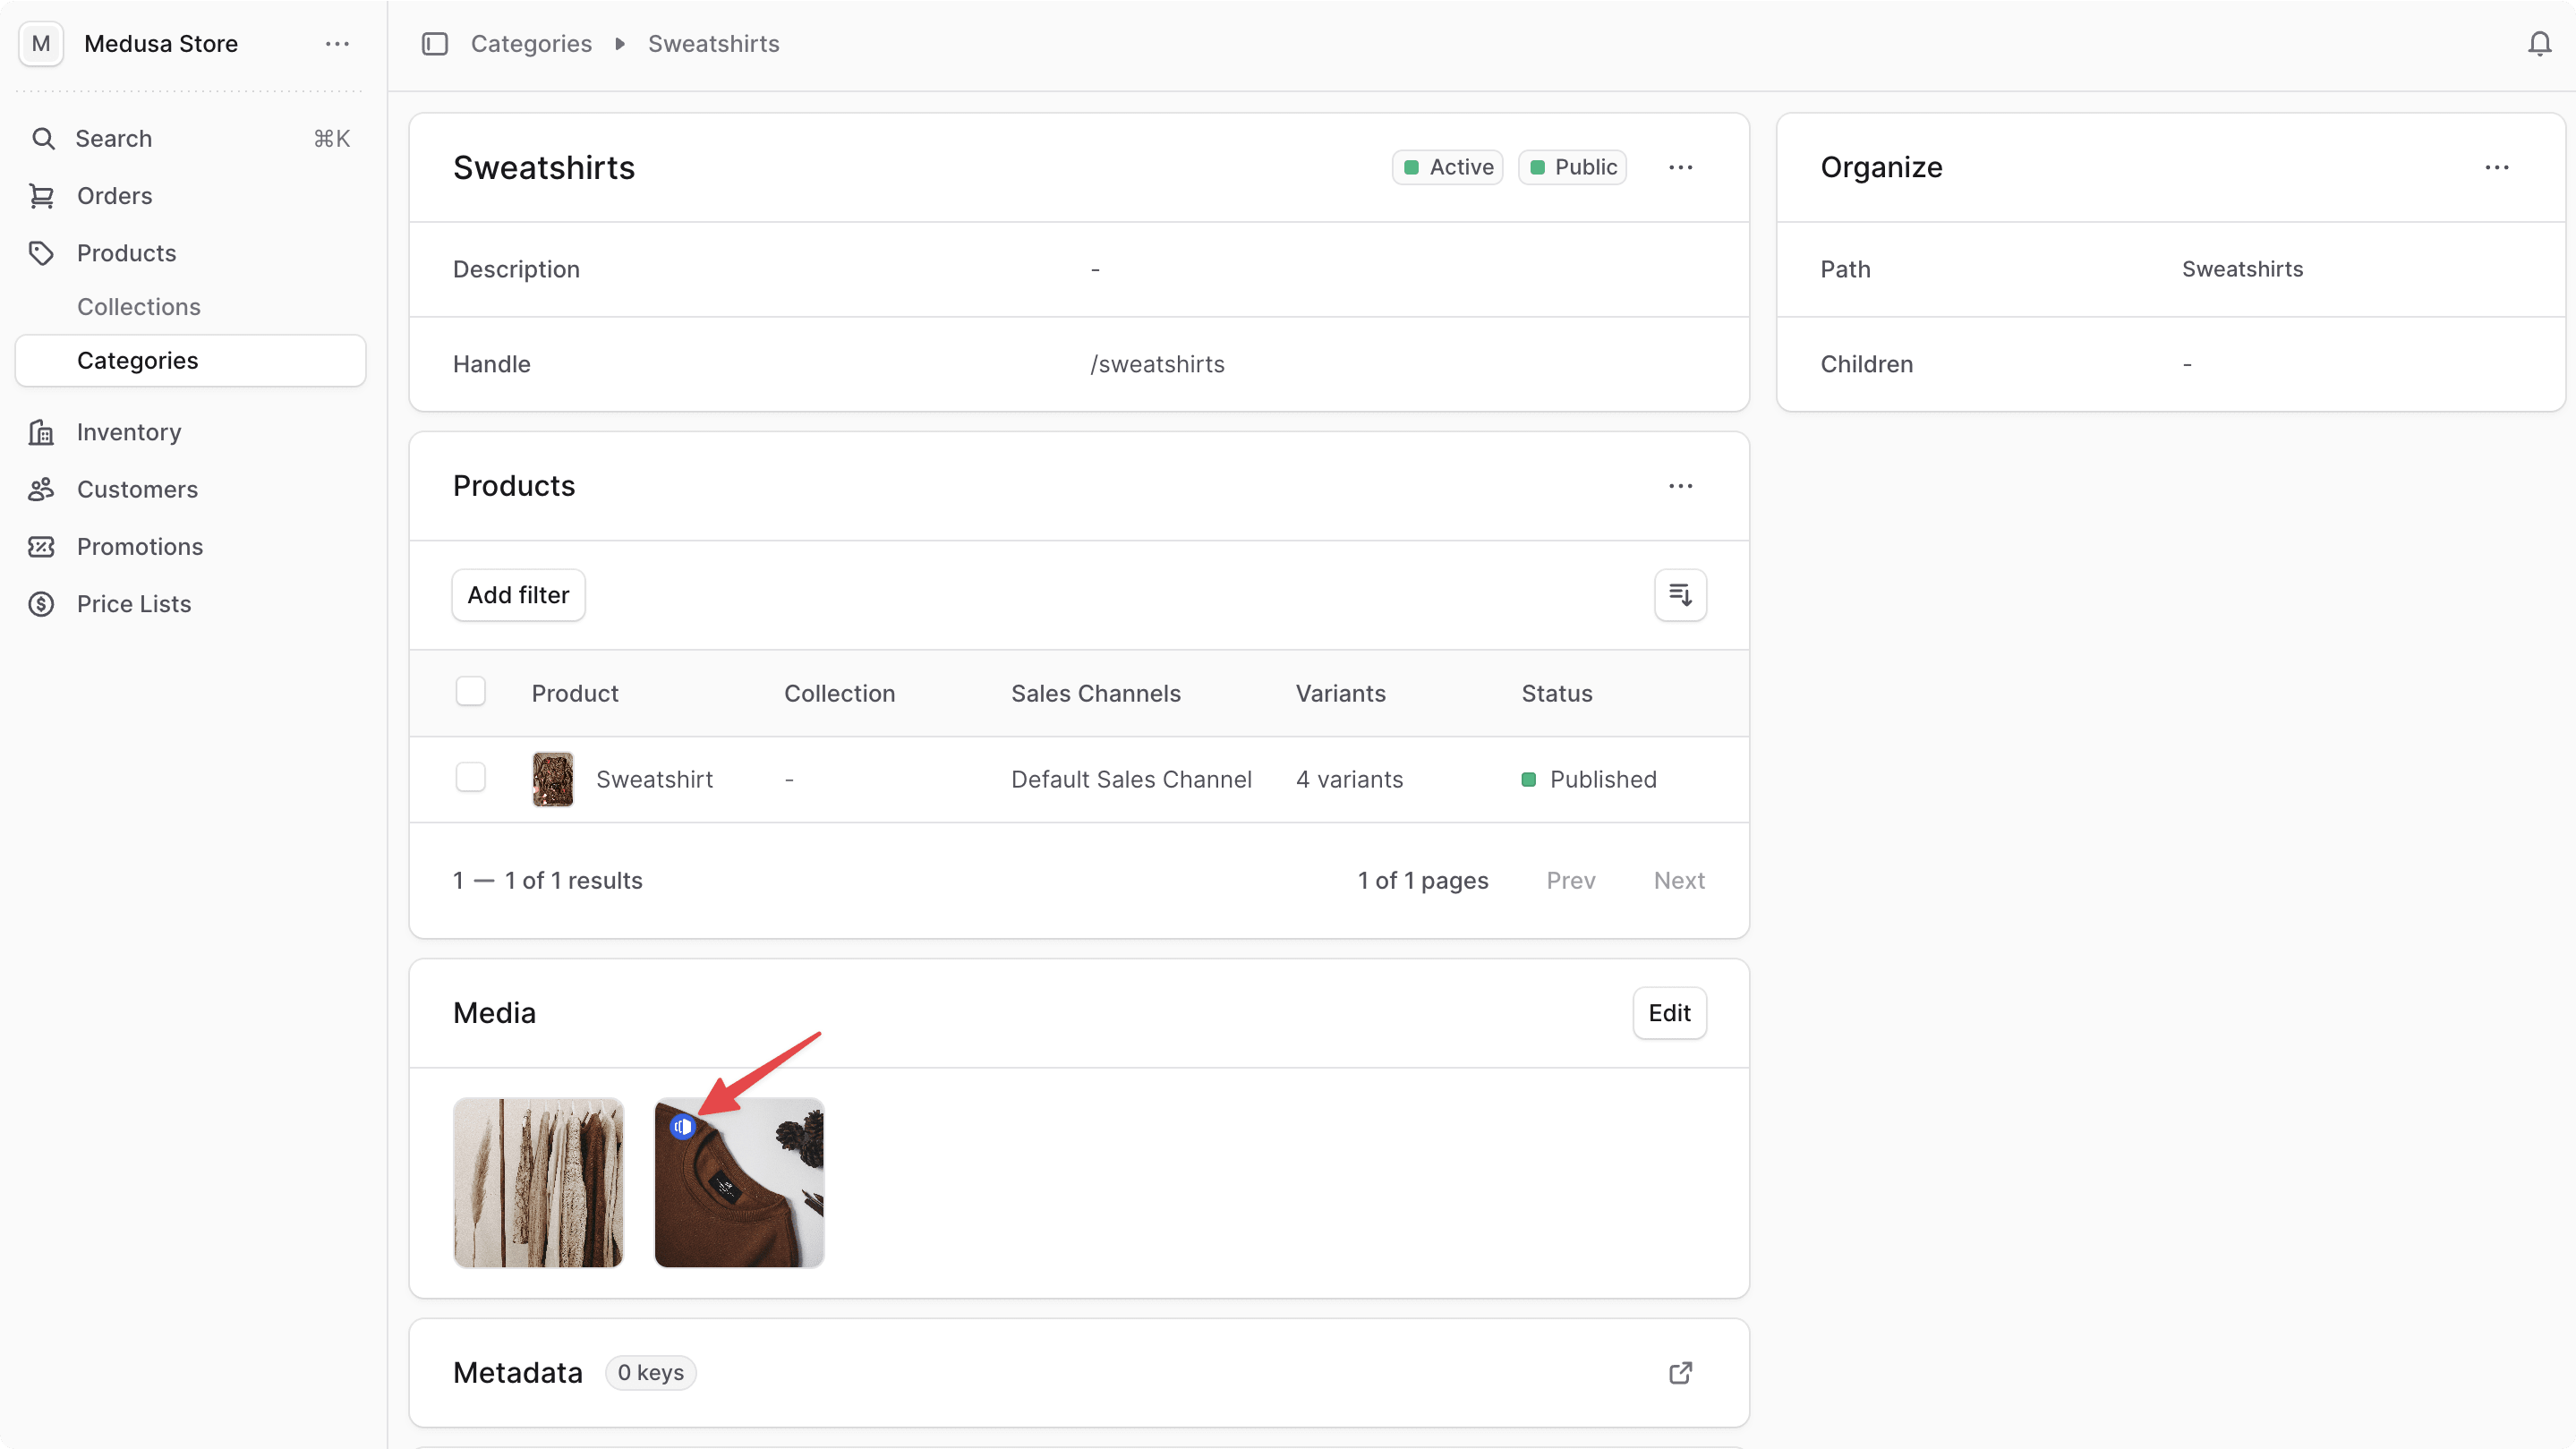
- Go to Products → Categories.
- Click on a category to view its details.
You'll see a new Media section in the category details page with an "Edit" button.
If you click the "Edit" button, a modal will open where you can upload new images.
static folder in your Medusa project.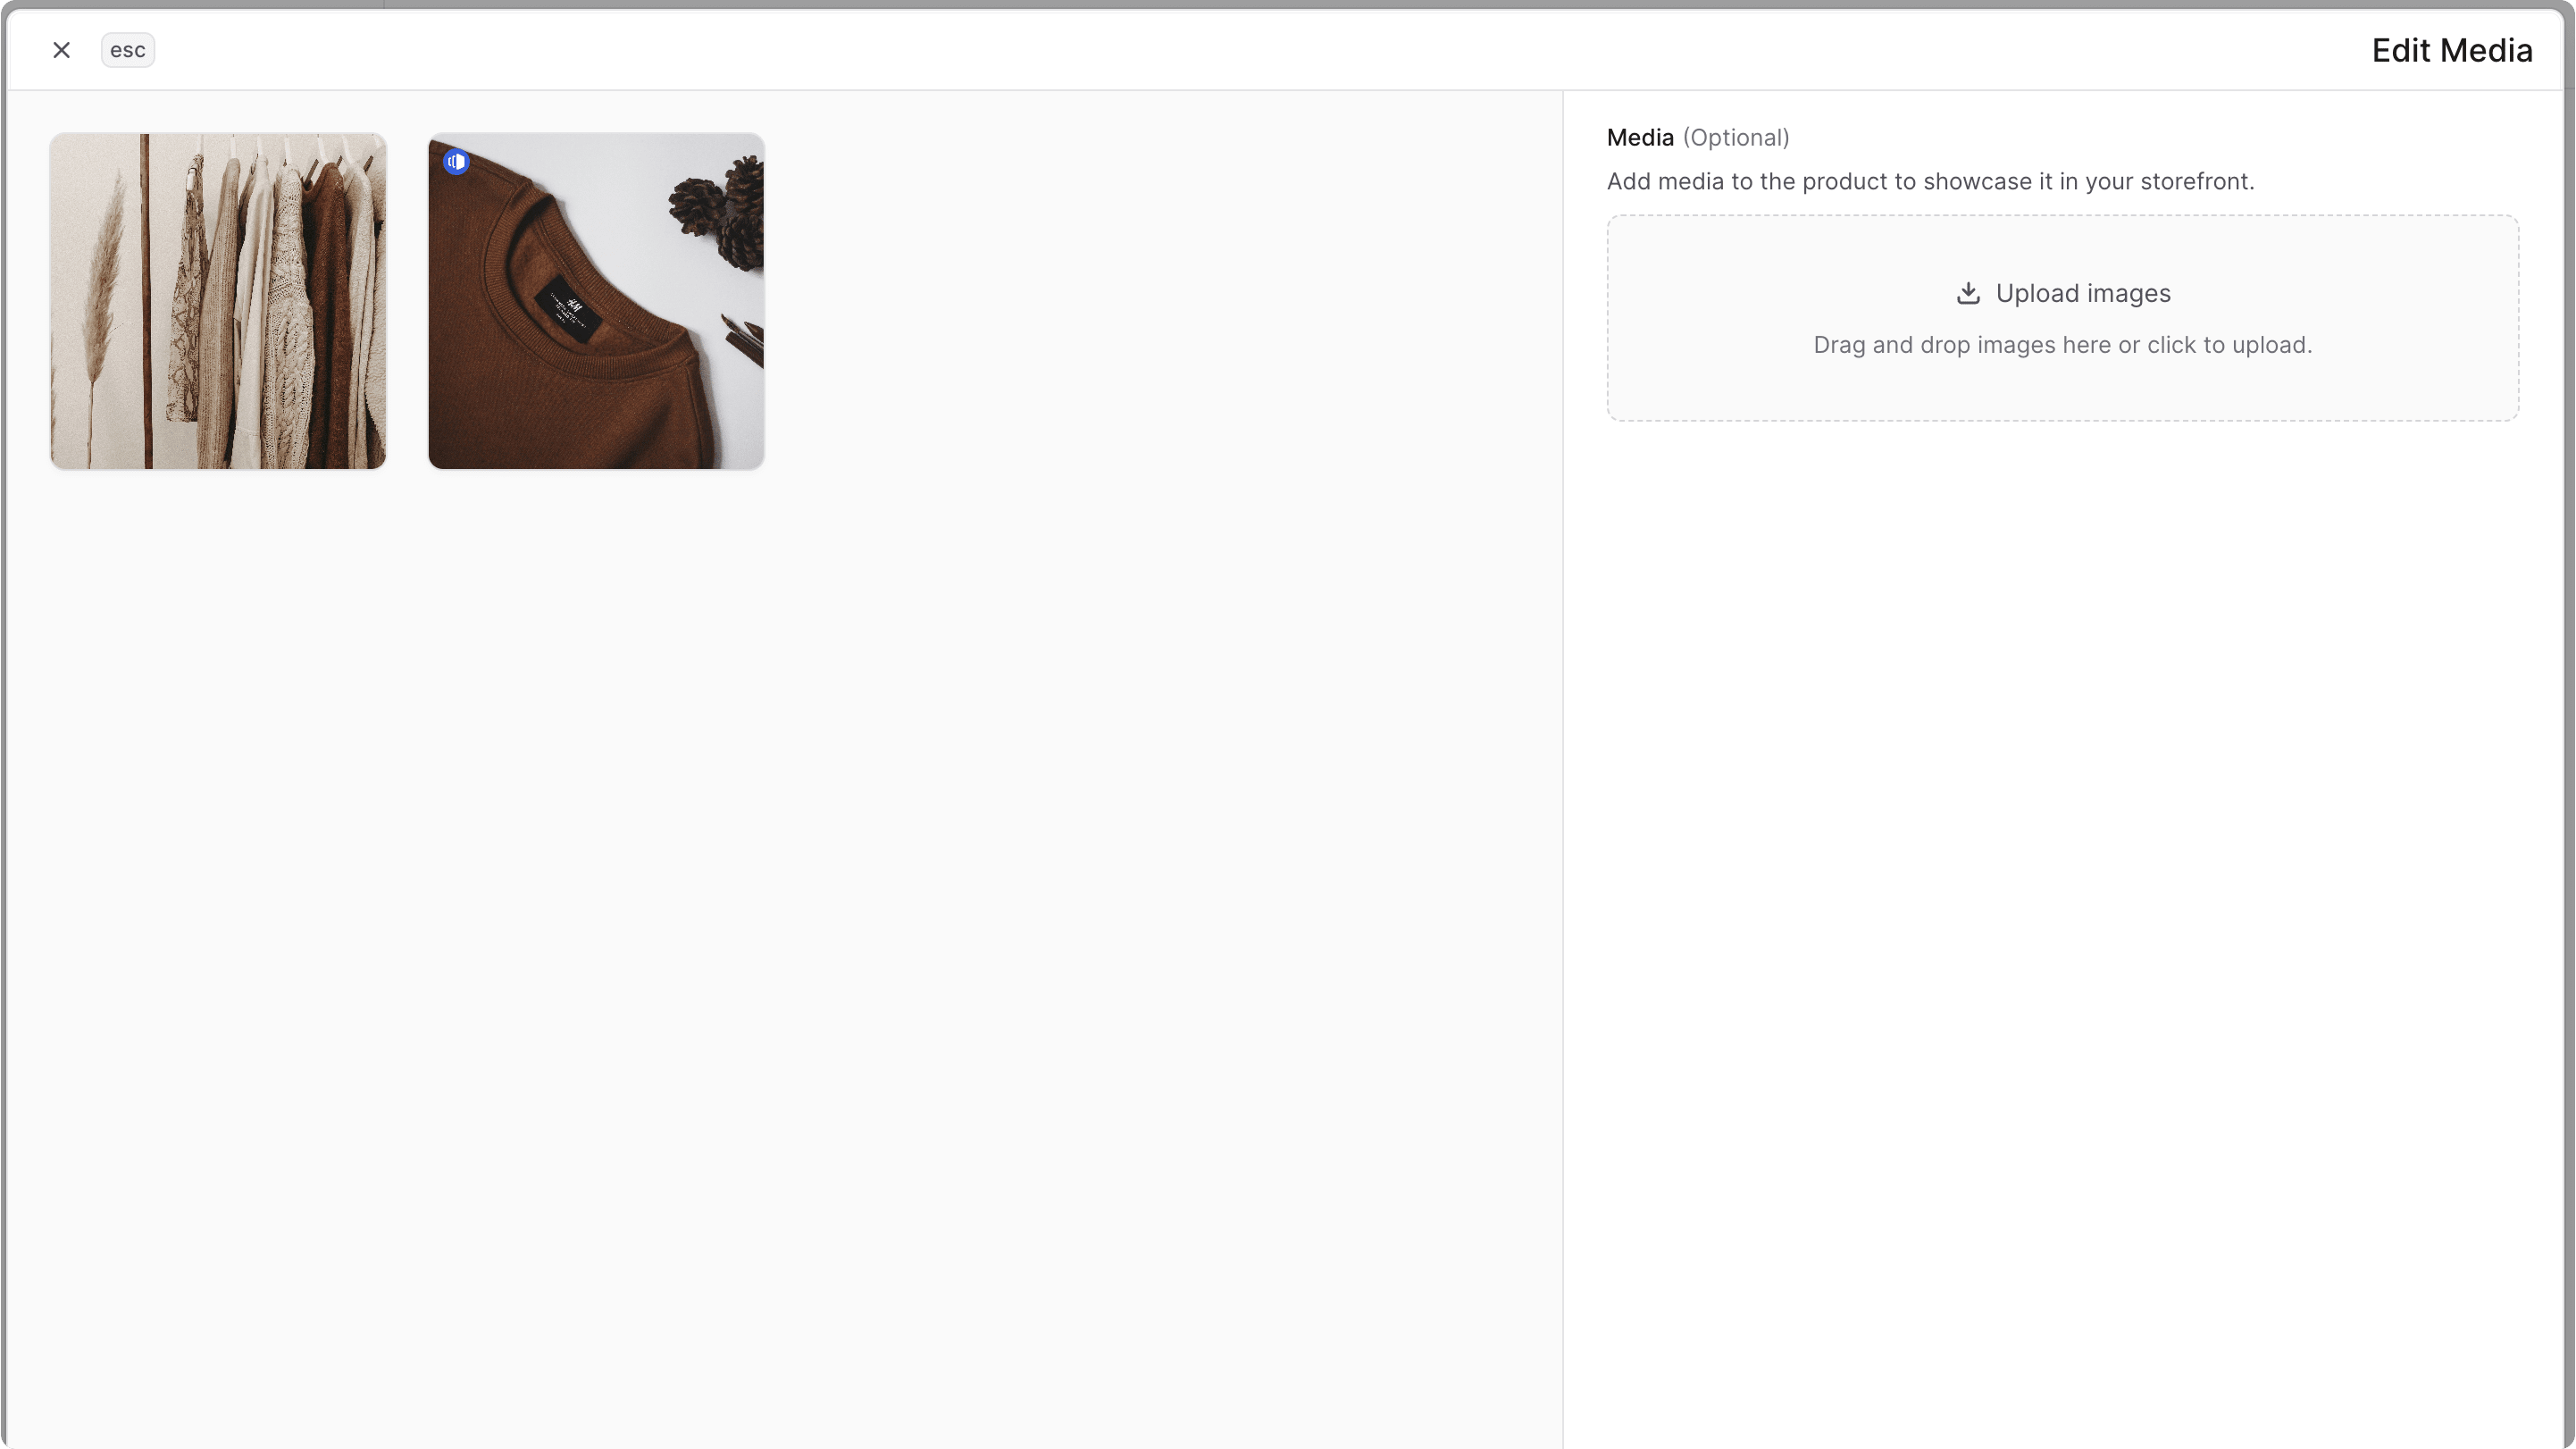
After uploading images, you can click the "Save" button to create the category images. The images will be displayed in the Media section of the category details page.

Step 6: Update Product Category Images#
In this step, you'll implement the functionality to update a category image's type (between "thumbnail" and "image"). This includes:
- Creating a workflow that updates category images.
- Adding an API route that exposes the workflow's functionality.
- Updating the Medusa Admin modal to allow updating image types.
a. Update Category Images Workflow#
The workflow that updates category images has the following steps:
Workflow hook
Step conditioned by when
View step details
Medusa provides the useQueryGraphStep, and you've already created the convertCategoryThumbnailsStep in step 3. You only need to create the updateCategoryImagesStep.
updateCategoryImagesStep
The updateCategoryImagesStep updates the category images.
To create the step, create the file src/workflows/steps/update-category-images.ts with the following content:
1import { createStep, StepResponse } from "@medusajs/framework/workflows-sdk"2import { PRODUCT_MEDIA_MODULE } from "../../modules/product-media"3import ProductMediaModuleService from "../../modules/product-media/service"4 5export type UpdateCategoryImagesStepInput = {6 updates: {7 id: string8 type?: "thumbnail" | "image"9 }[]10}11 12export const updateCategoryImagesStep = createStep(13 "update-category-images-step",14 async (input: UpdateCategoryImagesStepInput, { container }) => {15 const productMediaService: ProductMediaModuleService =16 container.resolve(PRODUCT_MEDIA_MODULE)17 18 // Get previous data for the images being updated19 const prevData = await productMediaService.listProductCategoryImages({20 id: input.updates.map((u) => u.id),21 })22 23 // Apply the requested updates24 const updatedData = await productMediaService.updateProductCategoryImages(25 input.updates26 )27 28 return new StepResponse(updatedData, prevData)29 },30 async (compensationData, { container }) => {31 if (!compensationData?.length) {32 return33 }34 35 const productMediaService: ProductMediaModuleService =36 container.resolve(PRODUCT_MEDIA_MODULE)37 38 // Revert all updates39 await productMediaService.updateProductCategoryImages(40 compensationData.map((img) => ({41 id: img.id,42 type: img.type,43 }))44 )45 }46)
This step accepts an array of updates, where each update contains the category image ID to update and the new type.
You update the category images in the step function and revert the updates in the compensation function.
Update Workflow
Next, you'll create the workflow that uses the step you just created to update category images.
Create the file src/workflows/steps/update-category-images.ts with the following content:
9import { convertCategoryThumbnailsStep } from "./steps/convert-category-thumbnails"10 11export type UpdateCategoryImagesInput = {12 updates: {13 id: string14 type?: "thumbnail" | "image"15 }[]16}17 18export const updateCategoryImagesWorkflow = createWorkflow(19 "update-category-images",20 (input: UpdateCategoryImagesInput) => {21 when(input, (data) => data.updates.some((u) => u.type === "thumbnail"))22 .then(23 () => {24 const categoryImageIds = transform({25 input,26 }, (data) => data.input.updates.filter(27 (u) => u.type === "thumbnail"28 ).map((u) => u.id))29 const { data: categoryImages } = useQueryGraphStep({30 entity: "product_category_image",31 fields: ["category_id"],32 filters: {33 id: categoryImageIds,34 },35 options: {36 throwIfKeyNotFound: true,37 },38 })39 const categoryIds = transform({40 categoryImages,41 }, (data) => data.categoryImages.map((img) => img.category_id))42 43 convertCategoryThumbnailsStep({44 category_ids: categoryIds,45 }) 46 }47 )48 const updatedImages = updateCategoryImagesStep({49 updates: input.updates,50 })51 52 return new WorkflowResponse(updatedImages)53 }54)
The workflow accepts the category images to update.
In the workflow, you:
- Check if any of the updates set an image to be a thumbnail using a
whencondition.- If so, you retrieve the category IDs of the images being updated to thumbnails using the
useQueryGraphStep, which uses Query to retrieve data across modules. - You then call the
convertCategoryThumbnailsStepto convert any existing thumbnails in those categories to regular images.
- If so, you retrieve the category IDs of the images being updated to thumbnails using the
- Finally, you call the
updateCategoryImagesStepto update the category images.
b. Update Category Images API Route#
Next, you'll create an API route that exposes the updateCategoryImagesWorkflow's functionality.
Create the file src/api/admin/categories/[category_id]/images/batch/route.ts with the following content:
1import { MedusaRequest, MedusaResponse } from "@medusajs/framework/http"2import {3 updateCategoryImagesWorkflow,4} from "../../../../../../workflows/update-category-images"5import { z } from "@medusajs/framework/zod"6 7export const UpdateCategoryImagesSchema = z.object({8 updates: z.array(z.object({9 id: z.string(),10 type: z.enum(["thumbnail", "image"]),11 })).min(1, "At least one update is required"),12})13 14type UpdateCategoryImagesInput = z.infer<typeof UpdateCategoryImagesSchema>15 16export async function POST(17 req: MedusaRequest<UpdateCategoryImagesInput>,18 res: MedusaResponse19): Promise<void> {20 const { updates } = req.validatedBody21 22 const { result } = await updateCategoryImagesWorkflow(req.scope).run({23 input: { updates },24 })25 26 res.status(200).json({ category_images: result })27}
You create a POST API route at /admin/categories/:category_id/images/batch that accepts an array of category images to update in the request body.
You validate the request body using a Zod schema, then execute the updateCategoryImagesWorkflow with the validated input.
Finally, you return the updated category images in the response.
c. Add Validation Middleware#
To ensure the request body is validated using the Zod schema you created, you'll add a validation middleware to the new API route.
In src/api/middlewares.ts, add the following import at the top of the file:
Then, add a new route object passed to the array in defineMiddlewares:
All POST requests to /admin/categories/:category_id/images/batch will now be validated using the UpdateCategoryImagesSchema.
d. Add Update Mutation#
Next, add a mutation to the useCategoryImageMutations hook for updating category images.
In src/admin/hooks/use-category-image.ts, update the UseCategoryImageMutationsProps type to include an onUpdateSuccess callback:
Then, in useCategoryImageMutations, add the onUpdateSuccess prop to the function parameters:
Next, add the updateImagesMutation mutation inside the useCategoryImageMutations function, after the createImagesMutation:
1const updateImagesMutation = useMutation({2 mutationFn: async (3 updates: { id: string; type: "thumbnail" | "image" }[]4 ) => {5 const response = await sdk.client.fetch(6 `/admin/categories/${categoryId}/images/batch`,7 {8 method: "POST",9 headers: {10 "Content-Type": "application/json",11 },12 body: {13 updates,14 },15 }16 )17 return response18 },19 onSuccess: () => {20 queryClient.invalidateQueries({ queryKey: ["category-images", categoryId] })21 onUpdateSuccess?.()22 },23})
Finally, add updateImagesMutation to the returned object of the useCategoryImageMutations hook:
e. Add Selection in Category Image Item#
Next, add the ability to select a category image in the CategoryImageItem component. You'll use this selection to choose which image to set as the thumbnail, and later to delete images.
In src/admin/components/category-media/category-image-item.tsx, add the following imports at the top of the file:
Then update the CategoryImageItemProps type to include two new props:
You add two new props:
isSelected: A boolean indicating whether the image is selected.onToggleSelect: A callback function that is called when the selection state changes.
Next, update the props in the CategoryImageItem component:
Finally, replace the TODO in the component's return statement with the following:
1<div className={clx(2 "transition-fg absolute right-2 top-2 opacity-0 group-focus-within:opacity-100 group-hover:opacity-100 group-focus:opacity-100",3 isSelected && "opacity-100"4)}>5 <Checkbox6 checked={isSelected}7 onCheckedChange={onToggleSelect}8 />9</div>
You add a checkbox in the top-right corner of the image that indicates whether it's selected. The checkbox is visible when the image is hovered or selected.
When the checkbox state changes, it calls the onToggleSelect callback to update the selection state.
f. Update Category Image Gallery#
Next, you'll update the CategoryImageGallery component to manage the selection state of category images.
In src/admin/components/category-media/category-image-gallery.tsx, update the CategoryImageGalleryProps type to include two new props:
You add two new props:
selectedImageIds: A set of IDs of the selected images.onToggleSelect: A callback function that is called when an image's selection state changes.
Then, update the props in the CategoryImageGallery component:
Next, update the CategoryImageItem components in the return statement to pass the new props:
1return (2 <div className="bg-ui-bg-subtle size-full overflow-auto">3 {/* ... */}4 {/* Existing images */}5 {visibleExistingImages.map((image) => {6 // ...7 8 return (9 <CategoryImageItem10 // ...11 isSelected={selectedImageIds.has(imageId)}12 onToggleSelect={() => onToggleSelect(imageId)}13 />14 )15 })}16 17 {/* Newly uploaded files */}18 {uploadedFiles.map((file) => {19 // ...20 21 return (22 <CategoryImageItem23 // ...24 isSelected={selectedImageIds.has(uploadedId)}25 onToggleSelect={() => onToggleSelect(file.id, true)}26 />27 )28 })}29 30 {/* ... */}31 </div>32)
You pass the isSelected prop to indicate whether the image is selected, and the onToggleSelect prop to handle selection changes.
g. Update Category Media Modal#
Lastly, you'll update the CategoryMediaModal component to manage the selection state and implement the update functionality.
In src/admin/components/category-media/category-media-modal.tsx, add the following import at the top of the file:
You'll use the CommandBar component from Medusa UI to show actions like "Set as Thumbnail" and "Delete".
Then, in the CategoryMediaModal component, add a new state variable to manage the selected image IDs:
Next, add to the destructured variables the updateImagesMutation from the useCategoryImageMutations hook, and pass the onUpdateSuccess callback:
After that, update the isSaving variable to include the updateImagesMutation's pending state:
Next, update the resetModalState function to clear the selected image IDs:
Next, add a function that toggles the selection state of an image:
1const handleImageSelection = (id: string, isUploaded: boolean = false) => {2 const itemId = isUploaded ? `uploaded:${id}` : id3 const newSelected = new Set(selectedImageIds)4 if (newSelected.has(itemId)) {5 newSelected.delete(itemId)6 } else {7 newSelected.add(itemId)8 }9 setSelectedImageIds(newSelected)10}
The handleImageSelection function accepts the image ID and a boolean indicating whether it's an uploaded file (not yet created as a category image).
It toggles the selection state of the image by adding or removing its ID from the selectedImageIds set.
Then, add a function that sets the selected image as the thumbnail:
1const handleSetAsThumbnail = () => {2 if (selectedImageIds.size !== 1) {return}3 4 const selectedId = Array.from(selectedImageIds)[0]5 setCurrentThumbnailId(selectedId)6 if (selectedId.startsWith("uploaded:")) {7 // update uploaded file type to thumbnail8 const uploadedFileId = selectedId.replace("uploaded:", "")9 setUploadedFiles((prev) =>10 prev.map((file) => {11 return file.id === uploadedFileId ? { ...file, type: "thumbnail" } : file12 })13 )14 }15 16 setSelectedImageIds(new Set())17}
The handleSetAsThumbnail function checks if exactly one image is selected. If so, it sets that image as the current thumbnail by updating the currentThumbnailId state.
If the selected image is an uploaded file (not yet created as a category image), it updates its type to "thumbnail" in the uploadedFiles state.
Next, update the handleSave function to include the update operation for changing image types:
1const handleSave = async () => {2 const hasNewImages = uploadedFiles.length > 03 4 const initialThumbnail = existingImages.find(5 (img) => img.type === "thumbnail"6 )7 const thumbnailChanged = 8 currentThumbnailId && 9 !currentThumbnailId.startsWith("uploaded:") &&10 currentThumbnailId !== initialThumbnail?.id11 12 if (!hasNewImages && !thumbnailChanged) {13 setOpen(false)14 return15 }16 17 try {18 const operations: Array<Promise<unknown>> = []19 if (hasNewImages) {20 const imagesToCreate = uploadedFiles.map((file) => ({21 url: file.url,22 file_id: file.id,23 type: file.type || (currentThumbnailId === `uploaded:${file.id}` ? 24 "thumbnail" : "image"25 ),26 }))27 operations.push(createImagesMutation.mutateAsync(imagesToCreate))28 }29 30 // Update thumbnail if changed31 if (thumbnailChanged) {32 const updates = [33 {34 id: currentThumbnailId,35 type: "thumbnail" as const,36 },37 ]38 operations.push(updateImagesMutation.mutateAsync(updates))39 }40 41 await Promise.all(operations)42 43 queryClient.invalidateQueries({ queryKey: ["category-images", categoryId] })44 setOpen(false)45 resetModalState()46 toast.success("Category media saved successfully")47 } catch (error) {48 toast.error("Failed to save changes")49 }50}
You update the handleSave function to:
- Check if the thumbnail has changed and isn't an uploaded file.
- If the thumbnail has changed, add an update operation to the
operationsarray to set the image type to "thumbnail" using theupdateImagesMutation. - Ensure that if the new thumbnail is an uploaded file, it doesn't attempt to update it, since it will be created with the correct type.
Finally, in the return statement, replace the /* TODO show command bar */ comment with the following:
1<CommandBar open={selectedImageIds.size > 0}>2 <CommandBar.Bar>3 <CommandBar.Value>4 {selectedImageIds.size} selected5 </CommandBar.Value>6 <CommandBar.Seperator />7 <CommandBar.Command8 action={handleSetAsThumbnail}9 label="Set as thumbnail"10 shortcut="t"11 disabled={selectedImageIds.size !== 1}12 />13 {/* TODO add delete command */}14 </CommandBar.Bar>15</CommandBar>
You add a CommandBar that shows the number of selected images and a command to "Set as thumbnail". The command is disabled unless exactly one image is selected.
Then, update the CategoryImageGallery component to pass the new props:
You pass the selectedImageIds state and the handleImageSelection function to manage image selection.
Test Update Functionality#
You can now test the update functionality in the Medusa Admin dashboard.
Start the Medusa server if it's not already running, and go to a category's details page:
- Click the "Edit" button in the Media section to open the modal.
- Hover over an image and click the checkbox to select it.
- You'll see a command bar at the bottom, where you can click "Set as thumbnail" to set the selected image as the thumbnail. You can also press the "t" key as a shortcut.
- Click the "Save" button to save the changes.

You'll now see the thumbnail icon on the image in the Media section of the category details page.
Step 7: Delete Product Category Images#
In this step, you'll implement the functionality to delete category images. This includes:
- Creating a workflow that deletes category images.
- Adding an API route that exposes the workflow's functionality.
- Updating the Medusa Admin modal to allow deleting images.
a. Delete Category Images Workflow#
The workflow that deletes category images has the following steps:
Workflow hook
Step conditioned by when
View step details
The first two steps are available out-of-the-box in Medusa. You only need to create the last step.
deleteCategoryImagesStep
The deleteCategoryImagesStep step deletes the category images.
To create the step, create the file src/workflows/steps/delete-category-image.ts with the following content:
1import { createStep, StepResponse } from "@medusajs/framework/workflows-sdk"2import { PRODUCT_MEDIA_MODULE } from "../../modules/product-media"3import ProductMediaModuleService from "../../modules/product-media/service"4 5export type DeleteCategoryImagesStepInput = {6 ids: string[]7}8 9export const deleteCategoryImagesStep = createStep(10 "delete-category-images-step",11 async (input: DeleteCategoryImagesStepInput, { container }) => {12 const productMediaService: ProductMediaModuleService =13 container.resolve(PRODUCT_MEDIA_MODULE)14 15 // Retrieve the full category images data before deleting16 const categoryImages = await productMediaService.listProductCategoryImages({17 id: input.ids,18 })19 20 // Delete the category images21 await productMediaService.deleteProductCategoryImages(input.ids)22 23 return new StepResponse(24 { success: true, deleted: input.ids }, 25 categoryImages26 )27 },28 async (categoryImages, { container }) => {29 if (!categoryImages || categoryImages.length === 0) {30 return31 }32 33 const productMediaService: ProductMediaModuleService =34 container.resolve(PRODUCT_MEDIA_MODULE)35 36 // Recreate all category images with their original data37 await productMediaService.createProductCategoryImages(38 categoryImages.map((categoryImage) => ({39 id: categoryImage.id,40 category_id: categoryImage.category_id,41 type: categoryImage.type,42 url: categoryImage.url,43 file_id: categoryImage.file_id,44 }))45 )46 }47)
This step accepts an array of category image IDs to delete.
In the step, you first retrieve the full data of the category images to be deleted. This is necessary for the compensation function to recreate them.
Then, you delete the category images and pass the deleted data to the compensation function.
In the compensation function, you recreate the deleted category images using their original data if an error occurs during workflow execution.
Delete Workflow
Next, you'll create the workflow that uses the step you just created to delete category images.
Create the file src/workflows/delete-category-image.ts with the following content:
9export type DeleteCategoryImagesInput = {10 ids: string[]11}12 13export const deleteCategoryImagesWorkflow = createWorkflow(14 "delete-category-images",15 (input: DeleteCategoryImagesInput) => {16 // First, get the category images to retrieve the file_ids17 const { data: categoryImages } = useQueryGraphStep({18 entity: "product_category_image",19 fields: ["id", "file_id", "url", "type", "category_id"],20 filters: {21 id: input.ids,22 },23 options: {24 throwIfKeyNotFound: true,25 },26 })27 28 // Transform the category images to extract file IDs29 const fileIds = transform(30 { categoryImages },31 (data) => data.categoryImages.map((img) => img.file_id)32 )33 34 // Delete the files from storage35 deleteFilesWorkflow.runAsStep({36 input: {37 ids: fileIds,38 },39 })40 41 // Then delete the category image records42 const result = deleteCategoryImagesStep({ ids: input.ids })43 44 return new WorkflowResponse(result)45 }46)
The workflow accepts the IDs of the category images to delete.
In the workflow, you:
- Retrieve the category images using
useQueryGraphStepto get their file IDs. This step uses Query to retrieve data across modules. - Prepare the file IDs using transform.
- Delete the files from storage using
deleteFilesWorkflow. - Delete the category images using
deleteCategoryImagesStep.
b. Delete Category Images API Route#
Next, you'll create an API route that exposes the deleteCategoryImagesWorkflow's functionality.
In src/api/admin/categories/[category_id]/images/batch/route.ts, add the following import at the top of the file:
Then, add the following at the end of the file:
1export const DeleteCategoryImagesSchema = z.object({2 ids: z.array(z.string()).min(1, "At least one ID is required"),3})4 5type DeleteCategoryImagesInput = z.infer<typeof DeleteCategoryImagesSchema>6 7export async function DELETE(8 req: MedusaRequest<DeleteCategoryImagesInput>,9 res: MedusaResponse10): Promise<void> {11 const { ids } = req.validatedBody12 13 await deleteCategoryImagesWorkflow(req.scope).run({14 input: { ids },15 })16 17 res.status(200).json({18 deleted: ids,19 })20}
You create a DELETE API route at /admin/categories/:category_id/images/batch that accepts an array of category image IDs to delete in the request body.
You validate the request body using a Zod schema, then execute the deleteCategoryImagesWorkflow with the validated input.
Finally, you return the deleted category image IDs in the response.
c. Add Validation Middleware#
To ensure the request body is validated using the Zod schema you created, you'll add a validation middleware to the new API route.
In src/api/middlewares.ts, add the following import at the top of the file:
Then, add a new route object passed to the array in defineMiddlewares:
All DELETE requests to /admin/categories/:category_id/images/batch will now be validated using the DeleteCategoryImagesSchema.
c. Add Delete Mutation#
Next, you'll add a mutation to the useCategoryImageMutations hook to delete category images.
In src/admin/hooks/use-category-image.ts, update the UseCategoryImageMutationsProps type to include an onDeleteSuccess callback:
Then, in useCategoryImageMutations, add the onDeleteSuccess prop to the function parameters:
Next, add the deleteImagesMutation mutation inside the useCategoryImageMutations function, after the updateImagesMutation:
1const deleteImagesMutation = useMutation({2 mutationFn: async (ids: string[]) => {3 const response = await sdk.client.fetch(4 `/admin/categories/${categoryId}/images/batch`,5 {6 method: "DELETE",7 headers: {8 "Content-Type": "application/json",9 },10 body: {11 ids,12 },13 }14 )15 return response16 },17 onSuccess: (_data, deletedIds) => {18 queryClient.invalidateQueries({ queryKey: ["category-images", categoryId] })19 onDeleteSuccess?.(deletedIds)20 },21})
Finally, add deleteImagesMutation to the returned object of the useCategoryImageMutations hook:
d. Update Category Image Gallery#
Next, you'll update the CategoryImageGallery component to hide images to be deleted.
In src/admin/components/category-media/category-image-gallery.tsx, update the CategoryImageGalleryProps type to include a new prop:
You add the imagesToDelete prop, which is a set of IDs of the images to be deleted.
Then, update the props in the CategoryImageGallery component:
Finally, update the visibleExistingImages to filter out images that are marked for deletion:
e. Update Category Media Modal#
Lastly, you'll update the CategoryMediaModal component to manage the images to be deleted and implement the delete functionality.
In src/admin/components/category-media/category-media-modal.tsx, add a new state variable to manage the IDs of images to be deleted:
Next, add to the destructured variables the deleteImagesMutation from the useCategoryImageMutations hook, and pass the onDeleteSuccess callback:
1const {2 // ...3 deleteImagesMutation,4} = useCategoryImageMutations({5 // ...6 onDeleteSuccess: (deletedIds) => {7 setSelectedImageIds(new Set())8 if (currentThumbnailId && deletedIds.includes(currentThumbnailId)) {9 setCurrentThumbnailId(null)10 }11 },12})
You update the onDeleteSuccess callback to clear the selected image IDs and reset the current thumbnail if it was deleted.
Then, update the isSaving variable to include the deleteImagesMutation's pending state:
Next, update the resetModalState function to clear the images to be deleted:
After that, add a function that marks selected images for deletion:
1const handleDelete = () => {2 if (selectedImageIds.size === 0) {return}3 4 const uploadedFileIds: string[] = []5 const savedImageIds: string[] = []6 7 selectedImageIds.forEach((id) => {8 if (id.startsWith("uploaded:")) {9 uploadedFileIds.push(id.replace("uploaded:", ""))10 } else {11 savedImageIds.push(id)12 }13 })14 15 if (uploadedFileIds.length > 0) {16 setUploadedFiles((prev) =>17 prev.filter((file) => !uploadedFileIds.includes(file.id))18 )19 if (currentThumbnailId?.startsWith("uploaded:")) {20 const thumbnailFileId = currentThumbnailId.replace("uploaded:", "")21 if (uploadedFileIds.includes(thumbnailFileId)) {22 setCurrentThumbnailId(null)23 }24 }25 }26 27 if (savedImageIds.length > 0) {28 setImagesToDelete((prev) => {29 const newSet = new Set(prev)30 savedImageIds.forEach((id) => newSet.add(id))31 return newSet32 })33 if (currentThumbnailId && savedImageIds.includes(currentThumbnailId)) {34 setCurrentThumbnailId(null)35 }36 }37 38 setSelectedImageIds(new Set())39}
In the handleDelete function, you:
- Check if any images are selected; if none, return early.
- Separate the selected IDs into
uploadedFileIds(newly uploaded files) andsavedImageIds(existing category images). - For uploaded files, remove them from the
uploadedFilesstate. If the current thumbnail is among the deleted uploaded files, reset the thumbnail state. - For saved images, add their IDs to the
imagesToDeletestate. If the current thumbnail is among the deleted saved images, reset the thumbnail state. - Finally, clear the selected image IDs.
Next, update the handleSave function to include the delete operation:
1const handleSave = async () => {2 const hasNewImages = uploadedFiles.length > 03 const hasImagesToDelete = imagesToDelete.size > 04 5 const initialThumbnail = existingImages.find((img) => img.type === "thumbnail")6 const thumbnailChanged = 7 currentThumbnailId && 8 !currentThumbnailId.startsWith("uploaded:") &&9 currentThumbnailId !== initialThumbnail?.id10 11 if (!hasNewImages && !hasImagesToDelete && !thumbnailChanged) {12 setOpen(false)13 return14 }15 16 try {17 const operations: Array<Promise<unknown>> = []18 if (hasNewImages) {19 const imagesToCreate = uploadedFiles.map((file) => ({20 url: file.url,21 file_id: file.id,22 type: file.type || (currentThumbnailId === `uploaded:${file.id}` ? 23 "thumbnail" : "image"24 ),25 }))26 operations.push(createImagesMutation.mutateAsync(imagesToCreate))27 }28 29 // Update thumbnail if changed and it's not an uploaded file30 if (thumbnailChanged && !(hasNewImages && currentThumbnailId?.startsWith("uploaded:"))) {31 const updates = [32 {33 id: currentThumbnailId,34 type: "thumbnail" as const,35 },36 ]37 operations.push(updateImagesMutation.mutateAsync(updates))38 }39 40 if (hasImagesToDelete) {41 const idsToDelete = Array.from(imagesToDelete)42 operations.push(deleteImagesMutation.mutateAsync(idsToDelete))43 }44 45 await Promise.all(operations)46 47 queryClient.invalidateQueries({ queryKey: ["category-images", categoryId] })48 setOpen(false)49 resetModalState()50 toast.success("Category media saved successfully")51 } catch (error) {52 toast.error("Failed to save changes")53 }54}
You update the handleSave function to:
- Check if there are images to delete.
- If images need deletion, add a delete operation to the
operationsarray usingdeleteImagesMutation.
Finally, in the return statement, replace the /* TODO add delete command */ comment with the following:
You add a command to "Delete" the selected images. You can also press the "d" key as a shortcut.
Then, update the CategoryImageGallery component to pass the new prop:
You pass the imagesToDelete state to hide images that are marked for deletion.
Test Delete Functionality#
You can now test the delete functionality in the Medusa Admin dashboard.
Start the Medusa server if it's not already running, and go to a category's details page:
- Click the "Edit" button in the Media section to open the modal.
- Hover over an image and click the checkbox to select it.
- You'll see a command bar at the bottom, where you can click "Delete" to mark the selected images for deletion. You can also press the "d" key as a shortcut.
- Click the "Save" button to save the changes.
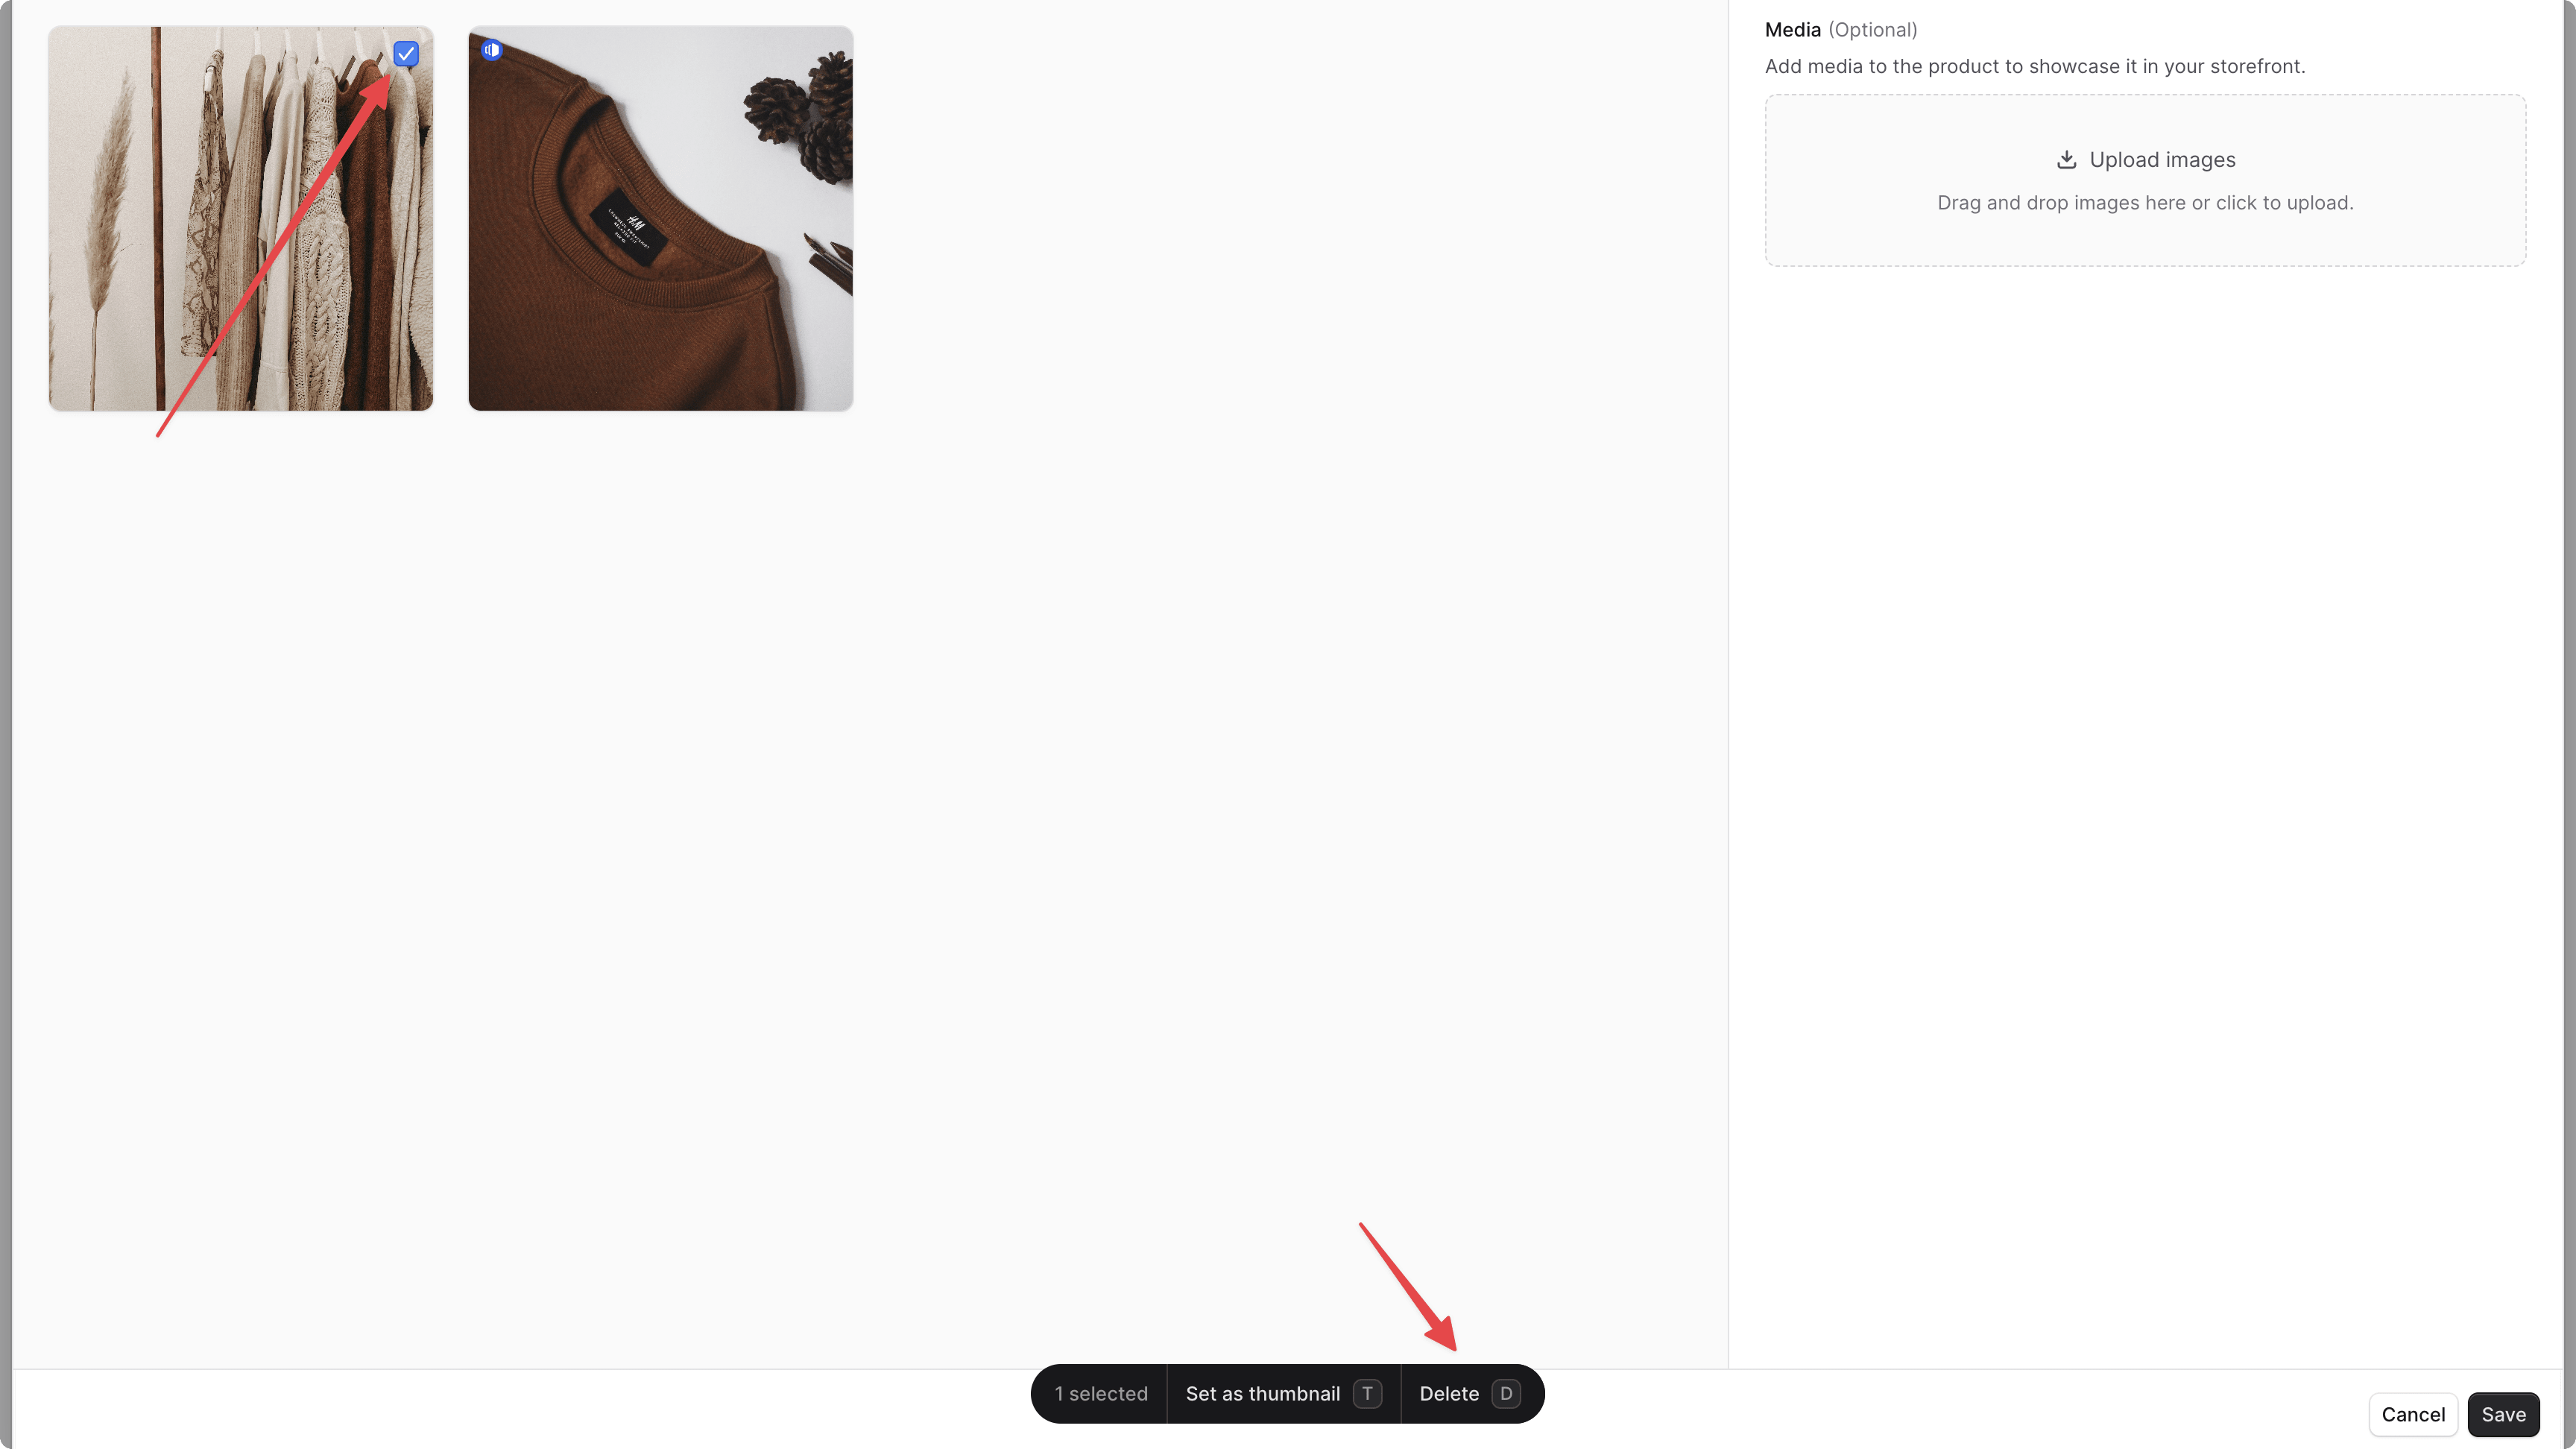
You'll see the selected images are removed from the Media section of the category details page.

Step 8: Show Category Images in Storefront#
In the last step, you'll update the Next.js Starter Storefront to:
- Add a megamenu that displays categories with their thumbnails.
- Display a banner image on category pages.
a. Add Read-Only Link#
Before customizing the storefront, you need a way to retrieve a category's images from the Medusa backend.
You can do this by creating a read-only link. A read-only link allows you to retrieve data related to a model from another module without compromising module isolation.
You'll create an inverse read-only link from the ProductCategory model in the Product module to the ProductCategoryImage model in the ProductMedia module.
To create the link, create the file src/links/product-category-image.ts with the following content:
1import { defineLink } from "@medusajs/framework/utils"2import ProductModule from "@medusajs/medusa/product"3import ProductMediaModule from "../modules/product-media"4 5export default defineLink(6 {7 linkable: ProductModule.linkable.productCategory,8 field: "id",9 isList: true,10 },11 {12 ...ProductMediaModule.linkable.productCategoryImage.id,13 primaryKey: "category_id",14 },15 {16 readOnly: true,17 }18)
You define a link using the defineLink function. It accepts three parameters:
- An object indicating the first data model in the link. It has the following properties:
linkable: A module has a speciallinkableproperty containing link configurations for its data models. You pass the linkable configurations of theProductCategorymodel.field: The field in theProductCategorymodel used to link to theProductCategoryImagemodel. In this case, it's theidfield.isList: A boolean indicating whether the data model links to multiple records in the other data model. Since a category can have multiple images, you set it totrue.
- An object indicating the second data model in the link. It has the following properties:
- You spread the linkable configurations of the
ProductCategoryImagemodel. primaryKey: The field in theProductCategoryImagemodel that links back to theProductCategorymodel. In this case, it's thecategory_idfield.
- You spread the linkable configurations of the
- An options object. You set the
readOnlyproperty totrueto indicate this is a read-only link.
You'll learn how this link allows you to retrieve category images in the next section.
b. Retrieve Category Images#
You'll now begin customizing the storefront.
First, update the functions that retrieve categories to include their images.
In src/lib/data/categories.ts, update the fields query parameter in the listCategories and getCategoryByHandle functions to include the new link you created:
1export const listCategories = async (query?: Record<string, any>) => {2 // ...3 return sdk.client4 .fetch<{ product_categories: HttpTypes.StoreProductCategory[] }>(5 "/store/product-categories",6 {7 query: {8 fields:9 "*category_children, *products, *parent_category, *parent_category.parent_category, *product_category_image",10 // ...11 },12 // ...13 }14 )15 // ...16}17 18export const getCategoryByHandle = async (categoryHandle: string[]) => {19 // ...20 21 return sdk.client22 .fetch<HttpTypes.StoreProductCategoryListResponse>(23 `/store/product-categories`,24 {25 query: {26 fields: "*category_children, *products, *product_category_image",27 // ...28 },29 // ...30 }31 )32 // ...33}
You add *product_category_image to the fields query parameter in both functions. The asterisk (*) indicates that you want to include all fields in the product category image record.
c. Add Category Image Type#
Next, you'll add a TypeScript type for a category image.
In src/types/global.ts, add the following type:
You define a CategoryImage type that represents a category image.
d. Add Megamenu#
Next, you'll add a megamenu that shows categories with their thumbnail. You'll then change the navigation bar to show the megamenu.
Create Megamenu Component
To create the megamenu component, create the file src/modules/layout/components/megamenu/index.tsx with the following content:
1import { HttpTypes } from "@medusajs/types"2import LocalizedClientLink from "@modules/common/components/localized-client-link"3import { CategoryImage } from "../../../../types/global"4import Thumbnail from "../../../products/components/thumbnail"5 6type CategoryWithImages = HttpTypes.StoreProductCategory & {7 product_category_image?: CategoryImage[]8}9 10const Megamenu = ({11 categories,12}: {13 categories: CategoryWithImages[]14}) => {15 // Filter to only show parent categories (no parent_category_id)16 const parentCategories = categories.filter(17 (category) => !category.parent_category_id18 )19 20 return (21 <div className="h-full w-full hidden small:flex items-center justify-center">22 <div className="w-fit group/megamenu h-full">23 <LocalizedClientLink24 data-testid="nav-categories-button"25 className="relative h-full flex items-center focus:outline-none hover:text-ui-fg-base"26 href="/store"27 >28 Shop29 </LocalizedClientLink>30 31 {/* Megamenu dropdown */}32 <div className="absolute left-0 right-0 top-full z-30 opacity-0 invisible translate-y-1 group-hover/megamenu:opacity-100 group-hover/megamenu:visible group-hover/megamenu:translate-y-0 transition-all duration-150 ease-out w-full">33 <div className="bg-white border-b border-ui-border-base shadow-sm">34 <div className="content-container">35 <div36 data-testid="nav-categories-popup"37 className="grid grid-cols-3 md:grid-cols-4 lg:grid-cols-5 xl:grid-cols-6 gap-x-8 gap-y-6 py-8"38 >39 {parentCategories.map((category) => {40 const thumbnail = category.product_category_image?.find(41 (img) => img.type === "thumbnail"42 )43 44 return (45 <LocalizedClientLink46 key={category.id}47 href={`/categories/${category.handle}`}48 className="group/megamenu-item flex flex-col gap-2 focus:outline-none"49 data-testid={`category-${category.handle}`}50 >51 <Thumbnail52 thumbnail={thumbnail?.url}53 size="square"54 className="!shadow-none"55 />56 <div className="text-center">57 <h3 className="text-xs text-ui-fg-base group-hover/megamenu-item:text-ui-fg-subtle transition-colors">58 {category.name}59 </h3>60 </div>61 </LocalizedClientLink>62 )63 })}64 </div>65 </div>66 </div>67 </div>68 </div>69 </div>70 )71}72 73export default Megamenu
The Megamenu component accepts an array of categories with their images.
It filters the categories to show only parent categories (those without a parent_category_id).
Then, it renders a megamenu that displays each parent category with its thumbnail image and name. Each category links to its category page.
Update Navigation Bar
Next, you'll update the navigation bar to show the megamenu.
In src/modules/layout/templates/nav/index.tsx, update the file content to the following:
1import { Suspense } from "react"2import { listCategories } from "@lib/data/categories"3import LocalizedClientLink from "@modules/common/components/localized-client-link"4import CartButton from "@modules/layout/components/cart-button"5import Megamenu from "@modules/layout/components/megamenu"6 7export default async function Nav() {8 const categories = await listCategories({9 limit: 5,10 })11 12 return (13 <div className="sticky top-0 inset-x-0 z-50 group">14 <header className="relative h-16 mx-auto border-b duration-200 bg-white border-ui-border-base">15 <nav className="content-container txt-xsmall-plus text-ui-fg-subtle flex items-center w-full h-full text-small-regular">16 {/* Left: Logo */}17 <div className="flex items-center gap-x-6 h-full">18 <LocalizedClientLink19 href="/"20 className="txt-compact-xlarge-plus hover:text-ui-fg-base uppercase"21 data-testid="nav-store-link"22 >23 Medusa Store24 </LocalizedClientLink>25 </div>26 27 {/* Center: Megamenu */}28 <div className="flex-1 flex justify-center h-full">29 <Megamenu categories={categories} />30 </div>31 32 {/* Right: Account and Cart */}33 <div className="flex items-center gap-x-6 h-full">34 <div className="hidden small:flex items-center gap-x-6 h-full">35 <LocalizedClientLink36 className="hover:text-ui-fg-base"37 href="/account"38 data-testid="nav-account-link"39 >40 Account41 </LocalizedClientLink>42 </div>43 <Suspense44 fallback={45 <LocalizedClientLink46 className="hover:text-ui-fg-base flex gap-2"47 href="/cart"48 data-testid="nav-cart-link"49 >50 Cart (0)51 </LocalizedClientLink>52 }53 >54 <CartButton />55 </Suspense>56 </div>57 </nav>58 </header>59 </div>60 )61}
You make the following key changes:
- Retrieve the categories using the
listCategoriesfunction, limiting it to 5 categories. - Move the logo to the left side of the navigation bar and remove the previous Menu item.
- Add the
Megamenucomponent in the center of the navigation bar, passing the retrieved categories as a prop.
Test Megamenu
To test out the megamenu, start the Medusa application with the following command:
Then, run the following command in the Next.js Starter Storefront directory to start the storefront:
Open the storefront at http://localhost:8000 in your browser. You'll see the "Shop" item in the navigation bar.
Hover over the "Shop" item to see the megamenu with categories and their thumbnails.

e. Show Banner Image on Category Page#
Next, you'll show a banner image on a category's page.
Create Banner Component
To create the banner component, create the file src/modules/categories/components/category-banner/index.tsx with the following content:
1import Image from "next/image"2import { CategoryImage } from ".././../../../types/global"3 4type CategoryBannerProps = {5 images?: CategoryImage[]6 categoryName: string7}8 9export default function CategoryBanner({10 images,11 categoryName,12}: CategoryBannerProps) {13 // Get the first image that is not a thumbnail14 const bannerImage = images?.find((img) => img.type === "image")15 16 if (!bannerImage) {17 return null18 }19 20 return (21 <div className="relative w-full h-64 md:h-80 lg:h-96 mb-8 overflow-hidden">22 <Image23 src={bannerImage.url}24 alt={categoryName}25 fill26 className="object-cover"27 priority28 sizes="100vw"29 />30 </div>31 )32}
The CategoryBanner component accepts an array of category images and the category name as props.
It retrieves the first non-thumbnail image and displays it as a banner. If no such image exists, it returns null.
Update Category Page
Next, you'll update the category page to include the banner component.
Replace the content of src/modules/categories/templates/index.tsx with the following:
1import { notFound } from "next/navigation"2import { Suspense } from "react"3 4import InteractiveLink from "@modules/common/components/interactive-link"5import SkeletonProductGrid from "@modules/skeletons/templates/skeleton-product-grid"6import RefinementList from "@modules/store/components/refinement-list"7import { SortOptions } from "@modules/store/components/refinement-list/sort-products"8import PaginatedProducts from "@modules/store/templates/paginated-products"9import LocalizedClientLink from "@modules/common/components/localized-client-link"10import CategoryBanner from "@modules/categories/components/category-banner"11import { HttpTypes } from "@medusajs/types"12import { CategoryImage } from ".././../../types/global"13 14type CategoryWithImages = HttpTypes.StoreProductCategory & {15 product_category_image?: CategoryImage[]16}17 18export default function CategoryTemplate({19 category,20 sortBy,21 page,22 countryCode,23}: {24 category: CategoryWithImages25 sortBy?: SortOptions26 page?: string27 countryCode: string28}) {29 const pageNumber = page ? parseInt(page) : 130 const sort = sortBy || "created_at"31 32 if (!category || !countryCode) {notFound()}33 34 const parents = [] as HttpTypes.StoreProductCategory[]35 36 const getParents = (category: HttpTypes.StoreProductCategory) => {37 if (category.parent_category) {38 parents.push(category.parent_category)39 getParents(category.parent_category)40 }41 }42 43 getParents(category)44 45 return (46 <>47 {/* Full-width banner outside content-container */}48 <CategoryBanner49 images={category.product_category_image}50 categoryName={category.name}51 />52 53 <div54 className="flex flex-col small:flex-row small:items-start pb-6 content-container"55 data-testid="category-container"56 >57 <RefinementList sortBy={sort} data-testid="sort-by-container" />58 <div className="w-full">59 <div className="flex flex-row mb-8 text-2xl-semi gap-4">60 {parents &&61 parents.map((parent) => (62 <span key={parent.id} className="text-ui-fg-subtle">63 <LocalizedClientLink64 className="mr-4 hover:text-black"65 href={`/categories/${parent.handle}`}66 data-testid="sort-by-link"67 >68 {parent.name}69 </LocalizedClientLink>70 /71 </span>72 ))}73 <h1 data-testid="category-page-title">{category.name}</h1>74 </div>75 {category.description && (76 <div className="mb-8 text-base-regular">77 <p>{category.description}</p>78 </div>79 )}80 {category.category_children && (81 <div className="mb-8 text-base-large">82 <ul className="grid grid-cols-1 gap-2">83 {category.category_children?.map((c) => (84 <li key={c.id}>85 <InteractiveLink href={`/categories/${c.handle}`}>86 {c.name}87 </InteractiveLink>88 </li>89 ))}90 </ul>91 </div>92 )}93 <Suspense94 fallback={95 <SkeletonProductGrid96 numberOfProducts={category.products?.length ?? 8}97 />98 }99 >100 <PaginatedProducts101 sortBy={sort}102 page={pageNumber}103 categoryId={category.id}104 countryCode={countryCode}105 />106 </Suspense>107 </div>108 </div>109 </>110 )111}
You make the following key changes:
- Update the type of the
categoryprop to include category images. - Display the
CategoryBannercomponent at the top of the page, passing the category images and name as props.
Test Category Banner
To test out the category banner, ensure both the Medusa application and the Next.js Starter Storefront are running.
Then, open the storefront at http://localhost:8000 in your browser. You can navigate to a category page by clicking on a category in the megamenu.
You'll see the banner image at the top of the category page. If you don't see a banner image, ensure that the category has an image of type "image" (not "thumbnail") in the Medusa Admin dashboard.

Next Steps#
You've now added support for category images in Medusa. You can expand on this by:
- Adding images to other models, such as collections.
- Adding support for reordering category images.
- Allowing setting multiple thumbnails for different use cases (for example, mobile vs. desktop).
- Adding alt text for category images for better accessibility and SEO.
Learn More About Medusa#
If you're new to Medusa, check out the main documentation for a more in-depth understanding of the concepts you've used in this guide and more.
To learn more about the commerce features Medusa provides, check out Commerce Modules.
Troubleshooting#
If you encounter issues during your development, check out the troubleshooting guides.
Getting Help#
If you encounter issues not covered in the troubleshooting guides:
- Visit the Medusa GitHub repository to report issues or ask questions.
- Join the Medusa Discord community for real-time support from community members.