Implement Quote Management in Medusa
In this guide, you'll learn how to implement quote management in Medusa.
When you install a Medusa application, you get a fully-fledged commerce platform with a Framework for customization. The Medusa application's commerce features are built around Commerce Modules which are available out-of-the-box.
By default, the Medusa application provides standard commerce features for orders and carts. However, Medusa's customization capabilities facilitate extending existing features to implement quote-management features.
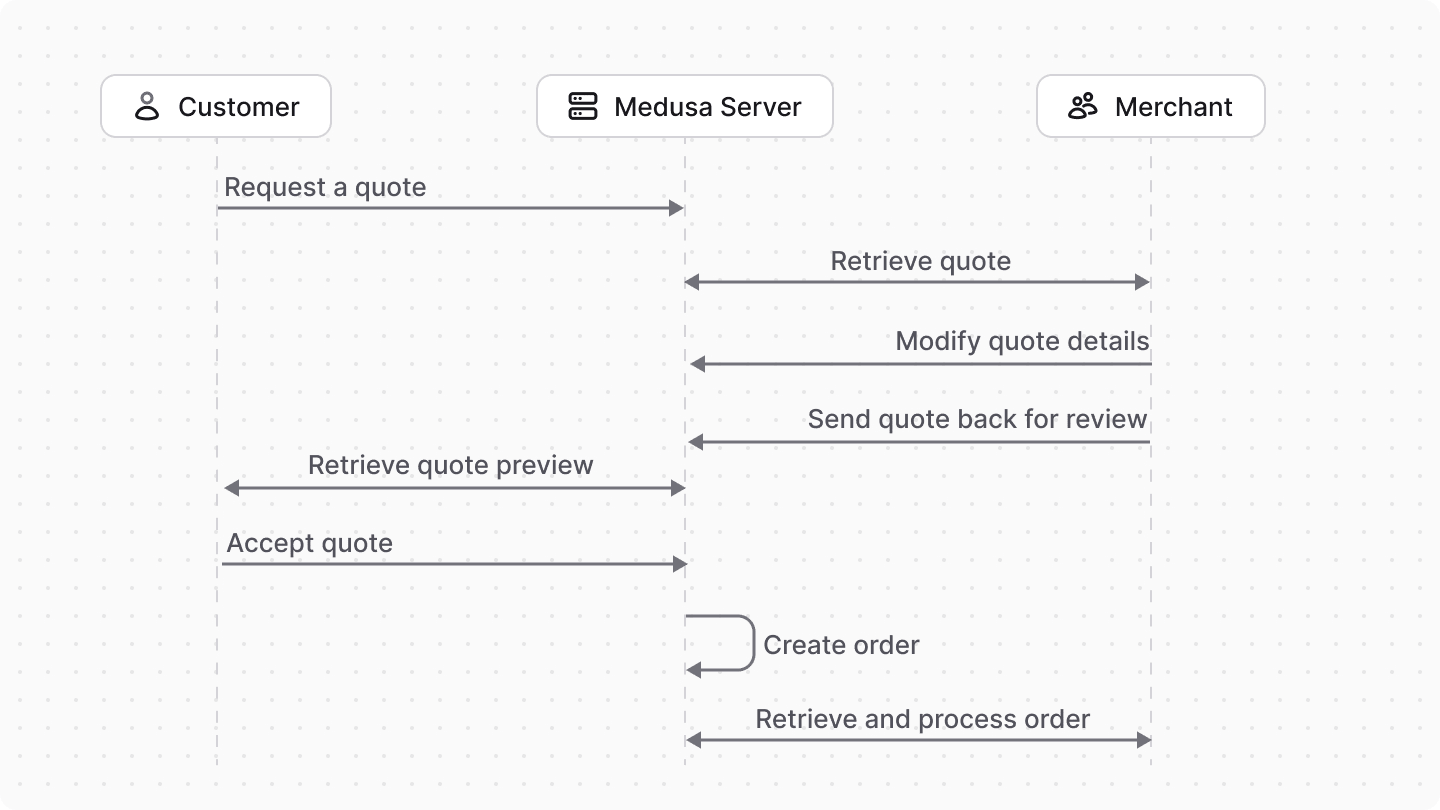
By building quote management features, you allow customers to request a quote for a set of products and, once the merchant and customer reach an agreement, you create an order for that quote. Quote management is useful in many use cases, including B2B stores.
Summary#
By following this guide, you'll add the following features to Medusa:
- Customers can request a quote for a set of products.
- Merchants can manage quotes in the Medusa Admin dashboard. They can reject a quote or send a counter-offer, and they can make edits to item prices and quantities.
- Customers can accept or reject a quote once it's been sent by the merchant.
- Once the customer accepts a quote, it's converted to an order in Medusa.
To implement these features, you'll be customizing the Medusa server and the Medusa Admin dashboard.
You can follow this guide whether you're new to Medusa or an advanced Medusa developer.
Step 1: Install a Medusa Application#
Start by installing the Medusa application on your machine with the following command:
You'll first be asked for the project's name. You can also optionally choose to install the Next.js Starter Storefront.
Afterwards, the installation process will start, which will install the Medusa application as a monorepository in a directory with your project's name. The backend is installed in the apps/backend directory. If you chose to install the Next.js Starter Storefront, it'll be in the apps/storefront directory.
Once the installation finishes successfully, the Medusa Admin dashboard will open with a form to create a new user. Enter the user's credentials and submit the form. Afterwards, you can log in with the new user and explore the dashboard.
apps/backend directory of your Medusa project.Step 2: Add Quote Module#
In Medusa, you can build custom features in a module. A module is a reusable package with functionalities related to a single feature or domain. Medusa integrates the module into your application without implications or side effects on your setup.
In the module, you define the data models necessary for a feature and the logic to manage these data models. Later, you can build commerce flows around your module and link its data models to other modules' data models, such as orders and carts.
In this step, you'll build a Quote Module that defines the necessary data model to store quotes.
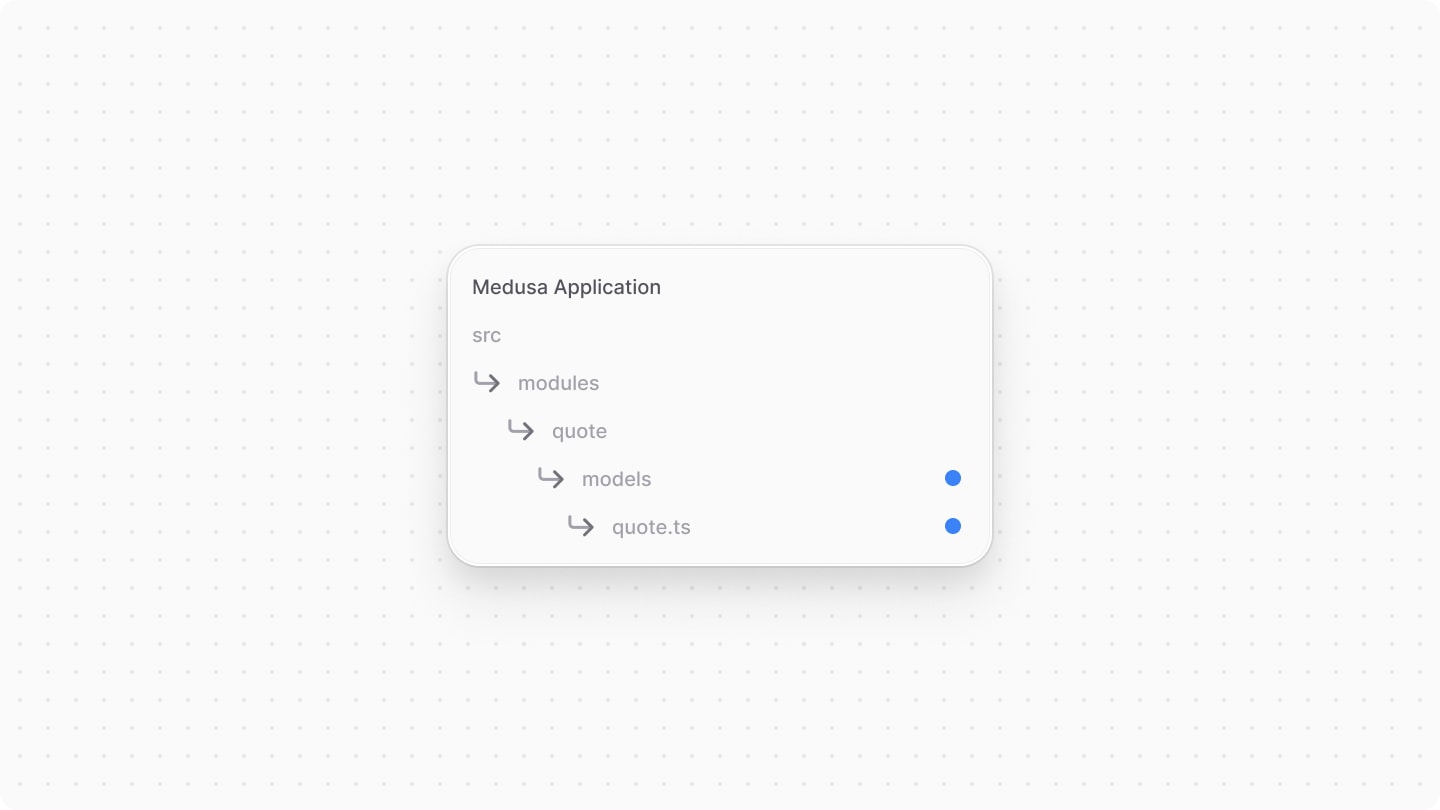
Create Module Directory#
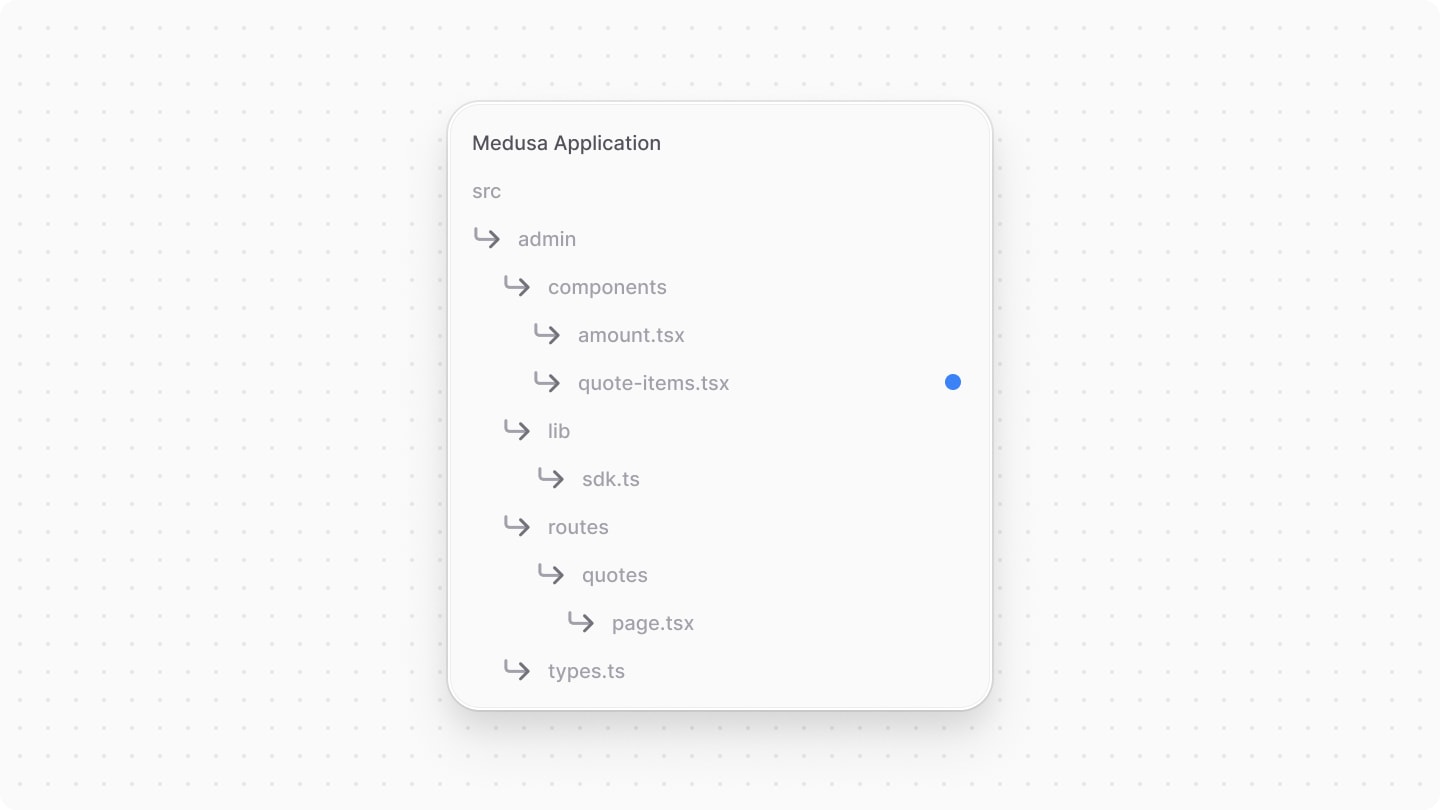
A module is created under the src/modules directory of your Medusa application. So, create the directory src/modules/quote.

Create Data Models#
A data model represents a table in the database. You create data models using Medusa's Data Model Language (DML). It simplifies defining a table's columns, relations, and indexes with straightforward methods and configurations.
For the Quote Module, you need to define a Quote data model that represents a quote requested by a customer.
So, start by creating the Quote data model. Create the file src/modules/quote/models/quote.ts with the following content:
1import { model } from "@medusajs/framework/utils"2 3export enum QuoteStatus {4 PENDING_MERCHANT = "pending_merchant",5 PENDING_CUSTOMER = "pending_customer",6 ACCEPTED = "accepted",7 CUSTOMER_REJECTED = "customer_rejected",8 MERCHANT_REJECTED = "merchant_rejected",9}10 11export const Quote = model.define("quote", {12 id: model.id().primaryKey(),13 status: model14 .enum(Object.values(QuoteStatus))15 .default(QuoteStatus.PENDING_MERCHANT),16 customer_id: model.text(),17 draft_order_id: model.text(),18 order_change_id: model.text(),19 cart_id: model.text(),20})
You define the Quote data model using the model.define method of the DML. It accepts the data model's table name as a first parameter, and the model's schema object as a second parameter.
Quote has the following properties:
id: A unique identifier for the quote.status: The status of the quote, which can be one of the following:pending_merchant: The quote is pending the merchant's approval or rejection.pending_customer: The quote is pending the customer's acceptance or rejection.accepted: The quote has been accepted by the customer and converted to an order.customer_rejected: The customer has rejected the quote.merchant_rejected: The merchant has rejected the quote.
customer_id: The ID of the customer who requested the quote. You'll later learn how to link this to a customer record.draft_order_id: The ID of the draft order created for the quote. You'll later learn how to link this to an order record.order_change_id: The ID of the order change created for the quote. An order change is a record of changes made to an order, such as price or quantity updates of the order's items. These changes are later applied to the order. You'll later learn how to link this to an order change record.cart_id: The ID of the cart that the quote was created from. The cart will hold the items that the customer wants a quote for. You'll later learn how to link this to a cart record.
Create Module's Service#
You now have the necessary data model in the Quote Module, but you need to define the logic to manage it. You do this by creating a service in the module.
A service is a TypeScript or JavaScript class that the module exports. In the service's methods, you can connect to the database, allowing you to manage your data models, or connect to a third-party service, which is useful if you're integrating with external services.
To create the Quote Module's service, create the file src/modules/quote/service.ts with the following content:

The QuoteModuleService extends MedusaService from the Modules SDK which generates a class with data-management methods for your module's data models. This saves you time on implementing Create, Read, Update, and Delete (CRUD) methods.
So, the QuoteModuleService class now has methods like createQuotes and retrieveQuote.
You'll use this service later when you implement custom flows for quote management.
Export Module Definition#
The final piece to a module is its definition, which you export in an index.ts file at its root directory. This definition tells Medusa the name of the module and its service.
So, create the file src/modules/quote/index.ts with the following content:

You use the Module function from the Modules SDK to create the module's definition. It accepts two parameters:
- The module's name, which is
quote. - An object with a required property
serviceindicating the module's service.
You also export the module's name as QUOTE_MODULE so you can reference it later.
Add Module to Medusa's Configurations#
Once you finish building the module, add it to Medusa's configurations to start using it.
In medusa-config.ts, add a modules property and pass an array with your custom module:
Each object in the modules array has a resolve property, whose value is either a path to the module's directory, or an npm package’s name.
Generate Migrations#
Since data models represent tables in the database, you define how they're created in the database with migrations. A migration is a TypeScript or JavaScript file that defines database changes made by a module.
Medusa's CLI tool generates the migrations for you. To generate a migration for the Quote Module, run the following command in your apps/backend directory:
The db:generate command of the Medusa CLI accepts the name of the module to generate the migration for. You'll now have a migrations directory under src/modules/quote that holds the generated migration.

Then, to reflect these migrations on the database, run the following command:
The table for the Quote data model is now created in the database.
Step 3: Define Links to Other Modules#
When you defined the Quote data model, you added properties that store the ID of records managed by other modules. For example, the customer_id property stores the ID of the customer that requested the quote, but customers are managed by the Customer Module.
Medusa integrates modules into your application without implications or side effects by isolating modules from one another. This means you can't directly create relationships between data models in your module and data models in other modules.
Instead, Medusa provides the mechanism to define links between data models, and retrieve and manage linked records while maintaining module isolation. Links are useful to define associations between data models in different modules, or extend a model in another module to associate custom properties with it.
In this step, you'll define the following links between the Quote Module's data model and data models in other modules:
Quote<>Cartdata model of the Cart Module: link quotes to the carts they were created from.Quote<>Customerdata model of the Customer Module: link quotes to the customers who requested them.Quote<>OrderChangedata model of the Order Module: link quotes to the order changes that record adjustments made to the quote's draft order.Quote<>Orderdata model of the Order Module: link quotes to their draft orders that are later converted to orders.
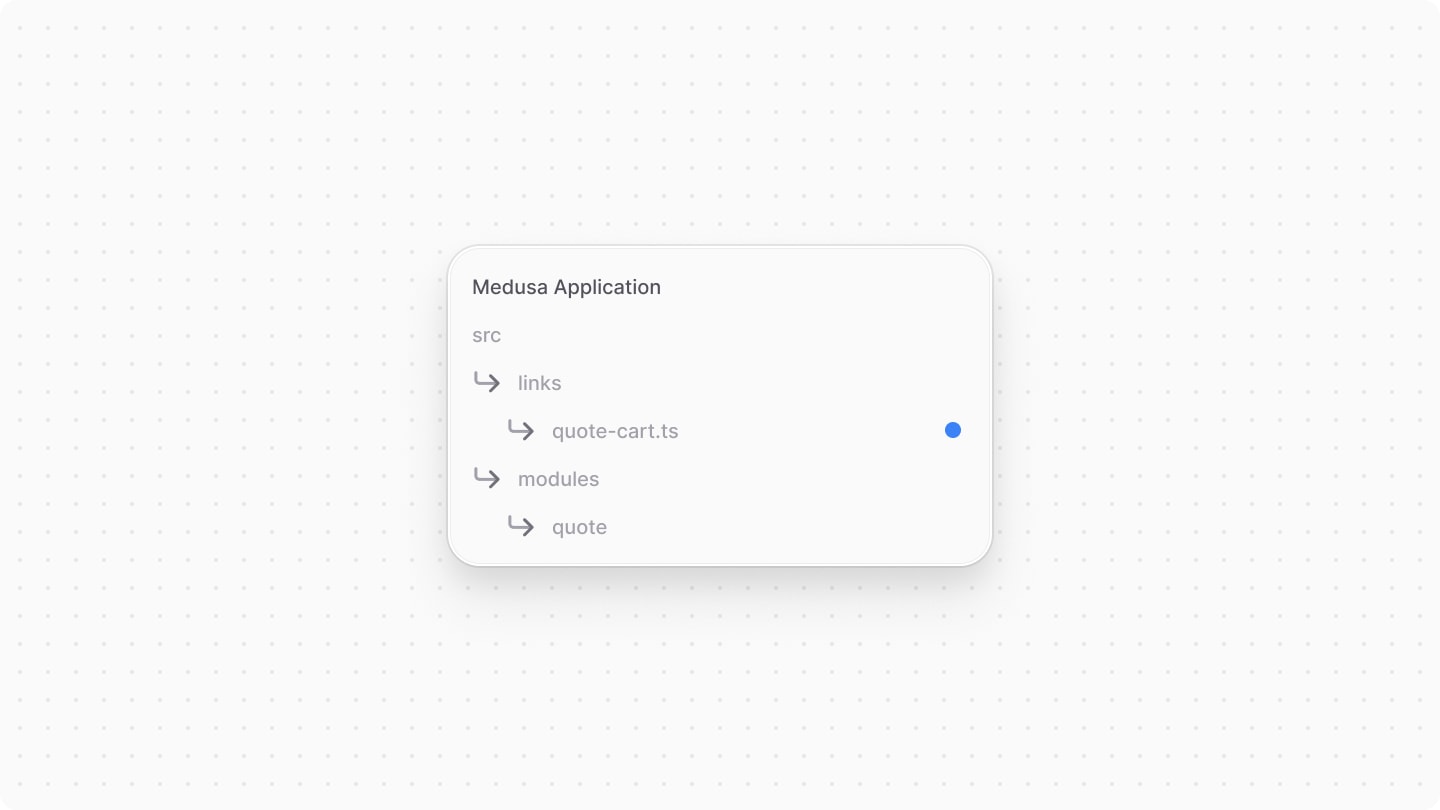
Define Quote <> Cart Link#
You can define links between data models in a TypeScript or JavaScript file under the src/links directory. So, to define the link between the Quote and Cart data models, create the file src/links/quote-cart.ts with the following content:
1import { defineLink } from "@medusajs/framework/utils"2import QuoteModule from "../modules/quote"3import CartModule from "@medusajs/medusa/cart"4 5export default defineLink(6 {7 linkable: QuoteModule.linkable.quote.id,8 field: "cart_id",9 },10 CartModule.linkable.cart,11 {12 readOnly: true,13 }14)
You define a link using the defineLink function from the Modules SDK. It accepts three parameters:
- An object indicating the first data model part of the link. A module has a special
linkableproperty that contains link configurations for its data models. So, you can pass the link configurations for theQuotedata model from theQuoteModulemodule, specifying that itscart_idproperty holds the ID of the linked record. - An object indicating the second data model part of the link. You pass the link configurations for the
Cartdata model from theCartModulemodule. - An optional object with additional configurations for the link. By default, Medusa creates a table in the database to represent the link you define. However, when you only want to retrieve the linked records without managing and storing the links, you can set the
readOnlyoption totrue.
You'll now be able to retrieve the cart that a quote was created from, as you'll see in later steps.
Define Quote <> Customer Link#
Next, you'll define the link between the Quote and Customer data model of the Customer Module. So, create the file src/links/quote-customer.ts with the following content:

1import { defineLink } from "@medusajs/framework/utils"2import QuoteModule from "../modules/quote"3import CustomerModule from "@medusajs/medusa/customer"4 5export default defineLink(6 {7 linkable: QuoteModule.linkable.quote.id,8 field: "customer_id",9 },10 CustomerModule.linkable.customer,11 {12 readOnly: true,13 }14)
You define the link between the Quote and Customer data models in the same way as the Quote and Cart link. In the first object parameter of defineLink, you pass the linkable configurations of the Quote data model, specifying the customer_id property as the link field. In the second object parameter, you pass the linkable configurations of the Customer data model from the Customer Module. You also configure the link to be read-only.
Define Quote <> OrderChange Link#
Next, you'll define the link between the Quote and OrderChange data model of the Order Module. So, create the file src/links/quote-order-change.ts with the following content:

1import { defineLink } from "@medusajs/framework/utils"2import QuoteModule from "../modules/quote"3import OrderModule from "@medusajs/medusa/order"4 5export default defineLink(6 {7 linkable: QuoteModule.linkable.quote.id,8 field: "order_change_id",9 },10 OrderModule.linkable.orderChange,11 {12 readOnly: true,13 }14)
You define the link between the Quote and OrderChange data models in the same way as the previous links. You pass the linkable configurations of the Quote data model, specifying the order_change_id property as the link field. In the second object parameter, you pass the linkable configurations of the OrderChange data model from the Order Module. You also configure the link to be read-only.
Define Quote <> Order Link#
Finally, you'll define the link between the Quote and Order data model of the Order Module. So, create the file src/links/quote-order.ts with the following content:

1import { defineLink } from "@medusajs/framework/utils"2import QuoteModule from "../modules/quote"3import OrderModule from "@medusajs/medusa/order"4 5export default defineLink(6 {7 linkable: QuoteModule.linkable.quote.id,8 field: "draft_order_id",9 },10 {11 linkable: OrderModule.linkable.order.id,12 alias: "draft_order",13 },14 {15 readOnly: true,16 }17)
You define the link between the Quote and Order data models similar to the previous links. You pass the linkable configurations of the Quote data model, specifying the draft_order_id property as the link field.
In the second object parameter, you pass the linkable configurations of the Order data model from the Order Module. You also set an alias property to draft_order. This allows you later to retrieve the draft order of a quote with the draft_order alias rather than the default order alias. Finally, you configure the link to be read-only.
You've finished creating the links that allow you to retrieve data related to quotes. You'll see how to use these links in later steps.
Step 4: Implement Create Quote Workflow#
You're now ready to start implementing quote-management features. The first one you'll implement is the ability for customers to request a quote for a set of items in their cart.
To build custom commerce features in Medusa, you create a workflow. A workflow is a series of queries and actions, called steps, that complete a task. You construct a workflow like you construct a function, but it's a special function that allows you to track its executions' progress, define roll-back logic, and configure other advanced features. Then, you execute the workflow from other customizations, such as in an endpoint.
So, in this section, you'll learn how to create a workflow that creates a quote for a customer.
The workflow will have the following steps:
Loading...The first four steps are provided by Medusa in its @medusajs/medusa/core-flows package. So, you only need to implement the createQuotesStep step.
createQuotesStep#
In the last step of the workflow, you'll create a quote for the customer using the Quote Module's service.
To create a step, create the file src/workflows/steps/create-quotes.ts with the following content:

1import { createStep, StepResponse } from "@medusajs/framework/workflows-sdk"2import { QUOTE_MODULE } from "../../modules/quote"3import QueryModuleService from "../../modules/quote/service"4 5type StepInput = {6 draft_order_id: string;7 order_change_id: string;8 cart_id: string;9 customer_id: string;10}[]11 12export const createQuotesStep = createStep(13 "create-quotes",14 async (input: StepInput, { container }) => {15 const quoteModuleService: QueryModuleService = container.resolve(16 QUOTE_MODULE17 )18 19 const quotes = await quoteModuleService.createQuotes(input)20 21 return new StepResponse(22 quotes,23 quotes.map((quote) => quote.id)24 )25 }26)
You create a step with createStep from the Workflows SDK. It accepts two parameters:
- The step's unique name, which is
create-quotes. - An async function that receives two parameters:
- The step's input, which is in this case an array of quotes to create.
- An object that has properties including the Medusa container, which is a registry of Framework and commerce tools that you can access in the step.
In the step function, you resolve the Quote Module's service from the Medusa container using the resolve method of the container, passing it the module's name as a parameter.
Then, you create the quotes using the createQuotes method. As you remember, the Quote Module's service extends the MedusaService which generates data-management methods for you.
A step function must return a StepResponse instance. The StepResponse constructor accepts two parameters:
- The step's output, which is the quotes created.
- Data to pass to the step's compensation function, which you'll add next.
Add Compensation to Step
A step can have a compensation function that undoes the actions performed in a step. Then, if an error occurs during the workflow's execution, the compensation functions of executed steps are called to roll back the changes. This mechanism ensures data consistency in your application, especially as you integrate external systems.
To add a compensation function to a step, pass it as a third-parameter to createStep:
1export const createQuotesStep = createStep(2 // ...3 async (quoteIds, { container }) => {4 if (!quoteIds) {5 return6 }7 8 const quoteModuleService: QueryModuleService = container.resolve(9 QUOTE_MODULE10 )11 12 await quoteModuleService.deleteQuotes(quoteIds)13 }14)
The compensation function accepts two parameters:
- The data passed from the step in the second parameter of
StepResponse, which in this case is an array of quote IDs. - An object that has properties including the Medusa container.
In the compensation function, you resolve the Quote Module's service from the Medusa container and call the deleteQuotes method to delete the quotes created in the step.
createRequestForQuoteWorkflow#
You can now create the workflow using the steps provided by Medusa and your custom step.
To create the workflow, create the file src/workflows/create-request-for-quote.ts with the following content:
19};20 21export const createRequestForQuoteWorkflow = createWorkflow(22 "create-request-for-quote",23 (input: WorkflowInput) => {24 const { data: carts } = useQueryGraphStep({25 entity: "cart",26 fields: [27 "id",28 "sales_channel_id",29 "currency_code",30 "region_id",31 "customer.id",32 "customer.email",33 "shipping_address.*",34 "billing_address.*",35 "items.*",36 "shipping_methods.*",37 "promotions.code",38 ],39 filters: { id: input.cart_id },40 options: {41 throwIfKeyNotFound: true,42 },43 })44 45 const { data: customers } = useQueryGraphStep({46 entity: "customer",47 fields: ["id", "customer"],48 filters: { id: input.customer_id },49 options: {50 throwIfKeyNotFound: true,51 },52 }).config({ name: "customer-query" })53 54 // TODO create order55 }56)
You create a workflow using createWorkflow from the Workflows SDK. It accepts the workflow's unique name as a first parameter.
It accepts as a second parameter a constructor function, which is the workflow's implementation. The function can accept input, which in this case is an object having the ID of the customer requesting the quote, and the ID of their cart.
In the workflow's constructor function, you use useQueryGraphStep to retrieve the cart and customer details using the IDs passed as an input to the workflow.
useQueryGraphStep uses Query, which allows you to retrieve data across modules. For example, in the above snippet you're retrieving the cart's promotions, which are managed in the Promotion Module, by passing promotions.code to the fields array.Next, you want to create the draft order for the quote. Replace the TODO in the workflow with the following:
1const orderInput = transform({ carts, customers }, ({ carts, customers }) => {2 return {3 is_draft_order: true,4 status: OrderStatus.DRAFT,5 sales_channel_id: carts[0].sales_channel_id || undefined,6 email: customers[0].email || undefined,7 customer_id: customers[0].id || undefined,8 billing_address: carts[0].billing_address,9 shipping_address: carts[0].shipping_address,10 items: carts[0].items as CreateOrderLineItemDTO[] || [],11 region_id: carts[0].region_id || undefined,12 promo_codes: carts[0].promotions?.map((promo) => promo?.code),13 currency_code: carts[0].currency_code,14 shipping_methods: carts[0].shipping_methods || [],15 } as CreateOrderWorkflowInput16})17 18const draftOrder = createOrderWorkflow.runAsStep({19 input: orderInput,20})21 22// TODO create order change
You first prepare the order's details using transform from the Workflows SDK. Since Medusa creates an internal representation of the workflow's constructor before any data actually has a value, you can't manipulate data directly in the function. So, Medusa provides utilities like transform to manipulate data instead. You can learn more in the transform variables documentation.
Then, you create the draft order using the createOrderWorkflow workflow which you imported from @medusajs/medusa/core-flows. The workflow creates and returns the created order.
After that, you want to create an order change for the draft order. This will allow the admin later to make edits to the draft order, such as updating the prices or quantities of the items in the order.
Replace the TODO with the following:
1const orderEditInput = transform({ draftOrder }, ({ draftOrder }) => {2 return {3 order_id: draftOrder.id,4 description: "",5 internal_note: "",6 metadata: {},7 }8})9 10const changeOrder = beginOrderEditOrderWorkflow.runAsStep({11 input: orderEditInput,12})13 14// TODO create quote
You prepare the order change's details using transform and then create the order change using the beginOrderEditOrderWorkflow workflow which is provided by Medusa.
Finally, you want to create the quote for the customer and return it. Replace the last TODO with the following:
1const quoteData = transform({2 draftOrder,3 carts,4 customers,5 changeOrder,6}, ({ draftOrder, carts, customers, changeOrder }) => {7 return {8 draft_order_id: draftOrder.id,9 cart_id: carts[0].id,10 customer_id: customers[0].id,11 order_change_id: changeOrder.id,12 }13})14 15const quotes = createQuotesStep([16 quoteData,17])18 19return new WorkflowResponse({ quote: quotes[0] })
Similar to before, you prepare the quote's details using transform. Then, you create the quote using the createQuotesStep you implemented earlier.
A workflow must return an instance of WorkflowResponse. The WorkflowResponse constructor accepts the workflow's output as a parameter, which is an object holding the created quote in this case.
In the next step, you'll learn how to execute the workflow when a customer requests a quote.
Step 5: Create Quote API Route#
Now that you have the logic to create a quote for a customer, you need to expose it so that frontend clients, such as a storefront, can use it. You do this by creating an API route.
An API Route is an endpoint that exposes commerce features to external applications and clients, such as storefronts. You'll create an API route at the path /store/customers/me/quotes that executes the workflow from the previous step.
Implement API Route#
An API route is created in a route.ts file under a sub-directory of the src/api directory. The path of the API route is the file's path relative to src/api.
By default, all routes starting with /store/customers/me require the customer to be authenticated. So, you'll be creating the API route at /store/customers/me/quotes.
To create the API route, create the file src/api/store/customers/me/quotes/route.ts with the following content:

8} from "../../../../../workflows/create-request-for-quote"9 10type CreateQuoteType = {11 cart_id: string;12}13 14export const POST = async (15 req: AuthenticatedMedusaRequest<CreateQuoteType>,16 res: MedusaResponse17) => {18 const {19 result: { quote: createdQuote },20 } = await createRequestForQuoteWorkflow(req.scope).run({21 input: {22 ...req.validatedBody,23 customer_id: req.auth_context.actor_id,24 },25 })26 27 const query = req.scope.resolve(28 ContainerRegistrationKeys.QUERY29 )30 31 const {32 data: [quote],33 } = await query.graph(34 {35 entity: "quote",36 fields: req.queryConfig.fields,37 filters: { id: createdQuote.id },38 },39 { throwIfKeyNotFound: true }40 )41 42 return res.json({ quote })43}
Since you export a POST function in this file, you're exposing a POST API route at /store/customers/me/quotes. The route handler function accepts two parameters:
- A request object with details and context on the request, such as body parameters or authenticated customer details.
- A response object to manipulate and send the response.
AuthenticatedMedusaRequest accepts the request body's type as a type argument.In the route handler function, you create the quote using the createRequestForQuoteWorkflow from the previous step. Then, you resolve Query from the Medusa container, which is available in the request object's req.scope property.
You use Query to retrieve the Quote with its fields and linked records, which you'll learn how to specify soon. Finally, you send the quote as a response.
Add Validation Schema#
The API route accepts the cart ID as a request body parameter. So, it's important to validate the body of a request before executing the route's handler. You can do this by specifying a validation schema in a middleware for the API route.
In Medusa, you create validation schemas using Zod in a TypeScript file under the src/api directory. So, create the file src/api/store/validators.ts with the following content:

You define a CreateQuote schema using Zod that specifies the cart_id parameter as a required string.
You also export a type inferred from the schema. So, go back to src/api/store/customers/me/quotes/route.ts and replace the implementation of CreateQuoteType to import the type from the validators.ts file instead:
1// other imports...2// add the following import3import { CreateQuoteType } from "../../../validators"4 5// remove CreateQuoteType definition6 7export const POST = async (8 // keep type argument the same9 req: AuthenticatedMedusaRequest<CreateQuoteType>,10 res: MedusaResponse11) => {12 // ...13}
Apply Validation Schema Middleware#
Now that you have the validation schema, you need to add the middleware that ensures the request body is validated before the route handler is executed. A middleware is a function executed when a request is sent to an API Route. It's executed before the route handler.
Middlewares are created in the src/api/middlewares.ts file. So create the file src/api/middlewares.ts with the following content:

1import { 2 defineMiddlewares, 3 validateAndTransformBody,4} from "@medusajs/framework/http"5import { CreateQuote } from "./store/validators"6 7export default defineMiddlewares({8 routes: [9 {10 method: ["POST"],11 matcher: "/store/customers/me/quotes",12 middlewares: [13 validateAndTransformBody(CreateQuote),14 ],15 },16 ],17})
To export the middlewares, you use the defineMiddlewares function. It accepts an object having a routes property, whose value is an array of middleware route objects. Each middleware route object has the following properties:
method: The HTTP methods the middleware applies to, which is in this casePOST.matcher: The path of the route the middleware applies to.middlewares: An array of middleware functions to apply to the route. In this case, you apply thevalidateAndTransformBodymiddleware, which accepts a Zod schema as a parameter and validates that a request's body matches the schema. If not, it throws and returns an error.
Specify Quote Fields to Retrieve#
In the route handler you just created, you specified what fields to retrieve in a quote using the req.queryConfig.fields property. The req.queryConfig field holds query configurations indicating the default fields to retrieve when using Query to return data in a request. This is useful to unify the returned data structure across different routes, or to allow clients to specify the fields they want to retrieve.
To add the Query configurations, you'll first create a file that exports the default fields to retrieve for a quote, then apply them in a validateAndTransformQuery middleware.
Create the file src/api/store/customers/me/quotes/query-config.ts with the following content:
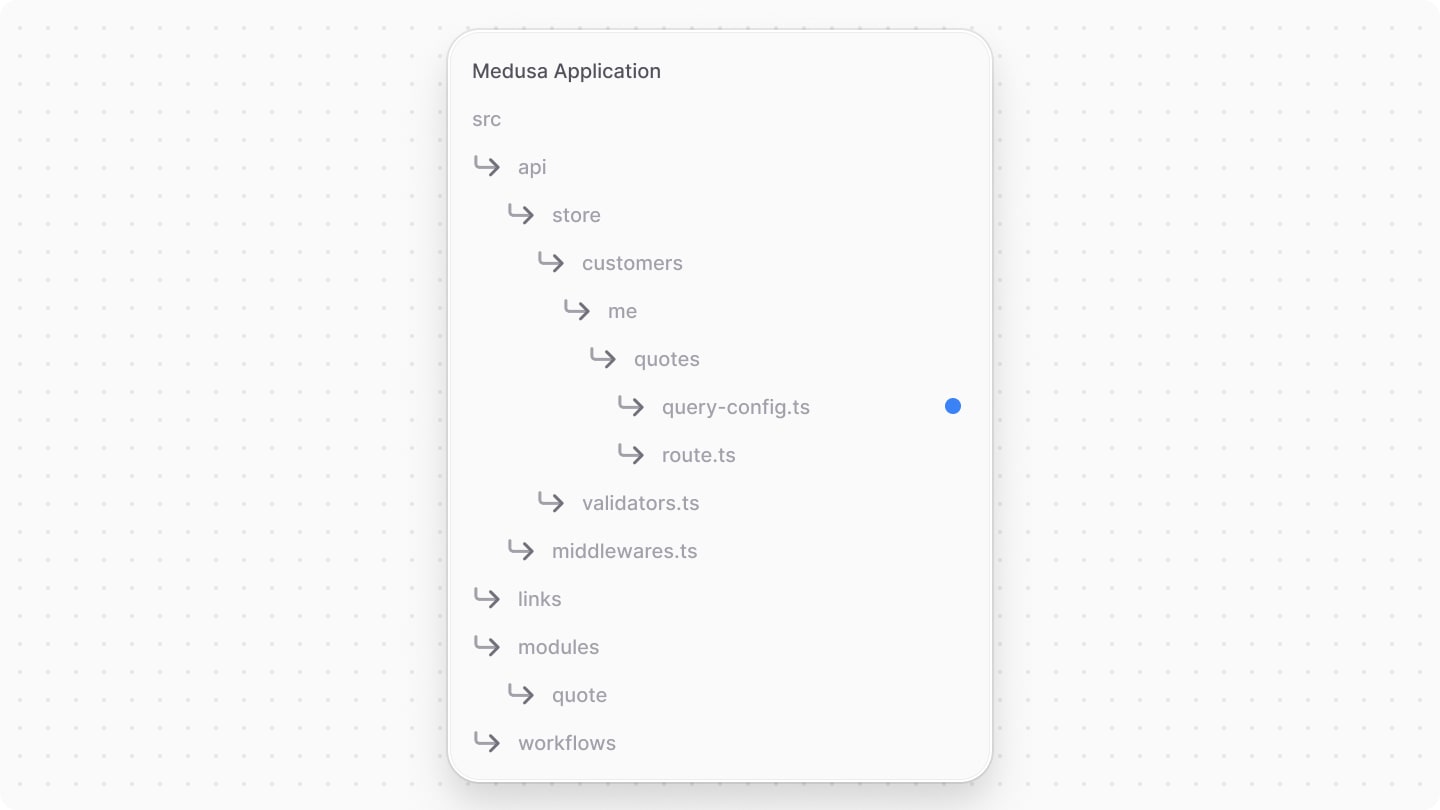
1export const quoteFields = [2 "id",3 "status",4 "*customer",5 "cart.id",6 "draft_order.id",7 "draft_order.currency_code",8 "draft_order.display_id",9 "draft_order.region_id",10 "draft_order.status",11 "draft_order.version",12 "draft_order.summary",13 "draft_order.total",14 "draft_order.subtotal",15 "draft_order.tax_total",16 "draft_order.order_change",17 "draft_order.discount_total",18 "draft_order.discount_tax_total",19 "draft_order.original_total",20 "draft_order.original_tax_total",21 "draft_order.item_total",22 "draft_order.item_subtotal",23 "draft_order.item_tax_total",24 "draft_order.original_item_total",25 "draft_order.original_item_subtotal",26 "draft_order.original_item_tax_total",27 "draft_order.shipping_total",28 "draft_order.shipping_subtotal",29 "draft_order.shipping_tax_total",30 "draft_order.original_shipping_tax_total",31 "draft_order.original_shipping_subtotal",32 "draft_order.original_shipping_total",33 "draft_order.created_at",34 "draft_order.updated_at",35 "*draft_order.items",36 "*draft_order.items.tax_lines",37 "*draft_order.items.adjustments",38 "*draft_order.items.variant",39 "*draft_order.items.variant.product",40 "*draft_order.items.detail",41 "*draft_order.payment_collections",42 "*order_change.actions",43]44 45export const retrieveStoreQuoteQueryConfig = {46 defaults: quoteFields,47 isList: false,48}49 50export const listStoreQuoteQueryConfig = {51 defaults: quoteFields,52 isList: true,53}
You export two objects:
retrieveStoreQuoteQueryConfig: Specifies the default fields to retrieve for a single quote.listStoreQuoteQueryConfig: Specifies the default fields to retrieve for a list of quotes, which you'll use later.
Notice that in the fields retrieved, you specify linked records such as customer and draft_order. You can do this because you've defined links between the Quote data model and these data models previously.
listStoreQuoteQueryConfig to all routes starting with /store/customers/me/quotes. However, you should instead apply retrieveStoreQuoteQueryConfig to routes that retrieve a single quote, and listStoreQuoteQueryConfig to routes that retrieve a list of quotes.Next, you'll define a Zod schema that allows client applications to specify the fields they want to retrieve in a quote as a query parameter. In src/api/store/validators.ts, add the following schema:
You create a GetQuoteParams schema using the createFindParams utility from Medusa. This utility creates a schema that allows clients to specify query parameters such as:
fields: The fields to retrieve in a quote.limit: The maximum number of quotes to retrieve. This is useful for routes that return a list of quotes.offset: The number of quotes to skip before retrieving the next set of quotes. This is useful for routes that return a list of quotes.order: The fields to sort the quotes by either in ascending or descending order. This is useful for routes that return a list of quotes.
Finally, you'll apply these Query configurations in a middleware. So, add the following middleware in src/api/middlewares.ts:
1// other imports...2import { GetQuoteParams } from "./store/validators"3import { validateAndTransformQuery } from "@medusajs/framework/http"4import { listStoreQuoteQueryConfig } from "./store/customers/me/quotes/query-config"5 6export default defineMiddlewares({7 routes: [8 // ...9 {10 matcher: "/store/customers/me/quotes*",11 middlewares: [12 validateAndTransformQuery(13 GetQuoteParams, 14 listStoreQuoteQueryConfig15 ),16 ],17 },18 ],19})
You apply the validateAndTransformQuery middleware on all routes starting with /store/customers/me/quotes. The validateAndTransformQuery middleware that Medusa provides accepts two parameters:
- A Zod schema that specifies how to validate the query parameters of incoming requests.
- A Query configuration object that specifies the default fields to retrieve in the response, which you defined in the
query-config.tsfile.
The create quote route is now ready to be used by clients to create quotes for customers.
Test the API Route#
To test out the API route, start the Medusa application:
Then, open the Medusa Admin dashboard at http://localhost:9000/app and login using the credentials you set up earlier.
Retrieve Publishable API Key
All requests sent to routes starting with /store must have a publishable API key in their header. This ensures that the request is scoped to a specific sales channel of your storefront.
To retrieve the publishable API key from the Medusa Admin, refer to this user guide.
Retrieve Customer Authentication Token
As mentioned before, the API route you added requires the customer to be authenticated. So, you'll first create a customer, then retrieve their authentication token to use in the request.
Before creating the customer, retrieve a registration token using the Retrieve Registration JWT Token API route:
Make sure to replace the email and password with the credentials you want.
Then, register the customer using the Create Customer API route:
Make sure to replace:
{token}with the registration token you received from the previous request.{your_publishable_api_key}with the publishable API key you retrieved from the Medusa Admin.
Also, if you changed the email in the first request, make sure to change it here as well.
The customer is now registered. Lastly, you need to retrieve its authenticated token by sending a request to the Authenticate Customer API route:
Copy the returned token to use it in the next requests.
Create Cart
The customer needs a cart with an item before creating the quote.
A cart requires a region ID. You can retrieve a region ID using the List Regions API route:
Make sure to replace the {your_publishable_api_key} with the publishable API key you retrieved from the Medusa Admin.
Then, create a cart for the customer using the Create Cart API route:
Make sure to replace:
{token}with the authentication token you received from the previous request.{your_publishable_api_key}with the publishable API key you retrieved from the Medusa Admin.{region_id}with the region ID you retrieved from the previous request.
This will create and return a cart. Copy its ID for the next request.
You now need to add a product variant to the cart. You can retrieve a product variant ID using the List Products API route:
Make sure to replace the {your_publishable_api_key} with the publishable API key you retrieved from the Medusa Admin.
Copy the ID of a variant in a product from the response.
Finally, to add the product variant to the cart, use the Add Item to Cart API route:
Make sure to replace:
{id}with the cart ID you retrieved previously.{token}with the authentication token you retrieved previously.{your_publishable_api_key}with the publishable API key you retrieved from the Medusa Admin.{variant_id}with the product variant ID you retrieved in the previous request.
This adds the product variant to the cart. You can now use the cart to create a quote.
For more accurate totals and processing of the quote's draft order, you should:
- Add shipping and billing addresses by updating the cart.
- Choose a shipping method for the cart.
- Create a payment collection for the cart.
- Initialize payment session in the payment collection.
You can also learn how to build a checkout experience in a storefront by following this storefront development guide. It's not specific to quote management, so you'll need to change the last step to create a quote instead of an order.
Create Quote
To create a quote for the customer, send a request to the /store/customers/me/quotes route you created:
Make sure to replace:
{token}with the authentication token you retrieved previously.{your_publishable_api_key}with the publishable API key you retrieved from the Medusa Admin.{cart_id}with the ID of the customer's cart.
This will create a quote for the customer and you'll receive its details in the response.
Step 6: List Quotes API Route#
After the customer creates a quote, the admin user needs to view these quotes to manage them. In this step, you'll create the API route to list quotes for the admin user. Then, in the next step, you'll customize the Medusa Admin dashboard to display these quotes.
The process of creating this API route will be somewhat similar to the previous route you created. You'll create the route, define the query configurations, and apply them in a middleware.
Implement API Route#
To create the API route, create the file src/api/admin/quotes/route.ts with the following content:

1import { MedusaRequest, MedusaResponse } from "@medusajs/framework/http"2import { ContainerRegistrationKeys } from "@medusajs/framework/utils"3 4export const GET = async (5 req: MedusaRequest,6 res: MedusaResponse7) => {8 const query = req.scope.resolve(ContainerRegistrationKeys.QUERY)9 10 const { data: quotes, metadata } = await query.graph({11 entity: "quote",12 ...req.queryConfig,13 })14 15 res.json({16 quotes,17 count: metadata!.count,18 offset: metadata!.skip,19 limit: metadata!.take,20 })21}
You export a GET function in this file, which exposes a GET API route at /admin/quotes.
In the route handler function, you resolve Query from the Medusa container and use it to retrieve the list of quotes. Similar to before, you use req.queryConfig to specify the fields to retrieve in the response.
req.queryConfig also includes pagination parameters, such as limit, offset, and count, and they're returned in the metadata property of Query's result. You return the pagination details and the list of quotes in the response.
Add Query Configurations#
Similar to before, you need to specify the default fields to retrieve in a quote and apply them in a middleware for this new route.
Since this is an admin route, create the file src/api/admin/quotes/query-config.ts with the following content:

1export const quoteFields = [2 "id",3 "status",4 "created_at",5 "updated_at",6 "*customer",7 "cart.id",8 "draft_order.id",9 "draft_order.currency_code",10 "draft_order.display_id",11 "draft_order.region_id",12 "draft_order.status",13 "draft_order.version",14 "draft_order.summary",15 "draft_order.total",16 "draft_order.subtotal",17 "draft_order.tax_total",18 "draft_order.order_change",19 "draft_order.discount_total",20 "draft_order.discount_tax_total",21 "draft_order.original_total",22 "draft_order.original_tax_total",23 "draft_order.item_total",24 "draft_order.item_subtotal",25 "draft_order.item_tax_total",26 "draft_order.original_item_total",27 "draft_order.original_item_subtotal",28 "draft_order.original_item_tax_total",29 "draft_order.shipping_total",30 "draft_order.shipping_subtotal",31 "draft_order.shipping_tax_total",32 "draft_order.original_shipping_tax_total",33 "draft_order.original_shipping_subtotal",34 "draft_order.original_shipping_total",35 "draft_order.created_at",36 "draft_order.updated_at",37 "*draft_order.items",38 "*draft_order.items.tax_lines",39 "*draft_order.items.adjustments",40 "*draft_order.items.variant",41 "*draft_order.items.variant.product",42 "*draft_order.items.detail",43 "*order_change.actions",44]45 46export const retrieveAdminQuoteQueryConfig = {47 defaults: quoteFields,48 isList: false,49}50 51export const listAdminQuoteQueryConfig = {52 defaults: quoteFields,53 isList: true,54}
You export two objects: retrieveAdminQuoteQueryConfig and listAdminQuoteQueryConfig, which specify the default fields to retrieve for a single quote and a list of quotes, respectively.
listAdminQuoteQueryConfig to all routes starting with /admin/quotes. However, you should instead apply retrieveAdminQuoteQueryConfig to routes that retrieve a single quote, and listAdminQuoteQueryConfig to routes that retrieve a list of quotes.Next, you'll define a Zod schema that allows client applications to specify the fields to retrieve and pagination fields as a query parameter. Create the file src/api/admin/validators.ts with the following content:

You define the AdminGetQuoteParams schema using the createFindParams utility from Medusa. The schema allows clients to specify query parameters such as:
fields: The fields to retrieve in a quote.limit: The maximum number of quotes to retrieve.offset: The number of quotes to skip before retrieving the next set of quotes.order: The fields to sort the quotes by either in ascending or descending order.
Finally, you need to apply the validateAndTransformQuery middleware on this route. So, add the following to src/api/middlewares.ts:
1// other imports...2import { AdminGetQuoteParams } from "./admin/quotes/validators"3import { listAdminQuoteQueryConfig } from "./admin/quotes/query-config"4 5export default defineMiddlewares({6 routes: [7 // ...8 {9 matcher: "/admin/quotes*",10 middlewares: [11 validateAndTransformQuery(12 AdminGetQuoteParams,13 listAdminQuoteQueryConfig14 ),15 ],16 },17 ],18})
You add the validateAndTransformQuery middleware to all routes starting with /admin/quotes. It validates the query parameters and sets the Query configurations based on the defaults you defined and the passed query parameters.
Your API route is now ready for use. You'll test it in the next step by customizing the Medusa Admin dashboard to display the quotes.
Step 7: List Quotes Route in Medusa Admin#
Now that you have the API route to retrieve the list of quotes, you want to show these quotes to the admin user in the Medusa Admin dashboard. The Medusa Admin is customizable, allowing you to add new pages as UI routes.
A UI route is a React component that specifies the content to be shown in a new page in the Medusa Admin dashboard. You'll create a UI route to display the list of quotes in the Medusa Admin.
Configure JS SDK#
Medusa provides a JS SDK that you can use to send requests to the Medusa server from any client application, including your Medusa Admin customizations.
The JS SDK is installed by default in your Medusa application. To configure it, create the file src/admin/lib/sdk.ts with the following content:

You create an instance of the JS SDK using the Medusa class from the @medusajs/js-sdk package. You pass it an object having the following properties:
baseUrl: The base URL of the Medusa server.debug: A boolean indicating whether to log debug information.auth: An object specifying the authentication type. When using the JS SDK for admin customizations, you use thesessionauthentication type.
Add Admin Types#
In your development, you'll need types that represents the data you'll retrieve from the Medusa server. So, create the file src/admin/types.ts with the following content:

1import {2 AdminCustomer,3 AdminOrder,4 AdminUser,5 FindParams,6 PaginatedResponse,7 StoreCart,8} from "@medusajs/framework/types"9 10export type AdminQuote = {11 id: string;12 status: string;13 draft_order_id: string;14 order_change_id: string;15 cart_id: string;16 customer_id: string;17 created_at: string;18 updated_at: string;19 draft_order: AdminOrder;20 cart: StoreCart;21 customer: AdminCustomer22};23 24export interface QuoteQueryParams extends FindParams {}25 26export type AdminQuotesResponse = PaginatedResponse<{27 quotes: AdminQuote[];28}>29 30export type AdminQuoteResponse = {31 quote: AdminQuote;32};
You define the following types:
AdminQuote: Represents a quote.QuoteQueryParams: Represents the query parameters that can be passed when retrieving quotes.AdminQuotesResponse: Represents the response when retrieving a list of quotes.AdminQuoteResponse: Represents the response when retrieving a single quote, which you'll implement later in this guide.
You'll use these types in the rest of the customizations.
Create useQuotes Hook#
When sending requests to the Medusa server from your admin customizations, it's recommended to use Tanstack Query, allowing you to benefit from its caching and data fetching capabilities.
So, you'll create a useQuotes hook that uses Tanstack Query and the JS SDK to fetch the list of quotes from the Medusa server.
Create the file src/admin/hooks/quotes.tsx with the following content:

1import { ClientHeaders, FetchError } from "@medusajs/js-sdk"2import {3 QuoteQueryParams,4 AdminQuotesResponse,5} from "../types"6import {7 QueryKey,8 useQuery,9 UseQueryOptions,10} from "@tanstack/react-query"11import { sdk } from "../lib/sdk"12 13export const useQuotes = (14 query: QuoteQueryParams,15 options?: UseQueryOptions<16 AdminQuotesResponse,17 FetchError,18 AdminQuotesResponse,19 QueryKey20 >21) => {22 const fetchQuotes = (query: QuoteQueryParams, headers?: ClientHeaders) =>23 sdk.client.fetch<AdminQuotesResponse>(`/admin/quotes`, {24 query,25 headers,26 })27 28 const { data, ...rest } = useQuery({29 ...options,30 queryFn: () => fetchQuotes(query)!,31 queryKey: ["quote", "list"],32 })33 34 return { ...data, ...rest }35}
You define a useQuotes hook that accepts query parameters and optional options as a parameter. In the hook, you use the JS SDK's client.fetch method to retrieve the quotes from the /admin/quotes route.
You return the fetched data from the Medusa server. You'll use this hook in the UI route.
Create Quotes UI Route#
You can now create the UI route that will show a new page in the Medusa Admin with the list of quotes.
UI routes are created in a page.tsx file under the src/admin/routes directory. The path of the UI route is the file's path relative to src/admin/routes.
So, to add the UI route at /quotes in the Medusa Admin, create the file src/admin/routes/quotes/page.tsx with the following content:

1import { defineRouteConfig } from "@medusajs/admin-sdk"2import { DocumentText } from "@medusajs/icons"3import { 4 Container, createDataTableColumnHelper, DataTable, 5 DataTablePaginationState, Heading, Toaster, useDataTable,6} from "@medusajs/ui"7import { useNavigate } from "react-router-dom"8import { useQuotes } from "../../hooks/quotes"9import { AdminQuote } from "../../types"10import { useState } from "react"11 12const Quotes = () => {13 // TODO implement page content14}15 16export const config = defineRouteConfig({17 label: "Quotes",18 icon: DocumentText,19})20 21export default Quotes
The route file must export a React component that implements the content of the page. To show a link to the route in the sidebar, you can also export a configuration object created with defineRouteConfig that specifies the label and icon of the route in the Medusa Admin sidebar.
In the Quotes component, you'll show a table of quotes using the DataTable component from Medusa UI. This component requires you first define the columns of the table.
To define the table's columns, add in the same file and before the Quotes component the following:
1const StatusTitles: Record<string, string> = {2 accepted: "Accepted",3 customer_rejected: "Customer Rejected",4 merchant_rejected: "Merchant Rejected",5 pending_merchant: "Pending Merchant",6 pending_customer: "Pending Customer",7}8 9const columnHelper = createDataTableColumnHelper<AdminQuote>()10 11const columns = [12 columnHelper.accessor("draft_order.display_id", {13 header: "ID",14 }),15 columnHelper.accessor("status", {16 header: "Status",17 cell: ({ getValue }) => StatusTitles[getValue()],18 }),19 columnHelper.accessor("customer.email", {20 header: "Email",21 }),22 columnHelper.accessor("draft_order.customer.first_name", {23 header: "First Name",24 }),25 columnHelper.accessor("draft_order.customer.company_name", {26 header: "Company Name",27 }),28 columnHelper.accessor("draft_order.total", {29 header: "Total",30 cell: ({ getValue, row }) => 31 `${row.original.draft_order.currency_code.toUpperCase()} ${getValue()}`,32 }),33 columnHelper.accessor("created_at", {34 header: "Created At",35 cell: ({ getValue }) => new Date(getValue()).toLocaleDateString(),36 }),37]
You use the createDataTableColumnHelper utility to create a function that allows you to define the columns of the table. Then, you create a columns array variable that defines the following columns:
ID: The display ID of the quote's draft order.Status: The status of the quote. Here, you use an object to map the status to a human-readable title.- The
cellproperty of the second object passed to thecolumnHelper.accessorfunction allows you to customize how the cell is rendered.
- The
Email: The email of the customer.First Name: The first name of the customer.Company Name: The company name of the customer.Total: The total amount of the quote's draft order. You format it to include the currency code.Created At: The date the quote was created.
Next, you'll use these columns to render the DataTable component in the Quotes component.
Change the implementation of Quotes to the following:
1const Quotes = () => {2 const navigate = useNavigate()3 const [pagination, setPagination] = useState<DataTablePaginationState>({4 pageSize: 15,5 pageIndex: 0,6 })7 8 const {9 quotes = [],10 count,11 isPending,12 } = useQuotes({13 limit: pagination.pageSize,14 offset: pagination.pageIndex * pagination.pageSize,15 fields:16 "+draft_order.total,*draft_order.customer",17 order: "-created_at",18 })19 20 const table = useDataTable({21 columns,22 data: quotes,23 getRowId: (quote) => quote.id,24 rowCount: count,25 isLoading: isPending,26 pagination: {27 state: pagination,28 onPaginationChange: setPagination,29 },30 onRowClick(event, row) {31 navigate(`/quotes/${row.id}`)32 },33 })34 35 36 return (37 <>38 <Container className="flex flex-col p-0 overflow-hidden">39 <Heading className="p-6 pb-0 font-sans font-medium h1-core">40 Quotes41 </Heading>42 43 <DataTable instance={table}>44 <DataTable.Toolbar>45 <Heading>Products</Heading>46 </DataTable.Toolbar>47 <DataTable.Table />48 <DataTable.Pagination />49 </DataTable>50 </Container>51 <Toaster />52 </>53 )54}
In the component, you use the useQuotes hook to fetch the quotes from the Medusa server. You pass the following query parameters in the request:
limitandoffset: Pagination fields to specify the current page and the number of quotes to retrieve. These are based on thepaginationstate variable, which will be managed by theDataTablecomponent.fields: The fields to retrieve in the response. You specify the total amount of the draft order and the customer of the draft order. Since you prefix the fields with+and*, the fields are retrieved along with the default fields specified in the Query configurations.order: The order in which to retrieve the quotes. Here, you retrieve the quotes in descending order of their creation date.
Next, you use the useDataTable hook to create a table instance with the columns you defined. You pass the fetched quotes to the DataTable component, along with configurations related to pagination and loading.
Notice that as part of the useDataTable configurations you navigate to the /quotes/:id UI route when a row is clicked. You'll create that route in a later step.
Finally, you render the DataTable component to display the quotes in a table.
Test List Quotes UI Route#
You can now test out the UI route and the route added in the previous section from the Medusa Admin.
First, start the Medusa application:
Then, open the Medusa Admin dashboard at http://localhost:9000/app and login using the credentials you set up earlier.
You'll find a "Quotes" sidebar item. If you click on it, it will show you the table of quotes.

Step 8: Retrieve Quote API Route#
Next, you'll add an admin API route to retrieve a single quote. You'll use this route in the next step to add a UI route to view a quote's details. You'll later expand on that UI route to allow the admin to manage the quote.
To add the API route, create the file src/api/admin/quotes/[id]/route.ts with the following content:

1import type {2 AuthenticatedMedusaRequest,3 MedusaResponse,4} from "@medusajs/framework/http"5import { ContainerRegistrationKeys } from "@medusajs/framework/utils"6 7export const GET = async (8 req: AuthenticatedMedusaRequest,9 res: MedusaResponse10) => {11 const query = req.scope.resolve(ContainerRegistrationKeys.QUERY)12 const { id } = req.params13 14 const {15 data: [quote],16 } = await query.graph(17 {18 entity: "quote",19 filters: { id },20 fields: req.queryConfig.fields,21 },22 { throwIfKeyNotFound: true }23 )24 25 res.json({ quote })26}
You export a GET route handler, which will create a GET API route at /admin/quotes/:id.
In the route handler, you resolve Query and use it to retrieve the quote. You pass the ID in the path parameter as a filter in Query. You also pass the query configuration fields, which are the same as the ones you've configured before, to retrieve the default fields and the fields specified in the query parameter.
/admin/quotes* route pattern, it will automatically apply to this route as well.You'll test this route in the next step as you create the UI route for a single quote.
Step 9: Quote Details UI Route#
In the Quotes List UI route, you configured the data table to navigate to a quote's page when you click on it in the table. Now that you have the API route to retrieve a single quote, you'll create the UI route that shows a quote's details.

Before you create the UI route, you need to create the hooks necessary to retrieve data from the Medusa server, and some components that will show the different elements of the page.
Add Hooks#
The first hook you'll add is a hook that will retrieve a quote using the API route you added in the previous step.
In src/admin/hooks/quote.tsx, add the following:
1// other imports...2import { AdminQuoteResponse } from "../types"3 4// ...5 6export const useQuote = (7 id: string,8 query?: QuoteQueryParams,9 options?: UseQueryOptions<10 AdminQuoteResponse,11 FetchError,12 AdminQuoteResponse,13 QueryKey14 >15) => {16 const fetchQuote = (17 id: string,18 query?: QuoteQueryParams,19 headers?: ClientHeaders20 ) =>21 sdk.client.fetch<AdminQuoteResponse>(`/admin/quotes/${id}`, {22 query,23 headers,24 })25 26 const { data, ...rest } = useQuery({27 queryFn: () => fetchQuote(id, query),28 queryKey: ["quote", id],29 ...options,30 })31 32 return { ...data, ...rest }33}
You define a useQuote hook that accepts the quote's ID and optional query parameters and options as parameters. In the hook, you use the JS SDK's client.fetch method to retrieve the quotes from the /admin/quotes/:id route.
The hook returns the fetched data from the Medusa server. You'll use this hook later in the UI route.
In addition, you'll need a hook to retrieve a preview of the quote's draft order. An order preview includes changes or edits to be applied on an order's items, such as changes in prices and quantities. Medusa already provides a Get Order Preview API route that you can use to retrieve the preview.
To create the hook, create the file src/admin/hooks/order-preview.tsx with the following content:

1import { HttpTypes } from "@medusajs/framework/types"2import { FetchError } from "@medusajs/js-sdk"3import { QueryKey, useQuery, UseQueryOptions } from "@tanstack/react-query"4import { sdk } from "../lib/sdk"5 6export const orderPreviewQueryKey = "custom_orders"7 8export const useOrderPreview = (9 id: string,10 query?: HttpTypes.AdminOrderFilters,11 options?: Omit<12 UseQueryOptions<13 HttpTypes.AdminOrderPreviewResponse,14 FetchError,15 HttpTypes.AdminOrderPreviewResponse,16 QueryKey17 >,18 "queryFn" | "queryKey"19 >20) => {21 const { data, ...rest } = useQuery({22 queryFn: async () => sdk.admin.order.retrievePreview(id, query),23 queryKey: [orderPreviewQueryKey, id],24 ...options,25 })26 27 return { ...data, ...rest }28}
You add a useOrderPreview hook that accepts as parameters the order's ID, query parameters, and options. In the hook, you use the JS SDK's admin.order.retrievePreview method to retrieve the order preview and return it.
You'll use this hook later in the quote's details page.
Add formatAmount Utility#
In the quote's details page, you'll display the amounts of the items in the quote. To format the amounts, you'll create a utility function that formats the amount based on the currency code.
Create the file src/admin/utils/format-amount.ts with the following content:

You define a formatAmount function that accepts an amount and a currency code as parameters. The function uses the Intl.NumberFormat API to format the amount as a currency based on the currency code.
You'll use this function in the UI route and its components.
Create Amount Component#
In the quote's details page, you want to display changes in amounts for items and totals. This is useful as you later add the capability to edit the price and quantity of items.

To display changes in an amount, you'll create an Amount component and re-use it where necessary. So, create the file src/admin/components/amount.tsx with the following content:

1import { clx } from "@medusajs/ui"2import { formatAmount } from "../utils/format-amount"3 4type AmountProps = {5 currencyCode: string;6 amount?: number | null;7 originalAmount?: number | null;8 align?: "left" | "right";9 className?: string;10};11 12export const Amount = ({13 currencyCode,14 amount,15 originalAmount,16 align = "left",17 className,18}: AmountProps) => {19 if (typeof amount === "undefined" || amount === null) {20 return (21 <div className="flex h-full w-full items-center">22 <span className="text-ui-fg-muted">-</span>23 </div>24 )25 }26 27 const formatted = formatAmount(amount, currencyCode)28 const originalAmountPresent = typeof originalAmount === "number"29 const originalAmountDiffers = originalAmount !== amount30 const shouldShowAmountDiff = originalAmountPresent && originalAmountDiffers31 32 return (33 <div34 className={clx(35 "flex h-full w-full items-center overflow-hidden",36 {37 "flex-col": shouldShowAmountDiff,38 "justify-start text-left": align === "left",39 "justify-end text-right": align === "right",40 },41 className42 )}43 >44 {shouldShowAmountDiff ? (45 <>46 <span className="truncate line-through text-xs">47 {formatAmount(originalAmount!, currencyCode)}48 </span>49 <span className="truncate text-blue-400 txt-small">{formatted}</span>50 </>51 ) : (52 <>53 <span className="truncate">{formatted}</span>54 </>55 )}56 </div>57 )58}
In this component, you show the current amount of an item and, if it has been changed, you show previous amount as well.
You'll use this component in other components whenever you want to display any amount that can be changed.
Create QuoteItems Component#
In the quote's UI route, you want to display the details of the items in the quote. You'll create a separate component that you'll use within the UI route.

Create the file src/admin/components/quote-items.tsx with the following content:
1import {2 AdminOrder,3 AdminOrderLineItem,4 AdminOrderPreview,5} from "@medusajs/framework/types"6import { Badge, Text } from "@medusajs/ui"7import { useMemo } from "react"8import { Amount } from "./amount-cell"9 10export const QuoteItem = ({11 item,12 originalItem,13 currencyCode,14}: {15 item: AdminOrderPreview["items"][0];16 originalItem?: AdminOrderLineItem;17 currencyCode: string;18}) => {19 20 const isItemUpdated = useMemo(21 () => !!item.actions?.find((a) => a.action === "ITEM_UPDATE"),22 [item]23 )24 25 return (26 <div27 key={item.id}28 className="text-ui-fg-subtle grid grid-cols-2 items-center gap-x-4 px-6 py-4 text-left"29 >30 <div className="flex items-start gap-x-4">31 <div>32 <Text33 size="small"34 leading="compact"35 weight="plus"36 className="text-ui-fg-base"37 >38 {item.title}39 </Text>40 41 {item.variant_sku && (42 <div className="flex items-center gap-x-1">43 <Text size="small">{item.variant_sku}</Text>44 </div>45 )}46 <Text size="small">47 {item.variant?.options?.map((o) => o.value).join(" · ")}48 </Text>49 </div>50 </div>51 52 <div className="grid grid-cols-3 items-center gap-x-4">53 <div className="flex items-center justify-end gap-x-4">54 <Amount55 className="text-sm text-right justify-end items-end"56 currencyCode={currencyCode}57 // @ts-ignore58 amount={item.detail.unit_price}59 originalAmount={item.unit_price}60 />61 </div>62 63 <div className="flex items-center gap-x-2">64 <div className="w-fit min-w-[27px]">65 <Badge size="xsmall" color="grey">66 <span className="tabular-nums text-xs">{item.quantity}</span>x67 </Badge>68 </div>69 70 <div>71 72 {isItemUpdated && (73 <Badge74 size="2xsmall"75 rounded="full"76 color="orange"77 className="mr-1"78 >79 Modified80 </Badge>81 )}82 </div>83 84 <div className="overflow-visible"></div>85 </div>86 87 <Amount88 className="text-sm text-right justify-end items-end"89 currencyCode={currencyCode}90 amount={item.total}91 originalAmount={originalItem?.total}92 />93 </div>94 </div>95 )96}
You first define the component for one quote item. In the component, you show the item's title, variant SKU, and quantity. You also use the Amount component to show the item's current and previous amounts.
Next, add to the same file the QuoteItems component:
1export const QuoteItems = ({2 order,3 preview,4}: {5 order: AdminOrder;6 preview: AdminOrderPreview;7}) => {8 const itemsMap = useMemo(() => {9 return new Map(order.items.map((item) => [item.id, item]))10 }, [order])11 12 return (13 <div>14 {preview.items?.map((item) => {15 return (16 <QuoteItem17 key={item.id}18 item={item}19 originalItem={itemsMap.get(item.id)}20 currencyCode={order.currency_code}21 />22 )23 })}24 </div>25 )26}
In this component, you loop over the order's items and show each of them using the QuoteItem component.
Create TotalsBreakdown Component#
Another component you'll need in the quote's UI route is a component that breaks down the totals of the quote's draft order, such as its discount or shipping totals.

Create the file src/admin/components/totals-breakdown.tsx with the following content:

1import { AdminOrder } from "@medusajs/framework/types"2import { Text } from "@medusajs/ui"3import { ReactNode } from "react"4import { formatAmount } from "../utils/format-amount"5 6export const Total = ({7 label,8 value,9 secondaryValue,10 tooltip,11}: {12 label: string;13 value: string | number;14 secondaryValue: string;15 tooltip?: ReactNode;16}) => (17 <div className="grid grid-cols-3 items-center">18 <Text size="small" leading="compact">19 {label} {tooltip}20 </Text>21 <div className="text-right">22 <Text size="small" leading="compact">23 {secondaryValue}24 </Text>25 </div>26 27 <div className="text-right">28 <Text size="small" leading="compact">29 {value}30 </Text>31 </div>32 </div>33)
You first define the Total component, which breaksdown a total item, such as discount. You'll use this component to breakdown the different totals in the TotalsBreakdown component.
Add the TotalsBreakdown component after the Total component:
1export const TotalsBreakdown = ({ order }: { order: AdminOrder }) => {2 return (3 <div className="text-ui-fg-subtle flex flex-col gap-y-2 px-6 py-4">4 <Total5 label="Discounts"6 secondaryValue=""7 value={8 order.discount_total > 09 ? `- ${formatAmount(order.discount_total, order.currency_code)}`10 : "-"11 }12 />13 {(order.shipping_methods || [])14 .sort((m1, m2) =>15 (m1.created_at as string).localeCompare(m2.created_at as string)16 )17 .map((sm, i) => {18 return (19 <div key={i}>20 <Total21 key={sm.id}22 label={"Shipping"}23 secondaryValue={sm.name}24 value={formatAmount(sm.total, order.currency_code)}25 />26 </div>27 )28 })}29 </div>30 )31}
In this component, you show the different totals of the quote's draft order, such as discounts and shipping totals. You use the Total component to show each total item.
Create Quote Details UI Route#
You can now create the UI route that will show a quote's details in the Medusa Admin.
Create the file src/admin/routes/quote/[id]/page.tsx with the following content:

1import { CheckCircleSolid } from "@medusajs/icons"2import {3 Button,4 Container,5 Heading,6 Text,7 Toaster,8} from "@medusajs/ui"9import { Link, useNavigate, useParams } from "react-router-dom"10import { useOrderPreview } from "../../../hooks/order-preview"11import { 12 useQuote, 13} from "../../../hooks/quotes"14import { QuoteItems } from "../../../components/quote-items"15import { TotalsBreakdown } from "../../../components/totals-breakdown"16import { formatAmount } from "../../../utils/format-amount"17 18const QuoteDetails = () => {19 const { id } = useParams()20 const navigate = useNavigate()21 const { quote, isLoading } = useQuote(id!, {22 fields:23 "*draft_order.customer",24 })25 26 const { order: preview, isLoading: isPreviewLoading } = useOrderPreview(27 quote?.draft_order_id!,28 {},29 { enabled: !!quote?.draft_order_id }30 )31 32 if (isLoading || !quote) {33 return <></>34 }35 36 if (isPreviewLoading) {37 return <></>38 }39 40 if (!isPreviewLoading && !preview) {41 throw "preview not found"42 }43 44 // TODO render content45}46 47export default QuoteDetails
The QuoteDetails component will render the content of the quote's details page. So far, you retrieve the quote and its preview using the hooks you created earlier. You also render empty components or an error message if the data is still loading or not found.
To add the rendered content, replace the TODO with the following:
1return (2 <div className="flex flex-col gap-y-3">3 <div className="flex flex-col gap-x-4 lg:flex-row xl:items-start">4 <div className="flex w-full flex-col gap-y-3">5 {quote.status === "accepted" && (6 <Container className="divide-y divide-dashed p-0">7 <div className="flex items-center justify-between px-6 py-4">8 <Text className="txt-compact-small">9 <CheckCircleSolid className="inline-block mr-2 text-green-500 text-lg" />10 Quote accepted by customer. Order is ready for processing.11 </Text>12 13 <Button14 size="small"15 onClick={() => navigate(`/orders/${quote.draft_order_id}`)}16 >17 View Order18 </Button>19 </div>20 </Container>21 )}22 23 <Container className="divide-y divide-dashed p-0">24 <div className="flex items-center justify-between px-6 py-4">25 <Heading level="h2">Quote Summary</Heading>26 </div>27 <QuoteItems order={quote.draft_order} preview={preview!} />28 <TotalsBreakdown order={quote.draft_order} />29 <div className=" flex flex-col gap-y-2 px-6 py-4">30 <div className="text-ui-fg-base flex items-center justify-between">31 <Text32 weight="plus"33 className="text-ui-fg-subtle"34 size="small"35 leading="compact"36 >37 Original Total38 </Text>39 <Text40 weight="plus"41 className="text-ui-fg-subtle"42 size="small"43 leading="compact"44 >45 {formatAmount(quote.draft_order.total, quote.draft_order.currency_code)}46 </Text>47 </div>48 49 <div className="text-ui-fg-base flex items-center justify-between">50 <Text51 className="text-ui-fg-subtle text-semibold"52 size="small"53 leading="compact"54 weight="plus"55 >56 Quote Total57 </Text>58 <Text59 className="text-ui-fg-subtle text-bold"60 size="small"61 leading="compact"62 weight="plus"63 >64 {formatAmount(preview!.summary.current_order_total, quote.draft_order.currency_code)}65 </Text>66 </div>67 </div>68 69 {/* TODO add actions later */}70 </Container>71 72 </div>73 74 <div className="mt-2 flex w-full max-w-[100%] flex-col gap-y-3 xl:mt-0 xl:max-w-[400px]">75 <Container className="divide-y p-0">76 <div className="flex items-center justify-between px-6 py-4">77 <Heading level="h2">Customer</Heading>78 </div>79 80 <div className="text-ui-fg-subtle grid grid-cols-2 items-start px-6 py-4">81 <Text size="small" weight="plus" leading="compact">82 Email83 </Text>84 85 <Link86 className="text-sm text-pretty text-blue-500"87 to={`/customers/${quote.draft_order?.customer?.id}`}88 onClick={(e) => e.stopPropagation()}89 >90 {quote.draft_order?.customer?.email}91 </Link>92 </div>93 </Container>94 </div>95 </div>96 97 <Toaster />98 </div>99)
You first check if the quote has been accepted by the customer, and show a banner to view the created order if so.
Next, you use the QuoteItems and TotalsBreakdown components that you created to show the quote's items and totals. You also show the original and current totals of the quote, where the original total is the total of the draft order before any changes are made to its items.
Finally, you show the customer's email and a link to view their details.
Test Quote Details UI Route#
To test the quote details UI route, start the Medusa application:
Then, open the Medusa Admin dashboard at http://localhost:9000/app and login using the credentials you set up earlier.
Next, click on Quotes in the sidebar, which will open the list of quotes UI route you created earlier. Click on one of the quotes to view its details page.
On the quote's details page, you can see the quote's items, its totals, and the customer's details. In the next steps, you'll add management features to the page.
Step 10: Add Merchant Reject Quote Feature#
After the merchant or admin views the quote, they can choose to either reject it, send the quote back to the customer to review it, or make changes to the quote's prices and quantities.
In this step, you'll implement the functionality to reject a quote from the quote's details page. This will include:
- Implementing the workflow to reject a quote.
- Adding the API route to reject a quote that uses the workflow.
- Add a hook in admin customizations that sends a request to the reject quote API route.
- Add a button to reject the quote in the quote's details page.
Implement Merchant Reject Quote Workflow#
To reject a quote, you'll need to create a workflow that will handle the rejection process. The workflow has the following steps:
Loading...As mentioned before, the useQueryGraphStep is provided by Medusa's @medusajs/medusa/core-flows package. So, you'll only implement the remaining steps.
validateQuoteNotAccepted
The second step of the merchant rejection workflow ensures that a quote isn't already accepted, as it can't be rejected afterwards.
To create the step, create the file src/workflows/steps/validate-quote-not-accepted.ts with the following content:

1import { MedusaError } from "@medusajs/framework/utils"2import { createStep } from "@medusajs/framework/workflows-sdk"3import { InferTypeOf } from "@medusajs/framework/types"4import { Quote, QuoteStatus } from "../../modules/quote/models/quote"5 6type StepInput = {7 quote: InferTypeOf<typeof Quote>8}9 10export const validateQuoteNotAccepted = createStep(11 "validate-quote-not-accepted",12 async function ({ quote }: StepInput) {13 if (quote.status === QuoteStatus.ACCEPTED) {14 throw new MedusaError(15 MedusaError.Types.INVALID_DATA,16 `Quote is already accepted by customer`17 )18 }19 }20)
You create a step that accepts a quote as an input and throws an error if the quote's status is accepted, as you can't reject a quote that has been accepted by the customer.
updateQuoteStatusStep
In the last step of the workflow, you'll change the workflow's status to merchant_rejected. So, you'll create a step that can be used to update a quote's status.
Create the file src/workflows/steps/update-quotes.ts with the following content:

1import { StepResponse, createStep } from "@medusajs/framework/workflows-sdk"2import { QUOTE_MODULE } from "../../modules/quote"3import { QuoteStatus } from "../../modules/quote/models/quote"4import QuoteModuleService from "../../modules/quote/service"5 6type StepInput = {7 id: string;8 status?: QuoteStatus;9}[]10 11export const updateQuotesStep = createStep(12 "update-quotes",13 async (data: StepInput, { container }) => {14 const quoteModuleService: QuoteModuleService = container.resolve(15 QUOTE_MODULE16 )17 18 const dataBeforeUpdate = await quoteModuleService.listQuotes(19 { id: data.map((d) => d.id) }20 )21 22 const updatedQuotes = await quoteModuleService.updateQuotes(data)23 24 return new StepResponse(updatedQuotes, {25 dataBeforeUpdate,26 })27 },28 async (revertInput, { container }) => {29 if (!revertInput) {30 return31 }32 33 const quoteModuleService: QuoteModuleService = container.resolve(34 QUOTE_MODULE35 )36 37 await quoteModuleService.updateQuotes(38 revertInput.dataBeforeUpdate39 )40 }41)
This step accepts an array of quotes to update their status. In the step function, you resolve the Quote Module's service. Then, you retrieve the quotes' original data so that you can pass them to the compensation function. Finally, you update the quotes' data and return the updated quotes.
In the compensation function, you resolve the Quote Module's service and update the quotes with their original data.
Implement Workflow
You can now implement the merchant-rejection workflow. Create the file src/workflows/merchant-reject-quote.ts with the following content:

1import { useQueryGraphStep } from "@medusajs/core-flows"2import { createWorkflow } from "@medusajs/workflows-sdk"3import { QuoteStatus } from "../modules/quote/models/quote"4import { validateQuoteNotAccepted } from "./steps/validate-quote-not-accepted"5import { updateQuotesStep } from "./steps/update-quotes"6 7type WorkflowInput = {8 quote_id: string;9}10 11export const merchantRejectQuoteWorkflow = createWorkflow(12 "merchant-reject-quote-workflow",13 (input: WorkflowInput) => {14 const { data: quotes } = useQueryGraphStep({15 entity: "quote",16 fields: ["id", "status"],17 filters: { id: input.quote_id },18 options: {19 throwIfKeyNotFound: true,20 },21 })22 23 validateQuoteNotAccepted({ 24 // @ts-ignore25 quote: quotes[0],26 })27 28 updateQuotesStep([29 {30 id: input.quote_id,31 status: QuoteStatus.MERCHANT_REJECTED,32 },33 ])34 }35)
You create a workflow that accepts the ID of a quote to reject. In the workflow, you:
- Use the
useQueryGraphStepto retrieve the quote's details. - Validate that the quote isn't already accepted using the
validateQuoteNotAccepted. - Update the quote's status to
merchant_rejectedusing theupdateQuotesStep.
You'll use this workflow next in an API route that allows a merchant to reject a quote.
Add Admin Reject Quote API Route#
You'll now add the API route that allows a merchant to reject a quote. The route will use the merchantRejectQuoteWorkflow you created in the previous step.
Create the file src/api/admin/quotes/[id]/reject/route.ts with the following content:

1import type {2 AuthenticatedMedusaRequest,3 MedusaResponse,4} from "@medusajs/framework/http"5import { ContainerRegistrationKeys } from "@medusajs/framework/utils"6import { merchantRejectQuoteWorkflow } from "../../../../../workflows/merchant-reject-quote"7 8export const POST = async (9 req: AuthenticatedMedusaRequest,10 res: MedusaResponse11) => {12 const query = req.scope.resolve(ContainerRegistrationKeys.QUERY)13 const { id } = req.params14 15 await merchantRejectQuoteWorkflow(req.scope).run({16 input: {17 quote_id: id,18 },19 })20 21 const {22 data: [quote],23 } = await query.graph(24 {25 entity: "quote",26 filters: { id },27 fields: req.queryConfig.fields,28 },29 { throwIfKeyNotFound: true }30 )31 32 res.json({ quote })33}
You create a POST route handler, which will expose a POST API route at /admin/quotes/:id/reject. In the route handler, you run the merchantRejectQuoteWorkflow with the quote's ID as input. You then retrieve the updated quote using Query and return it in the response.
Notice that you can pass req.queryConfig.fields to the query.graph method because you've applied the validateAndTransformQuery middleware before to all routes starting with /admin/quotes.
Add Reject Quote Hook#
Now that you have the API route, you can add a React hook in the admin customizations that sends a request to the route to reject a quote.
In src/admin/hooks/quotes.tsx add the following new hook:
1// other imports...2import {3 useMutation,4 UseMutationOptions,5} from "@tanstack/react-query"6 7// ...8 9export const useRejectQuote = (10 id: string,11 options?: UseMutationOptions<AdminQuoteResponse, FetchError, void>12) => {13 const queryClient = useQueryClient()14 15 const rejectQuote = async (id: string) =>16 sdk.client.fetch<AdminQuoteResponse>(`/admin/quotes/${id}/reject`, {17 method: "POST",18 })19 20 return useMutation({21 mutationFn: () => rejectQuote(id),22 onSuccess: (data: AdminQuoteResponse, variables: any, context: any) => {23 queryClient.invalidateQueries({24 queryKey: [orderPreviewQueryKey, id],25 })26 27 queryClient.invalidateQueries({28 queryKey: ["quote", id],29 })30 31 queryClient.invalidateQueries({32 queryKey: ["quote", "list"],33 })34 35 options?.onSuccess?.(data, variables, context)36 },37 ...options,38 })39}
You add a useRejectQuote hook that accepts the quote's ID and optional options as parameters. In the hook, you use the useMutation hook to define the mutation action that sends a request to the reject quote API route.
When the mutation is invoked, the hook sends a request to the API route to reject the quote, then invalidates all data related to the quote in the query client, which will trigger a re-fetch of the data.
Add Reject Quote Button#
Finally, you can add a button to the quote's details page that allows a merchant to reject the quote.
In src/admin/routes/quote/[id]/page.tsx, add the following imports:
Then, in the QuoteDetails component, add the following after the useOrderPreview hook usage:
1const prompt = usePrompt()2const { mutateAsync: rejectQuote, isPending: isRejectingQuote } =3 useRejectQuote(id!)4const [showRejectQuote, setShowRejectQuote] = useState(false)5 6useEffect(() => {7 if (8 ["customer_rejected", "merchant_rejected", "accepted"].includes(9 quote?.status!10 )11 ) {12 setShowRejectQuote(false)13 } else {14 setShowRejectQuote(true)15 }16}, [quote])17 18const handleRejectQuote = async () => {19 const res = await prompt({20 title: "Reject quote?",21 description:22 "You are about to reject this customer's quote. Do you want to continue?",23 confirmText: "Continue",24 cancelText: "Cancel",25 variant: "confirmation",26 })27 28 if (res) {29 await rejectQuote(void 0, {30 onSuccess: () =>31 toast.success("Successfully rejected customer's quote"),32 onError: (e) => toast.error(e.message),33 })34 }35}
First, you initialize the following variables:
prompt: A function that you'll use to show a confirmation pop-up when the merchant tries to reject the quote. TheusePrompthook is available from the Medusa UI package.rejectQuoteandisRejectingQuote: both are returned by theuseRejectQuotehook. TherejectQuotefunction invokes the mutation, rejecting the quote;isRejectingQuoteis a boolean that indicates if the mutation is in progress.showRejectQuote: A boolean that indicates whether the "Reject Quote" button should be shown. The button is shown if the quote's status is notcustomer_rejected,merchant_rejected, oraccepted. This state variable is changed based on the quote's status in theuseEffecthook.
You also define a handleRejectQuote function that will be called when the merchant clicks the reject quote button. The function shows a confirmation pop-up using the prompt function. If the user confirms the action, the function calls the rejectQuote function to reject the quote.
Finally, find the TODO in the return statement and replace it with the following:
1<div className="bg-ui-bg-subtle flex items-center justify-end gap-x-2 rounded-b-xl px-4 py-4">2 {showRejectQuote && (3 <Button4 size="small"5 variant="secondary"6 onClick={() => handleRejectQuote()}7 disabled={isRejectingQuote}8 >9 Reject Quote10 </Button>11 )}12</div>
In this code snippet, you show the reject quote button if the showRejectQuote state is true. When the button is clicked, you call the handleRejectQuote function to reject the quote.
Test Reject Quote Feature#
To test the reject quote feature, start the Medusa application:
Then, open the Medusa Admin dashboard at http://localhost:9000/app and login using the credentials you set up earlier.
Next, open a quote's details page. You'll find a new "Reject Quote" button. If you click on it and confirm rejecting the quote, the quote will be rejected, and a success message will be shown.

Step 11: Add Merchant Send Quote Feature#
Another action that a merchant can take on a quote is to send the quote back to the customer for review. The customer can then reject or accept the quote, which would convert it to an order.
In this step, you'll implement the functionality to send a quote back to the customer for review. This will include:
- Implementing the workflow to send a quote back to the customer.
- Adding the API route to send a quote back to the customer that uses the workflow.
- Add a hook in admin customizations that sends a request to the send quote API route.
- Add a button to send the quote back to the customer in the quote's details page.
Implement Merchant Send Quote Workflow#
You'll implement the logic of sending the quote in a workflow. The workflow has the following steps:
Loading...All the steps are available for use, so you can implement the workflow directly.
Create the file src/workflows/merchant-send-quote.ts with the following content:

1import { useQueryGraphStep } from "@medusajs/core-flows"2import { createWorkflow } from "@medusajs/workflows-sdk"3import { QuoteStatus } from "../modules/quote/models/quote"4import { updateQuotesStep } from "./steps/update-quotes"5import { validateQuoteNotAccepted } from "./steps/validate-quote-not-accepted"6 7type WorkflowInput = {8 quote_id: string;9}10 11export const merchantSendQuoteWorkflow = createWorkflow(12 "merchant-send-quote-workflow",13 (input: WorkflowInput) => {14 const { data: quotes } = useQueryGraphStep({15 entity: "quote",16 fields: ["id", "status"],17 filters: { id: input.quote_id },18 options: {19 throwIfKeyNotFound: true,20 },21 })22 23 validateQuoteNotAccepted({24 // @ts-ignore25 quote: quotes[0],26 })27 28 updateQuotesStep([29 {30 id: input.quote_id,31 status: QuoteStatus.PENDING_CUSTOMER,32 },33 ])34 }35)
You create a workflow that accepts the ID of a quote to send back to the customer. In the workflow, you:
- Use the
useQueryGraphStepto retrieve the quote's details. - Validate that the quote can be sent back to the customer using the
validateQuoteNotAcceptedstep. - Update the quote's status to
pending_customerusing theupdateQuotesStep.
You'll use this workflow next in an API route that allows a merchant to send a quote back to the customer.
Add Send Quote API Route#
You'll now add the API route that allows a merchant to send a quote back to the customer. The route will use the merchantSendQuoteWorkflow you created in the previous step.
Create the file src/api/admin/quotes/[id]/send/route.ts with the following content:

1import type {2 AuthenticatedMedusaRequest,3 MedusaResponse,4} from "@medusajs/framework/http"5import { ContainerRegistrationKeys } from "@medusajs/framework/utils"6import { 7 merchantSendQuoteWorkflow,8} from "../../../../../workflows/merchant-send-quote"9 10export const POST = async (11 req: AuthenticatedMedusaRequest,12 res: MedusaResponse13) => {14 const query = req.scope.resolve(ContainerRegistrationKeys.QUERY)15 const { id } = req.params16 17 await merchantSendQuoteWorkflow(req.scope).run({18 input: {19 quote_id: id,20 },21 })22 23 const {24 data: [quote],25 } = await query.graph(26 {27 entity: "quote",28 filters: { id },29 fields: req.queryConfig.fields,30 },31 { throwIfKeyNotFound: true }32 )33 34 res.json({ quote })35}
You create a POST route handler, which will expose a POST API route at /admin/quotes/:id/send. In the route handler, you run the merchantSendQuoteWorkflow with the quote's ID as input. You then retrieve the updated quote using Query and return it in the response.
Notice that you can pass req.queryConfig.fields to the query.graph method because you've applied the validateAndTransformQuery middleware before to all routes starting with /admin/quotes.
Add Send Quote Hook#
Now that you have the API route, you can add a React hook in the admin customizations that sends a request to the quote send API route.
In src/admin/hooks/quotes.tsx add the new hook:
1export const useSendQuote = (2 id: string,3 options?: UseMutationOptions<AdminQuoteResponse, FetchError, void>4) => {5 const queryClient = useQueryClient()6 7 const sendQuote = async (id: string) =>8 sdk.client.fetch<AdminQuoteResponse>(`/admin/quotes/${id}/send`, {9 method: "POST",10 })11 12 return useMutation({13 mutationFn: () => sendQuote(id),14 onSuccess: (data: any, variables: any, context: any) => {15 queryClient.invalidateQueries({16 queryKey: [orderPreviewQueryKey, id],17 })18 19 queryClient.invalidateQueries({20 queryKey: ["quote", id],21 })22 23 queryClient.invalidateQueries({24 queryKey: ["quote", "list"],25 })26 27 options?.onSuccess?.(data, variables, context)28 },29 ...options,30 })31}
You add a useSendQuote hook that accepts the quote's ID and optional options as parameters. In the hook, you use the useMutation hook to define the mutation action that sends a request to the send quote API route.
When the mutation is invoked, the hook sends a request to the send quote API route, then invalidates all data related to the quote in the query client, which will trigger a re-fetch of the data.
Add Send Quote Button#
Finally, you can add a button to the quote's details page that allows a merchant to send the quote back to the customer for review.
First, add the following import to the src/admin/routes/quote/[id]/page.tsx file:
Then, after the useRejectQuote hook usage, add the following:
You initialize the following variables:
sendQuoteandisSendingQuote: Data returned by theuseSendQuotehook. ThesendQuotefunction invokes the mutation, sending the quote back to the customer;isSendingQuoteis a boolean that indicates if the mutation is in progress.showSendQuote: A boolean that indicates whether the "Send Quote" button should be shown.
Next, update the existing useEffect hook to change showSendQuote based on the quote's status:
1useEffect(() => {2 if (["pending_merchant", "customer_rejected"].includes(quote?.status!)) {3 setShowSendQuote(true)4 } else {5 setShowSendQuote(false)6 }7 8 if (9 ["customer_rejected", "merchant_rejected", "accepted"].includes(10 quote?.status!11 )12 ) {13 setShowRejectQuote(false)14 } else {15 setShowRejectQuote(true)16 }17}, [quote])
The useEffect hook now updates both the showSendQuote and showRejectQuote states based on the quote's status. The "Send Quote" button is hidden if the quote's status is not pending_merchant or customer_rejected.
Then, after the handleRejectQuote function, add the following handleSendQuote function:
1const handleSendQuote = async () => {2 const res = await prompt({3 title: "Send quote?",4 description:5 "You are about to send this quote to the customer. Do you want to continue?",6 confirmText: "Continue",7 cancelText: "Cancel",8 variant: "confirmation",9 })10 11 if (res) {12 await sendQuote(13 void 0,14 {15 onSuccess: () => toast.success("Successfully sent quote to customer"),16 onError: (e) => toast.error(e.message),17 }18 )19 }20}
You define a handleSendQuote function that will be called when the merchant clicks the "Send Quote" button. The function shows a confirmation pop-up using the prompt hook. If the user confirms the action, the function calls the sendQuote function to send the quote back to the customer.
Finally, add the following after the reject quote button in the return statement:
In this code snippet, you show the "Send Quote" button if the showSendQuote state is true. When the button is clicked, you call the handleSendQuote function to send the quote back to the customer.
Test Send Quote Feature#
To test the send quote feature, start the Medusa application:
Then, open the Medusa Admin dashboard at http://localhost:9000/app and login using the credentials you set up earlier.
Next, open a quote's details page. You'll find a new "Send Quote" button. If you click on it and confirm sending the quote, the quote will be sent back to the customer, and a success message will be shown.

Step 12: Add Customer Preview Order API Route#
When the merchant sends back the quote to the customer, you want to show the customer the details of the quote and the order that would be created if they accept the quote. This helps the customer decide whether to accept or reject the quote (which you'll implement next).
In this step, you'll add the API route that allows a customer to preview a quote's order.
To create the API route, create the file src/api/store/customers/me/quotes/[id]/preview/route.ts with the following content:

1import type {2 AuthenticatedMedusaRequest,3 MedusaResponse,4} from "@medusajs/framework/http"5import { ContainerRegistrationKeys, Modules } from "@medusajs/framework/utils"6 7export const GET = async (8 req: AuthenticatedMedusaRequest,9 res: MedusaResponse10) => {11 const { id } = req.params12 const query = req.scope.resolve(13 ContainerRegistrationKeys.QUERY14 )15 16 const {17 data: [quote],18 } = await query.graph(19 {20 entity: "quote",21 filters: { id },22 fields: req.queryConfig.fields,23 },24 { throwIfKeyNotFound: true }25 )26 27 const orderModuleService = req.scope.resolve(28 Modules.ORDER29 )30 31 const preview = await orderModuleService.previewOrderChange(32 quote.draft_order_id33 )34 35 res.status(200).json({36 quote: {37 ...quote,38 order_preview: preview,39 },40 })41}
You create a GET route handler, which will expose a GET API route at /store/customers/me/quotes/:id/preview. In the route handler, you retrieve the quote's details using Query, then preview the order that would be created from the quote using the previewOrderChange method from the Order Module's service. Finally, you return the quote and its order preview in the response.
Notice that you're using the req.queryConfig.fields object in the query.graph method because you've applied the validateAndTransformQuery middleware before to all routes starting with /store/customers/me/quotes.
Test Customer Preview Order API Route#
To test the customer preview order API route, start the Medusa application:
Then, grab the ID of a quote placed by a customer that you have their authentication token. You can find the quote ID in the URL when viewing the quote's details page in the Medusa Admin dashboard.
Finally, send the following request to get a preview of the customer's quote and order:
Make sure to replace:
{quote_id}with the ID of the quote you want to preview.{your_publishable_api_key}with your publishable API key.{token}with the customer's authentication token.
You'll receive in the response the quote's details with the order preview. You can show the customer these details in the storefront.
Step 13: Add Customer Reject Quote Feature#
After the customer previews the quote and its order, they can choose to reject the quote. When the customer rejects the quote, the quote's status is changed to customer_rejected. The merchant will still be able to update the quote and send it back to the customer for review.
In this step, you'll implement the functionality to reject a quote from the customer's perspective. This will include:
- Implementing the workflow to reject a quote as a customer.
- Adding the API route to allow customers to reject a quote using the workflow.
Implement Customer Reject Quote Workflow#
To reject a quote from the customer's perspective, you'll need to create a workflow that will handle the rejection process. The workflow has the following steps:
Loading...All the steps are available for use, so you can implement the workflow directly.
Create the file src/workflows/customer-reject-quote.ts with the following content:

1import { useQueryGraphStep } from "@medusajs/core-flows"2import { createWorkflow } from "@medusajs/workflows-sdk"3import { QuoteStatus } from "../modules/quote/models/quote"4import { updateQuotesStep } from "./steps/update-quotes"5import { validateQuoteNotAccepted } from "./steps/validate-quote-not-accepted"6 7type WorkflowInput = {8 quote_id: string;9 customer_id: string;10}11 12export const customerRejectQuoteWorkflow = createWorkflow(13 "customer-reject-quote-workflow",14 (input: WorkflowInput) => {15 const { data: quotes } = useQueryGraphStep({16 entity: "quote",17 fields: ["id", "status"],18 filters: { id: input.quote_id, customer_id: input.customer_id },19 options: {20 throwIfKeyNotFound: true,21 },22 })23 24 validateQuoteNotAccepted({ 25 // @ts-ignore26 quote: quotes[0],27 })28 29 updateQuotesStep([30 {31 id: input.quote_id,32 status: QuoteStatus.CUSTOMER_REJECTED,33 },34 ])35 }36)
You create a workflow that accepts the IDs of the quote to reject and the customer rejecting it. In the workflow, you:
- Use the
useQueryGraphStepto retrieve the quote's details. Notice that you pass the IDs of the quote and the customer as filters to ensure that the quote belongs to the customer. - Validate that the quote isn't already accepted using the
validateQuoteNotAcceptedstep. - Update the quote's status to
customer_rejectedusing theupdateQuotesStep.
You'll use this workflow next in an API route that allows a customer to reject a quote.
Add Customer Reject Quote API Route#
You'll now add the API route that allows a customer to reject a quote. The route will use the customerRejectQuoteWorkflow you created in the previous step.
Create the file src/api/store/customers/me/quotes/[id]/reject/route.ts with the following content:

1import type { 2 AuthenticatedMedusaRequest, 3 MedusaResponse,4} from "@medusajs/framework/http"5import { ContainerRegistrationKeys } from "@medusajs/framework/utils"6import { 7 customerRejectQuoteWorkflow,8} from "../../../../../../../workflows/customer-reject-quote"9 10export const POST = async (11 req: AuthenticatedMedusaRequest,12 res: MedusaResponse13) => {14 const { id } = req.params15 const query = req.scope.resolve(16 ContainerRegistrationKeys.QUERY17 )18 19 await customerRejectQuoteWorkflow(req.scope).run({20 input: {21 quote_id: id,22 customer_id: req.auth_context.actor_id,23 },24 })25 26 const {27 data: [quote],28 } = await query.graph(29 {30 entity: "quote",31 filters: { id },32 fields: req.queryConfig.fields,33 },34 { throwIfKeyNotFound: true }35 )36 37 return res.json({ quote })38}
You create a POST route handler, which will expose a POST API route at /store/customers/me/quotes/:id/reject. In the route handler, you run the customerRejectQuoteWorkflow with the quote's ID as input. You then retrieve the updated quote using Query and return it in the response.
Notice that you can pass req.queryConfig.fields to the query.graph method because you've applied the validateAndTransformQuery middleware before to all routes starting with /store/customers/me/quotes.
Test Customer Reject Quote Feature#
To test the customer reject quote feature, start the Medusa application:
Then, send a request to reject a quote for the authenticated customer:
Make sure to replace:
{quote_id}with the ID of the quote you want to reject.{your_publishable_api_key}with your publishable API key.{token}with the customer's authentication token.
After sending the request, the quote will be rejected, and the updated quote will be returned in the response. You can also view the quote from the Medusa Admin dashboard, where you'll find its status has changed.
Step 14: Add Customer Accept Quote Feature#
The customer alternatively can choose to accept a quote after previewing it. When the customer accepts a quote, the quote's draft order should become an order whose payment can be processed and items fulfilled. No further changes can be made on the quote after it's accepted.
In this step, you'll implement the functionality to allow a customer to accept a quote. This will include:
- Implementing the workflow to accept a quote as a customer.
- Adding the API route to allow customers to accept a quote using the workflow.
Implement Customer Accept Quote Workflow#
You'll implement the quote acceptance logic in a workflow. The workflow has the following steps:
Loading...You only need to implement the validateQuoteCanAcceptStep step before implementing the workflow, as the other steps are already available for use.
validateQuoteCanAcceptStep
In the validateQuoteCanAcceptStep, you'll validate whether the customer can accept the quote. The customer can only accept a quote if the quote's status is pending_customer, meaning the merchant sent the quote back to the customer for review.
Create the file src/workflows/steps/validate-quote-can-accept.ts with the following content:

1import { MedusaError } from "@medusajs/framework/utils"2import { createStep } from "@medusajs/framework/workflows-sdk"3import { InferTypeOf } from "@medusajs/framework/types"4import { Quote, QuoteStatus } from "../../modules/quote/models/quote"5 6type StepInput = {7 quote: InferTypeOf<typeof Quote>8}9 10export const validateQuoteCanAcceptStep = createStep(11 "validate-quote-can-accept",12 async function ({ quote }: StepInput) {13 if (quote.status !== QuoteStatus.PENDING_CUSTOMER) {14 throw new MedusaError(15 MedusaError.Types.INVALID_DATA,16 `Cannot accept quote when quote status is ${quote.status}`17 )18 }19 }20)
You create a step that accepts a quote as input. In the step function, you throw an error if the quote's status is not pending_customer.
Implement Workflow
You can now implement the workflow that accepts a quote for a customer. Create the file src/workflows/customer-accept-quote.ts with the following content:

1import {2 confirmOrderEditRequestWorkflow,3 updateOrderWorkflow,4 useQueryGraphStep,5} from "@medusajs/core-flows"6import { OrderStatus } from "@medusajs/framework/utils"7import { createWorkflow } from "@medusajs/workflows-sdk"8import { validateQuoteCanAcceptStep } from "./steps/validate-quote-can-accept"9import { QuoteStatus } from "../modules/quote/models/quote"10import { updateQuotesStep } from "./steps/update-quotes"11 12type WorkflowInput = {13 quote_id: string;14 customer_id: string;15};16 17export const customerAcceptQuoteWorkflow = createWorkflow(18 "customer-accept-quote-workflow",19 (input: WorkflowInput) => {20 const { data: quotes } = useQueryGraphStep({21 entity: "quote",22 fields: ["id", "draft_order_id", "status"],23 filters: { id: input.quote_id, customer_id: input.customer_id },24 options: {25 throwIfKeyNotFound: true,26 },27 })28 29 validateQuoteCanAcceptStep({ 30 // @ts-ignore31 quote: quotes[0],32 })33 34 updateQuotesStep([{ 35 id: input.quote_id, 36 status: QuoteStatus.ACCEPTED,37 }])38 39 confirmOrderEditRequestWorkflow.runAsStep({40 input: {41 order_id: quotes[0].draft_order_id,42 confirmed_by: input.customer_id,43 },44 })45 46 updateOrderWorkflow.runAsStep({47 input:{ 48 id: quotes[0].draft_order_id,49 // @ts-ignore50 status: OrderStatus.PENDING,51 is_draft_order: false,52 },53 })54 }55)
You create a workflow that accepts the IDs of the quote to accept and the customer accepting it. In the workflow, you:
- Use the
useQueryGraphStepto retrieve the quote's details. You pass the IDs of the quotes and the customer as filters to ensure that the quote belongs to the customer. - Validate that the quote can be accepted using the
validateQuoteCanAcceptStep. - Update the quote's status to
acceptedusing theupdateQuotesStep. - Confirm the changes made on the draft order using the
confirmOrderEditRequestWorkflowexecuted as a step. This is useful when you soon add the admin functionality to edit the quote items. Any changes that the admin has made will be applied on the draft order using this step. - Update the draft order to change its status and convert it into an order using the
updateOrderWorkflowexecuted as a step.
You'll use this workflow next in an API route that allows a customer to accept a quote.
Add Customer Accept Quote API Route#
You'll now add the API route that allows a customer to accept a quote. The route will use the customerAcceptQuoteWorkflow you created in the previous step.
Create the file src/api/store/customers/me/quotes/[id]/accept/route.ts with the following content:

1import type {2 AuthenticatedMedusaRequest,3 MedusaResponse,4} from "@medusajs/framework/http"5import { ContainerRegistrationKeys } from "@medusajs/framework/utils"6import { 7 customerAcceptQuoteWorkflow,8} from "../../../../../../../workflows/customer-accept-quote"9 10export const POST = async (11 req: AuthenticatedMedusaRequest,12 res: MedusaResponse13) => {14 const query = req.scope.resolve(ContainerRegistrationKeys.QUERY)15 const { id } = req.params16 17 await customerAcceptQuoteWorkflow(req.scope).run({18 input: {19 quote_id: id,20 customer_id: req.auth_context.actor_id,21 },22 })23 24 const {25 data: [quote],26 } = await query.graph(27 {28 entity: "quote",29 filters: { id },30 fields: req.queryConfig.fields,31 },32 { throwIfKeyNotFound: true }33 )34 35 return res.json({ quote })36}
You create a POST route handler, which will expose a POST API route at /store/customers/me/quotes/:id/accept. In the route handler, you run the customerAcceptQuoteWorkflow with the quote's ID as input. You then retrieve the updated quote using Query and return it in the response.
Notice that you can pass req.queryConfig.fields to the query.graph method because you've applied the validateAndTransformQuery middleware before to all routes starting with /store/customers/me/quotes.
Test Customer Accept Quote Feature#
To test the customer accept quote feature, start the Medusa application:
Then, send a request to accept a quote for the authenticated customer:
Make sure to replace:
{quote_id}with the ID of the quote you want to accept.{your_publishable_api_key}with your publishable API key.{token}with the customer's authentication token.
After sending the request, the quote will be accepted, and the updated quote will be returned in the response.
You can also view the quote from the Medusa Admin dashboard, where you'll find its status has changed. The quote will also have an order, which you can view in the Orders page or using the "View Order" button on the quote's details page.

Step 15: Edit Quote Items UI Route#
The last feature you'll add is allowing merchants or admin users to make changes to the quote's items. This includes updating the item's quantity and price.
Since you're using an order change to manage edits to the quote's draft orders, you don't need to implement customizations on the server side, such as adding workflows or API routes. Instead, you'll only add a new UI route in the Medusa Admin that uses the Order Edit API routes to provide the functionality to edit the quote's items.
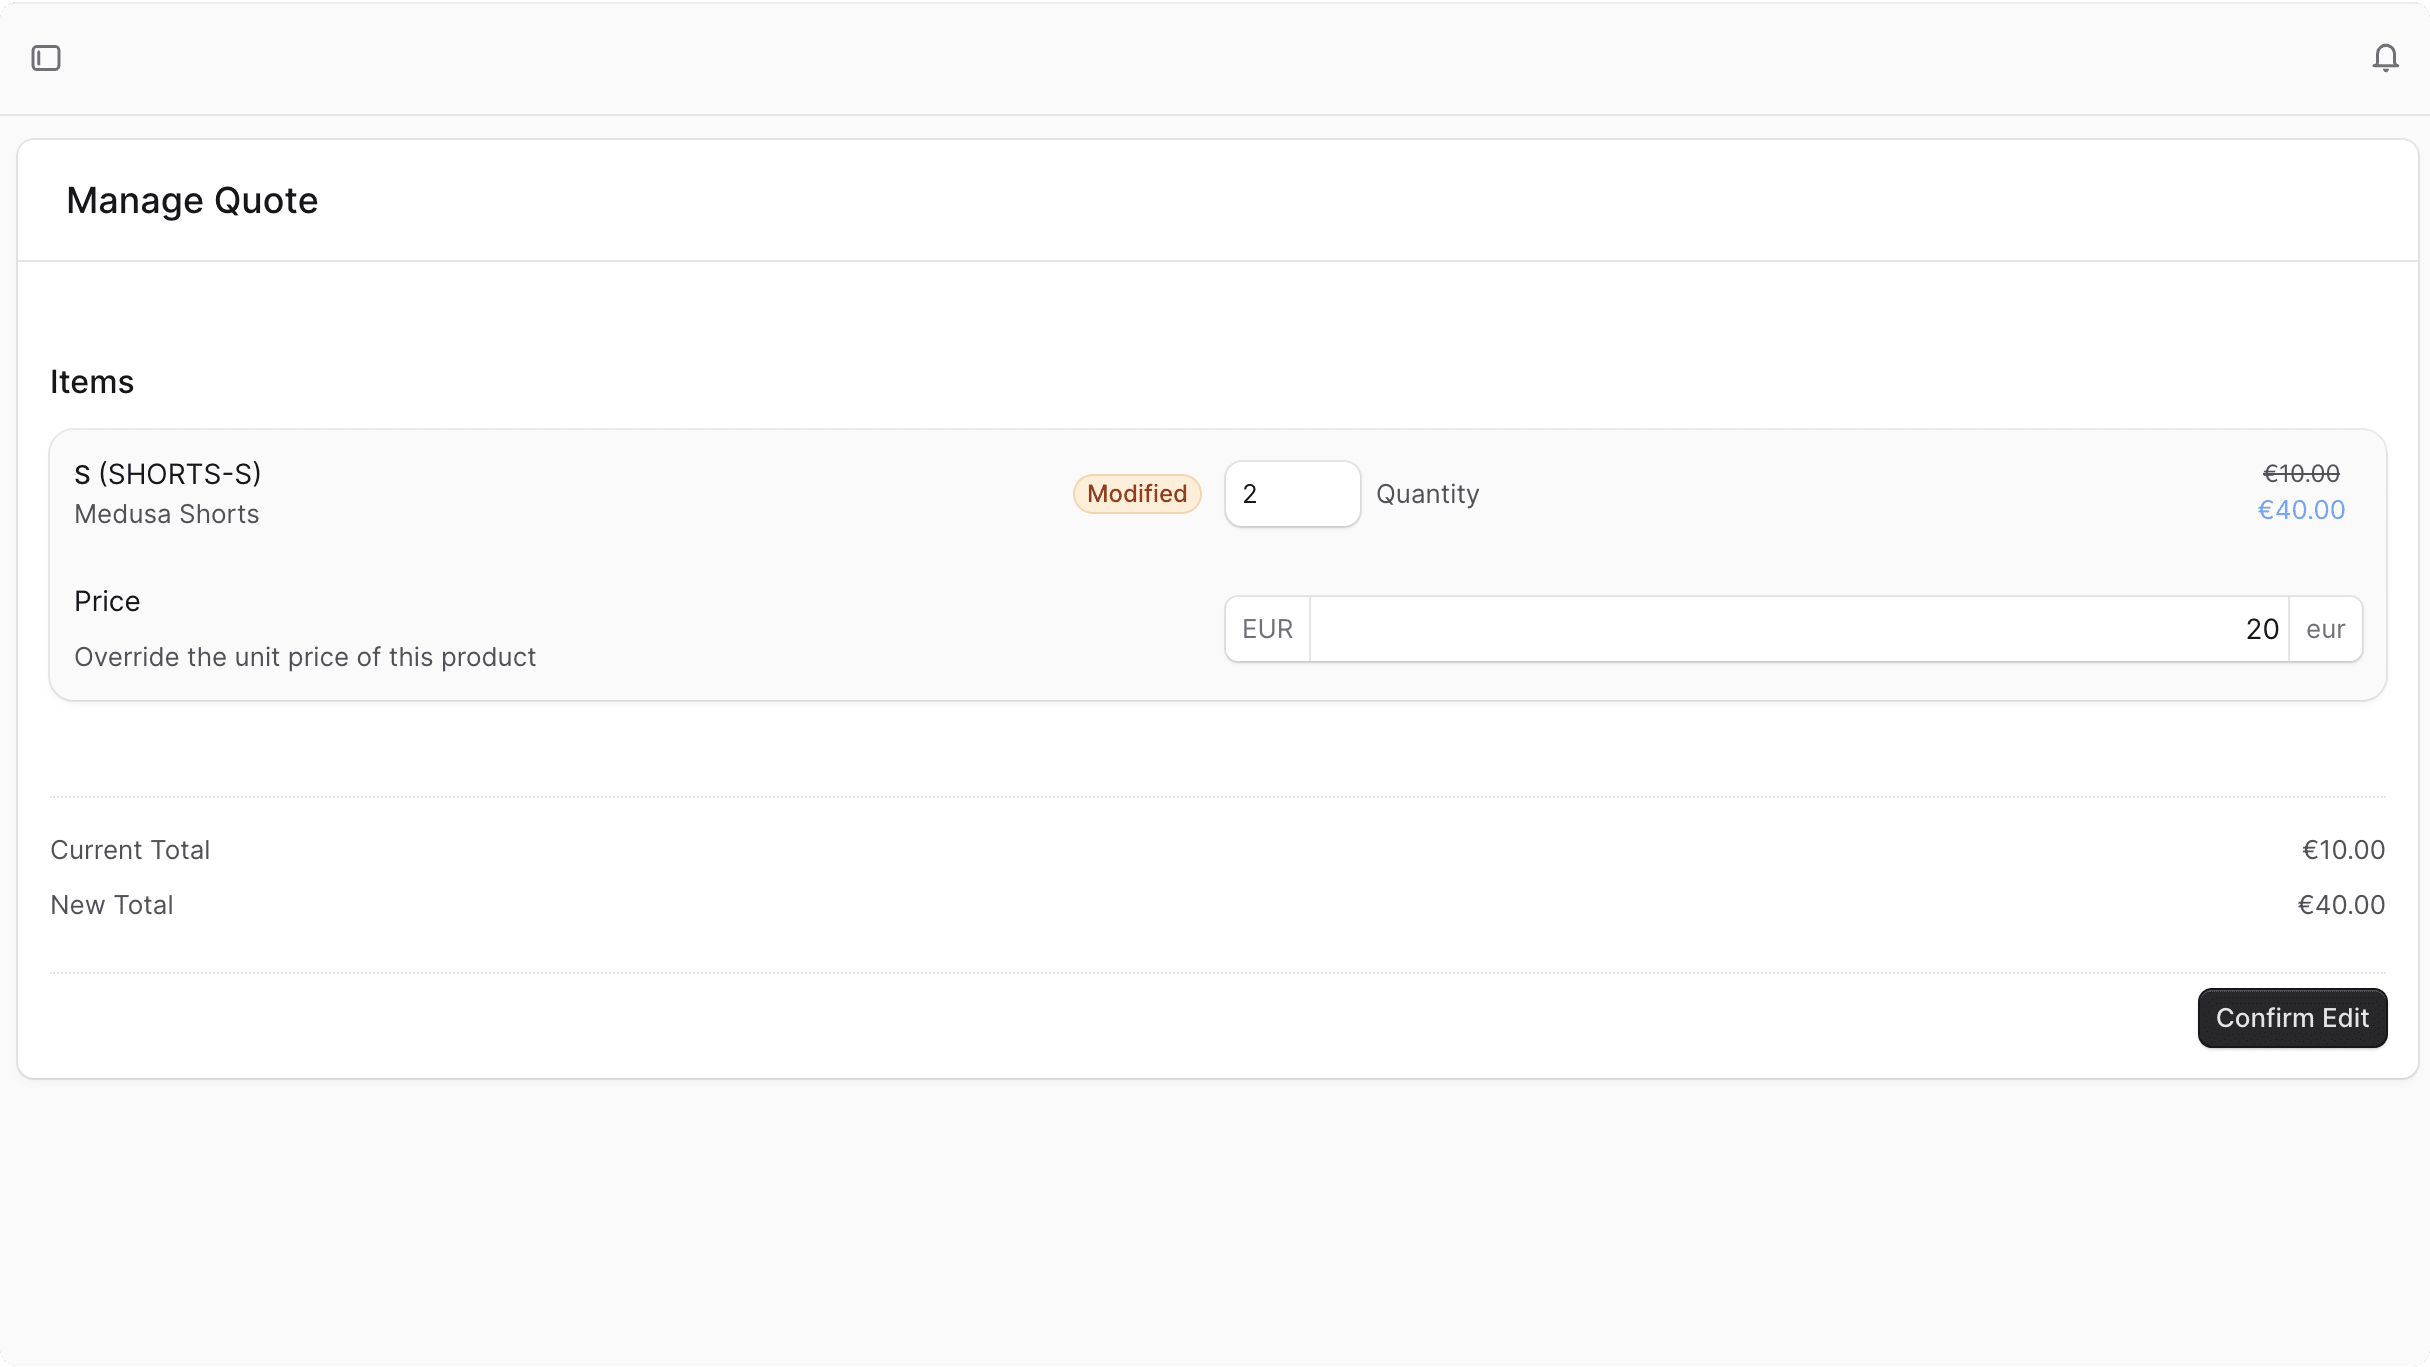
In this step, you'll add a new UI route to manage the quote's items. This will include:
- Adding hooks to send requests to Medusa's Order Edits API routes.
- Implement the components you'll use within the UI route.
- Add the new UI route to the Medusa Admin.
Intermission: Order Editing Overview#
Before you start implementing the customizations, here's a quick overview of how order editing works in Medusa.
When the admin wants to edit an order's items, Medusa creates an order change. You've already implemented this part on quote creation.
Then, when the admin makes an edit to an item, Medusa saves that edit but without applying it to the order or finalizing the edit. This allows the admin to make multiple edits before finalizing the changes.
Once the admin is finished editing, they can confirm the order edit, which finalizes it to later be applied on the order. You've already implemented applying the order edit on the order when the customer accepts the quote.
So, you still need two implement two aspects: updating the quote items, and confirming the order edit. You'll implement these in the next steps.
Add Hooks#
To implement the edit quote items functionality, you'll need two hooks:
- A hook that updates a quote item's quantity and price using the Order Edits API routes.
- A hook that confirms the edit of the items using the Order Edits API routes.
Update Quote Item Hook
The first hook updates an item's quantity and price using the Order Edits API routes. You'll use this whenever an admin updates an item's quantity or price.
In src/admin/hooks/quotes.tsx, add the following hook:
1// other imports...2import { HttpTypes } from "@medusajs/framework/types"3 4// ...5 6export const useUpdateQuoteItem = (7 id: string,8 options?: UseMutationOptions<9 HttpTypes.AdminOrderEditPreviewResponse,10 FetchError,11 UpdateQuoteItemParams12 >13) => {14 const queryClient = useQueryClient()15 16 return useMutation({17 mutationFn: ({18 itemId,19 ...payload20 }: UpdateQuoteItemParams) => {21 return sdk.admin.orderEdit.updateOriginalItem(id, itemId, payload)22 },23 onSuccess: (data: any, variables: any, context: any) => {24 queryClient.invalidateQueries({25 queryKey: [orderPreviewQueryKey, id],26 })27 28 options?.onSuccess?.(data, variables, context)29 },30 ...options,31 })32}
You create a useUpdateQuoteItem hook that accepts the quote's ID and optional options as parameters. In the hook, you use the useMutation hook to define the mutation action that updates an item's quantity and price using the sdk.admin.orderEdit.updateOriginalItem method.
When the mutation is invoked, the hook invalidates the quote's data in the query client, which will trigger a re-fetch of the data.
Confirm Order Edit Hook
Next, you'll add a hook that confirms the order edit. This hook will be used when the admin is done editing the quote's items. As mentioned earlier, confirming the order edit doesn't apply the changes to the order but finalizes the edit.
In src/admin/hooks/quotes.tsx, add the following hook:
1export const useConfirmQuote = (2 id: string,3 options?: UseMutationOptions<4 HttpTypes.AdminOrderEditPreviewResponse,5 FetchError,6 void7 >8) => {9 const queryClient = useQueryClient()10 11 return useMutation({12 mutationFn: () => sdk.admin.orderEdit.request(id),13 onSuccess: (data: any, variables: any, context: any) => {14 queryClient.invalidateQueries({15 queryKey: [orderPreviewQueryKey, id],16 })17 18 options?.onSuccess?.(data, variables, context)19 },20 ...options,21 })22}
You create a useConfirmQuote hook that accepts the quote's ID and optional options as parameters. In the hook, you use the useMutation hook to define the mutation action that confirms the order edit using the sdk.admin.orderEdit.request method.
When the mutation is invoked, the hook invalidates the quote's data in the query client, which will trigger a re-fetch of the data.
Now that you have the necessary hooks, you can use them in the UI route and its components.
Add ManageItem Component#
The UI route will show the list of items to the admin user and allows them to update the item's quantity and price. So, you'll create a component that allows the admin to manage a single item's details. You'll later use this component for each item in the quote.

Create the file src/admin/components/manage-item.tsx with the following content:

1import { AdminOrder, AdminOrderPreview } from "@medusajs/framework/types"2import {3 Badge,4 CurrencyInput,5 Hint,6 Input,7 Label,8 Text,9 toast,10} from "@medusajs/ui"11import { useMemo } from "react"12import {13 useUpdateQuoteItem,14} from "../hooks/quotes"15import { Amount } from "./amount"16 17type ManageItemProps = {18 originalItem: AdminOrder["items"][0];19 item: AdminOrderPreview["items"][0];20 currencyCode: string;21 orderId: string;22};23 24export function ManageItem({25 originalItem,26 item,27 currencyCode,28 orderId,29}: ManageItemProps) {30 const { mutateAsync: updateItem } = useUpdateQuoteItem(orderId)31 32 const isItemUpdated = useMemo(33 () => !!item.actions?.find((a) => a.action === "ITEM_UPDATE"),34 [item]35 )36 37 const onUpdate = async ({38 quantity,39 unit_price,40 }: {41 quantity?: number;42 unit_price?: number;43 }) => {44 if (45 typeof quantity === "number" &&46 quantity <= item.detail.fulfilled_quantity47 ) {48 toast.error("Quantity should be greater than the fulfilled quantity")49 return50 }51 52 try {53 await updateItem({54 quantity,55 unit_price,56 itemId: item.id,57 })58 } catch (e) {59 toast.error((e as any).message)60 }61 }62 63 // TODO render the item's details and input fields64}
You define a ManageItem component that accepts the following props:
originalItem: The original item details from the quote. This is the item's details before any edits.item: The item's details from the quote's order preview. This is the item's details which may have been edited.currencyCode: The currency code of the quote's draft order.orderId: The ID of the quote's draft order.
In the component, you define the following variables:
updateItem: ThemutateAsyncfunction returned by theuseUpdateQuoteItemhook. This function updates the item's quantity and price using Medusa's Order Edits API routes.isItemUpdated: A boolean that indicates whether the item has been updated.
You also define an onUpdate function that will be called when the admin updates the item's quantity or price. The function sends a request to update the item's quantity and price using the updateItem function. If the quantity is less than or equal to the fulfilled quantity, you show an error message.
Next, you'll add a return statement to show the item's details and allow the admin to update the item's quantity and price. Replace the TODO with the following:
1return (2 <div3 key={item.quantity}4 className="bg-ui-bg-subtle shadow-elevation-card-rest my-2 rounded-xl "5 >6 <div className="flex flex-col items-center gap-x-2 gap-y-2 p-3 text-sm md:flex-row">7 <div className="flex flex-1 items-center justify-between">8 <div className="flex flex-row items-center gap-x-3">9 10 <div className="flex flex-col">11 <div>12 <Text className="txt-small" as="span" weight="plus">13 {item.title}{" "}14 </Text>15 16 {item.variant_sku && <span>({item.variant_sku})</span>}17 </div>18 <Text as="div" className="text-ui-fg-subtle txt-small">19 {item.product_title}20 </Text>21 </div>22 </div>23 24 {isItemUpdated && (25 <Badge26 size="2xsmall"27 rounded="full"28 color="orange"29 className="mr-1"30 >31 Modified32 </Badge>33 )}34 </div>35 36 <div className="flex flex-1 justify-between">37 <div className="flex flex-grow items-center gap-2">38 <Input39 className="bg-ui-bg-base txt-small w-[67px] rounded-lg [appearance:textfield] [&::-webkit-inner-spin-button]:appearance-none [&::-webkit-outer-spin-button]:appearance-none"40 type="number"41 disabled={item.detail.fulfilled_quantity === item.quantity}42 min={item.detail.fulfilled_quantity}43 defaultValue={item.quantity}44 onBlur={(e) => {45 const val = e.target.value46 const quantity = val === "" ? null : Number(val)47 48 if (quantity) {49 onUpdate({ quantity })50 }51 }}52 />53 <Text className="txt-small text-ui-fg-subtle">54 Quantity55 </Text>56 </div>57 58 <div className="text-ui-fg-subtle txt-small mr-2 flex flex-shrink-0">59 <Amount60 currencyCode={currencyCode}61 amount={item.total}62 originalAmount={originalItem?.total}63 />64 </div>65 </div>66 </div>67 68 <div className="grid grid-cols-1 gap-2 p-3 md:grid-cols-2">69 <div className="flex flex-col gap-y-1">70 <Label>Price</Label>71 <Hint className="!mt-1">72 Override the unit price of this product73 </Hint>74 </div>75 76 <div className="flex items-center gap-1">77 <div className="flex-grow">78 <CurrencyInput79 symbol={currencyCode}80 code={currencyCode}81 defaultValue={item.unit_price}82 type="numeric"83 min={0}84 onBlur={(e) => {85 onUpdate({86 unit_price: parseFloat(e.target.value),87 quantity: item.quantity,88 })89 }}90 className="bg-ui-bg-field-component hover:bg-ui-bg-field-component-hover"91 />92 </div>93 </div>94 </div>95 </div>96)
You show the item's title, product title, and variant SKU. If the item has been updated, you show a "Modified" badge.
You also show input fields for the quantity and price of the item, allowing the admin to update the item's quantity and price. Once the admin updates the quantity or price, the onUpdate function is called to send a request to update the item's details.
Add ManageQuoteForm Component#
Next, you'll add the form component that shows the list of items in the quote and allows the admin to manage each item. You'll use the ManageItem component you created in the previous step for each item in the quote.

Create the file src/admin/components/manage-quote-form.tsx with the following content:

1import { AdminOrder } from "@medusajs/framework/types"2import { Button, Heading, toast } from "@medusajs/ui"3import { useConfirmQuote } from "../hooks/quotes"4import { formatAmount } from "../utils/format-amount"5import { useOrderPreview } from "../hooks/order-preview"6import { useNavigate, useParams } from "react-router-dom"7import { useMemo } from "react"8import { ManageItem } from "./manage-item"9 10type ReturnCreateFormProps = {11 order: AdminOrder;12};13 14export const ManageQuoteForm = ({ order }: ReturnCreateFormProps) => {15 const { order: preview } = useOrderPreview(order.id)16 const navigate = useNavigate()17 const { id: quoteId } = useParams()18 19 const { mutateAsync: confirmQuote, isPending: isRequesting } =20 useConfirmQuote(order.id)21 22 const handleSubmit = async (e: React.FormEvent<HTMLFormElement>) => {23 e.preventDefault()24 try {25 await confirmQuote()26 navigate(`/quotes/${quoteId}`)27 28 toast.success("Successfully updated quote")29 } catch (e) {30 toast.error("Error", {31 description: (e as any).message,32 })33 }34 }35 36 const originalItemsMap = useMemo(() => {37 return new Map(order.items.map((item) => [item.id, item]))38 }, [order])39 40 if (!preview) {41 return <></>42 }43 44 // TODO render form45}
You define a ManageQuoteForm component that accepts the quote's draft order as a prop. In the component, you retrieve the preview of that order. The preview holds any edits made on the order's items.
You also define the confirmQuote function using the useConfirmQuote hook. This function confirms the order edit, finalizing the changes made on the order's items.
Then, you define the handleSubmit function that will be called when the admin submits the form. The function confirms the order edit using the confirmQuote function and navigates the admin back to the quote's details page.
Next, you'll add a return statement to show the edit form for the quote's items. Replace the TODO with the following:
1return (2 <form onSubmit={handleSubmit} className="flex h-full flex-col p-4 gap-2">3 <div>4 <div className="mb-3 mt-8 flex items-center justify-between">5 <Heading level="h2">Items</Heading>6 </div>7 8 {preview.items.map((item) => (9 <ManageItem10 key={item.id}11 originalItem={originalItemsMap.get(item.id)!}12 item={item}13 orderId={order.id}14 currencyCode={order.currency_code}15 />16 ))}17 </div>18 19 <div className="mt-8 border-y border-dotted py-4">20 <div className="mb-2 flex items-center justify-between">21 <span className="txt-small text-ui-fg-subtle">22 Current Total23 </span>24 25 <span className="txt-small text-ui-fg-subtle">26 {formatAmount(order.total, order.currency_code)}27 </span>28 </div>29 30 <div className="mb-2 flex items-center justify-between">31 <span className="txt-small text-ui-fg-subtle">32 New Total33 </span>34 35 <span className="txt-small text-ui-fg-subtle">36 {formatAmount(preview.total, order.currency_code)}37 </span>38 </div>39 </div>40 41 <div className="flex w-full items-center justify-end gap-x-4">42 <div className="flex items-center justify-end gap-x-2">43 <Button44 key="submit-button"45 type="submit"46 variant="primary"47 size="small"48 disabled={isRequesting}49 >50 Confirm Edit51 </Button>52 </div>53 </div>54 </form>55)
You use the ManageItem component to show each item in the quote and allow the admin to update the item's quantity and price. You also show the updated total amount of the quote and a button to confirm the order edit.
You'll use this component next in the UI route that allows the admin to edit the quote's items.
Implement UI Route#
Finally, you'll add the UI route that allows the admin to edit the quote's items. The route will use the ManageQuoteForm component you created in the previous step.
Create the file src/admin/routes/quotes/[id]/manage/page.tsx with the following content:

1import { useParams } from "react-router-dom"2import { useQuote } from "../../../../hooks/quotes"3import { Container, Heading, Toaster } from "@medusajs/ui"4import { ManageQuoteForm } from "../../../../components/manage-quote-form"5 6const QuoteManage = () => {7 const { id } = useParams()8 const { quote, isLoading } = useQuote(id!, {9 fields:10 "*draft_order.customer",11 })12 13 if (isLoading) {14 return <></>15 }16 17 if (!quote) {18 throw "quote not found"19 }20 21 return (22 <>23 <Container className="divide-y p-0">24 <Heading className="flex items-center justify-between px-6 py-4">25 Manage Quote26 </Heading>27 28 <ManageQuoteForm order={quote.draft_order} />29 </Container>30 <Toaster />31 </>32 )33}34 35export default QuoteManage
You define a QuoteManage component that will show the form to manage the quote's items in the Medusa Admin dashboard.
In the component, you first retrieve the quote's details using the useQuote hook. Then, you show the ManageQuoteForm component, passing the quote's draft order as a prop.
Add Manage Button to Quote Details Page#
To allow the admin to access the manage page you just added, you'll add a new button on the quote's details page that links to the manage page.
In src/admin/routes/quotes/[id]/page.tsx, add the following variable definition after the showSendQuote variable:
This variable will be used to show or hide the manage quote button.
Then, update the existing useEffect hook to the following:
1useEffect(() => {2 if (["pending_merchant", "customer_rejected"].includes(quote?.status!)) {3 setShowSendQuote(true)4 } else {5 setShowSendQuote(false)6 }7 8 if (9 ["customer_rejected", "merchant_rejected", "accepted"].includes(10 quote?.status!11 )12 ) {13 setShowRejectQuote(false)14 } else {15 setShowRejectQuote(true)16 }17 18 if (![19 "pending_merchant",20 "customer_rejected",21 "merchant_rejected",22 ].includes(quote?.status!)) {23 setShowManageQuote(false)24 } else {25 setShowManageQuote(true)26 }27}, [quote])
The showManageQuote variable is now updated based on the quote's status, where you only show it if the quote is pending the merchant's action, or if it has been rejected by either the customer or merchant.
Finally, add the following button component after the Send Quote button:
The Manage Quote button is now shown if the showManageQuote variable is true. When clicked, it navigates the admin to the manage quote page.
Test Edit Quote Items UI Route#
To test the edit quote items UI route, start the Medusa application:
Then, open the Medusa Admin dashboard at http://localhost:9000/admin. Open a quote's details page whose status is either pending_merchant, merchant_rejected or customer_rejected. You'll find a new "Manage Quote" button.

Click on the button, and you'll be taken to the manage quote page where you can update the quote's items. Try to update the items' quantities or price. Then, once you're done, click the "Confirm Edit" button to finalize the changes.
The changes can now be previewed from the quote's details page. The customer can also see these changes using the preview API route you created earlier. Once the customer accepts the quote, the changes will be applied to the order.
Next Steps#
You've now implemented quote management features in Medusa. There's still more that you can implement to enhance the quote management experience:
- Refer to the B2B starter for more quote-management related features, including how to add or remove items from a quote, and how to allow messages between the customer and the merchant.
- To build a storefront, refer to the Storefront development guide. You can also add to the storefront features related to quote-management using the APIs you implemented in this guide.
If you're new to Medusa, check out the main documentation, where you'll get a more in-depth learning of all the concepts you've used in this guide and more.
To learn more about the commerce features that Medusa provides, check out Medusa's Commerce Modules.